2014 NISSAN TEANA SEC
[x] Cancel search: SECPage 4098 of 4801
B142A IGNITION VOLTAGESRC-105
< DTC/CIRCUIT DIAGNOSIS >
C
D E
F
G
I
J
K L
M A
B
SRC
N
O P
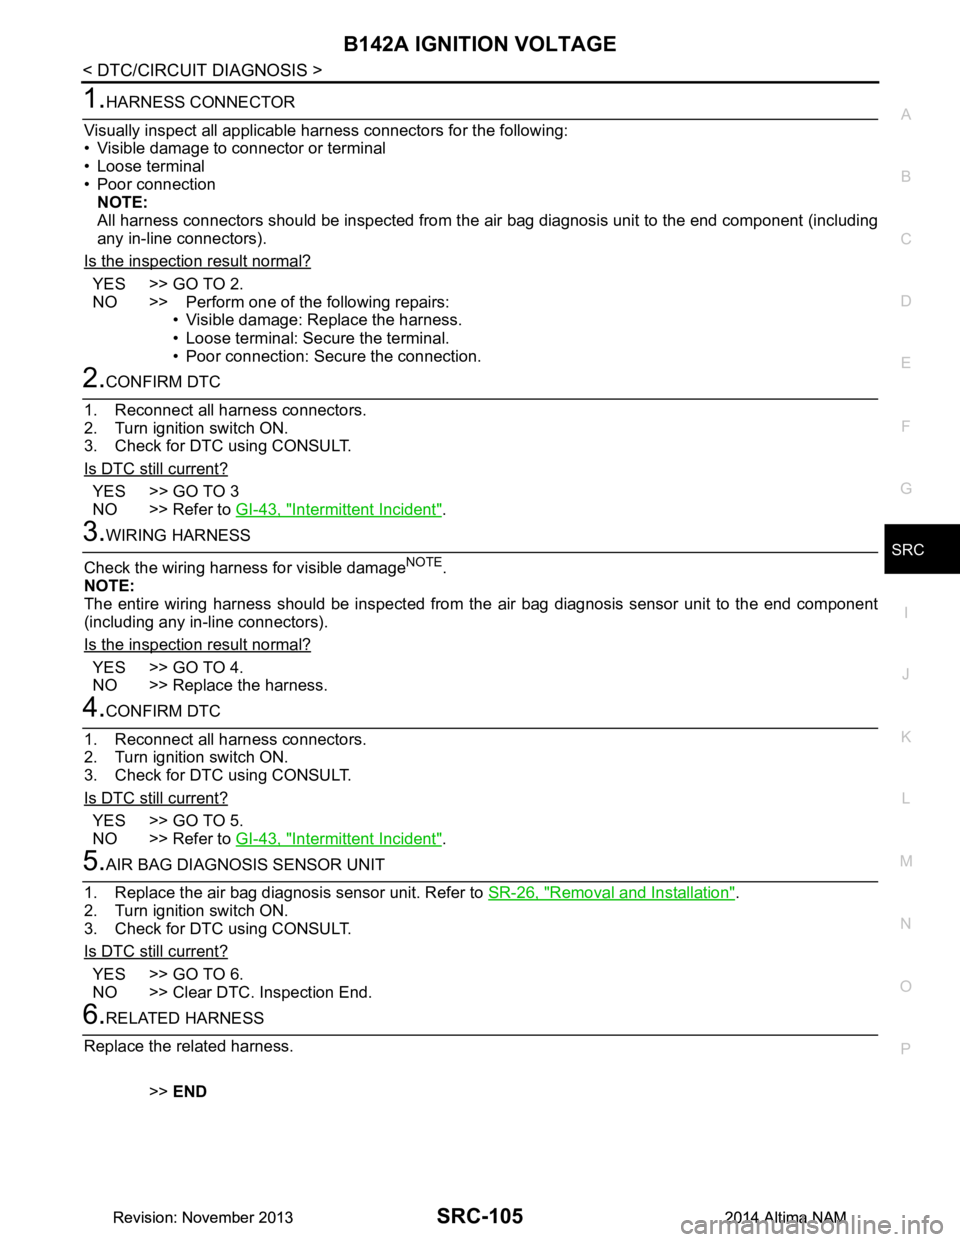
1.HARNESS CONNECTOR
Visually inspect all applicable harness connectors for the following:
• Visible damage to connector or terminal
• Loose terminal
• Poor connection NOTE:
All harness connectors should be inspected from the air bag diagnosis unit to the end component (including
any in-line connectors).
Is the inspection result normal?
YES >> GO TO 2.
NO >> Perform one of the following repairs: • Visible damage: Replace the harness.
• Loose terminal: Secure the terminal.
• Poor connection: Secure the connection.
2.CONFIRM DTC
1. Reconnect all harness connectors.
2. Turn ignition switch ON.
3. Check for DTC using CONSULT.
Is DTC still current?
YES >> GO TO 3
NO >> Refer to GI-43, "Intermittent Incident"
.
3.WIRING HARNESS
Check the wiring harness for visible damage
NOTE.
NOTE:
The entire wiring harness should be inspected from the air bag diagnosis sensor unit to the end component
(including any in-line connectors).
Is the inspection result normal?
YES >> GO TO 4.
NO >> Replace the harness.
4.CONFIRM DTC
1. Reconnect all harness connectors.
2. Turn ignition switch ON.
3. Check for DTC using CONSULT.
Is DTC still current?
YES >> GO TO 5.
NO >> Refer to GI-43, "Intermittent Incident"
.
5.AIR BAG DIAGNOSIS SENSOR UNIT
1. Replace the air bag diagnosis sensor unit. Refer to SR-26, "Removal and Installation"
.
2. Turn ignition switch ON.
3. Check for DTC using CONSULT.
Is DTC still current?
YES >> GO TO 6.
NO >> Clear DTC. Inspection End.
6.RELATED HARNESS
Replace the related harness.
>>END
Revision: November 20132014 Altima NAMRevision: November 20132014 Altima NAM
Page 4099 of 4801
SRC-106
< DTC/CIRCUIT DIAGNOSIS >
U1000 CAN COMM CIRCUIT
U1000 CAN COMM CIRCUIT
DescriptionINFOID:0000000009460807
CAN (Controller Area Network) is a serial communication system for real time application. It is an on-vehicle
multiplex communication system with high data comm unication speed and excellent error detection ability.
Many electronic control units are equipped into vehicl es, and each control unit shares information and links
with other control units during operation. With CAN co mmunication, control units are connected with two com-
munication lines (CAN-H line, CAN-L line) allowing a hi gh rate of information transmission with less wiring.
Each control unit transmits and receives data but selectively reads required data only. Refer to LAN-32, "CAN
COMMUNICATION SYSTEM : CAN Communication Signal Chart".
DTC LogicINFOID:0000000009460808
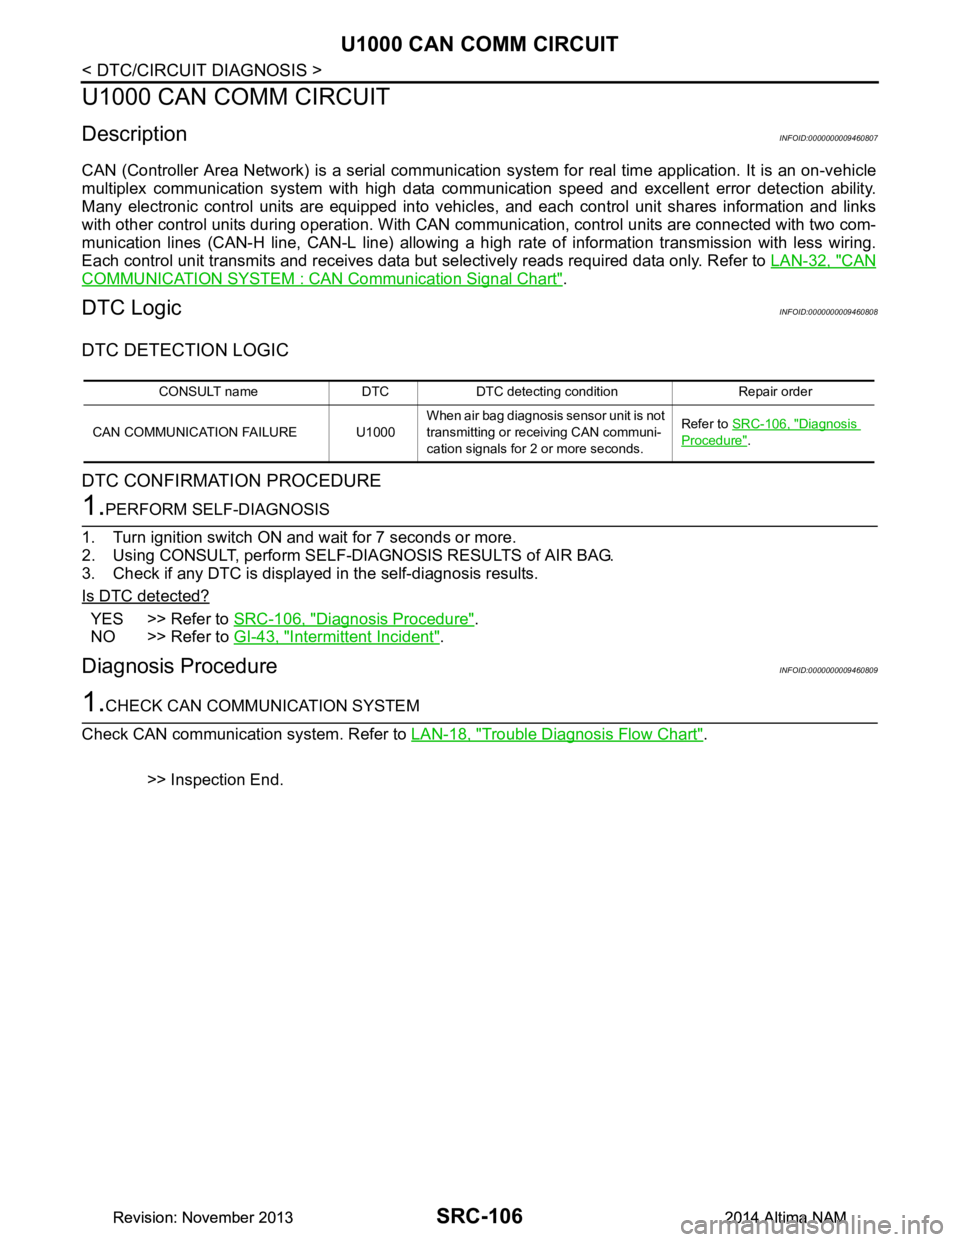
DTC DETECTION LOGIC
DTC CONFIRMATION PROCEDURE
1.PERFORM SELF-DIAGNOSIS
1. Turn ignition switch ON and wait for 7 seconds or more.
2. Using CONSULT, perform SELF-DIAGNOSIS RESULTS of AIR BAG.
3. Check if any DTC is displayed in the self-diagnosis results.
Is DTC detected?
YES >> Refer to SRC-106, "Diagnosis Procedure".
NO >> Refer to GI-43, "Intermittent Incident"
.
Diagnosis ProcedureINFOID:0000000009460809
1.CHECK CAN COMMUNICATION SYSTEM
Check CAN communication system. Refer to LAN-18, "Trouble Diagnosis Flow Chart"
.
>> Inspection End.
CONSULT name DTC DTC detecting condition Repair order
CAN COMMUNICATION FAILURE U1000 When air bag diagnosis sensor unit is not
transmitting or receiving CAN communi-
cation signals for 2 or more seconds. Refer to
SRC-106, "Diagnosis
Procedure".
Revision: November 20132014 Altima NAMRevision: November 20132014 Altima NAM
Page 4104 of 4801

ST-1
STEERING
C
D E
F
H I
J
K L
M
SECTION ST
A
B
ST
N
O P
CONTENTS
STEERING SYSTEM
PRECAUTION ................ ...............................3
PRECAUTIONS .............................................. .....3
Precaution for Supplemental Restraint System
(SRS) "AIR BAG" and "SEAT BELT PRE-TEN-
SIONER" ............................................................. ......
3
Precaution for Steering System .......................... ......3
Precaution for Work ............................................ ......3
PREPARATION ............................................5
PREPARATION .............................................. .....5
Special Service Tool ........................................... ......5
Commercial Service Tool ..........................................5
SYSTEM DESCRIPTION ..............................7
COMPONENT PARTS ................................... .....7
HEATED STEERING WHEEL SYSTEM ............... ......7
HEATED STEERING WHEEL SYSTEM : Compo-
nent Parts Location ............................................. ......
7
HEATED STEERING WHEEL SYSTEM : Compo-
nent Description .................................................. ......
7
SYSTEM ..............................................................8
HEATED STEERING WHEEL SYSTEM ............... ......8
HEATED STEERING WHEEL SYSTEM : System
Diagram ............................................................... ......
8
HEATED STEERING WHEEL SYSTEM : System
Description .......................................................... ......
8
ECU DIAGNOSIS INFORMATION ...............9
A/C AUTO AMP. ............................................. .....9
List of ECU Reference ........................................ ......9
WIRING DIAGRAM ......................................10
HEATED STEERING WHEEL ........................ ....10
Wiring Diagram ................................................... ....10
BASIC INSPECTION ...................................13
DIAGNOSIS AND REPAIR WORK FLOW .......13
Work Flow ............................................................ ....13
POWER STEERING FLUID ..............................15
Inspection ................................................................15
STEERING WHEEL ..........................................16
Inspection ................................................................16
STEERING COLUMN ........................................18
Inspection ................................................................18
POWER STEERING OIL PUMP .......................19
Inspection ................................................................19
STEERING GEAR AND LINKAGE ...................20
Inspection ................................................................20
DTC/CIRCUIT DIAGNOSIS .........................21
POWER SUPPLY AND GROUND CIRCUIT ....21
A/C AUTO AMP. .................................................... ....21
A/C AUTO AMP. : Diagnosis Procedure .................21
HEATED STEERING WHEEL SYSTEM ...........22
Component Function Check ....................................22
Diagnosis Procedure ...............................................22
Component Inspection (Heated Steering Wheel
Switch) ................................................................. ....
24
Component Inspection (Heated Steering Relay) .....24
Component Inspection (Heated Steering Wheel) ....25
HEATED STEERING WHEEL SWITCH INDI-
CATOR LAMP ...................................................
26
Component Function Check ................................ ....26
Diagnosis Procedure ...............................................26
SYMPTOM DIAGNOSIS ..............................28
STEERING COLUMN ........................................28
Revision: November 20132014 Altima NAMRevision: November 20132014 Altima NAM
Page 4106 of 4801
PRECAUTIONSST-3
< PRECAUTION >
C
D E
F
H I
J
K L
M A
B
ST
N
O P
PRECAUTION
PRECAUTIONS
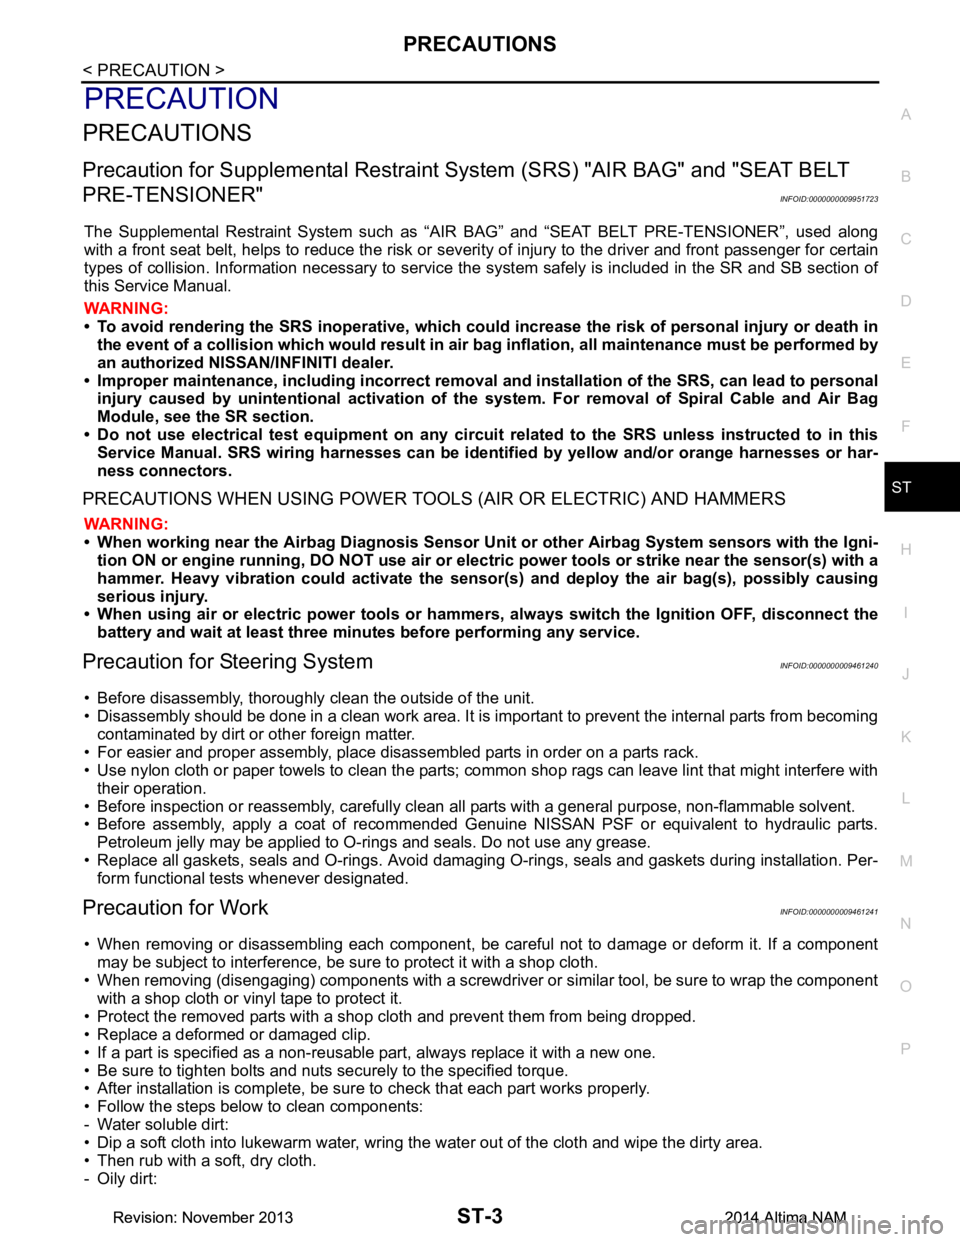
Precaution for Supplemental Restraint System (SRS) "AIR BAG" and "SEAT BELT
PRE-TENSIONER"
INFOID:0000000009951723
The Supplemental Restraint System such as “A IR BAG” and “SEAT BELT PRE-TENSIONER”, used along
with a front seat belt, helps to reduce the risk or severi ty of injury to the driver and front passenger for certain
types of collision. Information necessary to service t he system safely is included in the SR and SB section of
this Service Manual.
WARNING:
• To avoid rendering the SRS inoper ative, which could increase the risk of personal injury or death in
the event of a collision which would result in air bag inflation, all maintenance must be performed by
an authorized NISSAN/INFINITI dealer.
• Improper maintenance, including in correct removal and installation of the SRS, can lead to personal
injury caused by unintentional act ivation of the system. For removal of Spiral Cable and Air Bag
Module, see the SR section.
• Do not use electrical test equipm ent on any circuit related to the SRS unless instructed to in this
Service Manual. SRS wiring harnesses can be identi fied by yellow and/or orange harnesses or har-
ness connectors.
PRECAUTIONS WHEN USING POWER TOOLS (AIR OR ELECTRIC) AND HAMMERS
WARNING:
• When working near the Airbag Diagnosis Sensor Un it or other Airbag System sensors with the Igni-
tion ON or engine running, DO NOT use air or el ectric power tools or strike near the sensor(s) with a
hammer. Heavy vibration could activate the sensor( s) and deploy the air bag(s), possibly causing
serious injury.
• When using air or electric power tools or hammers , always switch the Ignition OFF, disconnect the
battery and wait at least three mi nutes before performing any service.
Precaution for Steering SystemINFOID:0000000009461240
• Before disassembly, thoroughly clean the outside of the unit.
• Disassembly should be done in a clean work area. It is im portant to prevent the internal parts from becoming
contaminated by dirt or other foreign matter.
• For easier and proper assembly, place disassembled parts in order on a parts rack.
• Use nylon cloth or paper towels to clean the parts; common shop rags can leave lint that might interfere with
their operation.
• Before inspection or reassembly, carefully clean al l parts with a general purpose, non-flammable solvent.
• Before assembly, apply a coat of recommended Genuine NISSAN PSF or equivalent to hydraulic parts.
Petroleum jelly may be applied to O-rings and seals. Do not use any grease.
• Replace all gaskets, seals and O-rings. Avoid damaging O-rings, seals and gaskets during installation. Per- form functional tests whenever designated.
Precaution for WorkINFOID:0000000009461241
• When removing or disassembling each component, be ca reful not to damage or deform it. If a component
may be subject to interference, be sure to protect it with a shop cloth.
• When removing (disengaging) components with a screwdriver or similar tool, be sure to wrap the component
with a shop cloth or vinyl tape to protect it.
• Protect the removed parts with a shop cloth and prevent them from being dropped.
• Replace a deformed or damaged clip.
• If a part is specified as a non-reusabl e part, always replace it with a new one.
• Be sure to tighten bolts and nuts securely to the specified torque.
• After installation is complete, be sure to check that each part works properly.
• Follow the steps below to clean components:
- Water soluble dirt:
• Dip a soft cloth into lukewarm water, wring the water out of the cloth and wipe the dirty area.
• Then rub with a soft, dry cloth.
-Oily dirt:
Revision: November 20132014 Altima NAMRevision: November 20132014 Altima NAM
Page 4118 of 4801
POWER STEERING FLUIDST-15
< BASIC INSPECTION >
C
D E
F
H I
J
K L
M A
B
ST
N
O P
POWER STEERING FLUID
InspectionINFOID:0000000009461251
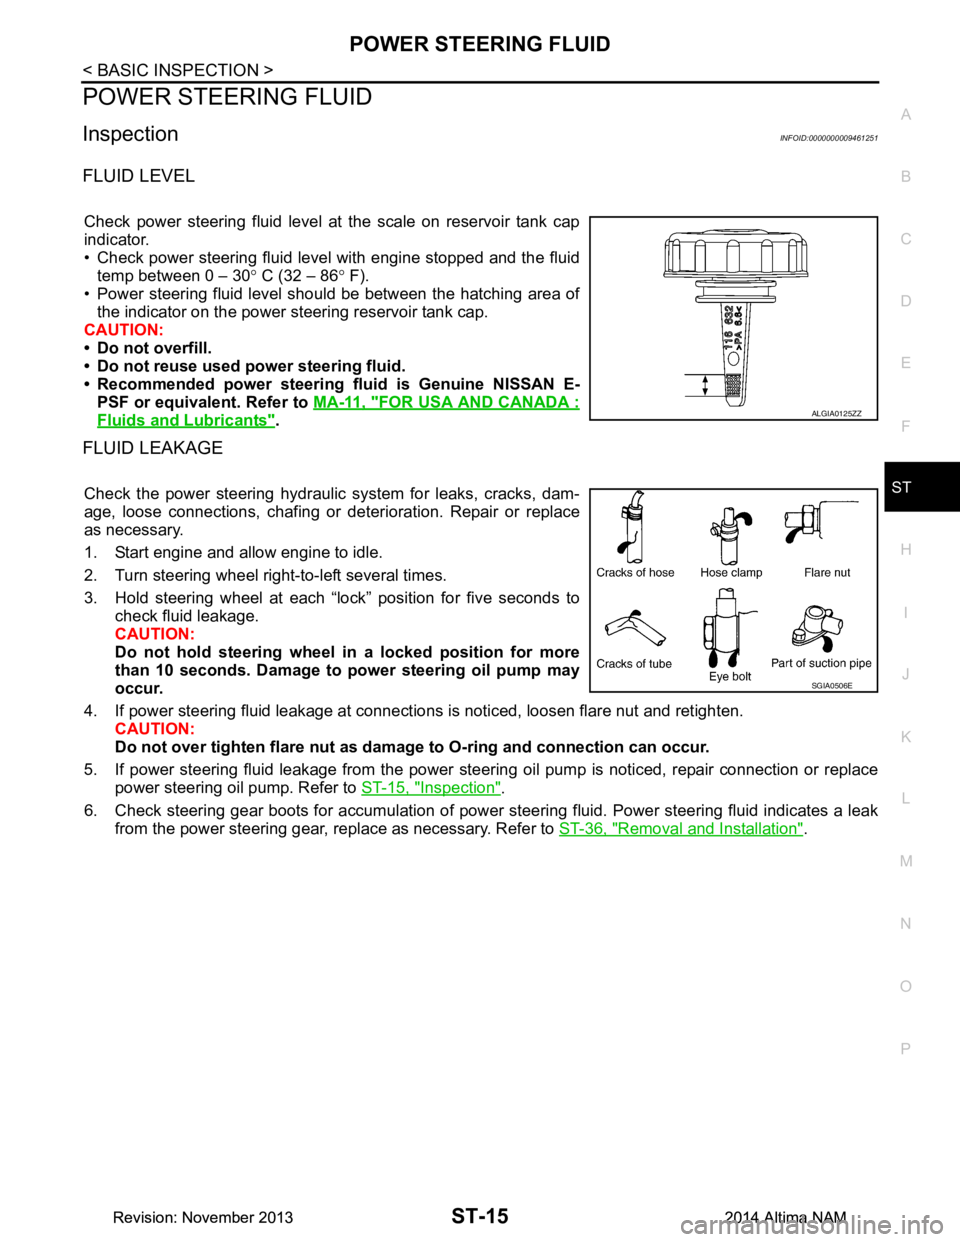
FLUID LEVEL
Check power steering fluid level at the scale on reservoir tank cap
indicator.
• Check power steering fluid level with engine stopped and the fluid temp between 0 – 30 ° C (32 – 86 ° F).
• Power steering fluid level should be between the hatching area of the indicator on the power steering reservoir tank cap.
CAUTION:
• Do not overfill.
• Do not reuse used power steering fluid.
• Recommended power steering fluid is Genuine NISSAN E-
PSF or equivalent. Refer to MA-11, "FOR USA AND CANADA :
Fluids and Lubricants".
FLUID LEAKAGE
Check the power steering hydraulic system for leaks, cracks, dam-
age, loose connections, chafing or det erioration. Repair or replace
as necessary.
1. Start engine and allow engine to idle.
2. Turn steering wheel right-to-left several times.
3. Hold steering wheel at each “lock” position for five seconds to check fluid leakage.
CAUTION:
Do not hold steering wheel in a locked position for more
than 10 seconds. Damage to power steering oil pump may
occur.
4. If power steering fluid leakage at connections is noticed, loosen flare nut and retighten.
CAUTION:
Do not over tighten flare nut as damage to O-ring and connection can occur.
5. If power steering fluid leakage from the power steer ing oil pump is noticed, repair connection or replace
power steering oil pump. Refer to ST-15, "Inspection"
.
6. Check steering gear boots for accumulation of power st eering fluid. Power steering fluid indicates a leak
from the power steering gear, replace as necessary. Refer to ST-36, "Removal and Installation"
.
ALGIA0125ZZ
SGIA0506E
Revision: November 20132014 Altima NAMRevision: November 20132014 Altima NAM
Page 4122 of 4801
POWER STEERING OIL PUMPST-19
< BASIC INSPECTION >
C
D E
F
H I
J
K L
M A
B
ST
N
O P
POWER STEERING OIL PUMP
InspectionINFOID:0000000009461254
RELIEF OIL PRESSURE
CAUTION:
Make sure that belt tension is normal be fore starting the following procedure.
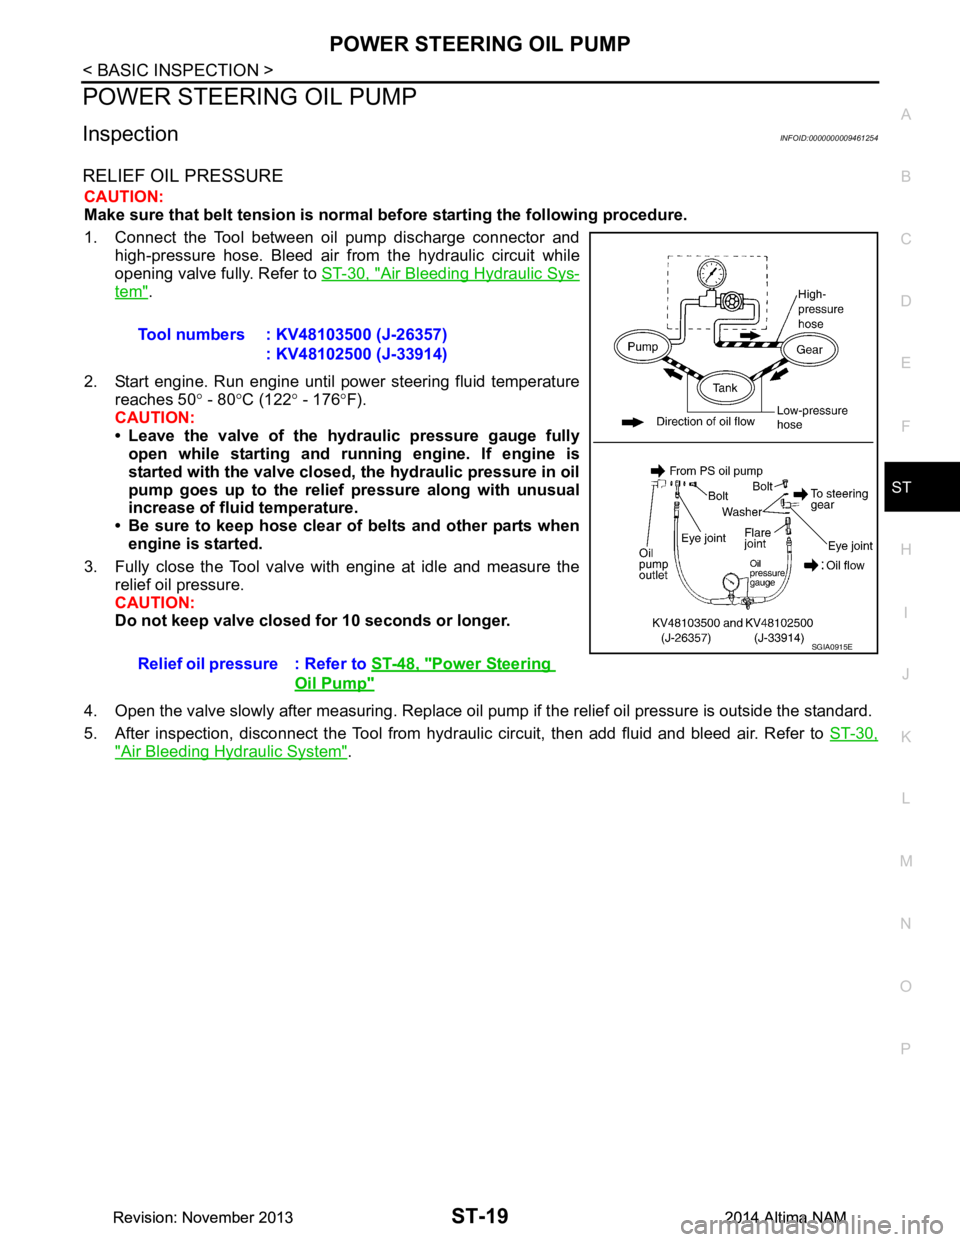
1. Connect the Tool between oil pump discharge connector and high-pressure hose. Bleed air from the hydraulic circuit while
opening valve fully. Refer to ST-30, "Air Bleeding Hydraulic Sys-
tem".
2. Start engine. Run engine until power steering fluid temperature reaches 50 ° - 80 °C (122 ° - 176 °F).
CAUTION:
• Leave the valve of the hydraulic pressure gauge fully open while starting and ru nning engine. If engine is
started with the valve closed, th e hydraulic pressure in oil
pump goes up to the relief pressure along with unusual
increase of fluid temperature.
• Be sure to keep hose clear of belts and other parts when engine is started.
3. Fully close the Tool valve with engine at idle and measure the relief oil pressure.
CAUTION:
Do not keep valve closed for 10 seconds or longer.
4. Open the valve slowly after measuring. Replace oil pump if the relief oil pressure is outside the standard.
5. After inspection, disconnect the Tool from hydraul ic circuit, then add fluid and bleed air. Refer to ST-30,
"Air Bleeding Hydraulic System".
Tool numbers : KV48103500 (J-26357)
: KV48102500 (J-33914)
Relief oil pressure : Refer to ST-48, "Power Steering
Oil Pump"
SGIA0915E
Revision: November 20132014 Altima NAMRevision: November 20132014 Altima NAM
Page 4152 of 4801

STC-1
STEERING
C
D E
F
H I
J
K L
M
SECTION STC
A
B
STC
N
O P
CONTENTS
STEERING CONTROL SYSTEM
PRECAUTION ................ ...............................3
PRECAUTIONS .............................................. .....3
Precaution for Supplemental Restraint System
(SRS) "AIR BAG" and "SEAT BELT PRE-TEN-
SIONER" ............................................................. ......
3
Service Notice and Precautions for Hydraulic
Pump Electric Power Steering System ............... ......
3
SYSTEM DESCRIPTION ..............................4
COMPONENT PARTS ................................... .....4
Component Parts Location .................................. ......4
Component Description .............................................4
Power Steering Oil Pump Assembly .........................5
SYSTEM ..............................................................6
HYDRAULIC PUMP ELECTRIC POWER STEER-
ING SYSTEM ........ ................................. ......................
6
HYDRAULIC PUMP ELECTRIC POWER
STEERING SYSTEM : System Description ..............
6
HYDRAULIC PUMP ELECTRIC POWER
STEERING SYSTEM : Fail-sa fe ......................... ......
8
HYDRAULIC PUMP ELECTRIC POWER
STEERING SYSTEM : Protec tion Function ..............
9
DIAGNOSIS SYSTEM (POWER STEERING
CONTROL MODULE) .................................... ....
10
CONSULT Function ............................................ ....10
ECU DIAGNOSIS INFORMATION ..............11
POWER STEERING CONTROL MODULE .... ....11
Reference Value ................................................. ....11
Fail-safe ..................................................................12
Protection Function .................................................12
DTC Inspection Priority Chart ............................. ....13
DTC Index ........................................................... ....13
WIRING DIAGRAM ......................................14
HYDRAULIC PUMP ELECTRIC POWER
STEERING SYSTEM .........................................
14
Wiring Diagram .................................................... ....14
BASIC INSPECTION ...................................19
DIAGNOSIS AND REPAIR WORK FLOW .......19
Work Flow ............................................................ ....19
Diagnostic Work Sheet ............................................20
DTC/CIRCUIT DIAGNOSIS .........................22
C1143 STEERING ANGLE SENSOR ...............22
DTC Logic ............................................................ ....22
Diagnosis Procedure ...............................................22
C1601 BATTERY POWER SUPPLY ................23
DTC Logic ................................................................23
Diagnosis Procedure ...............................................23
C1602 NO TUNING SET ...................................26
DTC Logic ................................................................26
Diagnosis Procedure ...............................................26
C1606 EPS MOTOR ..........................................27
DTC Logic ................................................................27
Diagnosis Procedure ...............................................27
C1607, C1608 POWER STEERING CON-
TROL MODULE ................................................
28
DTC Logic ............................................................ ....28
Diagnosis Procedure ...............................................28
C160A HEAT PROTECTION ............................29
DTC Logic ................................................................29
U1000 CAN COMM CIRCUIT ...........................30
Description ...............................................................30
DTC Logic ................................................................30
Diagnosis Procedure ...............................................30
HYDRAULIC PUMP ELECTRIC POWER
STEERING WARNING LAMP ...........................
31
Revision: November 20132014 Altima NAMRevision: November 20132014 Altima NAM
Page 4154 of 4801
PRECAUTIONSSTC-3
< PRECAUTION >
C
D E
F
H I
J
K L
M A
B
STC
N
O P
PRECAUTION
PRECAUTIONS
Precaution for Supplemental Restraint System (SRS) "AIR BAG" and "SEAT BELT
PRE-TENSIONER"
INFOID:0000000009951730
The Supplemental Restraint System such as “A IR BAG” and “SEAT BELT PRE-TENSIONER”, used along
with a front seat belt, helps to reduce the risk or severi ty of injury to the driver and front passenger for certain
types of collision. Information necessary to service t he system safely is included in the SR and SB section of
this Service Manual.
WARNING:
• To avoid rendering the SRS inoper ative, which could increase the risk of personal injury or death in
the event of a collision which would result in air bag inflation, all maintenance must be performed by
an authorized NISSAN/INFINITI dealer.
• Improper maintenance, including in correct removal and installation of the SRS, can lead to personal
injury caused by unintentional act ivation of the system. For removal of Spiral Cable and Air Bag
Module, see the SR section.
• Do not use electrical test equipm ent on any circuit related to the SRS unless instructed to in this
Service Manual. SRS wiring harnesses can be identi fied by yellow and/or orange harnesses or har-
ness connectors.
PRECAUTIONS WHEN USING POWER TOOLS (AIR OR ELECTRIC) AND HAMMERS
WARNING:
• When working near the Airbag Diagnosis Sensor Un it or other Airbag System sensors with the Igni-
tion ON or engine running, DO NOT use air or el ectric power tools or strike near the sensor(s) with a
hammer. Heavy vibration could activate the sensor( s) and deploy the air bag(s), possibly causing
serious injury.
• When using air or electric power tools or hammers , always switch the Ignition OFF, disconnect the
battery and wait at least three mi nutes before performing any service.
Service Notice and Precautions for Hydrau lic Pump Electric Power Steering System
INFOID:0000000009460340
• Check each tire for proper air pressure and size. Refer to WT-60, "Tire".
• Verify that the steering system components are G enuine NISSAN parts and have been installed properly.
• Check the steering column for loose mounting bolts.
• Check the steering gear assembly for loose mounting bolts. Check the inner sockets and outer sockets for
damage or wear. Inspect the boots and seals for leakage of power steering fluid.
• Verify proper wheel alignment. Refer to FSU-7, "Inspection and Adjustment"
.
• Check for any damage, wear, or modification to the suspension and body that would result in increased
weight or an improper wheelarch height. Refer to FSU-26, "Wheelarch Height (Unladen*
1)".
• Check for proper battery voltage.
• Verify that all power steering pump assembly connections are clean and fully seated.
• Verify that only Genuine NISSAN E-PSF is used. Use of any power steering fluid other than Genuine NIS-
SAN E-PSF will prevent the power st eering system from proper operation.
• An audible high pitch noise may be heard from the engine compartment when the steering wheel is oper-
ated, particularly at low speeds such as a parking lot maneuver. This condition is not a malfunction, rather
normal system operation. Steering at low speeds or parking lot maneuvers demands higher hydraulic assis-
tance, resulting in larger power st eering pump load and increased system noise.
• The power steering pump is electrically controlled by the power steering control module.
• Before connecting or disconnecting the power steeri ng control module harness connectors, turn ignition
switch “OFF” and disconnect battery ground cable. Batter y voltage is applied to power steering control mod-
ule even if ignition switch is turned “OFF”.
Revision: November 20132014 Altima NAMRevision: November 20132014 Altima NAM