2014 NISSAN TEANA fuse box
[x] Cancel search: fuse boxPage 154 of 4801
![NISSAN TEANA 2014 Service Manual
BRC-8
< SYSTEM DESCRIPTION >[VDC/TCS/ABS]
COMPONENT PARTS
SYSTEM DESCRIPTION
COMPONENT PARTS
Component Parts LocationINFOID:0000000009463741
1. IPDM E/R 2. Fuse, fusible link and relay box
(stop lamp NISSAN TEANA 2014 Service Manual
BRC-8
< SYSTEM DESCRIPTION >[VDC/TCS/ABS]
COMPONENT PARTS
SYSTEM DESCRIPTION
COMPONENT PARTS
Component Parts LocationINFOID:0000000009463741
1. IPDM E/R 2. Fuse, fusible link and relay box
(stop lamp](/manual-img/5/57390/w960_57390-153.png)
BRC-8
< SYSTEM DESCRIPTION >[VDC/TCS/ABS]
COMPONENT PARTS
SYSTEM DESCRIPTION
COMPONENT PARTS
Component Parts LocationINFOID:0000000009463741
1. IPDM E/R 2. Fuse, fusible link and relay box
(stop lamp relay)3. ABS actuator and el
ectric unit (con-
trol unit)
4. Brake fluid level switch 5. Vacuum sensor (attached to lower side of brake booster)6. Front wheel sensor LH (RH similar)
ALFIA0301ZZ
Revision: November 20132014 Altima NAMRevision: November 20132014 Altima NAM
Page 372 of 4801

CHG
L TERMINAL CIRCUIT (OPEN)CHG-27
< DTC/CIRCUIT DIAGNOSIS >
C
D E
F
G H
I
J
K L
B
A
O P
N
L TERMINAL CIRCUIT (OPEN)
DescriptionINFOID:0000000009460663
The “L” terminal circuit controls the charge warning
lamp. The charge warning lamp turns ON when the igni-
tion switch is set to ON or START. When the generator is providing sufficient voltage with the engine running,
the charge warning lamp turns OFF. If the charge warn ing lamp illuminates with the engine running, a malfunc-
tion is indicated.
Diagnosis ProcedureINFOID:0000000009460664
Regarding Wiring Diagram information. Refer to CHG-12, "Wiring Diagram".
1.CHECK “L” TERMINAL CONNECTION
1. Turn ignition switch OFF.
2. Check if “L” terminal is clean and tight.
Is the inspection result normal?
YES >> GO TO 2.
NO >> Repair “L” terminal connection. Confirm repair by performing complete Charging system test
using EXP-800 NI or GR8-1200 NI (if available). Refer to applicable Instruction Manual for proper
testing procedures.
2.CHECK “L” TERMINAL CIRCUIT (OPEN)
1. Disconnect the generator connector.
2. Apply ground to generator harness connector terminal.
3. Check condition of the charge warning lamp with the ignition switch in the ON position.
Does it illuminate?
YES >> “L” terminal circuit is normal. Refer to CHG-17, "Work Flow (With EXP-800 NI or GR8-1200 NI)" or
CHG-20, "Work Flow (Without EXP-800 NI or GR8-1200 NI)"
.
NO >> GO TO 3.
3.CHECK HARNESS CONTI NUITY (OPEN CIRCUIT)
1. Disconnect the battery cabl e from the negative terminal.
2. Disconnect the combination meter connector.
3. Check continuity between generator harness connector and combination meter harness connector.
is the inspection result normal?
YES >> GO TO 4.
NO >> Repair or replace the harness or connectors.
4.CHECK HARNESS CONTI NUITY (OPEN CIRCUIT)
Check continuity between combination me ter harness connector and fuse block (J/B).
Generator
GroundCondition
Connector Terminal Ignition switch position Charge warning lamp F7 2 ON Illuminate
Generator Combination meter Continuity
Connector Terminal Connector Terminal
F7 2 M24 11 Yes
Combination meter Fuse box (J/B) Continuity
Connector Terminal Connector Terminal
M24 21 M5 8P Yes
Revision: November 20132014 Altima NAMRevision: November 20132014 Altima NAM
Page 2274 of 4801

EXL-8
< SYSTEM DESCRIPTION >
COMPONENT PARTS
Component Description
INFOID:0000000009463542
1. BCM (view with combination meter re-
moved) 2. Combination switch
(lighting and turn signal switch) 3. IPDM E/R, (Headlamp high relay,
Headlamp low relay, Tail lamp relay
and Front fog lamp relay (if equipped))
4. Fuse, fusible link and relay box (Stop lamp relay) 5. Combination meter 6. Parking brake switch
7. Stop lamp switch 8. Hazard switch 9. Optical sensor
10. Front door switch LH (RH similar) 11. Rear door switch LH
(RH similar) 12. Daytime light relay
(if equipped)
Part Description
BCM Controls the exterior lighting system.
Combination switch
(Lighting & turn signal switch) Refer to
BCS-8, "COMBINATION SWITCH READIN G SYSTEM : System Description"
.
IPDM E/R Controls the integrated relays and supplies voltage to the load according to the request from the BCM
via CAN communication.
Stop lamp switch Transmits power to the stop lamp relay when the brake pedal is pressed to operate stop lamps.
Combination meter Refer to MWI-9, "METER SYSTEM : System Description"
.
Daytime light relay
(if equipped) Sends power to the daytime lamp when operated by the IPDM E/R.
Stop lamp relay Transmits power to the stop lamps when the brake pedal is pressed.
Front door switch LH/RH Transmits the door open signal to the BCM.
Rear door switch LH/RH
Optical sensor Optical sensor converts the outside brightness (lux) to voltage and transmits the optical sensor signal
to BCM to operate the auto light system.
Parking brake switch Transmits the parking brake switch signal to the combination meter to operate the auto light system.
Hazard switch Inputs the hazard switch signal to BCM.
Revision: November 20132014 Altima NAMRevision: November 20132014 Altima NAM
Page 3433 of 4801

PG
PG-1
ELECTRICAL & POWER CONTROL
C
D E
F
G H
I
J
K L
B
SECTION PG
A
O P
N
CONTENTS
POWER SUPPLY, GROUND & CIRCUIT ELEMENTS
PRECAUTION ................
...............................2
PRECAUTIONS .............................................. .....2
Precaution for Supplemental Restraint System
(SRS) "AIR BAG" and "SEAT BELT PRE-TEN-
SIONER" ............................................................. ......
2
PREPARATION ............................................3
PREPARATION .............................................. .....3
Special Service Tool ........................................... ......3
Commercial Service Tool ..........................................3
BASIC INSPECTION ....................................4
BATTERY ....................................................... .....4
How to Handle Battery ........................................ ......4
Work Flow ........................................................... ......4
INSPECTION AND ADJUSTMENT .....................7
ADDITIONAL SERVICE WHEN REMOVING BAT-
TERY NEGATIVE TERMINAL ............................... ......
7
ADDITIONAL SERVICE WHEN REMOVING
BATTERY NEGATIVE TERMINAL : Special Re-
pair Requirement ................................................. ......
7
DTC/CIRCUIT DIAGNOSIS ..........................8
POWER SUPPLY ROUTING CIRCUIT .......... .....8
Wiring Diagram — Battery Power Supply — ....... ......8
Wiring Diagram — Accessory Power Supply — .....15
Wiring Diagram — Ignition Power Supply — ..........19
Fuse ........................................................................28
Fusible Link .............................................................28
GROUND ...........................................................29
Ground Distribution .............................................. ....29
HARNESS .........................................................39
Harness Layout ................................................... ....39
ELECTRICAL UNITS LOCATION ....................61
Electrical Units Location ..........................................61
HARNESS CONNECTOR .................................65
Description ...............................................................65
STANDARDIZED RELAY .................................68
Description ...............................................................68
FUSE BLOCK - JUNCTION BOX (J/B) ............70
Terminal Arrangement .............................................70
FUSE, FUSIBLE LINK AND RELAY BOX ........71
Terminal Arrangement .............................................71
IPDM E/R (INTELLIGENT POWER DISTRI-
BUTION MODULE ENGINE ROOM) ................
72
Fuse, Connector and Terminal Arrangement ...... ....72
REMOVAL AND INSTALLATION ...............73
BATTERY ..........................................................73
Exploded View ..................................................... ....73
Removal and Installation (Battery) ..........................73
Removal and Installation (Battery Tray) ..................74
SERVICE DATA AND SPECIFICATIONS
(SDS) ............... .............................................
75
BATTERY ..........................................................75
Battery ................................................................. ....75
Revision: November 20132014 Altima NAM
Page 3472 of 4801

PG-40
< DTC/CIRCUIT DIAGNOSIS >
HARNESS
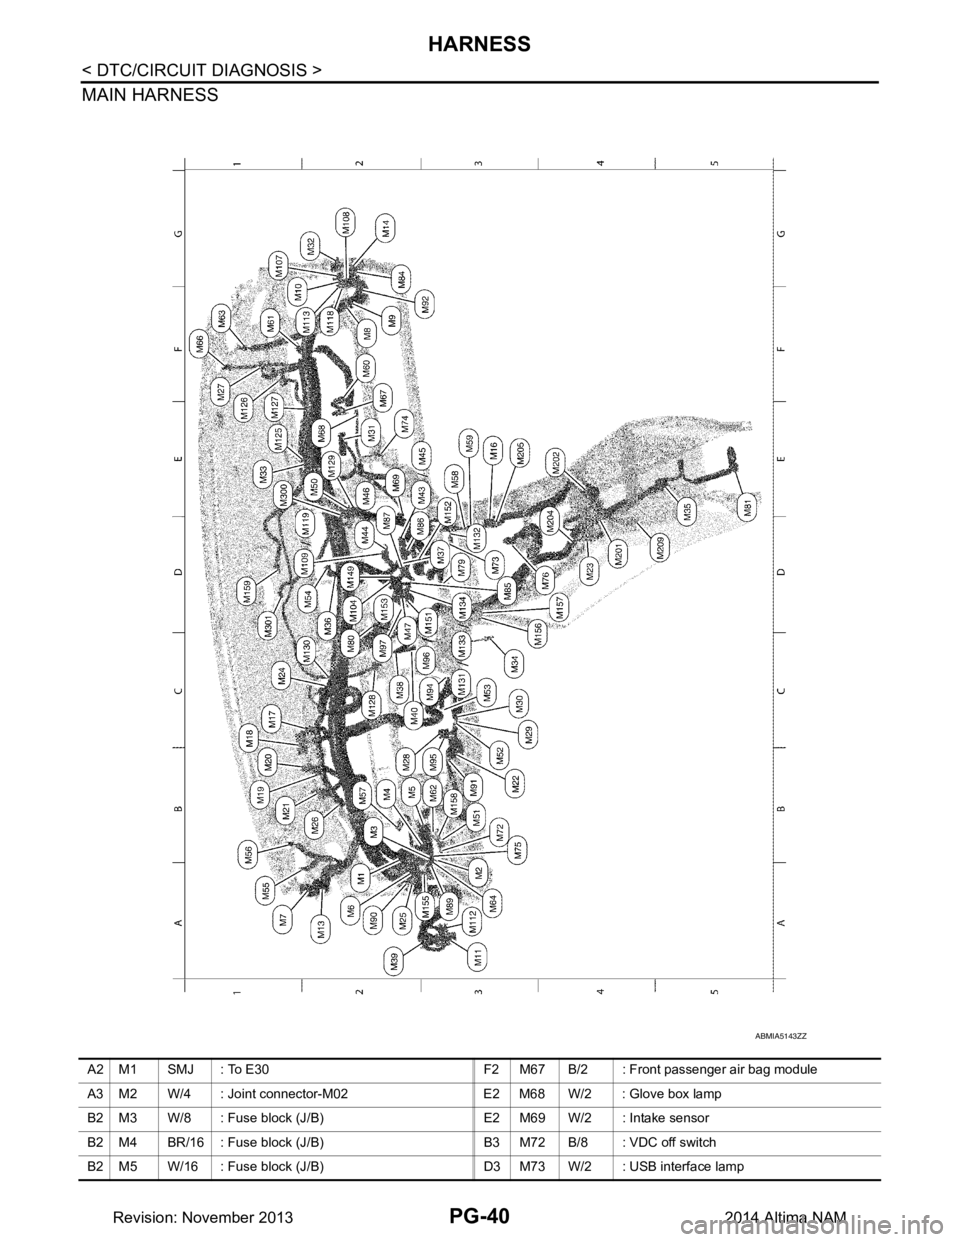
MAIN HARNESS
ABMIA5143ZZ
A2 M1 SMJ : To E30 F2 M67 B/2 : Front passenger air bag module
A3 M2 W/4 : Joint connector-M02 E2 M68 W/2 : Glove box lamp
B2 M3 W/8 : Fuse block (J/B) E2 M69 W/2 : Intake sensor
B2 M4 BR/16 : Fuse block (J/B) B3 M72 B/8 : VDC off switch
B2 M5 W/16 : Fuse block (J/B) D3 M73 W/2 : USB interface lamp
Revision: November 20132014 Altima NAM
Page 3502 of 4801

PG-70
< DTC/CIRCUIT DIAGNOSIS >
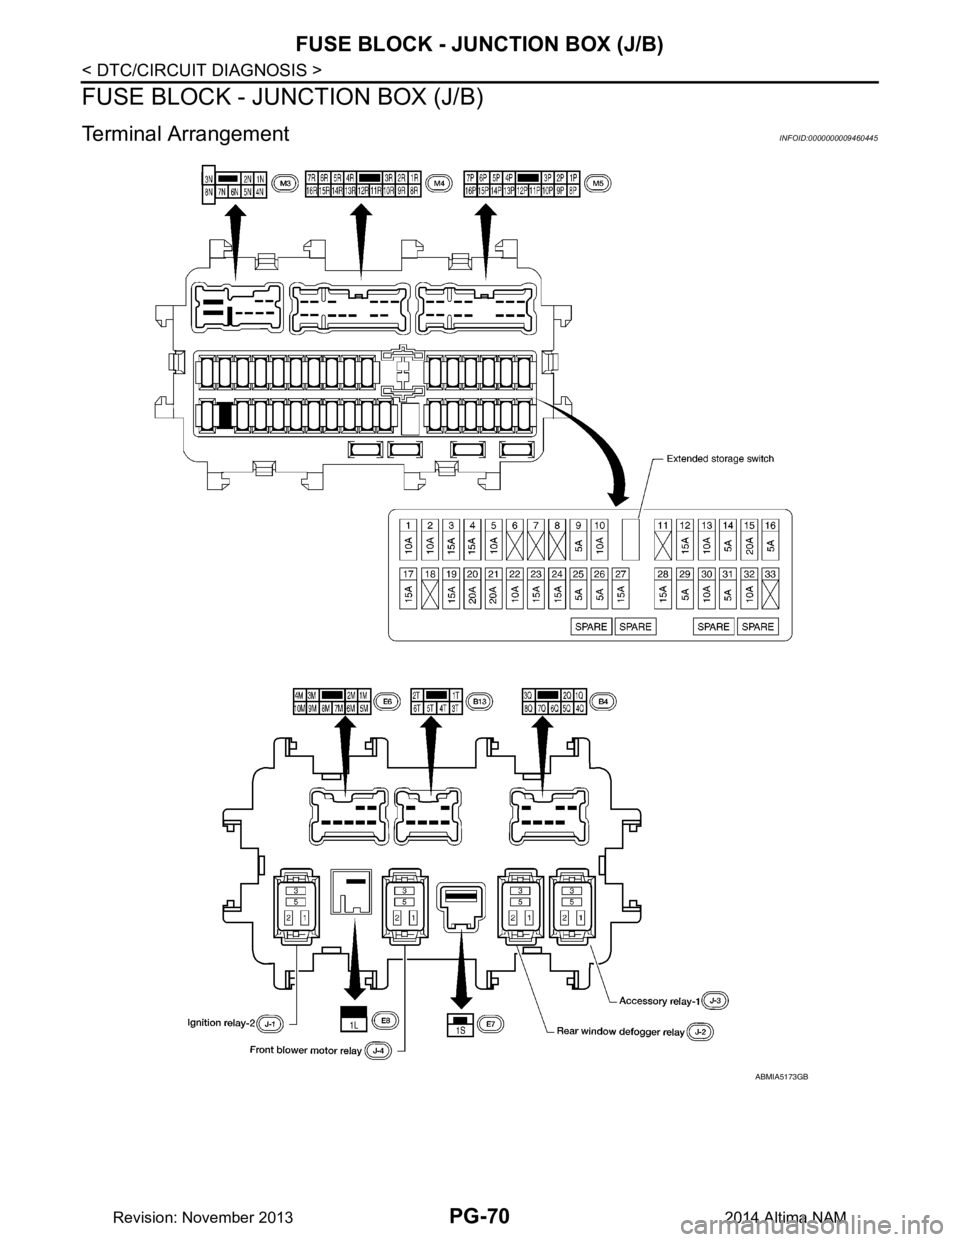
FUSE BLOCK - JUNCTION BOX (J/B)
FUSE BLOCK - JUNCTION BOX (J/B)
Terminal ArrangementINFOID:0000000009460445
ABMIA5173GB
Revision: November 20132014 Altima NAM
Page 3503 of 4801

PG
FUSE, FUSIBLE LINK AND RELAY BOXPG-71
< DTC/CIRCUIT DIAGNOSIS >
C
D E
F
G H
I
J
K L
B
A
O P
N
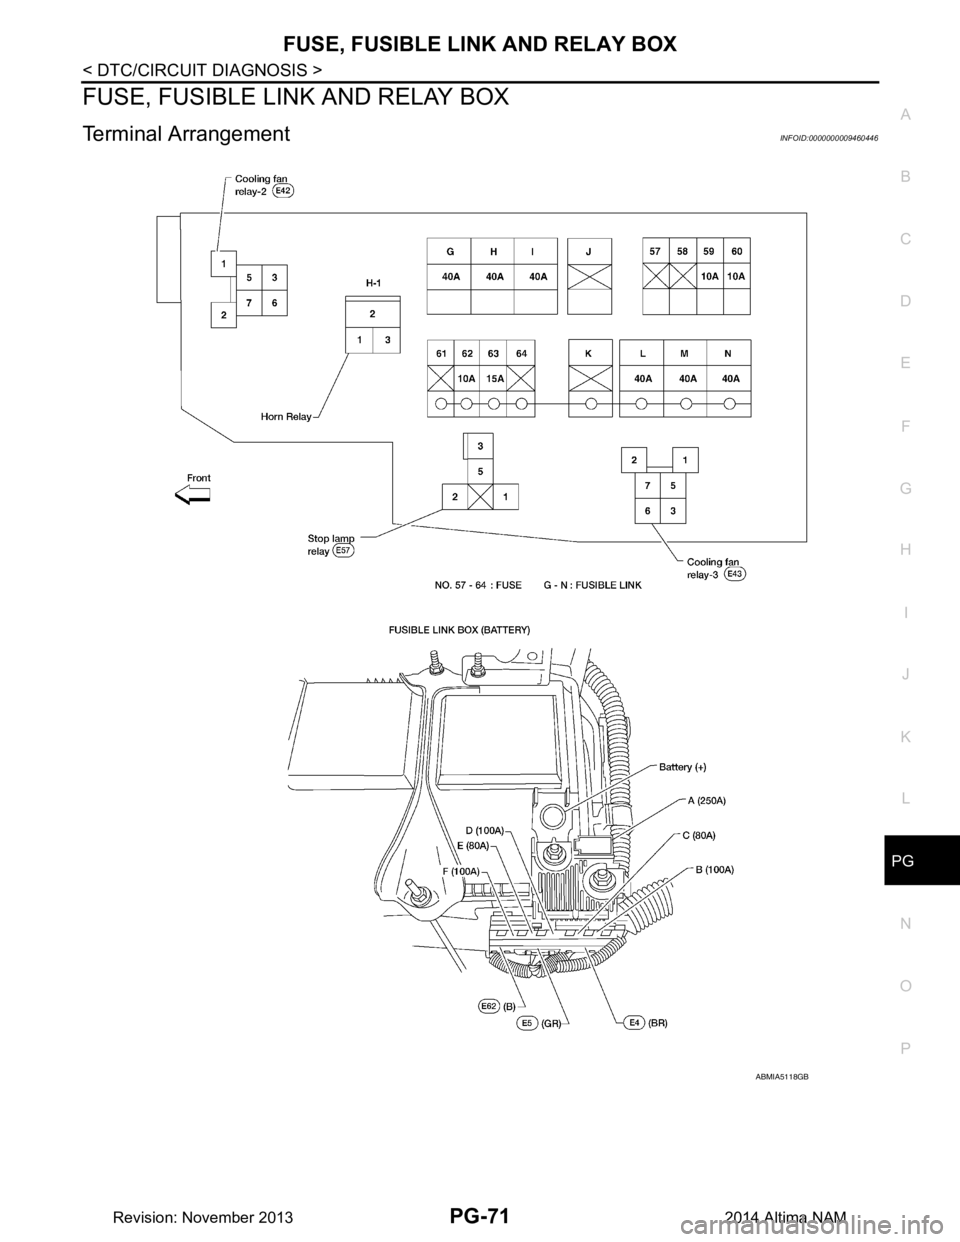
FUSE, FUSIBLE LINK AND RELAY BOX
Terminal ArrangementINFOID:0000000009460446
ABMIA5118GB
Revision: November 20132014 Altima NAM