2014 NISSAN TEANA lumbar support
[x] Cancel search: lumbar supportPage 3485 of 4801

PG
HARNESSPG-53
< DTC/CIRCUIT DIAGNOSIS >
C
D E
F
G H
I
J
K L
B
A
O P
N
E2 B8 W/4 : Front door switch LH C5 B46 GR/2 : Rear bumper antenna
G3 B9 Y/22 : Air bag diagnosis sensor unit E4 B47 W/2 : Rear speaker RH (Without BOSE audio
system)
G1 B10 W/12 : To E29 C2 B52 W/1 : Condenser
F2 B11 Y/2 : Front LH side air bag module B2 B53 B/1 : Rear window defogger
F2 B12 W/6 : To B201 D3 B54 B/1 : Rear window defogger
G1 B13 W/6 : Fuse block (J/B) D3 B58 — : Body ground
E2 B14 Y/2 : Front LH seat belt pre-tensioner D3 B61 Y/2 : Rear side air bag satellite sensor LH
E2 B15 Y/2 : Front side air bag satellite sensor LH G3 B65 W/4 : Joint connector-B04
B3 B16 W/12 : Rear view camera washer control unit E3 B66 O/2 : Front LH seat belt pre-tensioner
B4 B17 W/2 : Rear view camera air pump motor Chassis harness
D2 B18 W/4 : Rear door switch LH D4 C1 B/4 : To B43
C2 B19 — : Body ground C4 C2 B/2 : Rear wheel sensor LH
F2 B21 W/4 : Joint connector-B06 D5 C3 B/2 : Rear wheel sensor RH
B2 B22 L/12 : Joint connector-B07 Front seat LH harness
C 3 B 2 5 W / 2 : Rear speaker LH (Without BOSE audio
system) F 3 B 2 0 1 W / 6 : T o B 1 2
C 4 B 2 8 W / 3 : Trunk lamp switch and trunk release
solenoid F3 B202 W/2 : Seat belt buckle switch LH
D3 B29 GR/2 : Rear parcel shelf antenna E2 B203 W/10 : Power seat switch
A3 B30 W/6 : Rear combination lamp LH E2 B205 BR/4 : Lumbar support switch
C4 B32 BR/2 : License plate lamp RH F3 B206 GR/5 : Sliding motor
C4 B33 GR/2 : Trunk opener request switch E3 B207 W/6 : Reclining motor
B3 B34 BR/2 : License plate lamp LH F2 B208 W/6 : Front lifting motor
B4 B35 W/8 : Rear view camera F3 B209 W/6 : Rear lifting motor
C3 B36 W/2 : Trunk room lamp E3 B210 W/3 : Seat cushion heater LH
C 3 B 3 7 B / 2 : High-mounted stop lamp (Without rear
spoiler) D2 B211 W/2 : Seat back heater LH
E1 B38 Y/2 : LH side curtain air bag module G3 B212 B/2 : Lumbar support motor
D4 B39 B/2 : EVAP canister vent control valve
Revision: November 20132014 Altima NAM
Page 3773 of 4801

SE-24
< REMOVAL AND INSTALLATION >
FRONT SEAT
1. Seat cushion trim 2. Seat cushion pad 3. Seat cushion heater (if equipped)
4. Seat cushion outer finisher (RH) 5. Seat cushion inner finisher (RH front)6. Seat cushion inner finisher (RH rear)
7. Rear slide cover (RH) 8. Seat belt buckle 9. Slide cover (RH)
10. Front slide cover (RH) 11. Front slide cover (LH)12. Seat harness
13. Seat cushion outer finisher (LH) 14. Seat slide knob 15. Seat recline knob
16. Lumbar support switch (if equipped) 17. Power seat switch 18. Slide cover (LH)
19. Seat frame assembly 20. Rear slide cover (LH) 21. Seat cushion inner finisher (LH rear)
22. Seat cushion inner finisher (LH front) 23. Rear hinge cover 24. Side air bag module
25. Headrest holder (locked) 26. Headrest holder (free) 27. Seatback assembly
28. Lumbar support assembly (if equipped) 29. Headrest 30. Seatback board
A. Rear hinge cover clips B. Seatback board clips C. Side air bag module nuts
Revision: November 20132014 Altima NAMRevision: November 20132014 Altima NAM
Page 3776 of 4801
FRONT SEATSE-27
< REMOVAL AND INSTALLATION >
C
D E
F
G H
I
K L
M A
B
SE
N
O P
CAUTION:
Make sure that the seat harness or the floor trim is not damaged during installation.
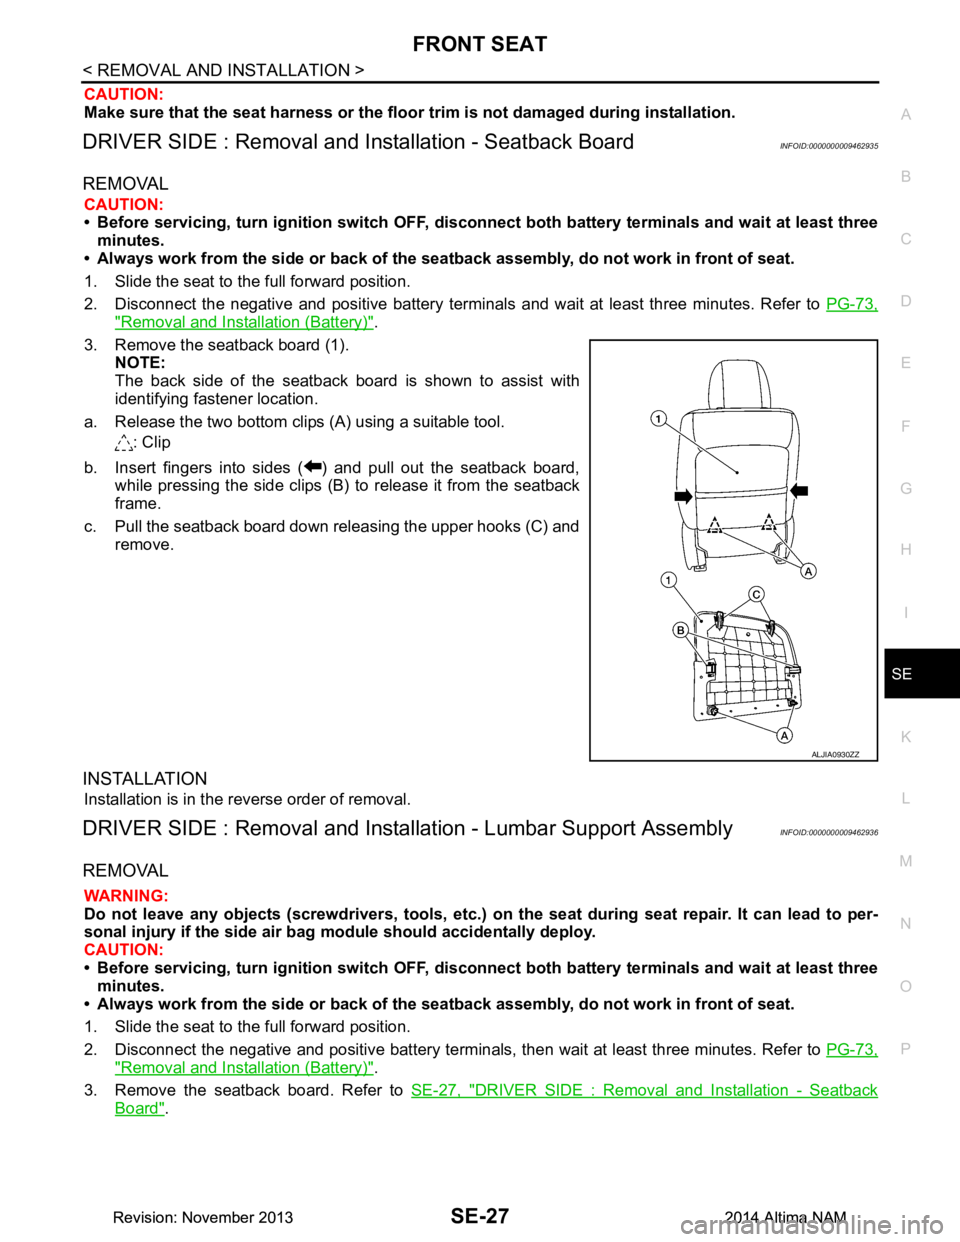
DRIVER SIDE : Removal and Installation - Seatback BoardINFOID:0000000009462935
REMOVAL
CAUTION:
• Before servicing, turn ignition swit ch OFF, disconnect both battery terminals and wait at least three
minutes.
• Always work from the side or back of the seat back assembly, do not work in front of seat.
1. Slide the seat to the full forward position.
2. Disconnect the negative and positive battery terminal s and wait at least three minutes. Refer to PG-73,
"Removal and Installation (Battery)".
3. Remove the seatback board (1). NOTE:
The back side of the seatback boar d is shown to assist with
identifying fastener location.
a. Release the two bottom clips (A) using a suitable tool. : Clip
b. Insert fingers into sides ( ) and pull out the seatback board, while pressing the side clips (B) to release it from the seatback
frame.
c. Pull the seatback board down releasing the upper hooks (C) and remove.
INSTALLATION
Installation is in the reverse order of removal.
DRIVER SIDE : Removal and Installation - Lumbar Support AssemblyINFOID:0000000009462936
REMOVAL
WARNING:
Do not leave any objects (screwdriver s, tools, etc.) on the seat during seat repair. It can lead to per-
sonal injury if the side air bag module should accidentally deploy.
CAUTION:
• Before servicing, turn ignition swit ch OFF, disconnect both battery terminals and wait at least three
minutes.
• Always work from the side or back of the seat back assembly, do not work in front of seat.
1. Slide the seat to the full forward position.
2. Disconnect the negative and positive bat tery terminals, then wait at least three minutes. Refer to PG-73,
"Removal and Installation (Battery)".
3. Remove the seatback board. Refer to SE-27, "DRIVER SIDE : Removal and Installation - Seatback
Board".
ALJIA0930ZZ
Revision: November 20132014 Altima NAMRevision: November 20132014 Altima NAM
Page 3777 of 4801
SE-28
< REMOVAL AND INSTALLATION >
FRONT SEAT
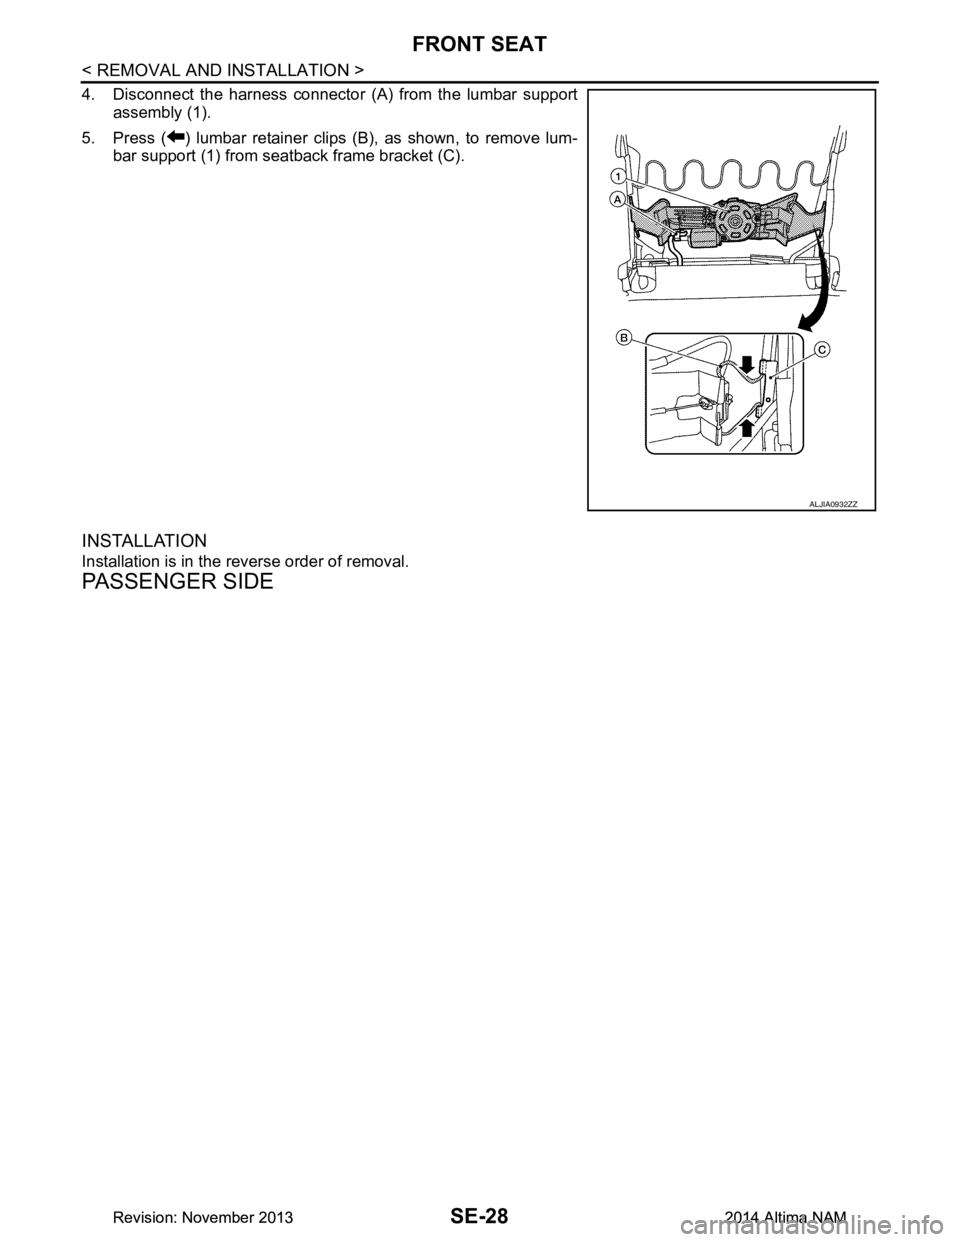
4. Disconnect the harness connector (A) from the lumbar supportassembly (1).
5. Press ( ) lumbar retainer clips (B), as shown, to remove lum- bar support (1) from seatback frame bracket (C).
INSTALLATION
Installation is in the reverse order of removal.
PASSENGER SIDE
ALJIA0932ZZ
Revision: November 20132014 Altima NAMRevision: November 20132014 Altima NAM
Page 3789 of 4801

SE-40
< UNIT DISASSEMBLY AND ASSEMBLY >
FRONT SEAT
1. Seat cushion trim 2. Seat cushion pad 3. Seat cushion heater (if equipped)
4. Seat cushion outer finisher (RH) 5. Seat cushion inner finisher (RH front)6. Seat cushion inner finisher (RH rear)
7. Rear slide cover (RH) 8. Seat belt buckle 9. Slide cover (RH)
10. Front slide cover (RH) 11. Front slide cover (LH) 12. Seat harness
13. Seat cushion outer finisher (LH) 14. Seat slide knob 15. Seat recline knob
16. Lumbar support switch (if equipped) 17. Power seat switch 18. Slide cover (LH)
19. Seat frame assembly 20. Rear slide cover (LH) 21. Seat cushion inner finisher (LH rear)
22. Seat cushion inner finisher (LH front) 23. Rear hinge cover 24. Side air bag module
25. Headrest holder (locked) 26. Headrest holder (free) 27. Seatback assembly
28. Lumbar support assembly (if equipped) 29. Headrest 30. Seatback board
A. Rear hinge cover clips B. Seatback board clips C. Side air bag module nuts
Revision: November 20132014 Altima NAMRevision: November 20132014 Altima NAM
Page 3791 of 4801
SE-42
< UNIT DISASSEMBLY AND ASSEMBLY >
FRONT SEAT
DRIVER SIDE : Disassembly and Assembly
INFOID:0000000009462949
SEATBACK ASSEMBLY
WARNING:
Do not leave any objects (screwdrivers, tools, etc. ) on the seat during seatback repair. It can lead to
personal injury if the side ai r bag should accidentally deploy.
CAUTION:
• Before servicing, turn ignition sw itch OFF, disconnect both battery terminals and wait at least three
minutes.
• Handle the side air bag module carefully. During disassembly, alw ays hold the side air bag module,
do not let it hang by the wire harness.
• Always work from the side or back of the seat back assembly, do not work in front of seat.
• Do not use air tools or electric tools for servicing the seat assembly.
• Replace the side air bag module if it h as been dropped or sustained an impact.
• Do not insert any objects into the side air bag module.
• Do not attempt to disassemble the side air bag module.
• Do not expose the side air bag module to temperatures exceeding 93 °C (200 °F).
• Do not expose the side air bag module to any oil, grease, detergent or water.
• During disassembly, do not damage the seatback board, chutes, connectors, retainers, clips, module
harness or the side air bag module.
NOTE:
If the vehicle has been involved in a collision and t he side air bag has deployed, the front seatback assembly
must be replaced.
Disassembly
1. Remove the front seat assembly. Refer to SE-26, "DRIVER SIDE : Removal and Installation - Seat
Assembly".
2. Remove the seatback board. Refer to SE-27, "DRIVER SIDE : Removal and Installation - Seatback
Board".
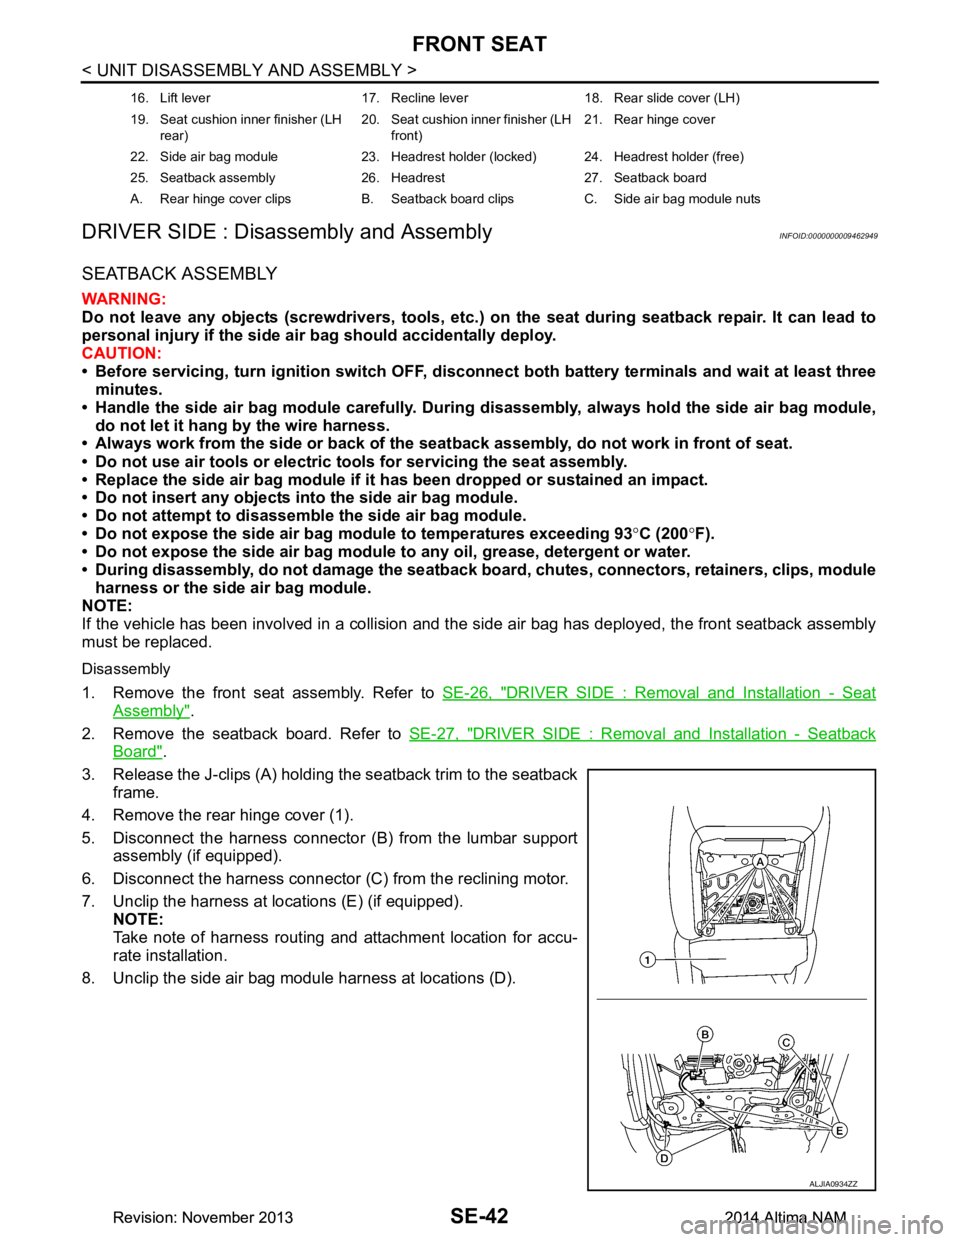
3. Release the J-clips (A) holding the seatback trim to the seatback frame.
4. Remove the rear hinge cover (1).
5. Disconnect the harness connector (B) from the lumbar support assembly (if equipped).
6. Disconnect the harness connector (C) from the reclining motor.
7. Unclip the harness at locations (E) (if equipped). NOTE:
Take note of harness routing and attachment location for accu-
rate installation.
8. Unclip the side air bag module harness at locations (D).
16. Lift lever 17. Recline lever 18. Rear slide cover (LH)
19. Seat cushion inner finisher (LH rear) 20. Seat cushion inner finisher (LH
front) 21. Rear hinge cover
22. Side air bag module 23. Headrest holder (locked) 24. Headrest holder (free)
25. Seatback assembly 26. Headrest 27. Seatback board
A. Rear hinge cover clips B. Seatback board clips C. Side air bag module nuts
ALJIA0934ZZ
Revision: November 20132014 Altima NAMRevision: November 20132014 Altima NAM
Page 3792 of 4801
FRONT SEATSE-43
< UNIT DISASSEMBLY AND ASSEMBLY >
C
D E
F
G H
I
K L
M A
B
SE
N
O P
9. From the bottom of the seat.
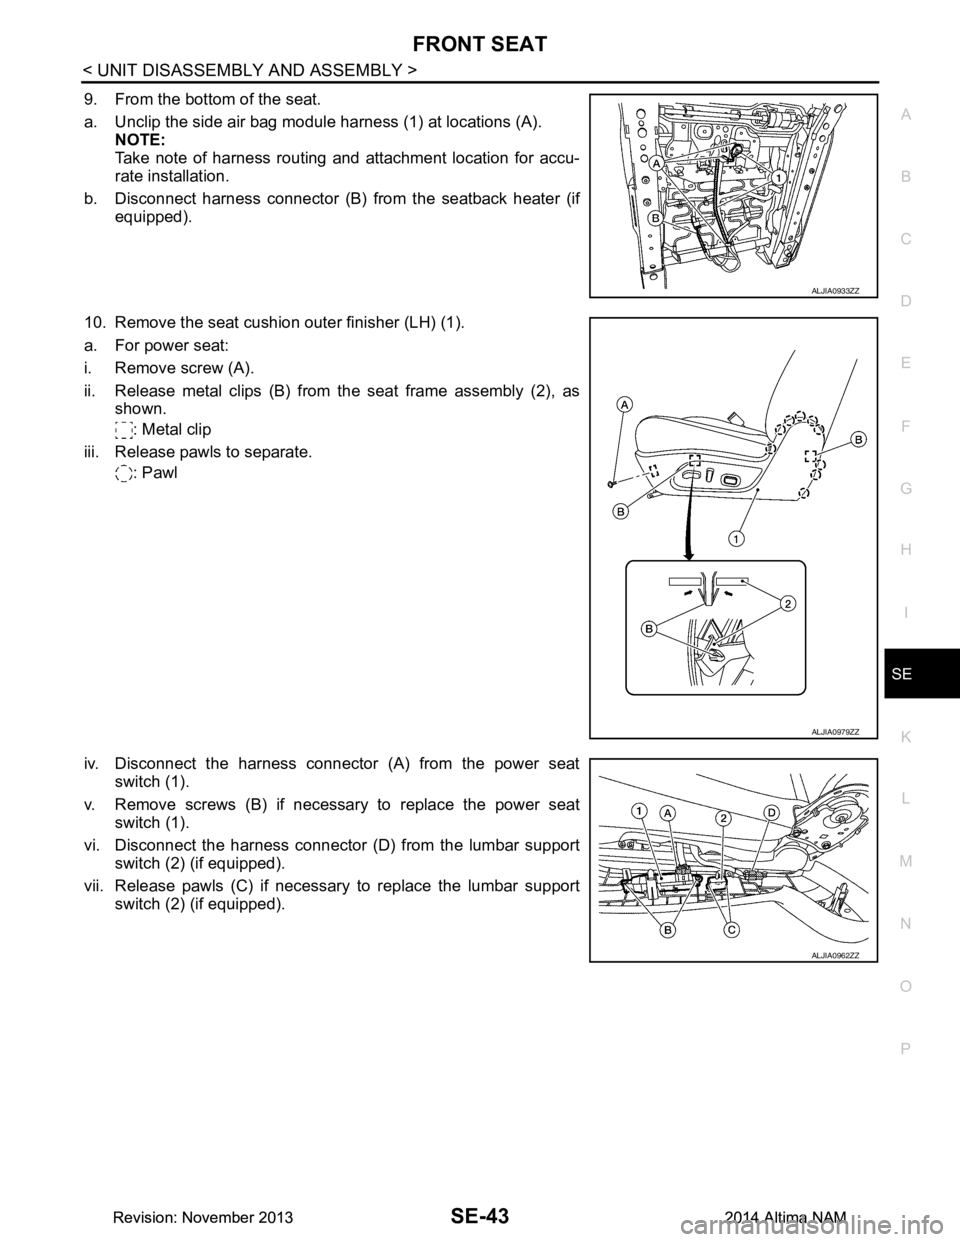
a. Unclip the side air bag module harness (1) at locations (A). NOTE:
Take note of harness routing and attachment location for accu-
rate installation.
b. Disconnect harness connector (B) from the seatback heater (if
equipped).
10. Remove the seat cushion outer finisher (LH) (1).
a. For power seat:
i. Remove screw (A).
ii. Release metal clips (B) from the seat frame assembly (2), as shown.
: Metal clip
iii. Release pawls to separate. : Pawl
iv. Disconnect the harness connector (A) from the power seat switch (1).
v. Remove screws (B) if necessa ry to replace the power seat
switch (1).
vi. Disconnect the harness connector (D) from the lumbar support switch (2) (if equipped).
vii. Release pawls (C) if necessary to replace the lumbar support switch (2) (if equipped).
ALJIA0933ZZ
ALJIA0979ZZ
ALJIA0962ZZ
Revision: November 20132014 Altima NAMRevision: November 20132014 Altima NAM
Page 3797 of 4801
SE-48
< UNIT DISASSEMBLY AND ASSEMBLY >
FRONT SEAT
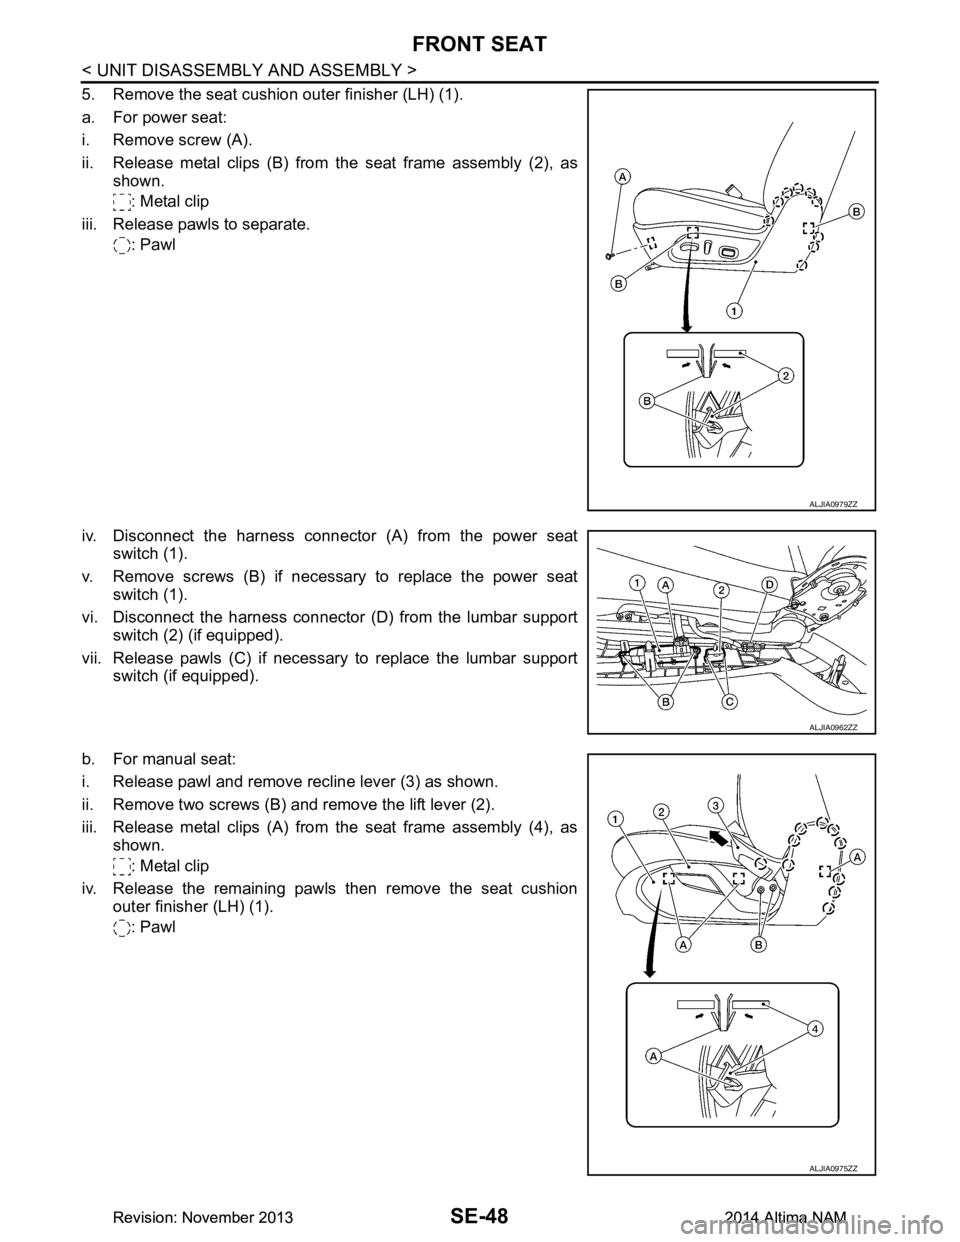
5. Remove the seat cushion outer finisher (LH) (1).
a. For power seat:
i. Remove screw (A).
ii. Release metal clips (B) from the seat frame assembly (2), as shown.
: Metal clip
iii. Release pawls to separate. : Pawl
iv. Disconnect the harness connector (A) from the power seat switch (1).
v. Remove screws (B) if necessary to replace the power seat switch (1).
vi. Disconnect the harness connector (D) from the lumbar support switch (2) (if equipped).
vii. Release pawls (C) if necessary to replace the lumbar support switch (if equipped).
b. For manual seat:
i. Release pawl and remove recline lever (3) as shown.
ii. Remove two screws (B) and remove the lift lever (2).
iii. Release metal clips (A) from the seat frame assembly (4), as shown.
: Metal clip
iv. Release the remaining pawls then remove the seat cushion outer finisher (LH) (1).
: Pawl
ALJIA0979ZZ
ALJIA0962ZZ
ALJIA0975ZZ
Revision: November 20132014 Altima NAMRevision: November 20132014 Altima NAM