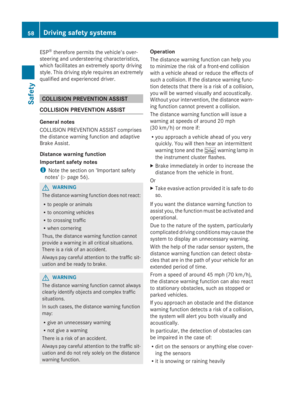
Page 305 of 338

For further information on the load-bearing
index, see "Load index" (Y page 303).
Speed rating: speed rating006Bspecifies the
approved maximum speed of the tire.
Regardless of the speed index always observe
the speed limits. Drive carefully and adapt
your driving style to the traffic conditions.
i Tire data is vehicle-specific and may devi-
ate from the data in the example. Index Speed rating
F up to 50 mph (80 km/h)
G up to 56 mph (90 km/h)
J up to 62 mph (100 km/h)
K up to 68 mph (110 km/h)
L up to 74 mph (120 km/h)
M up to 80 mph (130 km/h)
N up to 87 mph (140 km/h)
P up to 93 mph (150 km/h)
Q up to 100 mph (160 km/h)
R over 106 mph (170 km/h)
i
Not all tires that have the M+S identifica-
tion offer the driving characteristics of win-
ter tires. In addition to the M+S marking,
winter tires also have the 004Dsnowflake
symbol on the tire wall. Tires with this mark-
ing fulfill the requirements of the Rubber
Manufacturers Association (RMA) and the
Rubber Association of Canada (RAC)
regarding the tire traction on snow. They
have been especially developed for driving
on snow.
Further information on the reading of tire
information can be obtained at any qualified
specialist workshop. Load index
In addition to the load-bearing index, load rat-
ing
0043may be imprinted after the letters that
identify speed rating on the sidewall of the tire
(Y page 302).
R If no specification is given: no text (as in the
example above), represents a standard
load (SL) tire
R XL or Extra Load: represents a reinforced
tire
R Light Load: represents a light load tire
R C, D, E: represents a load range that
depends on the maximum load that the tire
can carry at a certain pressure
i Tire data is vehicle-specific and may devi-
ate from the data in the example.
Maximum tire load Maximum tire load
0043is the maximum per-
missible weight for which the tire is approved.
Do not overload the tires by exceeding the
specified load limit. The maximum permissi-
ble load can be found on the vehicle's Tire and What you should know about wheels and tires
303Wheels and tires Z
Page 306 of 338

Loading Information placard on the B-pilla
ron
the driver's side (Y page 298).
i The actual values for tires are specific to
each vehicle and may deviate from the val-
ues in the illustration.
DOT, Tire Identification Number (TIN) U.S. tire regulations stipulate that every tire
manufacturer or retreader must imprint a TIN
in or on the sidewall of each tire produced. The TIN is a unique identification number. The
TIN enables the tire manufacturers or retread-
ers to inform purchasers of recalls and other
safety-relevant matters. It makes it possible
for the purchaser to easily identify the
affected tires.
The TIN is made up of manufacturer identifi-
cation code 0044, tire size 0087, tire type
code 0085and manufacturing date 0083.
DOT (Department of Transportation): tire
symbol 0043indicates that the tire complies
with the requirements of the U.S. Department
of Transportation.
Manufacturer identification code: manu-
facturer identification code 0044provides
details on the tire manufacturer. New tires
have a code with two symbols. Retreaded
tires have a code with four symbols.
Further information about retreaded tires
(Y page 286).
Tire size: identifier0087describes the tire size.
Tire type code: tire type code0085can be
used by the manufacturer as a code to
describe specific characteristics of the tire. Date of manufacture:
date of manufacture
0083 provides information about the age of a
tire. The first and second positions represent
the week of manufacture, starting with "01"
for the first calendar week. Positions three
and four represent the year of manufacture.
For example, a tire that is marked with
"3208", was manufactured in week 32 in
2008.
i Tire data is vehicle-specific and may devi-
ate from the data in the example.
Tire characteristics This information describes the type of tire
cord and the number of layers in side-
wall 0043and under tire tread 0044.
i Tire data is vehicle-specific and may devi-
ate from the data in the example.
Definitions for tires and loading Tire structure and characteristics
Describes the number of layers or the number
of rubber-coated belts in the tire tread and
the tire wall. These consist of steel, nylon,
polyester, and other materials.
Bar
Metric unit for tire pressure.
14.5038 pound
s per square inch (psi) and
100 kilopascals (kPa) are the equivalent of
1 bar. 304
What you should know about wheels and tiresWheels and tires
Page 307 of 338

DOT (Department of Transportation)
DOT marked tires fulfill the requirements of
the United States Department of Transporta-
tion.
Average weight of vehicle occupants
The number of occupants for which the vehi-
cle is designed multiplied by 68 kilograms
(150 lbs).
Uniform Tire Quality Grading Standards
A uniform standard to grade the quality of
tires with regard to tread quality, traction and
temperature characteristics. The quality
grading assessment is made by the manufac-
turer following specifications from the U.S
government. The quality grade of a tire is
imprinted on the sidewall of the tire.
Recommended tire pressure
The recommended tire pressure are the pres-
sures specified for the tires mounted on the
vehicle at the factory.
The Tire and Loading Information placard 7
contains the recommended tire pressure for
cold tires, the maximum permissible load and
the maximum permissible vehicle speed.
The tire pressure table contains the recom-
mended tire pressure for cold tires under var-
ious operating conditions, i.e. loading and/or
speed of the vehicle.
Increased vehicle weight due to optional
equipment
The combined weight of all standard and
optional equipment available for the vehicle,
regardless of whether it is actually installed
on the vehicle or not.
Wheel rim
The part of the wheel on which the tire is
mounted.
GAWR (Gross Axle Weight Rating)
GAWR is the maximum gross axle weight rat-
ing. The actual load on an axle must never
exceed the gross axle weight rating. The Gross Axle Weight Rating can be found on the
vehicle identification plate on the driver seat
frame (Y
page 319).
Speed index
The speed index is part of the tire identifica-
tion. It specifies the speed range for which the
tire is approved.
GTW (Gross Trailer Weight)
GTW is the total of weight of a trailer and the
weight of the load, accessories etc. on the
trailer.
GVW (Gross Vehicle Weight)
The gross vehicle weight includes the weight
of the vehicle including fuel, tools, spare
wheel, accessories installed, occupants, lug-
gage and the drawbar noseweight if applica-
ble. The gross vehicle weight may never
exceed the gross vehicle weight rating
(GVWR) specified on the vehicle identification
plate at the base of the driver's seat
(Y page 319).
GVWR (Gross Vehicle Weight Rating)
The GVWR is the maximum permitted gross
weight of the fully laden vehicle (weight of the
vehicle including all accessories, occupants,
fuel, luggage and the drawbar noseweight if
applicable). The Gross Vehicle Weight Rating
is specified on the vehicle identification plate
on the driver seat frame (Y page 319).
Maximum weight of the laden vehicle
The maximum weight is the sum of:
R the curb weight of the vehicle
R the weight of the accessories
R the load limit
R the weight of the factory installed optional
equipment
Kilopascal (kPa)
Metric unit for tire pressure. 6.9 kPa are the
equivalent of 1 psi. Another tire pressure unit
7 Only for vehicles with a gross weight of less than 10,000 lbs (4,536 kg). What you should know about wheels and ti
res
305Wheels and tires Z
Page 308 of 338

is bar. 100 kilopascals (kPa) are the equiva-
lent of 1 bar.
Load index
In addition to the load bearing index, a load
index can be stamped onto the sidewall of the
tire. It specifies the load-bearing capacity of
the tire more precisely.
Curb weight
The weight of a vehicle with standard equip-
ment including the maximum filling capacity
of fuel, oil, and coolant. It also includes the
air-conditioning system and optional equip-
ment if these are installed on the vehicle, but
does not include passengers or luggage.
Maximum tire load
The maximum tire load in kilograms or
pounds is the maximum weight for which a
tire is approved.
Maximum permissible tire pressure
Maximum permissible tire pressure for one
tire.
Maximum load on one tire
Maximum load on one tire. This is calculated
by dividing the maximum axle load of one axle
by two.
PSI (Pounds per square inch)
Standard unit of measurement for tire pres-
sure.
Aspect ratio
Relationship between tire height and width in
percent.
Tire pressure
Pressure inside the tire applying an outward
force to every square inch of the tire's sur-
face. Tire pressure is specified in pounds per
square inch (psi), in kilopascal (kPa) or in bar.
Tire pressure should only be corrected when
the tires are cold. Cold tire pressure
The tires are cold:
R
if the vehicle has been parked for at least
three hours without direct sunlight on the
tires, and
R if the vehicle has not been driven further
than 1 mile (1.6 km)
Tire tread
The part of the tire that comes into contact
with the road.
Tire bead
The tire bead ensures that the tire sits
securely on the wheel. There are several steel
wires in the bead to prevent the tire from
coming loose from the wheel rim.
Sidewall
The part of the tire between the tread and the
tire bead.
Weight of optional extras
The combined weight of those optional extras
that weigh more than the replaced standard
parts and more than 2.3 kg (5 lbs). These
optional extras, such as high-performance
brakes, level control, a roof rack or a high-
performance battery, are not included in the
curb weight and the weight of the accesso-
ries.
TIN (Tire Identification Number)
A unique identification number which can be
used by a tire manufacturer to identify tires,
for example for a product recall, and thus
identify the purchasers. The TIN is composed
of the manufacturer identification code, tire
size, tire model code and manufacturing date.
Load bearing index
The load bearing index (also load index) is a
code that contains the maximum load bearing
capacity of a tire. 306
What you should know about wheels and tiresWheels and tires
Page 309 of 338

Traction
Traction is the result of friction between the
tires and the road surface.
TWR (permissible trailer drawbar load)
The TWR is the maximum permissible weight
that may act on the ball coupling of the trailer
tow hitch.
Wear indicator
Narrow bars (tread wear bars) that are dis-
tributed over the tire tread. If the tire tread is
level with the bars, the wear limit of 00CDin
(1.6 mm) has been reached.
Distribution of the vehicle occupants
The distribution of vehicle occupants over
designated seat positions in a vehicle.
Maximum permissible payload weight
Nominal load and goods/luggage load plus
68 kg (150 lbs) multiplied by the number of
seats in the vehicle. Flat tire
General notes
Your vehicle is equipped with a spare wheel.
The spare wheel is under the vehicle at the
rear (Y page 313).
Information about fitting a wheel can be found
in the "Wheel change" section (Y page 308).
When you replace a tire, we recommend that
you also replace the tire valve. Please observe
the safety-relevant information on tire valve
(Y page 292). Changing wheels
Rotating the wheels
G
WARNING
Interchanging the front and rear wheels may
severely impair the driving characteristics if
the wheels or tires have different dimensions.
The wheel brakes or suspension components may also be damaged. There is a risk of acci-
dent.
Rotate front and rear wheels only if the wheels
and tires are of the same dimensions.
! On vehicles equipped with a tire pressure
monitor, electronic components are
located in the wheel.
Tire-mounting tools should not be used
near the valve. This could damage the elec-
tronic components.
Only have tires changed at a qualified spe-
cialist workshop.
Always observe the instructions and safety
notes in the "Mounting a wheel" section
(Y page 308).
The wear patterns on the front and rear tires
differ, depending on the operating conditions.
Rotate the wheels before a clear wear pattern
has formed on the tires. Front tires typically
wear more on the shoulders and the rear tires
in the center.
If your vehicle's tire configuration allows, you
can rotate the wheels according to the inter-
vals in the tire manufacturer's warranty book
in your vehicle documents. If no warranty
book is available, the tires should be rotated
every 3,000 to 6,000 miles (5,000 to
10,000 km), or earlier if tire wear requires. Do
not change the direction of rotation.
Clean the contact surfaces of the wheel and
the brake disc thoroughly every time a wheel
is rotated. Check the tire pressure and reac-
tivate the tire pressure monitor if necessary. Changing wheels
307Wheels and tires Z
Page 310 of 338

Diagram showing tire rotation for single and dual
tires
Single tires: if the tires are of identical
dimensions, you can rotate both wheels on
both the front and rear axles so that the tires'
original direction of rotation is maintained. On
unidirectional tires, an arrow on the sidewall
shows the prescribed direction of rotation of
the tire.
Twin rear tires: if the tires are of identical
dimensions, you can rotate the wheels on the
front axle and the inner wheels on the rear
axle in pairs such that the original direction of
tire rotation is retained. With unidirectional
tires, you may rotate the outside wheels at
the rear axle from one side to the other. Direction of rotation
Tires with a specified direction of rotation
have additional benefits, e.g. if there is a risk
of hydroplaning. You will only gain these ben-
efits if the correct direction of rotation is
observed.
An arrow on the sidewall of the tire indicates
its correct direction of rotation.
You may mount a spare wheel against the
direction of rotation. Observe the time
restriction on use as well as the speed limi-
tation specified on the spare wheel. Storing wheels
Store wheels that are not being used in a cool,
dry and preferably dark place. Protect the
tires from contact with oil, grease and fuel. Mounting a wheel
Vehicle preparation X
Stop the vehicle as far away as possible
from traffic and on a level, firm and non-slip
surface.
X If your vehicle poses a risk to approaching
traffic, switch on the hazard warning lamps.
X Apply the parking brake.
X Turn the front wheels to the straight-ahead
position.
X Move the selector lever of the automatic
transmission to position P.
X Switch off the engine.
X Passengers should leave the vehicle. Make
sure that the passengers are not endan-
gered as they do so.
X Make sure that no one is near the danger
area while the wheel is being changed. Any-
one who is not directly assisting in the
wheel change should, for example, stand
behind the barrier.
X Place the warning triangle or warning lamp
at a suitable distance.
Observe legal requirements.
X Secure the vehicle to prevent it from rolling
away.
i Observe the safety notes on parking in the
section on "Driving and parking"
(Y page 151).
X On level terrain: place chocks or other
suitable objects under the front and rear of
the wheel that is diagonally opposite the
wheel to be changed.
X On slight inclines: place chocks or other
suitable objects under the wheels on the
front and rear axles opposite the wheel to
be changed. 308
Changing wheelsWheels and tires
Page 311 of 338

X
Take the vehicle tool kit and the jack from
the footwell on the co-driver's side
(Y page 276).
X Remove the spare wheel from the spare
wheel bracket (Y page 314). Observe the
safety notes in the "Spare wheel" section
(Y page 313).
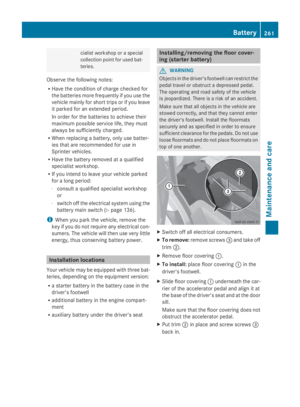
X On wheels with wheel bolts, remove the
hub caps. X
Assemble the lug wrench extension using
the middle rod and the rod with the largest
diameter from the three-piece jack pump
lever.
X Starting with the middle rod, slide the lug
wrench extension as far as it will go onto
the lug wrench.
X Using lug wrench 0043, loosen the wheel
bolts/wheel nuts on the wheel to be
changed by about one full turn. Do not
unscrew the wheel bolts/nuts completely.
Raising the vehicle G
WARNING
If you do not position the jack correctly at the
appropriate jacking point of the vehicle, the
jack could tip over with the vehicle raised.
There is a risk of injury.
Only position the jack at the appropriate jack-
ing point of the vehicle. The base of the jack
must be positioned vertically, directly under
the jacking point of the vehicle. G
WARNING
On uphill and downhill slopes, the jack could
tip over with the vehicle raised. There is a risk
of injury.
Do not change wheels on uphill or downhill
gradients. Notify a qualified specialist work-
shop.
! Only position the jack on the jacking
points intended for this purpose. You could
otherwise damage the vehicle.
Observe the following when raising the vehi-
cle:
R When raising the vehicle, only use the jack
which Mercedes-Benz has specifically
approved for your vehicle.
R The vehicle's jack is intended only to raise
the vehicle for a short time when changing
a wheel. It is not suited for performing
maintenance work under the vehicle.
R Avoid changing the wheel on uphill and
downhill slopes.
R Before raising the vehicle, secure it from
rolling away by applying the parking brake
and inserting wheel chocks. Never disen-
gage the parking brake while the vehicle is
raised.
R The jack must be placed on a firm, flat and
non-slip surface. On a loose surface, a
large, load-bearing underlay must be used.
On a slippery surface, a non-slip underlay
must be used, e.g. rubber mats.
R Make sure that the distance between the
underside of the tires and the ground does
not exceed 1,2 in(3 cm).
R Never place your hands or feet under the
raised vehicle.
R Never lie under the raised vehicle.
R Never start the engine when the vehicle is
raised.
R Never open or close a door when the vehi-
cle is raised.
R Make sure that no persons are present in
the vehicle when the vehicle is raised. Changing wheels
309Wheels and tires Z
Page 312 of 338

!
Only use the jack pump lever middle rod
and the rod with the largest diameter as a
lug wrench extension. Only slide the middle
rod as far as it will go onto the lug wrench.
The rods may otherwise bend and be dis-
torted to such an extent that they can no
longer be used as a pump lever for the jack.
! Do not place the jack on the leaf spring or
the differential case. Hydraulic jack
Preparing the hydraulic jack
X
Insert the third rod of jack pump lever 0043
into the lug wrench extension.
Jack pump lever 0043is assembled.
X Close pressure release screw 0044.
X To do this, use the flattened section on
pump lever 0043to turn pressure release
screw 0044clockwise to the stop.
i Do not turn pressure release screw 0044
more than 1 or 2 full turns. Hydraulic fluid
could otherwise escape.
X Insert pump lever 0043into the recess on the
jack and secure by turning it clockwise.
X Place the jack vertically beneath the jack-
ing points described below. Jacking point, front axle
Jacking point at the front axle
X
Place the jack under the longitudinal mem-
ber in front of the front axle. Jacking point, rear axle (example: vehicle type
2500)
Jacking point, rear axle (example: vehicle type
3500)
Jacking point at the rear axle on vehicle
types 2500 and 3500
X Place the jack under the longitudinal mem-
ber in front of the rear axle. 310
Changing wheelsWheels and tires