Page 145 of 338

Problems with the engine
Problem Possible causes/consequences and
0050
0050Solutions The engine does not
start.
The starter motor can
be heard. There is air in the fuel system.
X
Turn the key back to position 0in the ignition lock before
attempting to start the engine again.
X Start the engine again.
Please bear in mind that lengthy and frequent starting attempts
will drain the battery.
If the engine does not start after several attempts:
X Consult a qualified specialist workshop. The engine does not
start.
The starter motor can
be heard. The reserve
fuel warning lamp is lit
and the fuel gage is at
0. The fuel tank has been run dry.
X
Refuel the vehicle.
If you drive until the fuel tank is completely empty, air may get into
the fuel system. If the engine does not start after refueling, bleed
the fuel system as follows:
X Turn the key to position 2in the ignition for approximately
10 seconds.
X Start the engine continuously for a maximum of 60 seconds.
If the engine does not start:
X Wait approximately 2 minutes.
X Restart the engine continuously for a maximum of 60 seconds.
X If the engine still fails start, do not continue trying to start it.
X Consult a qualified specialist workshop. The vehicle cannot be
driven at a speed
exceeding 5 mph
(8 km/h).
The yellow
00B9engine
diagnostic lamp and
the yellow 00E2DEF
indicator lamp 2
light
up. The exhaust gas aftertreatment is faulty, an emission-relevant
malfunction has occurred or the DEF reserve has been used up.
This malfunction or defect can damage the exhaust gas after-
treatment.
X
Observe the messages in the display:
R
on vehicles without steering-wheel buttons (Y page 202)
R on vehicles with steering-wheel buttons (Y page 213) and
(Y page 213). The engine does not
start.
The starter motor can-
not be heard. The battery isolating switch is switched off.
X
Switch on the power supply (Y page 136).2
Only vehicles without steering-wheel buttons. Driving
143Driving and parking Z
Page 146 of 338

Problem Possible causes/consequences and
0050
0050Solutions The engine does not
start.
The starter motor can-
not be heard. The on-board voltage is too low. The battery is too weak or dis-
charged.
X
Jump-start the vehicle (Y page 278).
If the engine cannot be jump-started, the starter motor is faulty.
X Consult a qualified specialist workshop. The engine does not
start.
The starter motor can-
not be heard. The battery is discharged or faulty.
X
Check the battery for damage.
X Charge the battery (Y page 266).Automatic transmission
Important safety notes
G
WARNING
If the engine speed is above the idling speed
and you engage transmission position Dor
R, the vehicle could pull away suddenly. There
is a risk of an accident.
When engaging transmission position Dor R,
always firmly depress the brake pedal and do
not simultaneously accelerate.
! Vehicles with automatic transmission
may roll only briefly in the neutral position
N. Prolonged rolling of the wheels, e.g.
when being towed, will result in transmis-
sion damage. Selector lever
005D
Park position with parking lock
005E Reverse gear
005C Neutral
005B Drive
The display in the instrument cluster shows
the present selector lever position or the cur-
rent shift range:
R on vehicles with steering wheel buttons
(Y page 189)
R on vehicles without steering wheel buttons
(Y page 184) 144
Automatic transmissionDriving and parking
Page 147 of 338

Selector lever positions
0045
Park position
This prevents the vehicle from roll-
ing away when stopped. Only move
the selector lever to
Pif the vehicle
is stationary.
You can only remove the key when
the selector lever is in this position.
The selector lever is locked in posi-
tion Pif the key is removed.
The parking lock should not be
used as a brake when parking.
Always apply the parking brake as
well once you have parked the vehi-
cle. 0046
Reverse gear
Only move the selector lever to
R
when the vehicle is stationary. 0044
Neutral
No power is transmitted from the
engine to the drive wheels. Releas-
ing the brakes will allow you to
move the vehicle freely, e.g. by
pushing or towing.
Do not move the selector lever to
N
while driving. The automatic
transmission could otherwise be
damaged.
If ASR is deactivated or ESP ®
has
malfunctioned: only move the
selector lever to Nif the vehicle is
in danger of skidding, e.g. on icy
roads. 003A
Drive
The automatic transmission
changes gear itself. All forward
gears are available.
You can influence the gearshifts
and shift gears yourself or limit the
shift range. Changing gear
The 5-speed automatic transmission adapts
to your individual driving style by contin-
uously adjusting its shift points. These shift
point adjustments take into account the cur-
rent operating and driving conditions. If the
operating or driving conditions change, the
automatic transmission reacts by adjusting
the gearshift program.
When the selector lever is in position D, the
automatic transmission selects the individual
gears automatically. This depends on:
R any restriction in the shift range
(Y page 146)
R the position of the accelerator pedal
R the road speed Touchshift
When the selector lever is in position D, you
can perform gearshifts yourself.
X To shift down: press the selector lever to
the left towards D–.
The automatic transmission shifts to the
next gear down, depending on the gear cur-
rently engaged. The shift range is also
restricted.
i The automatic transmission does not shift
down if you press the selector lever
towards D–while traveling at too high a
speed. This protects the engine from over-
revving.
X To shift up: briefly press the selector lever
to the right towards D+.
The automatic transmission shifts to the
next gear up, depending on the current
gearshift program. This also extends the
shift range. Automatic transmission
145Driving and parking Z
Page 148 of 338

X
To derestrict the shift range: press and
hold the selector lever towards D+until D
D
appears in the display again.
The automatic transmission shifts from the
current shift range directly to D.
X To select the optimum shift range: press
and hold the selector lever to the left
towards D–.
The automatic transmission will shift to a
range which allows easy acceleration and
deceleration. To do this, the automatic
transmission will shift down one or more
gears. Shift ranges
When the selector lever is in position Dyou
can restrict or derestrict the shift range for
the automatic transmission.
X To extend/restrict the shift range: press
the selector lever briefly to the right
towards D+or left towards D–.
The display shows the selected shift range.
The automatic transmission shifts only as
far as the relevant gear.
i If the maximum engine speed for the
restricted shift range is reached and you
depress the accelerator pedal, the auto-
matic transmission will not shift up. Driving situations
0038
Use the braking effect of the engine
on steep downhill gradients and for
driving:
R
on steep mountain roads
R in mountainous terrain
R in arduous conditions 0037
Use the braking effect of the engine
on extremely steep downhill gradi-
ents and long downhill stretches. Driving tips
Accelerator pedal position Your style of driving influences how the auto-
matic transmission shifts gear:
R little throttle: early upshifts
R lots of throttle: later upshifts
Kickdown Use kickdown for maximum acceleration:
X
Depress the accelerator pedal beyond the
pressure point.
The automatic transmission shifts to the
next gear down, depending on the engine
speed.
X Ease off on the accelerator pedal once the
desired speed is reached.
The automatic transmission shifts up again.
Maneuvering Maneuvering in a tight space:
X
Control the vehicle's speed by braking
carefully.
X Depress the accelerator pedal slightly and
evenly.
i You can shift back and forth between
drive position Dand reverse gear Rat low
speeds without applying the brakes. This
can help you, for example when rapidly
maneuvering the vehicle or rocking it out of
snow or slush.
Towing a trailer X
Drive at moderate engine speeds on steep
uphill gradients.
X Depending on the uphill or downhill gradi-
ent, shift down to a shift range adapted to
the driving situation (Y page 146), even if
cruise control is activated. 146
Automatic transmissionDriving an
d parking
Page 149 of 338

Problems with the transmission
Problem Possible causes/consequences and
0050
0050Solutions The transmission mal-
functions when shifting
gear. The transmission is losing oil.
X
Have the transmission checked immediately at a qualified spe-
cialist workshop. The acceleration char-
acteristics have deter-
iorated noticeably.
The transmission does
not shift. The transmission is in emergency mode.
It is only possible to shift into second gear or reverse gear
R.
X Stop the vehicle.
X Depress the brake pedal.
X Move the selector lever to position P.
X Switch off the engine.
X Wait at least 10 seconds before restarting the engine.
X Depress the brake pedal.
X Move the selector lever to position Dor R.
In position D, the transmission shifts into second gear; in posi-
tion R, the transmission shifts into reverse gear.
X Have the transmission checked immediately at a qualified spe-
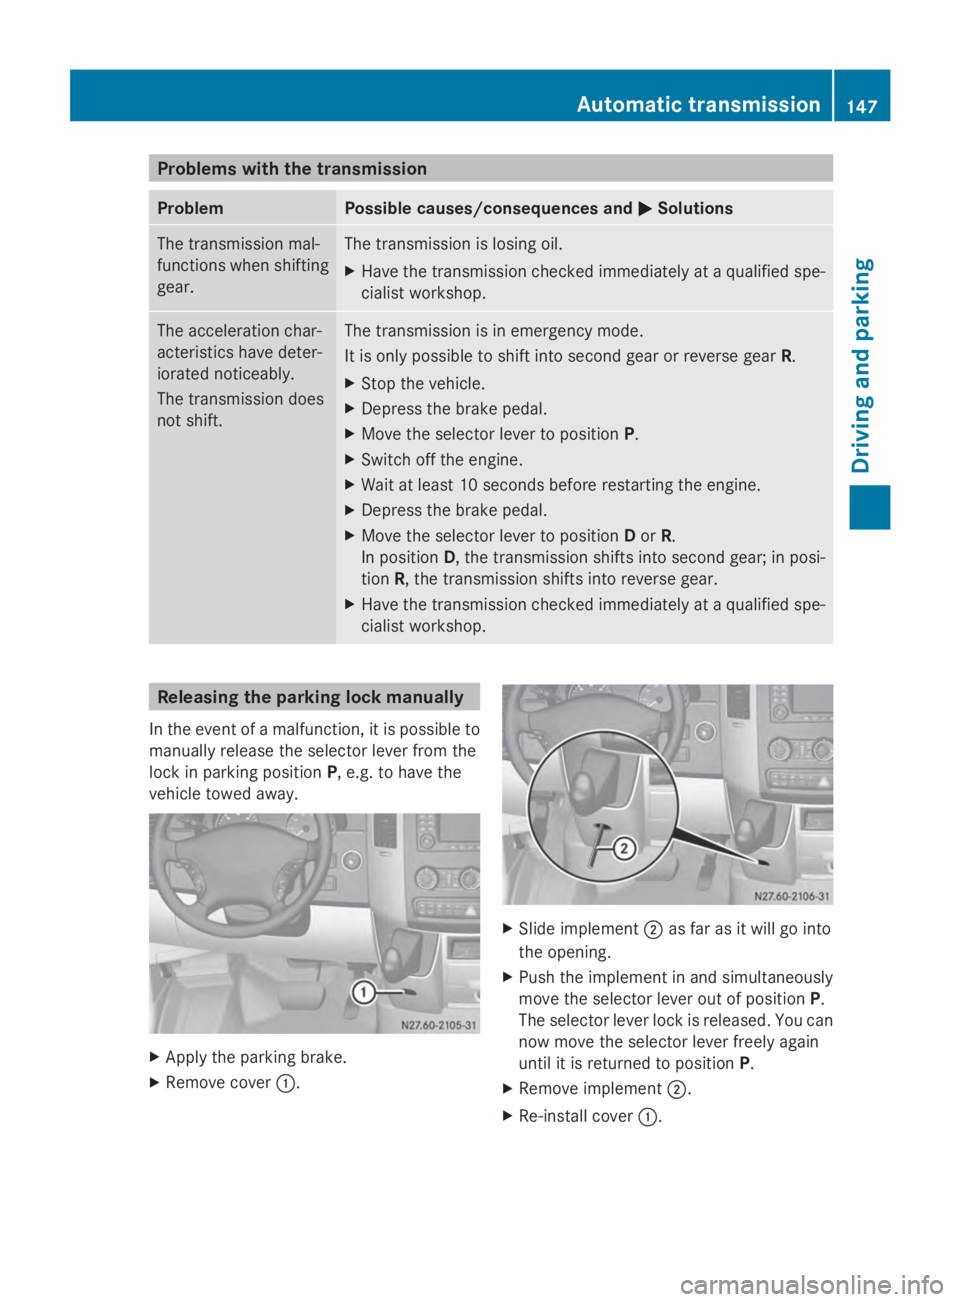
cialist workshop. Releasing the parking lock manually
In the event of a malfunction, it is possible to
manually release the selector lever from the
lock in parking position P, e.g. to have the
vehicle towed away. X
Apply the parking brake.
X Remove cover 0043. X
Slide implement 0044as far as it will go into
the opening.
X Push the implement in and simultaneously
move the selector lever out of position P.
The selector lever lock is released. You can
now move the selector lever freely again
until it is returned to position P.
X Remove implement 0044.
X Re-install cover 0043. Automatic transmission
147Driving and parking Z
Page 150 of 338

i
The screwdriver from the vehicle tool kit
could function as the implement, for
instance (Y page 276). Refueling
Important safety notes
G
WARNING
Fuel is highly flammable. Improper handling
of fuel creates a risk of fire and explosion.
Avoid fire, open flames, smoking and creating
sparks under all circumstances. Switch off the
engine and, if applicable, the auxiliary heating
before refueling. G
WARNING
Fuel is poisonous and hazardous to health.
There is a risk of injury.
You must make sure that fuel does not come
into contact with your skin, eyes or clothing
and that it is not swallowed. Do not inhale fuel
vapors. Keep fuel away from children.
If you or others come into contact with fuel,
observe the following:
R Wash away fuel from skin immediately
using soap and water.
R If fuel comes into contact with your eyes,
immediately rinse them thoroughly with
clean water. Seek medical assistance with-
out delay.
R If fuel is swallowed, seek medical assis-
tance without delay. Do not induce vomit-
ing.
R Immediately change out of clothing which
has come into contact with fuel. G
WARNING
If you mix diesel fuel with gasoline, the flash
point is lower than that of pure diesel fuel.
When the engine is running, exhaust system
components could overheat without being
noticed. There is a risk of fire.
Never refuel with gasoline. Never mix gasoline
with diesel fuel. H
Environmental note
If fuels are handled improperly, they pose a
danger to persons and the environment. Do
not allow fuels to run into the sewage system,
the surface waters, the ground water or into
the ground.
! Do not use gasoline to refuel vehicles with
a diesel engine. Even small amounts of gas-
oline will cause damage to the fuel system
and engine.
! Do not switch on the ignition if you acci-
dentally refuel with the wrong fuel. Other-
wise, the fuel will enter the fuel lines. Notify
a qualified specialist workshop and have
the fuel tank and fuel lines drained com-
pletely.
! Overfilling the fuel tank could damage the
fuel system.
! Take care not to spill any fuel on painted
surfaces. You could otherwise damage the
paintwork.
! Filter the fuel before transferring it to the
vehicle if you are refueling the vehicle from
barrels or containers.
This will prevent malfunctions in the fuel
system due to contaminated fuel.
Further information on fuel and on fuel grades
can be found in the "Technical data" section
(Y page 321). Refueling procedure148
RefuelingDriving and parking
Page 151 of 338

The fuel filler flap is beside the front left-hand
door when viewed in the direction of travel. It
is only possible to open the fuel filler flap
when the front door is open.
X Remove the key from the ignition lock.
X Switch off the auxiliary heating system
(Y page 122).
X Open the front left-hand door first, and then
the fuel filler flap.
X Close all vehicle doors to prevent fuel
vapors from entering the vehicle.
X Turn fuel filler cap 0044counter-clockwise,
remove it and let it hang from strap 0043.
X Completely insert the filler neck of the fuel
pump nozzle into the tank and refuel.
X Only fill the tank until the pump nozzle
switches off. Fuel may otherwise leak out.
X Replace tank filler cap 0044and turn clock-
wise.
You will hear a click when the fuel filler cap
is closed fully.
X Open the front left-hand door first, and then
close the filler flap. Problems with the fuel and fuel tank
If your vehicle is losing fuel, the fuel lines or
the fuel tank are defective.
X Turn the key to position 0in the ignition
lock immediately and remove it.
X Do not restart the engine under any cir-
cumstances.
X Consult a qualified specialist workshop. Diesel Exhaust Fluid (DEF)
Important safety notes H
Environmental note
Dispose of DEF in an environmentally respon-
sible manner.
! Only use DEF in accordance with
ISO 22241. Never mix DEF with additives or thin it with tap water. The exhaust gas
aftertreatment may otherwise be dam-
aged.
Observe the MB Specifications for Service
Products, Sheet 352.0.
Damage that results from the use of addi-
tives or tap water leads to the loss of the
New Vehicle Limited Warranty.
! If DEF comes into contact with a painted
or aluminum surface, wash the surface off
immediately with plenty of water.
! DEF is not a diesel additive and must not
be mixed with fuel in the tank. Even small
amounts of DEF can cause engine damage.
Damage that results from the blending of
DEF will not be covered by the New Vehicle
Limited Warranty.
The exhaust gas aftertreatment requires a
reducing agent, Diesel Exhaust Fluid (DEF), in
order to function correctly.
When opening the DEF tank filler cap at high
outside temperatures, ammonia vapors may
escape.
Ammonia vapors have a pungent smell and
primarily cause irritation of the:
R skin
R mucous membranes
R eyes
You may experience a burning sensation in
your eyes, nose and throat, as well as cough-
ing and watering of the eyes.
Do not inhale ammonia vapors. Avoid contact
with DEF.
Do not allow DEF to come into direct contact
with your skin; it is hazardous to your health.
Rinse any affected areas off with plenty of
clean water. Consult a doctor if necessary.
i If the DEF level has dropped below the
reserve range, add at least 2.0 US gal
(7.6 l) of DEF at the latest after receiving
the second warning message
(Y page 184). Refueling
149Driving and parking Z
Page 152 of 338

i
If you switch off the engine at a low out-
side temperature and add DEF, restart the
engine after refueling. If you leave the vehi-
cle parked without restarting the engine
and the DEF freezes in the DEF tank, the
on-board computer will only be able to reg-
ister the new fill level after a defrosting
period of up to 60 minutes. During this time
the engine may only be operated in neutral.
You will find further information on DEF in the
"Service products" section (Y page 321).
Refueling procedure DEF filler neck in the engine compartment
X
Remove the key from the ignition lock.
X Switch off the auxiliary heating system
(Y page 130).
X Open the hood.
X Close all vehicle doors so that no ammonia
vapors can enter the vehicle.
i Do not inhale any ammonia vapor which
may escape when you unscrew cap 0043.
Ammonia vapors have a pungent odor.
However, they are neither toxic nor hazard-
ous to health in this concentration.
X Turn blue cap 0043counter-clockwise and
remove it.
X Only fill up the DEF tank until the DEF level
is visible in the filler neck.
X Replace blue DEF filler neck cap 0043on the
filler neck and turn clockwise.
You will hear a click when cap 0043is fully
closed. DEF filler neck on the right-hand vehicle
side The DEF reservoir on the right-hand side of the
vehicle (example: Cab Chassis)
Fuel filler cap
X
Remove the key from the ignition lock.
X Switch off the auxiliary heating system
(Y page 130).
X Remove tool 0083for unlocking tank filler
cap 0044from the footwell on the co-driver's
side (Y page 276).
X Close all vehicle doors so that no ammonia
vapors can enter the vehicle.
X Pull cover 0085up, turn 90° and release.
X Insert tool 0083into hole 0087of tank filler
cap 0044.
i Do not inhale any ammonia vapor that
may escape when you unscrew tank filler
cap 0044. Ammonia vapors have a pungent
odor. However, they are neither toxic nor
hazardous to health in this concentration.
X Turn blue filler cap 0044counter-clockwise,
remove it and let it hang from strap 0043.150
RefuelingDriving and parking