Page 265 of 338

Reconnecting the starter battery
!
Always connect the battery in the order
described below. Never swap the terminal
clamps. You may otherwise damage the
vehicle electronics.
X Fold the positive terminal clamp with the
pre-fuse box down to the terminal.
X Connect the positive terminal clamp.
X Attach the cover to the positive terminal.
X Connect the negative terminal clamp.
X Position battery cover 0043so that
screws 0044are positioned over the large
recesses.
X Slide battery cover 0043in the direction of
travel into the smaller recesses.
X Tighten screws 0044.
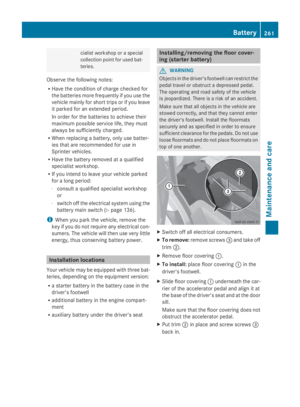
X Install the floor covering in the driver's foot-
well (Y page 261).
Carry out the following work after connecting
the battery:
X Reset the side windows (Y page 79).Removing/installing the starter bat-
tery
Removing the starter battery X
Disconnect the battery ( Ypage 262).
X Pull breather hose with connector
bracket 0044from connection 0043on the
degassing cover. X
Loosen the bolts holding retainer 0087, which
prevents the battery from moving around. X
Pull retainer 0087upwards.
X Slide the battery from its anchorage in the
direction of travel.
X Fold the bar of the battery upwards and
remove the battery from the battery case.
Installing the starter battery X
Insert the battery into the battery case.
X Fold down the bar of the battery.
X Slide the battery into its anchorage in the
opposite direction to the direction of travel.
X Insert retainer 0087.
X Tighten the bolts on retainer 0087which
holds the battery in place.
X Attach breather hose with connector
bracket 0044to connection 0043of the venti-
lation cover.
X Connect the battery (Y page 262). Battery
263Maintenance and care Z
Page 266 of 338

Disconnecting and connecting the
additional battery (engine compart-
ment)
Important safety notes G
WARNING
During the charging process, a battery produ-
ces hydrogen gas. If a short circuit occurs or
sparks are created, the hydrogen gas can
ignite. There is a risk of an explosion.
R Make sure that the positive terminal of a
connected battery does not come into con-
tact with vehicle parts.
R Never place metal objects or tools on a bat-
tery.
R It is important that you observe the descri-
bed order of the battery terminals when
connecting and disconnecting a battery.
R When jump-starting, make sure that the
battery poles with identical polarity are
connected.
R It is particularly important to observe the
described order when connecting and dis-
connecting the jumper cables.
R Never connect or disconnect the battery
terminals while the engine is running.
Disconnecting the additional battery !
Switch off the engine and remove the key
from the ignition lock before you loosen or
disconnect the terminal clamps. You may
otherwise destroy electronic components
such as the alternator.
Always disconnect the starter battery in the
battery case in the driver's footwell first.
! Always disconnect the battery in
the order described below. Never swap the
terminal clamps. You may otherwise dam-
age the vehicle electronics. Additional battery in the engine compartment
X Switch off all electrical consumers.
X Switch off the engine and remove the key
from the ignition lock.
X Open the hood (Y page 250).
X First loosen and remove the negative ter-
minal clamp so that it is no longer in contact
with the terminal.
X Remove the cover from the positive termi-
nal.
X Loosen and remove the positive terminal
clamp.
Connecting the additional battery !
Always connect the battery in the order
described below. Never swap the terminal
clamps. You may otherwise damage the
vehicle electronics.
X Connect the positive terminal clamp.
X Attach the cover to the positive terminal.
X Connect the negative terminal clamp.
X Close the hood.
Carry out the following work after connecting
the battery:
X Reset the side windows ( Ypage 79). 264
BatteryMaintenance and care
Page 267 of 338

Installing and removing the additional
battery (engine compartment)
Removing the additional battery X
Disconnect the battery (Y page 264).
X Loosen the bolts holding the retainer that
prevents the battery from moving around.
X Remove the battery holder and take out the
battery.
Installing the additional battery X
Insert the battery into the battery case.
X Insert the battery holder.
X Tighten the bolts holding the retainer that
prevents the battery in the engine com-
partment from moving around.
X Connect the battery (Y page 264).Disconnecting and connecting the
auxiliary battery (base of the driver's
seat)
Important safety notes G
WARNING
During the charging process, a battery produ-
ces hydrogen gas. If a short circuit occurs or
sparks are created, the hydrogen gas can
ignite. There is a risk of an explosion.
R Make sure that the positive terminal of a
connected battery does not come into con-
tact with vehicle parts.
R Never place metal objects or tools on a bat-
tery.
R It is important that you observe the descri-
bed order of the battery terminals when
connecting and disconnecting a battery.
R When jump-starting, make sure that the
battery poles with identical polarity are
connected. R
It is particularly important to observe the
described order when connecting and dis-
connecting the jumper cables.
R Never connect or disconnect the battery
terminals while the engine is running.
Disconnecting the auxiliary battery !
Switch off the engine and remove the key
from the ignition lock before you loosen or
disconnect the terminal clamps. Other-
wise, you could destroy electronic compo-
nents such as the alternator.
First disconnect the starter battery in the
engine compartment.
! Always disconnect the battery in
the order described below. Never swap the
terminal clamps. You may otherwise dam-
age the vehicle electronics.
The auxiliary battery is located in the driver's
seat base.
X Switch off all electrical consumers.
X Switch off the engine and remove the key
from the ignition lock.
X Fold the driver's seat cushion forward.
X First loosen and remove the negative ter-
minal clamp so that it is no longer in contact
with the terminal.
X Remove the cover from the positive termi-
nal.
X Loosen and remove the positive terminal
clamp.
Reconnecting the auxiliary battery !
Always connect the battery in the order
described below. Never swap the terminal
clamps. You may otherwise damage the
vehicle electronics.
X Connect the positive terminal clamp.
X Attach the cover to the positive terminal.
X Connect the negative terminal clamp.
X Fold the driver's seat cushion back. Battery
265Maintenance and care Z
Page 268 of 338

Installing and removing the auxiliary
battery (base of the driver's seat)
Removing the auxiliary battery X
Disconnect the battery (Y page 265).
X Loosen the bolts holding the retainer that
prevents the battery from moving around in
the base of the driver's seat.
X Remove the battery holder and take out the
battery.
Installing the auxiliary battery X
Insert the battery into the battery case.
X Insert the battery holder.
X Tighten the bolts holding the retainer that
prevents the battery from moving around in
the base of the driver's seat.
X Connect the battery (Y page 265).Charging
G
WARNING
During charging and jump-starting, explosive
gases can escape from the battery. There is a
risk of an explosion.
Particularly avoid fire, open flames, creating
sparks and smoking. Ensure there is sufficient
ventilation while charging and jump-starting.
Do not lean over a battery. G
WARNING
Battery acid is caustic. There is a risk of injury.
Avoid contact with the skin, eyes or clothing.
Do not inhale any battery gases. Do not lean
over the battery. Keep children away from
batteries. Wash battery acid immediately with
water and seek medical attention.
! Only charge the installed battery with a
battery charger that has been tested and
approved by the distributor named on the
inside of the front cover. This device allows
the battery to be charged when it is instal- led in the vehicle. The vehicle's electronics
may otherwise be damaged.
X Recharge the removed battery. Observe
the notes in the operating instructions for
your battery charger.
X Install the battery. Observe the notes on
reconnecting the battery.
i If batteries are not being used, you should
charge them once a month.
It is also possible to charge the starter bat-
tery using the jump-starting connection
point in the engine compartment
(Y page 278). Care
! Dirty battery clamps and battery surfaces
cause leak currents which lead to the bat-
teries discharging.
! Do not use cleaning agents containing
fuel. Cleaning agents containing fuel cor-
rode the battery housing.
! If dirt gets into the battery cell, battery
self-discharge will increase and the battery
may be damaged.
The following points on battery care must be
observed:
X Regularly check the battery terminals and
the fastening of the negative cable to the
chassis to ensure that they are firmly
seated.
X Always keep the battery terminals and bat-
tery surfaces clean and dry.
X Lightly grease the undersides of the battery
terminals with acid-resistant grease.
X Only clean the batteries when the caps are
screwed on.
Otherwise, dirt could get into the battery
cells.
X Unscrew the caps and clean blocked
breathers with a suitable tool such as a
piece of wire. 266
BatteryMaintenance and care
Page 269 of 338

If you do not unscrew the caps for cleaning,
there is a risk of short circuit.
The breathers in the caps and the cell ven-
tilation tubes must be open. Otherwise, gas
cannot escape.
X Only clean the battery casing with a com-
mercially available cleaning product. Care
Notes on care
G
WARNING
If you use openings in the bodywork or
detachable parts as steps, you could:
R slip and/or fall
R damage the vehicle and cause yourself to
fall.
There is a risk of injury.
Always use secure climbing aids, e.g. a suita-
ble ladder.
! For cleaning your vehicle, do not use any
of the following:
R dry, rough or hard cloths
R abrasive cleaning agents
R solvents
R cleaning agents containing solvents
Do not scrub.
Do not touch the surfaces or protective
films with hard objects, e.g. a ring or ice
scraper. You could otherwise scratch or
damage the surfaces and protective film.
! Do not park the vehicle for an extended
period straight after cleaning it, particularly
after having cleaned the wheels with wheel
cleaner. Wheel cleaners could cause
increased corrosion of the brake discs and
brake pads/linings. For this reason, you
should drive for a few minutes after clean-
ing. Braking heats the brake discs and the
brake pads/linings, thus drying them. The
vehicle can then be parked. H
Environmental note
Only clean your vehicle at specially designed
wash bays. Dispose of empty containers and
used cleaning products in an environmentally
responsible manner. H
Environmental note
Dispose of empty packaging and cleaning
cloths in an environmentally responsible man-
ner.
Regular care of your vehicle is a condition for
retaining the quality in the long term.
Use care products and cleaning agents rec-
ommended and approved for Sprinter vehi-
cles. Washing the vehicle and cleaning the
paintwork
Automatic car wash G
WARNING
Braking efficiency is reduced after washing
the vehicle. There is a risk of an accident.
After the vehicle has been washed, brake
carefully while paying attention to the traffic
conditions until full braking power is restored.
! Never clean your vehicle in a Touchless
Automatic Car Wash as these use special
cleaning agents. These cleaning agents can
damage the paintwork or plastic parts.
! Make sure that the automatic car wash is
suitable for the size of the vehicle.
Before washing the vehicle in an automatic
car wash, fold in the exterior mirrors and
remove any additional antennas. Other-
wise, the exterior mirror, antenna or the
vehicle itself could be damaged.
Make sure that the exterior mirrors are fully
folded out again and that any additional
antennas are re-installed when you leave
the automatic car wash. Care
267Maintenance and care Z
Page 270 of 338

!
Make sure that:
R the side windows and the roof are com-
pletely closed
R the climate control blower is switched off
R the windshield wiper switch is at position
0
The vehicle could otherwise be damaged.
You can wash the vehicle in an automatic car
wash from the very start.
Wash off excess dirt before cleaning the vehi-
cle in an automatic car wash.
After putting the vehicle through an auto-
matic car wash, wipe off wax from:
R the rear view camera lens (Y page 271)
R the windshield
R the windshield wiper blades
This will prevent smears and reduce wiping
noises caused by residue on the wind-
shield.
Washing by hand In some countries, washing by hand is only
allowed at specially equipped washing bays.
Observe the legal requirements for each indi-
vidual country.
X Do not use hot water and do not wash the
vehicle in direct sunlight.
X Use a soft car sponge.
X Use a mild cleaning agent, e.g. a car sham-
poo approved for use with Sprinter vehi-
cles.
X Thoroughly hose down the vehicle with a
gentle jet of water.
X Do not point the water jet directly towards
the air inlets.
X Use plenty of water and rinse out the
sponge frequently.
X Rinse the vehicle with clean water and dry
thoroughly with a chamois.
X Do not let the cleaning agents dry on the
paintwork. When using the vehicle in winter, remove all
traces of road salt deposits carefully and as
soon as possible.
High-pressure cleaning equipment G
WARNING
The water jet from a circular jet nozzle (dirt
blasters) can cause invisible exterior damage
to the tires or chassis components. Compo-
nents damaged in this way may fail unexpect-
edly. There is a risk of an accident.
Do not use power washers with circular jet
nozzles to clean the vehicle. Have damaged
tires or chassis components replaced imme-
diately.
! Under no circumstances use power wash-
ers in the vehicle interior. The pressurized
water and associated spray produced by
the power washer could cause extensive
damage to the vehicle.
! Observe the minimum distance to be
maintained between the nozzle of the
power washer and object to be cleaned, as
outlined below:
R approximately 2.2 ft(70 cm) when using
round-jet nozzles
R approximately 1 ft (30 cm) when using
25°flat-spray jets and dirt blasters
Keep the water jet moving while cleaning.
To avoid causing damage, do not point the
water jet directly at:
R door joints
R brake hoses
R electrical components
R electrical connections
R seals
R drive train, especially not at the inter-
mediate bearing of the propeller shaft
R rear view camera (camera lens and
microphone opening on the bottom)
Keep a minimum distance of
1.6 ft(50 cm). 268
CareMaintenance and care
Page 271 of 338

Cleaning the engine
!
Water must not enter intake or ventilation
openings. When cleaning with high pres-
sure water or steam cleaners, the spray
must not be aimed directly at electrical
components or the terminals of electrical
lines.
Preserve the engine after the engine has
been cleaned. Protect the belt drive system
from exposure to the preservative agent.
Also observe the information in the section
"Power washer" (Y page 268).
Cleaning the paintwork !
Do not affix:
R stickers
R films
R magnetic plates or similar items
to painted surfaces. You could otherwise
damage the paintwork.
Scratches, corrosive deposits, areas affected
by corrosion and damage caused by inade-
quate care cannot always be completely
repaired. In such cases, visit a qualified spe-
cialist workshop.
X Remove impurities immediately, where
possible, whilst avoiding rubbing too hard.
X Soak insect remains with insect remover
and rinse off the treated areas afterwards.
X Soak bird droppings with water and rinse
off the treated areas afterwards.
X Remove coolant, brake fluid, tree resin,
oils, fuels and greases by rubbing gently
with a cloth soaked in petroleum ether or
lighter fluid.
X Use tar remover to remove tar stains.
X Use silicone remover to remove wax.
Cleaning the windows G
WARNING
You could become trapped by the windshield
wipers if they start moving while cleaning the windshield or wiper blades. There is a risk of
injury.
Always switch off the windshield wipers and
the ignition before cleaning the windshield or
wiper blades.
! Do not fold the windshield wipers away
from the windshield unless the hood is
closed. Otherwise, you could damage the
hood.
! Hold the wiper arm securely when folding
back. The windshield could be damaged if
the wiper arm smacks against it suddenly.
! Do not use dry cloths, abrasive products,
solvents or cleaning agents containing sol-
vents to clean the inside of the windows.
Do not touch the insides of the windows
with hard objects, e.g. an ice scraper or
ring. There is otherwise a risk of damaging
the windows.
Before cleaning the windshield
X Turn the key to position 0in the ignition
lock or remove it.
X Fold the windshield wiper arms away from
the windshield until you feel them engage.
Before switching the ignition on again, fold
the windshield wipers back into position.
Cleaning the windows
X Clean the inside and outside of the win-
dows with a damp cloth and a cleaning
agent that is recommended and approved
for Sprinter vehicles. Exterior
Cleaning the wheels !
Do not use any acidic or alkaline cleaning
agents. They can cause corrosion on the
wheel bolts (wheel nuts) or the retainer
springs for the wheel-balancing weights.
! Do not park the vehicle for an extended
period straight after cleaning it, particularly
after having cleaned the wheels with wheel Care
269Maintenance and care Z
Page 272 of 338

cleaner. Wheel cleaners could cause
increased corrosion of the brake discs and
brake pads/linings. For this reason, you
should drive for a few minutes after clean-
ing. Braking heats the brake discs and the
brake pads/linings, thus drying them. The
vehicle can then be parked.
If you clean the wheels with a power washer,
observe the safety notes for the power
washer (Y page 268). You could otherwise
damage the tires.
Cleaning the wiper blades G
WARNING
You could become trapped by the windshield
wipers if they start moving while cleaning the
windshield or wiper blades. There is a risk of
injury.
Always switch off the windshield wipers and
the ignition before cleaning the windshield or
wiper blades.
! Do not fold the windshield wipers away
from the windshield unless the hood is
closed. Otherwise, you could damage the
hood.
! Do not pull the wiper blade. Otherwise,
the wiper blade could be damaged.
! Do not clean wiper blades too often and
do not rub them too hard. Otherwise, the
graphite coating could be damaged. This
could cause wiper noise.
! Hold the wiper arm securely when folding
back. The windshield could be damaged if
the wiper arm smacks against it suddenly.
X Turn the key to position 0in the ignition
lock or remove it.
X Fold the windshield wiper arms away from
the windshield until you feel them engage.
X Carefully clean the wiper blades with a
damp cloth.
X Fold back the wiper arms before switching
on the ignition. Cleaning the exterior lighting !
Only use cleaning agents or cleaning
cloths which are suitable for plastic light
lenses. Unsuitable cleaning agents or
cleaning cloths could scratch or damage
the plastic light lenses.
X Clean the plastic covers of the exterior
lighting with a damp sponge and a mild
cleaning agent, e.g. car shampoo for
Sprinter vehicles, or with cleaning cloths.
Cleaning the mirror turn signal !
Only use cleaning agents or cleaning
cloths that are suitable for plastic lenses.
Unsuitable cleaning agents or cleaning
cloths could scratch or damage the plastic
lenses of the mirror turn signals.
X Clean the plastic lenses of the mirror turn
signals in the exterior mirror housing using
a wet sponge and mild cleaning agent, e.g.
car shampoo or cleaning cloths.
Cleaning the sensors !
Do not use dry, coarse or hard cloths and
do not scrub. You will otherwise scratch or
damage the sensors.
If you clean the sensors with a power
washer or steam cleaner, observe the infor-
mation provided by the manufacturer
regarding the distance to be maintained
between the vehicle and the nozzle of the
power washer. PARKTRONIC sensors (example: front bumper, left
side of vehicle)270
CareMaintenance and care