2014 MERCEDES-BENZ B-CLASS SPORTS hood open
[x] Cancel search: hood openPage 13 of 360
HOLD function
Deactivating ................................... 172
Display message ............................ 226
Function/notes ............................. 171
Hood
Closing .......................................... .281
Display message ............................ 235
Important safety notes ..................280
Opening ......................................... 280
Hydroplaning ..................................... 159I
Ignitio nlock
see Key positions
Immobilizer .......................................... 70
Indicator lamps see Warning and indicator lamps
Instrument cluster
Overview .......................................... 31
Settings ......................................... 202
Warning and indicator lamps ...........32
Instrument cluster lighting ..............190
Interior lighting ................................. 109
Automatic control ..........................110
Delayeds witch-off (on-board
computer) ...................................... 204
Emergency lighting ........................110
Manual control ............................... 110
Overview ........................................ 109
Reading lamp ................................. 109
Setting the brightness of the
ambient lighting (on-board
computer) ...................................... 204J
Jack Storage location ............................ 294
Using ............................................. 337
Jump starting (engine) ......................303 K
Kickdown Driving tips .................................... 146
Manual drive program ....................149
Kne ebag.............................................. 45 L
Lamps see Warning and indicator lamps
Lane Keepin gAssist
Activating/deactivating .................201
Display message ............................ 227
Function/informatio n.................... 186
Lane Tracking package .....................184
LATCH-type (ISOFIX) child seat
anchors ................................................ 60
Licens eplate lamp
Changing bulbs .............................. 117
Licens eplate lamp (display
message) ............................................ 221
Light function ,active
Display message ............................ 223
Lighting
Ligh tswitc h................................... 104
Lights
Activating/deactivating the
interio rlighting delayed switch-off .204
Automatic headlamp mode ............105
Cornering light function .................107
Display message ............................ 220
Driving abroad ............................... 104
Fog lamps ...................................... 105
Fog lamps (extended) ....................108
Hazard warning lamps ...................107
High bea mflasher .......................... 107
High-beam headlamps ...................106
Low-beam headlamps ....................105
Parking lamps ................................ 106
Rea rfog lamp ................................ 106
Setting the brightness of the
ambient lighting (on-board
computer) ...................................... 204
Standing lamps .............................. 106
Switching Adaptive Highbeam
Assist on/off ................................. 203
Switching the daytime running
lamps on/off (on-board computer) 203
Switching the daytime running
lamps on/off (switch) ....................105
Switching the exterio rlighting
delayed switch-off on/off (on-
board computer )............................ 204 Index
11
Page 32 of 360
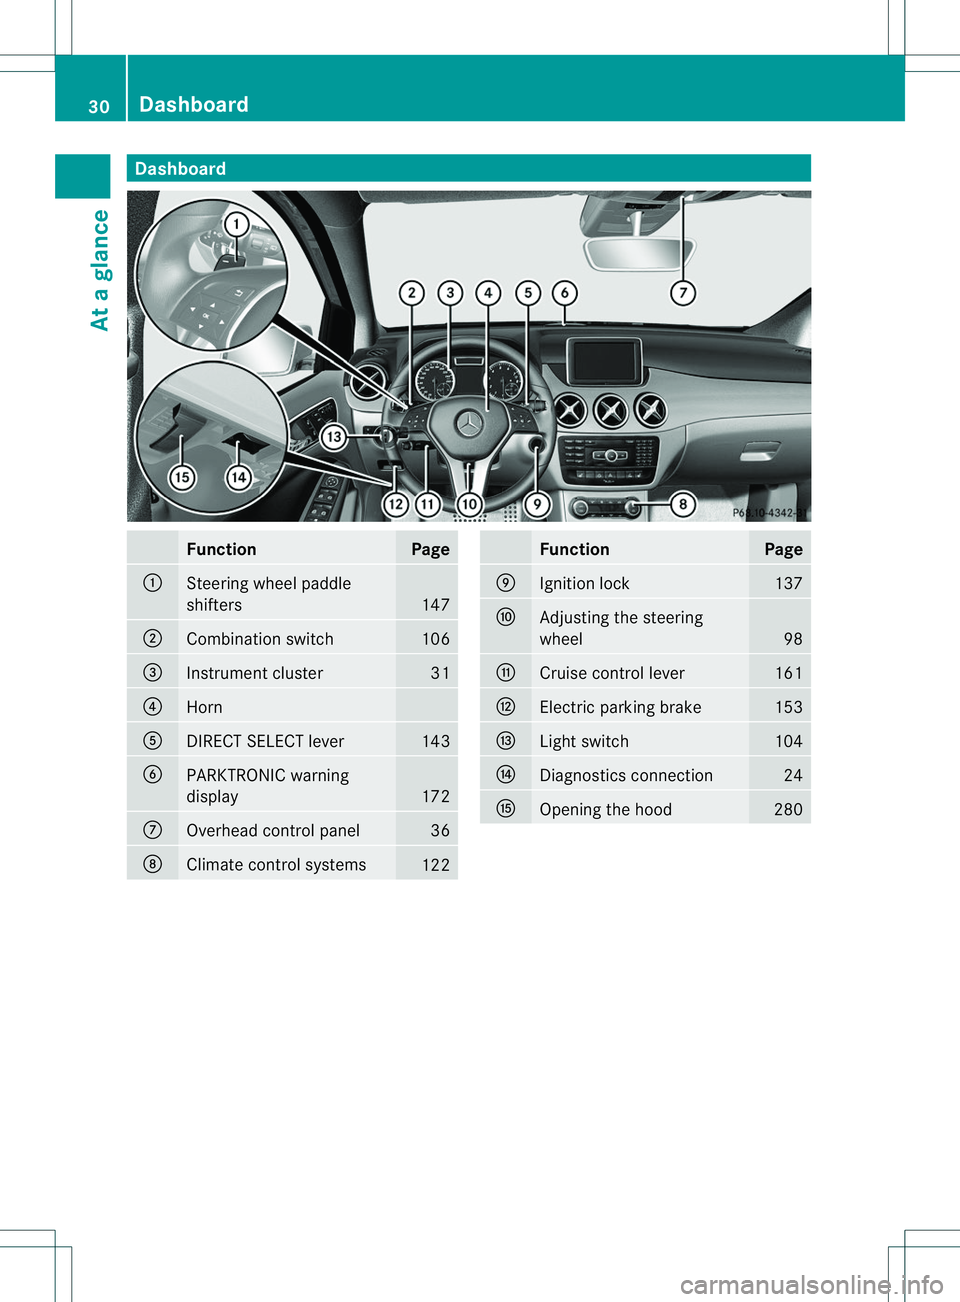
Dashboard
Function Page
001A
Steerin
gwhee lpaddle
shifters 147
0010
Combination switch 106
0023
Instrumen
tcluster 31
0021
Horn
001E
DIREC
TSELEC Tlever 143
0024
PARKTRONIC warning
display
172
0007
Overhead contro
lpanel 36
0008
Climat
econtrol systems 122 Function Page
0009
Ignition lock 137
0016
Adjustin
gthe steering
wheel 98
001D
Cruis
econtrol lever 161
0004
Electric parking brake 153
000B
Light switch 104
001C
Diagnostic
sconnection 24
000E
Opening th
ehood 28030
Dashboa
rdAtag lance
Page 72 of 360
(Y
page 138). For further information ,see
Driving tips (Y page 157). STEER CONTROL
General information STEER CONTROL helps you by transmitting a
noticeable steering forc etothe steering
wheel in the direction required for vehicle
stabilization.
This steering assistance is provided in
particular if:
R both right wheels or both left wheels are on
aw et or slippery road surface when you
brake.
R the vehicle start stoskid.
Importan tsafet ynotes If ESP
®
is malfunctioning, you will not receive
steering support from STEER CONTROL.
Power steering will, however, continue to
function. Thef
tdeterrent locking system Immobilizer
The immobilizer prevents your vehicle from
being started without the correct SmartKey.
X To activate: removethe SmartKey from
the ignition lock.
X To deactivate: switchont he ignition.
When leaving the vehicle, always tak ethe
SmartKey with you and lock the vehicle. The
engin ecan be started by anyone with avalid
SmartKey that is left inside the vehicle.
i The immobilizer is always deactivated
when you start the engine.
In the event that the engin ecannot be
started when the starter battery is fully
charged, the immobilizer may be faulty.
Contact an authorized Mercedes-Benz
Cente rorcall 1-800-FOR-MERCedes (in the
USA) or 1-800-387-0100 (in Canada). ATA (anti-thef
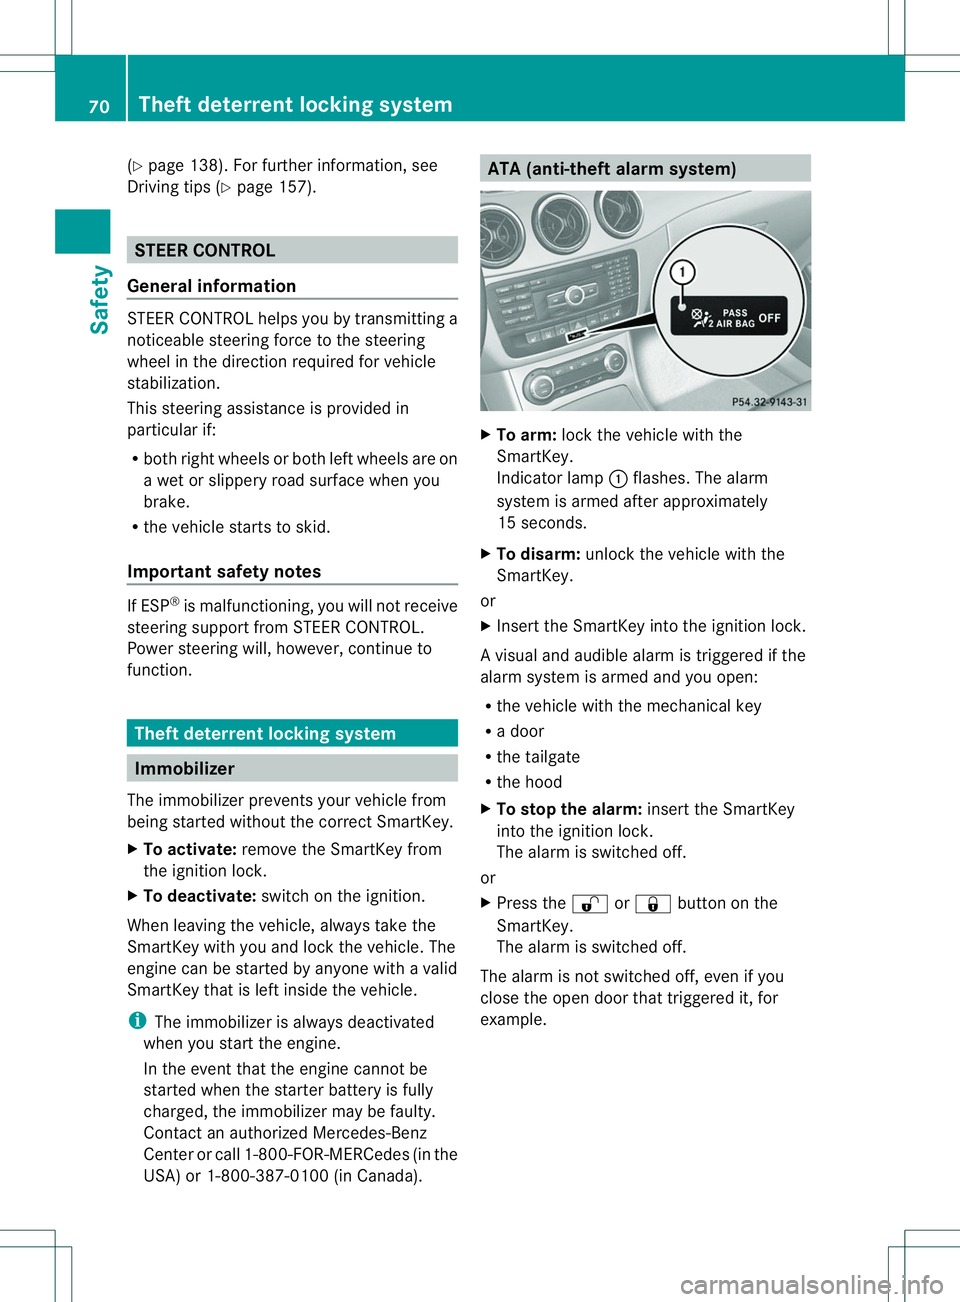
talarm system) X
To arm: lockthe vehicle with the
SmartKey.
Indicator lamp 001Aflashes. The alarm
system is armed after approximately
15 seconds.
X To disarm: unlock the vehicle with the
SmartKey.
or
X Insert the SmartKey into the ignition lock.
Av isual and audible alarm is triggere difthe
alarm system is armed and you open:
R the vehicle with the mechanical key
R ad oor
R the tailgate
R the hood
X To stop th ealarm: insert the SmartKey
int ot he ignition lock.
The alarm is switched off.
or
X Press the 0009or0010 button on the
SmartKey.
The alarm is switched off.
The alarm is not switched off ,even if you
clos ethe open door that triggere dit, for
example. 70
Theft deterrent locking systemSafety
Page 115 of 360
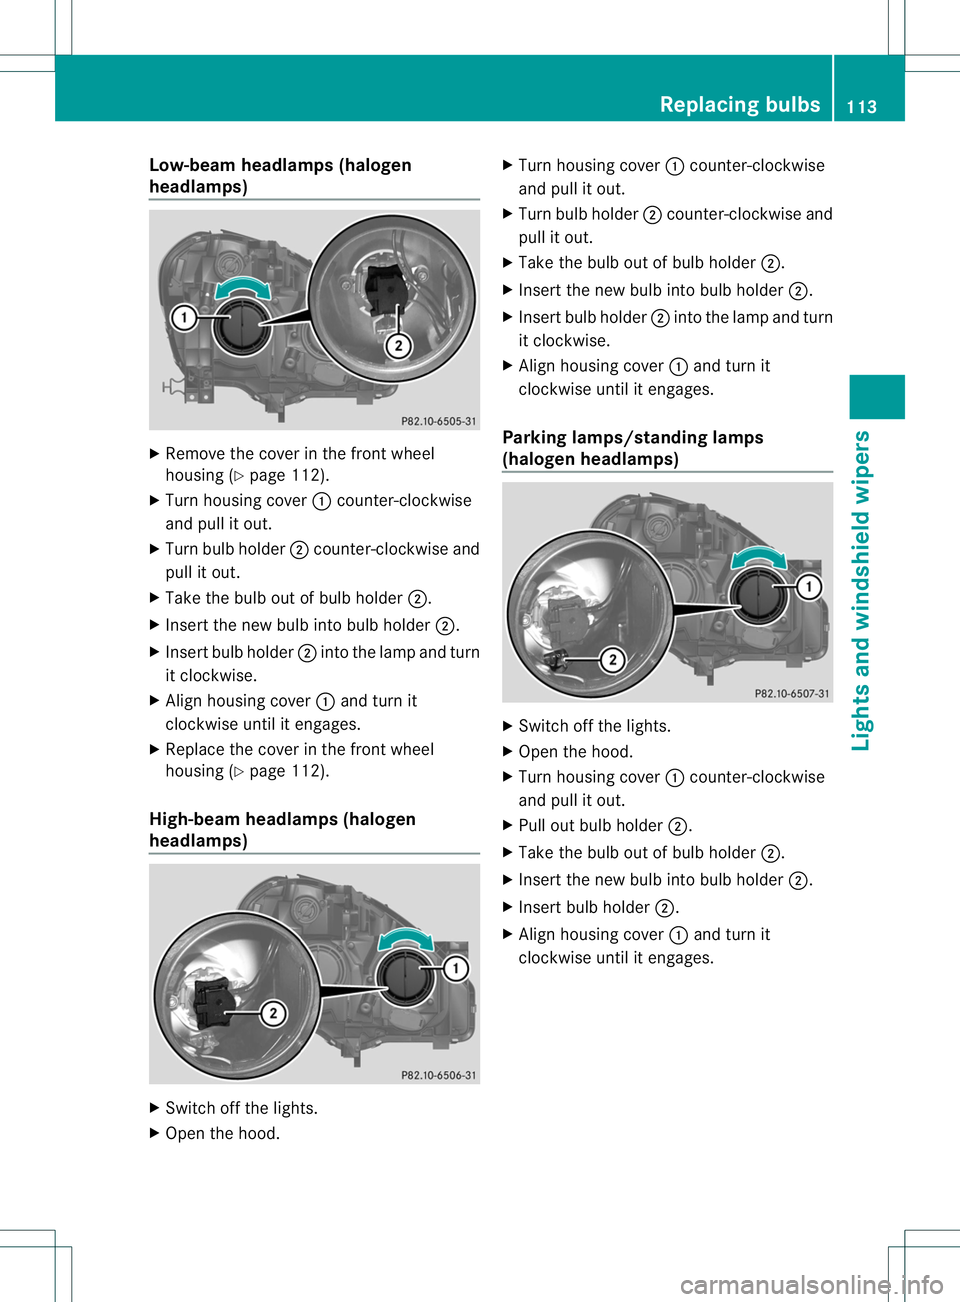
Low-bea
mheadlamps (halogen
headlamps) X
Remov ethe cover in th efront wheel
housin g(Ypage 112).
X Turn housin gcover 001Acounter-clockwise
and pull it out.
X Turn bulb holder 0010counter-clockwise and
pull it out.
X Take th ebulb out of bulb holder 0010.
X Inser tthe new bulb into bulb holder 0010.
X Insert bulb holder 0010into the lamp and turn
it clockwise.
X Align housing cover 001Aand turn it
clockwise until it engages.
X Replace the cover in the front wheel
housing (Y page 112).
High-beam headlamps (halogen
headlamps) X
Switch off the lights.
X Open the hood. X
Turn housing cover 001Acounter-clockwise
and pull it out.
X Turn bulb holder 0010counter-clockwise and
pull it out.
X Take the bulb out of bulb holder 0010.
X Insert the new bulb into bulb holder 0010.
X Insert bulb holder 0010into the lamp and turn
it clockwise.
X Align housing cover 001Aand turn it
clockwise until it engages.
Parking lamps/standing lamps
(halogen headlamps) X
Switch off the lights.
X Open the hood.
X Turn housing cover 001Acounter-clockwise
and pull it out.
X Pull out bulb holder 0010.
X Take the bulb out of bulb holder 0010.
X Insert the new bulb into bulb holder 0010.
X Insert bulb holder 0010.
X Align housing cover 001Aand turn it
clockwise until it engages. Replacing bulbs
113Lights and windshield wipers Z
Page 116 of 360
Turn signals (haloge
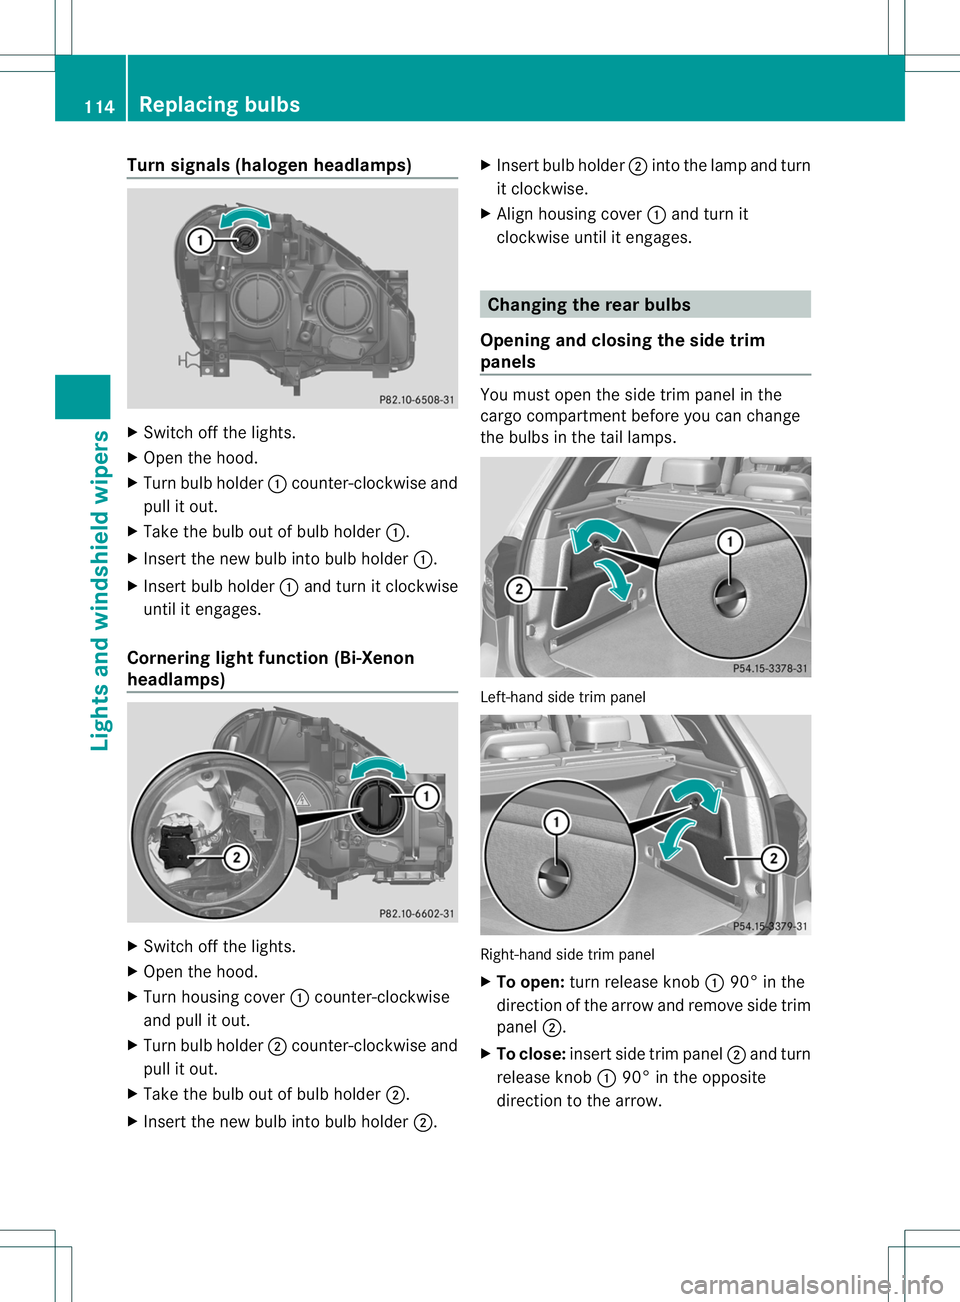
nheadlamps) X
Switch off the lights.
X Open the hood.
X Turn bulb holder 001Acounter-clockwis eand
pull it out.
X Take the bulb ou tofbulb holder 001A.
X Inser tthe new bulb into bulb holder 001A.
X Insert bulb holder 001Aand turn it clockwise
until it engages.
Cornering light function (Bi-Xenon
headlamps) X
Switch off the lights.
X Open the hood.
X Turn housing cover 001Acounter-clockwise
and pull it out.
X Turn bulb holder 0010counter-clockwise and
pull it out.
X Take the bulb out of bulb holder 0010.
X Insert the new bulb into bulb holder 0010.X
Insert bulb holder 0010into the lamp and turn
it clockwise.
X Align housing cover 001Aand turn it
clockwise until it engages. Changing the rear bulbs
Opening and closing the side trim
panels You must open the side trim panel in the
cargo compartmentb
efore you can change
the bulbs in the tail lamps. Left-hand side trim panel
Right-hand side trim panel
X
To open: turn release knob 001A90° in the
direction of the arrow and remove side trim
panel 0010.
X To close: insert side trim panel 0010and turn
release knob 001A90° in the opposite
direction to the arrow. 114
Replacing bulbsLights and windshield wipers
Page 120 of 360
the
0002 position, causing the windshield
wipers to wipe mor efrequently.
If the wipe rblades are worn ,the windshield
will no longer be wiped properly. This could
prevent you fro mobservin gthe traffic
conditions. Replace the wiper blades twic ea
year, ideally in sprin gand fall. Switching th
erearw indow wiper on/
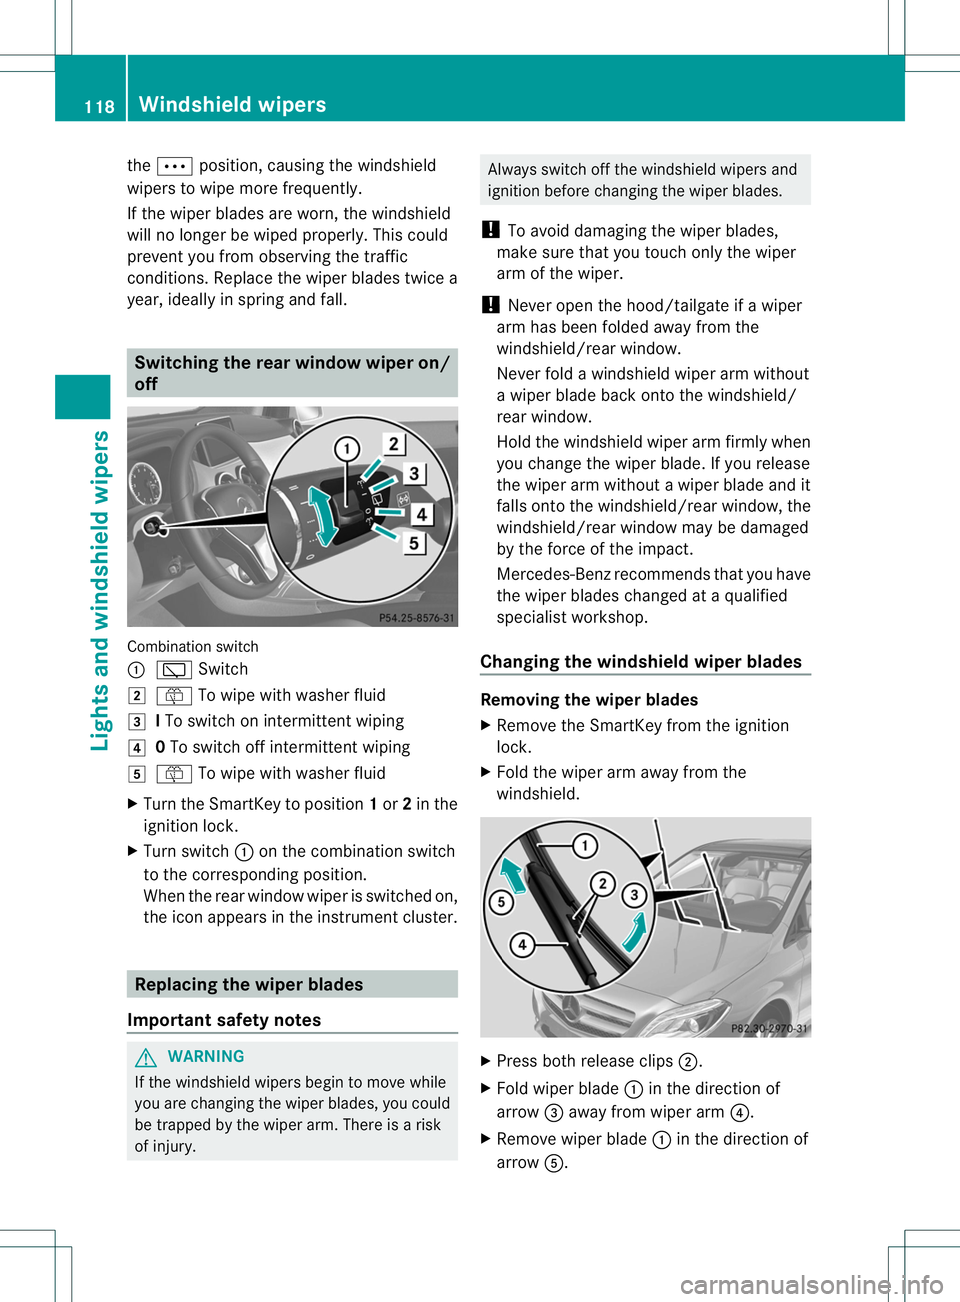
off Combination switch
001A
001B Switch
0001 0018 To wipe with washer fluid
0002 ITo switc honintermitten twiping
001F 0To switc hoff intermitten twiping
0011 0018 To wipe with washer fluid
X Turn the SmartKey to position 1or 2in the
ignition lock.
X Turn switch 001Aon the combination switch
to the correspondin gposition.
When the rear window wiper is switched on,
the icon appears in the instrumen tcluster. Replacing th
ewiper blades
Important safety notes G
WARNING
If the windshield wipers begin to mov ewhile
you are changing the wiper blades, you could
be trapped by the wiper arm. There is arisk
of injury. Always switc
hoff the windshield wipers and
ignition befor echanging the wiper blades.
! To avoid damagin gthe wiper blades,
mak esure that you touc honly the wiper
ar moft he wiper.
! Never open the hood/tailgate if awiper
arm has been folded away from the
windshield/rear window.
Never fold awindshield wiper arm without
aw iper blade back onto the windshield/
rear window.
Hold the windshield wiper arm firmly when
you change the wiper blade. If you release
the wiper arm without awiper blade and it
falls onto the windshield/rear window, the
windshield/rear window may be damaged
by the force of the impact.
Mercedes-Ben zrecommends that you have
the wiper blades changed at aqualified
specialist workshop.
Changing th ewindshield wiper blades Removing th
ewiper blades
X Remove th eSmartKey from th eignition
lock.
X Fold th ewiper arm away from the
windshield. X
Press bot hrelease clips 0010.
X Fold wiper blade 001Ain th edirection of
arrow 0023away from wiper arm 0021.
X Remove wiper blade 001Ain th edirection of
arrow 001E. 118
Windshiel
dwipersLight sand windshield wipers
Page 135 of 360
Activating/deactivating
X
Turn th eSmartKey to position 0in the
ignition loc korremove it (Y page 137).
X To activate: press the0016button.
The indicator lamp in the 0016buttonlights
up.
X To deactivate: press the0016button.
The indicator lamp in the 0016button goes
out.
i Residual heat is deactivated
automatically:
R after approximately 30 minutes
R when the ignition is switched on
R if the battery voltage drops Setting th
eair vents Important safety notes
G
WARNING
Very hot or very cold air can flow fro mthe air
vents. This could result in burns or frostbite in
the immediate vicinity of the air vents. There
is ar isk of injury.
Make sure that all vehicle occupants always
maintain asufficient distance to the air
outlets. If necessary, redirect the airflow to
another area of the vehicle interior.
In order to ensure the direct flow of fresh air
through the air ventsi nto the vehicle interior,
please observe the following notes:
R keep the air inlet between the windshield
and the hood free of blockages, such as ice,
snow or leaves.
R never cover the air ventsora ir intake grilles
in the vehicle interior.
i You can move the adjusters for the air
ventsv ertically or horizontally to set the
direction of the airflow.
i For optimal climate control in the vehicle,
open the air ventsc ompletely and set the
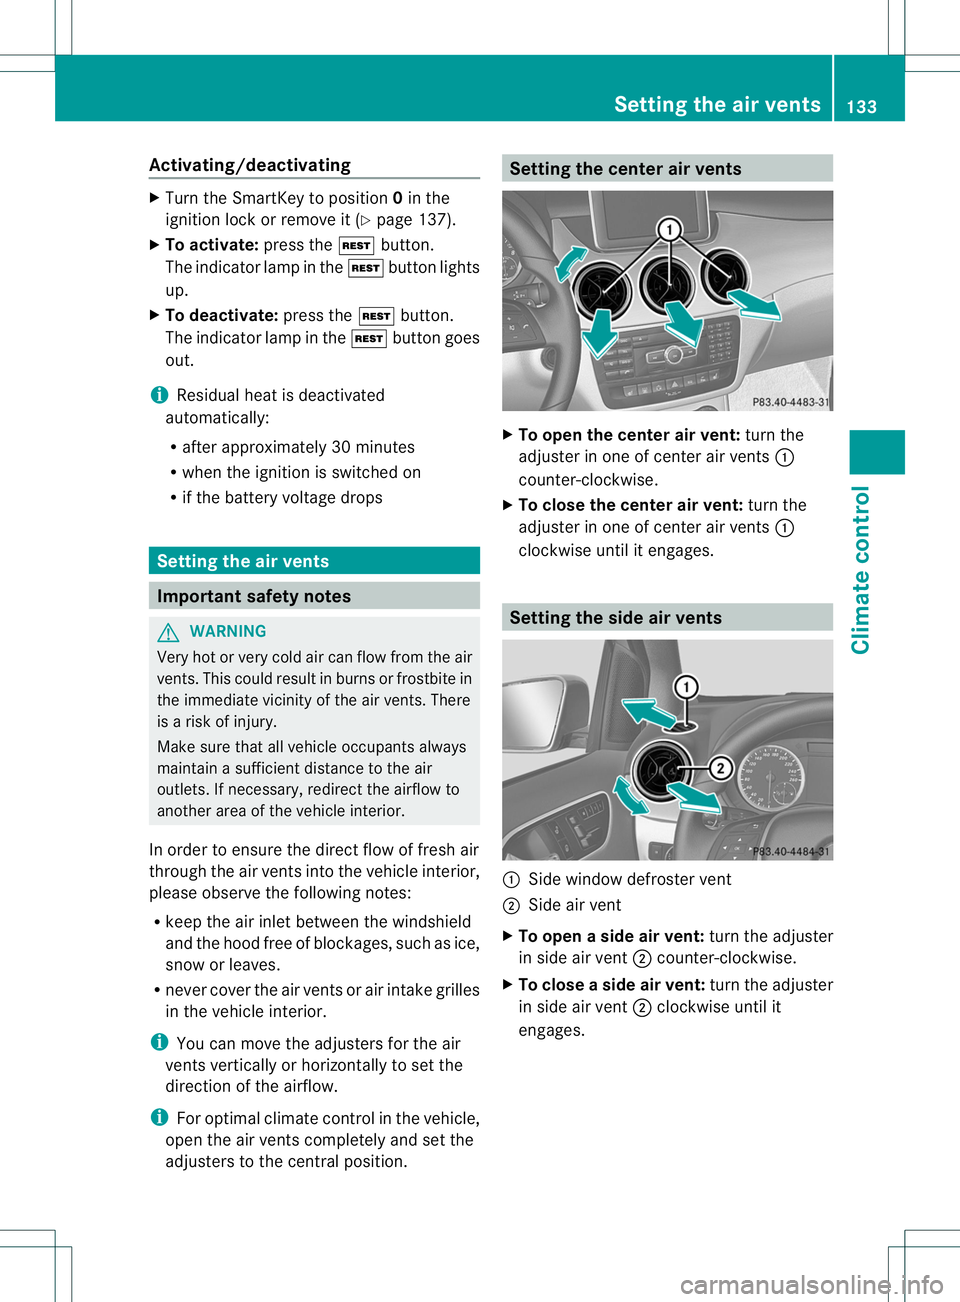
adjusters to the central position. Setting the center air vents
X
To open the center air vent: turn the
adjuster in one of center air vents 001A
counter-clockwise.
X To close the center air vent: turn the
adjuster in one of center air vents 001A
clockwise until it engages. Setting the side air vents
001A
Side window defroster vent
0010 Side air vent
X To open aside air vent: turn the adjuster
in side air vent 0010counter-clockwise.
X To close aside air vent: turn the adjuster
in side air vent 0010clockwise until it
engages. Setting thea
ir vents
133Climatecontrol Z
Page 192 of 360
Useful information
i This Operator's Manual describes all
models and all standard and optional
equipment of your vehicle available at the
time of publication of the Operator's
Manual. Country-specific differences are
possible. Please not ethat your vehicle may
not be equipped with all features
described. This also applies to safety-
related system sand functions.
i Read the information on qualified
specialist workshops: (Y page 25).Important safet
ynotes G
WARNING
If you operate information system sand
communication equipment integrated in the
vehicle while driving, you will be distracted
from traffic conditions. You could also lose
contro lofthe vehicle. There is arisk of an
accident.
Only operate the equipment when the traffic
situatio npermits .Ifyou are not sure that this
is possible, park the vehicle paying attention
to traffic conditions and operate the
equipment when the vehicle is stationary. G
WARNING
If the instrument cluster has failed or
malfunctioned, you may not recognize
function restrictions in systems relevant to
safety. The operating safety of your vehicle
may be impaired. There is arisk of an
accident.
Drive on carefully. Have the vehicle checked
at aq ualified specialist workshop
immediately.
You must observe the legal requirements for
the country in which you are currently driving
when operating the on-board computer.
The on-board computer only shows messages
or warnings from certain systems in the multifunction display
.You should therefore
make sure your vehicle is operating safely at
all times. Otherwise, avehicle that is not
operating safely may cause an accident.
For an overview, see the instrument panel
illustration (Y page 31). Displays and operation
Instrument cluster lighting
The lighting in the instrument cluster, in the
display sand the controls in the vehicle
interior can be adjusted using the brightness
control knob.
The brightness control knob is located on the
bottom left of the instrument cluster
(Y page 31).
X Turn the brightness control knob clockwise
or counter-clockwise.
If the light switch is set to 000C,000For
0005,t he brightness is dependent upon
the brightness of the ambient light.
i The light sensor in the instrument cluster
automatically controls the brightness of
the multifunction display.
In daylight, the display sinthe instrument
cluster are not illuminated. Coolant temperature display
G
WARNING
Opening the hood when the engine is
overheated or when there is afire in the
engine compartment could expose you to hot
gases or other service products. There is a
risk of injury.
Let an overheated engine cool down before
opening the hood. If there is afire in the
engine compartment, keep the hood closed
and contact the fire department.
! Adisplay message is shown if the coolant
temperature is too high. 190
Display
sand operationOn-board computer and displays