2014 MERCEDES-BENZ B-CLASS SPORTS washer fluid
[x] Cancel search: washer fluidPage 17 of 360
Restraint system
see SRS (Supplemental Restraint
System)
Reversin gfeature
Panorama sliding sunroof ................86
Roller sunblinds ............................... 87
Side windows ................................... 83
Roadside Assistanc e(breakdown) ....23
Roller sunblind Opening/closing .............................. 88
Panorama roof with power tilt/
sliding pane l..................................... 87
Roof carrier ........................................ 261
Roof lining and carpets (cleaning
guidelines) ......................................... 291
Roof load (maximum) ........................353
Route (navigation) see Route guidance (navigation)
Route guidance (navigation) ............195 S
Safety Childre ninthe vehicle ..................... 56
Child restraint systems ....................56
Occupant Classification System
(OCS) ............................................... 47
Safety system
see Driving safety systems
Seat
Folding the backres t(rear
compartment) forwards/back
(vehicles withou tthe EASY-
VARIO-PLUS system) .....................254
Folding the backres t(rear
compartment) forwards/back
(vehicles with the EASY-VARIO-
PLUS system) ................................ 255
Seat belts
Adjusting the height ......................... 54
Belt force limiters ............................ 55
center rear-compartment sea t......... 54
Cleaning ......................................... 291
Correct usage .................................. 52
Emergency Tensioning Devices ....... .55
Fastening ......................................... 53
Important safety guidelines .............52
Releasing ......................................... 54Safety guidelines
............................. 42
Warning lamp ................................. 237
Warning lamp (function) ................... 55
Seats
Adjusting (electrically). ....................95
Adjusting (manually). .......................94
Adjusting the 4-way lumbar
support ............................................ 96
Adjusting the hea drestraint ............ 95
Cleaning the cover .........................291
Correct driver's sea tposition ........... 92
Important safety notes ....................93
Seat heating problem ......................98
Storing settings (memory function) 101
Switching sea theating on/off .........97
Sensors (cleaning instructions) .......289
Service menu (on-board computer) .202
Service products Brake fluid ..................................... 350
Coolant (engine) ............................ 351
Engine oil ....................................... 349
Fuel ................................................ 348
Important safety notes ..................347
Refrigerant (air-conditioning
system) .......................................... 352
Washer fluid .................................. .352
Service work
see ASSYST PLUS
Settings
Factory (on-board computer) .........206
On-board computer .......................202
Settin gthe air distribution ...............129
Settin gthe airflow ............................ 129
Side impact air bag .............................46
Side marker lamp (display
message) ............................................ 222
Side windows Cleaning ......................................... 288
Convenience closing feature ............84
Convenience opening feature ..........84
Important safety information ...........83
Opening/closing .............................. 83
Problem (malfunction) .....................85
Resetting ......................................... 85
Sliding sunroof
see Panorama roof with power
tilt/sliding panel Index
15
Page 21 of 360
Loading
.......................................... 323
Locking (in an emergency) ...............81
Locking (SmartKey) .......................... 74
Lowering ........................................ 339
Maintenance .................................... 22
Parking for along period ................ 155
Pulling away ................................... 138
Raising ........................................... 337
Reporting problems .........................25
Securing from rolling away ............337
Towing away .................................. 305
Tow-starting ................................... 305
Transporting .................................. 307
Unlocking (in an emergency) ...........81
Unlocking (SmartKey) ......................74
Vehicle data ................................... 353
Vehicle data ....................................... 353
Vehicle dimensions ...........................353
Vehicle emergency locking ................81
Vehicle identification number see VIN
Vehicle identification plate ..............346
Vehicle tool kit .................................. 294
Video (DVD) ........................................ 197
VIN ...................................................... 346W
Warning and indicator lamps ABS ................................................ 239
Brakes ........................................... 239
Check Engine ................................. 245
Coolant .......................................... 245
Distance warning ........................... 247
DISTRONI CPLUS ........................... 247
ESP ®
.............................................. 241
ESP ®
OFF ....................................... 242
Fuel tank ........................................ 245
Overview .......................................... 32
PASSENGER AIR BAG OFF
indicator lamp .................................. 47
Reserve fuel ................................... 245
Seat bel t........................................ 237
SRS ................................................ 244
Tire pressure monitor ....................248
Warranty ............................................ 346
Washer fluid Display message ............................ 236Whee
lboltt ightening torque ...........339
Whee lchock ...................................... 337
Wheels Changing awheel .......................... 336
Checking ........................................ 313
Cleaning ......................................... 287
Cleaning (warning) .........................336
Emergency spare wheel .................342
Important safety notes ..................312
Interchanging/changing ................336
Mounting anew wheel ................... 339
Mounting awheel .......................... 337
Removing awheel .......................... 339
Storing ........................................... 336
Tightening torqu e........................... 339
Whee lsize/tir esize ....................... 340
Windo wcurtain air bag
Display message ............................ 217
Operation ........................................ .47
Windows
see Side windows
Windshield
Defrosting ...................................... 130
Windshiel dwasher system
Adding washer fluid .......................284
Notes ............................................. 352
Windshiel dwipers
Display message ............................ 236
Problem (malfunction) ...................120
Rea rwindow wiper ........................ 118
Replacing the wiper blades ............118
Switching on/off ........................... 117
Winte rdriving
Slippery roa dsurface s................... 160
Snow chains .................................. 315
Winte roperation
General notes ................................ 314
Winte rtires
M+S tires ....................................... 314
Wiper blades
Cleaning ......................................... 288
Important safety notes ..................118
Replacing (rea rwindow) ................ 119
Replacing (windshield )................... 118
Wooden trim (cleaning instructions) 290
Workshops see Qualified specialist workshop Index
19
Page 119 of 360
X
Position trim 0024and engage it in place by
tapping it with your hand, starting from the
outside.
X Clip in the lower section of handle 001Aagain.
X Inser tand engag ethe uppe rsection of
handle 0023intol ower section 001A.
License plat elamp X
Switc hoff the lights.
X Open the tailgate.
X Position ascrewdriver on lamp lens 001A
from the outside.
X Lever out lamp lens 001Aand remove it.
X Replace the bulb.
X Inser tlamp lens 001Aintot he licens eplate
lamp and pres sitinuntil it engages. Windshield wipers
Switching th
ewindshield wiper son/
off
! Do no toperate the windshield wipers
when the windshield is dry, as this could
damage the wiper blades. Moreover ,dust
that has collected on the windshield can
scratch the glass if wiping takes place when
the windshield is dry.
If it is necessary to switc honthe windshield
wipers in dry weather conditions, always
use washer fluid when operatin gthe
windshield wipers. !
If the windshield wipers leave smears on
the windshield after the vehicle has been
washed in an automatic car wash, wax or
other residues may be the reason for this.
Cleant he windshield using washer fluid
after washing the vehicle in an automatic
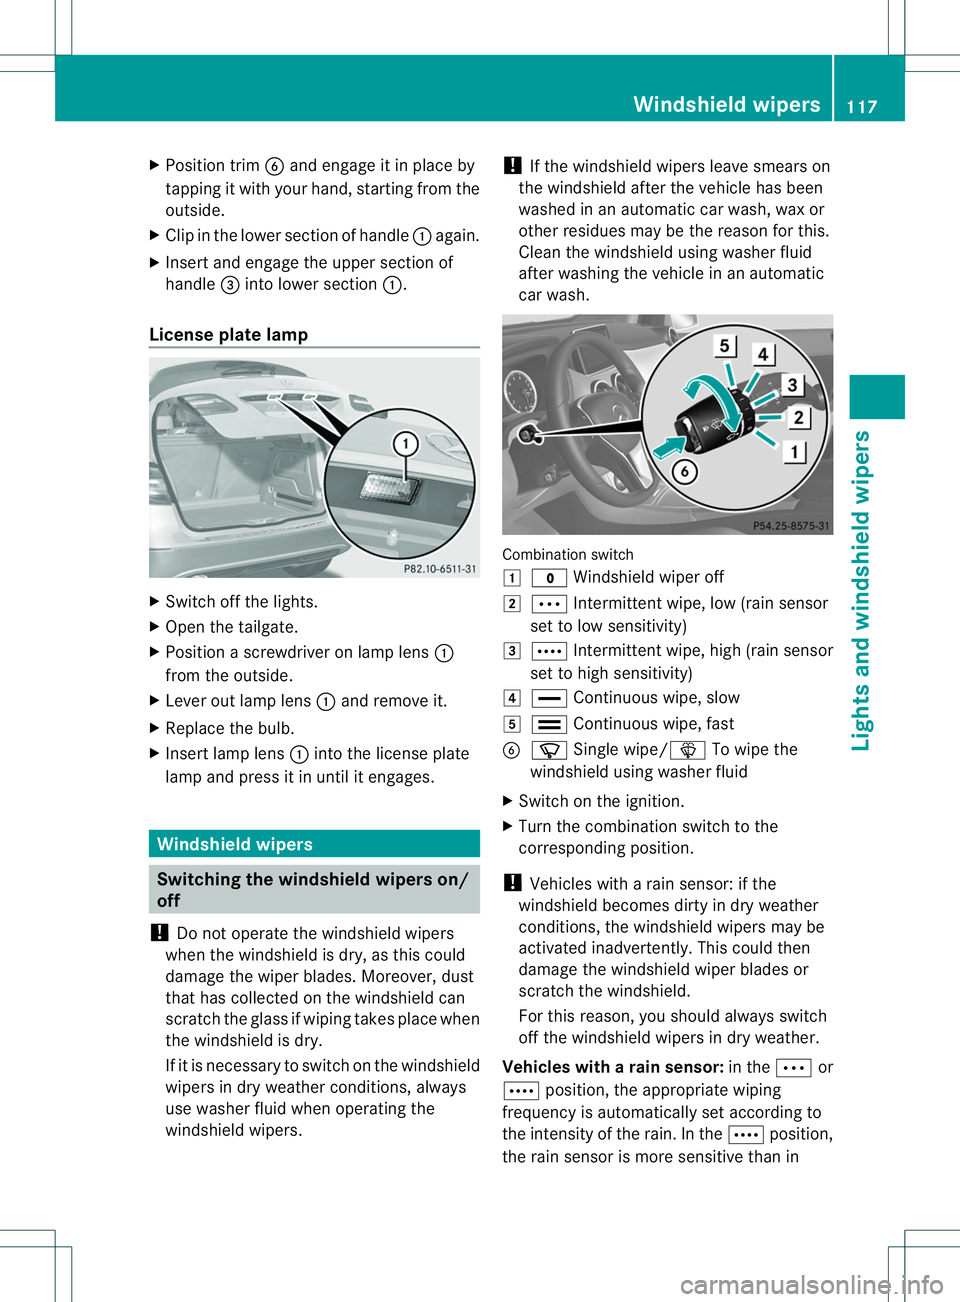
car wash. Combination switch
000C
0003 Windshield wiper off
0001 0002 Intermittent wipe, low (rain sensor
set to low sensitivity)
0002 0001 Intermittent wipe, high (rain sensor
set to high sensitivity)
001F 000B Continuous wipe, slow
0011 0008 Continuous wipe, fast
0024 0002 Single wipe/0003 To wipe the
windshield using washer fluid
X Switch on the ignition.
X Turn the combination switch to the
corresponding position.
! Vehicles with arain sensor: if the
windshield becomes dirty in dry weather
conditions, the windshield wipers may be
activated inadvertently. This could then
damage the windshield wiper blades or
scratcht he windshield.
For this reason, you should always switch
off the windshield wipers in dry weather.
Vehicles with arain sensor: in the0002or
0001 position, the appropriate wiping
frequency is automatically set according to
the intensity of the rain. In the 0001position,
the rai nsensor is more sensitive than in Windshield wipers
117Lights and windshield wipers Z
Page 120 of 360
the
0002 position, causing the windshield
wipers to wipe mor efrequently.
If the wipe rblades are worn ,the windshield
will no longer be wiped properly. This could
prevent you fro mobservin gthe traffic
conditions. Replace the wiper blades twic ea
year, ideally in sprin gand fall. Switching th
erearw indow wiper on/
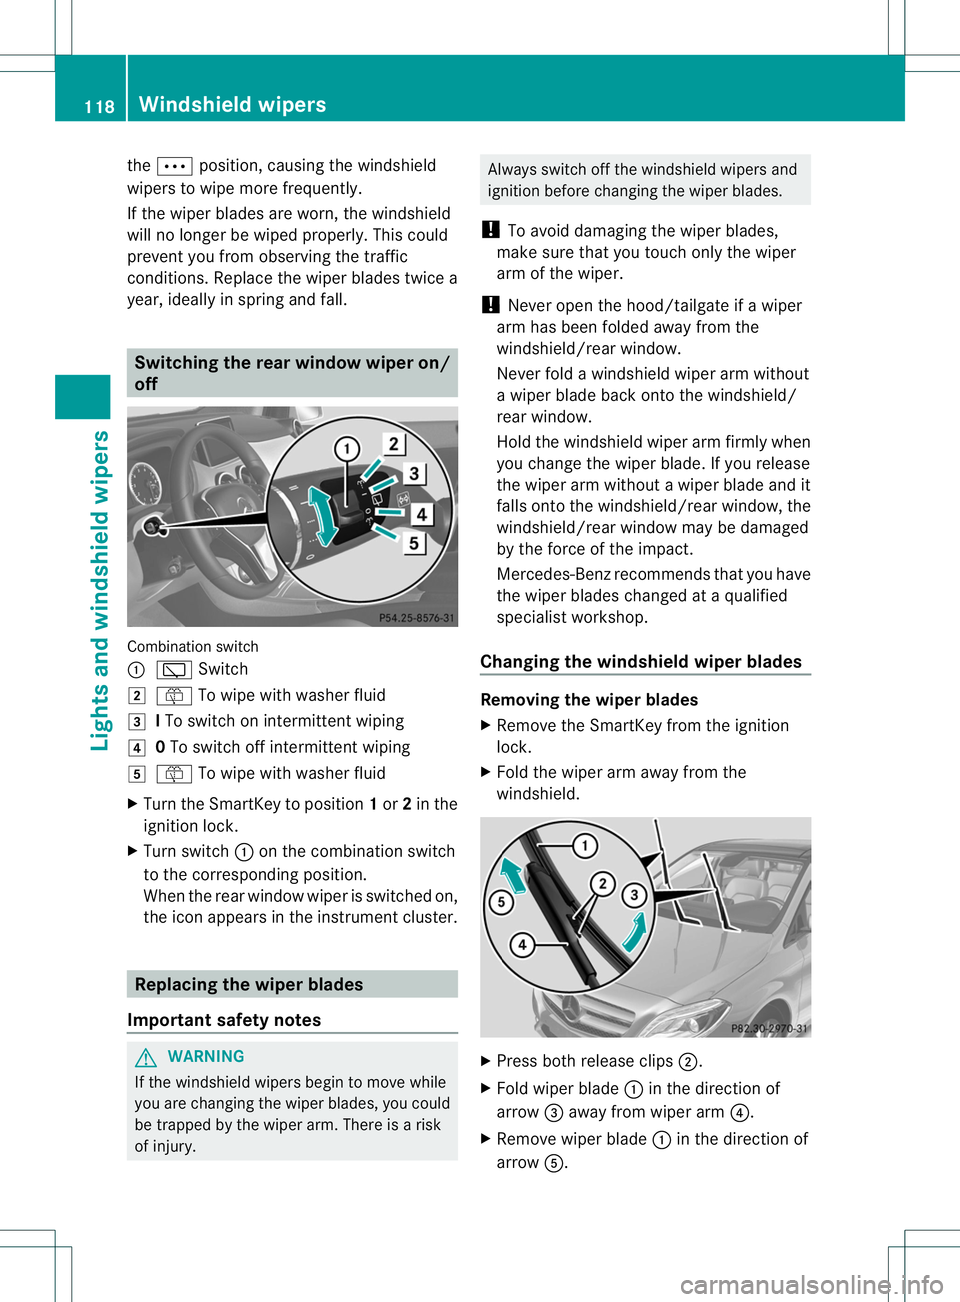
off Combination switch
001A
001B Switch
0001 0018 To wipe with washer fluid
0002 ITo switc honintermitten twiping
001F 0To switc hoff intermitten twiping
0011 0018 To wipe with washer fluid
X Turn the SmartKey to position 1or 2in the
ignition lock.
X Turn switch 001Aon the combination switch
to the correspondin gposition.
When the rear window wiper is switched on,
the icon appears in the instrumen tcluster. Replacing th
ewiper blades
Important safety notes G
WARNING
If the windshield wipers begin to mov ewhile
you are changing the wiper blades, you could
be trapped by the wiper arm. There is arisk
of injury. Always switc
hoff the windshield wipers and
ignition befor echanging the wiper blades.
! To avoid damagin gthe wiper blades,
mak esure that you touc honly the wiper
ar moft he wiper.
! Never open the hood/tailgate if awiper
arm has been folded away from the
windshield/rear window.
Never fold awindshield wiper arm without
aw iper blade back onto the windshield/
rear window.
Hold the windshield wiper arm firmly when
you change the wiper blade. If you release
the wiper arm without awiper blade and it
falls onto the windshield/rear window, the
windshield/rear window may be damaged
by the force of the impact.
Mercedes-Ben zrecommends that you have
the wiper blades changed at aqualified
specialist workshop.
Changing th ewindshield wiper blades Removing th
ewiper blades
X Remove th eSmartKey from th eignition
lock.
X Fold th ewiper arm away from the
windshield. X
Press bot hrelease clips 0010.
X Fold wiper blade 001Ain th edirection of
arrow 0023away from wiper arm 0021.
X Remove wiper blade 001Ain th edirection of
arrow 001E. 118
Windshiel
dwipersLight sand windshield wipers
Page 122 of 360
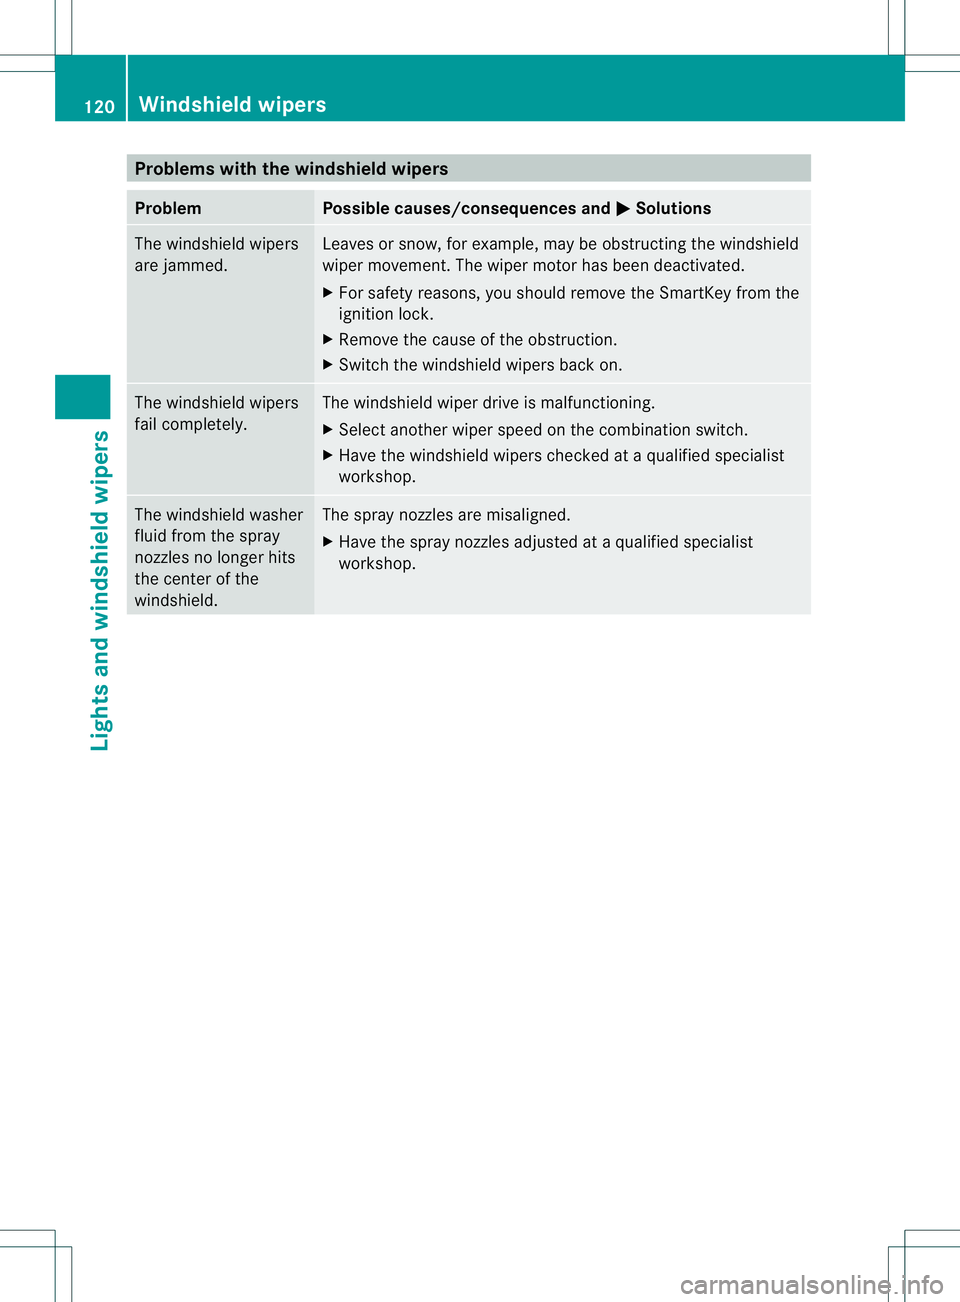
Problems with the windshield wipers
Problem Possible causes/consequences and
000B Solutions
The windshield wipers
are jammed. Leaves or snow, for example, may be obstructing the windshield
wiper movement.T
he wiper motor has been deactivated.
X For safety reasons, you should remove the SmartKey from the
ignition lock.
X Remove the cause of the obstruction.
X Switch the windshield wipers back on. The windshield wipers
fail completely. The windshield wiper drive is malfunctioning.
X
Select another wiper speed on the combination switch.
X Have the windshield wipers checked at aqualified specialist
workshop. The windshield washer
fluid from the spray
nozzles no longer hits
the center of the
windshield. The spray nozzles are misaligned.
X
Have the spray nozzles adjusted at aqualified specialist
workshop. 120
Windshield wipersLights and windshield wipers
Page 238 of 360
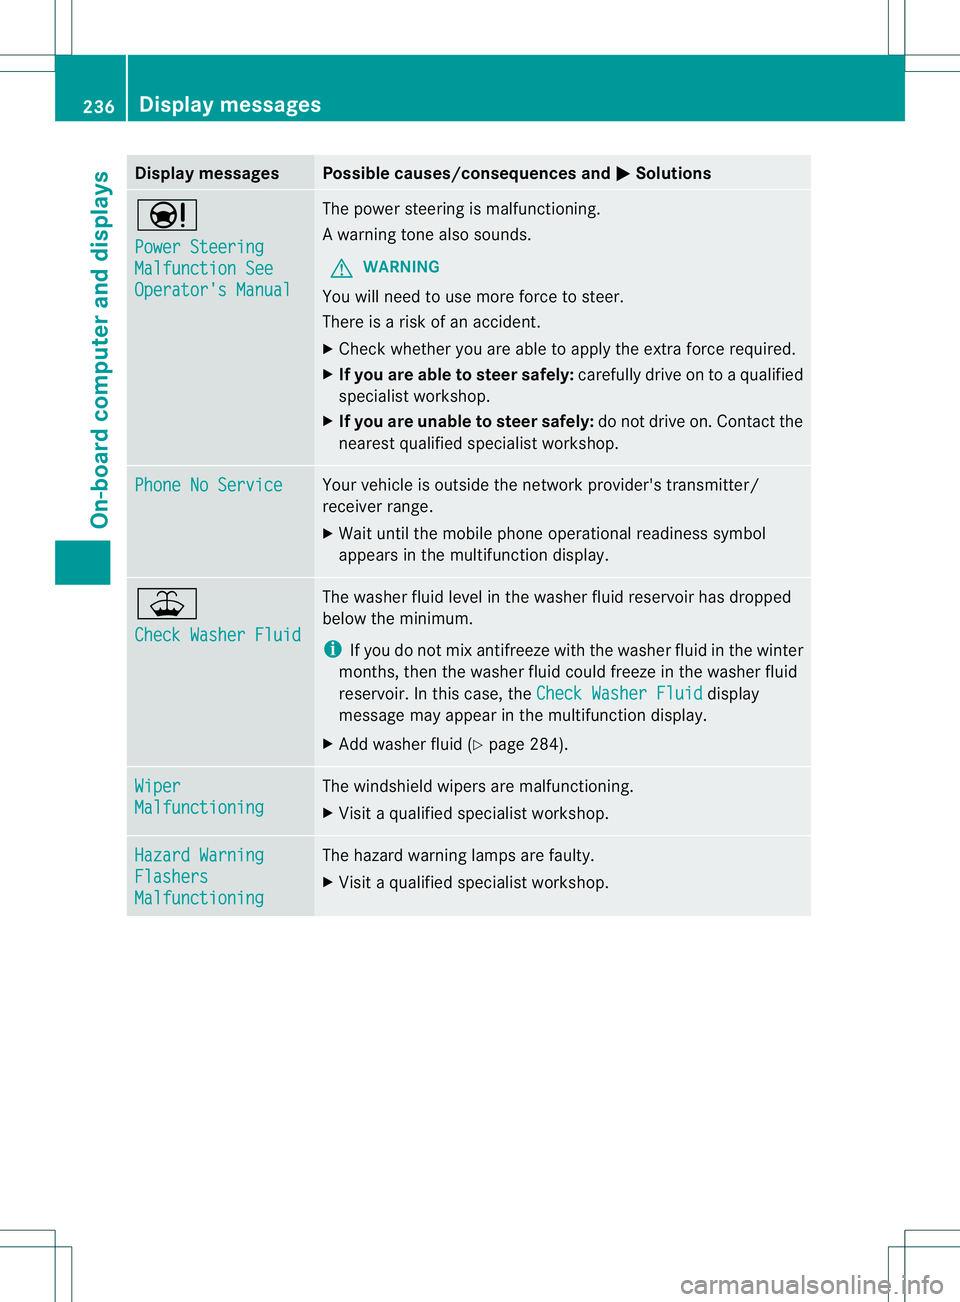
Display messages Possible causes/consequences and
000B Solutions
000F
Power Steering
Malfunction See
Operator'
sManual The powe
rsteering is malfunctioning.
Aw arning tone also sounds.
G WARNING
You will need to use mor eforce to steer.
Ther eisar iskofana ccident.
X Check whethe ryou are able to apply the extraf orce required.
X If you are able to steer safely: carefully drive on toaqualified
specialist workshop.
X If you are unable to steer safely: do not drive on. Contact the
nearest qualified specialist workshop. Phone No Service Your vehicle is outside the network provider's transmitter/
receiver range.
X
Wait until the mobile phone operational readiness symbol
appears in the multifunction display. 001E
Check Washer Fluid The washer fluid level in the washer fluid reservoir has dropped
below the minimum.
i
If you do not mix antifreeze with the washer fluid in the winter
months, then the washer fluid could freeze in the washer fluid
reservoir. In this case, the Check Washer Fluid display
message may appear in the multifunction display.
X Add washer fluid (Y page 284).Wiper
Malfunctioning The windshield wipers are malfunctioning.
X
Visit aqualified specialist workshop. Hazard Warning
Flashers
Malfunctioning The hazard warning lamps are faulty.
X
Visit aqualified specialist workshop. 236
Display messagesOn-board computer and displays
Page 286 of 360
Windshield washe
rsystem G
WARNING
Certain components in the engine
compartment, such as the engine, radiator
and parts of the exhaust system, can become
very hot. Working in the engine compartment
poses arisk of injury.
Where possible, let the engine cool down and
touch only the components described in the
following. G
WARNING
Windshieldw asherconcentrate is highly
flammable. If it comes into contact with hot
engine components or the exhaust system it
could ignite. There is arisk of fire and injury.
Make sure that no windshield washer
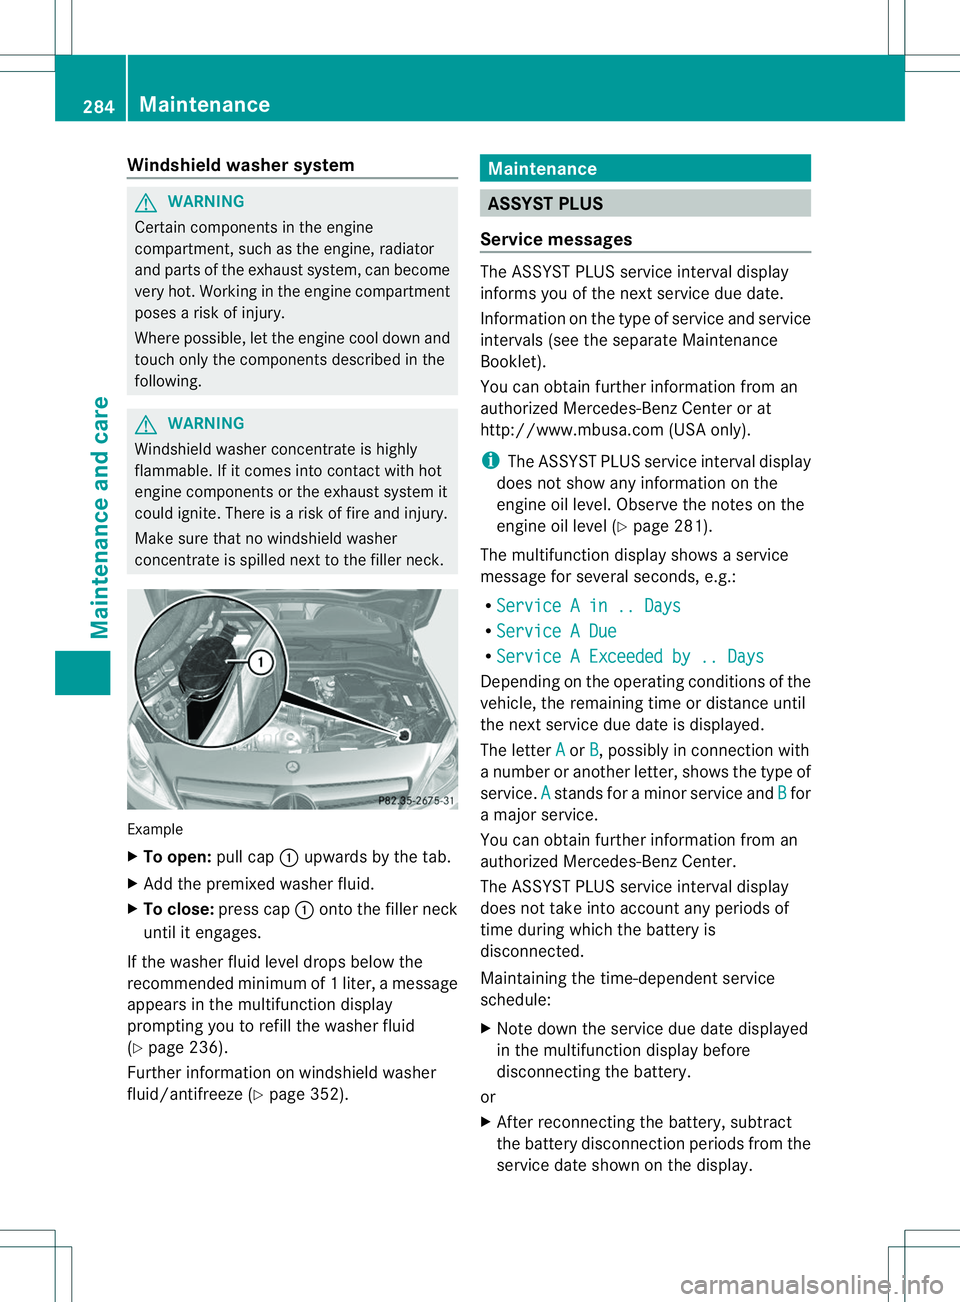
concentrate is spilled next to the filler neck. Example
X
To open: pull cap001Aupwards by the tab.
X Add the premixed washer fluid.
X To close: press cap 001Aontot he filler neck
until it engages.
If the washer fluid level drops below the
recommended minimum of 1liter ,am essage
appears in the multifunction display
promptin gyou to refill the washer fluid
(Y page 236).
Further information on windshield washer
fluid/antifreeze (Y page 352). Maintenance
ASSYST PLUS
Service messages The ASSYS
TPLUS service interval display
inform syou of the nex tservice due date.
Information on the type of servic eand service
intervals (see the separate Maintenance
Booklet).
You can obtain further information from an
authorized Mercedes-BenzC enter or at
http://www.mbusa.com (USA only).
i The ASSYST PLUS servic einterva ldisplay
does not sho wany informatio nonthe
engine oil level. Observe the notes on the
engine oil level (Y page 281).
The multifunction displays howsaservice
message for several seconds, e.g.:
R Service Ain..D ays R
Service ADue R
Service AExceeded by .. Days Depending on the operating conditionsoft
he
vehicle, the remaining time or distance until
the next service due date is displayed.
The letter A or
B ,p
ossibly in connection with
an umber or another letter, shows the type of
service. A stands for
aminor service and B for
am ajor service.
You can obtain further information from an
authorized Mercedes-Ben zCenter.
The ASSYST PLUS servic einterval display
does not take intoa ccountany periods of
time during which the battery is
disconnected.
Maintaining the time-dependent service
schedule:
X Note down the servic eduedate displayed
in the multifunctio ndisplay before
disconnecting the battery.
or
X After reconnecting the battery, subtract
the battery disconnection periods fro mthe
service date shown on the display. 284
MaintenanceMaintenance and care
Page 289 of 360
Powerw
ashers G
WARNING
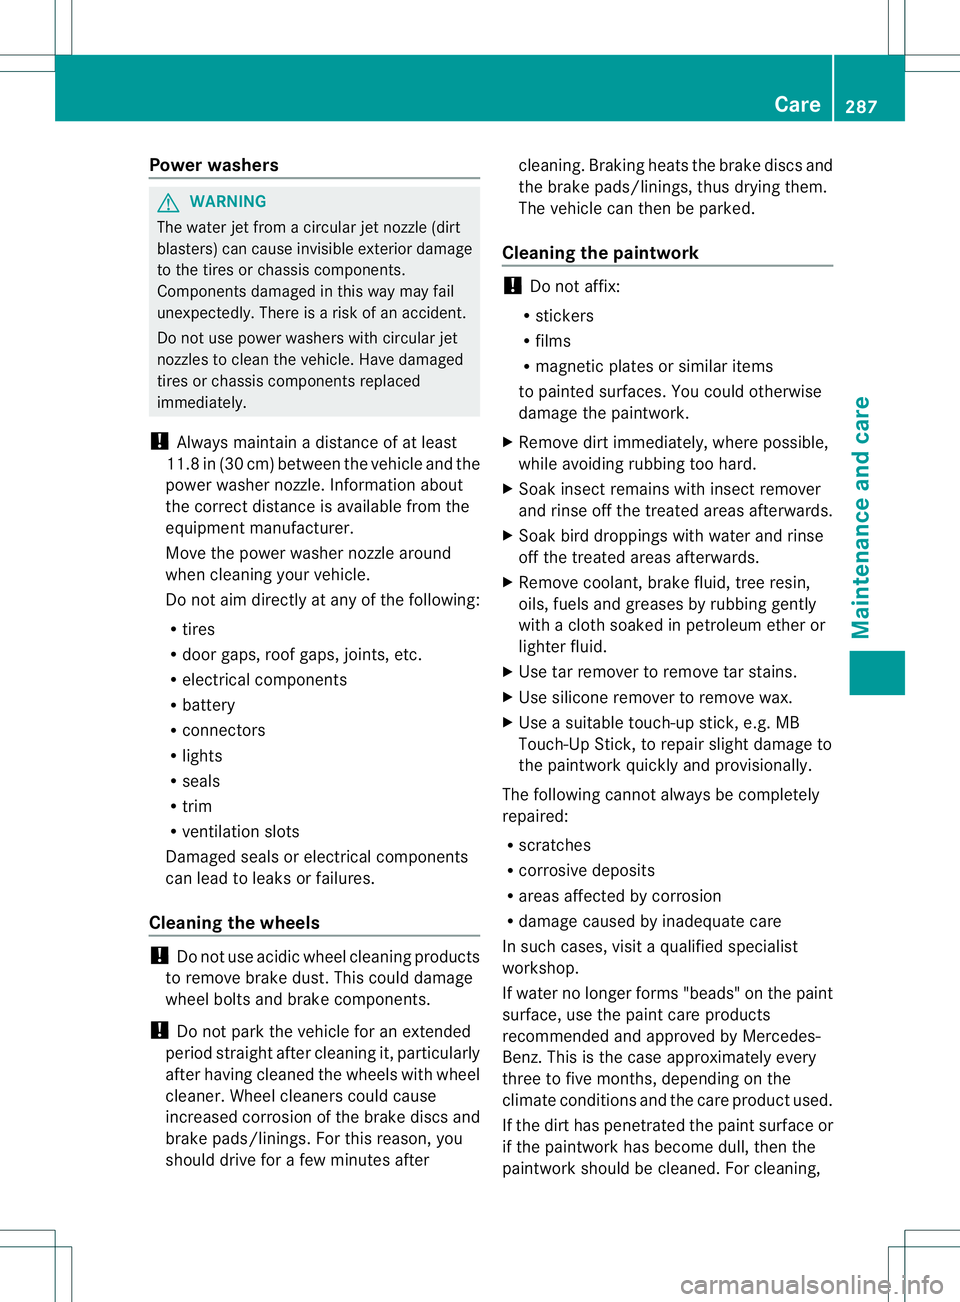
The water jet from acircular jet nozzle (dirt
blasters) can cause invisibl eexterior damage
to the tire sorchassiscomponents.
Components damaged in this wa ymay fail
unexpectedly .There is arisk of an accident.
Do not use power washers with circular jet
nozzles to clean the vehicle. Have damaged
tires or chassis components replaced
immediately.
! Always maintain adistance of at least
11.8 in (30 cm) between the vehicle and the
power washer nozzle. Information about
the correct distance is available from the
equipment manufacturer.
Move the power washer nozzle around
when cleaning your vehicle.
Do not aim directly at any of the following:
R tires
R door gaps, roof gaps, joints, etc.
R electrical components
R battery
R connectors
R lights
R seals
R trim
R ventilation slots
Damaged seals or electrical components
can lead to leaks or failures.
Cleaningt he wheels !
Do not use acidic wheel cleaning products
to remove brake dust. This could damage
wheel bolts and brake components.
! Do not park the vehicle for an extended
period straight after cleaning it, particularly
after having cleaned the wheels with wheel
cleaner. Wheel cleaners could cause
increased corrosion of the brake discs and
brake pads/linings. For this reason, you
should drive for afew minutes after cleaning. Braking heats the brake discs and
the brake pads/linings, thus drying them.
The vehicle can then be parked.
Cleaningt he paintwork !
Do not affix:
R stickers
R films
R magnetic plates or similar items
to painted surfaces. You could otherwise
damage the paintwork.
X Remove dirt immediately,w here possible,
while avoiding rubbing too hard.
X Soak insect remains with insect remover
and rinse off the treated areas afterwards.
X Soak bird droppings with water and rinse
off the treated areas afterwards.
X Remove coolant, brake fluid, tree resin,
oils, fuels and greases by rubbing gently
with acloth soaked in petroleum ether or
lighter fluid.
X Use tar remover to remove tar stains.
X Use silicone remover to remove wax.
X Use asuitable touch-up stick,e .g. MB
Touch-Up Stick, to repair slight damage to
the paintwork quickly and provisionally.
The following cannot always be completely
repaired:
R scratches
R corrosive deposits
R areas affected by corrosion
R damage caused by inadequate care
In such cases, visit aqualified specialist
workshop.
If water no longer forms "beads" on the paint
surface, use the paint care products
recommended and approved by Mercedes-
Benz.T his is the case approximately every
three to five months, depending on the
climate conditionsa nd the care product used.
If the dirt has penetrated the paint surface or
if the paintwork has become dull, then the
paintwork should be cleaned. For cleaning, Care
287Maintenance and care Z