2014 MERCEDES-BENZ B-CLASS SPORTS buttons
[x] Cancel search: buttonsPage 18 of 360
SmartKey
Changing the battery .......................76
Changing the programming .............75
Checking the battery .......................76
Convenience closing feature ............84
Convenience opening feature ..........84
Display message ............................ 237
Door central locking/unlocking .......74
Important safety notes ....................74
Loss ................................................. 78
Mechanical key ................................ 75
Positions (ignition lock) .................137
Problem (malfunction) .....................78
Starting the engine ........................138
SmartKey position s(ignition lock) ..137
Sno wchains ...................................... 315
Sockets Center console .............................. 264
Luggage compartment ...................265
Points to observe before use .........264
Rea rcompartmen t......................... 265
Specialist workshop ............................ 25
Speed, controlling see Cruise control
Speedometer
Activating/deactivating the
additiona lspeedometer .................202
Digita l............................................ 195
In the Instrument cluster .................31
Segments ...................................... 191
Selecting the unit of measurement 202
see Instrument cluster
SRS
see SRS (Supplemental Restraint
System)
SRS (Supplemental Restraint
System)
Display message ............................ 216
Introduction ..................................... 40
Warning lamp ................................. 244
Warning lamp (function) ................... 41
Standin glamps
Changing bulbs .............................. 113
Display message ............................ 222
Switching on/off ........................... 106
Start/stop function
see ECO start/stop function
Starting (engine) ................................ 137 Status overview (on-board
computer)
.......................................... 199
STEE RCONTROL .................................. 70
Steering (display message) ..............236
Steering wheel Adjusting (manually )........................ 98
Button overview ............................... 33
Buttons (on-board computer) ......... 191
Cleaning ......................................... 290
Important safety notes ....................98
Paddle shifters ............................... 147
Steering wheel paddle shifters ........147
Stowage areas ................................... 251
Stowage compartments Armrest (front) ............................... 252
Armrest (under) ............................. 252
Center console .............................. 251
Cuph olders ................................... 261
Eyeglasses compartment ...............251
Glove box ...................................... .251
Important safety information .........251
Parce lnet ...................................... 253
Under driver's seat/front-
passenger sea t.............................. 252
Stowage space
Center console (rear) .....................252
Summer tires ..................................... 314
Sun visor ............................................ 263
Surround lighting (on-board
computer) .......................................... 204
Switchin gair-recirculation mode
on/off ................................................. 132
Switchin goff the alarm (ATA) ............70 T
Tachometer ........................................ 191
Tailgate Display message ............................ 235
Emergency unlocking .......................82
Important safety notes ....................81
Opening/closing (from outside) .......82
Opening dimensions ......................353
Tail lamps
Display message ............................ 221
see Lights
Tank content
Fuel gauge ....................................... 3116
Index
Page 77 of 360
X
To lock centrally: press button001A.
The SmartKe ycentrall yloc ks/unlocks:
R the doors
R the tailgate
R the fuel fille rflap
The tur nsignals flash onc ewhen unlocking
and three times when locking.
i When it is dark, the surround lighting also
comes on if it is activated in the on-board
computer (Y page 204).
i You can also set an audible signal to
confirm that the vehicle has been locked.
The audible signal can be activated and
deactivated using the on-board computer
(Y page 205). Changing the settings of the locking
system
You can change the settings of the locking
system. When you then unlock the vehicle
only the driver's door and the fuel filler flap
are unlocked. This is useful if you frequently
travel on your own.
X To change the setting: press and hold
down the 0009and0010 buttons
simultaneously for approximately six
seconds until the battery check lamp
(Y page 76) flashes twice.
i If the settingoft he locking system is
changed within the signal range of the
vehicle, pressing the 0010or0009 button:
R locks or
R unlocks the vehicle
The SmartKey now functions as follows:
X To unlock the driver's door: press the
0009 button once.
X To unlock centrally: press the0009
button twice.
X To lock centrally: press the0010button.
X To restore the factory settings: press
and hold down the 0009and0010 buttons simultaneously for approximately six
seconds until the battery check lamp
flashes twice (Y
page 76). Mechanical key
General notes If the vehicle can no longer be unlocked with
the SmartKey, use the mechanical key.
If you use the mechanical key to unlock and
open the driver's door, the anti-theft alarm
system will be triggered (Y
page 70).
There are several waystot urn off the alarm:
X Press the 0009or0010 button on the
SmartKey.
or
X Insert the SmartKey into the ignition lock.
If you unlock the vehicle using the mechanical
key, the fuel filler flap will not be unlocked
automatically.
X To unlock the fuel filler flap: insert the
SmartKey into the ignition lock.
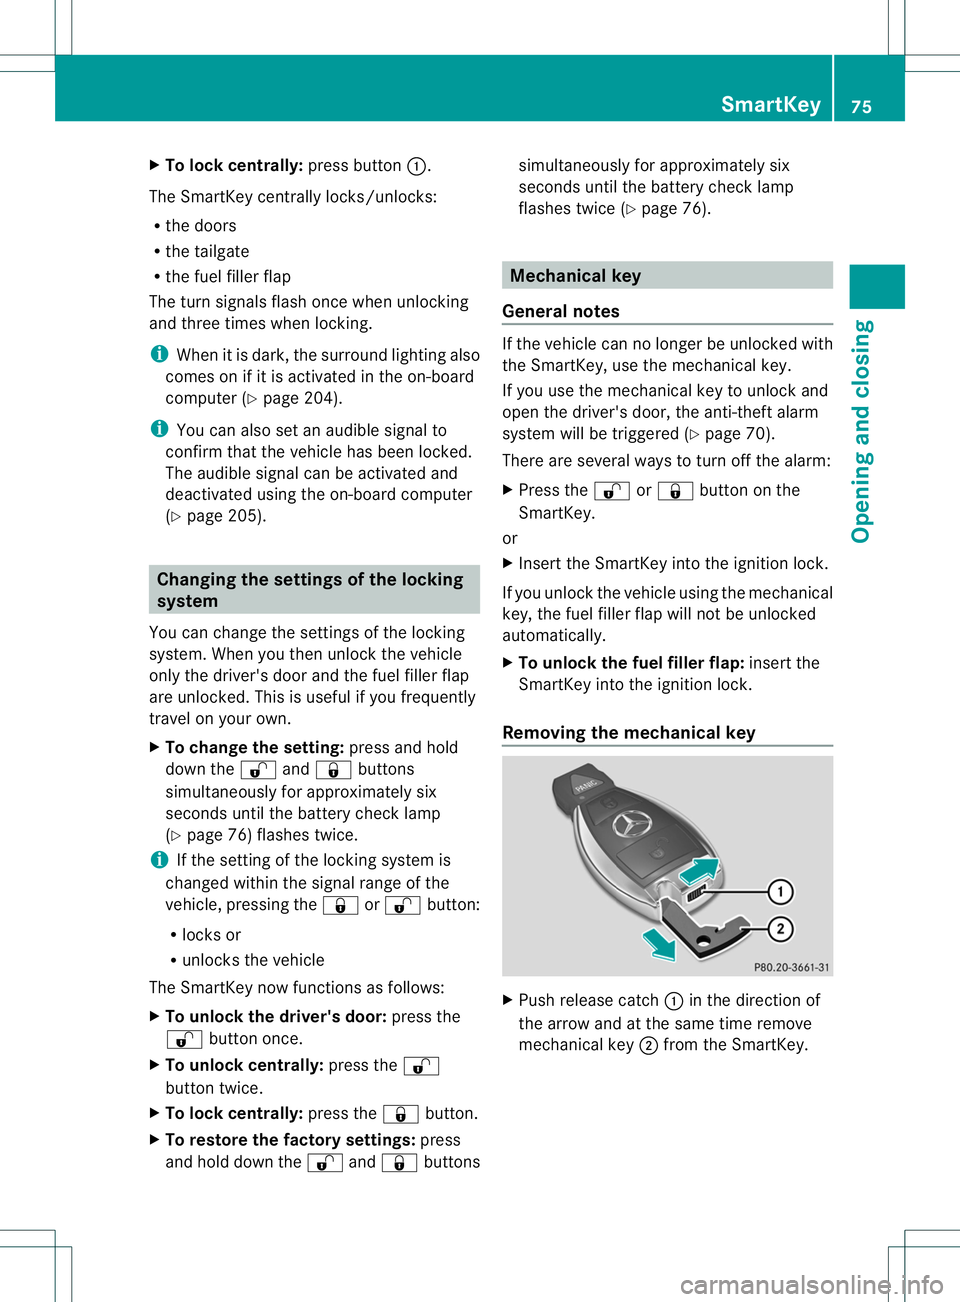
Removing the mechanical key X
Push release catch 001Ain the direction of
the arrow and at the same time remove
mechanical key 0010from the SmartKey. SmartKey
75Opening and closing Z
Page 79 of 360
X
Repeatedly tap th eSmartKey against your
palm until battery 0023fallsout.
X Inser tthe new battery with the positive
terminal facing upwards. Use alint-free
cloth to do so.
X Make sure that the surface of the battery is
free from lint, grease and all other forms of
contamination.
X Insert the front tabs of battery tray
cover 001Aand then press to close it.
X Insert the mechanical key into the
SmartKey.
X Check the function of all SmartKey buttons
on the vehicle. SmartKey
77Opening and closing Z
Page 127 of 360
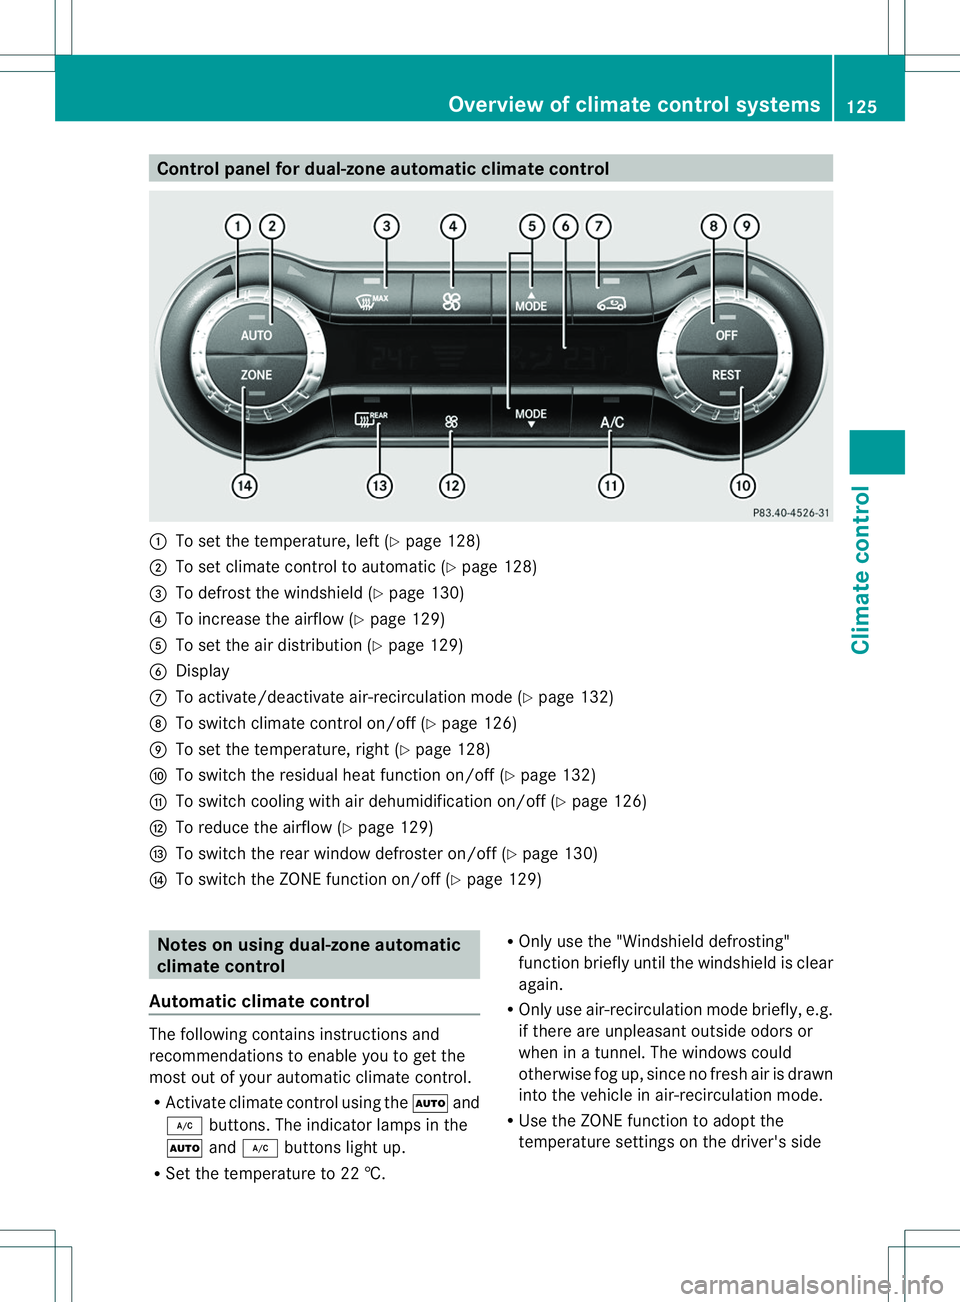
Control panel for dual-zone automatic climat
econtrol 001A
To set th etem perature, left (Y page 128)
0010 To set climate control to automatic (Y page 128)
0023 To defros tthe windshield (Y page 130)
0021 To increase the airflow (Y page 129)
001E To set the air distribution (Y page 129)
0024 Display
0007 To activate/deactivate air-recirculation mode (Y page 132)
0008 To switch climate control on/off (Y page 126)
0009 To set the temperature, right (Y page 128)
0016 To switch the residual heat function on/off (Y page 132)
001D To switch cooling with air dehumidification on/off (Y page 126)
0004 To reduce the airflow (Y page 129)
000B To switch the rear window defroster on/off (Y page 130)
001C To switch the ZONE function on/off (Y page 129)Notes on using dual-zone automatic
climate control
Automatic climate control The following contains instructions and
recommendations to enable you to get the
most out of your automatic climate control.
R Activate climate control using the 000Cand
0001 buttons. The indicator lamps in the
000C and0001 buttons light up.
R Set the temperature to 22 †. R
Only use the "Windshield defrosting"
function briefly until the windshield is clear
again.
R Only use air-recirculation mode briefly, e.g.
if there are unpleasant outside odors or
when in atunnel. The windows could
otherwise fog up, since no fresh air is drawn
into the vehicle in air-recirculation mode.
R Use the ZONE function to adopt the
temperature settings on the driver's side Overview of climate control systems
125Climatecontrol
Page 131 of 360
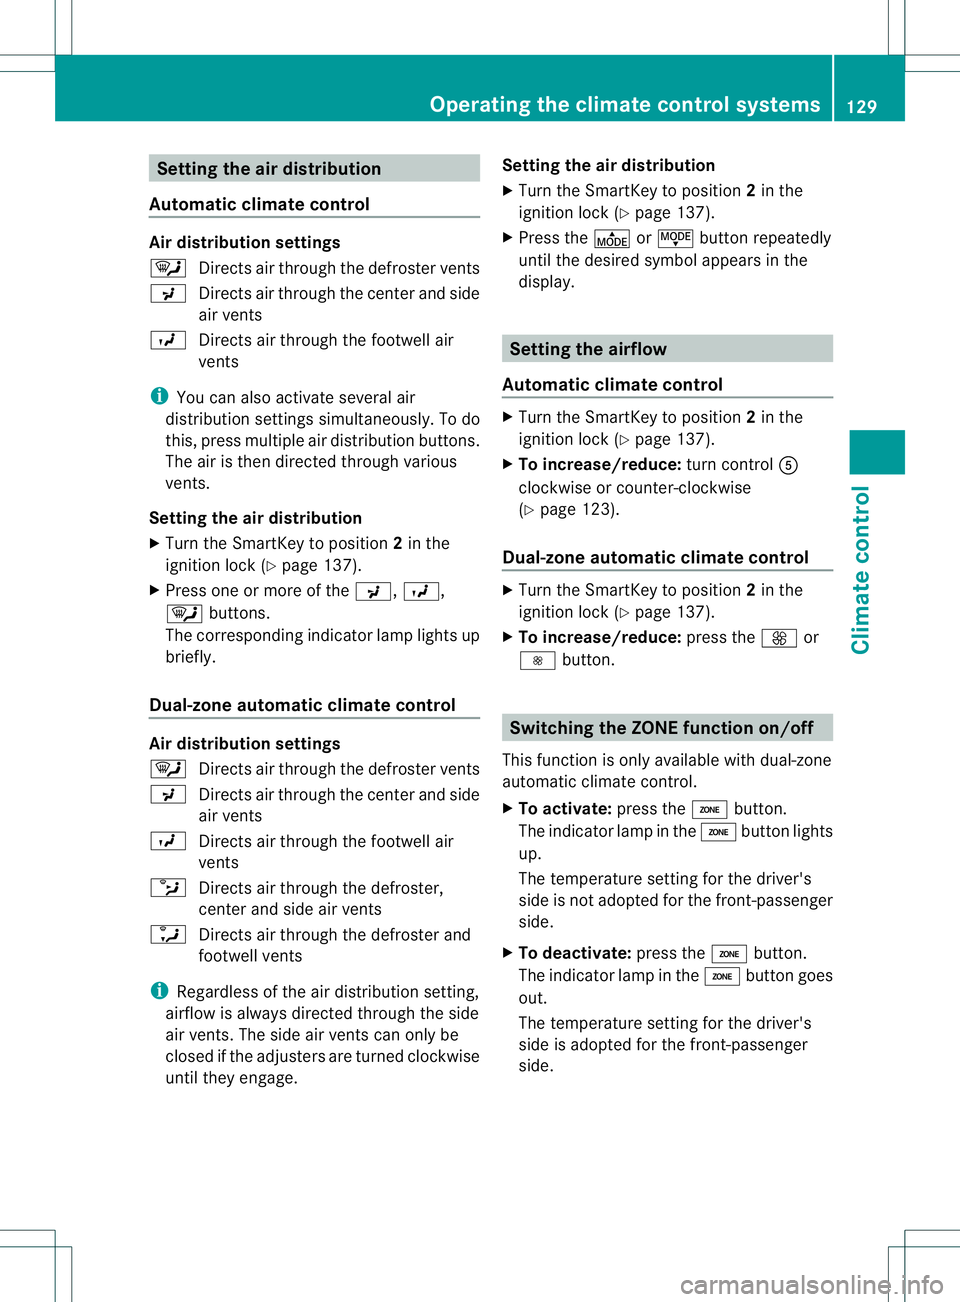
Setting the air distribution
Automatic climate control Air distribution settings
0002
Directsa ir through the defroster vents
0018 Directsa ir through the center and side
air vents
000B Directsa ir through the footwell air
vents
i You can also activate several air
distribution settings simultaneously. To do
this, press multiple air distribution buttons.
The air is then directed through various
vents.
Setting the air distribution
X Turn the SmartKey to position 2in the
ignition lock (Y page 137).
X Press one or more of the 0018,000B,
0002 buttons.
The corresponding indicator lamp lights up
briefly.
Dual-zone automatic climate control Air distribution settings
0002
Directsa ir through the defroster vents
0018 Directsair through the center and side
air vents
000B Directsair through the footwell air
vents
0013 Directsair through the defroster,
center and side air vents
0009 Directsair through the defroster and
footwell vents
i Regardless of the air distribution setting,
airflow is always directed through the side
air vents. The side air ventsc an only be
closed if the adjusters are turned clockwise
until they engage. Setting the air distribution
X
Turn the SmartKey to position 2in the
ignition lock (Y page 137).
X Press the 000For0017 button repeatedly
until the desired symbol appears in the
display. Setting the airflow
Automatic climate control X
Turn the SmartKey to position 2in the
ignition lock (Y page 137).
X To increase/reduce: turn control001E
clockwise or counter-clockwise
(Y page 123).
Dual-zone automatic climate control X
Turn the SmartKey to position 2in the
ignition lock (Y page 137).
X To increase/reduce: press the0004or
000E button. Switching the ZONE function on/off
This function is only available with dual-zone
automatic climate control.
X To activate: press the000Dbutton.
The indicator lamp in the 000Dbutton lights
up.
The temperature setting for the driver's
side is not adopted for the front-passenger
side.
X To deactivate: press the000Dbutton.
The indicator lamp in the 000Dbutton goes
out.
The temperature setting for the driver's
side is adopted for the front-passenger
side. Operating the climate control systems
129Climate control
Page 193 of 360
If the coolant temperature is over
248 ‡(120 †), do not continue driving. The
engine willo therwisebedamaged.
The coolant temperature gauge is in the
instrument cluster on the right-hand side.
Under normal operating conditions and with
the specified coolant level,t he coolant
temperature may rise to 248 ‡(120 †). Tachometer
! Do not drive in the overrevving range, as
this could damage the engine.
The red band in the tachometer indicates the
engine's overrevving range.
The fuel supply is interrupted to protect the
engine when the red band is reached. Outside temperatur
edisplay
You shouldp ay specialattention to road
conditions when temperature sare around
freezing point.
The outsid etemperature display is in the
multifunction display.
Changes in the outsid etemperature are
displayed after ashort delay. Speedometer with segments
The speedometer is divided into segments on
vehicle swith DISTRONIC PLUS.
The segments in the speedometer indicate
which speed range is available.
R Cruise control activated (Y page 160):
The segments lightupf rom the stored
speed to the maximum speed.
R DISTRONIC PLUS activated (Y page 162):
One or two segments in the set speed
range light up.
R DISTRONIC PLUS detects avehicle in front: The segments between the speed of the
vehicle in fron
tand the stored speed light
up. Operatin
gthe on-board computer
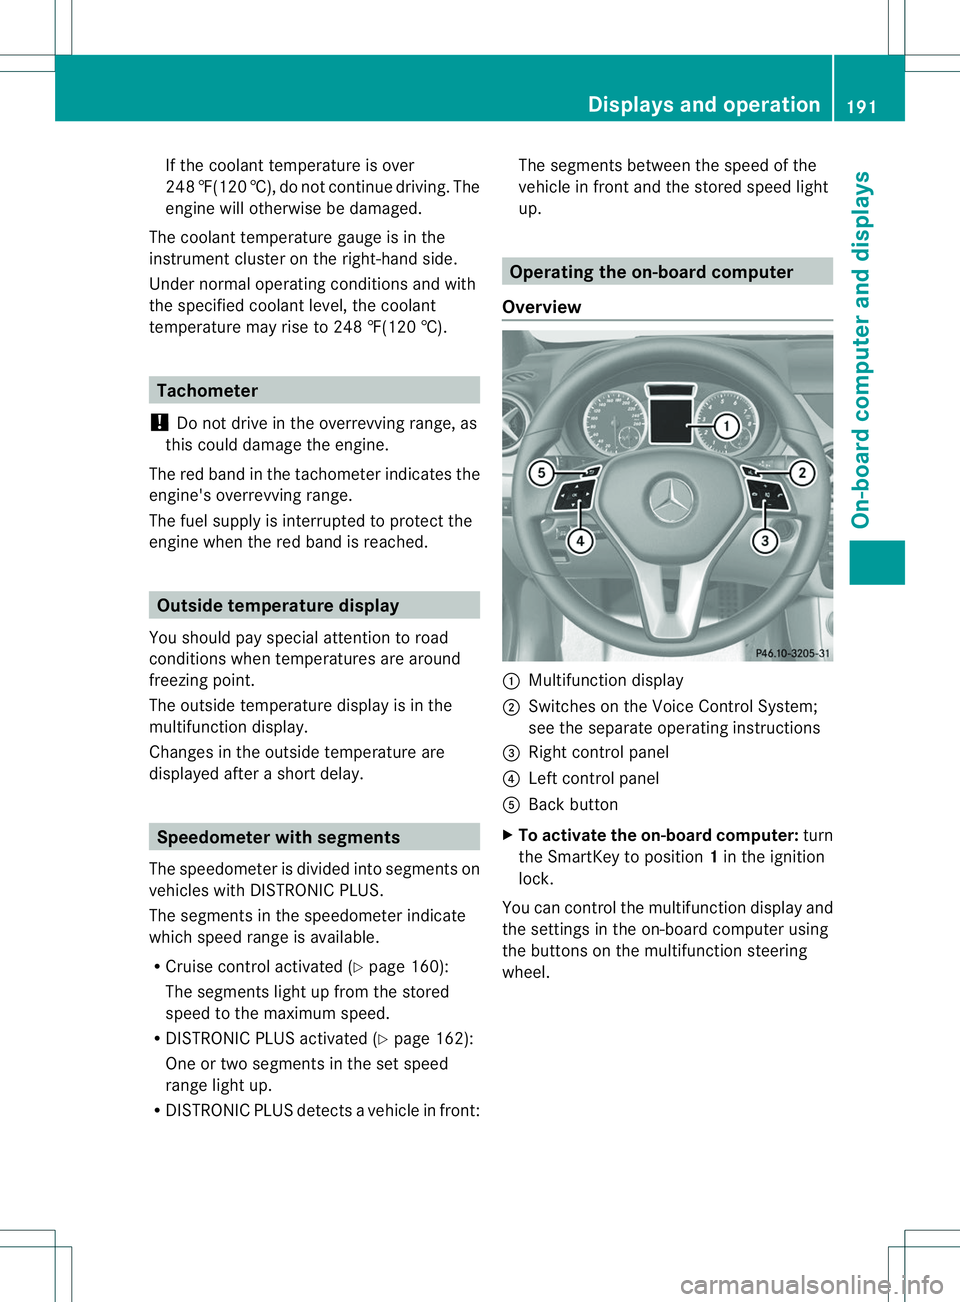
Overview 001A
Multifunctio ndisplay
0010 Switches on the Voic eControl System;
see the separat eoperating instructions
0023 Right control panel
0021 Left control panel
001E Bac kbutton
X To activat ethe on-board computer: turn
the SmartKey to position 1in the ignition
lock.
You can control the multifunction displaya nd
the settings in the on-board computer using
the buttons on the multifunction steering
wheel. Displays and operation
191On-board computer and displays Z
Page 276 of 360
opener, contact an authorized Mercedes-
Benz Center.
Alternatively, you can call the following
telephone assistance services:
R
USA: Mercedes-Benz Customer
Assistance Center at
1-800-FOR-MERCedes
R Canada: Customer Servic eat
1-800-387-0100
R HomeLink ®
hotline 1-800-355-3515
(free of charge)
More information on HomeLink ®
and/or
compatible products is also available
online at http://www.homelink.com.
i Notes on the declaration of conformity
(Y page 24).
USA:F CC ID: CB2HMIHL4
Canada: IC: 279B-HMIHL4
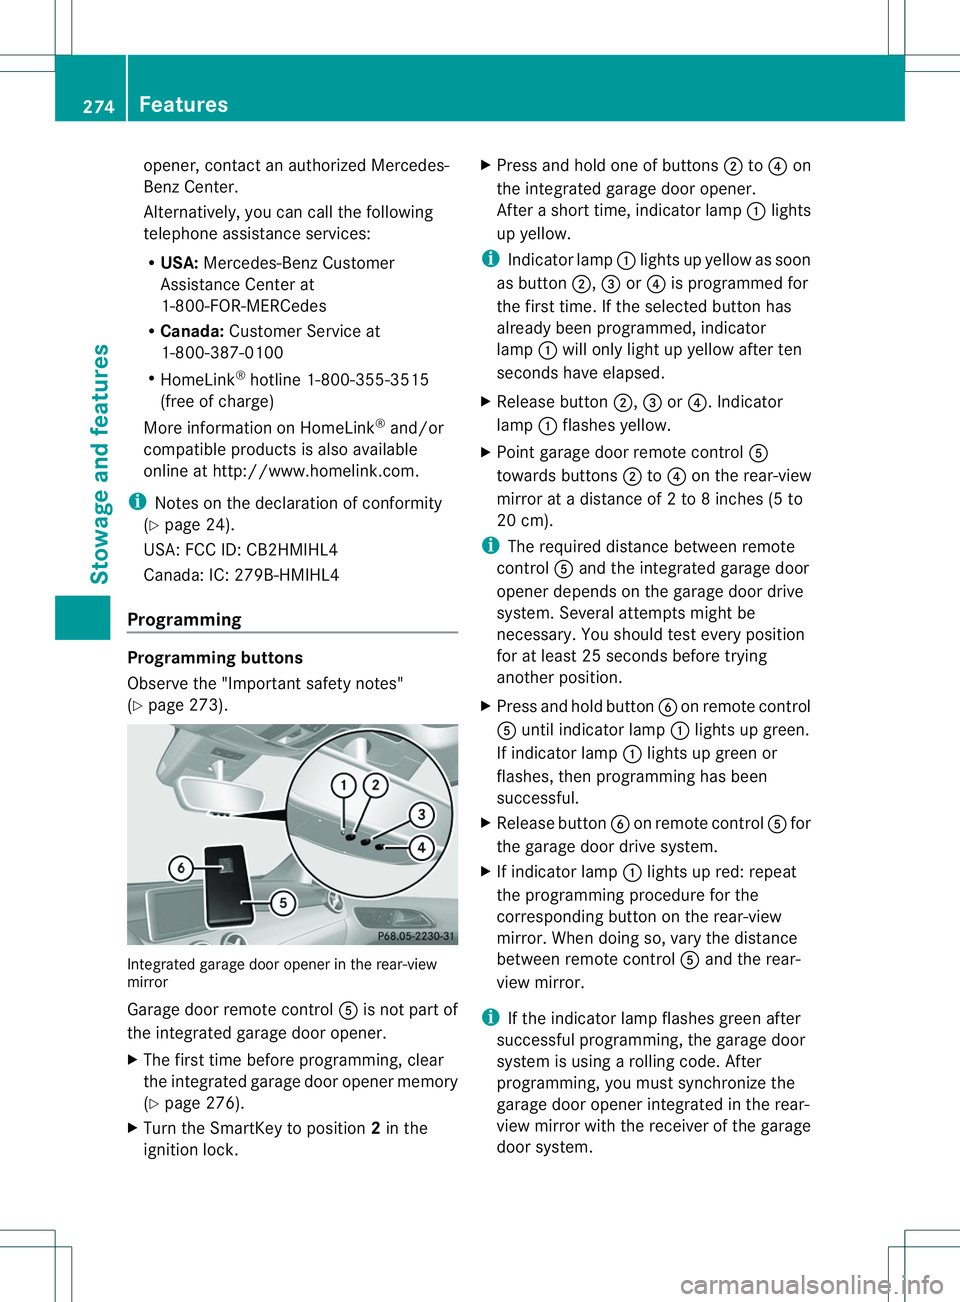
Programming Programming buttons
Observe the "Important safety notes"
(Y page 273). Integrated garage door opener in the rear-view
mirror
Garage door remote control
001Eis not part of
the integrated garage door opener.
X The first time before programming, clear
the integrated garage door opener memory
(Y page 276).
X Turn the SmartKey to position 2in the
ignition lock. X
Press and hold one of buttons 0010to0021 on
the integrated garage door opener.
After ashort time, indicator lamp 001Alights
up yellow.
i Indicator lamp 001Alights up yellow as soon
as button 0010,0023or0021 is programmed for
the first time. If the selected button has
already been programmed, indicator
lamp 001Awill only light up yellow after ten
seconds have elapsed.
X Release button 0010,0023or0021.I ndicator
lamp 001Aflashes yellow.
X Point garage door remote control 001E
towards buttons 0010to0021 on the rear-view
mirror at adistance of 2to8inches (5 to
20 cm).
i The required distance between remote
control 001Eand the integrated garage door
opener depends on the garage door drive
system. Several attempt smight be
necessary. You should tes tevery position
for at least 25 seconds before trying
another position.
X Press and hold button 0024on remote control
001E until indicator lamp 001Alights up green.
If indicator lamp 001Alights up green or
flashes, then programming has been
successful.
X Release button 0024on remote control 001Efor
the garage door drive system.
X If indicator lamp 001Alights up red: repeat
the programming procedure for the
corresponding button on the rear-view
mirror. When doing so, vary the distance
between remote control 001Eand the rear-
view mirror.
i If the indicator lamp flashes green after
successfu lprogramming, the garage door
system is using arolling code. After
programming, you must synchronize the
garage door opener integrated in the rear-
view mirror with the receive rofthe garage
door system. 274
FeaturesStowage and features
Page 277 of 360
Synchronizing the rolling code
Observe the "Important safety notes"
(Y
page 273).
Your vehicle must be within reach of the
garage door or exterior gate drive. Make sure
that neither your vehicle nor any persons/
objectsa re present within the sweep of the
door or gate.
X Turn the SmartKey to position 2in the
ignition lock.
X Press the program button of the door or
gate drive (see the door or gate drive
operating instructions, e.g. under
"programming of additional remote
controls").
i Usually, you now have 30seconds to
initiate the next step.
X Press previously programmed button 0010,
0023 or0021 of the integrated garage door
opener until the door closes.
The rolling code synchronization is then
complete.
Notes on programming the remote
control
Canadianr adio frequency laws require a
"break "(or interruption )ofthetransmission
signals after broadcastin gfor afew seconds.
Therefore, these signals may no tlast long
enough for th eintegrate dgarag edoor
opener. The signal is no trecognized during
programming. Comparable with Canadian
law, some U.S.g arage door openers also
feature a"break".
Procee dasfollows:
R if you live in Canada
R if you have difficulties programmin gthe
garag edoor opener (regardless of where
you live) when usin gthe programming
steps X
Press and hold on eofbuttons 0010to0021 on
th ei ntegrate dgarag edoor opener.
Afte ras hort time, indicator lamp 001Alights
up yellow.
X Release the button.
Indicator lamp 001Aflashes yellow.
X Press button 0024of garage door remote
control 001Efor two seconds, then release it
for two seconds.
X Press button 0024againf or two seconds.
X Repeat this sequence on button 0024of
remote control 001Euntil indicator lamp 001A
lights up green.
If indicator lamp 001Aturns red, repeat the
process.
X Continue with the other programming
steps (see above).
Problems when programming
If you are experiencing problems
programming the integrated garage door
opener on the rear-view mirror, take noteof
the following instructions:
R Check the transmitter frequency of garage
door drive remote control 001E.This can
usually be found on the back of the remote
control.
The integrated garage door opener is
compatible with devices that have units
which operate in the frequency range of
280to4 33MHz.
R Replace the batteries in garage door
remote control 001E.This increases the
likelihood that garage door remote control
001E will transmit astronga nd precis esignal
to the integrated garage door opene rinthe
rear-view mirror.
R When programming, hold remote control
001E at varying distances and angles from the
button that you are programming. Try
various angles at adistance between 2and
12 inches (5to 30 cm) or at the same angle
but at varying distances.
R If another remote control for the same
garage door drive is available, repeat the Features
275Stowage and features Z