2014 MERCEDES-BENZ B-CLASS SPORTS inflation pressure
[x] Cancel search: inflation pressurePage 297 of 360
X
Open the tailgate.
X Lift the cargo compartment floor up
(Y page 259).
i Towing eye 0010is located under tire
inflation compressor 001A.
Vehiclesw ithatire-change tool kit X
Open the tailgate.
X Lift the carg ocompartmen tfloor up
(Y page 259).
X Remove the tire-change too lkit.
The tire-chang etoolkit contains:
R Jack
R Lug wrench
R One pair of gloves
R Foldin gwheel chock Flat tire
Preparing th
evehicle
Your vehicle may be equipped with:
R MOExtende dtires (tires with run-flat
properties )(Y page 295)
Vehicle preparation is not necessary on
vehicles with MOExtende dtires.
R aT IREFIT kit (Y page 294)
Information on changing/mounting awheel
(Y page 337).
X Stop the vehicle on solid, non-slippery and
level ground, as far away as possible from
traffic.
X Switch on the hazar dwarnin glamps.
X Secure the vehicle against rollin gaway
(Y page 152).
X If possible ,brin gthe front wheels int othe
straight-ahead position.
X Switch off the engine.
X Remove the SmartKey fro mthe ignition
lock. X
All occupant smust get out of the vehicle.
Make sure that the yare not endangered as
the ydos o.
X Make sure that no one is near the danger
area while awheel is being changed.
Anyone who is not directly assisting in the
wheel change should, for example, stand
behin dthe barrier.
X Get out of the vehicle. Pay attention to
traffic conditions when doing so.
X Close the driver's door.
i Vehicles equipped with MOExtende dtires
are not equipped with aTIREFIT kit at the
factory. It is therefore recommende dthat
you additionally equip your vehicle with a
TIREFIT kit if you moun ttires that do not
feature run-flat properties ,e.g. winter tires.
AT IREFIT kit can be obtained fro ma
qualified specialist workshop. MOExtended tires (tires with run-flat
properties)
General notes With MOExtende
dtires (tires with run flat
characteristics), you can continue to drive
your vehicle even if there is atotal loss of
pressure in one or mor etires. The affected
tir em ust not show any clearly visible damage.
You can recognize MOExtende dtires by the
MOExtende dmarking which appears on the
sidewall of the tire. You will fin dthis marking
nex ttot he tire size designation, the load-
bearing capacity and the speed index
(Y page 330).
MOExtended tires may only be used in
conjunction with an active tire pressure loss
warning system.
If the pressur eloss warning message
appears in the multifunction display:
R Observe the instructions in the display
messages (Y page 231).
R Check the tire for damage.
R If driving on, observe the following notes. Flat tire
295Breakdown assistance
Page 300 of 360
X
Press on/of fswitch 0021on th etirei nflation
compressor to ON.
The tir einflatio ncompressor is switched
on. The tire is inflated.
i First,t ire sealant is pumped into the tire.
The pressure can briefly rise to
approximately 500 kPa (5 bar/73 psi).
Do not switch off the tire inflation
compressor during this phase.
X Let the tire inflation compressor run for a
maximum of ten minutes. The tire should
then have attained apressure of at least
200 kPa (2.0 bar/29 psi).
! Do not operate the tire inflation
compressor for longer than ten minutes at
at ime without abreak. It may otherwise
overheat.
The tire inflation compressor can be
operated again once it has cooled down.
If at ire pressure of 200 kPa (2.0 ba r/29 psi)
is achieved after amaximu moften minutes,
see (Y page298).
If at ire pressure of 200 kPa (2.0 ba r/29 psi)
is not achieved after amaximu moften
minutes, see (Y page298).
i If tire sealant leaks out, allow it to dry .It
can then be removed like alayer of film.
If yourc lothes are soiled with tir esealant,
have the mcleaned with perchloroethylene
at ad ry cleaner as soon as possible.
Tir ep ressur enot reached If
ap ressure of 200 kPa (2.0 ba r/29 psi )has
not bee nachieved after ten minutes:
X Switch off the tire inflation compressor.
X Unscrew the filler hose from the valve of
the faulty tire.
X Very slowly drive forwards or reverse
approximately 30 ft (10 m).
X Pump up the tire again.
After amaximu moften minutes, the tire
pressure must be at least 200 kPa (2.0 bar/
29 psi). G
WARNING
If the required tire pressure is not reached
after the specified time, the tire is too badly
damaged. The tire sealant cannot repair the
tire in this instance. Damaged tires and atire
pressure that is too low can significantly
impair the vehicle's braking and driving
characteristics .There is arisk of accident.
Do not continue driving. Contact aqualified
specialist workshop.
Tire pressure reached G
WARNING
At ire temporarily sealed with tir esealant
impairs the drivin gcharacteristics and is not
suitable for higher speeds. There is arisk of
accident.
You should therefore adapt your drivin gstyle
accordingly and drive carefully. Do not exceed
the specified maximum speed with atiret hat
has been repaire dusing tir esealant.
! After use, excess tir esealant may run out
of the filler hose. This could cause stains.
Therefore, place the filler hose in the plastic
bag that contained the TIREFIT kit. H
Environmental note
Have the used tir esealant bottle dispose dof
professionally, e.g. at aqualifie dspecialist
workshop.
If at ire pressure of 200 kPa (2.0 ba r/29 psi)
has bee nachieved afte rten minutes:
X Switc hoff the tire inflation compressor.
X Unscrew the filler hose from the valve of
the faulty tire.
X Stow the tire sealant bottle and the tire
inflation compressor.
X Pull away immediately.
The maximum speed for atire sealed with tire
sealant is 50 mph (80k m/h). The upper part
of the TIREFIT sticker must be affixed to the
instrument cluster in the driver' sfieldof
vision. 298
Flat tireBreakdown assistance
Page 301 of 360
X
Stop afte rdriving for approximatel yten
minutes and check the tire pressure with
the tire inflation compressor.
The tire pressure mus tnow be at least
130 kPa (1.3 bar/19 psi). G
WARNING
If the required tire pressure is not reached
after driving for ashort period, the tire is too
badly damaged. The tire sealant cannot repair
the tire in this instance. Damaged tires and a
tire pressure that is too low can significantly
impair the vehicle's braking and driving
characteristics. There is arisk of accident.
Do not continue driving. Contact aqualified
specialist workshop.
X Correct the tire pressure if it is still at least
130 kPa (1.3 bar/19 psi) (for the values,
see the Tire and Loading Information
placard on the driver's side B-pillar or tire
pressure table on the fuel filler flap).
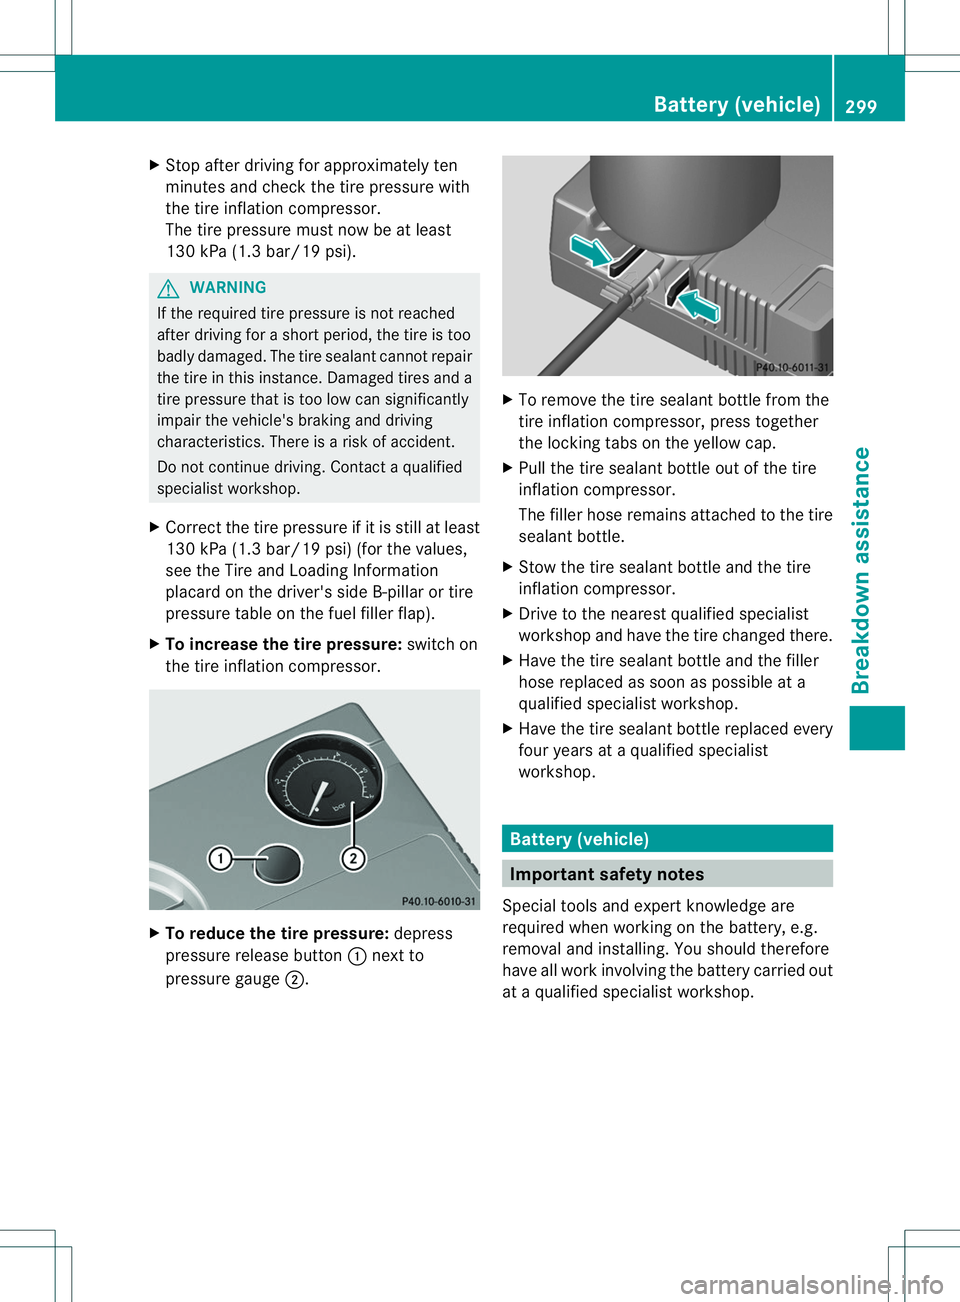
X To increase the tire pressure: switch on
the tire inflation compressor. X
To reduce the tire pressure: depress
pressure release button 001Anext to
pressure gauge 0010. X
To remove the tire sealant bottle from the
tire inflation compressor ,press together
the lockin gtabs on the yellow cap.
X Pull the tire sealant bottle out of the tire
inflation compressor.
The filler hose remains attached to the tire
sealant bottle.
X Stow the tire sealant bottle and the tire
inflation compressor.
X Drive to the nearest qualified specialist
workshop and have the tire changed there.
X Have the tire sealant bottle and the filler
hose replaced as soon as possible at a
qualified specialist workshop.
X Have the tire sealant bottle replaced every
four years at aqualified specialist
workshop. Battery (vehicle)
Important safety notes
Special tools and expert knowledge are
required when working on the battery, e.g.
removal and installing. You should therefore
have all work involving the battery carried out
at aq ualified specialist workshop. Battery (vehicle)
299Breakdown assistance Z
Page 315 of 360
the unusual handling characteristics
.Ifyou
find no signs of damage, have the wheels
and tires checked at aqualified specialist
workshop.
R When parking your vehicle, make sure that
the tires do not get deformed by the curb
or other obstacles. If it is necessary to drive
over curbs, speed humps or similar
elevations, try to do so slowly and at an
obtuse angle. Otherwise, the tires,
particularly the sidewalls, may be
damaged. Regular checking of wheels and tires
G
WARNING
Damaged tires can cause tire inflation
pressure loss. As aresult, you could lose
control of your vehicle. There is arisk of
accident.
Check the tires regularly for signs of damage
and replace any damaged tires immediately.
Regularly check the wheels and tires of your
vehicle for damage at least once amonth, as
well as after driving off-road or on rough
roads. Damaged wheels can cause aloss of
tire pressure. Pay particular attention to
damage such as:
R cuts in the tires
R punctures
R tears in the tires
R bulges on tires
R deformation or severe corrosion on wheels
Regularly check the tire tread depth and the
condition of the tread across the whole width
of the tire (Y page 313). If necessary, turn
the front wheels to full lock in order to inspect
the inner side of the tire surface.
All wheels must have avalve cap to protect
the valve against dirt and moisture. Do not
mount anything ontot he valve other than the
standard valve cap or other valve caps
approved by Mercedes-Benz for your vehicle. Do not use any other valve caps or systems,
e.g. tire pressure monitoring systems.
Regularly check the pressure of all the tires
particularly prior to long trips. Adjust the tire
pressure as necessary (Y
page 315).
The service life of tires depends, among other
things, on the following factors:
R Drivin gstyle
R Tire pressure
R Distance covered Important safety notes on the tire
tread
G
WARNING
Insufficient tire tread will reduce tire traction.
The tire is no longer able to dissipate water.
This means that on wet road surfaces, the risk
of hydroplaning increases, in particular where
speed is not adapted to suit the driving
conditions. There is arisk of accident.
If the tire pressure is too high or too low, tires
may exhibit different levels of wear at
different locations on the tire tread. Thus, you
should regularly check the tread depth and
the condition of the tread across the entire
width of all tires.
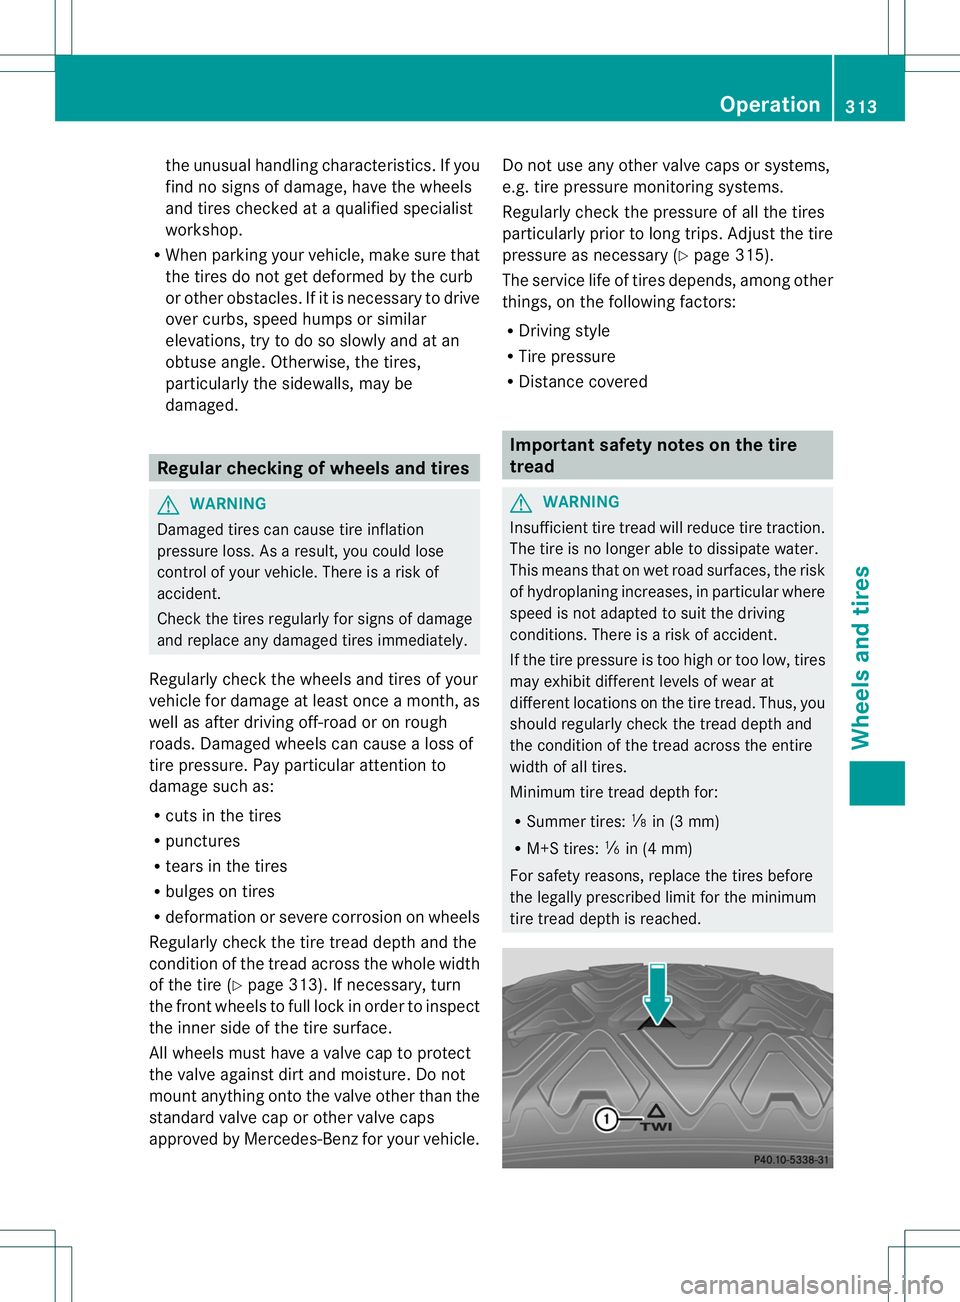
Minimum tire tread depth for:
R Summer tires: 0014in (3 mm)
R M+S tires: 0015in (4 mm)
For safety reasons, replace the tires before
the legally prescribed limit for the minimum
tire tread depth is reached. Operation
313Wheels and tires Z
Page 318 of 360
Follow recommende
dtire inflation pressures
and check the pressure of al lthe tires
including the spare wheel:
R monthly, at least
R if the loa dchanges
R before beginning along journey
R under different operating conditions, e.g.
off-roa ddriving
If necessary ,correct the tire pressure.
Use asuitabl epressure gaug etocheck the
tire pressure. The outer appearance of atire
doe snot permit any reliabl econclusio nabout
the tire pressure. On vehicles equipped with
the electronic tire pressure monitor, the tire
pressure can be checked in the on-board
computer.
The recommended tire pressures for the tires
mounted at the factory can be found on the
labels described here.
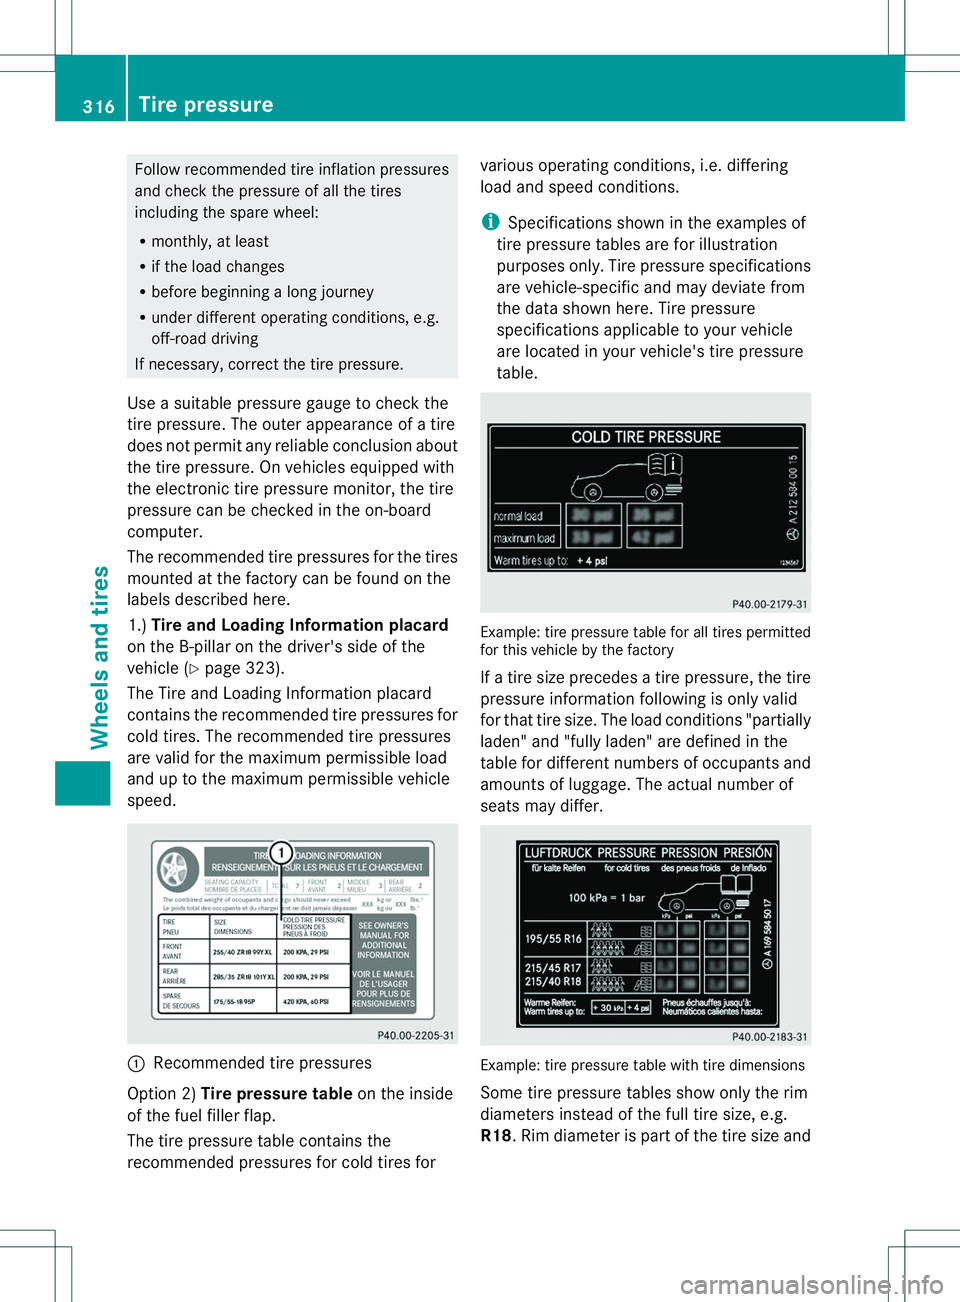
1.) Tirea nd Loading Information placard
on the B-pillar on the driver' sside of the
vehicle (Y page 323).
The Tire and Loading Information placard
contains the recommended tire pressures for
cold tires .The recommended tire pressures
are valid for the maximum permissible load
and up to the maximum permissible vehicle
speed. 001A
Recommended tire pressures
Option 2) Tire pressuret ableon the inside
of the fuel filler flap.
The tire pressure table contains the
recommended pressures for cold tires for various operating conditions, i.e. differing
load and speed conditions.
i
Specifications shown in the examples of
tire pressure tables are for illustration
purposes only. Tire pressure specifications
are vehicle-specific and may deviate from
the data shown here. Tire pressure
specifications applicable to your vehicle
are located in your vehicle's tire pressure
table. Example: tire pressure table for all tires permitted
for this vehicle by the factory
If
at ire size precedes atire pressure, the tire
pressure information following is only valid
for that tire size. The load conditions" partially
laden" and "fully laden" are defined in the
table for different numbers of occupants and
amounts of luggage. The actual number of
seats may differ. Example: tire pressure table with tire dimensions
Some tire pressure tables show only the rim
diameters instead of the full tire size, e.g.
R18.R
im diameter is part of the tir esize and 316
Tir
ep ressureWheels and tires
Page 320 of 360
Observe the recommended tire pressures for
cold tires:
R on the Tire and Loading Information placard
on the B-pillar on the driver's side
R in the tire pressure table on the inside of
the fuel filler flap Underinflated or overinflated tires
Underinflation G
WARNING
Tires with pressure that is too low can
overheat and burst as aconsequence. In
addition, they also suffer from excessive and/
or irregularw ear, which can severely impair
the braking properties and the driving
characteristics. There is arisk of an accident.
Avoid tire pressures that are too low in all the
tires, including the spare wheel.
Underinflated tires may:
R wear quickly and unevenly
R have an adverse effec tonfuel consumption
R overheat, leadin gtotired efects
R have an adverse effect on handling
characteristics
Overinflation G
WARNING
Tire swithe xcessively high pressur ecan burst
because they are damaged mor eeasily by
road debris, potholes etc. In addition ,they
also suffer from irregular wear, whic hcan
severel yimpair th ebraking properties and the
driving characteristics .There is arisk of an
accident.
Avoid tire pressures that are too high in all the
tires, including the spare wheel.
Overinflated tires may:
R have an adverse effect on handling
characteristics
R wear quickly and unevenly R
be more susceptible to damage
R have an adverse effect on ride comfort
R increase the braking distance
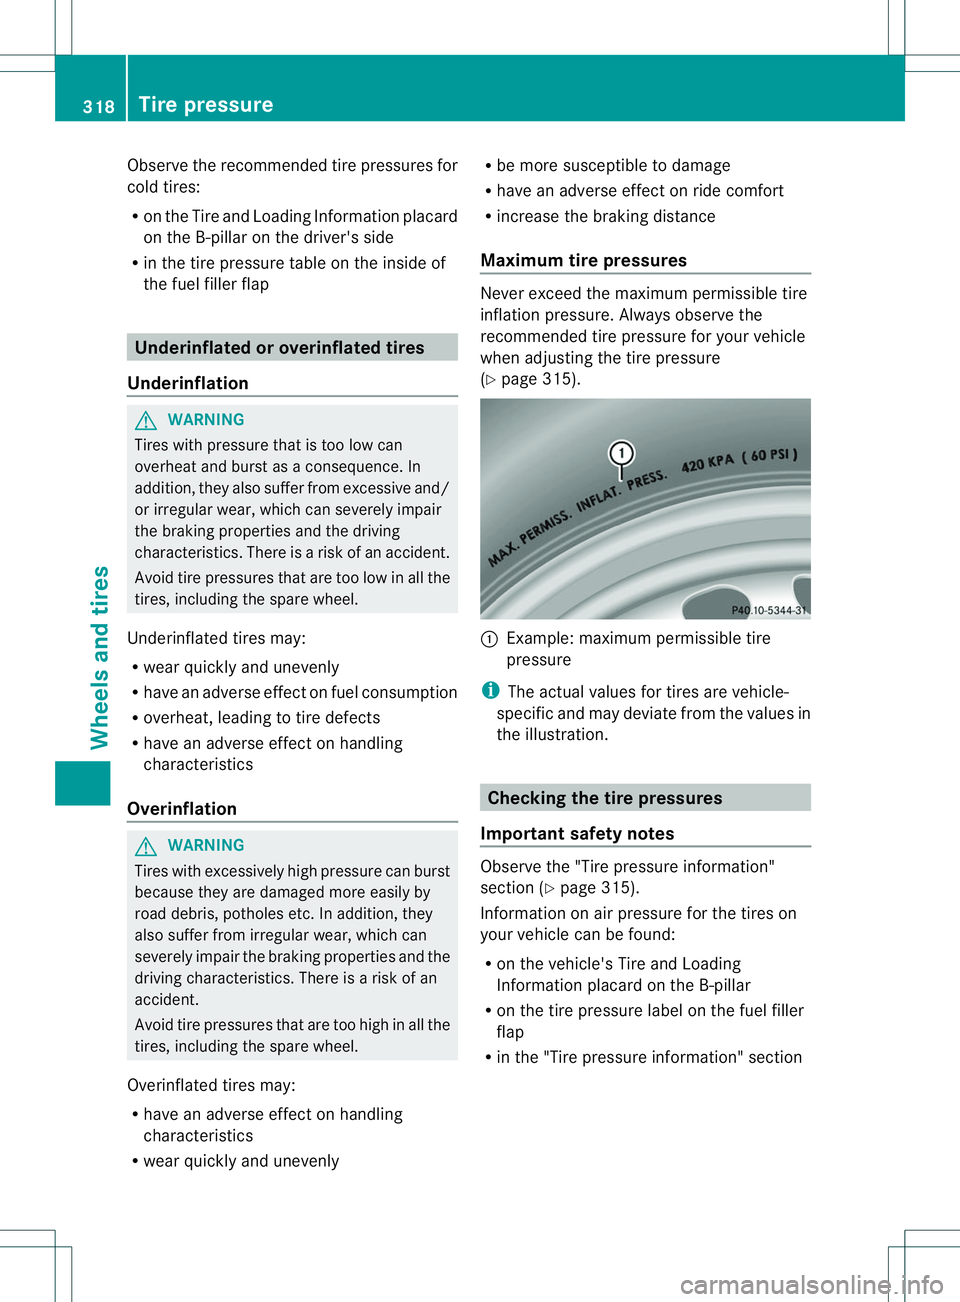
Maximum tire pressures Never exceed the maximum permissible tire
inflation pressure. Always observe the
recommended tire pressure for your vehicle
when adjusting the tire pressure
(Y
page 315). 001A
Example: maximum permissible tire
pressure
i The actual values for tires are vehicle-
specific and may deviate from the values in
the illustration. Checking the tire pressures
Important safety notes Observe the "Tire pressure information"
section (Y
page 315).
Information on air pressure for the tires on
your vehicle can be found:
R on the vehicle's Tire and Loading
Information placard on the B-pillar
R on the tire pressure label on the fuel filler
flap
R in the "Tire pressure information "section 318
Tire pressureWheels and tires
Page 323 of 360
tire
saresignificantl yunderinflated.
Accordingly, when the lo wtire pressure
telltale lights up ,you shoul dstop and check
your tire sassoonasp ossible,a nd inflate
them to the proper pressure. Driving on a
significantly underinflated tire causes the tire
to overheat and can lead to tire failure.
Underinflation also reduces fuel efficiency
and tire tread life, and may affect the vehicle's
handling and stopping ability. Please note that
the TPMS is not asubstitute for proper tire
maintenance, and it is the driver's
responsibility to maintain correct tire
pressure, even if underinflation has not
reached the level to trigger illumination of the
TPMS low tire pressure telltale.
Your vehicle has also been equipped with a
TPMS malfunction indicator to indicate when
the system is not operating properly. The
TPMS malfunction indicator is combined with
the low tire pressure telltale. When the
system detects amalfunction, the warning
lamp will flash for approximately aminute and
then remain continuously illuminated. This
sequence will be repeated every time the
vehicle is started as long as the malfunction
exists. When the malfunction indicator is
illuminated, the system may not be able to
detect or signal low tire pressure as intended.
TPMS malfunctions may occur for avariety of
reasons, including the installation of
incompatible replacement or alternate tires
or wheels on the vehicle that prevent the
TPMS from functioningp roperly. Always
check the TPMS malfunction telltale after
replacing one or more tires or wheels on your
vehicle to ensure that the replacement or
alternate Tires and wheels allow the TPMS to
continue to function properly.
It is the driver's responsibility to set the tire
pressure to that recommended for cold tires
which is suitablef or the operating situation
(Y page 315). Note that the correct tire
pressure for the current operating situation
must first be taught-in to the tire pressure
monitor. If there is asubstantial loss of pressure, the warning threshold for the
warning message is aligned to the reference
valuest
aught-in. Restart the tire pressure
monitor after adjusting the pressure of the
cold tires (Y page 322). The current
pressures are saved as new reference values.
As aresult, awarning message will appearif
the tir epressure drops significantly.
Th et irep ressure monitor does not warn you
of an incorrectly se ttirep ressure. Observe
the note sonthe recommended tir epressure
(Y page 315).
Th et irep ressure monitor is not able to warn
yo uofas uddenlossofp ressure, e.g .ifthe
tire is penetrated by aforeign object.Int he
event of asudden loss of pressure, bring the
vehicle to ahalt by braking carefully. Avoid
abrupt steering maneuvers.
The tire pressure monitor has ayellow
warning lamp in the instrumentc luster for
indicating apressure loss or malfunction.
Whether the warning lamp flashes or lights up
indicates whether atire pressure is too low or
the tire pressure monitor is malfunctioning:
R if the warning lamp is lit continuously,t he
tire pressure on one or more tires is
significantly too low. The tire pressure
monitor is not malfunctioning.
R if the warning lamp flashes for around a
minute and then remains lit constantly, the
tire pressure monitor is malfunctioning.
i In addition to the warning lamp, a
message appears in the multifunction
display.
Further information can be found on
(Y page 231).
If the tire pressure monitor is malfunctioning,
it may take more than ten minutes for the tire
pressure warning lamp to inform you of the
malfunction by flashing for approximately one
minute and then remaining lit. When the
malfunction has been rectified, the tire
pressure warning lamp goes out after afew
minutes of driving. Tire pressure
321Wheels and tires Z
Page 331 of 360
not covered with ice or snow
.Take
appropriate car ewhend riving.
! Avoi dwheelspin .Thisc an lead to damage
to the drive train. Temperature
G
WARNING
The temperatur egrade for thi stire is
established for atire tha tisproperly inflated
and not overloaded.E xcessive speed,
underinflation, or excessive loading ,either
separatel yorincombination, can cause
excessive hea tbuild-up and possible tire
failure.
The temperatur egrades are A(the highest),
B, and C. Thes erepresent the tire's
resistanc etothe generatio nofheat and its
ability to dissipate heat when tested under
controlled conditions on aspecified indoor
laboratory test wheel. Sustained high
temperature can cause the material of the tire
to degenerat eand reduce tire life, and
excessive temperature can lead to sudden
tire failure. The grade Ccorresponds to alevel
of performanc ewhich all passenger car tires
must meet under the Federal Motor Vehicle
Safety Standard No. 109. Grades Band A
represent higher levels of performanc eonthe
laboratory test wheel than the minimum
required by law. Tire labeling
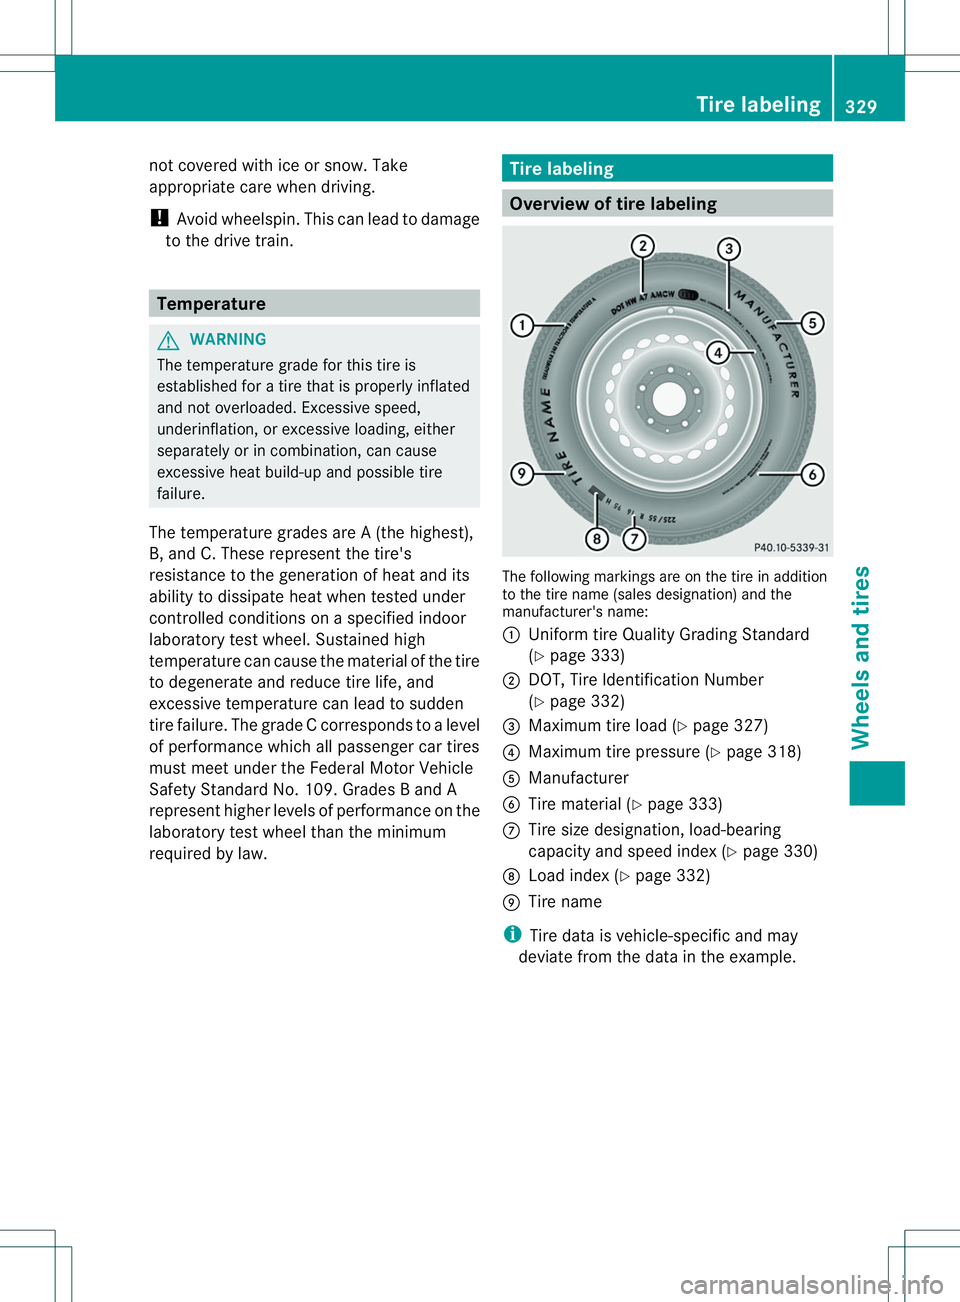
Overview of tire labeling
The following markings are on the tire in addition
to the tire name (sales designation) and the
manufacturer's name:
001A
Uniform tire Quality Grading Standard
(Ypage 333)
0010 DOT, Tire Identification Number
(Ypage 332)
0023 Maximum tire load (Y page 327)
0021 Maximum tire pressure (Y page 318)
001E Manufacturer
0024 Tire material (Y page 333)
0007 Tire size designation, load-bearing
capacity and speed index (Y page 330)
0008 Load index (Y page 332)
0009 Tire name
i Tire data is vehicle-specific and may
deviate from the data in the example. Tirel
abeling
329Wheels and tires Z