2014 MERCEDES-BENZ B-CLASS SPORTS tire type
[x] Cancel search: tire typePage 20 of 360
Labeling (overview)
........................329
Load bearing index (definition) ......335
Load index ..................................... 332
Load index (definition) ...................334
M+S tires ....................................... 314
Maximum loaded vehicle weight
(definition) ..................................... 334
Maximum loa donatire (definition) 334
Maximum permissible tire
pressure (definition) ....................... 334
Maximum tire loa d......................... 327
Maximum tire loa d(definition) .......334
MOExtended tires ..........................314
Optional equipment weight
(definition) ..................................... 335
PSI (pounds per square inch)
(definition) ..................................... 334
Replacing ....................................... 336
Service life ..................................... 314
Sidewall (definition) .......................335
Speed rating (definition) ................334
Storing ........................................... 336
Structure and characteristics
(definition) ..................................... 333
Summer tires ......................... 160, 314
Temperature .................................. 329
TIN (Tire Identification Number)
(definition) ..................................... 335
Tire bea d(definition) ...................... 335
Tire pressure (definition) ................335
Tire pressure s(recommended )...... 333
Tire size (data) ............................... 340
Tire size designation, load-bearing
capacity, spee drating .................... 330
Tire tread ....................................... 313
Tire tread (definition) .....................335
Total loa dlimit (definition) .............335
Traction ......................................... 328
Traction (definition) .......................335
Trea dwear ..................................... 328
Uniform Tire Quality Grading
Standard s...................................... 328
Uniform Tire Quality Grading
Standard s(definition) .................... 333
Unladen weight (definition) ............334
Wea rindicato r(definition) .............335
Whee lrim (definition ).................... 333
see Flat tire Top Tether
............................................ 60
Towing Important safety guidelines ...........305
Installing the towing eye. ...............306
Removing the towing eye. ..............306
Towing away
With both axle sonthe ground .......307
With front axle raised ..................... 307
Tow-starting
Emergency engine starting ............308
Important safety notes ..................305
Installing the towing eye. ...............306
Removing the towing eye. ..............306
Transmission
see Automatic transmission
Transmission position display .........144
Transporting the vehicle ..................307
Trim pieces (cleaning instructions) .290
Trip computer (on-board computer) 194
Trip odometer Calling up ....................................... 193
Resetting (on-board computer) ......195
Trunk
see Tailgate
Turn signals
Changing bulbs (front) ...................114
Changing bulbs (rear) ....................115
Display message ............................ 220
Switching on/off ........................... 106
Type identification plate
see Vehicle identification plate U
Unlocking Emergency unlocking .......................81
From insid ethe vehicle (central
unlocking button) ............................. 80 V
Vanity mirror (in the sun visor) ........263
Vehicle Correct use ...................................... 25
Data acquisition ............................... 26
Equipment ....................................... 22
Individua lsettings .......................... 202
Limited Warranty ............................. 2618
Index
Page 293 of 360
are chrome-plated or not, consult an
authorized Mercedes-Ben zCenter.
X Wipe the wooden trim and trim pieces with
ad amp, lint-free cloth, e.g. amicrofiber
cloth.
X Heavy soiling: use car care and cleaning
product srecommended and approved by
Mercedes-Benz.
Cleaning the seat covers General notes
!
Do not use microfiber cloths to clean
genuine leather, artificial leather or
DINAMICA covers. If used often ,these can
damage the cover.
i Note that regular care is essential to
ensure that the appearance and comfort of
the cover sisretained over time.
Genuine leather seat covers
Leather is anatural product.
It exhibits natural surface characteristics, for
example:
R differences in the texture
R signs of stretching and marking
R slight nuances of color
These are characteristic sofleather and not
material defects.
! To retain the natural appearance of the
leather, observe the following cleaning
instructions:
R Clean genuine leather cover scarefully
with adamp clot hand then wipe the
cover sdown with adry cloth.
R Make sure that the leather does not
become soaked. It may otherwise
become rough and cracked.
R Only use leather care agents that have
been tested and approved by Mercedes-
Benz. You can obtain these from a
qualified specialist workshop. Seat covers of other materials
!
Observe the following when cleaning:
R Clean artificial leather cover swithacloth
moistened with asolution containing
1% detergen t(e.g. dish washing liquid).
R Clean clot hcover switham icrofiber
clot hm oistened with asolution
containin g1%detergen t(e.g. dish
washing liquid). Rub carefully and always
wipe entire seat sections to avoid leaving
visible lines. Leave the seat to dry
afterwards. Cleaning results depend on
the type of dirt and how long it has been
there.
R Clean Alcantara® cover swithadamp
cloth. Make sure that you wipe entire
seat sections to avoid leaving visible
lines.
Cleaning the seat belts G
WARNING
Seat belts can become severely weakened if
bleached or dyed. This could cause the seat
belts to tear or fail, for instance, in the event
of an accident. This poses an increased risk
of injur yorfatal injury.
Never bleach or dye the seat belts.
! Do not clean the seat belts using chemical
cleanin gagents .Don ot dry the seat belts
by heating at temperatures above 176 ‡
(80 †) or in direct sunlight.
X Use clean, lukewarm water and soap
solution.
Cleaning the headliner and carpets X
Headliner: if it is very dirty, use asoft brush
or ac leaning agent recommended and
approved by Mercedes-Benz.
X Carpets: use the carpet and textile
cleaning agents recommended and
approved by Mercedes-Benz. Care
291Maintenance and care Z
Page 298 of 360
The maximum driving distanc
eis
approximately 50 miles (80 km) when the
vehicle is partially laden and approximately
18 miles (30 km) when the vehicle is fully
laden.
In addition to the vehicle load, the driving
distanc epossible depends upon:
R Speed
R Road condition
R Outside temperature
The driving distanc epossible in run-flat mode
may be reduced by extreme driving
conditions/maneuvers, or it can be increased
through amoderate style of driving.
The maximum permissible distanc ewhich
can be driven in run-flat mode is counted from
the moment the tire pressure loss warning
appears in the multifunction display.
You must not exceed amaximum speed of
50 mph (80 km/h).
i When replacing one or all tires, make sure
that you use only tires:
R of the size specified for the vehicle and
R marked "MOExtended"
If at ire has gone flat and cannot be
replaced with aMOExtended tire, a
standard tire may be used as atemporary
measure. Make sure that you use the
proper size and type (summer or winter
tire).
i Vehicles equipped with MOExtended tires
are not equipped with aTIREFIT kit at the
factory. It is therefore recommended that
you additionally equip your vehicle with a
TIREFIT kit if you mount tires that do not
feature run-flat properties, e.g. winter tires.
AT IREFIT kit can be obtained from a
qualified specialist workshop.
Important safety notes G
WARNING
When driving in emergenc ymode, the driving
characteristics deteriorate, e.g. when cornering, acceleratin
gquickly and when
braking. There is arisk of an accident.
Do not exceed the stated maximum speed.
Avoid abrupt steerin gand driving maneuvers,
and driving over obstacles (curbs, potholes,
off-road). This applies in particular to aladen
vehicle.
Stop driving in emergenc ymode if:
R you hear banging noises.
R the vehicle start stoshake.
R you see smoke and smell rubber.
R ESP ®
is intervening constantly.
R there are tears in the sidewalls of the tire.
After driving in emergenc ymode, have the
wheel rims checked at aqualified specialist
workshop with regard to their further use. The
defective tire must be replaced in every case. TIREFIT kit
Important safety notes TIREFIT is
atire sealant.
You can use TIREFIT to seal punctures of up
to 0.16in(4m m),particularl ythose in the tire
tread. Yo ucan us eTIREFIT at outside
temperatures down to 000F4‡(000F20 †). G
WARNING
In the following situations, the tir esealan tis
unabl etop rovide sufficient breakdown
assistance, as it is unabl etosealthe tire
properly:
R there ar ecutsorp unctures in the tir elarger
tha nthose mentioned above.
R the wheel rim is damaged.
R you have driven at very low tire pressures
or on aflat tire.
There is arisk of an accident.
Do not drive the vehicle. Contact aqualified
specialist workshop. 296
Flat tireBreakdown assistance
Page 308 of 360
!
When COLLISION PREVENTION ASSIST
PLUS, DISTRONIC PLUS or the HOLD
function is activated, the vehicle brakes
automaticallyinc ertain situations. To avoid
damage to the vehicle, deactivate these
systems in the following or similar
situations:
R when towing the vehicle
R in the car wash
! Only secure the tow rope or tow bar at the
towing eyes. Otherwise, the vehicle could
be damaged.
! Do not use the towing eyes for recovery
purposes as this could damage the vehicle.
If in doubt, recover the vehicle with acrane.
! When towing, pull aways lowlyand
smoothly. If the tractive power is too high,
the vehicles could be damaged.
! The vehicle can be towed amaximum of
30 miles (50km). The towing speed of
30 mph (50km/h) must not be exceeded.
If the vehicle has to be towed more than
30 miles (50km), the front axle must be
raised or the entire vehicle raised and
transported.
! Do not tow with sling-type equipment.
This could damage the vehicle.
! Vehicles with automatic transmission
must not be started by tow-starting. This
could otherwise damage the transmission.
It is better to have the vehicle transported
than to have it towed.
When towing avehicle, the transmission must
be in position N.
The battery must be connected and charged.
Otherwise, you:
R cannot turn the SmartKey to position 2in
the ignition lock
R cannot shift the transmission to position
N.
i Disarm the automatic locking feature
before the vehicle is towed (Y page 205).You could otherwise be locked out when
pushing or towing the vehicle. Installing/removing the towing eye
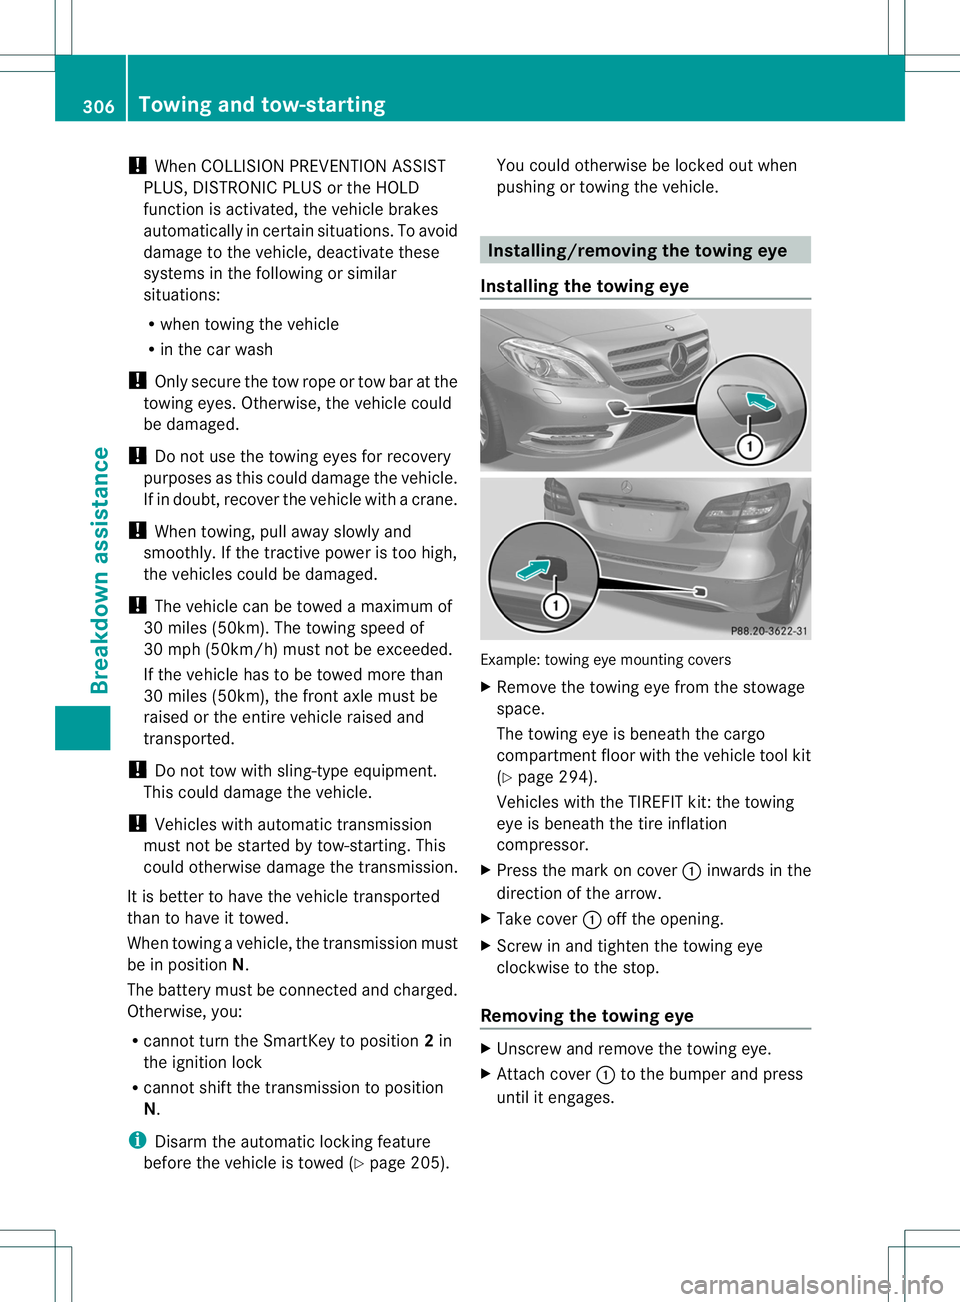
Installingt he towing eye Example: towing eye mounting covers
X
Remove the towing eye from the stowage
space.
The towing eye is beneath the cargo
compartment floor with the vehicle tool kit
(Y page 294).
Vehicles with the TIREFIT kit: the towing
eye is beneath the tire inflation
compressor.
X Press the mark on cover 001Ainwards in the
direction of the arrow.
X Take cover 001Aoff the opening.
X Screw in and tighten the towing eye
clockwise to the stop.
Removing the towing eye X
Unscrew and remove the towing eye.
X Attach cover 001Ato the bumper and press
until it engages. 306
Towing and tow-startingBreakdown assistance
Page 314 of 360
Useful information
i This Operator's Manual describes all
models and all standard and optional
equipment of your vehicle available at the
time of publication of the Operator's
Manual. Country-specific differences are
possible. Please not ethat your vehicle may
not be equipped with all features
described. This also applies to safety-
related system sand functions.
i Read the information on qualified
specialist workshops: (Y page 25).Important safet
ynotes G
WARNING
If wheels and tires of the wrong size are used,
the wheel brakes or suspension components
may be damaged. There is arisk of an
accident.
Always replac ewheels and tires with those
that fulfill the specifications of the original
part.
When replacing wheels, make sure to use the
correct:
R designation
R model
When replacing tires, make sure to use the
correct:
R designation
R manufacturer
R model G
WARNING
Af lat tir eseverely impairs the driving,
steerin gand braking characteristics of the
vehicle. There is arisk of accident.
Tires without run-flat characteristics:
R do not drive with aflat tire.
R immediately replac ethe flat tir ewith your
emergenc yspare wheel or spare wheel, or
consult aqualified specialist workshop. Tires with run-flat characteristics:
R
pay attention to the information and
warnin gnotices on MOExtended tires (tires
with run-flat characteristics).
Accessories that are not approved for your
vehicle by Mercedes-Ben zorthat are not
being used correctly can impair operating
safety.
Before purchasing and using non-approved
accessories, visit aqualified specialist
workshop and inquire about:
R suitability
R legal stipulations
R factory recommendations
Information on dimensions and types of
wheels and tires for your vehicle can be found
(Y page 340).
Information on air pressure for the tires on
your vehicle can be found:
R on the vehicle's Tire and Loading
Information placard on the B-pillar
R on the tire pressure label on the fuel filler
flap
R under "Tire pressure"
i Further information on wheels and tires
can be obtained at any qualified specialist
workshop. Operation
Information on driving
R If the vehicle is heavily loaded, check the
tire pressures and correct them if
necessary.
R While driving, pay attention to vibrations,
noises and unusual handling
characteristics, e.g. pulling to one side.
This may indicate that the wheels or tires
are damaged. If you suspect that atire is
defective, reduce your speed immediately.
Stop the vehicle as soon as possible to
check the wheels and tires for damage.
Hidden tire damage could also be causing 312
OperationWheels and tires
Page 316 of 360
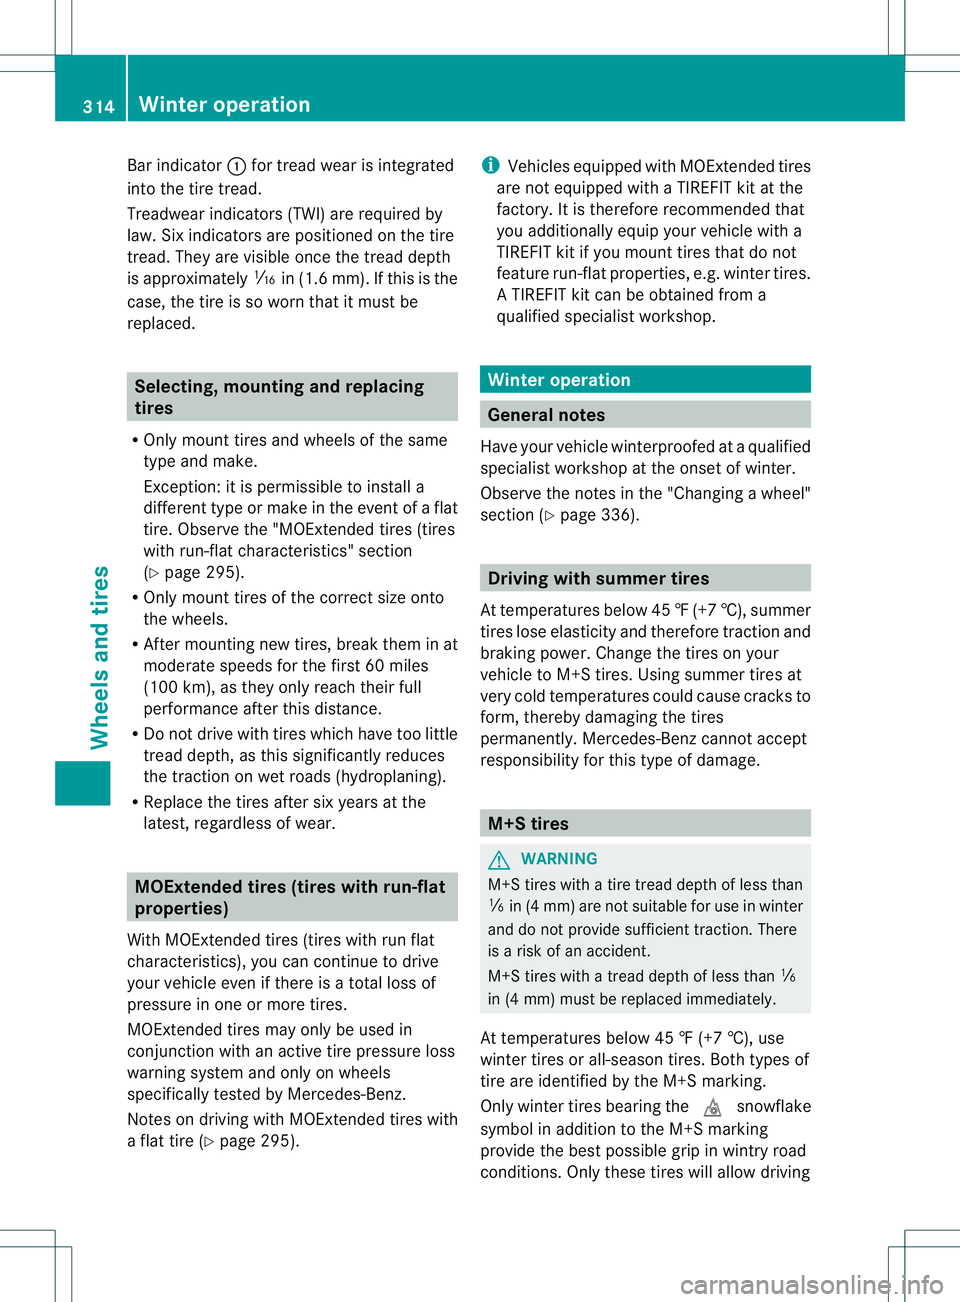
Bar indicator
001Afor trea dwearisi ntegrated
into the tire tread.
Treadwear indicator s(TWI) are required by
law. Six indicator sare positioned on the tire
tread. The yare visible once the trea ddepth
is approximately 0003in (1.6 mm). If this is the
case ,the tire is so worn that it mus tbe
replaced. Selecting, mounting and replacing
tires
R Only mount tires and wheels of the same
type and make.
Exception: it is permissible to install a
different type or make in the event of aflat
tire. Observe the "MOExtended tires (tires
with run-flat characteristics" section
(Y page2 95).
R Only mount tires of the correct size onto
the wheels.
R After mounting new tires, brea kthem in at
moderate speeds for the first 60 miles
(100 km), as they only reach their full
performance after this distance.
R Do not drive with tires which have too little
tread depth, as this significantly reduces
the traction on wet roads (hydroplaning).
R Replace the tires after six years at the
latest, regardless of wear. MOExtended tires (tires with run-flat
properties)
With MOExtended tires (tires with run flat
characteristics), you can continue to drive
your vehicle even if there is atotal loss of
pressure in one or more tires.
MOExtended tires may only be used in
conjunction with an active tire pressure loss
warning system and only on wheels
specifically tested by Mercedes-Benz.
Notes on driving with MOExtended tires with
af lat tire (Y page 295). i
Vehicles equipped with MOExtended tires
are not equipped with aTIREFIT kit at the
factory. It is therefore recommended that
you additionallye quip your vehicle with a
TIREFIT kit if you mount tires that do not
feature run-flat properties, e.g. winter tires.
AT IREFIT kit can be obtained from a
qualified specialist workshop. Winter operation
General notes
Have your vehicle winterproofed at aqualified
specialist workshop at the onset of winter.
Observe the notes in the "Changing awheel"
section (Y page 336). Driving with summer tires
At temperatures below 45 ‡(+7 †), summer
tires lose elasticity and therefore traction and
braking power. Change the tires on your
vehicle to M+S tires. Using summe rtires at
very cold temperatures coul dcause cracks to
form, thereb ydamaging the tires
permanently. Mercedes-Benz cannot accept
responsibility for this type of damage. M+S tires
G
WARNING
M+S tires with atire tread depth of less than
0015 in (4 mm) are not suitabl efor use in winter
and do not provide sufficient traction. There
is ar isk of an accident.
M+S tires with atread depth of less than 0015
in (4 mm) must be replaced immediately.
At temperatures below 45 ‡(+7 †), use
winter tires or all-season tires. Both type sof
tire are identified by the M+S marking.
Only winter tires bearing the 000Esnowflake
symbol in addition to the M+S marking
provide the best possibl egrip in wintry road
conditions. Only these tires will allow driving 314
Winte
roperationWheels and tires
Page 332 of 360
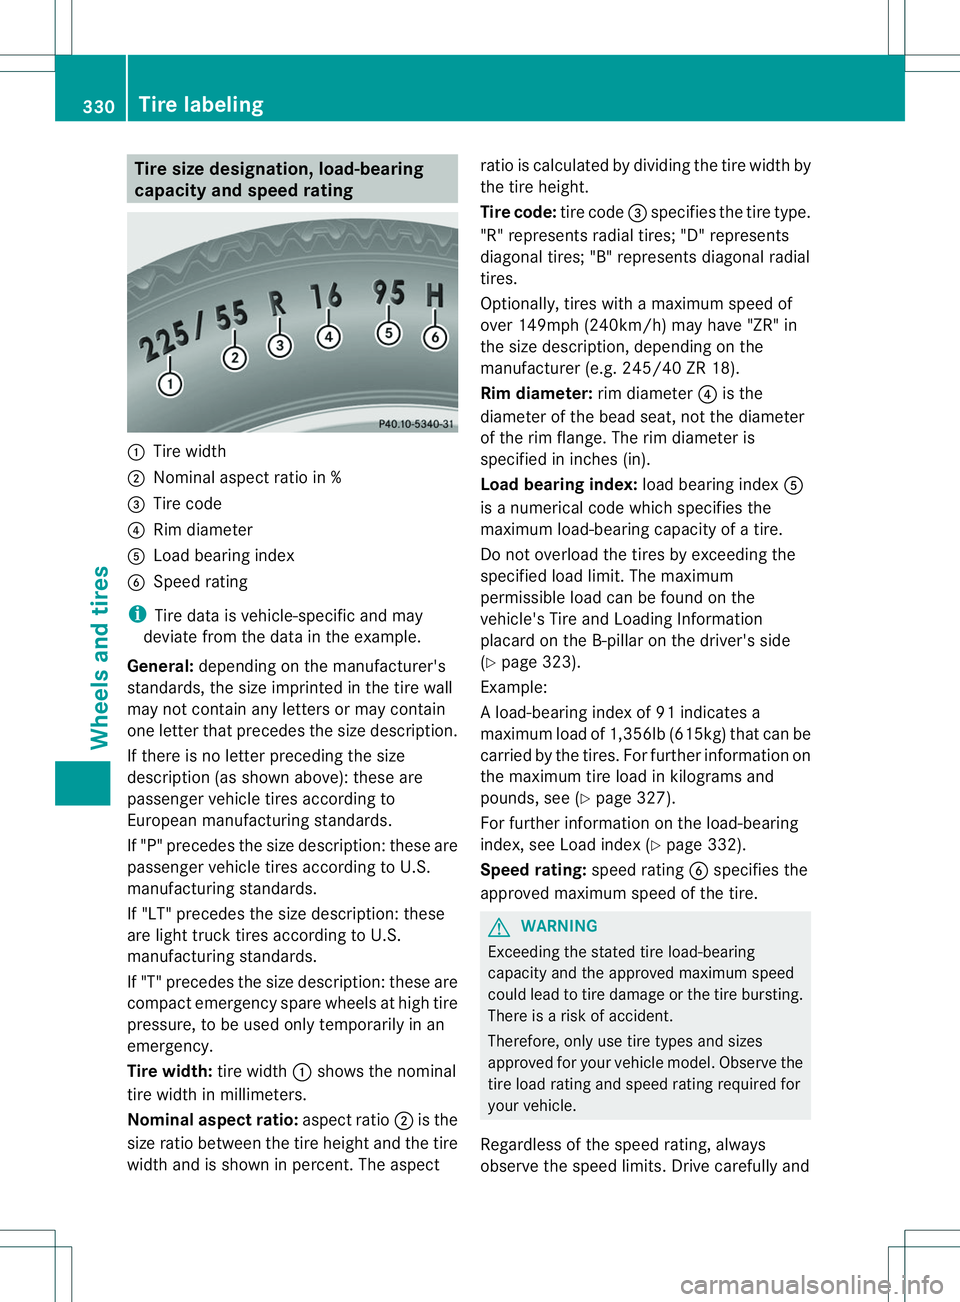
Tire size designation
,load-bearing
capacit yand speed rating 001A
Tire width
0010 Nominal aspec tratio in %
0023 Tire code
0021 Rim diameter
001E Load bearing index
0024 Speed rating
i Tire dat aisvehicle-specific and may
deviate from th edataint heexample.
General: dependingonthemanufacturer's
standards ,the sizeimprinted in th etirew all
may no tcontai nany letters or may contain
on elette rthat precedes the size description.
If there is no letter preceding the size
description (as shown above): these are
passenger vehicle tires according to
European manufacturing standards.
If "P" precedes the size description: these are
passenger vehicle tires according to U.S.
manufacturing standards.
If "LT" precedes the size description: these
are light truck tires according to U.S.
manufacturing standards.
If "T" precedes the size description: these are
compact emergency spare wheels at high tire
pressure, to be used only temporarily in an
emergency.
Tire width: tire width001Ashows the nominal
tire width in millimeters.
Nominal aspect ratio: aspect ratio0010is the
size ratio between the tire height and the tire
width and is shown in percent.T he aspectratio is calculated by dividing the tire width by
the tire height.
Tire code:
tire code0023specifies the tire type.
"R" represents radial tires; "D" represents
diagonal tires; "B" represents diagonal radial
tires.
Optionally, tires with amaximum speed of
over 149mph (240km/h) may have "ZR"in
the size description, depending on the
manufacturer (e.g. 245/40 ZR 18).
Rim diameter: rim diameter0021is the
diameter of the bead seat, not the diameter
of the rim flange. The rim diameter is
specified in inches (in).
Load bearing index: load bearing index001E
is an umerical code which specifies the
maximum load-bearing capacity of atire.
Do not overload the tires by exceeding the
specified load limit. The maximum
permissible load can be found on the
vehicle's Tire and Loading Information
placard on the B-pillar on the driver's side
(Y page 323).
Example:
Al oad-bearing index of 91 indicates a
maximum load of 1,356lb (615kg) that can be
carried by the tires. For further information on
the maximum tire load in kilograms and
pounds, see (Y page 327).
For further information on the load-bearing
index, see Load index (Y page 332).
Speed rating: speed rating0024specifies the
approved maximum speed of the tire. G
WARNING
Exceeding the stated tire load-bearing
capacity and the approved maximum speed
could lead to tire damage or the tire bursting.
There is arisk of accident.
Therefore, only use tire types and sizes
approved for your vehicle model. Observe the
tire load rating and speed rating required for
your vehicle.
Regardless of the speed rating, always
observe the speed limits. Drive carefully and 330
Tirel
abelingWheels and tires
Page 334 of 360
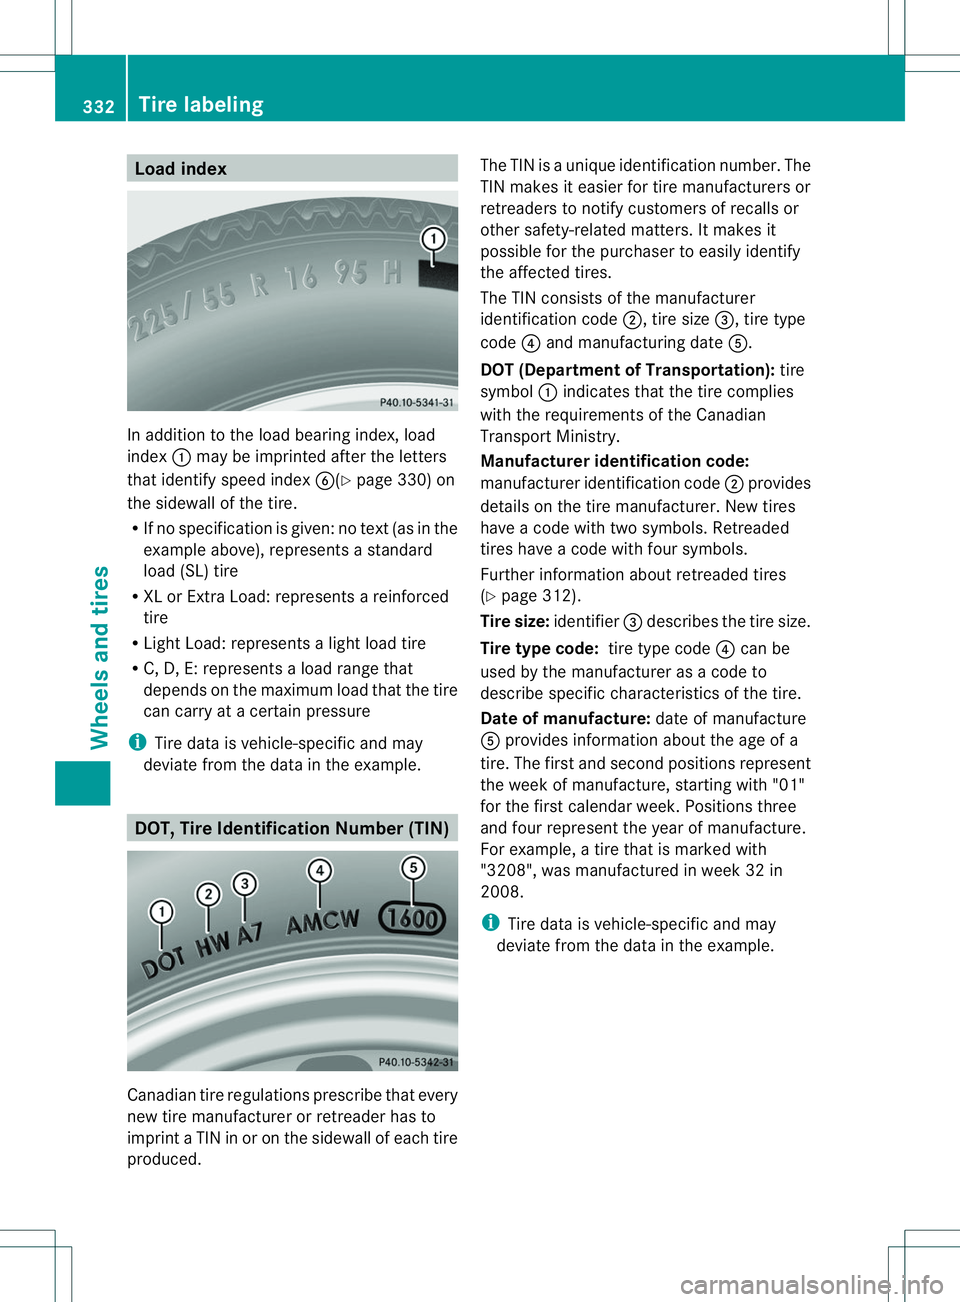
Load index
In addition to th
eload bearin gindex, load
index 001Amay be imprinted after th eletters
that identif yspeed index 0024(Ypage 330) on
th es idewall of th etire.
R If no specificatio nisgiven: no text (as in the
example above), represents astandard
load (SL )tire
R XL or Extra Load: represents areinforced
tire
R Ligh tLoad: represent salight load tire
R C, D, E: represent saload range that
depends on the maximum load that the tire
can carry at acertain pressure
i Tire data is vehicle-specific and may
deviate from the data in the example. DOT, Tire Identification Number (TIN)
Canadia
ntire regulations prescribe that every
new tir emanufacturer or retreader has to
imprin taTIN in or on the sidewall of each tire
produced. The TIN is
aunique identification number. The
TIN makes it easier for tire manufacturers or
retreaders to notify customers of recalls or
other safety-related matters. It makes it
possible for the purchaser to easily identify
the affected tires.
The TIN consists of the manufacturer
identification code 0010,tire size 0023,tire type
code 0021and manufacturing date 001E.
DOT (Department of Transportation): tire
symbol 001Aindicates that the tire complies
with the requirement softhe Canadian
Transport Ministry.
Manufacturer identification code:
manufacturer identification code 0010provides
details on the tire manufacturer. New tires
have acode with two symbols. Retreaded
tires have acode with four symbols.
Further information about retreaded tires
(Y page 312).
Tire size: identifier0023describes the tire size.
Tire typec ode:tire type code 0021can be
used by the manufacturer as acode to
describe specific characteristics of the tire.
Date of manufacture: date of manufacture
001E provides information about the age of a
tire. The first and second positions represent
the week of manufacture, starting with "01"
for the first calendar week. Positions three
and four represent the year of manufacture.
For example, atire that is marked with
"3208", was manufactured in week 32 in
2008.
i Tire data is vehicle-specific and may
deviate from the data in the example. 332
Tirel
abelingWheels and tires