2014 MERCEDES-BENZ B-CLASS SPORTS wheel size
[x] Cancel search: wheel sizePage 21 of 360
Loading
.......................................... 323
Locking (in an emergency) ...............81
Locking (SmartKey) .......................... 74
Lowering ........................................ 339
Maintenance .................................... 22
Parking for along period ................ 155
Pulling away ................................... 138
Raising ........................................... 337
Reporting problems .........................25
Securing from rolling away ............337
Towing away .................................. 305
Tow-starting ................................... 305
Transporting .................................. 307
Unlocking (in an emergency) ...........81
Unlocking (SmartKey) ......................74
Vehicle data ................................... 353
Vehicle data ....................................... 353
Vehicle dimensions ...........................353
Vehicle emergency locking ................81
Vehicle identification number see VIN
Vehicle identification plate ..............346
Vehicle tool kit .................................. 294
Video (DVD) ........................................ 197
VIN ...................................................... 346W
Warning and indicator lamps ABS ................................................ 239
Brakes ........................................... 239
Check Engine ................................. 245
Coolant .......................................... 245
Distance warning ........................... 247
DISTRONI CPLUS ........................... 247
ESP ®
.............................................. 241
ESP ®
OFF ....................................... 242
Fuel tank ........................................ 245
Overview .......................................... 32
PASSENGER AIR BAG OFF
indicator lamp .................................. 47
Reserve fuel ................................... 245
Seat bel t........................................ 237
SRS ................................................ 244
Tire pressure monitor ....................248
Warranty ............................................ 346
Washer fluid Display message ............................ 236Whee
lboltt ightening torque ...........339
Whee lchock ...................................... 337
Wheels Changing awheel .......................... 336
Checking ........................................ 313
Cleaning ......................................... 287
Cleaning (warning) .........................336
Emergency spare wheel .................342
Important safety notes ..................312
Interchanging/changing ................336
Mounting anew wheel ................... 339
Mounting awheel .......................... 337
Removing awheel .......................... 339
Storing ........................................... 336
Tightening torqu e........................... 339
Whee lsize/tir esize ....................... 340
Windo wcurtain air bag
Display message ............................ 217
Operation ........................................ .47
Windows
see Side windows
Windshield
Defrosting ...................................... 130
Windshiel dwasher system
Adding washer fluid .......................284
Notes ............................................. 352
Windshiel dwipers
Display message ............................ 236
Problem (malfunction) ...................120
Rea rwindow wiper ........................ 118
Replacing the wiper blades ............118
Switching on/off ........................... 117
Winte rdriving
Slippery roa dsurface s................... 160
Snow chains .................................. 315
Winte roperation
General notes ................................ 314
Winte rtires
M+S tires ....................................... 314
Wiper blades
Cleaning ......................................... 288
Important safety notes ..................118
Replacing (rea rwindow) ................ 119
Replacing (windshield )................... 118
Wooden trim (cleaning instructions) 290
Workshops see Qualified specialist workshop Index
19
Page 46 of 360
As the ai
rbag inflate swith considerable
spee dand force, aproper seating position
and correc tpositioning of th ehands on the
steering wheel will help to keep you at asafe
distanc efromt heair bag. Occupants who are
no tw earing their seat belt, are not seated
properly or are too close to the air bag can be
seriously injured or killed by an air bag, as it
inflates with great forc einstantaneously:
R sit with the seat belt fastened correctly and
in ap osition that is as upright as possible
with your back against the backrest.
R move the driver's seat as far back as
possible, still permitting proper operation
of vehicle controls. The distanc efrom the
center of the driver's chest to the center of
the air bag cover on the steerin gwheel
must be at least 10 inches (25 cm). You
should be able to accomplish this by
adjustin gthe seat and steerin gwheel. If
you have any difficulties, please contact an
authorized Mercedes-Benz Center.
R do not lean your head or chest close to the
steerin gwheel or dashboard.
R only hold the steerin gwheel on the outside.
Placing hands and arms inside the rim can
increase the risk and potential severit yof
hand/arm injury if the driver fron tair bag
inflates.
R adjust the front-passenger seat as far back
as possible from the dashboard when the
seat is occupied.
R occupants, especially children ,should
never place their bodies or lean their heads
in the area of the door where the side
impact air bag inflates .This could result in
serious or fatal injuries should the side
impact air bag be deployed. Always sit as
upright as possible, wear the seat belt
properly and use an appropriately sized
infant restraint,t oddler restraint or booster
seat recommended for the size and weight
of the child.
Failure to follow these instructions can result
in severe injuries to you or other occupants. If you sell your vehicle, it is important that you
make the buyer aware of this safety
information. Be sure to give the buyer this
Operator's Manual.
If the air bags are deployed, you will hear a
bang, and asmall amount of powder may also
be released. Only in rare cases will the bang
affect your hearing. The powder that is
released generally does not constitute a
health hazard and does not indicate that there
is af ire in the vehicle. The dust might cause
some temporary breathing difficulty for
people with asthma or other breathing
trouble. To avoid this, you may wish to get out
of the vehicle as soon as it is safe to do so.
You can also open the window to allow fresh
air to enter the vehicle interior. The 0021SRS
warning lamp lights up.
The air bag installation locations are
identified by the AIR BAG symbol.
The air bags are deployed if the air bag control
unit detects the need for deployment.O nly in
the event of such asituatio nwill the air bags
provide their supplemental protection.
If the drive rand front passenge rdonot wear
their seat belts, it is not possible for the air
bags to provide their supplemental
protection.
In the event of other types of impacts and
impacts below air bag deployment
thresholds, the air bags will not deploy. The
driver and passenger will then be protected
to the extentp ossible byaproperly fastened
seat belt. Aproperl yfastened seat beltisa lso
needed to provide the best possible
protection in arollover.
Air bags provide additional protection; they
are not, however, asubstitute for seat belts.
All vehicle occupants must fasten their seat
belts regardless of whether your vehicle is
equipped with air bags or not.
It is important for your safety and that of your
passenger to have deployed air bags replaced
and to have any malfunctioning air bags
repaired. This will help to make sure the air
bags continue to perform their protective 44
Occupant safetySafety
Page 95 of 360
The seat belt should:
R
fit snugly across your body
R be routed across the middle of your
shoulder
R be routed in your pelvic area across the
hip joints
X Before starting off, adjust the rear-view
mirror and the exterior mirrors
(Y page 99) in such away that you have
ag ood view of road and traffic conditions.
X Vehicles with amemor yfunction: save
the seat and exterior mirror settings
(Y page 101). Seats
Important safety notes
G
WARNING
Children could become trapped if they adjust
the seats, particularly when unattended.
There is arisk of injury.
When leaving the vehicle, alway stake the
SmartKey with you and lock the vehicle. Never
leave children unsupervised in the vehicle. G
WARNING
You could lose control of your vehicle if you
do the following while driving:
R adjust the driver's seat, head restraint,
steerin gwheel or mirrors
R fasten the seat belt
There is arisk of an accident.
Adjust the driver's seat, head restraint,
steerin gwheel and mirror and fasten your
seat belt before starting the engine. G
WARNING
If you adjust the seat height carelessly, you or
other vehicle occupant scould be trapped and
thereby injured. Children in particular could
accidentally press the electrical seat
adjustmen tbutton sand become trapped.
Ther eisar iskofi njury. While moving the seats, make sure tha
tyour
hands or other body parts do not get under
the lever assembly of the seat adjustment
system. G
WARNING
When you adjust aseat, you or other vehicle
occupant scould become trapped, e.g. on the
seat guide rail. There is arisk of injury.
Make sure when adjusting aseat that no one
has any body parts in the sweep of the seat. G
WARNING
The seat belt does not offer the intended level
of protection if the backrest is not in the
upright position .When braking or in the event
of an accident, you could slide underneath the
seat belt and sustain abdomen or neck
injuries, for example. This poses an increased
risk of injury or even fatal injury.
Adjust the seat properly before beginning
your journey. Always make sure that the seat
is in the upright position. G
WARNING
If head restraintsa re not installed and
adjusted correctly, they cannot provide
protection as intended. There is an increased
risk of injury in the head and neck area, e.g.
in the event of an accident or when braking.
Always drive with the head restraints
installed. Before driving off, make sure for
every vehicle occupant that the center of the
head restraint supports the back of the head
at about eye level. G
WARNING
According to accident statistics, children are
safer when properly restrained on the rear
seats than on the front-passenger seat. Thus,
we strongly recommendt hat children be
placed in the rear seat whenever possible.
Regardless of seating position, children 12
years old and under must be seated and
properly secured in an appropriately sized
child restraint system or booster seat Seats
93Seats, steering wheela nd mirrors
Z
Page 96 of 360
recommended for the size and weight of the
child
.For additional information, see the
"Children in the vehicle" section.
Ac hild's risk of serious or fatal injuries is
significantly increased if the child restraints
are not properly secured in the vehicle and/
or the child is not properly secured in the child
restraint.
! To avoid damage to the seats and the seat
heating, observe the following information:
R keep liquids from spilling on the seats. If
liquidiss pilled on the seats, dry them as
soon as possible.
R if the seat covers are damp or wet, do not
switch on the seat heating. The seat
heating should also not be used to dry
the seats.
R clean the seat covers as recommended;
see the "Interior care" section.
R do not transport heavy loads on the
seats. Do not place sharp objectsont he
seat cushions, e.g. knives, nails or tools.
The seats should only be occupied by
passengers, if possible.
R when the seat heating is in operation, do
not cover the seats with insulating
materials, e.g. blankets, coats, bags,
seat covers, child seats or booster seats.
! Make sure that there are no objectsint he
footwell or behind the seats when resetting
the seats. There is arisk that the seats
and/or the objectsc ould be damaged.
i The head restraintsint he front and rear
seats can be removed. 1
For more information ,contact aqualified
specialist workshop.
i Further related subjects:
R Luggage compartmente nlargement
(folding down the rea rseats)
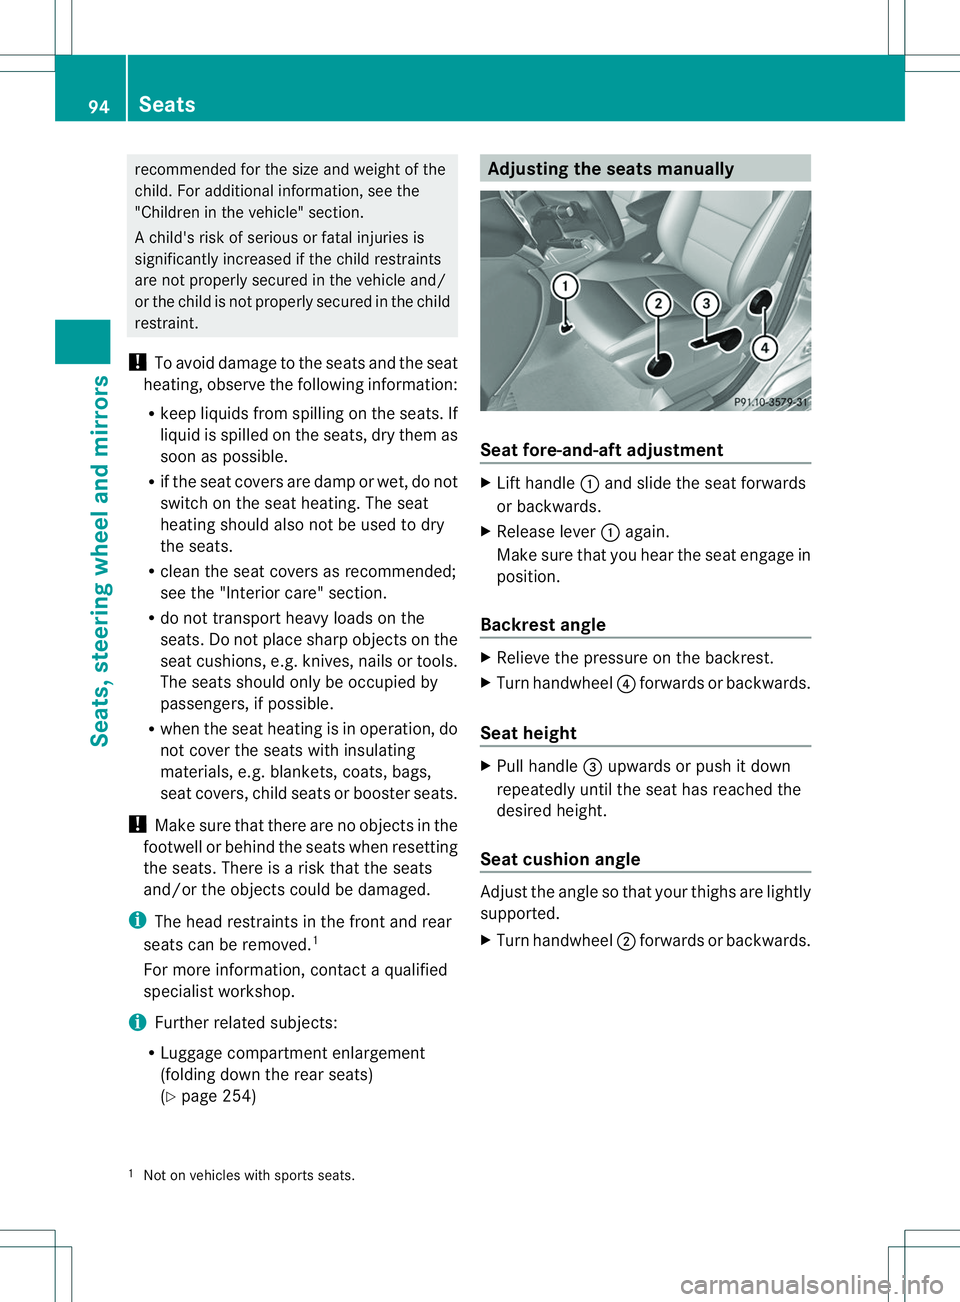
(Y page 254) Adjusting the seats manually
Seat fore-and-aft adjustment
X
Lift handle 001Aand slide the seat forwards
or backwards.
X Release lever 001Aagain.
Make sure that you hear the seat engage in
position.
Backrest angle X
Relieve the pressure on the backrest.
X Turn handwheel 0021forwards or backwards.
Seat height X
Pull handle 0023upwards or push it down
repeatedly until the seat has reached the
desired height.
Seat cushion angle Adjust the angle so that your thighs are lightly
supported.
X
Turn handwheel 0010forwards or backwards.
1 Not on vehicles with sport sseats. 94
SeatsSeats, steering wheel and mirrors
Page 101 of 360
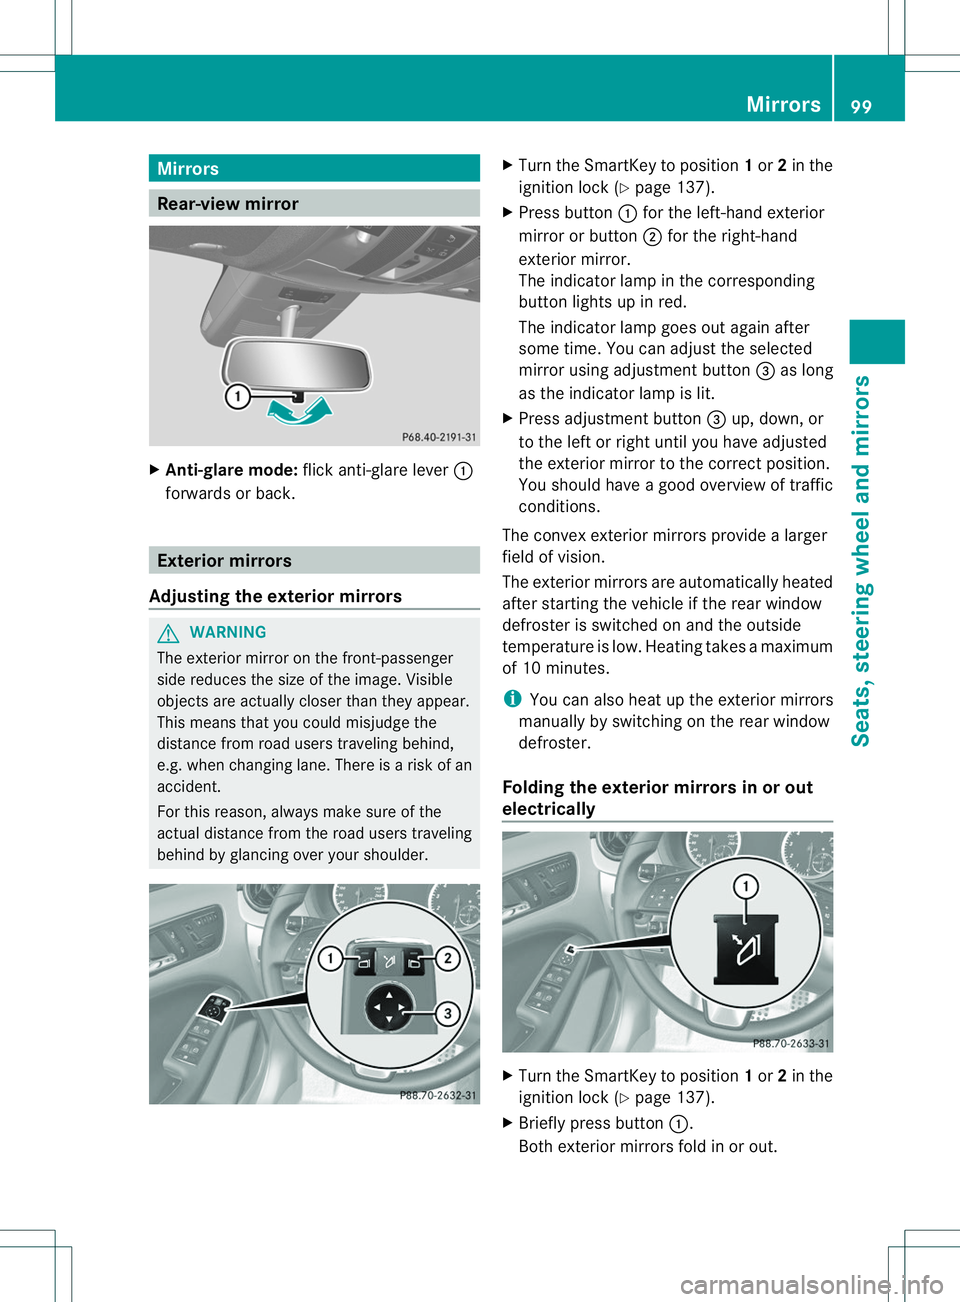
Mirrors
Rear-view mirror
X
Anti-glare mode: flick anti-glare lever 001A
forwards or back. Exterior mirrors
Adjusting the exterior mirrors G
WARNING
The exterior mirror on the front-passenger
side reduces the size of the image. Visible
objects are actually closer than they appear.
This means that you coul dmisjudge the
distance from road users traveling behind,
e.g. when changing lane .There is arisk of an
accident.
For this reason, always make sure of the
actual distance from the road users traveling
behind by glancing over your shoulder. X
Turn the SmartKey to position 1or 2in the
ignition lock (Y page 137).
X Press button 001Afor the left-hand exterior
mirror or button 0010for the right-hand
exterior mirror.
The indicator lamp in the corresponding
button lights up in red.
The indicator lamp goes out again after
some time. You can adjust the selected
mirror using adjustment button 0023as long
as the indicator lamp is lit.
X Press adjustment button 0023up, down, or
to the left or right until you have adjusted
the exterior mirror to the correct position.
You should have agood overview of traffic
conditions.
The convex exterior mirrors provide alarger
field of vision.
The exterior mirrors are automatically heated
after startingt he vehicle if the rear window
defroster is switched on and the outside
temperature is low. Heating takes amaximum
of 10 minutes.
i You can also heat up the exterior mirrors
manually by switching on the rear window
defroster.
Folding the exterior mirrors in or out
electrically X
Turn the SmartKey to position 1or 2in the
ignition lock (Y page 137).
X Briefly press button 001A.
Both exterior mirrors fold in or out. Mirrors
99Seats, steering wheela nd mirrors Z
Page 297 of 360
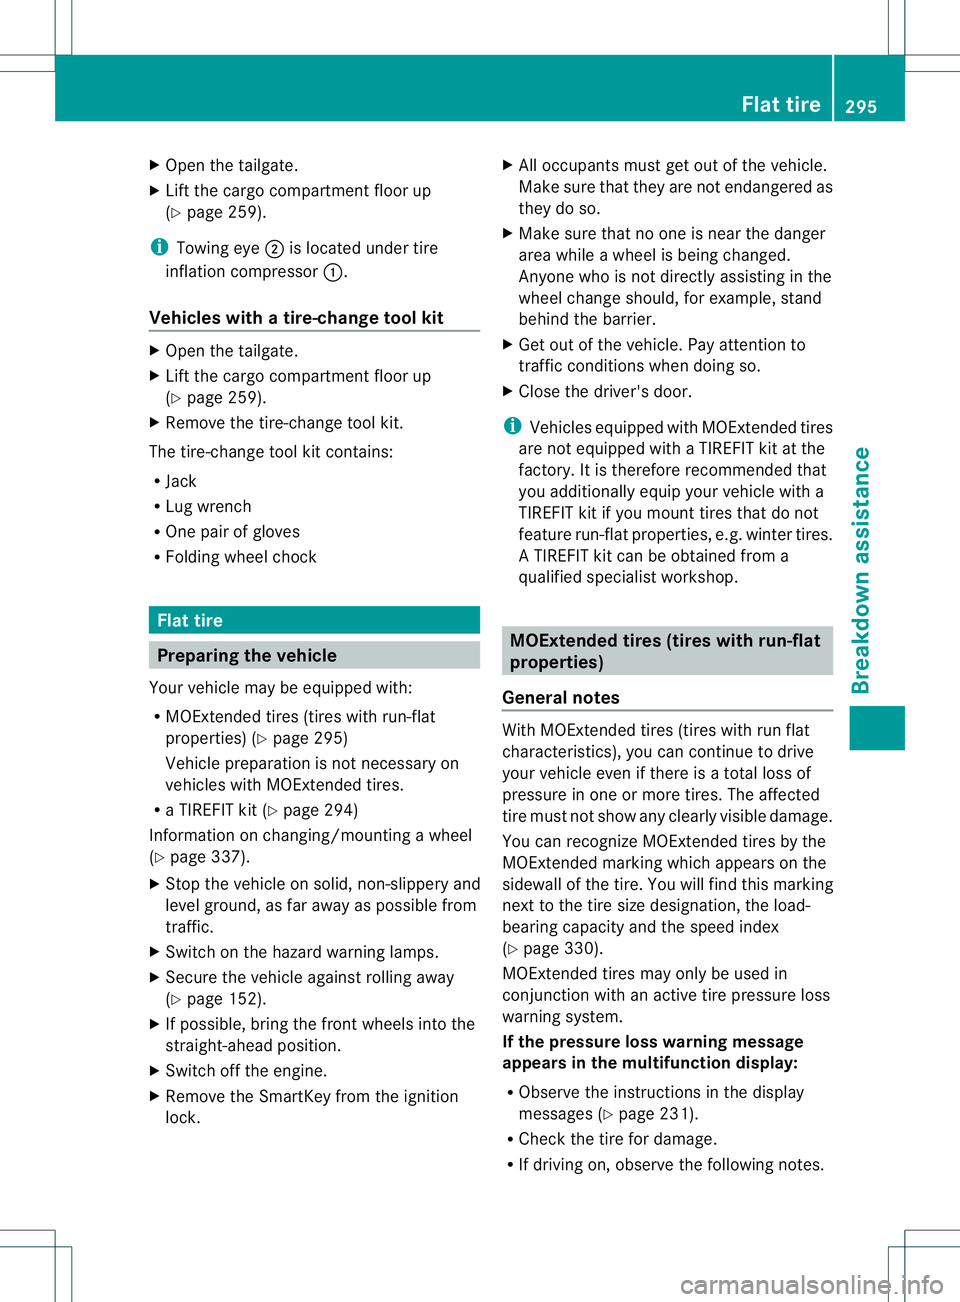
X
Open the tailgate.
X Lift the cargo compartment floor up
(Y page 259).
i Towing eye 0010is located under tire
inflation compressor 001A.
Vehiclesw ithatire-change tool kit X
Open the tailgate.
X Lift the carg ocompartmen tfloor up
(Y page 259).
X Remove the tire-change too lkit.
The tire-chang etoolkit contains:
R Jack
R Lug wrench
R One pair of gloves
R Foldin gwheel chock Flat tire
Preparing th
evehicle
Your vehicle may be equipped with:
R MOExtende dtires (tires with run-flat
properties )(Y page 295)
Vehicle preparation is not necessary on
vehicles with MOExtende dtires.
R aT IREFIT kit (Y page 294)
Information on changing/mounting awheel
(Y page 337).
X Stop the vehicle on solid, non-slippery and
level ground, as far away as possible from
traffic.
X Switch on the hazar dwarnin glamps.
X Secure the vehicle against rollin gaway
(Y page 152).
X If possible ,brin gthe front wheels int othe
straight-ahead position.
X Switch off the engine.
X Remove the SmartKey fro mthe ignition
lock. X
All occupant smust get out of the vehicle.
Make sure that the yare not endangered as
the ydos o.
X Make sure that no one is near the danger
area while awheel is being changed.
Anyone who is not directly assisting in the
wheel change should, for example, stand
behin dthe barrier.
X Get out of the vehicle. Pay attention to
traffic conditions when doing so.
X Close the driver's door.
i Vehicles equipped with MOExtende dtires
are not equipped with aTIREFIT kit at the
factory. It is therefore recommende dthat
you additionally equip your vehicle with a
TIREFIT kit if you moun ttires that do not
feature run-flat properties ,e.g. winter tires.
AT IREFIT kit can be obtained fro ma
qualified specialist workshop. MOExtended tires (tires with run-flat
properties)
General notes With MOExtende
dtires (tires with run flat
characteristics), you can continue to drive
your vehicle even if there is atotal loss of
pressure in one or mor etires. The affected
tir em ust not show any clearly visible damage.
You can recognize MOExtende dtires by the
MOExtende dmarking which appears on the
sidewall of the tire. You will fin dthis marking
nex ttot he tire size designation, the load-
bearing capacity and the speed index
(Y page 330).
MOExtended tires may only be used in
conjunction with an active tire pressure loss
warning system.
If the pressur eloss warning message
appears in the multifunction display:
R Observe the instructions in the display
messages (Y page 231).
R Check the tire for damage.
R If driving on, observe the following notes. Flat tire
295Breakdown assistance
Page 298 of 360
The maximum driving distanc
eis
approximately 50 miles (80 km) when the
vehicle is partially laden and approximately
18 miles (30 km) when the vehicle is fully
laden.
In addition to the vehicle load, the driving
distanc epossible depends upon:
R Speed
R Road condition
R Outside temperature
The driving distanc epossible in run-flat mode
may be reduced by extreme driving
conditions/maneuvers, or it can be increased
through amoderate style of driving.
The maximum permissible distanc ewhich
can be driven in run-flat mode is counted from
the moment the tire pressure loss warning
appears in the multifunction display.
You must not exceed amaximum speed of
50 mph (80 km/h).
i When replacing one or all tires, make sure
that you use only tires:
R of the size specified for the vehicle and
R marked "MOExtended"
If at ire has gone flat and cannot be
replaced with aMOExtended tire, a
standard tire may be used as atemporary
measure. Make sure that you use the
proper size and type (summer or winter
tire).
i Vehicles equipped with MOExtended tires
are not equipped with aTIREFIT kit at the
factory. It is therefore recommended that
you additionally equip your vehicle with a
TIREFIT kit if you mount tires that do not
feature run-flat properties, e.g. winter tires.
AT IREFIT kit can be obtained from a
qualified specialist workshop.
Important safety notes G
WARNING
When driving in emergenc ymode, the driving
characteristics deteriorate, e.g. when cornering, acceleratin
gquickly and when
braking. There is arisk of an accident.
Do not exceed the stated maximum speed.
Avoid abrupt steerin gand driving maneuvers,
and driving over obstacles (curbs, potholes,
off-road). This applies in particular to aladen
vehicle.
Stop driving in emergenc ymode if:
R you hear banging noises.
R the vehicle start stoshake.
R you see smoke and smell rubber.
R ESP ®
is intervening constantly.
R there are tears in the sidewalls of the tire.
After driving in emergenc ymode, have the
wheel rims checked at aqualified specialist
workshop with regard to their further use. The
defective tire must be replaced in every case. TIREFIT kit
Important safety notes TIREFIT is
atire sealant.
You can use TIREFIT to seal punctures of up
to 0.16in(4m m),particularl ythose in the tire
tread. Yo ucan us eTIREFIT at outside
temperatures down to 000F4‡(000F20 †). G
WARNING
In the following situations, the tir esealan tis
unabl etop rovide sufficient breakdown
assistance, as it is unabl etosealthe tire
properly:
R there ar ecutsorp unctures in the tir elarger
tha nthose mentioned above.
R the wheel rim is damaged.
R you have driven at very low tire pressures
or on aflat tire.
There is arisk of an accident.
Do not drive the vehicle. Contact aqualified
specialist workshop. 296
Flat tireBreakdown assistance
Page 314 of 360
Useful information
i This Operator's Manual describes all
models and all standard and optional
equipment of your vehicle available at the
time of publication of the Operator's
Manual. Country-specific differences are
possible. Please not ethat your vehicle may
not be equipped with all features
described. This also applies to safety-
related system sand functions.
i Read the information on qualified
specialist workshops: (Y page 25).Important safet
ynotes G
WARNING
If wheels and tires of the wrong size are used,
the wheel brakes or suspension components
may be damaged. There is arisk of an
accident.
Always replac ewheels and tires with those
that fulfill the specifications of the original
part.
When replacing wheels, make sure to use the
correct:
R designation
R model
When replacing tires, make sure to use the
correct:
R designation
R manufacturer
R model G
WARNING
Af lat tir eseverely impairs the driving,
steerin gand braking characteristics of the
vehicle. There is arisk of accident.
Tires without run-flat characteristics:
R do not drive with aflat tire.
R immediately replac ethe flat tir ewith your
emergenc yspare wheel or spare wheel, or
consult aqualified specialist workshop. Tires with run-flat characteristics:
R
pay attention to the information and
warnin gnotices on MOExtended tires (tires
with run-flat characteristics).
Accessories that are not approved for your
vehicle by Mercedes-Ben zorthat are not
being used correctly can impair operating
safety.
Before purchasing and using non-approved
accessories, visit aqualified specialist
workshop and inquire about:
R suitability
R legal stipulations
R factory recommendations
Information on dimensions and types of
wheels and tires for your vehicle can be found
(Y page 340).
Information on air pressure for the tires on
your vehicle can be found:
R on the vehicle's Tire and Loading
Information placard on the B-pillar
R on the tire pressure label on the fuel filler
flap
R under "Tire pressure"
i Further information on wheels and tires
can be obtained at any qualified specialist
workshop. Operation
Information on driving
R If the vehicle is heavily loaded, check the
tire pressures and correct them if
necessary.
R While driving, pay attention to vibrations,
noises and unusual handling
characteristics, e.g. pulling to one side.
This may indicate that the wheels or tires
are damaged. If you suspect that atire is
defective, reduce your speed immediately.
Stop the vehicle as soon as possible to
check the wheels and tires for damage.
Hidden tire damage could also be causing 312
OperationWheels and tires