2014 MERCEDES-BENZ B-CLASS SPORTS height adjustment
[x] Cancel search: height adjustmentPage 8 of 360
Exhaus
tpipe .................................. 290
Exterior lights ................................ 289
Gea rors electo rlever .................... 290
Interior ........................................... 290
Matte finish ................................... 288
Notes ............................................. 285
Paint .............................................. 287
Plastic trim .................................... 290
Power washer ................................ 287
Rea rview camera .......................... 289
Roo flining ...................................... 291
Seat bel t........................................ 291
Seat cover ..................................... 291
Sensors ......................................... 289
Steering wheel ............................... 290
Trim pieces .................................... 290
Washing by hand ........................... 286
Wheels ........................................... 287
Windows ........................................ 288
Wiper blades .................................. 288
Wooden trim .................................. 290
Cargo compartment cover ...............258
Cargo compartment enlargement ...254
Important safety notes ..................254
Notes on use ................................. 256
Cargo compartment floor
Height adjustment .........................260
Important safety notes ..................259
Opening/closing ............................ 259
Stowag ewell (under) ..................... 259
Cargo net
Attaching ....................................... 259
Important safety information .........259
Cargo tie dow nrings ......................... 257
Car wash (care) ................................. 286
Center console Lowe rsection .................................. 35
Uppe rsection .................................. 34
Central locking
Automatic locking (on-board
computer) ...................................... 205
Locking/unlocking (SmartKey) ........74
Changing bulbs
Brake lamps ................................... 115
Cornering light function .................114
High-beam headlamps ...................113
License plate lighting .....................117
Low-beam headlamps ....................113Parking lamps
................................ 113
Rea rfog lamp ................................ 115
Reversing lamps ............................ 115
Standing lamps (front) ...................113
Tai llamps ...................................... 115
Turn signals (front) ......................... 114
Turn signals (rear) ..........................115
Child-proof locks
Important safety notes ....................61
Rea rdoors ....................................... 62
Children
In the vehicle ................................... 56
Restraint systems ............................ 56
Child seat
LATCH-typ e(ISOFIX) chil dseat
anchors ............................................ 60
On the front-passenger sea t............ 59
Top Tether ....................................... 60
Cigarette lighter ................................ 264
Climate control Automatic climate control .............123
Automatic climate control (dual-
zone) .............................................. 125
Controlling automatically ...............128
Cooling with aird ehumidification..126
Defrosting the windows .................130
Defrosting the windshield ..............130
Important safety notes ..................122
Indicator lamp ................................ 128
Notes on using automatic climate
control ........................................... 125
Notes on using dual-zone
automatic climate control ..............123
Overview of systems ......................122
Problems with cooling with air
dehumidification ............................ 128
Problem with the rear window
defroster ........................................ 132
Refrigerant ..................................... 352
Refrigerant filling capacity .............353
Setting the aird istribution.............129
Setting the airflow .........................129
Setting the airv ents...................... 133
Setting the temperature ................128
Switching air-recirculation mode
on/off ............................................ 132
Switching on/off ........................... 126
Switching residua lheato n/off ......132 6
Index
Page 55 of 360
bags, and ETDs) impact
swhich exceed
preset deployment thresholds and in
certain rollovers (window curtain air bags
and ETDs).
R Never wear the shoulder belt under your
arm, across your nec koroff yourshoulder.
In af rontal crash, your body would move
too far forward. That would increase the
chance of head and neck injuries. The seat
belt would also apply too much force to the
ribs or abdomen, which could severely
injure internal organs such as your liver or
spleen.
Adjust the seat belt so that the shoulder
section is located as close as possible to
the middle of the shoulder. It should not
touch the neck.N ever pass the shoulder
portion of the seat belt under your arm. For
this purpose, you can adjust the height of
the seat belt outlet.
R Position the lap belt as low as possible on
your hips and not across the abdomen. If
the lap belt is positioned across your
abdomen, it could cause serious injuries in
ac rash.
R Never wear seat belts over rigid or
breakable objects in or on your clothing,
such as eyeglasses, pens, keys etc., as
these might cause injuries.
R Make sure the seat belt is alway sfitted
snugly. Take special care of this when
wearing loose clothing.
R Never use aseat belt for more than one
person at atime. Do not fasten aseat belt
around aperson and another person or
other objects at the same time.
R Seat belts should not be worn twisted. In a
crash, you would not have the full width of
the seat belt to distribut eimpact forces.
The twisted seat belt against yourb ody
could cause injuries.
R Pregnant women should also alwaysu se a
lap-shoulder belt. The lap belt portion
should be positioned as low as possible on
the hips to avoid any possible pressure on
the abdomen. R
Place the seat backrest in aposition that is
as upright as possible.
R Check your seat belt during travel to make
sure it is properly positioned.
R Never place your feet on the instrument
panel, dashboard, or on the seat. Always
keep both feet on the floor in front of the
seat.
R When using aseat belt to secure infant
restraints, toddler restraints, or children in
booster seats, alwaysf ollow the child seat
manufacturer' sinstructions. G
WARNING
Do not pass seat belts over sharp edges. They
could tear.
Do not allow the seat belt to get caught in the
door or in the seat adjustment mechanism.
This could damage the seat belt.
Never attempt to make modifications to seat
belts. This could impair the effectiveness of
the seat belts.
Fastening seat belts G
WARNING
According to accident statistics, children are
safer when properly restrained on the rear
seats than on the front-passenger seat. Thus,
we strongly recommen dthat children be
placed in the rear seat whenever possible.
Regardless of seating position, children 12
years old and under must be seated and
properly secured in an appropriately sized
child restraint system or booster seat
recommended for the size and weight of the
child. For additional information, see the
"Children in the vehicle" section.
Ac hild's risk of serious or fatal injuries is
significantly increased if the child restraints
are not properly secured in the vehicle and/
or the child is not properly secured in the child
restraint. Occupant safety
53Safety Z
Page 56 of 360
X
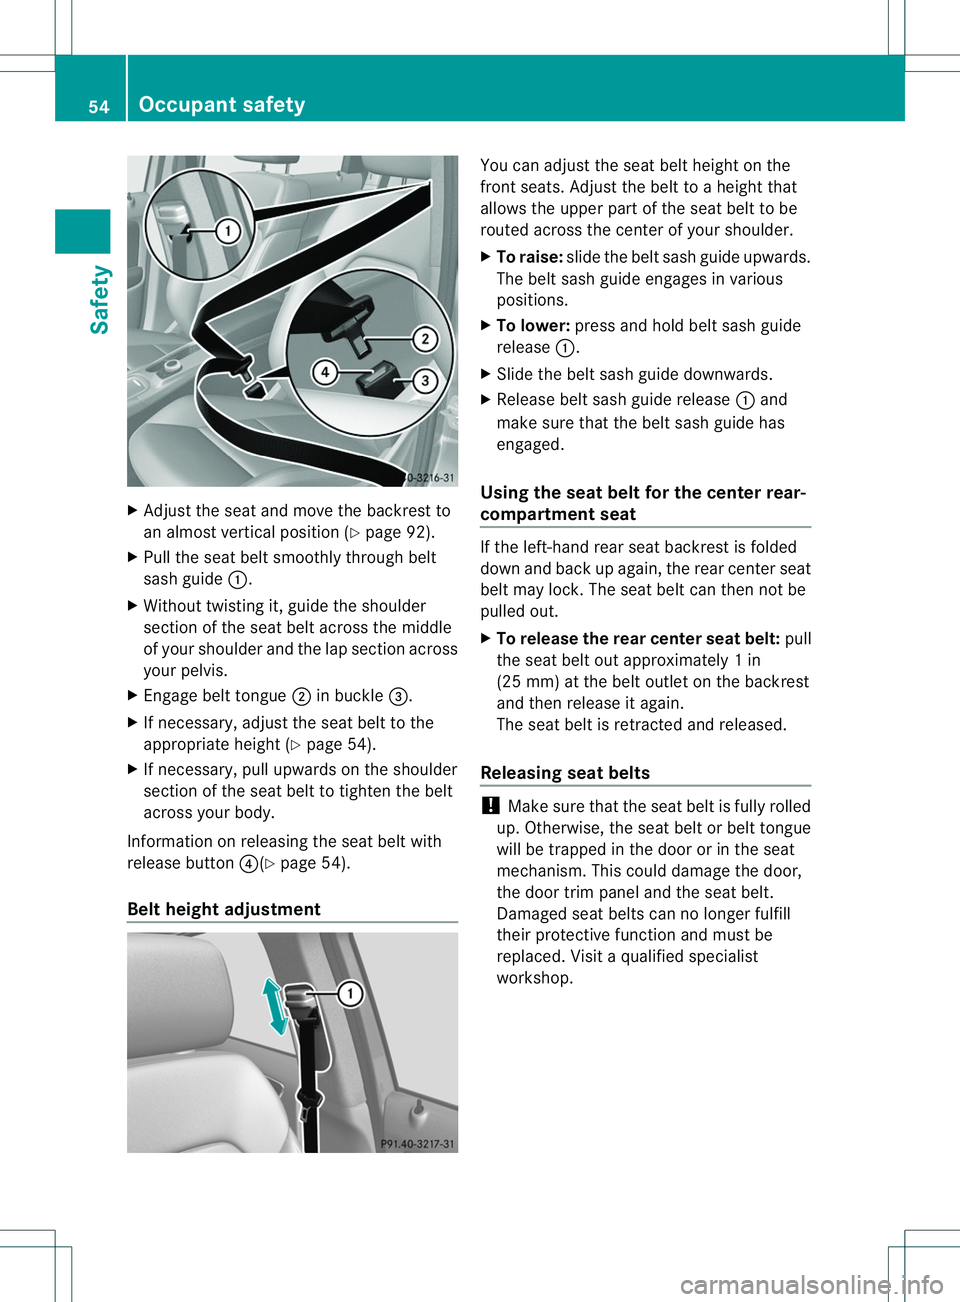
Adjust the sea tand mov ethe backres tto
an almos tvertical position (Y page 92).
X Pull the seat belt smoothly through belt
sash guide 001A.
X Without twisting it, guide the shoulder
section of the seat belt across the middle
of your shoulder and the lap section across
your pelvis.
X Engage belt tongue 0010in buckle 0023.
X If necessary, adjust the seat belt to the
appropriate height (Y page 54).
X If necessary, pull upwards on the shoulder
section of the seat belt to tighten the belt
across your body.
Information on releasing the seat belt with
release button 0021(Ypage 54).
Belt height adjustment You can adjust the seat belt height on the
fron
tseats. Adjust the belt to aheight that
allows the upper part of the seat belt to be
routed across the center of your shoulder.
X To raise: slide the belt sash guide upwards.
The belt sash guide engages in various
positions.
X To lower: press and hold belt sash guide
release 001A.
X Slide the belt sash guide downwards.
X Release belt sash guide release 001Aand
make sure that the belt sash guide has
engaged.
Using the seat belt for the center rear-
compartment seat If the left-hand rear seat backrest is folded
down and back up again, the rear center seat
belt may lock. The seat belt can then not be
pulled out.
X
To release the rear center seat belt: pull
the seat belt out approximately 1in
(25 mm) at the belt outlet on the backrest
and then release it again.
The seat belt is retracted and released.
Releasing seat belts !
Make sure that the seat belt is fully rolled
up. Otherwise, the seat belt or belt tongue
will be trapped in the door or in the seat
mechanism. This could damage the door,
the door trim panel and the seat belt.
Damaged seat belts can no longer fulfill
their protective function and must be
replaced. Visit aqualified specialist
workshop. 54
Occupant safetySafety
Page 95 of 360
The seat belt should:
R
fit snugly across your body
R be routed across the middle of your
shoulder
R be routed in your pelvic area across the
hip joints
X Before starting off, adjust the rear-view
mirror and the exterior mirrors
(Y page 99) in such away that you have
ag ood view of road and traffic conditions.
X Vehicles with amemor yfunction: save
the seat and exterior mirror settings
(Y page 101). Seats
Important safety notes
G
WARNING
Children could become trapped if they adjust
the seats, particularly when unattended.
There is arisk of injury.
When leaving the vehicle, alway stake the
SmartKey with you and lock the vehicle. Never
leave children unsupervised in the vehicle. G
WARNING
You could lose control of your vehicle if you
do the following while driving:
R adjust the driver's seat, head restraint,
steerin gwheel or mirrors
R fasten the seat belt
There is arisk of an accident.
Adjust the driver's seat, head restraint,
steerin gwheel and mirror and fasten your
seat belt before starting the engine. G
WARNING
If you adjust the seat height carelessly, you or
other vehicle occupant scould be trapped and
thereby injured. Children in particular could
accidentally press the electrical seat
adjustmen tbutton sand become trapped.
Ther eisar iskofi njury. While moving the seats, make sure tha
tyour
hands or other body parts do not get under
the lever assembly of the seat adjustment
system. G
WARNING
When you adjust aseat, you or other vehicle
occupant scould become trapped, e.g. on the
seat guide rail. There is arisk of injury.
Make sure when adjusting aseat that no one
has any body parts in the sweep of the seat. G
WARNING
The seat belt does not offer the intended level
of protection if the backrest is not in the
upright position .When braking or in the event
of an accident, you could slide underneath the
seat belt and sustain abdomen or neck
injuries, for example. This poses an increased
risk of injury or even fatal injury.
Adjust the seat properly before beginning
your journey. Always make sure that the seat
is in the upright position. G
WARNING
If head restraintsa re not installed and
adjusted correctly, they cannot provide
protection as intended. There is an increased
risk of injury in the head and neck area, e.g.
in the event of an accident or when braking.
Always drive with the head restraints
installed. Before driving off, make sure for
every vehicle occupant that the center of the
head restraint supports the back of the head
at about eye level. G
WARNING
According to accident statistics, children are
safer when properly restrained on the rear
seats than on the front-passenger seat. Thus,
we strongly recommendt hat children be
placed in the rear seat whenever possible.
Regardless of seating position, children 12
years old and under must be seated and
properly secured in an appropriately sized
child restraint system or booster seat Seats
93Seats, steering wheela nd mirrors
Z
Page 96 of 360
recommended for the size and weight of the
child
.For additional information, see the
"Children in the vehicle" section.
Ac hild's risk of serious or fatal injuries is
significantly increased if the child restraints
are not properly secured in the vehicle and/
or the child is not properly secured in the child
restraint.
! To avoid damage to the seats and the seat
heating, observe the following information:
R keep liquids from spilling on the seats. If
liquidiss pilled on the seats, dry them as
soon as possible.
R if the seat covers are damp or wet, do not
switch on the seat heating. The seat
heating should also not be used to dry
the seats.
R clean the seat covers as recommended;
see the "Interior care" section.
R do not transport heavy loads on the
seats. Do not place sharp objectsont he
seat cushions, e.g. knives, nails or tools.
The seats should only be occupied by
passengers, if possible.
R when the seat heating is in operation, do
not cover the seats with insulating
materials, e.g. blankets, coats, bags,
seat covers, child seats or booster seats.
! Make sure that there are no objectsint he
footwell or behind the seats when resetting
the seats. There is arisk that the seats
and/or the objectsc ould be damaged.
i The head restraintsint he front and rear
seats can be removed. 1
For more information ,contact aqualified
specialist workshop.
i Further related subjects:
R Luggage compartmente nlargement
(folding down the rea rseats)
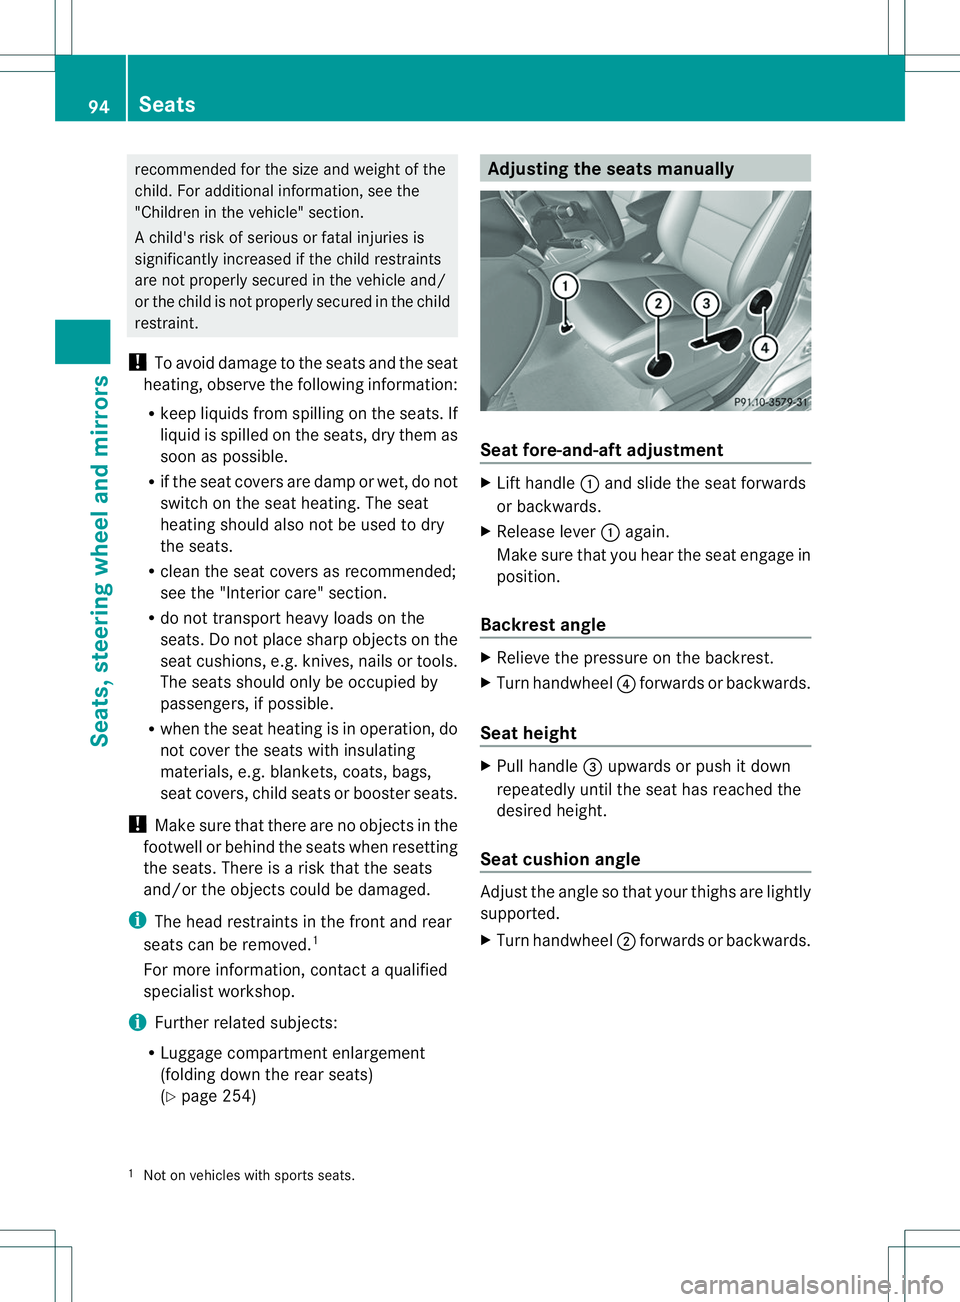
(Y page 254) Adjusting the seats manually
Seat fore-and-aft adjustment
X
Lift handle 001Aand slide the seat forwards
or backwards.
X Release lever 001Aagain.
Make sure that you hear the seat engage in
position.
Backrest angle X
Relieve the pressure on the backrest.
X Turn handwheel 0021forwards or backwards.
Seat height X
Pull handle 0023upwards or push it down
repeatedly until the seat has reached the
desired height.
Seat cushion angle Adjust the angle so that your thighs are lightly
supported.
X
Turn handwheel 0010forwards or backwards.
1 Not on vehicles with sport sseats. 94
SeatsSeats, steering wheel and mirrors
Page 97 of 360
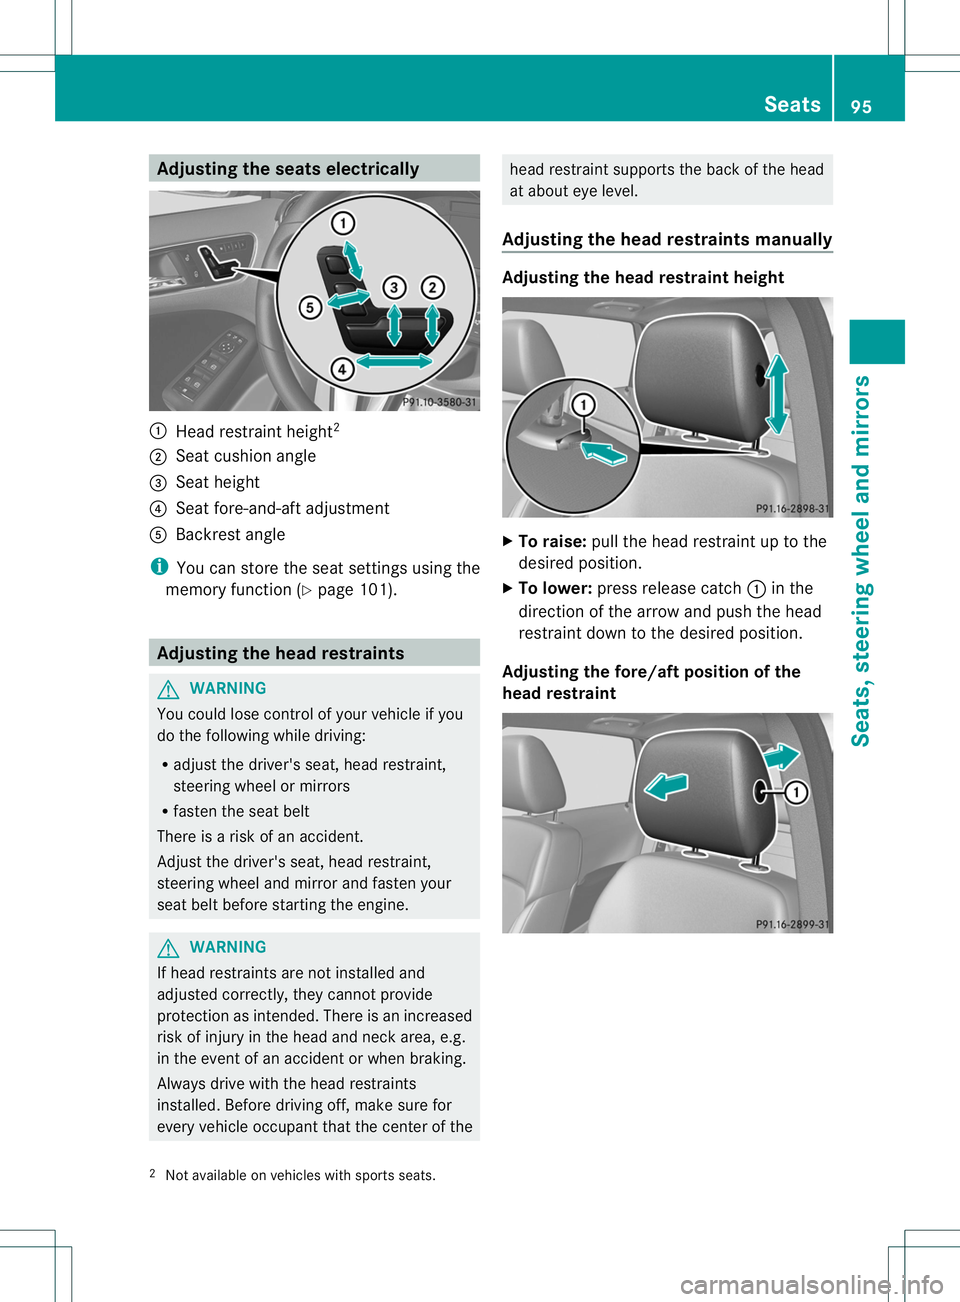
Adjusting th
eseats electrically 001A
Hea drestrain theight 2
0010 Seat cushion angle
0023 Seat height
0021 Seat fore-and-aft adjustment
001E Backrest angle
i You can stor ethe seat settings using the
memory function (Y page 101). Adjusting the head restraints
G
WARNING
You could lose control of your vehicle if you
do the following while driving:
R adjust the driver's seat, head restraint,
steering wheel or mirrors
R fasten the seat belt
There is arisk of an accident.
Adjust the driver's seat, head restraint,
steering wheel and mirror and fasten your
seat belt before starting the engine. G
WARNING
If head restraint sare not installed and
adjusted correctly, they cannot provide
protection as intended. There is an increased
risk of injur yinthe head and neck area, e.g.
in the event of an acciden torwhen braking.
Always drive with the head restraints
installed. Befor edriving off, make sure for
every vehicle occupan tthat the center of the head restraint supports the back of the head
at about eye level.
Adjusting the head restraint smanually Adjusting the head restraint height
X
To raise: pull the head restraint up to the
desired position.
X To lower: press release catch 001Ain the
direction of the arrow and push the head
restraint down to the desired position.
Adjusting the fore/aft position of the
head restraint 2
Not available on vehicles with sport sseats. Seats
95Seats, steering wheel and mirrors Z
Page 98 of 360
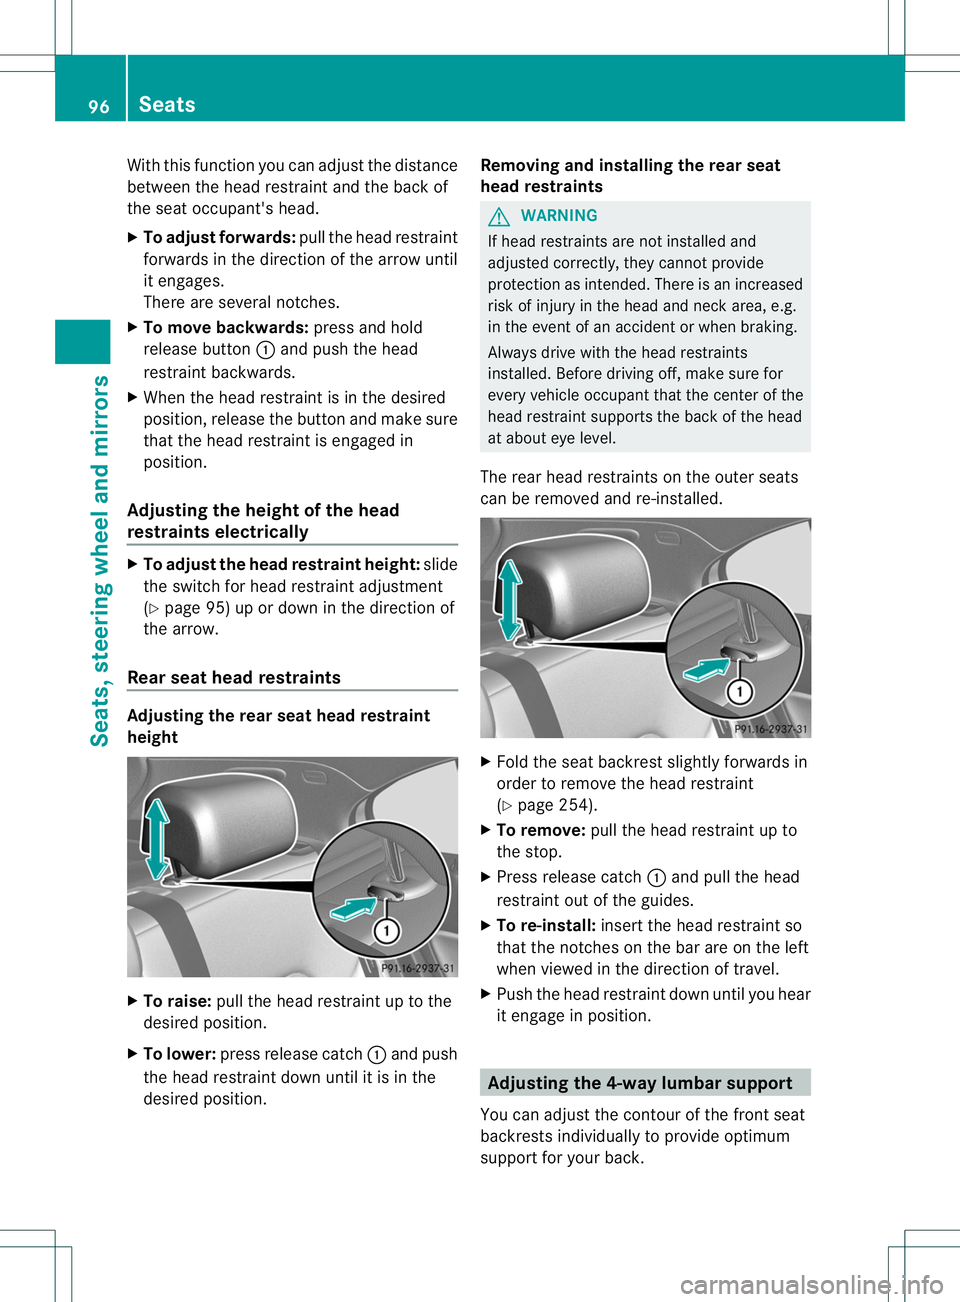
With this function you can adjust the distance
between the head restraint and the back of
the seat occupant's head.
X
To adjust forwards: pull the head restraint
forwards in the direction of the arrow until
it engages.
There are several notches.
X To move backwards: press and hold
release button 001Aand push the head
restraint backwards.
X When the head restraint is in the desired
position ,release the button and make sure
that the head restraint is engaged in
position.
Adjusting the height of the head
restraints electrically X
To adjust the head restraint height: slide
the switch for head restraint adjustment
(Y page 95) up or down in the direction of
the arrow.
Rear seat head restraints Adjusting the rear seat head restraint
height
X
To raise: pull the head restraint up to the
desired position.
X To lower: press release catch 001Aand push
the head restraint down until it is in the
desired position. Removing and installing the rear seat
head restraints G
WARNING
If head restraints are not installed and
adjusted correctly, they cannot provide
protection as intended. There is an increased
risk of injury in the head and neck area, e.g.
in the event of an accident or when braking.
Always drive with the head restraints
installed. Befor edriving off, make sure for
every vehicle occupant that the center of the
head restraint supports the back of the head
at about eye level.
The rear head restraints on the outer seats
can be removed and re-installed. X
Fold the seat backres tslightly forwards in
order to remove the head restraint
(Y page 254).
X To remove: pull the head restraint up to
the stop.
X Press release catch 001Aand pull the head
restraint out of the guides.
X To re-install: insert the head restraint so
that the notches on the bar are on the left
when viewed in the direction of travel.
X Push the head restraint down until you hear
it engage in position. Adjusting th
e4-way lumbar support
You can adjust the contour of the front seat
backrest sindividually to provide optimum
support for your back. 96
SeatsSeats, steering wheel and mirrors
Page 100 of 360
Problems with the seat heating
Problem Possible causes/consequences and
000B Solutions
The seat heating has
switched off
prematurely or cannot
be switched on. The on-board voltage is too low because too many electrical
consumers are switched on.
X
Switch off electrical consumers that you do not need, such as
the rear window defroster or interior lighting.
Once the battery is sufficiently charged, the seat heating will
switch back on automatically. Steering wheel
Important safety notes
G
WARNING
You could lose control of your vehicle if you
do the following while driving:
R adjust the driver's seat, head restraint,
steering wheel or mirrors
R fasten the seat belt
There is arisk of an accident.
Adjust the driver's seat, head restraint,
steering wheel and mirror and fasten your
seat belt before startingt he engine.G
WARNING
Children could injure themselves if they
adjust the steering wheel. There is arisk of
injury.
When leaving the vehicle, always take the
SmartKey with you and lock the vehicle. Never
leave children unsupervised in the vehicle. Adjusting the steering wheel
G
WARNING
If the steering wheel is unlocked while the
vehicle is in motion, it could change position
unexpectedly. This could cause you to lose
control of the vehicle. There is arisk of an
accident. Before startingo
ff, make sure the steering
wheel is locked. Never unlock the steering
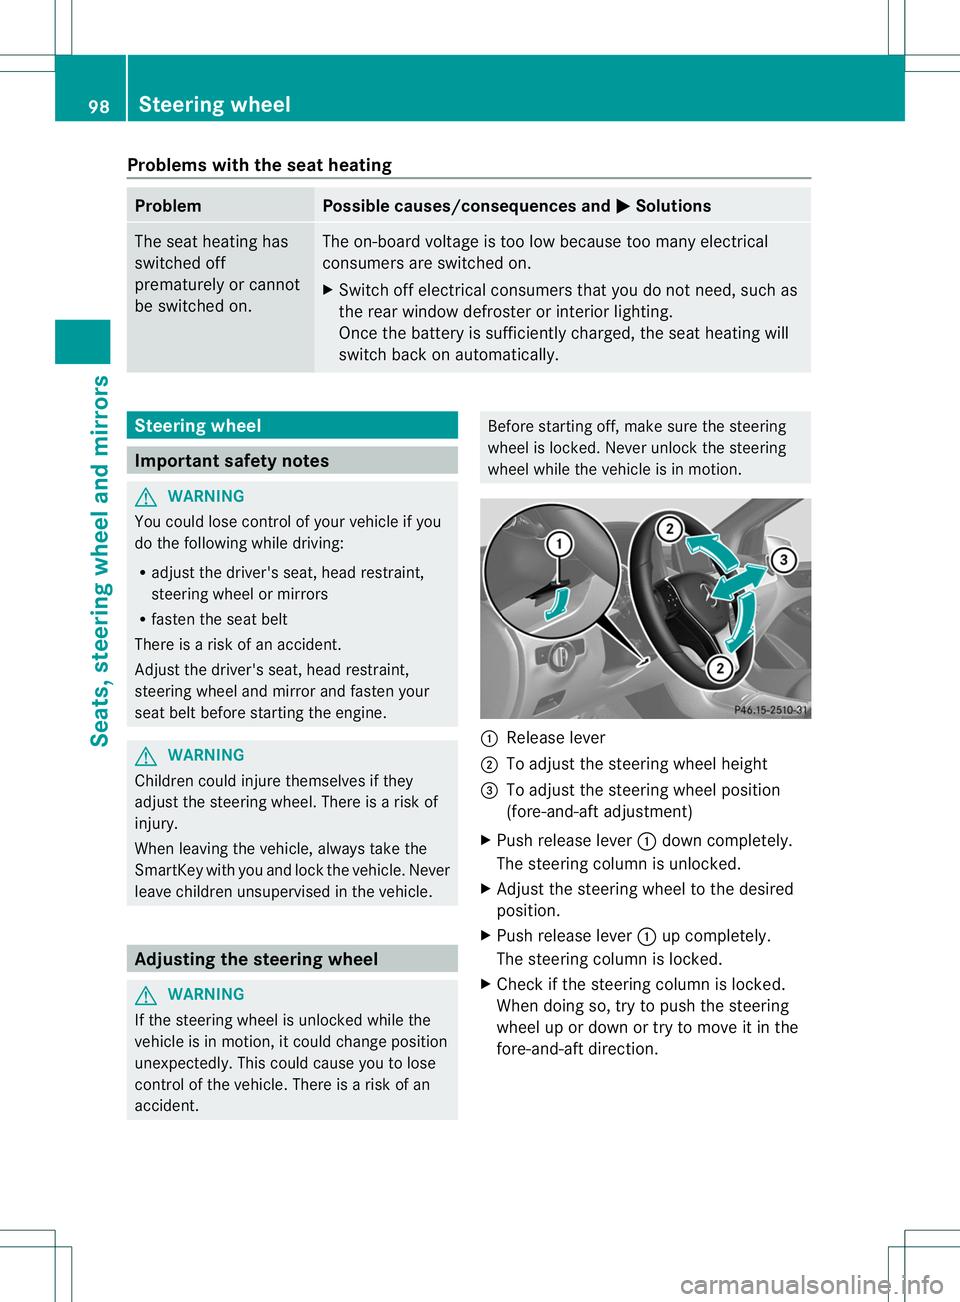
wheel while the vehicle is in motion. 001A
Release lever
0010 To adjust the steering wheel height
0023 To adjust the steering wheel position
(fore-and-aft adjustment)
X Push release lever 001Adown completely.
The steering column is unlocked.
X Adjust the steering wheel to the desired
position.
X Push release lever 001Aup completely.
The steering column is locked.
X Check if the steering column is locked.
When doing so, try to push the steering
wheel up or down or try to move it in the
fore-and-aft direction. 98
Steering wheelSeats, steering wheela
nd mirrors