2014 MERCEDES-BENZ B-CLASS SPORTS oil temperature
[x] Cancel search: oil temperaturePage 15 of 360
N
Navigation Menu (on-boar dcomputer) ............195
see separate operating instructions
Notes on breaking-i nanew vehicle 136 O
Occupant Classification System
(OCS) Fault s............................................... 51
Operation ........................................ .47
System self-test ............................... 50
Occupant safety
Childre ninthe vehicle ..................... 56
Important safety notes ....................40
OCS
Faults ............................................... 51
Operation ........................................ .47
System self-test ............................... 50
Oil
see Engine oil
On-board computer
Assistance menu ........................... 199
Audi omenu ................................... 196
Convenience submenu ..................206
Displaying aservice message ........285
Display messages ..........................207
DISTRONI CPLUS ........................... 168
Factory settings submenu .............206
Important safety notes ..................190
Instrument cluster submenu ..........202
Lighting submenu .......................... 203
Menu overview .............................. 193
Message memory .......................... 207
Navigation menu ............................ 195
Operation ....................................... 191
Service menu ................................. 202
Settings menu ............................... 202
Standard displa y............................ 193
Telephone menu ............................ 197
Trip menu ...................................... 193
Vehicle submenu ........................... 205
Video DVD operatio n..................... 197
Opening and closing the side trim
panels ................................................. 114Operatin
gsafety
Declaratio nofconformity ................ 24
Important safety notes ....................23
Operatin gsystem
see On-board computer
Operator's Manual
Vehicle equipment ...........................22
Outside temperature display ...........191
Overhead control panel ......................36
Override feature Rea rside windows ........................... 62 P
Pain tcode number ............................ 346
Paintwork (cleaning instructions) ...287
Pani calarm .......................................... 40
Panorama roof with power tilt/
sliding panel
Opening/closing the roller
sunblind ........................................... 88
Problem (malfunction) .....................88
Resetting ......................................... 88
Panorama sliding sunroof
Important safety notes ....................86
Parce lnet ........................................... 253
Parking ............................................... 152
Important safety notes ..................152
Parking brake ................................ 153
Position of exterio rmirror, front-
passenger sid e............................... 100
Rea rview camera .......................... 179
see Active Parking Assist
see PARKTRONIC
Parking aid
Active Parking Assist .....................175
see Exterior mirrors
see PARKTRONIC
Parking brake
Display message ............................ 211
Electric parking brake ....................153
Warning lamp ................................. 244
Parking lamps
Switching on/off ........................... 106
Parking lamps (changing bulbs) ......113
PARKTRONIC Deactivating/activating .................174
Driving system ............................... 172 Index
13
Page 140 of 360
Starting procedure
X
Turn the SmartKey to position 3in the
ignition lock (Y page 137) and release it as
soon as the engine is running. Pulling away
Automatic transmission i
It is only possible to shift the transmission
from position Pto the desired position if
you depress the brake pedal. Only then can
the parking lock be deactivated. If you do
not depress the brake pedal, the DIRECT
SELECT lever can still be moved but the
parking lock remains engaged.
i If the transmission oil temperature is
below 000F4‡(000F20 †),y ou can only shift from
position Pwhen the engin eisrunning.
X Depress the brake pedal and keep it
depressed.
X Shif tthe transmission to position Dor R.
X Release the brake pedal.
X Carefully depress the accelerator pedal.
The electric parking brake (Y page 153) is
automatically released.
The red 000Aindicator lamp in the
instrumentc luster goes out.
i The vehicle lock scentrally onc eyou have
pulled away. The locking knobs in the doors
drop down.
You can open the doors fro mthe inside at
any time.
You can also deactivate the automatic
locking feature (Y page 205).
i Upshifts take place at higher engine
speeds after acold start. This helps the
catalytic converter to reach its operating
temperature more quickly. Hill starta
ssist Hill start assist helps you when pulling away
forwards or in reverse on an uphill gradient.
It holds the vehicle for
ashort time after you
have removed your foot from the brake pedal.
This gives you enough time to move your foot
from the brake pedal to the accelerator pedal
and to depress it before the vehicle begins to
roll. G
WARNING
After ashort time, hill start assist will no
longer brake your vehicle and it could roll
away. There is arisk of an accident and injury.
Therefore, quickly move your foot from the
brake pedal to the accelerator pedal. Never
leave the vehicle when it is held by hill start
assist.
X Remove your foot from the brake pedal.
The vehicle is then held for about asecond.
X Pull away.
Hill start assist is not active if:
R you are pulling away on alevel road or on
ad ownhill gradient.
R the transmission is in position N.
R the electric parking brake is applied.
R ESP ®
is malfunctioning.
Further information on holding the vehicle
stationary on uphill gradients (Y page 146). ECO start/stop function
Introduction The ECO start/stop function switches the
engine off automatically if the vehicle is
stopped under certain conditions.
The engine start
sautomatically when the
driver wants to pull away again. The ECO
start/stop function thereby helps you to
reduce the fuel consumption and emissions
of your vehicle. 138
DrivingDriving and parking
Page 283 of 360
could otherwise damag
ethe windshield
wiper sorthe hood. X
Make sure that the windshield wiper sare
switched off.
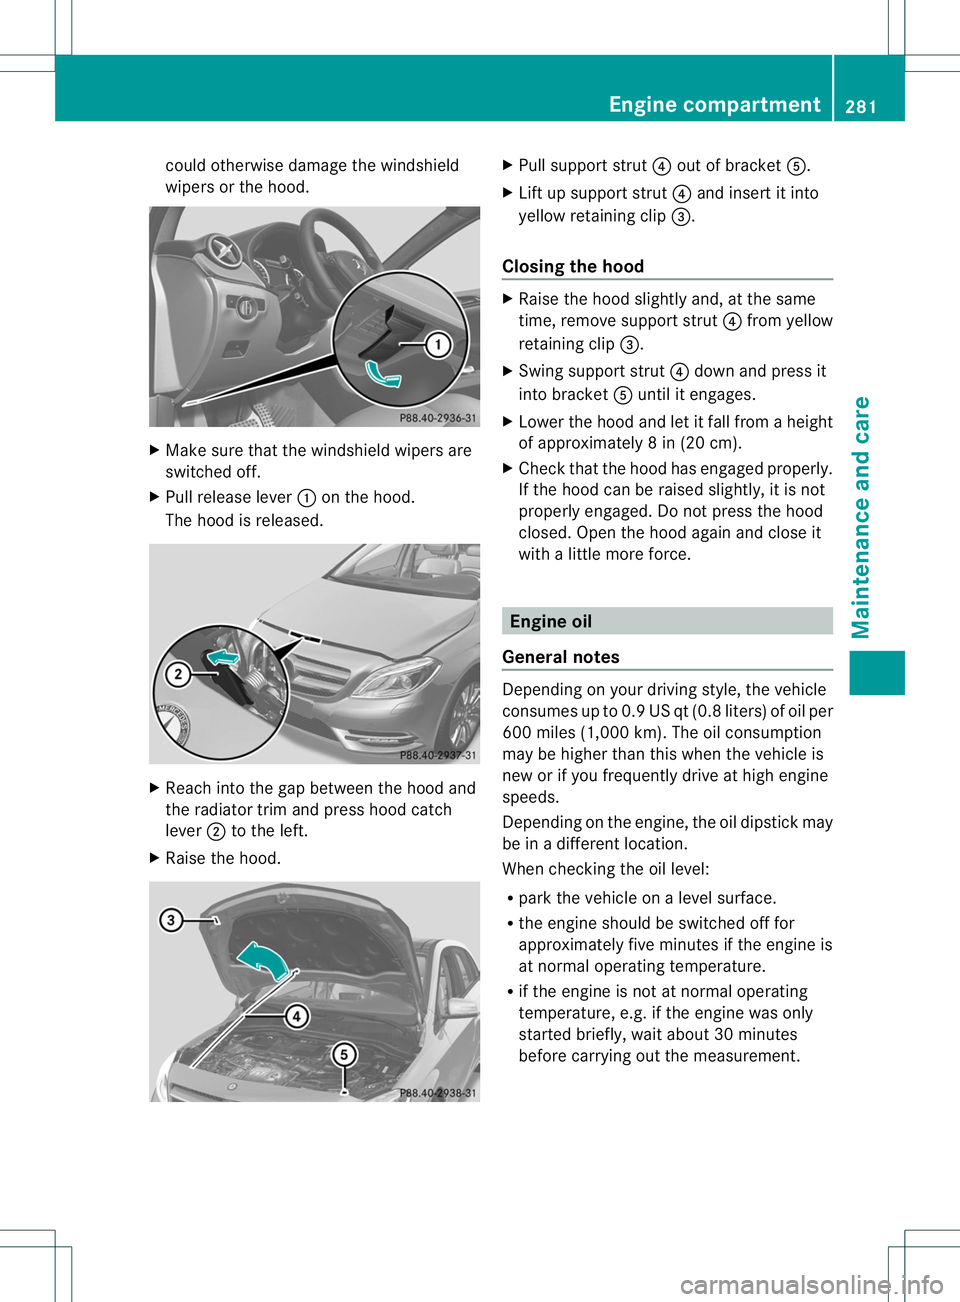
X Pull release lever 001Aon the hood.
The hoo disreleased. X
Reach into the ga pbetween the hoo dand
the radiator trim and press hoo dcatch
lever 0010to the left.
X Raise the hood. X
Pull support strut 0021outofb racket 001E.
X Lift up support strut 0021and insert it into
yellow retaining clip 0023.
Closin gthe hood X
Raise the hoo dslightl yand,att he same
time ,remove support strut 0021from yellow
retaining clip 0023.
X Swing support strut 0021dow nand press it
into bracket 001Eunti lite ngages.
X Lower the hoo dand le titfall from aheight
of approximately 8in(20 cm).
X Chec kthat the hood has engaged properly.
If the hood can be raised slightly, it is not
properly engaged. Do not press the hood
closed. Open the hood again and close it
with alittle more force. Engine oil
General notes Depending on your driving style, the vehicle
consumes up to 0.9 US qt (0.8 liters) of oil per
600 miles (1,000 km). The oil consumption
may be higher than this when the vehicle is
new or if you frequently drive at high engine
speeds.
Depending on the engine, the oil dipstick may
be in
adifferent location.
When checking the oil level:
R park the vehicle on alevel surface.
R the engine should be switched off for
approximately five minutes if the engine is
at normal operating temperature.
R if the engine is not at normal operating
temperature, e.g. if the engine was only
started briefly, wait about 30 minutes
before carrying out the measurement. Engine compartment
281Maintenance and care Z
Page 285 of 360
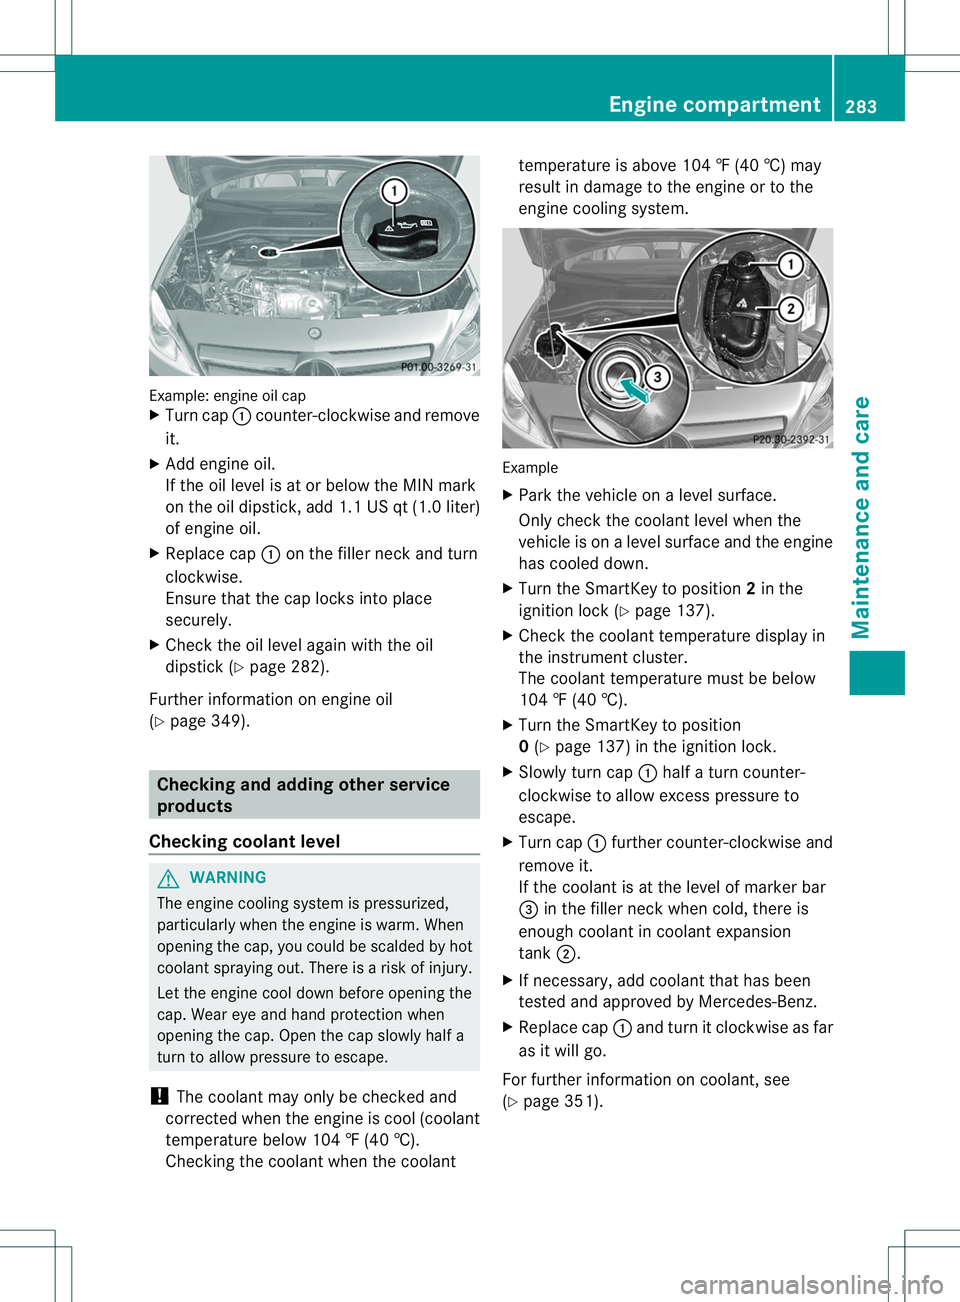
Example: engine oi
lcap
X Turn cap 001Acounter-clockwis eand remove
it.
X Add engine oil.
If the oi llev el is at or belo wthe MIN mark
on the oi ldipstick, ad d1.1 US qt (1.0 liter)
of engine oil.
X Replace cap 001Aon the fille rneck and turn
clockwise.
Ensure tha tthe cap locks into place
securely.
X Check the oi llev el agai nwith the oil
dipstick (Y page 282).
Further information on engine oil
(Y page 349). Checking and adding other service
products
Checking coolant level G
WARNING
The engine cooling system is pressurized,
particularly when the engine is warm. When
opening the cap, you could be scalde dbyhot
coolan tspraying out. There is arisk of injury.
Let the engin ecool down before openin gthe
cap. Wear eye and hand protection when
openin gthe cap. Open the cap slowly half a
turn to allow pressure to escape.
! The coolant may only be checked and
corrected when the engin eiscool (coolant
temperature below 104 ‡(40 †).
Checking the coolant when the coolant temperature is above 104
‡(40 †) may
result in damage to the engine or to the
engine cooling system. Example
X
Park the vehicle on alevel surface.
Only check the coolant level when the
vehicle is on alevel surface and the engine
has cooled down.
X Turn the SmartKey to position 2in the
ignition lock (Y page 137).
X Check the coolant temperature displayin
the instrument cluster.
The coolant temperature must be below
104 ‡(40 †).
X Turn the SmartKey to position
0(Y page 137) in the ignition lock.
X Slowly turn cap 001Ahalf aturn counter-
clockwise to allow excess pressure to
escape.
X Turn cap 001Afurther counter-clockwise and
remove it.
If the coolant is at the level of marker bar
0023 in the filler neck when cold, there is
enough coolant in coolant expansion
tank 0010.
X If necessary, add coolant that has been
tested and approved by Mercedes-Benz.
X Replace cap 001Aand turn it clockwise as far
as it will go.
For further information on coolant, see
(Y page 351). Engine compartment
283Maintenance and care Z
Page 293 of 360
are chrome-plated or not, consult an
authorized Mercedes-Ben zCenter.
X Wipe the wooden trim and trim pieces with
ad amp, lint-free cloth, e.g. amicrofiber
cloth.
X Heavy soiling: use car care and cleaning
product srecommended and approved by
Mercedes-Benz.
Cleaning the seat covers General notes
!
Do not use microfiber cloths to clean
genuine leather, artificial leather or
DINAMICA covers. If used often ,these can
damage the cover.
i Note that regular care is essential to
ensure that the appearance and comfort of
the cover sisretained over time.
Genuine leather seat covers
Leather is anatural product.
It exhibits natural surface characteristics, for
example:
R differences in the texture
R signs of stretching and marking
R slight nuances of color
These are characteristic sofleather and not
material defects.
! To retain the natural appearance of the
leather, observe the following cleaning
instructions:
R Clean genuine leather cover scarefully
with adamp clot hand then wipe the
cover sdown with adry cloth.
R Make sure that the leather does not
become soaked. It may otherwise
become rough and cracked.
R Only use leather care agents that have
been tested and approved by Mercedes-
Benz. You can obtain these from a
qualified specialist workshop. Seat covers of other materials
!
Observe the following when cleaning:
R Clean artificial leather cover swithacloth
moistened with asolution containing
1% detergen t(e.g. dish washing liquid).
R Clean clot hcover switham icrofiber
clot hm oistened with asolution
containin g1%detergen t(e.g. dish
washing liquid). Rub carefully and always
wipe entire seat sections to avoid leaving
visible lines. Leave the seat to dry
afterwards. Cleaning results depend on
the type of dirt and how long it has been
there.
R Clean Alcantara® cover swithadamp
cloth. Make sure that you wipe entire
seat sections to avoid leaving visible
lines.
Cleaning the seat belts G
WARNING
Seat belts can become severely weakened if
bleached or dyed. This could cause the seat
belts to tear or fail, for instance, in the event
of an accident. This poses an increased risk
of injur yorfatal injury.
Never bleach or dye the seat belts.
! Do not clean the seat belts using chemical
cleanin gagents .Don ot dry the seat belts
by heating at temperatures above 176 ‡
(80 †) or in direct sunlight.
X Use clean, lukewarm water and soap
solution.
Cleaning the headliner and carpets X
Headliner: if it is very dirty, use asoft brush
or ac leaning agent recommended and
approved by Mercedes-Benz.
X Carpets: use the carpet and textile
cleaning agents recommended and
approved by Mercedes-Benz. Care
291Maintenance and care Z
Page 352 of 360
When handling engine oil, observe the
important safety notes on service products
(Y page 347).
The engine oils are matched to the
performance of Mercedes-Benz engines and
service intervals. You should therefore only
use engine oils and oil filters that are
approved for vehicles with maintenance
systems.
For alist of approved engine oils and oil filters,
consult an authorized Mercedes-Benz
Center .Orvisit the website
http://bevo.mercedes-benz.com.
The table shows which engine oils have been
approved for your vehicle. Model Engine
model MB
Approval B2
50 270 229.5
i
MB approval is indicated on the oil
containers.
Filling capacities The following values refer to an oil change
includin
gthe oil filter. Model Capacity
B2
50 5.9 US qt
(5.6 l) Additives
!
Do no tuse any additives in the engine oil.
This could damage the engine. Engineo
il viscosity Viscosity describes the flow characteristics
of
afluid. If an engine oil has ahigh viscosity,
this means that it is thick; alow viscosity
means that it is thin.
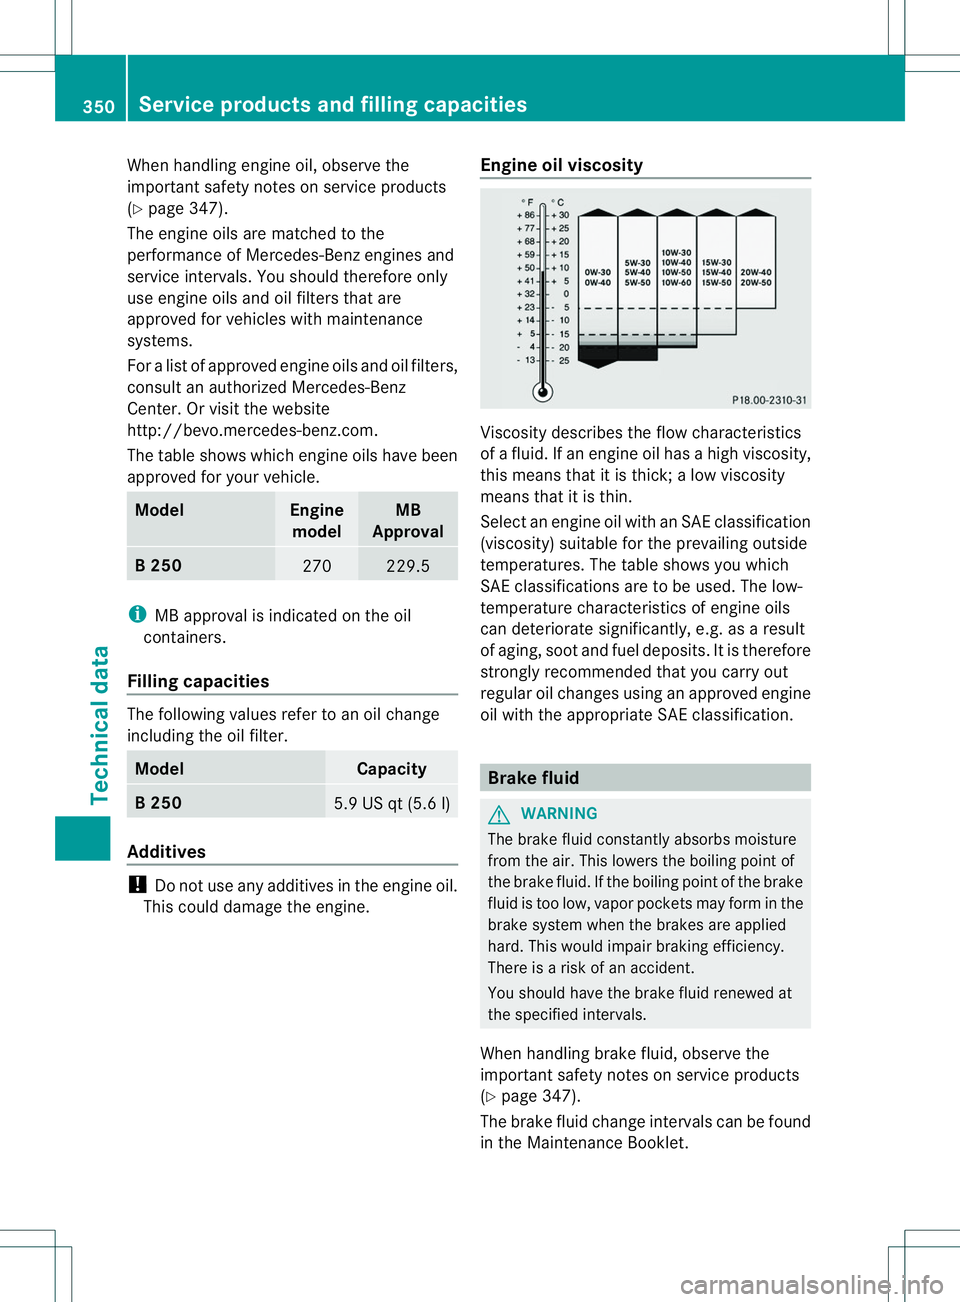
Select an engine oil with an SAE classification
(viscosity) suitablef or the prevailing outside
temperatures. The table shows you which
SAE classifications are to be used. The low-
temperature characteristics of engine oils
can deteriorate significantly, e.g. as aresult
of aging, soot and fuel deposits. It is therefore
strongly recommended that you carry out
regularo il changes using an approved engine
oil with the appropriate SA Eclassification. Brake fluid
G
WARNING
The brak efluid constantly absorb smoisture
fro mt he air. This lowers the boiling point of
the brake fluid. If the boiling point of the brake
fluid is too low, vapor pockets may form in the
brake system when the brakes are applied
hard. This would impair braking efficiency.
There is arisk of an accident.
You should have the brake fluid renewed at
the specified intervals.
When handling brake fluid, observe the
important safety notes on service products
(Y page 347).
The brake fluid change intervals can be found
in the MaintenanceB ooklet.350
Service products and fillingc
apacitiesTechnical data
Page 353 of 360
Only use brake fluid approved by Mercedes-
Benz according to MB Approval 331.0.
Information abouta
pproved brake fluid can
be obtaine datany qualified specialist
workshop or on the Internet at
http://bevo.mercedes-benz.com.
i Have the brake fluid renewed regularly at
aq ualified specialist workshop. Coolant
Importan tsafet ynotes G
WARNING
If antifreeze comes int ocontact with hot
component sinthe engin ecompartment ,it
may ignite. There is arisk of fire and injury.
Let the engin ecool down before you add
antifreeze .Make sure that antifreeze is not
spilled nex ttothe filler neck.T horoughly
clean the antifreeze from components before
startingt he engine.
! Only add coolant that has been premixed
with the desired antifreezep rotection. You
coul dotherwise damage the engine.
Further information on coolants can be
found in the Mercedes-Benz Specifications
for Service Products, MB Specifications for
Service Products 310.1, e.g. on the
Internet at
http://bevo.mercedes-benz.com .Or
contact aqualified specialist workshop.
! Always use asuitable coolant mixture,
even in countries where high temperatures
prevail.
Otherwise, the engine cooling system is not
sufficiently protected from corrosio nand
overheating.
i Have the coolant regularl yreplaced at a
qualified specialist workshop and the
replacement confirmed in the Maintenance
Booklet. Comply with the important safety precautions
for service products when handling coolant
(Y
page3 47).
The coolant is amixture of water and
antifreeze/corrosion inhibitor. It performs
the following tasks:
R corrosio nprotection
R antifreeze protection
R raising the boiling point
If the coolant has antifreeze protection down
to -35 ‡(-37 †), the boiling point of the
coolant during operatio nisapproximately
266 ‡(130 †).
The antifreeze/corrosion inhibitor
concentration in the engine cooling system
should:
R be at least 50%. This will protect the engine
cooling system against freezing down to
approximately -35 ‡(-37 †).
R not exceed 55% (antifreeze protection
down to -49 ‡[-45 †]). Otherwise, heat
will not be dissipated as effectively.
If the vehicle has lost coolant, add equal
amounts of water and antifreeze/corrosion
inhibitor.
Mercedes-Benz recommends an antifreeze/
corrosion inhibitor concentrate in
accordance with MB Specifications for
Service Products 310.1.
i When the vehicle is first delivered, it is
filled with acoolant mixture that ensures
adequate antifreeze and corrosion
protection.
i The coolant is checked with every
maintenance interval at aqualified
specialist workshop. Service products and filling capacities
351Technical data Z
Page 354 of 360
Filling capacities
Missing value
swere no tavailableatt ime of
goin gtop rint. Model Capacity
B2
50 Approx
.8.2 US qt
(7.8 l) i
Use antifreeze/corrosion inhibitor
according to MB approval 325.0 or 326.0. Windshield washer system
Important safet ynotes G
WARNING
Windshield washer concentrat eishighly
flammable. If it comes int ocontact with hot
engin ecomponent sorthe exhaust system it
could ignite. There is arisk of fire and injury.
Make sure that no windshield washer
concentrat eisspilled nex ttothe filler neck.
! Do not add distilled or de-ionized water to
the washer fluid container .Otherwise, the
level senso rmay be damaged.
! Only MB SummerFit and MB WinterFit
washe rfluid should be mixed together. The
spray nozzles may otherwise become
blocked.
When handlin gwasher fluid, observe the
importan tsafet ynotes on service products
(Y page 347).
At temperatures above freezing:
X Fill the washer fluid reservoir with amixture
of water and windshield washer fluid, e.g.
MB SummerFit.
Add 1part MB SummerFit to 100 part swater. At temperatures below freezing:
X
Fill th ewashe rfluid reservoir with amixture
of water and washer fluid, e.g. MB
WinterFit.
Adapt the mixing ratio to the outside
temperature.
R Down to 14 ‡(000F10 †): mix 1part MB
WinterFit to 2partsw ater.
R Down to 000F4‡(000F20 †): mix 1part MB
WinterFit to 1part water.
R Down to 000F20.2‡(000F29 †): mix 2partsMB
WinterFit to 1part water.
i Add windshield washer fluid, e.g. MB
SummerFit or MB WinterFit, to the washer
fluid all year round. Climate control system refrigerant
Important safety notes The climate control system of your vehicle is
filled with refrigerant R-134a.
The instruction label regarding the refrigerant
type used can be foun
donthe radiator cross
member.
! Only the refrigeran tR-134a and the PAG
oil approved by Mercedes-Ben zmay be
used. The approved PA Goil may no tbe
mixed with any other PAG oil that is not
approved for R-134a refrigerant.
Otherwise, the climate control system may
be damaged.
Service work, such as topping-u prefrigerant
or replacing components, may only be carried
out by aqualified specialist workshop .All
applicable regulations must be adhered to,
SA Es tandard J639 included.
Always have work on the climate control
system carried out at aqualified specialist
workshop. 352
Service products and filling capacitiesTechnica
ldata