Page 153 of 258
 NOTE
l The
volume control mode will shut off auto-
matically if another mode is selected, or if no
adjustment is made within about 2 seconds.
To adjust the tone E00708801285
1. Press
the b")
NOTE
l The
volume control mode will shut off auto-
matically if another mode is selected, or if no
adjustment is made within about 2 seconds.
To adjust the tone E00708801285
1. Press
the button repeatedly to select the
tone,
balance and SCV (Speed Compensated
Volume) function control to change. The or-
der is: BASS → TREBLE → FADER →
BALANCE → SCV → Audio adjust mode
OFF
2. Press the SEEK button to change the tone, bal- ance and SCV function setting.
The status will be displayed in the display. A- Adjust mode
B-
Adjust level Adjust
mode Adjust level Adjusting operation
BASS
-6 to 6Stronger Weaker
TREBLE Stronger Weaker
FADER F11 to R11 F (Front)
increases R (Rear)
increases
BAL-
ANCE L11 to R11 R (Right)
increases L (Left)
increases
SCV HIGH, MID,
LOW, OFF HIGH
↑
MID ↑
LOW ↑
OFF HIGH
↓
MID ↓
LOW ↓
OFF BASS (Bass tone control)
To select the desired bass level.
TREBLE (Treble tone control)
To select the desired treble level.
FADER (Front/Rear balance control)
To
balance the volume from the F (front) and the R
(rear) speakers.
BALANCE (Left/Right balance control)
To balance the volume from the L (left) and the R
(right) speakers. NOTE
l Keep
the FADER setting in the middle posi-
tion. Since no rear speakers are connected, ad-
justing the FADER setting towards the “R”
side will result in loss of sound output.
SCV (Speed Compensated Volume) function
The Speed Compensated Volume function is a fea-
ture that automatically adjusts the VOLUME,
BASS and TREBLE settings in accordance with
the vehicle speed.
The effects of the SCV function can be selected ei-
ther of three levels (LOW, MID and HIGH). Select
the degree of your choice by pressing the SEEK but-
ton.
If you want to stop the SCV function, select the OFF.
NOTE l The audio adjust mode will automatically
shut off when another mode is selected, or if
no adjustment is made within about 10 sec-
onds. For pleasant driving
6-11 6
OHAE13E1
Page 154 of 258
 Radio control panel and display
E007089012311- FM (FM1/FM2/FM3) indicator
2-
RADIO (FM/MW/LW selection) button
3- MEMORY (Memory selection) button
4- POWER (On-Off) button
5- SEEK (Up-seek) button
6")
Radio control panel and display
E007089012311- FM (FM1/FM2/FM3) indicator
2-
RADIO (FM/MW/LW selection) button
3- MEMORY (Memory selection) button
4- POWER (On-Off) button
5- SEEK (Up-seek) button
6- SEEK (Down-seek) button
To listen to the radio E00709000900
1. Press
the POWER button until it beeps to
turn the audio system on and off. The system
turns on in the last mode used.
2. Press the RADIO button to select the desired band.
3. Press the SEEK button to tune to a station, or
press the MEMORY button either or
to recall a station memorised. To tune the radio
E00709100640
Automatic tuning
After
pressing the SEEK button, a receivable sta-
tion will be automatically selected and reception of
the station will begin.
Manual tuning
The frequency changes every time the SEEK but-
ton is pressed. Press the button to select the desired
station.
To enter frequencies into the memory E00716101186
Manual setting
You
can assign a maximum of 18 stations in the
FM band (6 FM1, 6 FM2 and 6 FM3 stations) and
6 stations each in the MW and LW band to the
MEMORY button. (Stations already assigned to
the MEMORY button are replaced by any newly as-
signed stations.) Follow the steps described below.
1. Press
the SEEK button to tune to the frequen-
cy you wish to keep in the memory. 2.
Press
the MEMORY button either or
until it beeps.
The
sound will be momentarily interrupted
while the frequency is being entered into the
memory.
3. The preset memory setting is retrieved by pressing the button and then releasing it with-
in 2 seconds.
NOTE l Disconnecting the auxiliary battery terminal
erases all the radio frequencies stored in the
memory.
Automatic setting
With the method, all manually set stations in the
band currently selected for reception are replaced
with stations in the same band that are automatical-
ly selected in order of signal strength. The radio au-
tomatically selects 6 stations in the FM band (FM3
station only) and 6 stations each in the MW and
LW band.
Follow the steps described below. 1. With the radio mode selected, hold down theRADIO button for 2 seconds or longer. The
6 stations with the best signal strength will au-
tomatically be assigned to the MEMORY but-
ton, with the lowest-frequency station being
assigned to the lowest-number.
2. When you subsequently press a MEMORY button to select a channel number, the radio
will begin receiving the station assigned to
that number. For pleasant driving
6-12
6
OHAE13E1
Page 155 of 258
 NOTE
l If
you press the RADIO button for 2 seconds
or longer while tuning in the FM1 or FM2
band, the radio will automatically switch to
the FM3 band, where the automatic seeking/")
NOTE
l If
you press the RADIO button for 2 seconds
or longer while tuning in the FM1 or FM2
band, the radio will automatically switch to
the FM3 band, where the automatic seeking/
storing will be activated.
Radio data system (RDS) E007092004781- SELECT knob
2-
MEMORY button
3- RDS (Radio data system) indicator
4- PTY (Program type) indicator
5- TP (Traffic program identification) indicator
6- AF (Alternative Frequencies) indicator
7- REG (Regional program) indicator
8- CT (Clock time) indicator
9- Display
10- POWER (On-Off) switch
11- MENU button
12- TP (Traffic program)/PTY (Program type) button
13- SEEK (Up-step/Up-seek) button
14- SEEK (Down-step/Down-seek) button RDS uses PI (program identification) signal and
AF
(alternative frequency) list transmitted in addi-
tion to the normal FM broadcasting programs, and
picks up the FM stations that are transmitting the
same program from the AF list and automatically
tunes to the station with the strongest signal intensi-
ty.
Therefore, you can continue listening to one pro-
gram in, for example, a long distance driving with-
out retuning to the other station transmitting the
same program when you are leaving the service
area of the currently receiving station.
The RDS radio also features the limited reception
of the program types, the break-in reception of the
traffic announcement to the EON (enhanced other
network) and emergency broadcast, and the limited/
unlimited reception of the regional programs.
AF (Alternative Frequencies) function E00720900175
The AF function finds a station broadcasting the
same
program and selects the station with the stron-
gest signal of AF lists.
The AF function is turned on (with the AF indica-
tor shown on the display) at all times unless you
manually switch it off.
The AF function can be turned ON and OFF.
Refer to “Function setup mode” on page 6-15.
CT (Clock Time) function E00721000160
The clock can be set automatically by using the sig-
nal
from the local RDS stations. Refer to “Digital
clock” on page 6-31.
REG (Regional) function E00721100057
REG function limits to receive the stations broad-
casting regional programs. Regional programming and regional networks are
organized
differently depending on the country or
area (they may be changed according to the hour,
state, or broadcast area), so if you don’t want to re-
ceive the regional programs automatically, you can
set up REG ON not to receive regional programs.
The REG function can be turned ON and OFF.
Refer to “Function setup mode” on page 6-15.
PI (Program Identification) search function E00721200289
When travelling long distance and the recalled pre-
set
station is weak, the radio searches another fre-
quency broadcasting the same programming with
the same PI code in AF list.
If there are no frequencies broadcasting the same
programming, the radio searches a frequency broad-
casting the regional programming. The radio suc-
ceeds in searching the regional programming, then
the display shows the REG indicator.
If the radio does not succeed in searching the re-
gional programming, the radio returns to the recal-
led preset station.
The PI function can be turned ON and OFF.
Refer to “Function setup mode” on page 6-15.
NOTE
l While searching, the audio system is muted.
The display shows “WAIT” or “SEARCH”.
PTY (Program type) E00721300352
RDS broadcasts are classified according to pro-
gram
type (PTY) as follows. Use the SELECT
knob to select your desired PTY. 1. NEWS
2. AFFAIRS (Current affairs) For pleasant driving
6-13 6
OHAE13E1
Page 156 of 258
 3. INFO (Information)
4.
SPORT
5. EDUCATE (Education)
6. DRAMA
7. CULTURE
8. SCIENCE
9. VARIED
10. POP M (Pop music)
11. ROCK M (Rock music)
12. EASY M (Easy music)
13. LIGHT M (Light classics)
14. CL")
3. INFO (Information)
4.
SPORT
5. EDUCATE (Education)
6. DRAMA
7. CULTURE
8. SCIENCE
9. VARIED
10. POP M (Pop music)
11. ROCK M (Rock music)
12. EASY M (Easy music)
13. LIGHT M (Light classics)
14. CLASSICS
15. OTHER M (Other music)
16. WEATHER (Weather information)
17. FINANCE
18. CHILDREN
19. SOCIAL
20. RELIGION
21. PHONE IN
22. TRAVEL
23. LEISURE
24. JAZZ
25. COUNTRY
26. NATION M (National music)
27. OLDIES
28. FOLK M (Folk music)
29. DOCUMENT
To search for a broadcast of desired program type: 1. Press the TP/PTY button.
2. Turn the SELECT knob to select your de-sired PTY.
3. Two seconds after a desired PTY has been se- lected, the radio will begin to search for a
broadcast of your selected PTY. During
search, the selected PTY on the display blinks.
4. When the radio picks up a station with your desired PTY, the display will show the name
of the station. NOTE
l If
the SEEK button is pressed for more than
1 second, the radio will try to find out anoth-
er broadcast of the same program type as cur-
rently selected.
l If no station is found with your desired PTY,
the display will show “EMPTY” for about 5
seconds and the radio will return to the previ-
ous station.
How to enter PTYs in the memory E00721400164
As many as 6 PTYs can be entered in the memory.
Follow the steps described below.
1. Turn
the SELECT knob to tune the PTY to
be entered in the memory.
2. Press the MEMORY button for 2 seconds or longer. The channel number to the entry into
the memory and the PTY are displayed.
3. The preset memory setting is retrieved by pressing the MEMORY button and then re-
leasing it within about 2 seconds.
To change the language of PTY display E00721500240
You can select your favourite language among Eng-
lish,
French, German, Swedish, Spanish and Italian.
1. Press the MENU button for 2 seconds or lon- ger to select the language of PTY display
mode.
Refer to “Function setup mode” on page
6-15. 2. Press the SEEK button to select a language.
NOTE
l After
selecting a mode, you can leave the func-
tion setup mode by taking either of the fol-
lowing steps: • Press the MENU button for at least 2 sec-onds.
• Make no entry for 10 seconds.
Traffic information E00721600267
The radio will automatically tune in to traffic infor-
mation
broadcasts while receiving FM broadcasts
or playing compact discs etc.
To select this function, follow the instructions below. 1. Press the TP/PTY button. The display willshow TP indicator. If the RDS data can be
read, the display will show RDS indicator. If
not, the display will show “NO RDS” for
about 5 seconds. For pleasant driving
6-14
6
OHAE13E1
Page 157 of 258
 2. If the radio detects traffic information on ei-
ther the station currently selected or another
station, the display will show “TRAF INF”
for 5 seconds followed by a 2-second i")
2. If the radio detects traffic information on ei-
ther the station currently selected or another
station, the display will show “TRAF INF”
for 5 seconds followed by a 2-second indica-
tion of the frequency. Then, it will show the
name of the station broadcasting the traffic in-
formation to which you will listen. The vol-
ume level is set separately for listening to nor-
mal audio programs and for listening to traf-
fic information. The volume level will there-
fore change automatically to that set when
traffic information was last received. When
the traffic information broadcast is over, the
radio will return to the previously received
program and to the corresponding volume lev-
el.
3. Press the TP/PTY button to return to the pre- vious condition.
NOTE l While “TP” is illuminated, the radio stops on-
ly at TP stations even if the SELECT knob is
turned.
TP (Traffic information Program) search function E00721800201
The traffic information program standby function
is
turned on (with the TP indicator shown on the dis-
play) and after about 45 seconds since the RDS in-
dicator turns off due to weak signal or the tuning
station is changed over from a TP station to a sta-
tion which does not broadcast traffic information,
and seeks out a TP station in all frequencies auto-
matically.
The TP search function can be turned ON and OFF.
Refer to “Function setup mode” on page 6-15. Emergency broadcasts
E00721700255 If an emergency broadcast is caught while receiv-
ing
a FM broadcast or playing back a compact disc
with the electric motor switch in the “ACC” or
“ON” position, the display will show “ALARM”
and the emergency broadcast will interrupt the cur-
rent program. The volume level is set separately
for listening to normal audio programs and for lis-
tening to emergency broadcasts. The volume level
will therefore change automatically to that set
when an emergency broadcast or traffic informa-
tion broadcast was last received. When the emer-
gency broadcast is over, the radio will return to the
previously received program and to the correspond-
ing volume level. Function setup mode
E00722500452
It is possible to change the following functions:
lAF
l REG*
l TP-S
l PI-S*
l Language of PTY display
1. Press
the MENU button for 2 seconds or lon- ger to select the function setup mode. 2. Press
the MENU button repeatedly to select
the mode you wish to change.
The order is: AF → REG* → TP-S → PI-S*
→ Language of PTY display → Function set-
up mode OFF.
3. Select the desired setting for each mode to be turned ON and OFF as shown below. For pleasant driving
6-15 6
OHAE13E1
Page 158 of 258
 The setting will be shown on the display.
NOTE
l After
selecting a mode, you can leave the func-
tion setup mode by taking either of the fol-
lowing steps: • Press the MENU button for at le")
The setting will be shown on the display.
NOTE
l After
selecting a mode, you can leave the func-
tion setup mode by taking either of the fol-
lowing steps: • Press the MENU button for at least 2 sec-onds.
• Make no entry for 10 seconds. CD control panel and display
E00709501218 1- Disc-loading slot
2-
Eject button
3- CD (CD mode changeover) button
4- TRACK (Fast-forward/Track up) button
5- TRACK (Fast-reverse/Track down) button
6-
CD indicator
7- SEL (Select mode) indicator
8- FOLDER indicator
9- TRACK indicator
10- Display
11- RDM/F-RDM indicator
12- RPT/F-RPT indicator
13- SELECT knob
14- POWER (On-Off) button/PAGE (Title scroll) button
15- DISP (Title display) button
16- MENU button
17- SEEK (Up-seek) button/ (Return) but-
ton
18- SEEK (Down-seek) button/ (Select)
button To listen to a CD
E00709602304
To set a disc 1. Press
the POWER button until it beeps to
turn the audio system ON and OFF. The sys-
tem turns on in the last mode used.
2. Insert disc with label facing up. When a disc is inserted, the CD indicator
will come on and the CD player will begin
playing even if the radio is being used. The
CD player will also begin playing when the
CD button is pressed with a disc set in the
CD player or in the disc loading slot, even if
the radio is being used.
NOTE l For information concerning the adjustment
of volume and tone, refer to “To adjust the
volume” on page 6-10 and “To adjust the
tone” on page 6-11.
l An 8 cm compact disc cannot be played on
this CD player.
l For information concerning the handling of
the compact discs, refer to “Handling of com-
pact discs” on page 6-29.
To eject a disc
When the eject button is pressed, the disc automati-
cally stops and is ejected. The system automatical-
ly switches to radio mode.
NOTE l If you do not remove an ejected disc before
15 seconds have elapsed, the disc will be re-
loaded. For pleasant driving
6-16
6
OHAE13E1
Page 159 of 258
 To listen to a music CD
Push the CD button if a disc is already in the CD
player.
The audio system will enter CD mode and
start playback. The track number and the playing
tim")
To listen to a music CD
Push the CD button if a disc is already in the CD
player.
The audio system will enter CD mode and
start playback. The track number and the playing
time will appear on the display. The tracks in the
disc will be played consecutively and continuously. To listen to an MP3 CD
This
CD player allows you to play MP3 (MPEG Au-
dio Layer-3) files recorded on CD-ROMs, CD-Rs
(recordable CDs), and CD-RWs (rewritable CDs)
in ISO9660 Level 1/Level 2, Joliet, and Romeo for-
mats. Each disc may have a maximum of 16 trees,
100 folders and 255 files. During MP3 playback,
the unit can display ID3 tag information. For infor-
mation concerning ID3 tag, refer to “CD text and
MP3 title display” on page 6-19. Push the CD button if a disc is already in the CD
player.
The display shows “READING”, then playback be-
gins.
The folder number, the track number and the
playing time will appear on the display. NOTE
l While
listening to a disc on which CD-DA
(CD-Digital Audio) and MP3 files have both
been recorded, you can switch between read-
ing of the CD-DA, reading of the MP3 files,
and the external audio input mode by press-
ing the CD button for 2 seconds or longer (un-
til you hear a beep).
l With a disc that contains both CD-DA and
MP3 files, the CD-DA files are automatical-
ly played first.
l The playback sound quality differs depend-
ing on the encoding software and the bit rate.
For details, refer to the user manual of your
encoding software.
l Depending on file/folder configurations on a
disc, it may take some time before playback
starts.
l MP3 encoding software and writing software
are not supplied with this unit.
l You may encounter trouble in playing an
MP3 or displaying the information of MP3
files recorded with certain writing software
or CD recorders (CD-R/RW drivers).
l If you record too many folders or files other
than MP3 onto a disc, it may take some time
before playback starts.
l This unit does not record MP3 files.
l For information on CD-Rs/RWs, refer to
“Notes on CD-Rs/RWs” on page 6-29. For pleasant driving
6-17 6
OHAE13E1
Page 160 of 258
 CAUTION
l
Attempting to play a file not in the MP3
format which has a “.mp3” file name may
produce noise from the speakers and
speaker damage, and can damage your
hearing.
Folder")
CAUTION
l
Attempting to play a file not in the MP3
format which has a “.mp3” file name may
produce noise from the speakers and
speaker damage, and can damage your
hearing.
Folder selection order/MP3 file playback order
(Example)
Root folder (root directory)
Tree 1 Tree 2 Tree 3 Tree 4 Folder selection
In the order File selection
In the order
To fast-forward/fast-reverse the disc
To
fast forward or fast reverse the disc, press the
TRACK button or the TRACK button.
Fast-forward
You
can fast-forward the disc by pressing the
TRACK button. While the button is kept press-
ed, the disc will be fast-forwarded.
Fast-reverse
You
can fast reverse the disc by pressing the
TRACK button. While the button is kept press-
ed, the disc will be fastreversed.
To select a desired track
You
can select your desired track by using the
TRACK button.
Track up
Press the TRACK button repeatedly until the de-
sired track number appears on the display.
When
listening to an MP3 CD, keep pressing the
button to continue to move up tracks.
Track down
Press the TRACK button repeatedly until the de-
sired track number appears on the display.
When
listening to an MP3 CD, keep pressing the
button to continue to move down tracks. NOTE
l Pressing
the TRACK button once during
the
song will cause the CD player to restart
playback from the beginning of the song.
To find a file (MP3 CDs only)
Operate the following buttons or the SELECT
knob to select the desired file.
When this mode is activated by pressing the but-
ton,
the SEL indicator will be displayed in the dis-
play. button
: Press the button to start this
mode or cancel the selection.
SELECT
knob : Turn the knob to show the fold-
er or file. button
: Press the button to select the fold-
er or file.
NOTE l If
no operation is performed for 10 seconds
or more or another button is operated after
the SELECT knob has been turned, search-
ing of the desired file is cancelled.
l If no operation is performed for 5 seconds or
more after the file is displayed, playback
starts.
l When the SEL indicator is not shown on the
display and the SELECT knob is operated,
the volume adjustment is effective.
To select the playing mode E00765900013
1. Press
the MENU button until you hear a beep. For pleasant driving
6-18
6
OHAE13E1
 1
1 2
2 3
3 4
4 5
5 6
6 7
7 8
8 9
9 10
10 11
11 12
12 13
13 14
14 15
15 16
16 17
17 18
18 19
19 20
20 21
21 22
22 23
23 24
24 25
25 26
26 27
27 28
28 29
29 30
30 31
31 32
32 33
33 34
34 35
35 36
36 37
37 38
38 39
39 40
40 41
41 42
42 43
43 44
44 45
45 46
46 47
47 48
48 49
49 50
50 51
51 52
52 53
53 54
54 55
55 56
56 57
57 58
58 59
59 60
60 61
61 62
62 63
63 64
64 65
65 66
66 67
67 68
68 69
69 70
70 71
71 72
72 73
73 74
74 75
75 76
76 77
77 78
78 79
79 80
80 81
81 82
82 83
83 84
84 85
85 86
86 87
87 88
88 89
89 90
90 91
91 92
92 93
93 94
94 95
95 96
96 97
97 98
98 99
99 100
100 101
101 102
102 103
103 104
104 105
105 106
106 107
107 108
108 109
109 110
110 111
111 112
112 113
113 114
114 115
115 116
116 117
117 118
118 119
119 120
120 121
121 122
122 123
123 124
124 125
125 126
126 127
127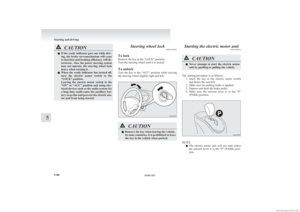 128
128 129
129 130
130 131
131 132
132 133
133 134
134 135
135 136
136 137
137 138
138 139
139 140
140 141
141 142
142 143
143 144
144 145
145 146
146 147
147 148
148 149
149 150
150 151
151 152
152 153
153 154
154 155
155 156
156 157
157 158
158 159
159 160
160 161
161 162
162 163
163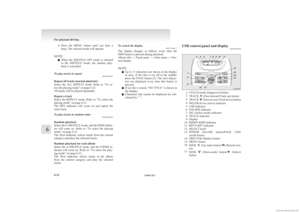 164
164 165
165 166
166 167
167 168
168 169
169 170
170 171
171 172
172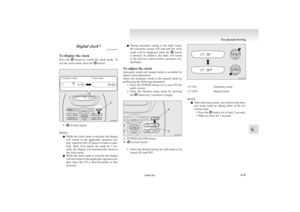 173
173 174
174 175
175 176
176 177
177 178
178 179
179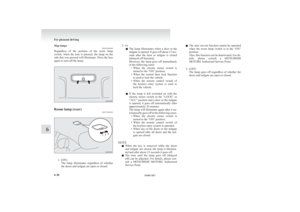 180
180 181
181 182
182 183
183 184
184 185
185 186
186 187
187 188
188 189
189 190
190 191
191 192
192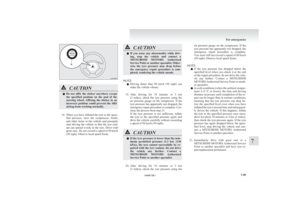 193
193 194
194 195
195 196
196 197
197 198
198 199
199 200
200 201
201 202
202 203
203 204
204 205
205 206
206 207
207 208
208 209
209 210
210 211
211 212
212 213
213 214
214 215
215 216
216 217
217 218
218 219
219 220
220 221
221 222
222 223
223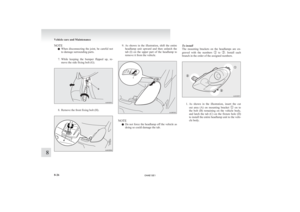 224
224 225
225 226
226 227
227 228
228 229
229 230
230 231
231 232
232 233
233 234
234 235
235 236
236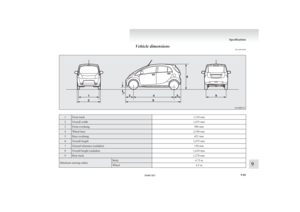 237
237 238
238 239
239 240
240 241
241 242
242 243
243 244
244 245
245 246
246 247
247 248
248 249
249 250
250 251
251 252
252 253
253 254
254 255
255 256
256 257
257