2013 MERCEDES-BENZ B-CLASS SPORTS ESP
[x] Cancel search: ESPPage 227 of 336
Problem Possible causes/consequences and
M Solutions
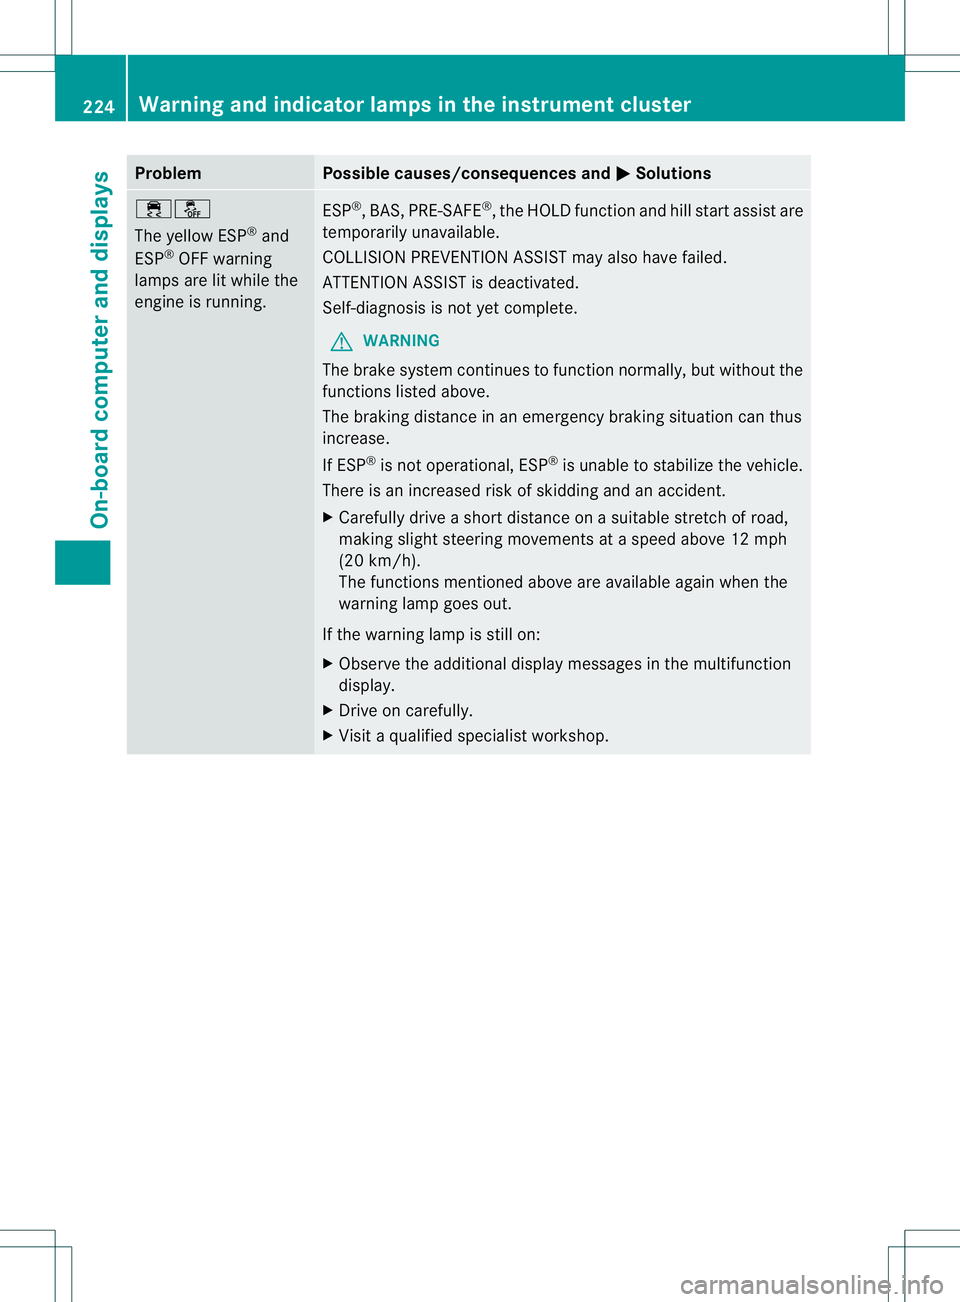
֌
The yellow ESP
®
and
ESP ®
OFF warning
lamps are lit while the
engine is running. ESP
®
,B AS, PRE-SAFE ®
, the HOLD functio nand hill start assist are
temporarily unavailable.
COLLISION PREVENTION ASSIST may also have failed.
ATTENTION ASSIST is deactivated.
Self-diagnosis is not ye tcomplete.
G WARNING
The brake system continues to function normally, but without the
functions listed above.
The braking distance in an emergency braking situation can thus
increase.
If ESP ®
is not operational, ESP ®
is unable to stabilize the vehicle.
There is an increased risk of skidding and an accident.
X Carefully drive a short distance on a suitable stretch of road,
making slight steering movements at a speed above 12 mph
(20 km/h).
The functions mentioned above are available again when the
warning lamp goes out.
If the warning lamp is still on:
X Observe the additional display messages in the multifunction
display.
X Drive on carefully.
X Visit a qualified specialist workshop. 224
Warning and indicator lamps in the instrument clusterOn-board computer and displays
Page 237 of 336
X
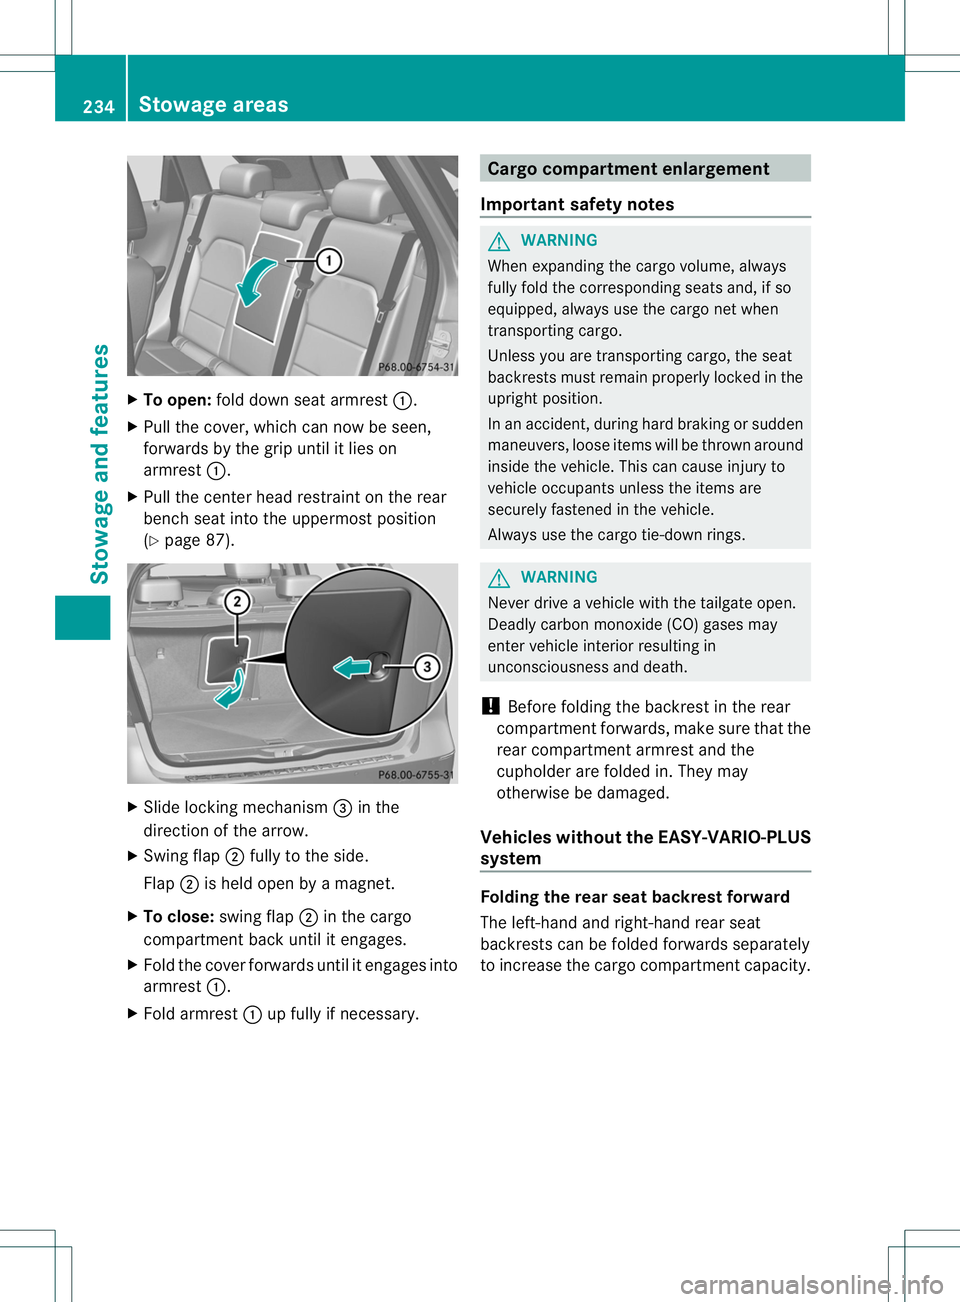
To open: fold down sea tarmrest :.
X Pull the cover, which can now be seen,
forwards by the grip until it lies on
armrest :.
X Pull the center head restraint on the rear
bench seat into the uppermost position
(Y page 87). X
Slide locking mechanism =in the
direction of the arrow.
X Swing flap ;fully to the side.
Flap ;is held open by a magnet.
X To close: swing flap ;in the cargo
compartment back until it engages.
X Fold the cover forwards until it engages into
armrest :.
X Fold armrest :up fully if necessary. Cargo compartment enlargement
Important safety notes G
WARNING
When expanding the cargo volume, always
fully fold the corresponding seats and, if so
equipped, always use the cargo net when
transporting cargo.
Unless you are transporting cargo, the seat
backrests must remai nproperly locked in the
upright position.
In an accident, during hard braking or sudden
maneuvers, loose items will be thrown around
inside the vehicle. This can cause injury to
vehicle occupants unless the items are
securely fastened in the vehicle.
Always use the cargo tie-dow nrings. G
WARNING
Never drive a vehicle with the tailgate open.
Deadly carbo nmonoxide (CO) gases may
enter vehicle interior resulting in
unconsciousness and death.
! Before folding the backrest in the rear
compartment forwards, make sure that the
rear compartment armrest and the
cupholder are folded in. They may
otherwise be damaged.
Vehicles without the EASY-VARIO-PLUS
system Folding the rear seat backrest forward
The left-hand and right-hand rear seat
backrests can be folded forwards separately
to increase the cargo compartment capacity.234
Stowage areasStowage and features
Page 238 of 336
X
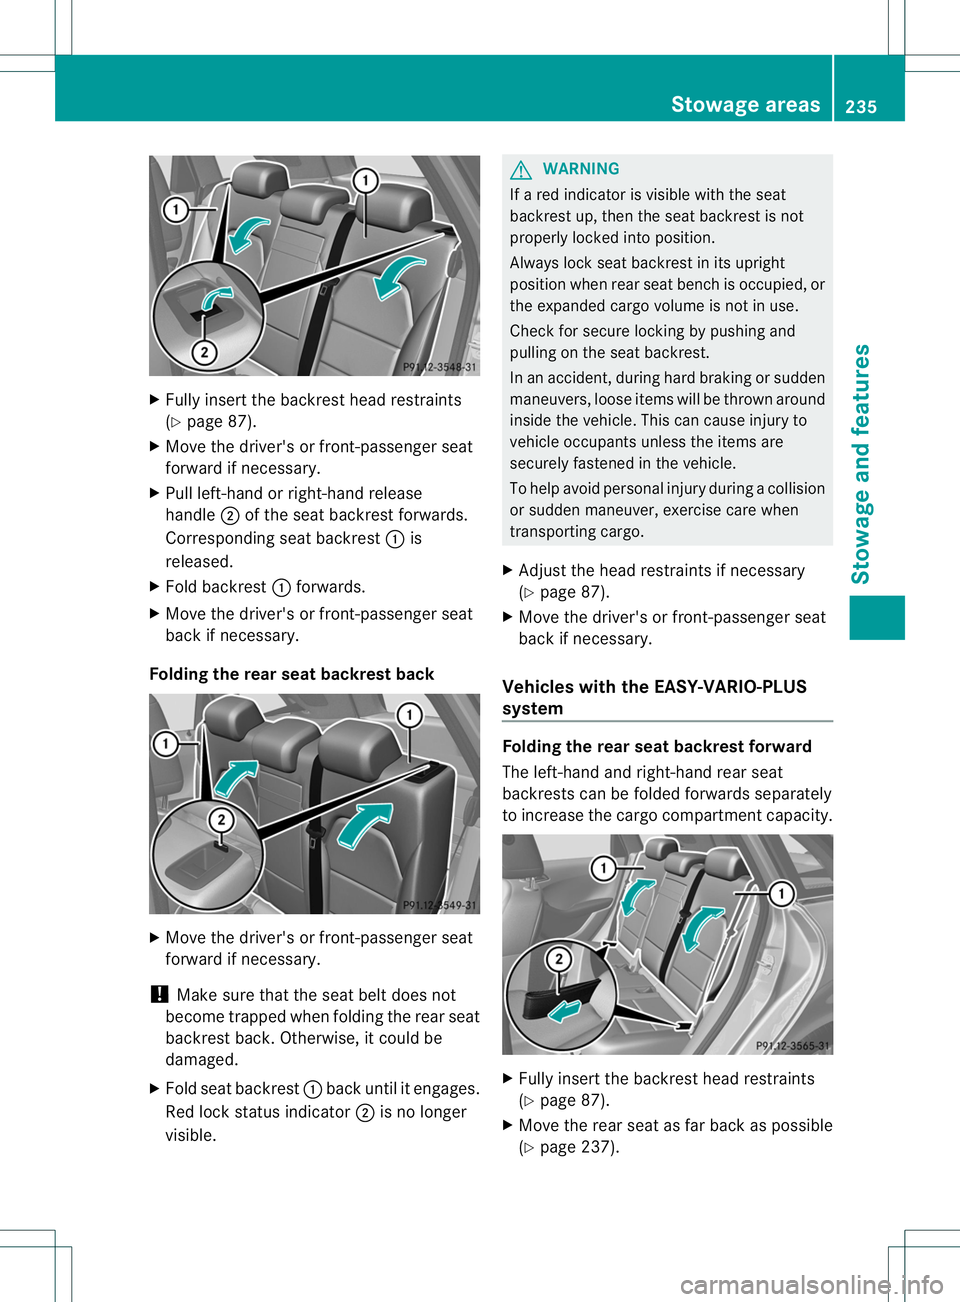
Fully insert the backrest head restraints
(Y page 87).
X Move the driver's or front-passenger seat
forward if necessary.
X Pull left-hand or right-hand release
handle ;of the seatb ackrestforwards.
Corresponding seat backrest :is
released.
X Fold backrest :forwards.
X Move the driver's or front-passenger seat
back if necessary.
Folding the rear seat backrest back X
Move the driver's or front-passenger seat
forward if necessary.
! Make sure that the seat belt does not
become trapped when folding the rear seat
backrest back. Otherwise, it could be
damaged.
X Fold seat backrest :back until it engages.
Red lock status indicator ;is no longer
visible. G
WARNING
If a red indicator is visible with the seat
backrest up, then the seat backrest is not
properly locked into position.
Always lock seat backrest in its upright
position when rear seat bench is occupied, or
the expanded cargo volume is not in use.
Check for secure locking by pushing and
pulling on the seat backrest.
In an accident, during hard braking or sudden
maneuvers, loose items will be thrown around
inside the vehicle. This can cause injury to
vehicle occupants unless the items are
securely fastened in the vehicle.
To help avoid personal injury during a collision
or sudden maneuver, exercise care when
transporting cargo.
X Adjust the head restraints if necessary
(Y page 87).
X Move the driver's or front-passenger seat
back if necessary.
Vehicles with the EASY-VARIO-PLUS
system Folding the rear seat backrest forward
The left-hand and right-hand rear seat
backrests can be folded forwards separately
to increase the cargo compartment capacity.
X
Fully insert the backrest head restraints
(Y page 87).
X Move the rear seat as far back as possible
(Y page 237). Stowage areas
235Stowage and features Z
Page 239 of 336
X
Move the driver's or front-passenger seat
forward if necessary.
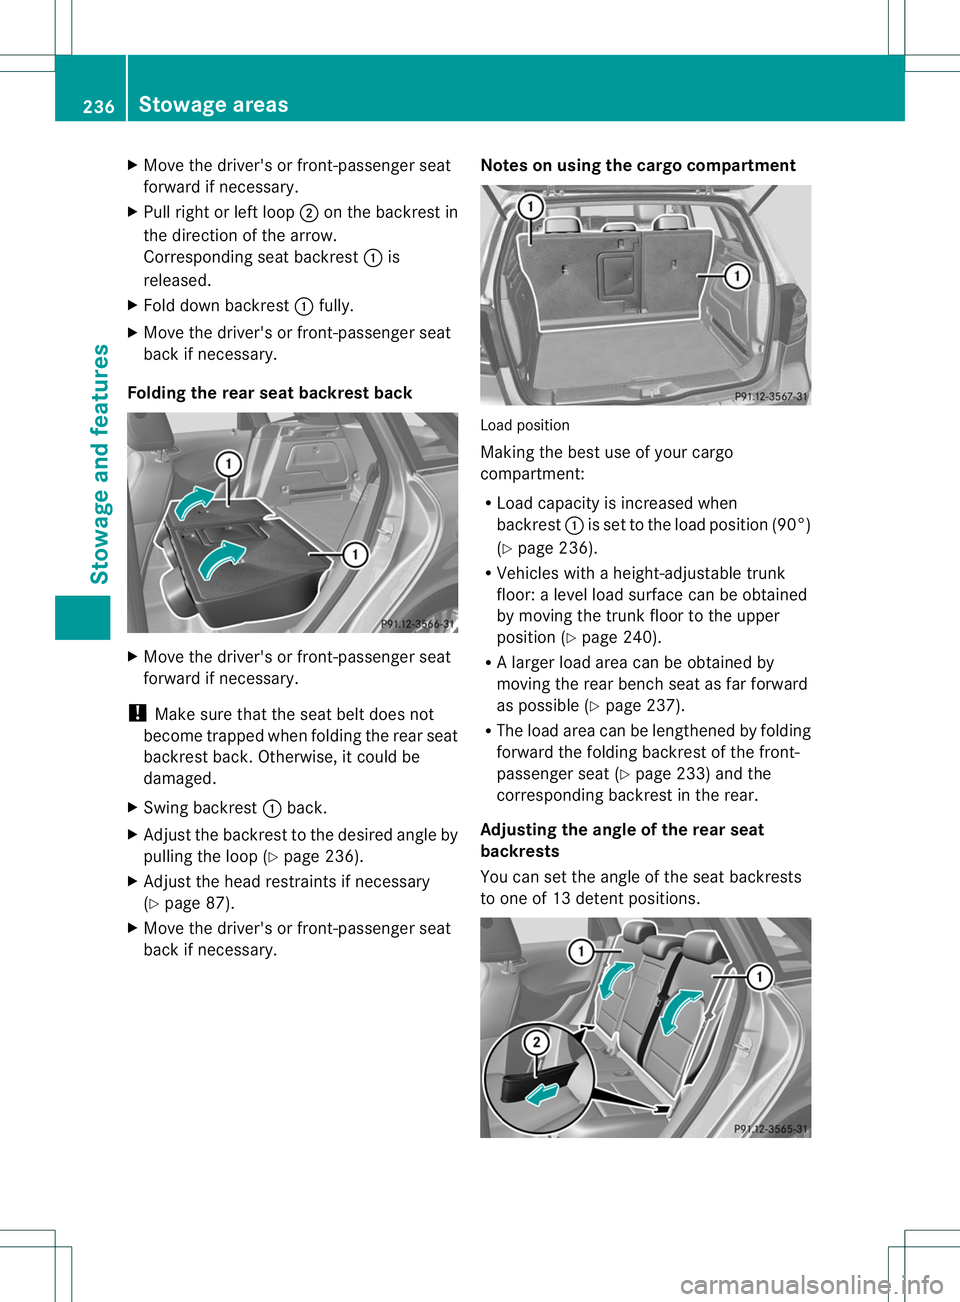
X Pull right or left loop ;on the backrest in
the direction of the arrow.
Corresponding seat backrest :is
released.
X Fold down backrest :fully.
X Move the driver's or front-passenger seat
back if necessary.
Folding the rear seat backrest back X
Move the driver's or front-passenger seat
forward if necessary.
! Make sure that the seat belt does not
become trapped when folding the rear seat
backrest back. Otherwise, it could be
damaged.
X Swing backrest :back.
X Adjust the backrest to the desired angle by
pulling the loop (Y page 236).
X Adjust the head restraints if necessary
(Y page 87).
X Move the driver's or front-passenger seat
back if necessary. Notes on using the cargo compartment Load position
Making the best use of your cargo
compartment:
R
Load capacity is increased when
backrest :is set to the load position (90°)
(Y page 236).
R Vehicles with a height-adjustable trunk
floor: a level load surface can be obtained
by moving the trunk floor to the upper
position (Y page 240).
R Al arge rload area can be obtained by
moving the rear bench seat as far forward
as possible (Y page 237).
R The load area can be lengthened by folding
forward the folding backrest of the front-
passenger seat (Y page 233) and the
corresponding backrest in the rear.
Adjusting the angle of the rear seat
backrests
You can set the angle of the seat backrests
to one of 13 detent positions. 236
Stowage areasStowage and features
Page 240 of 336
X
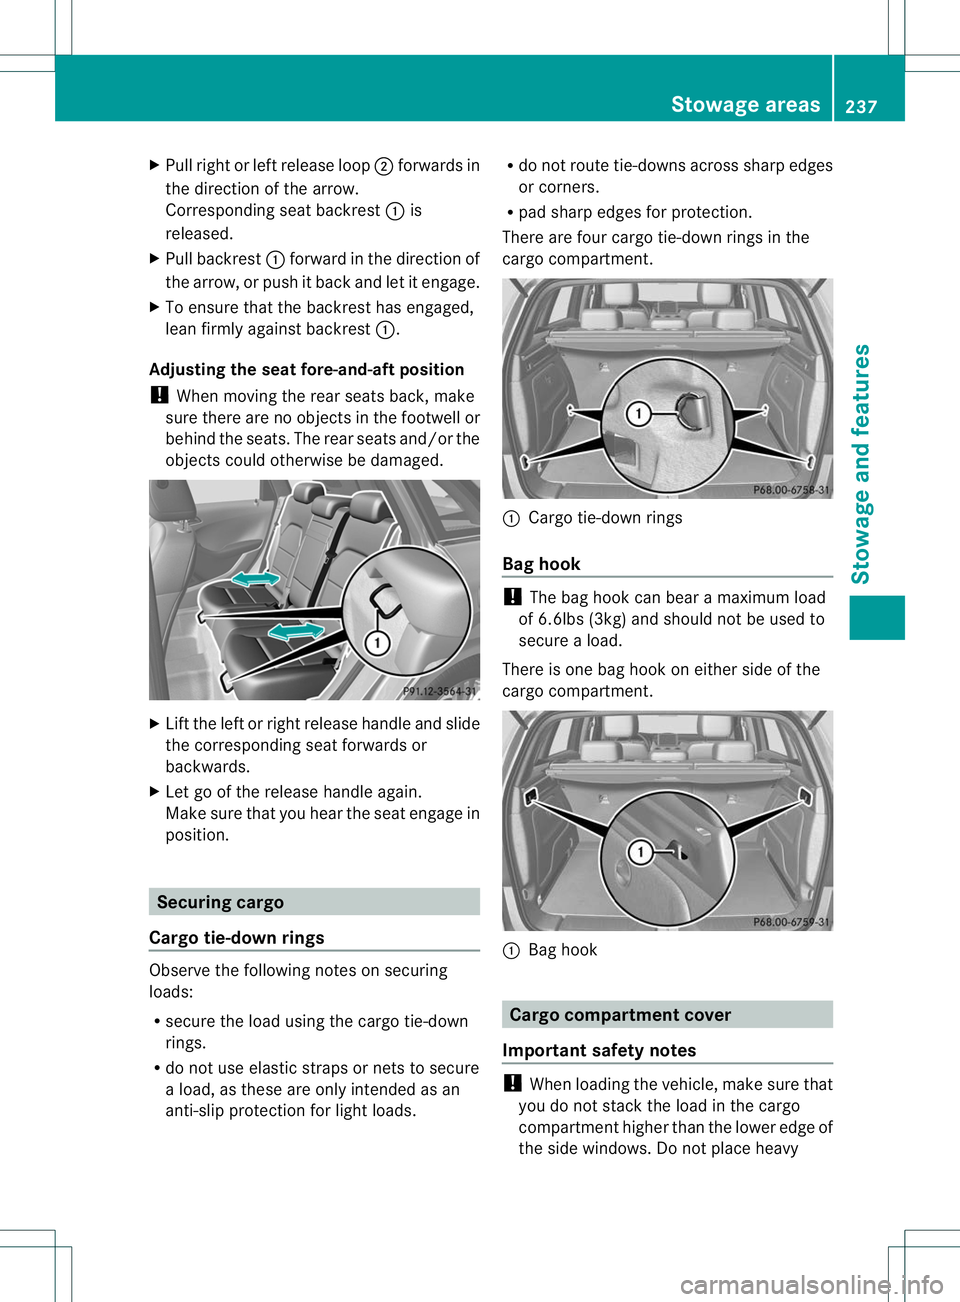
Pull right or left release loop ;forwards in
the direction of the arrow.
Corresponding seat backrest :is
released.
X Pull backrest :forward in the direction of
the arrow, or push it back and let it engage.
X To ensure that the backrest has engaged,
lean firmly against backrest :.
Adjusting the seat fore-and-aft position
! When moving the rear seats back, make
sure there are no objects in the footwell or
behind the seats. The rear seats and/or the
objects could otherwise be damaged. X
Lift the left or right release handle and slide
the corresponding seat forwards or
backwards.
X Let go of the release handle again.
Make sure that you hear the seat engage in
position. Securing cargo
Cargo tie-down rings Observe the following notes on securing
loads:
R
secure the load using the cargo tie-down
rings.
R do not use elastic straps or nets to secure
a load, as these are only intended as an
anti-slip protection for light loads. R
do not route tie-downs across sharp edges
or corners.
R pad sharp edges for protection.
There are four cargo tie-down rings in the
cargo compartment. :
Cargo tie-down rings
Bag hook !
The bag hook can bear a maximum load
of 6.6lbs (3kg) and should not be used to
secure a load.
There is one bag hook on either side of the
cargo compartment. :
Bag hook Cargo compartment cover
Important safety notes !
When loading the vehicle, make sure that
you do not stack the load in the cargo
compartment higher than the lower edge of
the side windows. Do not place heavy Stowage areas
237Stowage and features Z
Page 241 of 336
objects on top of the cargo compartment
cover.
! When removing and installing the cargo
compartment cover, ensure that its end
caps do not scrape the light-colored parts
of the vehicle.
The cargo compartment cover is located
behind the rear bench seat backrest.
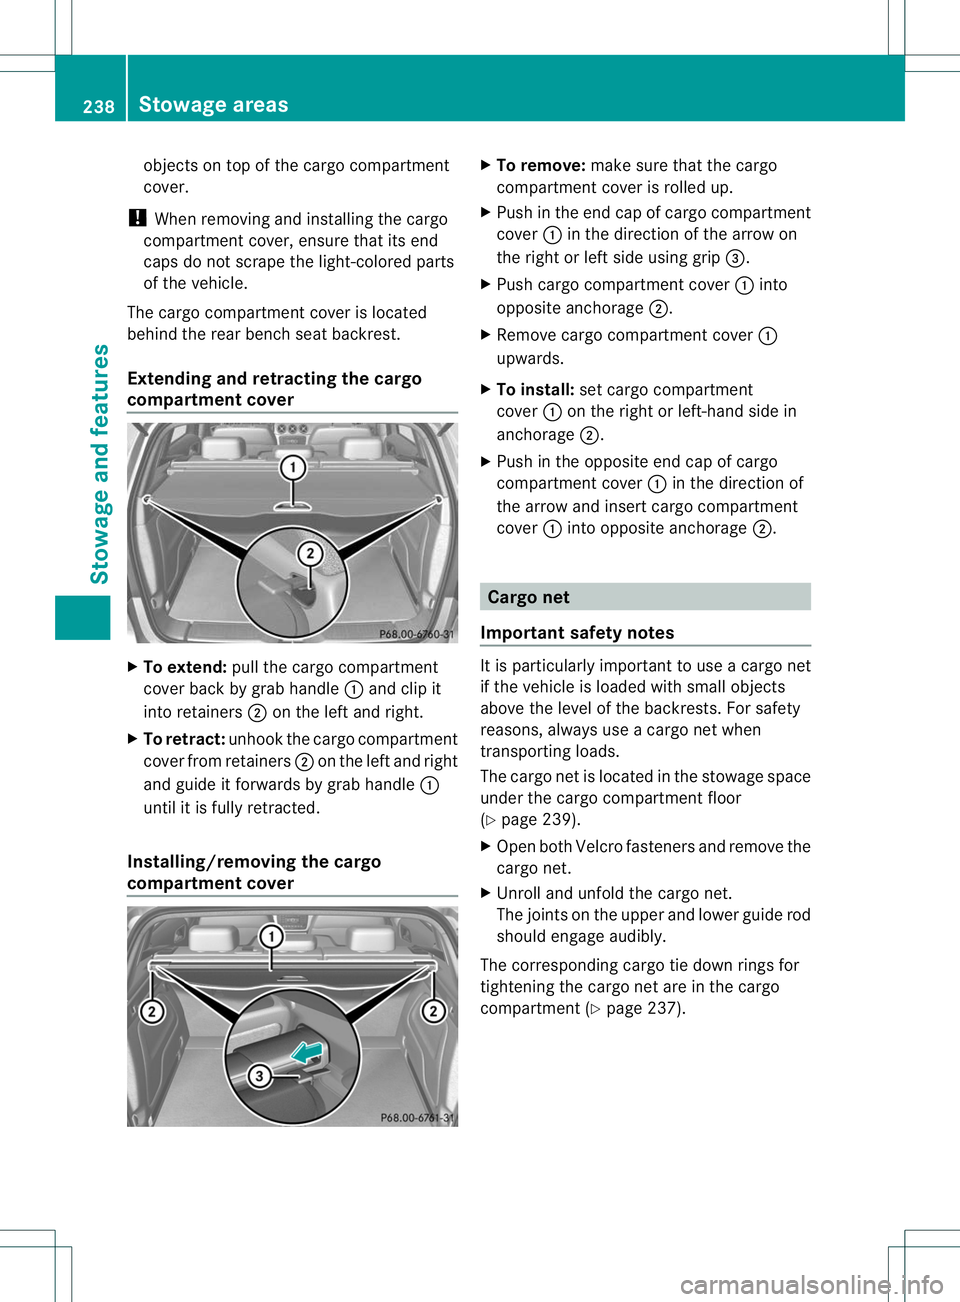
Extending and retracting the cargo
compartment cover X
To extend: pull the cargo compartment
cover back by grab handle :and clip it
into retainers ;on the left and right.
X To retract: unhook the cargo compartment
cover from retainers ;on the left and right
and guide it forwards by grab handle :
until it is fully retracted.
Installing/removing the cargo
compartment cover X
To remove: make sure that the cargo
compartment cover is rolled up.
X Push in the end cap of cargo compartment
cover :in the direction of the arrow on
the right or left side using grip =.
X Push cargo compartment cover :into
opposite anchorage ;.
X Remove cargo compartment cover :
upwards.
X To install: set cargo compartment
cover :on the right or left-hand side in
anchorage ;.
X Push in the opposite end cap of cargo
compartment cover :in the direction of
the arrow and insert cargo compartment
cover :into opposite anchorage ;. Cargo net
Important safety notes It is particularly important to use a cargo net
if the vehicle is loaded with small objects
above the level of the backrests. For safety
reasons, always use a cargo net when
transporting loads.
The cargo net is located in the stowage space
under the cargo compartment floor
(Y
page 239).
X Open both Velcro fastener sand remove the
cargo net.
X Unroll and unfold the cargo net.
The joints on the uppe rand lowe rguide rod
should engage audibly.
The corresponding cargo tie down rings for
tightening the cargo net are in the cargo
compartment (Y page 237).238
Stowage areasStowage and features
Page 244 of 336
X
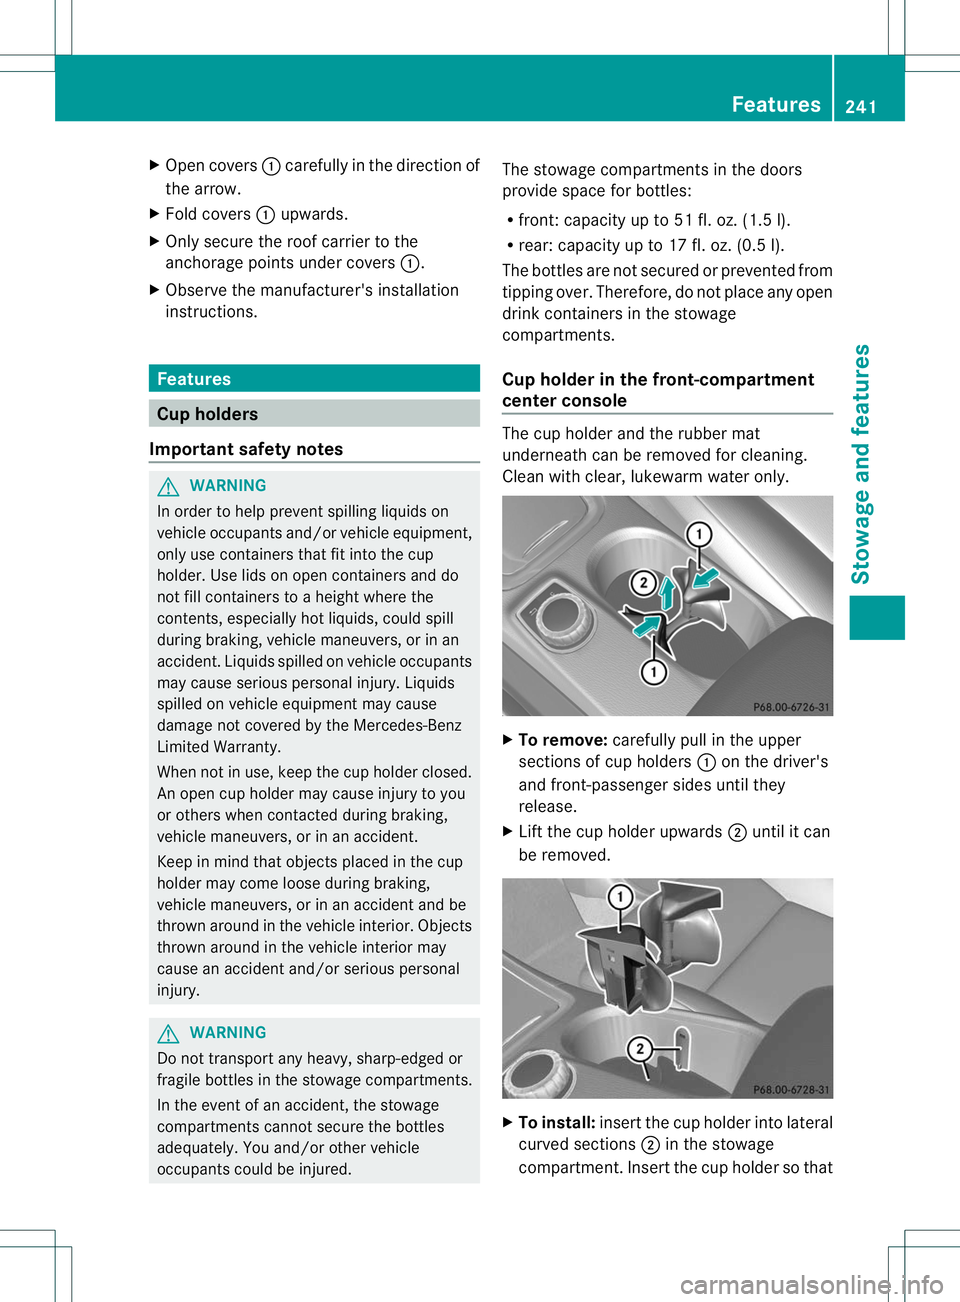
Open covers :carefully in the direction of
the arrow.
X Fold covers :upwards.
X Only secure the roof carrier to the
anchorage points under covers :.
X Observe the manufacturer's installation
instructions. Features
Cup holders
Important safety notes G
WARNING
In order to help prevent spilling liquids on
vehicle occupants and/or vehicle equipment,
only use containers that fit into the cup
holder. Use lids on open containers and do
not fill containers to aheight where the
contents, especially hot liquids, could spill
during braking, vehicle maneuvers, or in an
accident. Liquids spilled on vehicle occupants
may cause serious personal injury. Liquids
spilled on vehicle equipment may cause
damage not covered by the Mercedes-Benz
Limited Warranty.
When not in use, keep the cup holder closed.
An open cup holder may cause injury to you
or others when contacted during braking,
vehicle maneuvers, or in an accident.
Keep in mind that objects placed in the cup
holder may come loose during braking,
vehicle maneuvers, or in an accident and be
thrown around in the vehicle interior. Objects
thrown around in the vehicle interior may
cause an acciden tand/o rserious personal
injury. G
WARNING
Do not transport any heavy, sharp-edged or
fragile bottles in the stowage compartments.
In the event of an accident, the stowage
compartments cannot secure the bottles
adequately. You and/or other vehicle
occupants could be injured. The stowage compartments in the doors
provide space for bottles:
R
front: capacity up to 51 fl. oz. (1.5 l).
R rear: capacity up to 17 fl. oz. (0.5 l).
The bottles are not secured or prevented from
tipping over. Therefore, do not place any open
drink containers in the stowage
compartments.
Cup holder in the front-compartment
center console The cup holder and the rubber mat
underneath can be removed for cleaning.
Clean with clear, lukewarm water only.
X
To remove: carefully pull in the upper
sections of cup holders :on the driver's
and front-passenger sides until they
release.
X Lift the cup holder upwards ;until it can
be removed. X
To install: insert the cup holder into lateral
curved sections ;in the stowage
compartment .Inser tthe cup holder so that Features
241Stowage and features Z
Page 248 of 336
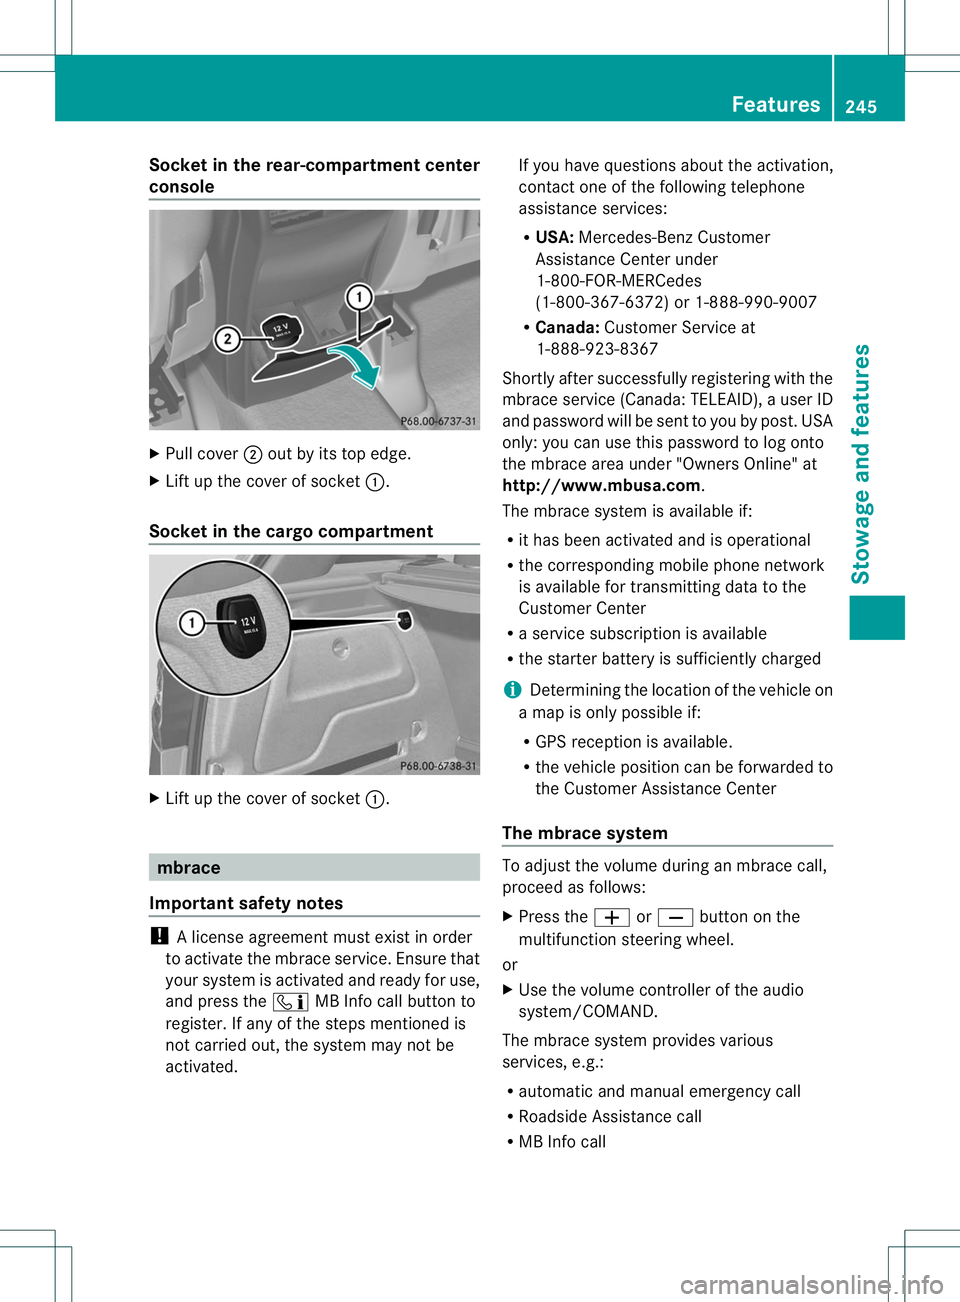
Socket in the rear-compartment center
console
X
Pull cover ;out by its top edge.
X Lift up the cover of socket :.
Socket in the cargo compartment X
Lift up the cover of socket :.mbrace
Important safety notes !
Alicense agreement must exis tinorder
to activate the mbrace service. Ensure that
yours ystem is activated and ready fo ruse,
and press the ïMB Info call button to
register. If any of the steps mentioned is
not carried out, the system may not be
activated. If you have questions aboutt
he activation,
contact one of the following telephone
assistance services:
R USA: Mercedes-BenzC ustomer
Assistance Cente runder
1-800-FOR-MERCedes
(1-800-367-6372) or 1-888-990-9007
R Canada: Customer Service at
1-888-923-8367
Shortly after successfull yregistering with the
mbrace service (Canada: TELEAID), a user ID
and password will be sent to you by post. USA
only: you can use this password to log onto
the mbrace area under "Owners Online" at
http://www.mbusa.com.
The mbrace system is available if:
R it has been activated and is operational
R the corresponding mobile phone network
is available for transmitting data to the
Customer Center
R a service subscription is available
R the starter battery is sufficiently charged
i Determining the location of the vehicle on
a map is only possible if:
R GPS reception is available.
R the vehicle position can be forwarded to
the Customer Assistance Center
The mbrace system To adjust the volume during an mbrace call,
proceed as follows:
X
Press the WorX button on the
multifunction steering wheel.
or
X Use the volume controller of the audio
system/COMAND.
The mbrace system provides various
services, e.g.:
R automatic and manual emergency call
R Roadside Assistance call
R MB Info call Features
245Stowage and features Z