2013 MERCEDES-BENZ B-CLASS SPORTS torque
[x] Cancel search: torquePage 21 of 336

Trip odometer
Calling up ....................................... 182
Resetting (on-board computer) ......183
Trunk
see Tailgate
Turn signals
Changing bulbs (front) ...................106
Changing bulbs (rear) ....................107
Display message ............................ 203
Switching on/off .............................. 98
Type identification plate
see Vehicle identification plate U
Unlocking Emergency unlocking .......................75
From inside the vehicle (central
unlocking button) ............................. 74V
Vanity mirror (in the sun visor) ........242
Vehicle Correct use ...................................... 24
Data acquisition ............................... 24
Equipment ....................................... 21
Individua lsettings .......................... 189
Limited Warranty ............................. 24
Loading .......................................... 300
Locking (in an emergency) ...............75
Locking (SmartKey) .......................... 68
Lowering ........................................ 315
Maintenance .................................... 21
Parking for a long period ................ 144
Pulling away ................................... 127
Raising ........................................... 313
Reporting problems .........................24
Securing from rolling away ............313
Towing away .................................. 285
Tow-starting ................................... 285
Transporting .................................. 287
Unlocking (in an emergency) ...........75
Unlocking (SmartKey) ......................68
Vehicle data ................................... 329
Vehicle data ....................................... 329
Vehicle dimensions ...........................329
Vehicle emergency locking ................75Vehicle identification number
see VIN
Vehicle identification plate ..............323
Vehicle tool kit .................................. 274
Video (DVD) ........................................ 186
VIN ...................................................... 323 W
Warning and indicator lamps ABS ................................................ 220
Brakes ........................................... 220
Check Engine ................................. 226
Coolant .......................................... 226
Distance warning ........................... 228
DISTRONI CPLUS ........................... 228
ESP ®
.............................................. 222
ESP ®
OFF ....................................... 223
Fuel tank ........................................ 226
Overview .......................................... 28
PASSENGER AIRBAG OFF ................50
Reserve fuel ................................... 226
Seat belt. ....................................... 218
SRS ................................................ 225
Warranty ............................................ 323
Washer fluid Display message ............................ 217
Wheel bol ttightening torque ...........315
Wheel chock ...................................... 313
Wheels Changing awheel .......................... 312
Checking ........................................ 293
Cleaning ......................................... 267
Cleaning (warning) .........................312
Emergency spare wheel .................318
Important safety notes ..................292
Interchanging/changing ................312
Mounting anew wheel ................... 315
Mounting awheel .......................... 312
Removing awheel .......................... 315
Storing ........................................... 312
Tightening torque ........................... 315
Whee lsize/tir esize ....................... 316
Window curtain air bag
Display message ............................ 202
Operation ........................................ .42
Windows
see Side windows 18
Index
Page 67 of 336

Traction control remains active if you
deactivate ESP
®
.
Deactivating/activating ESP ®i
Observe the "Importan tsafety notes"
sectio n(Ypage 59). G
WARNING
If you deactivate ESP ®
, ESP ®
no longer
stabilizes the vehicle. There is an increased
risk of skidding and an accident.
Only deactivate ESP ®
in the situations
described in the following.
! Avoid spinning the driven wheels for an
extended period with ESP ®
deactivated.
You could otherwise damage the drivetrain.
ESP ®
is activated automatically when the
engine is started.
If ESP ®
is deactivated and one or more wheels
start to spin, the ÷ESP®
warning lamp in
the instrument cluster flashes. In such
situations, ESP ®
will not stabilize the vehicle.
X To deactivate:(Y page 187).
The å ESP®
OFF warning lamp in the
instrument cluster lights up.
X To activate: (Ypage 187).
The å ESP®
OFF warning lamp in the
instrument cluster goes out.
It may be best to deactivate ESP ®
in the
following situations:
R when using snow chains
R in deep snow
R on sand or gravel
If you deactivate ESP ®
:
R ESP ®
no longer improves driving stability.
R traction control is still activated.
R ESP ®
still provides support when you
brake.
R the engine's torque is no longer limited and
the drive wheels can spin. The spinning of
the wheels results in a cutting action, which
provides better grip. EBD (electronic brake force
distribution)
i Observe the "Important safety notes"
section (Y page 59). G
WARNING
If EBDh as malfunctioned, the rear wheels can
still lock, e.g .unde rfull braking .This
increases the risk of skidding and an accident.
You should therefore adapt your driving style
to the different handling characteristics. Have
the brake system checked at a qualified
specialist workshop.
Observe information regarding indicator and
warning lamps (Y page 220) as well as
display messages (Y page 196).
EBD monitors and controls the brake
pressure on the rear wheels to improve
driving stability while braking. ADAPTIVE BRAKE
ADAPTIVE BRAKE enhances braking safety
and offers increased braking comfort. In
addition to the braking function, ADAPTIVE
BRAKE also has the HOLD function
(Y page 160) and hill start assist
(Y page 128). For further information, see
Driving tips (Y page 146). STEER CONTROL
STEER CONTROL helps you by transmitting a
noticeable steering force to the steering
wheel in the direction required for vehicle
stabilization.
This steering assistance is provided in
particular if:
R both right wheels or both left wheels are on
a wet or slippery road surface when you
brake
R the vehicle starts to skid
If ESP ®
is malfunctioning, you will not receive
steering support from STEER CONTROL. 64
Driving safety systemsSafety
Page 318 of 336

X
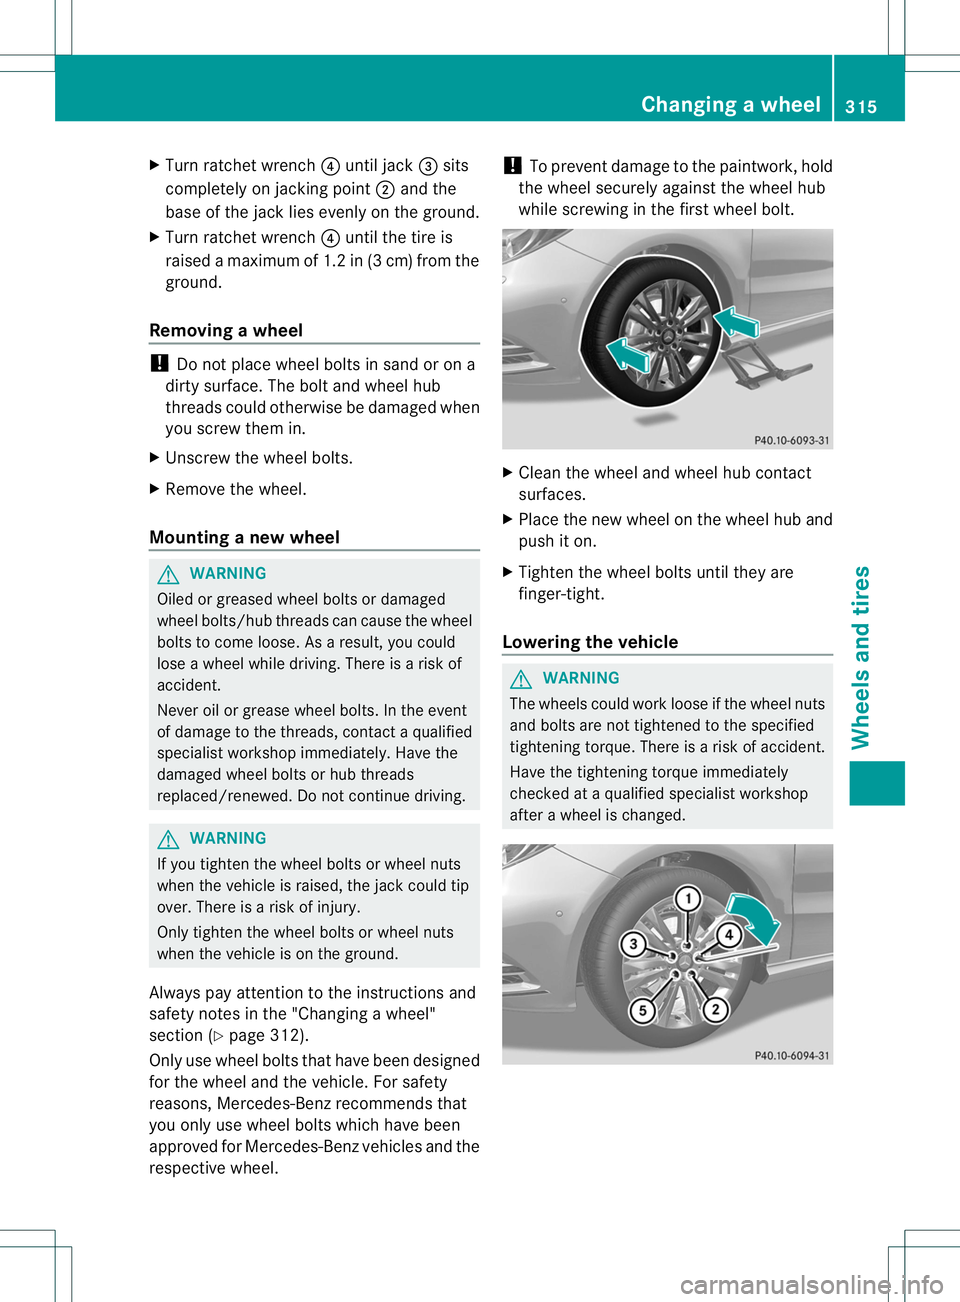
Turn ratchet wrench ?until jack =sits
completely on jacking point ;and the
base of the jack lies evenly on the ground.
X Turn ratchet wrench ?until the tire is
raised amaximum of 1.2 in (3 cm )from the
ground.
Removing awheel !
Do not place wheel bolts in sand or on a
dirty surface. The bolta nd wheel hub
threads could otherwise be damaged when
you screw them in.
X Unscrew the wheel bolts.
X Remove the wheel.
Mounting anew wheel G
WARNING
Oiled or greased wheel bolts or damaged
wheel bolts/hub threads can cause the wheel
bolts to come loose .As a result, you could
lose a wheel while driving. There is a risk of
accident.
Never oil or grease wheel bolts. In the event
of damage to the threads, contact a qualified
specialist workshop immediately.H ave the
damaged wheel bolts or hub threads
replaced/renewed. Do notc ontinue driving.G
WARNING
If you tighten the wheel bolts or wheel nuts
when the vehicle is raised, the jack could tip
over. There is a risk of injury.
Only tighten the wheel bolts or wheel nuts
when the vehicle is on the ground.
Always pay attention to the instructions and
safety notes in the "Changing a wheel"
section (Y page 312).
Only use wheel bolts that have been designed
for the wheel and the vehicle. For safety
reasons, Mercedes-Benz recommends that
you only use wheel bolts which have been
approved for Mercedes-Benz vehicles and the
respective wheel. !
To prevent damage to the paintwork, hold
the wheel securely against the wheel hub
while screwing in the first wheel bolt. X
Clean the wheel and wheel hub contact
surfaces.
X Place the new wheel on the wheel hub and
push it on.
X Tighten the wheel bolts until they are
finger-tight.
Lowering the vehicle G
WARNING
The wheels could work loose if the wheel nuts
and bolts are not tightened to the specified
tightening torque. There is a risk of accident.
Have the tightening torque immediately
checked at a qualified specialist workshop
after a wheel is changed. Changing
awheel
315Wheels and tires Z
Page 319 of 336

X
Place the ratchet wrench onto the hexagon
nut of the jack so that the letters ABare
visible.
X Turn the ratchet wrench until the vehicle is
once again standing firmly on the ground.
X Place the jack to one side.
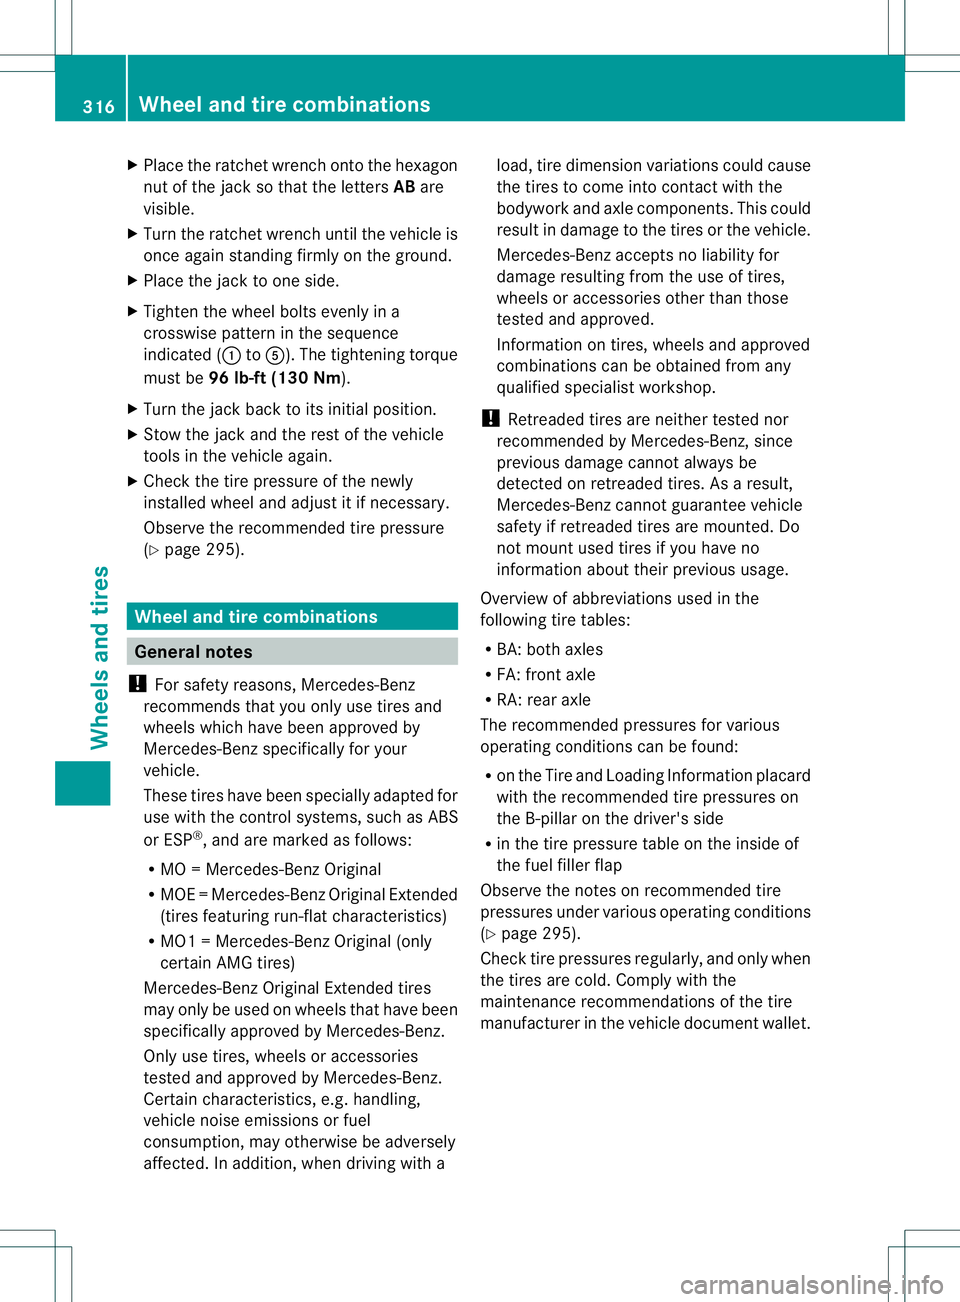
X Tighten the wheel bolts evenly in a
crosswise patter ninthe sequence
indicated ( :toA). The tightening torque
must be 96 lb-ft (130 Nm).
X Turn the jack back to its initial position.
X Stow the jack and the rest of the vehicle
tools in the vehicle again.
X Check the tire pressure of the newly
installed wheel and adjust it if necessary.
Observe the recommended tire pressure
(Y page 295). Wheel and tire combinations
General notes
! For safety reasons, Mercedes-Benz
recommends that you only use tires and
wheels which have been approved by
Mercedes-Benzs pecifically for your
vehicle.
These tires have been specially adapted for
use with the control systems, such as ABS
or ESP ®
, and are marked as follows:
R MO =Mercedes-BenzO riginal
R MOE =Mercedes-BenzO riginal Extended
(tires featuring run-flat characteristics)
R MO1 =Mercedes-Benz Original (only
certain AMG tires)
Mercedes-BenzO riginal Extended tires
may only be used on wheels that have been
specifically approved by Mercedes-Benz.
Only use tires, wheels or accessories
tested and approved by Mercedes-Benz.
Certain characteristics, e.g. handling,
vehicle noise emissions or fuel
consumption, may otherwise be adversely
affected. In addition, when driving with a load, tire dimension variations could cause
the tires to come into contact with the
bodywork and axle components. This could
result in damage to the tires or the vehicle.
Mercedes-Benz accepts no liability for
damage resulting from the use of tires,
wheels or accessories other than those
tested and approved.
Information on tires, wheels and approved
combinations can be obtained from any
qualified specialist workshop.
! Retreaded tires are neither tested nor
recommended by Mercedes-Benz, since
previous damage cannot always be
detected on retreaded tires. As a result,
Mercedes-Benz cannot guarantee vehicle
safety if retreaded tires are mounted. Do
not mount used tires if you have no
information about their previous usage.
Overview of abbreviations usedint he
following tire tables:
R BA: both axles
R FA: front axle
R RA: rear axle
The recommended pressures for various
operating conditions can be found:
R on the Tire and Loading Information placard
with the recommended tire pressures on
the B-pillar on the driver's side
R in the tire pressure table on the inside of
the fuel filler flap
Observe the notes on recommended tire
pressures under various operating conditions
(Y page 295).
Check tire pressures regularly, and only when
the tires are cold. Comply with the
maintenance recommendations of the tire
manufacturer in the vehicle document wallet. 316
Wheel and tire combinationsWheels and tires