2013 MERCEDES-BENZ B-CLASS SPORTS run flat
[x] Cancel search: run flatPage 8 of 336
Automatic transmission
Automatic drive program ...............136
Changing gear. .............................. 135
DIRECT SELECT leve r..................... 133
Display message ............................ 215
Drive program displa y.................... 133
Driving tips .................................... 135
Emergency running mode ..............139
Engaging drive position .................. 134
Engaging neutra l............................ 134
Engaging revers egear ................... 134
Engaging the par kposition ............ 133
Kickdow n....................................... 135
Manual drive program ....................136
Overview ........................................ 132
Problem (malfunction) ...................139
Progra mselecto rbutton ................ 135
Pulling away ................................... 127
Starting the engine ........................127
Steering wheel paddle shifters ......136
Transmission position display. .......133
Transmission positions ..................134
Automatic transmission
emergency mode ............................... 139 B
Backup lamp Changing bulbs .............................. 107
Display message ............................ 205
Bag hook ............................................ 237
BAS (Brake Assist System) .................60
Battery (SmartKey) Checking .......................................... 70
Important safety notes ....................70
Replacing ......................................... 70
Battery (vehicle)
Charging ........................................ 281
Display message ............................ 208
Important safety notes ..................279
Jump starting ................................. 283
Belt force limiters (activation) ...........37
Blinds see Roller sunblind
Blin dSpot Assist
Activating/deactivating .................188
Notes/function .............................. 173Brake Assist
see BAS (Brake Assist System)
Brake fluid
Display message ............................ 200
Notes ............................................. 327
Brake lamps
Adaptive .......................................... .63
Changin gbulbs .............................. 107
Display message ............................ 203
Brakes
ABS .................................................. 59
Adaptive Brake Assist ......................61
BAS .................................................. 60
Brake fluid (notes) .........................327
Display message ............................ 194
Driving tips .................................... 146
Important safety notes ..................146
Maintenance .................................. 147
Parking brake ................................ 142
Warning lamp ................................. 220
Breakdown
see Flat tire
see Towing away/tow-starting
Bulbs
see Changing bulbs C
Calling up a malfunction see Display messages
Car
see Vehicle
Care
Carpets .......................................... 271
Car wash ........................................ 265
Display ........................................... 269
Exhaust pip e.................................. 269
Exterior lights ................................ 268
Gea rors electo rlever .................... 270
Interior ........................................... 269
Matte finish ................................... 267
Notes ............................................. 265
Paint .............................................. 267
Plastic trim .................................... 269
Power washer ................................ 266
Rea rview camera .......................... 269
Roof lining ...................................... 271
Seat belt. ....................................... 271 Index
5
Page 217 of 336
Tires
Display messages Possible causes/consequences and
M Solutions
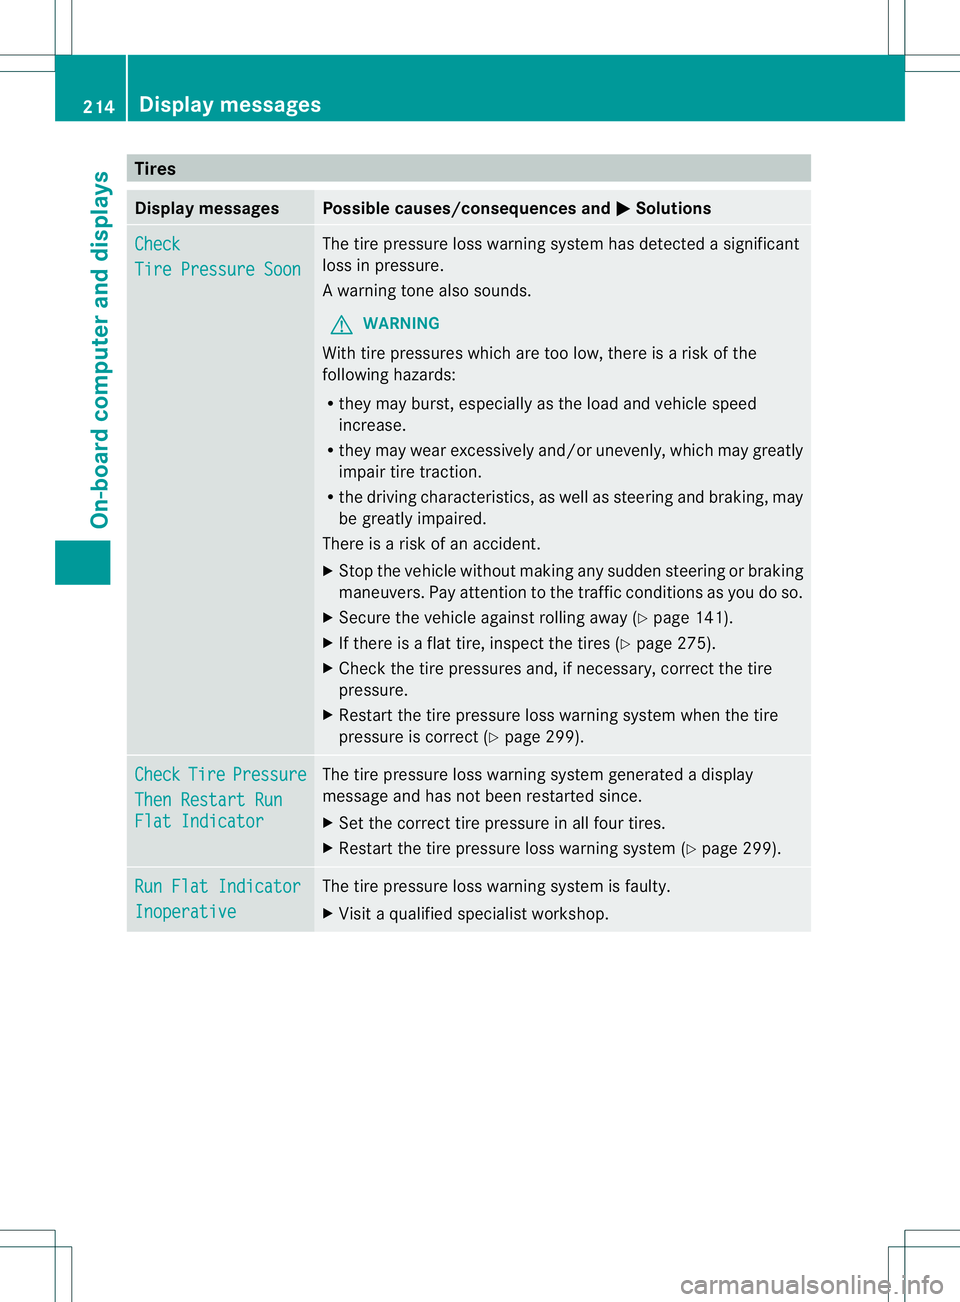
Check
Tire Pressure Soon The tire pressure loss warnin
gsystem has detected a significant
loss in pressure.
Aw arning tone also sounds.
G WARNING
With tire pressures which are too low, there is a ris kofthe
following hazards:
R they may burst, especially as the load and vehicle speed
increase.
R they may wear excessively and/or unevenly, which may greatly
impair tire traction.
R the driving characteristics, as well as steering and braking, may
be greatly impaired.
There is a risk of an accident.
X Stop the vehicle without making any sudden steering or braking
maneuvers. Pay attention to the traffic conditions as you do so.
X Secure the vehicle against rolling away (Y page 141).
X If there is a flat tire, inspect the tires (Y page 275).
X Check the tire pressures and, if necessary, correct the tire
pressure.
X Restart the tire pressure loss warning system when the tire
pressure is correct (Y page 299).Check Tire Pressure
Then Restart Run
Flat Indicator The tire pressure loss warning system generated a display
message and has not been restarted since.
X
Set the correct tire pressure in all four tires.
X Restart the tire pressure loss warning system (Y page 299).Run Flat Indicator
Inoperative The tire pressure loss warning system is faulty.
X
Visit a qualified specialist workshop. 214
Display messagesOn-board computer and displays
Page 243 of 336
X
Attach hook =to the cargo
compartment's uppers eal?.
X To close: detach hook =from seal ?.
X Fasten hook =to the bracket on the
underside of the cargo compartment floor.
X Fold the trunk floor down.
X Press the trun kfloor down until it engages.
Setting the height of the trunk floor The stowage well under the trunk floor can be
increased or decreased in size as necessary.
To do this, you can lock the floor at two
differen
theights. The upper catch gives a flat
load surface when the rear bench seat is
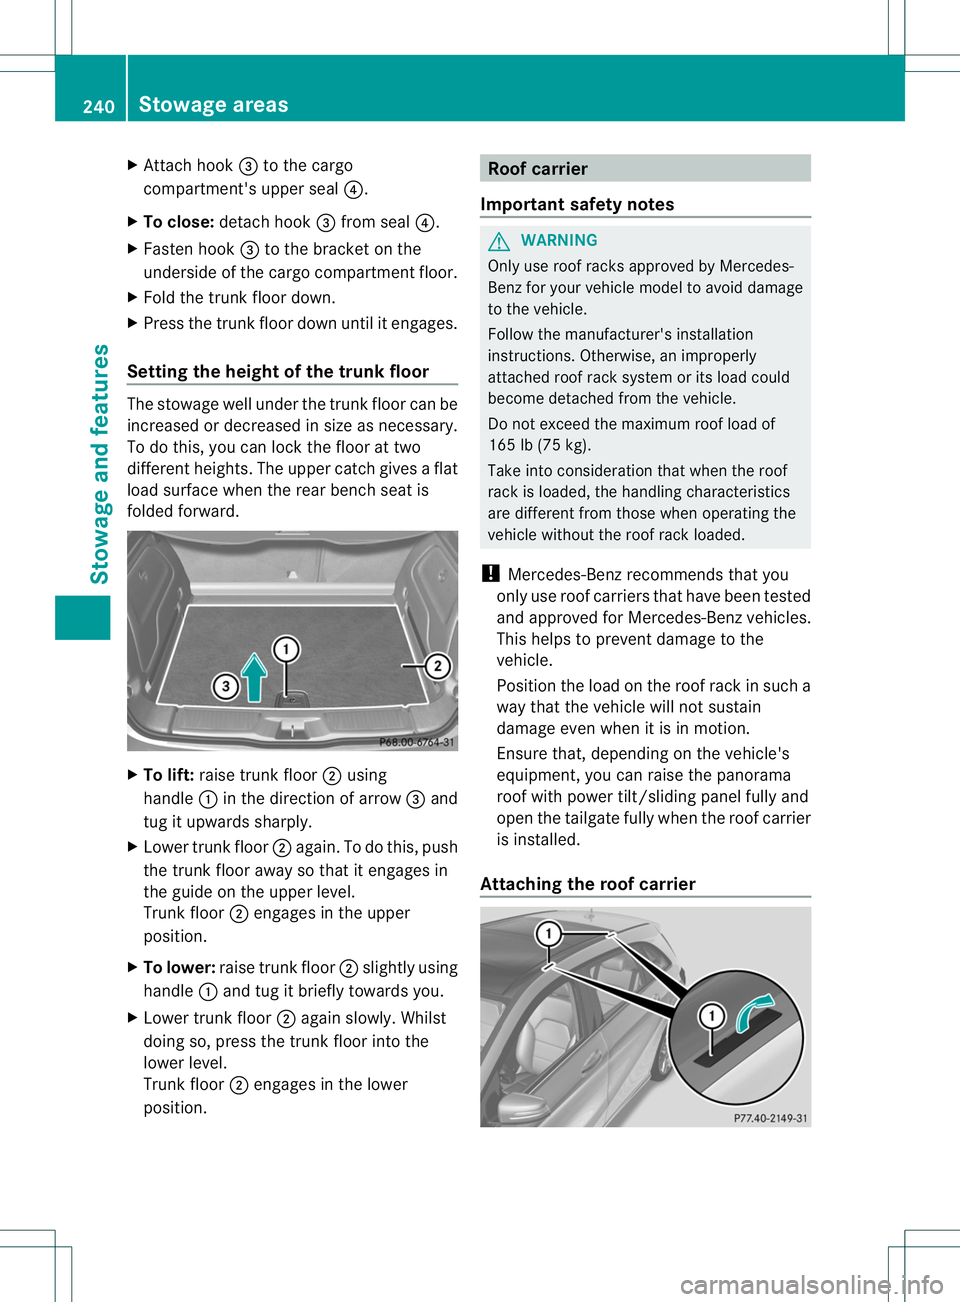
folded forward. X
To lift: raise trunk floor ;using
handle :in the direction of arrow =and
tug it upwards sharply.
X Lower trunk floor ;again. To do this, push
the trun kfloor away so that it engages in
the guide on the upper level.
Trunk floor ;engages in the upper
position.
X To lower: raise trunk floor ;slightly using
handle :and tug it briefly towards you.
X Lower trunk floor ;again slowly. Whilst
doing so, press the trunk floor into the
lower level.
Trunk floor ;engages in the lower
position. Roof carrier
Important safety notes G
WARNING
Only use roof racks approved by Mercedes-
Ben zfor your vehicle model to avoid damage
to the vehicle.
Follow the manufacturer' sinstallation
instructions. Otherwise, an improperly
attached roo frack system or its load could
become detached from the vehicle.
Do not exceed the maximum roof load of
165 lb (75 kg).
Take into consideratio nthat when the roof
rack is loaded, the handling characteristics
are different from those when operating the
vehicle without the roof rack loaded.
! Mercedes-Benzr ecommends that you
only use roof carriers that have been tested
and approved for Mercedes-Benzv ehicles.
This helps to preven tdamage to the
vehicle.
Positio nthe load on the roof rack in such a
way that the vehicle will not sustain
damage even when it is in motion.
Ensure that, depending on the vehicle's
equipment, you can raise the panorama
roof with power tilt/sliding panel fully and
open the tailgate fully when the roof carrier
is installed.
Attaching the roof carrier 240
Stowage areasStowage and features
Page 278 of 336
X
Open the tailgate.
X Lift the cargo compartment floor up
(Y page 239).
i Towing eye ;is located under tire
inflation compressor :.
Vehicles with atire-change tool kit X
Open the tailgate.
X Lift the cargo compartment floor up
(Y page 239).
X Remove the tire-change toolk it.
The tire-change tool kit contains:
R Jack
R Lug wrench
R One pair of gloves
R Folding wheel chock Flat tire
Preparing the vehicle
Your vehicle may be equipped with:
R MOExtended tires (tires with run-flat
properties) (Y page 275)
R a TIREFIT kit
Information on mounting a wheel
(Y page 312).
Vehicle preparation is not necessary on
vehicles with MOExtended tires.
X Stop the vehicle on solid, non-slippery and
level ground, as far away as possible from
traffic.
X Switch on the hazard warning lamps.
X Secure the vehicle against rolling away
(Y page 141).
X If possible, bring the front wheels into the
straight-ahead position.
X Switch off the engine.
X Remove the SmartKey from the ignition
lock. X
All occupants must get out of the vehicle.
Make sure that they are not endangered as
they do so.
X Make sure that no one is near the danger
area while a wheel is being changed.
Anyone who is not directly assisting in the
wheel change should, for example, stand
behind the barrier.
X Get out of the vehicle. Pay attention to
traffic conditions when doing so.
X Close the driver's door.
i Vehicles equipped with MOExtended tires
are not equipped with a TIREFIT kit at the
factory. It is therefore recommended that
you additionally equip your vehicle with a
TIREFIT kit if you mount tires that do not
feature run-flat properties, e.g. winter tires.
A TIREFIT kit can be obtained from a
qualified specialist workshop. MOExtended tires (tires with run-flat
properties)
G
WARNING
When driving in emergency mode, the driving
characteristics deteriorate, e.g. when
cornering, accelerating quickly and when
braking. There is a risk of an accident.
Do not exceed the stated maximum speed.
Avoid abrupt steering and driving maneuvers,
and driving over obstacles (curbs, potholes,
off-road). This applies in particular to a laden
vehicle.
Stop driving in emergency mode if:
R you hear banging noises.
R the vehicle starts to shake.
R you see smoke and smell rubber.
R ESP ®
is intervening constantly.
R there are tears in the sidewalls of the tire.
After driving in emergency mode, have the
wheel rims checked at a qualified specialist
workshop with regard to their further use. The
defective tire must be replaced in every case. Flat tire
275Breakdown assistance Z
Page 279 of 336
With MOExtended tires (tires with run flat
characteristics), you can continue to drive
your vehicle even if there is a total loss of
pressure in one or more tires.
MOExtended tires may only be used in
conjunction with an active tire pressure loss
warning system.
The maximum driving distance is
approximately 50 miles (80 km) when the
vehicle is partially laden and approximately
18 miles (30 km) when the vehicle is fully
laden.
In addition to the vehicle load, the driving
distance possible depends upon:
R
speed
R road condition
R outside temperature
The driving distance possible in run-flat mode
may be reduced by extreme driving
conditions/maneuvers, or it can be increased
through a moderate style of driving.
The maximum permissible distance which
can be driven in run-flat mode is counted from
the momen tthe tire pressure loss warning
appears in the multifunction display.
You must not exceed a maximum speed of
50 mph (80 km/h).
i When changing or replacing one or all of
the tires, note the label "MOExtended".
Take note also of the size specified for the
vehicle.
i Vehicles equipped with MOExtended tires
are not equipped with a TIREFIT kit at the
factory. It is therefore recommended that
you additionally equip your vehicle with a
TIREFIT kit if you mount tires that do not
feature run-flat properties, e.g. winter tires.
AT IREFIT kit is available, for example, from
a qualified specialist workshop. TIREFI
Tkit
Using the TIREFIT kit TIREFIT is a tire sealant.
TIREFIT can be used to seal small punctures
of up to 0.16 inches (4 mm), particularly on
the tire tread. You can use TIREFIT at outside
temperatures down to
Ò4 ‡ (Ò20 †). G
WARNING
In the following situations ,the tire sealant is
unable to provide sufficient breakdown
assistance, as it is unable to seal the tire
properly:
R there are cuts or punctures in the tire larger
than those mentioned above.
R the wheel rim is damaged.
R you have driven at very low tire pressures
or on a flat tire.
There is a risk of an accident.
Do not drive any further. Contact a qualified
specialist workshop. G
WARNING
The tire sealant is harmful and causes
irritation. It must not come into contact with
your skin, eyes or clothing or be swallowed.
Do not inhale TIREFIT fumes. Keep tire sealant
away from children. There is a risk of injury.
If you come into contact with the tire sealant,
observe the following:
R Rinse off the tire sealant from your skin
immediately with water.
R If the tire sealant comes into contact with
your eyes, immediately rinse them
thoroughly with clean water.
R If tire sealant is swallowed, immediately
rinse your mouth out thoroughly and drink
plenty of water. Do not induce vomiting,
and seek medical attention immediately.
R Immediately change out of clothing which
has come into contact with tire sealant.
R If an allergic reaction occurs, seek medical
attention immediately. 276
Flat tireBreakdown assistance
Page 280 of 336
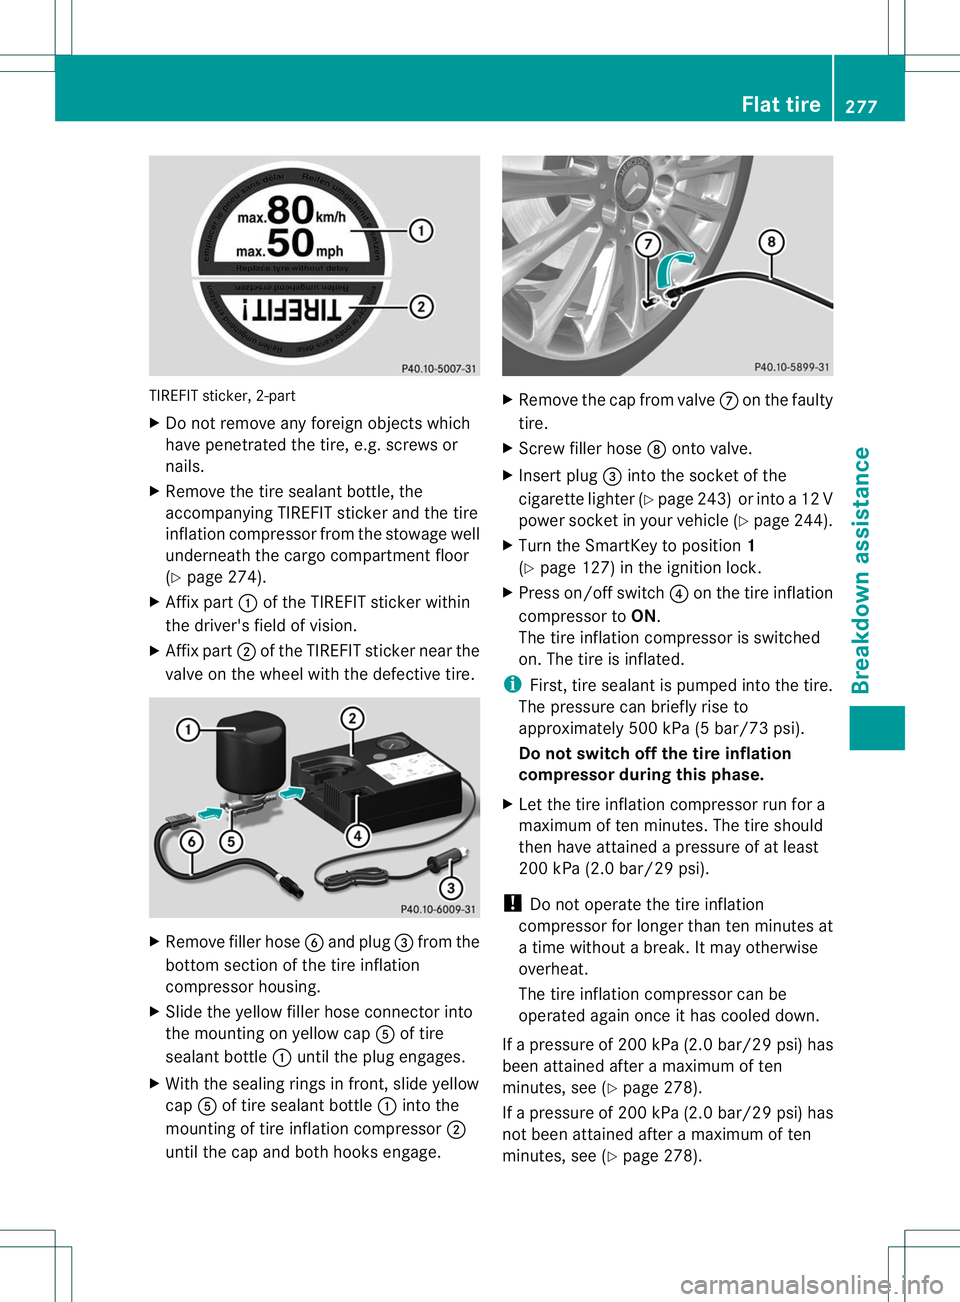
TIREFIT sticker, 2-part
X
Do not remove any foreign objects which
have penetrated the tire, e.g. screws or
nails.
X Remove the tire sealant bottle, the
accompanying TIREFIT sticker and the tire
inflation compressor from the stowage well
underneath the cargo compartment floor
(Y page 274).
X Affix part :of the TIREFIT sticker within
the driver's field of vision.
X Affix part ;of the TIREFIT sticker near the
valve on the wheel with the defective tire. X
Remove filler hose Band plug =from the
bottom section of the tire inflation
compressor housing.
X Slide the yellow filler hose connector into
the mounting on yellow cap Aof tire
sealant bottle :until the plug engages.
X With the sealing rings in front, slide yellow
cap Aof tire sealant bottle :into the
mounting of tire inflation compressor ;
until the cap and both hooks engage. X
Remove the cap from valve Con the faulty
tire.
X Screw filler hose Donto valve.
X Insert plug =into the socket of the
cigarette lighter (Y page 243) or into a 12 V
power socket in your vehicle (Y page 244).
X Turn the SmartKey to position 1
(Y page 127) in the ignition lock.
X Press on/offs witch?on the tire inflation
compressor to ON.
The tire inflatio ncompressor is switched
on. The tire is inflated.
i First, tire sealant is pumped into the tire.
The pressure can briefly rise to
approximately 500 kPa (5 bar/73 psi).
Do not switch off the tire inflation
compressor during this phase.
X Let the tire inflation compressor run for a
maximum of ten minutes. The tire should
then have attained a pressure of at least
200 kPa (2.0 bar/29 psi).
! Do not operate the tire inflation
compressor for longer than ten minutes at
a time without a break. It may otherwise
overheat.
The tire inflation compressor can be
operated again once it has cooled down.
If ap ressure of 200 kPa (2.0 bar/ 29 psi) has
been attained after a maximum of ten
minutes, see (Y page 278).
If ap ressure of 200 kPa (2.0 bar/ 29 psi) has
not been attained after a maximum of ten
minutes, see (Y page 278). Flat tire
277Breakdown assistance Z
Page 281 of 336
i
If tire sealant leaks out, allow it to dry. It
can then be removed like a layer of film.
If yourc lothes are soiled with tire sealant,
have the mcleaned with perchloroethylene
at a dry cleaner as soon as possible.
Tire pressure not reached If
ap ressure of 200 kPa (2.0 bar/ 29 psi) has
not been achieved after ten minutes:
X Switch off the tire inflation compressor.
X Unscrew the filler hose from the valve of
the faulty tire.
X Very slowly drive forwards or reverse
approximately 30 ft (10 m).
X Pump up the tire again.
After a maximum of ten minutes, the tire
pressure must be at least 200 kPa (2.0 bar/
29 psi). G
WARNING
If the required tire pressure is not reached
after the specified time, the tire is too badly
damaged. The tire sealant cannot repair the
tire in this instance. Damaged tires and a tire
pressure that is too low can significantly
impair the vehicle's braking and driving
characteristics. There is a risk of accident.
Do not continue driving. Contact a qualified
specialist workshop.
Tire pressure reached G
WARNING
At ire temporarily sealed with tire sealant
impairs the driving characteristics and is not
suitable for higher speeds. There is a risk of
accident.
You should therefore adapt your driving style
accordingly and drive carefully. Do not exceed
the specified maximum speed with a tire that
has been repaired using tire sealant.
! After use, excess tire sealant may run out
of the filler hose. This could cause stains. Therefore, place the filler hose in the plastic
bag that contained the TIREFIT kit. H
Environmental note
Have the used tire sealant bottle disposed of
professionally, e.g. at aqualified specialist
workshop.
If ap ressure of 200 kPa (2.0 bar/ 29 psi) has
been attained after a maximum of ten
minutes:
X Switch off the tire inflation compressor.
X Unscrew the filler hose from the valve of
the faulty tire.
X Stow the tire sealant bottle and the tire
inflation compressor.
X Pull away immediately.
The maximu mspeed for atire treated with tire
sealant is 50 mph (80k m/h). The upper part
of the TIREFIT sticker must be affixed to the
instrument cluster in the driver's field of
vision.
X Stop after driving for approximately ten
minutes and check the tire pressure with
the tire inflation compressor.
The tire pressure must now be at least
130 kPa (1.3 bar/19 psi). G
WARNING
If the required tire pressure is not reached
after driving for a short period, the tire is too
badly damaged. The tire sealant cannot repair
the tire in this instance. Damaged tires and a
tire pressure that is too low can significantly
impair the vehicle's braking and driving
characteristics. There is a risk of accident.
Do not continue driving. Contact a qualified
specialist workshop.
X Correct the tire pressure if it is still at least
130 kPa (1.3 bar/19 psi) (for the values,
see the Tire and Loading Information
placard on the driver's side B-pillar or tire
pressure table on the fuel filler flap).
X To increase the tire pressure: switch on
the tire inflation compressor. 278
Flat tireBreakdown assistance
Page 289 of 336
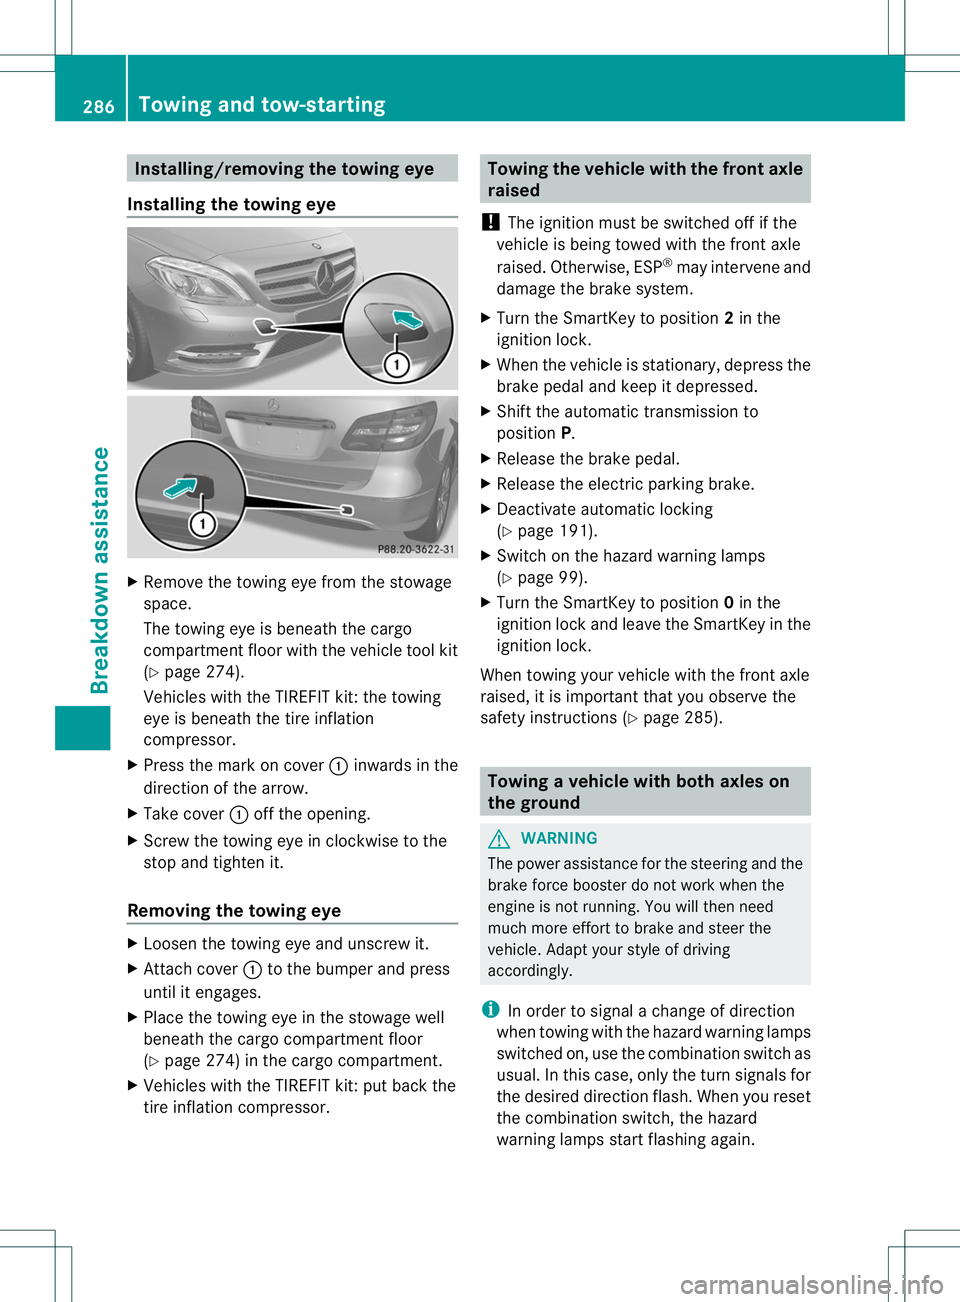
Installing/removing the towing eye
Installing the towing eye X
Remove the towing eye from the stowage
space.
The towing eye is beneath the cargo
compartmen tfloor with the vehicle tool kit
(Y page 274).
Vehicles with the TIREFIT kit :the towing
eye is beneath the tire inflation
compressor.
X Press the mark on cover :inwards in the
direction of the arrow.
X Take cover :off the opening.
X Screw the towing eye in clockwise to the
stop and tighten it.
Removing the towing eye X
Loosen the towing eye and unscrew it.
X Attach cover :to the bumper and press
until it engages.
X Place the towing eye in the stowage well
beneath the cargo compartmentf loor
(Y page 274) in the cargo compartment.
X Vehicles with the TIREFIT kit: put back the
tire inflation compressor. Towing the vehicle with the front axle
raised
! The ignition must be switched off if the
vehicle is being towed with the front axle
raised. Otherwise, ESP ®
may intervene and
damage the brake system.
X Turn the SmartKey to position 2in the
ignition lock.
X When the vehicle is stationary, depress the
brake pedal and keep it depressed.
X Shift the automatic transmission to
position P.
X Release the brake pedal.
X Release the electric parking brake.
X Deactivate automatic locking
(Y page 191).
X Switch on the hazard warning lamps
(Y page 99).
X Turn the SmartKey to position 0in the
ignition lock and leave the SmartKey in the
ignition lock.
When towing your vehicle with the front axle
raised, it is importan tthat you observe the
safety instructions (Y page 285). Towing
avehicle with both axles on
the ground G
WARNING
The power assistance for the steering and the
brake force booster do not work when the
engine is not running. You will then need
much more effort to brake and steer the
vehicle .Adapt your style of driving
accordingly.
i In order to signal a change of direction
when towing with the hazard warning lamps
switched on, use the combination switch as
usual. In this case, only the turn signals for
the desired direction flash. When you reset
the combination switch, the hazard
warning lamps start flashing again. 286
Towing and tow-startingBreakdown assistance