2013 MERCEDES-BENZ B-CLASS SPORTS inflation pressure
[x] Cancel search: inflation pressurePage 280 of 336
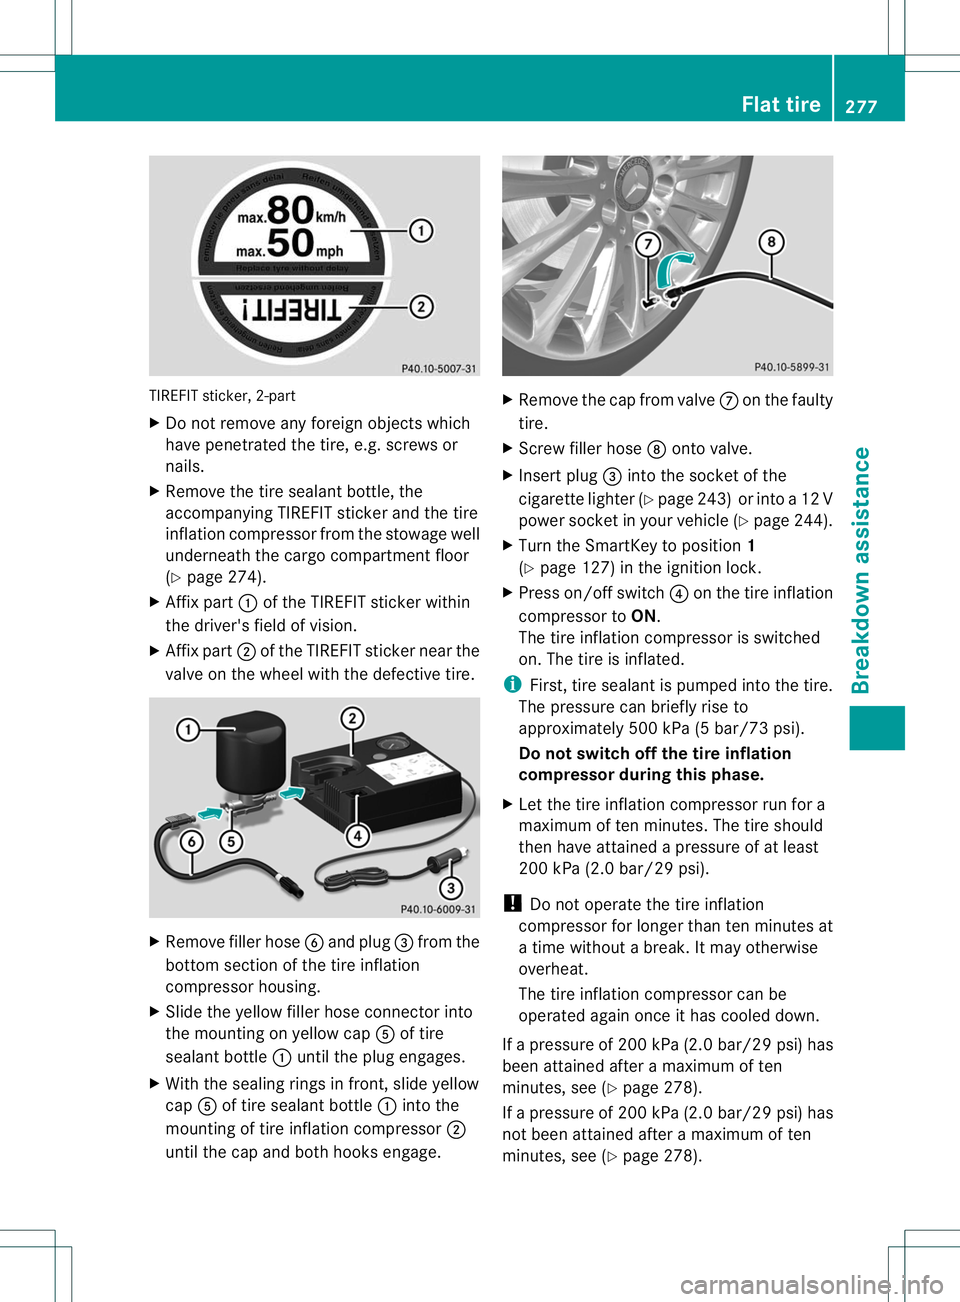
TIREFIT sticker, 2-part
X
Do not remove any foreign objects which
have penetrated the tire, e.g. screws or
nails.
X Remove the tire sealant bottle, the
accompanying TIREFIT sticker and the tire
inflation compressor from the stowage well
underneath the cargo compartment floor
(Y page 274).
X Affix part :of the TIREFIT sticker within
the driver's field of vision.
X Affix part ;of the TIREFIT sticker near the
valve on the wheel with the defective tire. X
Remove filler hose Band plug =from the
bottom section of the tire inflation
compressor housing.
X Slide the yellow filler hose connector into
the mounting on yellow cap Aof tire
sealant bottle :until the plug engages.
X With the sealing rings in front, slide yellow
cap Aof tire sealant bottle :into the
mounting of tire inflation compressor ;
until the cap and both hooks engage. X
Remove the cap from valve Con the faulty
tire.
X Screw filler hose Donto valve.
X Insert plug =into the socket of the
cigarette lighter (Y page 243) or into a 12 V
power socket in your vehicle (Y page 244).
X Turn the SmartKey to position 1
(Y page 127) in the ignition lock.
X Press on/offs witch?on the tire inflation
compressor to ON.
The tire inflatio ncompressor is switched
on. The tire is inflated.
i First, tire sealant is pumped into the tire.
The pressure can briefly rise to
approximately 500 kPa (5 bar/73 psi).
Do not switch off the tire inflation
compressor during this phase.
X Let the tire inflation compressor run for a
maximum of ten minutes. The tire should
then have attained a pressure of at least
200 kPa (2.0 bar/29 psi).
! Do not operate the tire inflation
compressor for longer than ten minutes at
a time without a break. It may otherwise
overheat.
The tire inflation compressor can be
operated again once it has cooled down.
If ap ressure of 200 kPa (2.0 bar/ 29 psi) has
been attained after a maximum of ten
minutes, see (Y page 278).
If ap ressure of 200 kPa (2.0 bar/ 29 psi) has
not been attained after a maximum of ten
minutes, see (Y page 278). Flat tire
277Breakdown assistance Z
Page 281 of 336
i
If tire sealant leaks out, allow it to dry. It
can then be removed like a layer of film.
If yourc lothes are soiled with tire sealant,
have the mcleaned with perchloroethylene
at a dry cleaner as soon as possible.
Tire pressure not reached If
ap ressure of 200 kPa (2.0 bar/ 29 psi) has
not been achieved after ten minutes:
X Switch off the tire inflation compressor.
X Unscrew the filler hose from the valve of
the faulty tire.
X Very slowly drive forwards or reverse
approximately 30 ft (10 m).
X Pump up the tire again.
After a maximum of ten minutes, the tire
pressure must be at least 200 kPa (2.0 bar/
29 psi). G
WARNING
If the required tire pressure is not reached
after the specified time, the tire is too badly
damaged. The tire sealant cannot repair the
tire in this instance. Damaged tires and a tire
pressure that is too low can significantly
impair the vehicle's braking and driving
characteristics. There is a risk of accident.
Do not continue driving. Contact a qualified
specialist workshop.
Tire pressure reached G
WARNING
At ire temporarily sealed with tire sealant
impairs the driving characteristics and is not
suitable for higher speeds. There is a risk of
accident.
You should therefore adapt your driving style
accordingly and drive carefully. Do not exceed
the specified maximum speed with a tire that
has been repaired using tire sealant.
! After use, excess tire sealant may run out
of the filler hose. This could cause stains. Therefore, place the filler hose in the plastic
bag that contained the TIREFIT kit. H
Environmental note
Have the used tire sealant bottle disposed of
professionally, e.g. at aqualified specialist
workshop.
If ap ressure of 200 kPa (2.0 bar/ 29 psi) has
been attained after a maximum of ten
minutes:
X Switch off the tire inflation compressor.
X Unscrew the filler hose from the valve of
the faulty tire.
X Stow the tire sealant bottle and the tire
inflation compressor.
X Pull away immediately.
The maximu mspeed for atire treated with tire
sealant is 50 mph (80k m/h). The upper part
of the TIREFIT sticker must be affixed to the
instrument cluster in the driver's field of
vision.
X Stop after driving for approximately ten
minutes and check the tire pressure with
the tire inflation compressor.
The tire pressure must now be at least
130 kPa (1.3 bar/19 psi). G
WARNING
If the required tire pressure is not reached
after driving for a short period, the tire is too
badly damaged. The tire sealant cannot repair
the tire in this instance. Damaged tires and a
tire pressure that is too low can significantly
impair the vehicle's braking and driving
characteristics. There is a risk of accident.
Do not continue driving. Contact a qualified
specialist workshop.
X Correct the tire pressure if it is still at least
130 kPa (1.3 bar/19 psi) (for the values,
see the Tire and Loading Information
placard on the driver's side B-pillar or tire
pressure table on the fuel filler flap).
X To increase the tire pressure: switch on
the tire inflation compressor. 278
Flat tireBreakdown assistance
Page 282 of 336
X
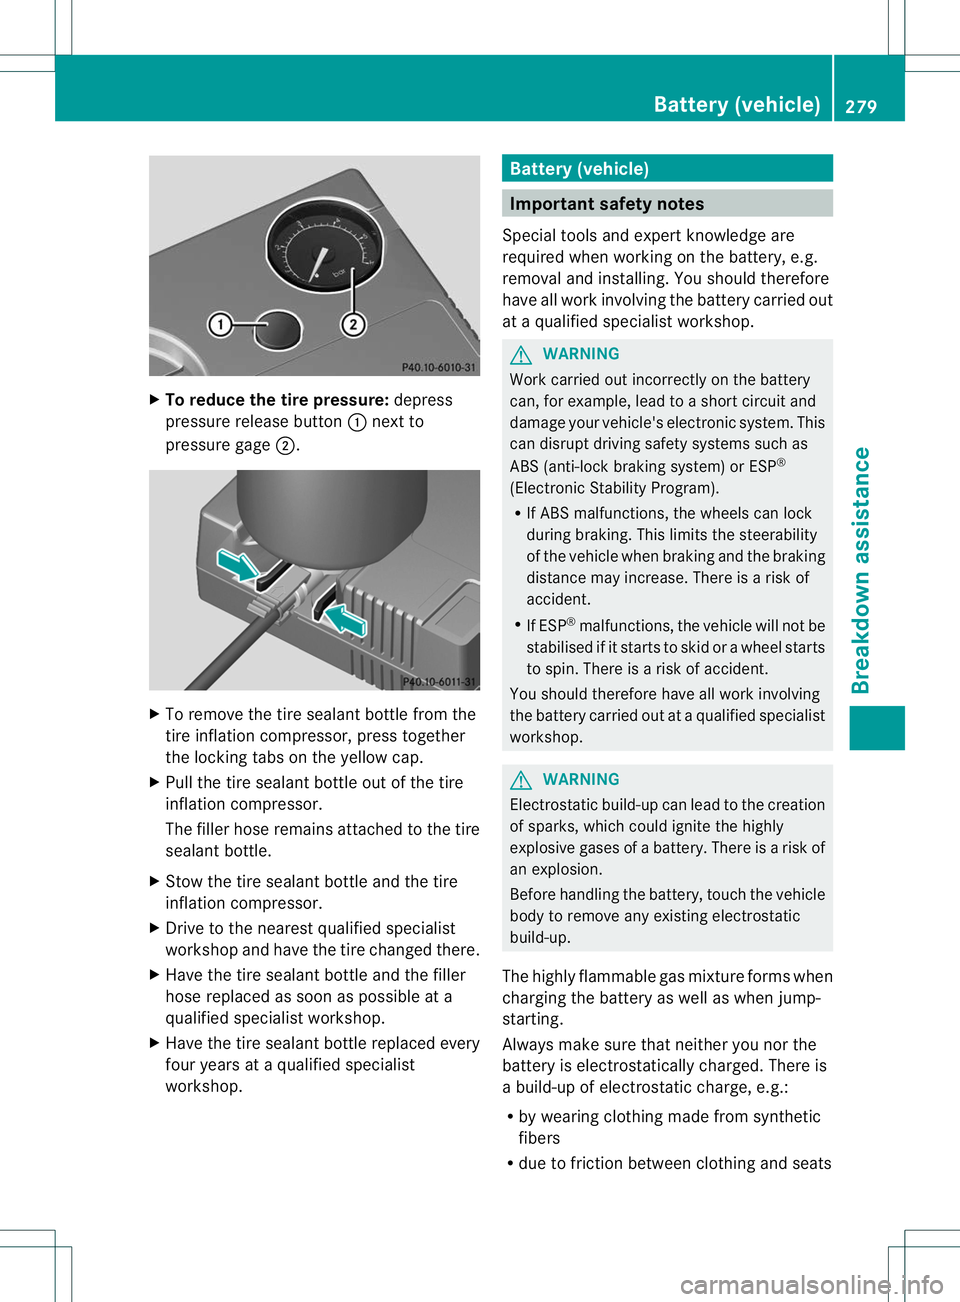
To reduce the tire pressure: depress
pressure release button :next to
pressure gage ;. X
To remove the tire sealant bottle from the
tire inflation compressor, press together
the locking tabs on the yellow cap.
X Pull the tire sealant bottle outoft he tire
inflation compressor.
The filler hose remains attached to the tire
sealant bottle.
X Stow the tire sealant bottle and the tire
inflation compressor.
X Drive to the nearest qualified specialist
workshop and have the tire changed there.
X Have the tire sealant bottle and the filler
hose replaced as soon as possible at a
qualified specialist workshop.
X Have the tire sealant bottle replaced every
four years at a qualified specialist
workshop. Battery (vehicle)
Important safety notes
Special tools and expert knowledge are
required when working on the battery, e.g.
removal and installing. You should therefore
have all work involving the battery carried out
at a qualified specialist workshop. G
WARNING
Work carried out incorrectly on the battery
can, for example, lead to a short circuit and
damage your vehicle's electronic system. This
can disrupt driving safety systems such as
ABS (anti-lock braking system) or ESP ®
(Electronic Stability Program).
R If ABS malfunctions, the wheels can lock
during braking. This limits the steerability
of the vehicle when braking and the braking
distance may increase. There is a risk of
accident.
R If ESP ®
malfunctions, the vehicle will not be
stabilised if it starts to skid or a wheel starts
to spin. There is a risk of accident.
You should therefore have all work involving
the battery carried out at a qualified specialist
workshop. G
WARNING
Electrostatic build-up can lead to the creation
of sparks, which could ignite the highly
explosive gases of a battery. There is a risk of
an explosion.
Before handling the battery, touch the vehicle
body to remove any existing electrostatic
build-up.
The highly flammable gas mixture forms when
charging the battery as well as when jump-
starting.
Always make sure that neither you nor the
battery is electrostatically charged. There is
a build-up of electrostatic charge, e.g.:
R by wearing clothing made from synthetic
fibers
R due to friction between clothing and seats Battery (vehicle)
279Breakdown assistance Z
Page 296 of 336
particularly the sidewalls, may be
damaged.
Regular checking of wheels and tires
G
WARNING
Damaged tires can cause tire inflation
pressure loss. As a result, you could lose
control of your vehicle. There is a risk of
accident.
Check the tires regularly for signs of damage
and replace any damaged tires immediately.
Regularly checkt he wheels and tires of your
vehicle for damage at least once a month, as
well as after driving off-road or on rough
roads. Damaged wheels can cause a loss of
tire pressure. Pay particular attention to
damage such as:
R cuts in the tires
R punctures
R tears in the tires
R bulges on tires
R deformation or severe corrosion on wheels
Regularly check the tire tread depth and the
condition of the tread across the whole width
of the tire (Y page 293). If necessary, turn
the front wheels to full lock in order to inspect
the inner side of the tire surface.
All wheels must have a valve cap to protect
the valve against dirt and moisture. Do not
mount anything onto the valve other than the
standard valve cap or other valve caps
approved by Mercedes-Ben zfor your vehicle.
Do not use any other valve caps or systems,
e.g. tire pressure monitoring systems.
Regularly check the pressure of all the tires
particularly prior to long trips. Adjust the tire
pressure as necessary (Y page 295).
The service life of tires depends, among other
things, on the following factors:
R Driving style
R Tire pressure
R Distance covered Tire tread
G
WARNING
Insufficient tire tread will reduce tire traction.
The tire is no longer able to dissipate water.
This means that on wet road surfaces, the risk
of hydroplaning increases, in particular where
speed is not adapted to suit the driving
conditions. There is a risk of accident.
If the tire pressure is too high or too low, tires
may exhibit different levels of wear at
different locations on the tire tread. Thus, you
should regularly check the tread depth and
the condition of the tread across the entire
width of all tires.
Minimum tire tread depth for:
R Summer tires: âin (3 mm)
R M+S tires: ãin (4 mm)
For safety reasons, replace the tires before
the legally prescribed limit for the minimum
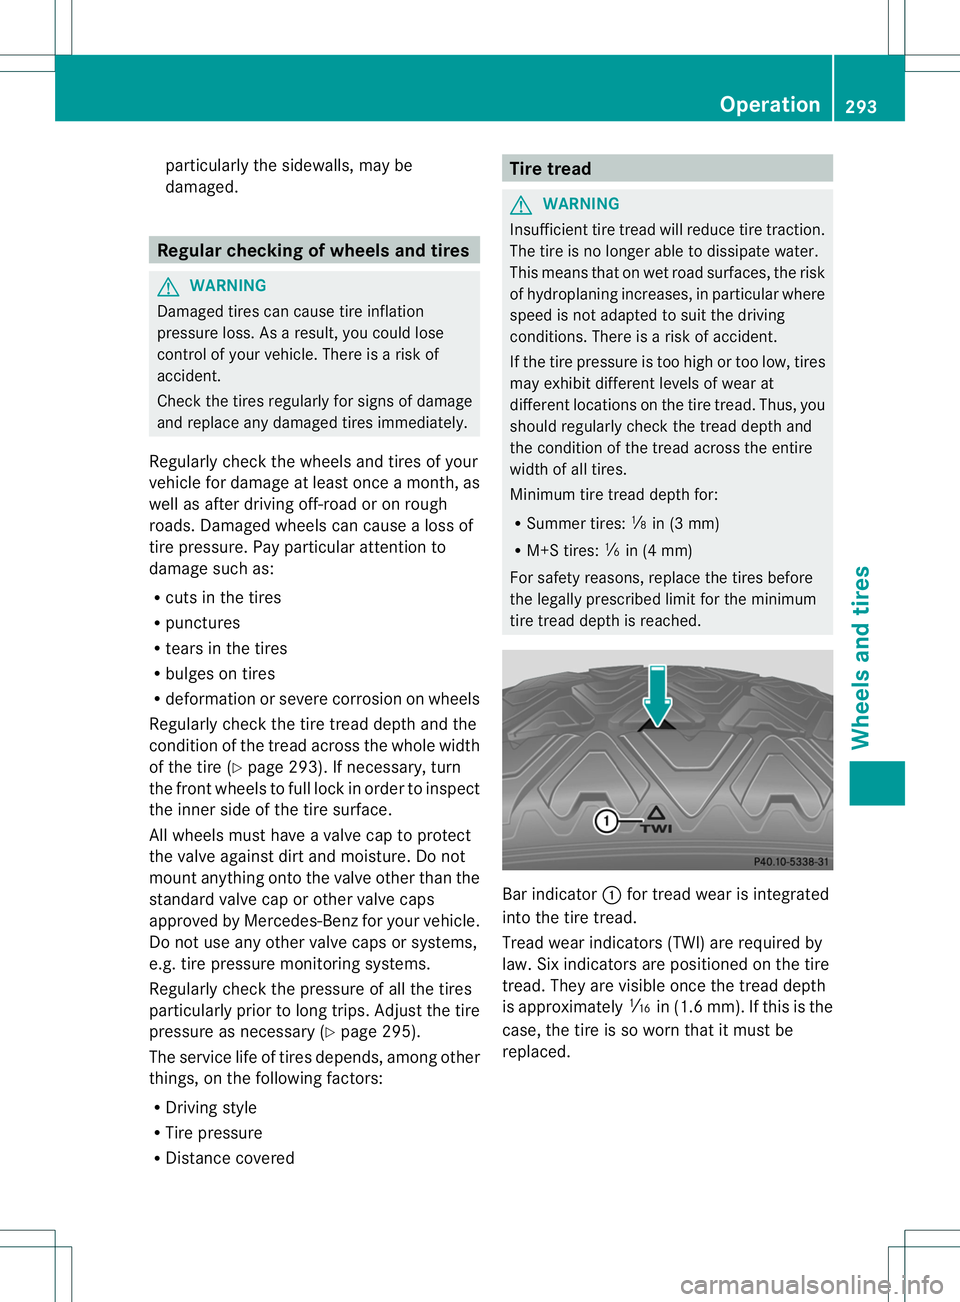
tire tread depth is reached. Bar indicator
:for tread wear is integrated
into the tire tread.
Tread wear indicators (TWI) are required by
law. Six indicators are positioned on the tire
tread. They are visible once the tread depth
is approximately áin (1.6 mm). If this is the
case, the tire is so worn that it must be
replaced. Operation
293Wheels and tires Z
Page 298 of 336
For more information on driving with the
emergency spare wheel, see (Y
page 318).Snow chains
G
WARNING
If snow chains are mounted on the rear
wheels, the snow chains could cause abrasion
to the vehicle body or to chassis components.
This could cause damage to the vehicle or the
tires. There is a risk of an accident.
To avoid hazardous situations:
R never mount snow chains on the rear
wheels
R only mount snow chains in pairs on the
front wheels.
! On some tire sizes there is not enough
space for snow chains. To avoid damage to
the vehicle or tires, observe the "Wheel and
tire combinations" section under "Tires and
wheels".
For safety reasons, Mercedes-Benz
recommends that you only use snow chains
that have beens pecially approved for your
vehicle by Mercedes-Benz, or are of a
corresponding standard of quality.
If you intend to mount snow chains, please
bear the following points in mind:
R Snow chains may not be mounted on all
wheel/tire combinations .Permissible
wheel-tire combinations (Y page 316).
R Only use snow chains when driving on
roads completely covered by snow.
Remove the snow chains as soon as
possible when you come to aroad that is
not snow-covered.
R Local regulations may restrict the use of
snow chains. Observe the appropriate
regulations if you wish to mount snow
chains.
R Do not exceed the maximum permissible
speed of 30 mph (50 km/h).
R If snow chains are mounted, you cannot
use Active Parking Assist (Y page 164).i
You can deactivate ESP ®
(Y page 63)
when pulling away with snow chains
installed. This way you can allow the wheels
to spin in a controlled manner, achieving an
increased driving force (cutting action).
For more information on driving with the
emergency spare wheel, see (Y page 318). Tire pressure
Tire pressure specifications
G
WARNING
Tires with tire pressures that are too low or
too high are associated with the following
hazards:
R they can burst, in particular if the vehicle is
heavily laden or when driven at high
speeds.
R the tires can wear excessively and/or
unevenly, which can severely impair tire
traction.
R the driving, steering and braking
characteristics may be severely impaired.
There is a risk of accident.
Follow recommended tire inflation pressures
and check the pressure of all the tires
including the spare wheel:
R monthly, at least
R if the load changes
R before beginning a long journey
R under different operating conditions, e.g.
off-road driving
If necessary, correct the tire pressure.
The recommended tire pressures for the tires
mounted at the factory can be found on the
labels described here.
Option 1) Tire and Loading Information
placard on the B-pillar on the driver's side of
the vehicle (Y page 300).
The Tire and Loading Information placard
contains the recommended tire pressures for
cold tires. The recommended tire pressures Tire pressure
295Wheels and tires Z
Page 300 of 336
For more information, contact a qualified
specialist workshop.
Important notes on tire pressure
G
WARNING
If the tire pressure drop srepeatedly, the
wheel, valve or tire may be damaged. Tire
pressure that is too low may result in a tire
blow-out. There is a risk of an accident.
R Check the tire for foreign objects.
R Check whether the wheel is losing air or the
valve is leaking.
If you are unable to rectify the damage,
contact a qualified specialist workshop. G
WARNING
If you fit unsuitable accessories onto tire
valves, the tire valves may be overloaded and
malfunction, which can cause tire pressure
loss. Due to their design, retrofitted tire
pressure monitors keep the tire valve open.
This can also result in tire pressure loss. There
is a risk of an accident.
Only screw the standard valve cap or other
valve caps approved by Mercedes-Benz for
your vehicle onto the tire valve.
Use a suitable pressure gauge to chec kthe
tire pressure. The outer appearance of a tire
does not permit any reliable conclusion about
the tire pressure.
The tire temperature and pressure increase
when the vehicle is in motion. This is
dependent on the driving speed and the load.
Therefore, you should only correct tire
pressures when the tires are cold.
The tires are cold:
R if the vehicle has been parked without
direct sunlight on the tires for at least three
hours and
R if the vehicle has not been driven further
than 1 mile (1.6 km)
The tire temperature changes depending on
the outside temperature, the vehicle speed and the tire load. If the tire temperature
changes by 18 ‡ (10 †), the tire pressure
changes by approximately 10 kPa (0.1 bar/
1.5 psi). Take this into account when
checking the pressure of warm tires. Only
correct the tire pressure if it is too low for the
current operating conditions. If you check the
tire pressure when the tires are warm, the
resulting value will be higher than if the tires
were cold. This is normal. Do not reduce the
tire pressure to the value specified for cold
tires. The tire pressure would otherwise be
too low.
Observe the recommended tire pressures for
cold tires:
R
on the Tire and Loading Information placard
on the B-pillar on the driver's side
R in the tire pressure table on the inside of
the fuel filler flap Underinflated or overinflated tires
Underinflation G
WARNING
Tires with pressure that is too low can
overheat and burst as a consequence. In
addition, they also suffer from excessive and/
or irregular wear, which can severely impair
the braking properties and the driving
characteristics. There is a risk of an accident.
Avoid tire pressures that are too low in all the
tires, including the spare wheel.
Underinflated tires may:
R wear quickly and unevenly
R have an adverse effect on fuel consumption
R overheat, leading to tire defects
R have an adverse effect on handling
characteristics Tire pressure
297Wheels and tires Z
Page 301 of 336
Overinflation
G
WARNING
Tires with excessively high pressure can burst
because they are damaged more easily by
road debris, potholes etc.Ina ddition, they
also suffer from irregular wear, which can
severely impair the brakin gproperties and the
driving characteristics. There is a risk of an
accident.
Avoid tire pressures that are too high in all the
tires, including the spare wheel.
Overinflated tires may:
R have an adverse effect on handling
characteristics
R wearq uickly and unevenly
R be more susceptible to damage
R have an adverse effect on ride comfort
R increase the braking distance
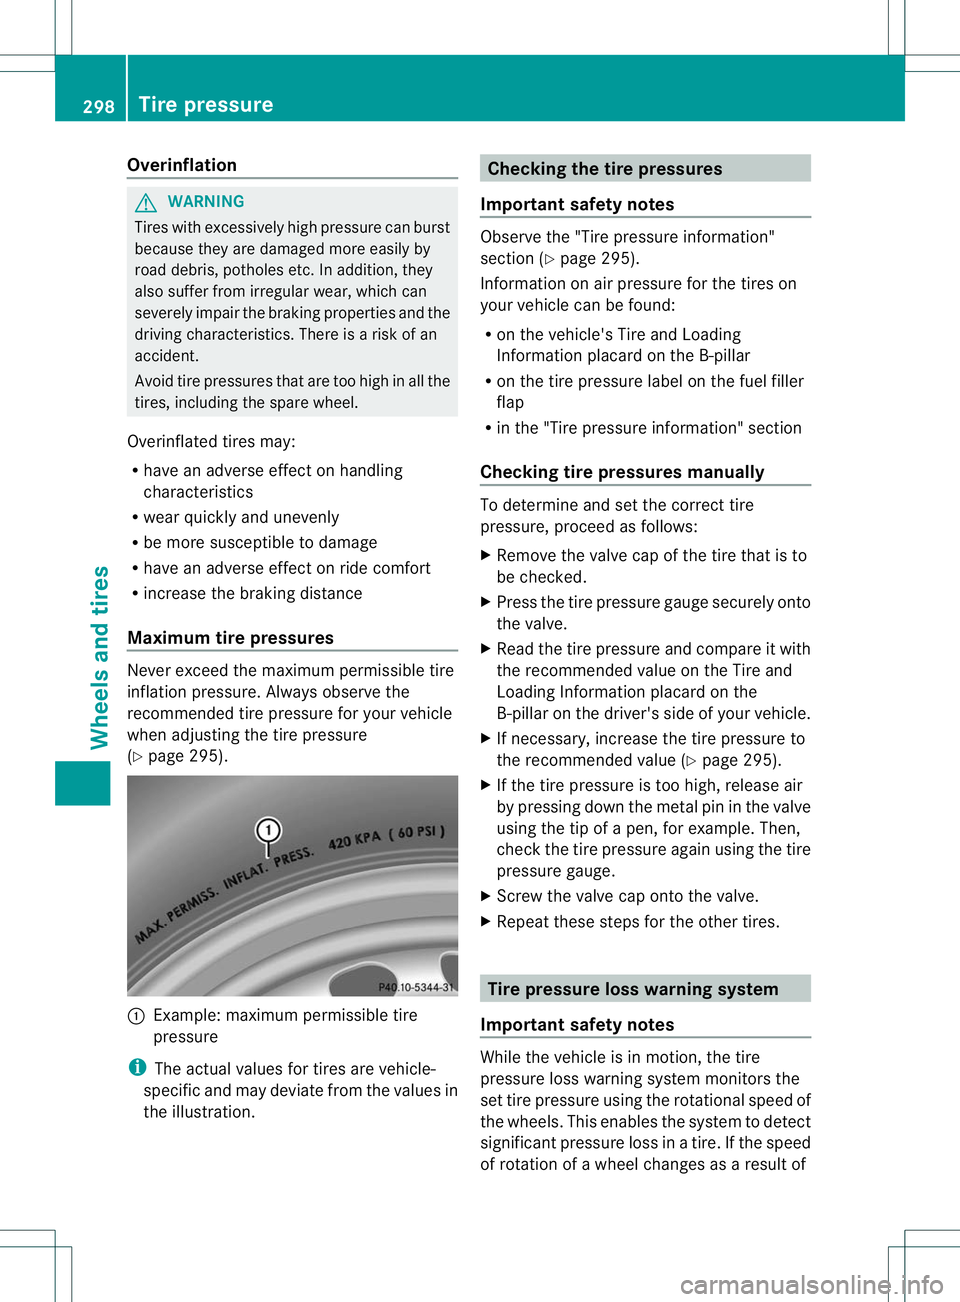
Maximum tire pressures Never exceed the maximum permissible tire
inflation pressure. Always observe the
recommended tire pressure for your vehicle
when adjusting the tire pressure
(Y
page 295). :
Example :maximum permissible tire
pressure
i The actual values for tires are vehicle-
specific and may deviate from the values in
the illustration. Checking the tire pressures
Important safety notes Observe the "Tire pressure information"
sectio
n(Ypage 295).
Information on air pressure for the tires on
your vehicle can be found:
R on the vehicle's Tire and Loading
Information placard on the B-pillar
R on the tire pressure label on the fuel filler
flap
R in the "Tire pressure information" section
Checking tire pressures manually To determine and set the correct tire
pressure, proceed as follows:
X
Remove the valve cap of the tire that is to
be checked.
X Press the tire pressure gauge securely onto
the valve.
X Read the tire pressure and compare it with
the recommended value on the Tire and
Loading Information placard on the
B-pillar on the driver's side of your vehicle.
X If necessary, increase the tire pressure to
the recommended value (Y page 295).
X If the tire pressure is too high, release air
by pressing down the metal pin in the valve
using the tip of a pen, for example. Then,
chec kthe tire pressure again using the tire
pressure gauge.
X Screw the valve cap onto the valve.
X Repeatt hese steps for the other tires. Tire pressure loss warning system
Important safety notes While the vehicle is in motion, the tire
pressure loss warning system monitors the
set tire pressure using the rotational speed of
the wheels. This enables the system to detect
significant pressure loss in a tire. If the speed
of rotation of a wheel changes as a result of298
Tire pressureWheels and tires
Page 308 of 336
not covered with ice or snow. Take
appropriate care when driving.
!
Avoid wheelspin. This can lead to damage
to the drive train. Temperature
G
WARNING
The temperature grade for this tire is
established for a tire tha tis properly inflated
and not overloaded.E xcessive speed,
underinflation, or excessive loading, either
separately or in combination, can cause
excessive hea tbuild-up and possible tire
failure.
The temperature grades are A(the highest),
B, and C. These represent the tire's
resistance to the generatio nofheat and its
ability to dissipate heat when tested under
controlled conditions on a specified indoor
laboratory test wheel. Sustained high
temperature can cause the material of the tire
to degenerate and reduce tire life, and
excessive temperature can lead to sudden
tire failure. The grade Ccorresponds to a level
of performance which all passenger car tires
must meet under the Federal Motor Vehicle
Safety Standard No. 109. Grades B and A
represent higher levels of performance on the
laboratory test wheel than the minimum
required by law. Tire labeling
Tire labeling overview
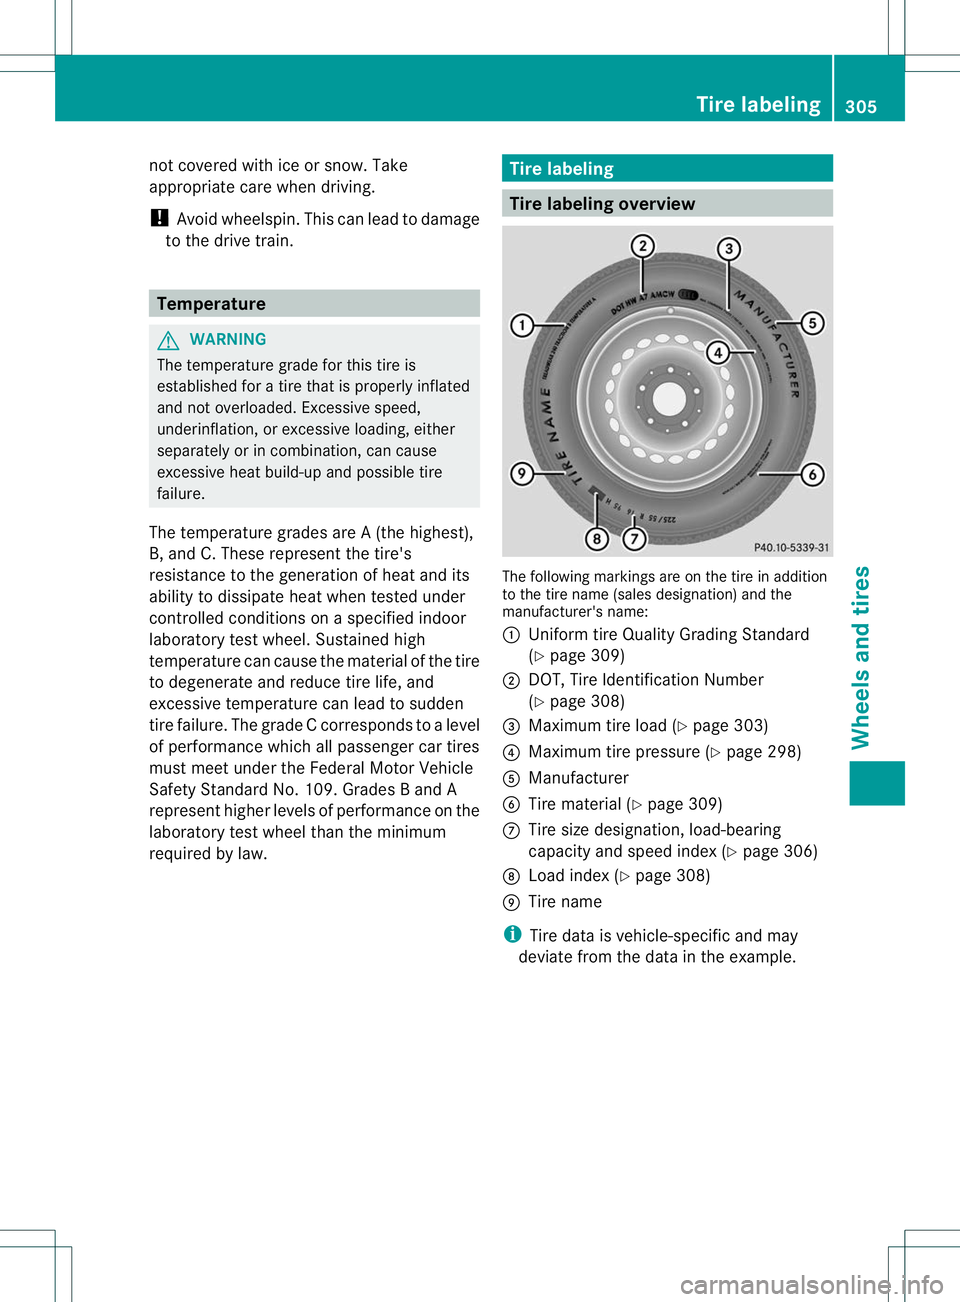
The following markings are on the tire in addition
to the tire name (sales designation) and the
manufacturer's name:
:
Uniform tire Quality Grading Standard
(Ypage 309)
; DOT, Tire Identification Number
(Ypage 308)
= Maximum tire load (Y page 303)
? Maximum tire pressure (Y page 298)
A Manufacturer
B Tire material (Y page 309)
C Tire size designation, load-bearing
capacity and speed index (Y page 306)
D Load index (Y page 308)
E Tire name
i Tire data is vehicle-specific and may
deviate from the data in the example. Tire labeling
305Wheels and tires Z