2013 MERCEDES-BENZ B-CLASS SPORTS open hood
[x] Cancel search: open hoodPage 13 of 336
Flat tire
MOExtended tires ..........................275
Preparing the vehicle .....................275
TIREFIT kit ...................................... 276
see Emergency spare wheel
Floormat ............................................ .258
Fog lamps Extended range .............................. 100
Switching on/off .............................. 97
Folding table ...................................... 232
Front fog lamps Display message ............................ 204
Switching on/off .............................. 97
Front-passenger seat
Folding the backrestf orward/
back ............................................... 233
Fuel
Additives ........................................ 326
Consumption statistics ..................182
Displaying the current
consumption .................................. 183
Displaying the range ......................183
Driving tips .................................... 144
Fuel gauge ....................................... 27
Grade (gasoline) ............................ 325
Important safety notes ..................324
Premium-grade unleaded gasoline .325
Problem (malfunction) ...................141
Refueling ........................................ 139
Tank content/reserve fuel .............325
Fuel filler flap
Opening/closing ............................ 140
Fuel level
Calling up the range (on-board
computer) ...................................... 183
Fuel tank
Capacity ........................................ 325
Problem (malfunction) ...................141
Fuses
Allocation chart ............................. 288
Before changing ............................. 288
Fuse box in the engine
compartment ................................. 288
Fuse box in the front-passenger
footwell .......................................... 288
Important safety notes ..................287 G
Garage door opener Clearing the memory .....................256
Important safety notes ..................253
Opening/closing the garage door ..256
Programming (button in the rear-
view mirror) ................................... 254
Gear or selector lever (cleaning
guidelines) ......................................... 270
Genuine Mercedes-Benz parts .........322
Glove box ........................................... 231 H
Handbrake see Parking brake
Hazard warning lamps ........................99
Headlamps Adding fluid to cleaning system .....263
Cleaning system (capacity )............ 329
Cleaning system (function) ..............99
Cleaning system (notes) ................328
Fogging up ..................................... 101
see Automatic headlamp mode
Head restraints
Adjusting ......................................... 87
Adjusting (electrically). ....................87
Adjusting (manually). .......................87
Adjusting (rear) ................................ 87
Installing/removing (rear) ................88
Heating
see Climate control
High-beam headlamps
Changing bulbs .............................. 105
Display message ............................ 204
Switching Adaptive Highbeam
Assist on/off ................................. 100
Switching on/off .............................. 98
Hill start assist .................................. 128
HOLD function Deactivating ................................... 161
Display message ............................ 209
Function/notes ............................. 160
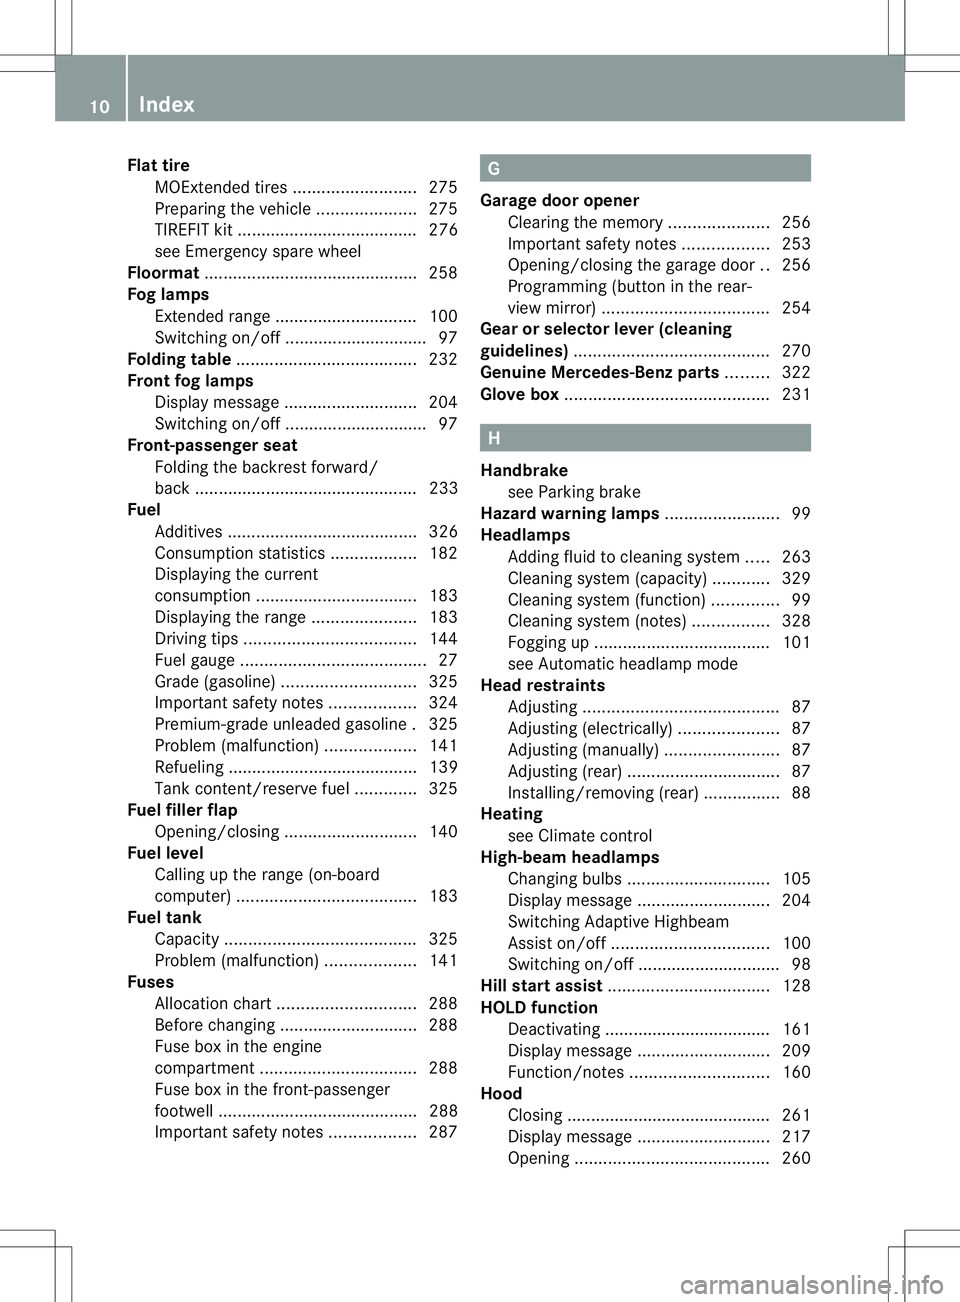
Hood
Closing .......................................... .261
Display message ............................ 217
Opening ......................................... 26010
Index
Page 29 of 336
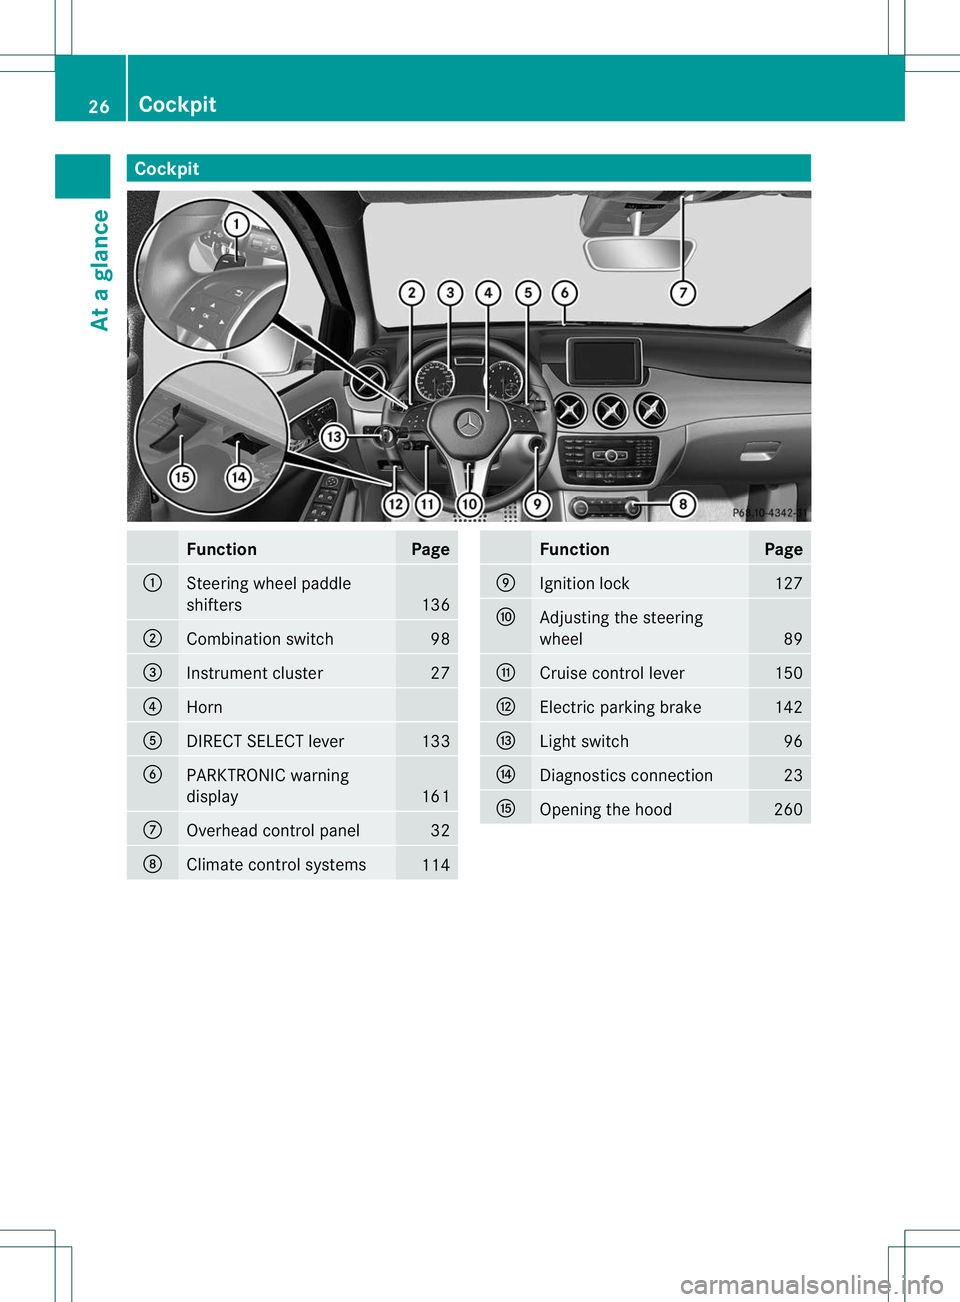
Cockpit
Function Page
:
Steering wheel paddle
shifters
136
;
Combination switch 98
=
Instrument cluster 27
?
Horn
A
DIRECT SELECT lever 133
B
PARKTRONIC warning
display
161
C
Overhead control panel 32
D
Climate control systems
114 Function Page
E
Ignition lock 127
F
Adjusting the steering
wheel
89
G
Cruise control lever 150
H
Electric parking brake 142
I
Ligh
tswitch 96
J
Diagnostics connection 23
K
Opening the hood 26026
CockpitAt a glance
Page 68 of 336
Power steering will, however, continue to
function.
Theft deterrent locking system
Immobilizer
The immobilizer prevents your vehicle from
being started without the correct SmartKey.
X To activate: remove the SmartKey from
the ignition lock.
X To deactivate: switch on the ignition.
When leaving the vehicle, always take the
SmartKey with you and lock the vehicle. The
engine can be started by anyone with a valid
SmartKey that is left inside the vehicle.
i The immobilizer is always deactivated
when you start the engine.
In the event that the engine cannot be
started when the starter battery is fully
charged, the immobilizer may be faulty.
Contact an authorized Mercedes-Benz
Center or call 1-800-FOR-MERCedes (in the
USA) or 1-800-387-0100 (in Canada).
In the event that the engine cannot be
started when the starter battery is fully
charged, the immobilizer may be faulty.
Contact an authorized Mercedes-Benz
Center or call 1-800-387-0100. ATA (anti-theft alarm system)
Function Av
isual and audible alarm is triggered if the
alarm system is armed and you open:
R a door
R the vehicle with the mechanical key
R the tailgate
R the hood
The alarm is not switched off, even if you
close the open door that has triggered it, for
example. i
If the alarm stays on for more than
30 seconds, the Tele Aid system
automatically initiates a call to the
Customer Assistance center.T he Tele Aid
system will initiate the call provided that:
R you have subscribed to the Tele Aid
service.
R the Tele Aid service has been activated
properly.
R the required mobile phone, power supply
and GPS are available.
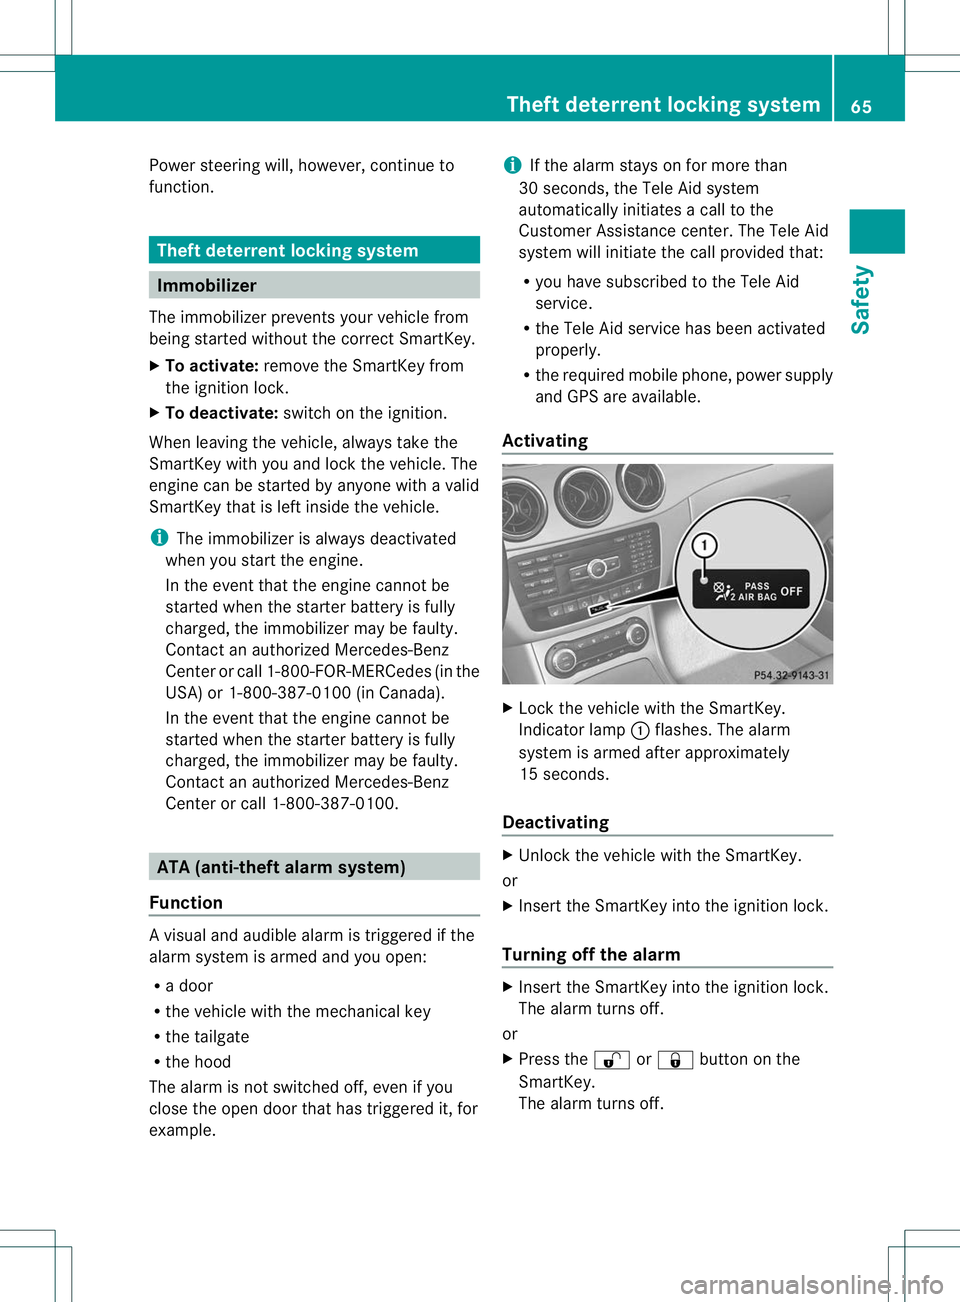
Activating X
Lock the vehicle with the SmartKey.
Indicator lamp :flashes. The alarm
system is armed after approximately
15 seconds.
Deactivating X
Unlock the vehicle with the SmartKey.
or
X Insert the SmartKey into the ignition lock.
Turning off the alarm X
Insert the SmartKey into the ignition lock.
The alarm turns off.
or
X Press the %or& button on the
SmartKey.
The alarm turns off. Theft deterrent locking system
65Safety Z
Page 108 of 336
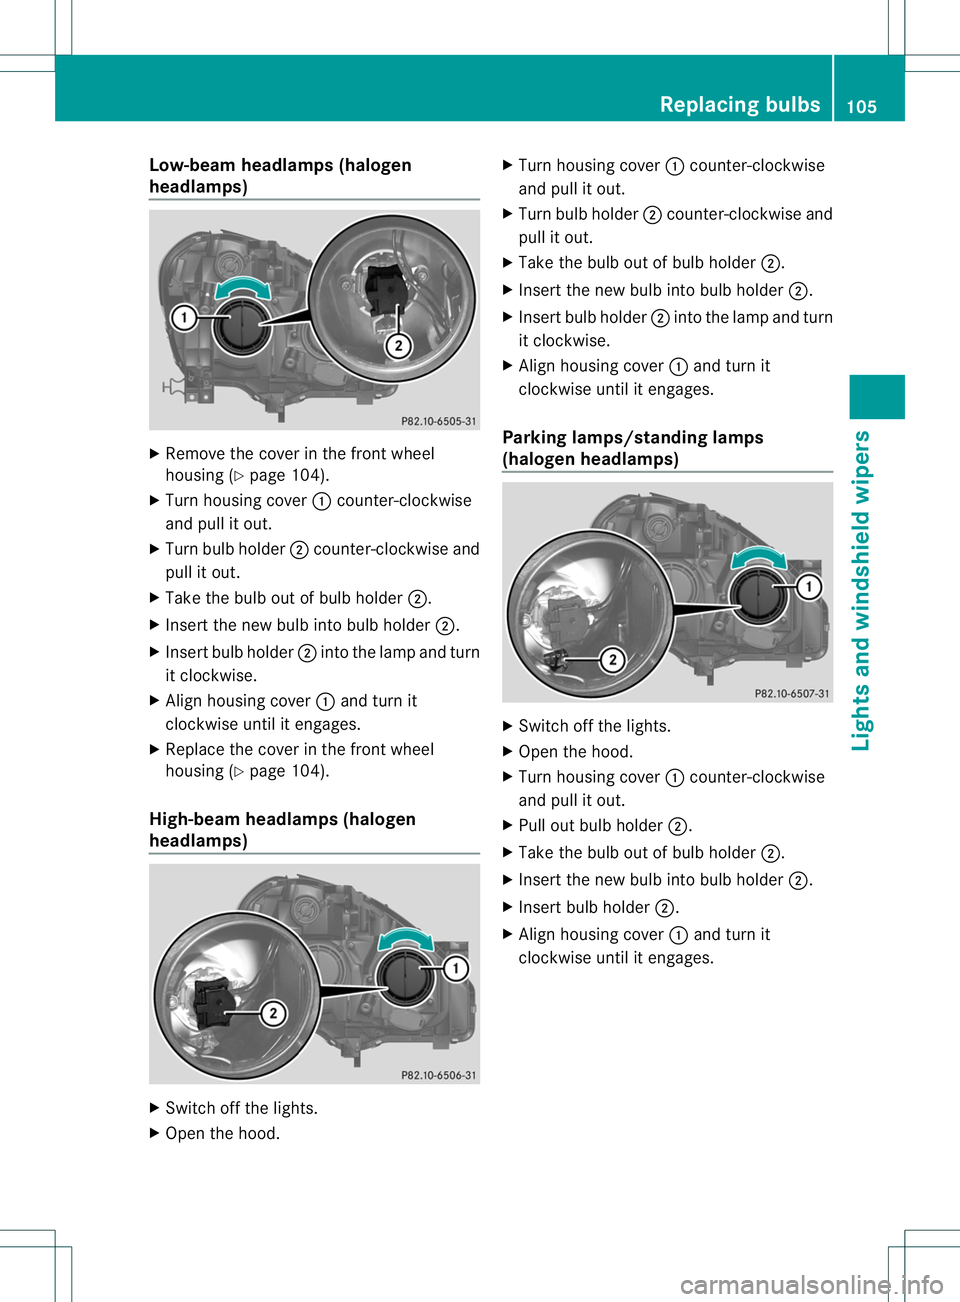
Low-bea
mheadlamps (halogen
headlamps) X
Remove the cover in the front wheel
housing (Y page 104).
X Turn housing cover :counter-clockwise
and pull it out.
X Turn bulb holder ;counter-clockwise and
pull it out.
X Take the bulb out of bulb holder ;.
X Inser tthe new bulb into bulb holder ;.
X Insert bulb holder ;into the lamp and turn
it clockwise.
X Align housing cover :and turn it
clockwise until it engages.
X Replace the cover in the front wheel
housing (Y page 104).
High-beam headlamps (halogen
headlamps) X
Switch off the lights.
X Open the hood. X
Turn housing cover :counter-clockwise
and pull it out.
X Turn bulb holder ;counter-clockwise and
pull it out.
X Take the bulb out of bulb holder ;.
X Insert the new bulb into bulb holder ;.
X Insert bulb holder ;into the lamp and turn
it clockwise.
X Align housing cover :and turn it
clockwise until it engages.
Parking lamps/standing lamps
(halogen headlamps) X
Switch off the lights.
X Open the hood.
X Turn housing cover :counter-clockwise
and pull it out.
X Pull out bulb holder ;.
X Take the bulb out of bulb holder ;.
X Insert the new bulb into bulb holder ;.
X Insert bulb holder ;.
X Align housing cover :and turn it
clockwise until it engages. Replacing bulbs
105Lights and windshield wipers Z
Page 109 of 336
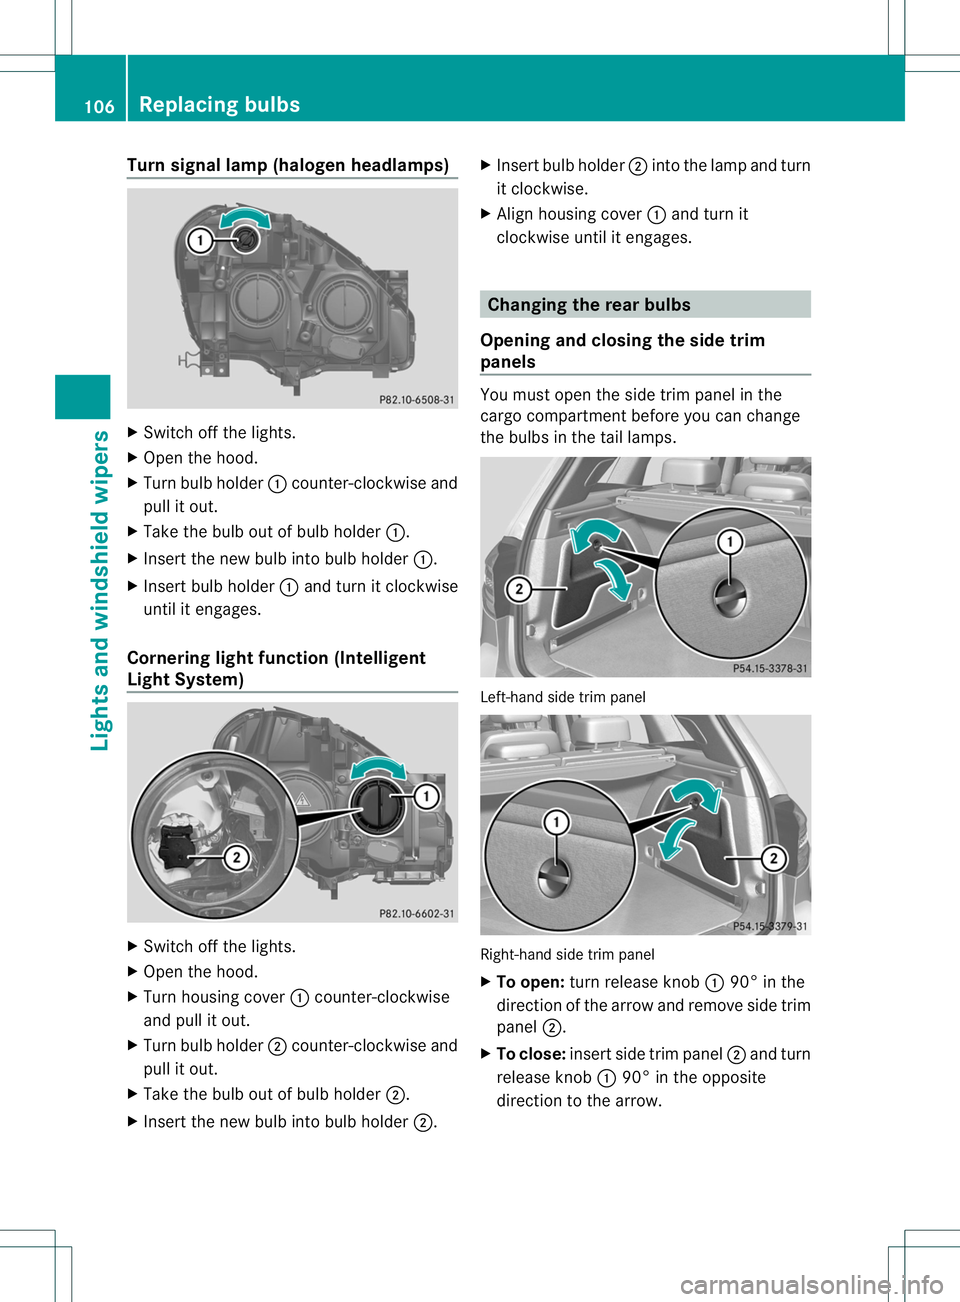
Turn signal lamp (halogen headlamps)
X
Switch off the lights.
X Open the hood.
X Turn bulb holder :counter-clockwise and
pull it out.
X Take the bulb ou tofbulb holder :.
X Inser tthe new bulb into bulb holder :.
X Insert bulb holder :and turn it clockwise
until it engages.
Cornering light function (Intelligent
Light System) X
Switch off the lights.
X Open the hood.
X Turn housing cover :counter-clockwise
and pull it out.
X Turn bulb holder ;counter-clockwise and
pull it out.
X Take the bulb out of bulb holder ;.
X Insert the new bulb into bulb holder ;.X
Insert bulb holder ;into the lamp and turn
it clockwise.
X Align housing cover :and turn it
clockwise until it engages. Changing the rear bulbs
Opening and closing the side trim
panels You must open the side trim panel in the
cargo compartment before you can change
the bulbs in the tail lamps.
Left-hand side trim panel
Right-hand side trim panel
X
To open: turn release knob :90° in the
direction of the arrow and remove side trim
panel ;.
X To close: insert side trim panel ;and turn
release knob :90° in the opposite
direction to the arrow. 106
Replacing bulbsLights and windshield wipers
Page 113 of 336
For this reason, you shoul
dalways switch
off the windshield wipers in dry weather.
Vehicles with arain sensor: in theÄor
Å position, the appropriate wiping
frequency is automatically set according to
the intensity of the rain. In the Åposition,
the rains ensor is more sensitive than in
the Ä position, causing the windshield
wipers to wipe more frequently. Switching the rear window wiper on/
off
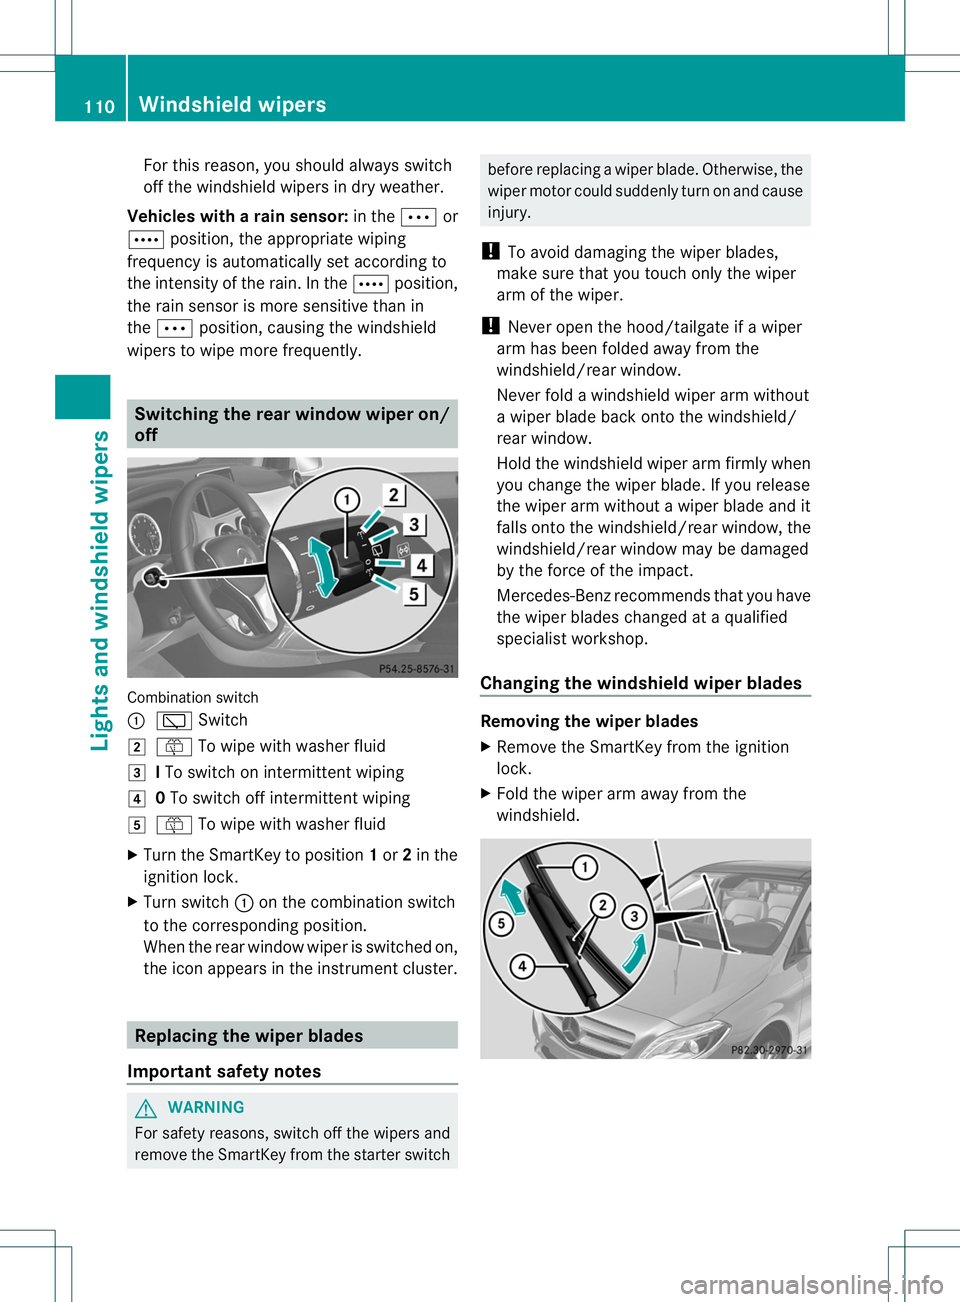
Combination switch
:
è Switch
2 ô To wipe with washer fluid
3 ITo switch on intermittent wiping
4 0To switch off intermittent wiping
5 ô To wipe with washer fluid
X Turn the SmartKey to position 1or 2in the
ignition lock.
X Turn switch :on the combination switch
to the corresponding position.
When the rear window wiper is switched on,
the icon appears in the instrument cluster. Replacing the wiper blades
Important safety notes G
WARNING
For safety reasons, switch off the wipers and
remove the SmartKey from the starter switch before replacing a wiper blade. Otherwise, the
wiper motor could suddenly turn on and cause
injury.
! To avoid damaging the wiper blades,
make sure that you touch only the wiper
arm of the wiper.
! Never open the hood/tailgate if a wiper
arm has been folded away from the
windshield/rear window.
Never fold a windshield wiper arm without
a wiper blade back onto the windshield/
rear window.
Hold the windshield wiper arm firmly when
you change the wiper blade. If you release
the wiper arm without a wiper blade and it
falls onto the windshield/rear window, the
windshield/rear window may be damaged
by the force of the impact.
Mercedes-Benzr ecommends that you have
the wiper blades changed at aqualified
specialist workshop.
Changing the windshield wiper blades Removing the wiper blades
X
Remove the SmartKey from the ignition
lock.
X Fold the wiper arm away from the
windshield. 110
Windshiel
dwipersLights and windshield wipers
Page 126 of 336
stationary vehicle for up to 30 minutes after
the engine has been switched off. The heating
time depends on the temperature that has
been set.
i
The blower will run at a low speed
regardless of the airflow setting.
i If you activate the residual heat function
at high temperatures, only the ventilation
will be activated. The blower runs at
medium speed.
X Turn the SmartKey to position 0in the
ignition lock or remove it.
X To activate: press theÌbutton.
The indicator lamp in the Ìbutton lights
up.
X To deactivate: press theÌbutton.
The indicator lamp in the Ìbutton goes
out.
i Residual heat is deactivated
automatically:
R after approximately 30 minutes
R when the ignition is switched on
R if the battery voltage drops
R when the auxiliary heating is activated Setting the air vents
Important safety notes
G
WARNING
Very hot or very cold air can flow from the air
vents. This could cause burns or frostbite to
bare skin in the immediate vicinity of the
vents. Keep bare skin away from these air
vents. If necessary, direct the airflow away to
a different area of the vehicle interior. In order to ensure the direct flow of fresh air
through the air vents into the vehicle interior,
please observe the following notes:
R
keep the air inlet between the windshield
and the hood free of blockages, such as ice,
snow or leaves.
R never cover the air vents or air intake grilles
in the vehicle interior.
i You can move the adjusters for the air
vents vertically or horizontally to set the
direction of the airflow.
i For optimal climate control in the vehicle,
open the air vents completely and set the
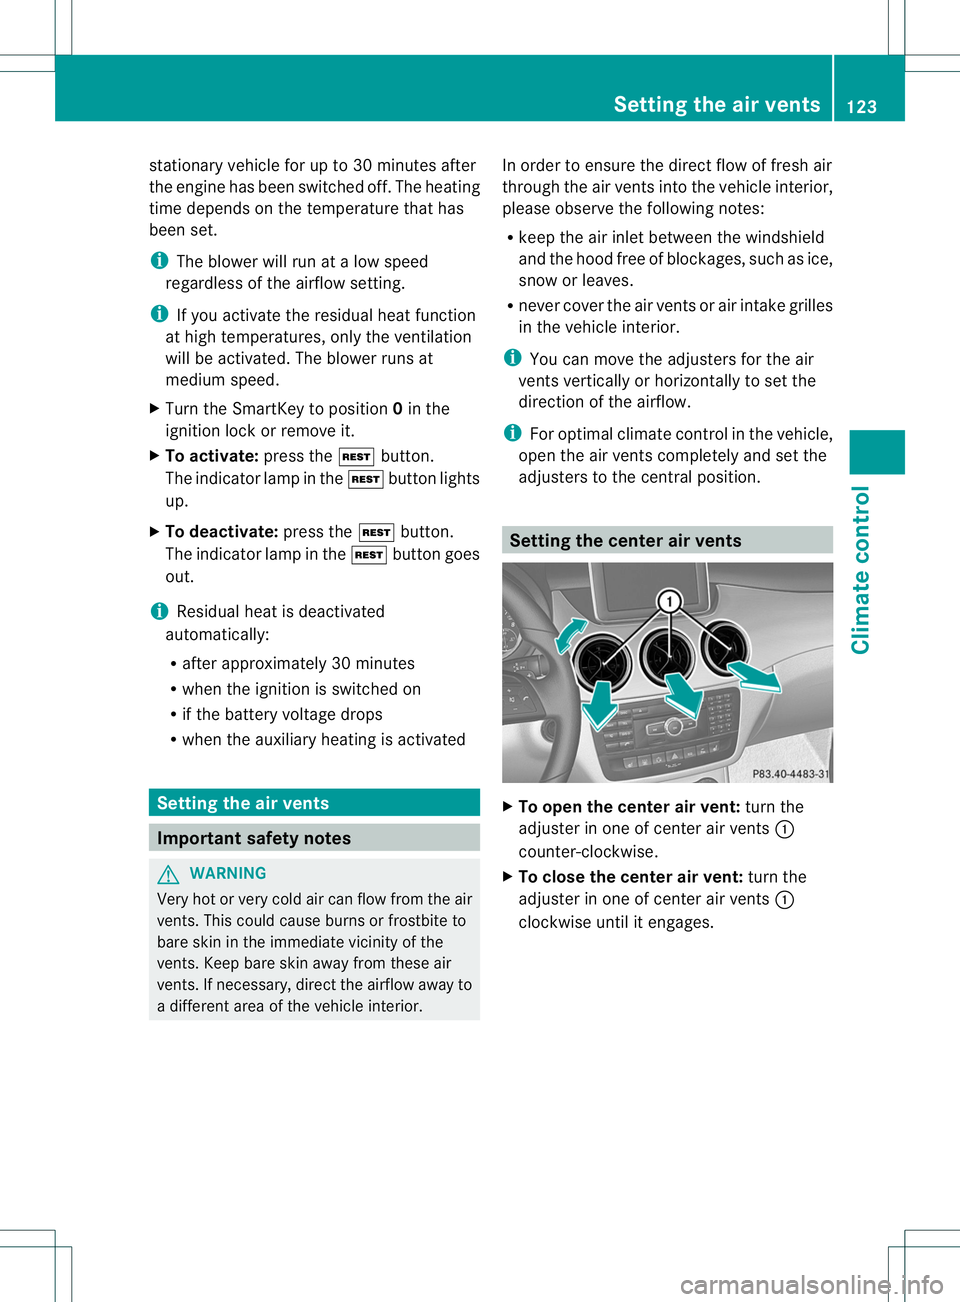
adjusters to the central position. Setting the center air vents
X
To open the center air vent: turn the
adjuster in one of center air vents :
counter-clockwise.
X To close the center air vent: turn the
adjuster in one of center air vents :
clockwise until it engages. Setting the air vents
123Climate control Z
Page 132 of 336
Automatic engine switch-off
General notes
The ECO start/stop function is operational
and the
¤symbol is displayed in the
multifunction display, if:
R the indicator lamp in th eECO butto nis lit
green.
R the outside temperature is within the
comfort range.
R the engine is at normal operating
temperature.
R the set temperature for the vehicle interior
has been reached.
R the battery is sufficiently charged.
R the system detects that the windshield is
not fogged up when the air-conditioning
system is switched on.
R the hood is closed.
R the driver's door is closed and the driver's
seat belt is fastened.
If conditions for automatic engine switch-off
have not been fulfilled, the ¤symbol will
not be shown.
i All of the vehicle's systems remain active
when the engine has been stopped
automatically.
i The engine can be switched off
automatically a maximum of four times
(first stop and three subsequent stops) in
succession. Automatic engine switch-off is
possible againo nce the ECO symbol
appears in the multifunctio ndisplay.
i During automatic engine switch-off, the
climate control system only operates at a
reduced capacity. If you require full climate
control capacity, the ECO start/stop
function can be deactivated by pressing the
ECO button (Y page 130).
Vehicles with automatic transmission
If the vehicle is braked to a standstill in Dor
N, the ECO start/stop function switches off
the engine automatically. i
You can still activate the HOLD function
when the vehicle is stationary, even if the
engine has been switched off
automatically. It is then not necessary to
continue applying the brakes during the
automatic stop phase. When you depress
the accelerator pedal, the engine starts
automatically and the braking effect of the
HOL Dfunction is deactivated. Depress the
accelerato rpedal carefully, as the engine
must be started first.
Automatic engine start General notes
The engine starts automatically if:
R
you switch off the ECO start/stop function
by pressing the ECO button.
R you engage reverse gear R.
R the vehicle starts to roll.
R the brake system requires this.
R the temperature in the vehicle interior
deviates from the set range.
R the system detects moisture on the
windshield when the air-conditioning
system is switched on.
R the charge level of the battery is too low.
R the driver's seat belt is removed or the
driver's door is opened.
Vehicles with automatic transmission
The engine is started automatically if you:
R release the brake pedal when HOLD is not
activated and the transmission is in
position Dor N
R depress the accelerator pedal
R move the transmission out of position P.
i Shifting the transmission to position P
does not start the engine.
i If you shift the transmission from Rto D,
the ECO start/stop function is available
again as soon as the ¤symbol
reappears in the multifunction display. Driving
129Driving and parking Z