2013 MERCEDES-BENZ B-CLASS SPORTS fog light
[x] Cancel search: fog lightPage 9 of 336

Sea
tcover ..................................... 270
Sensors ......................................... 269
Steering wheel ............................... 270
Trim pieces .................................... 270
Washing by hand ........................... 266
Wheels ........................................... 267
Windows ........................................ 268
Wiper blades .................................. 268
Wooden trim .................................. 270
Cargo compartment cover ...............237
Cargo compartment enlargement ...234
Important safety notes ..................234
Notes on use ................................. 236
Cargo compartment floor
Height adjustment .........................240
Opening/closing ............................ 239
Stowag ewell (under) ..................... 239
Cargo net
Attaching ....................................... 239
Important safety information .........238
Cargo tie down rings .........................237
Car wash (care) ................................. 265
Center console Lowe rsection .................................. 31
Uppe rsection .................................. 30
Central locking
Automatic locking (on-board
computer) ...................................... 191
Locking/unlocking (SmartKey) ........68
Changing bulbs
Brake lamps ................................... 107
Cornering light function .................106
High-beam headlamps ...................105
Important safety notes ..................102
License plate lighting .....................109
Low-beam headlamps ....................105
Overview of bul btypes .................. 103
Parking lamps ................................ 105
Rea rfog lamp ................................ 107
Removing/replacing the cover
(front wheel arch) .......................... 104
Reversing lamps ............................ 107
Standing lamps (front) ...................105
Tai llamps ...................................... 107
Turn signals (front) ......................... 106
Turn signals (rear) ..........................107Child-proof locks
Important safety notes ....................58
Rea rdoors ....................................... 58
Children
In the vehicle ................................... 47
Restraint systems ............................ 47
Child seat
Automatic recognition .....................50
LATCH-type (ISOFIX) child seat
anchors ............................................ 51
On the front-passenger sea t............ 49
Problem (malfunction) .....................54
Recommendations ...........................56
Suitable positions ............................ 54
Top Tether ....................................... 52
Cigarette lighter ................................ 243
Climate control Automatic climate control (dual-
zone) .............................................. 117
Controlling automatically ...............119
Cooling with aird ehumidification..118
Defrosting the windows .................121
Defrosting the windshield ..............121
Dual-zone automatic climate
control ........................................... 115
Important safety notes ..................114
Indicator lamp ................................ 119
Notes on using automatic climate
control ................................... 115, 117
Overview of systems ......................114
Problems with cooling with air
dehumidification ............................ 119
Problem with the rear window
defroster ........................................ 122
Setting the aird istribution.............120
Setting the airflow .........................120
Setting the airv ents...................... 123
Setting the temperature ................119
Switching air-recirculation mode
on/off ............................................ 122
Switching on/off ........................... 118
Switching residual hea ton/off ......122
Switching the rear window
defroster on/off ............................ 122
Switching the ZONE function on/
off .................................................. 1206
Index
Page 14 of 336

Hydroplaning
..................................... 149I
Ignition lock see Key positions
Immobilizer .......................................... 65
Indicator lamps see Warning and indicator lamps
Instrument cluster
Overview .......................................... 27
Settings ......................................... 189
Warning and indicator lamps ...........28
Instrument cluster lighting ..............178
Interior lighting ................................. 101
Automatic control ..........................102
Delayed switch-off (on-board
computer) ...................................... 191
Emergency lighting ........................102
Manual control ............................... 102
Overview ........................................ 101
Reading lamp ................................. 101
Interior motion sensor ........................66 J
Jack Storage location ............................ 274
Using ............................................. 313
Jump starting (engine) ......................283 K
Kickdown Driving tips .................................... 135
Manual drive program ....................137
Knee bag .............................................. 42L
Lamps see Warning and indicator lamps
Lane Keeping Assist
Activating/deactivating .................188
Display message ............................ 210
Function/informatio n.................... 174
Lane Tracking package .....................173
LATCH-type (ISOFIX) child seat
anchors ................................................ 51License plate lamp
Changing bulbs .............................. 109
License plate lamp (display
message) ............................................ 204
Light function ,active
Display message ............................ 205
Lights
Activating/deactivating the
interio rlighting delayed switch-off .191
Automatic headlamp mode ..............97
Cornering light function ...................99
Display message ............................ 202
Driving abroad ................................. 96
Fog lamps ........................................ 97
Fog lamps (extended) ....................100
Hazard warning lamps .....................99
High beamf lasher ............................ 99
High-beam headlamps .....................98
Ligh tswitc h..................................... 96
Low-beam headlamps ......................97
Parking lamps .................................. 98
Rea rfog lamp .................................. 98
Standing lamps ................................ 98
Switching Adaptive Highbeam
Assist on/off ................................. 190
Switching the daytime running
lamps on/off (on-board
computer) ...................................... 190
Switching the daytime running
lamps on/off (switch) ......................97
Switching the exterio rlighting
delayed switch-off on/off (on-
board computer )............................ 190
Switching the surround lighting
on/off (on-board computer) ..........190
Turn signals ..................................... 98
see Changing bulbs
see Interior lighting
Light sensor (display message) .......205
Loading guidelines ............................230
Locking see Centra llocking
Locking (doors)
Automatic ........................................ 74
Emergency locking ........................... 75
From inside (central locking
button) ............................................. 74 Index
11
Page 99 of 336
Useful information
i This Operator's Manual describes all
models and all standard and optional
equipment of your vehicle available at the
time of publication of the Operator's
Manual. Country-specific differences are
possible. Please note that your vehicle may
not be equipped with all features
described. This also applies to safety-
related systems and functions.
i Please read the information on qualified
specialist workshops (Y page 23).Exterior lighting
Important safety notes
For reasons of safety, Mercedes-Benz
recommends that you drive with the lights
switched on even during the daytime. In some
countries, operation of the headlamps varies
due to legal requirements and self-imposed
obligations. Driving abroad
Conversion to symmetrical low beam Switch the headlamps to symmetrical low
beam in countries in which traffic drives on
the opposite side of the road from the country
where the vehicle is registered. This prevents
glare to oncoming traffic. When using
symmetrical lights, the edge of the road is not
lit as widely and as far ahead as normal.
Have the headlamps converted at a qualified
specialist workshop as close to the border as
possible before driving in these countries.
Conversion to asymmetrical low beam
after returning
Have the headlamps converted back to
asymmetrical low-beam headlamps at a
qualified specialist workshop as soon as
possible after crossing the border again. Setting the exterior lighting
Setting options Exterior lighting can be set using:
R
the light switch
R the combination switch (Y page 98)
R the on-board computer (Y page 190)
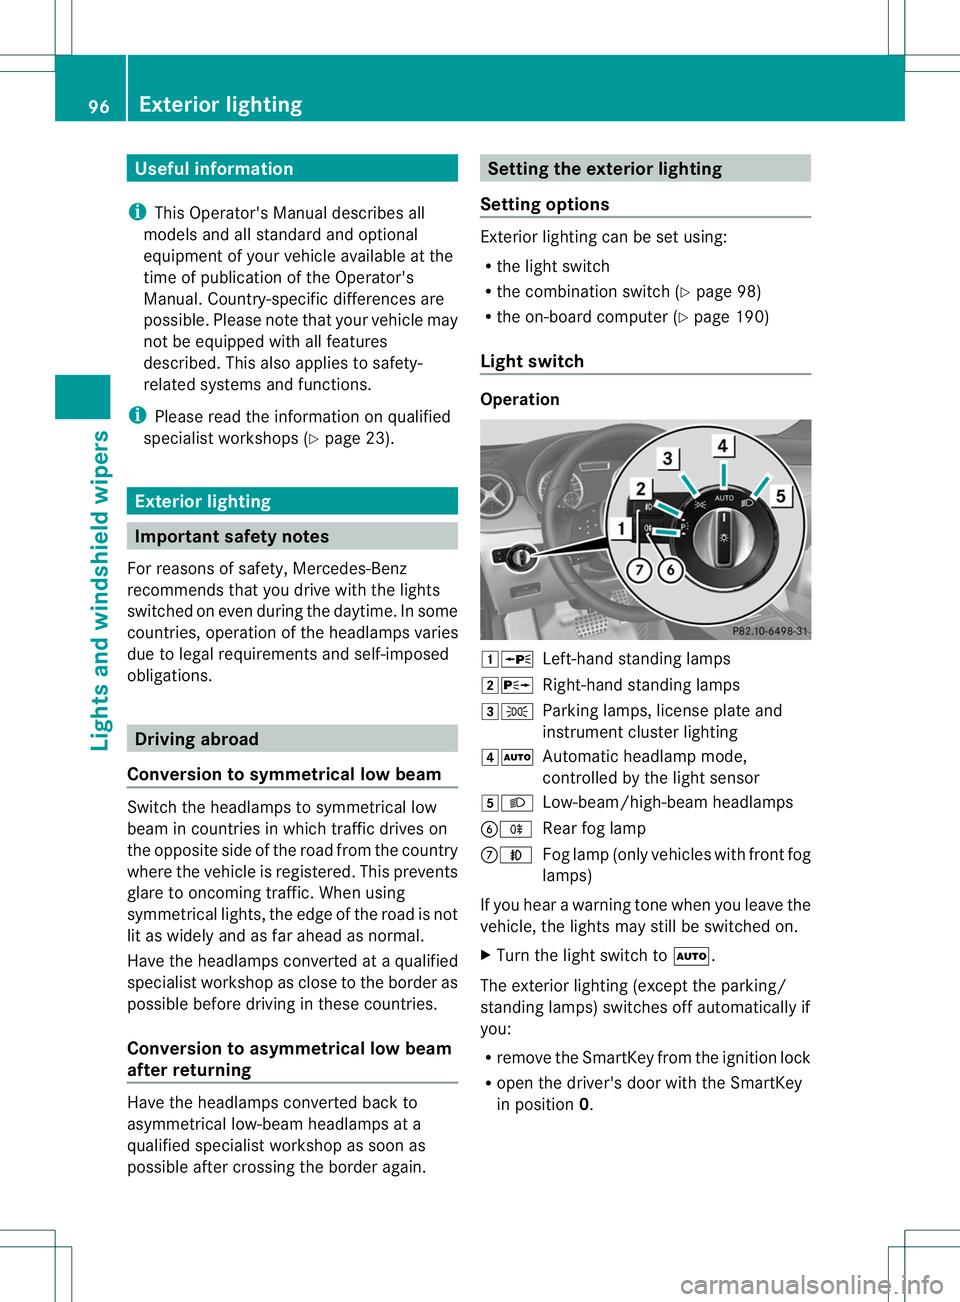
Light switch Operation
1W
Left-hand standing lamps
2X Right-hand standing lamps
3T Parking lamps, license plate and
instrumen tcluste rlighting
4Ã Automatic headlamp mode,
controlled by the light sensor
5L Low-beam/high-beam headlamps
BR Rear fog lamp
CN Fog lamp (only vehicles with front fog
lamps)
If you hear a warning tone when you leave the
vehicle, the lights may still be switched on.
X Turn the light switch to Ã.
The exterior lighting (except the parking/
standing lamps) switches off automatically if
you:
R remove the SmartKey fromt he ignition lock
R open the driver's door with the SmartKey
in position 0. 96
Exterior lightingLights and windshield wipers
Page 100 of 336
Automatic headlamp mode
G
WARNING
If the ligh tswitch is set to Ãand it is foggy,
snowing or there is poor visibility, the low-
beam headlamps will not come on
automatically. This could endange ryou and
others. In such situations turn the light switch
to L.
The automatic headlamp feature is only an
aid. The driver is responsible for the vehicle's
lighting at all times.
à is the favored light switch setting. The
light setting is automatically selected
according to the brightness of the ambient
light (exception: poor visibility due to weather
conditions such as fog, snow or spray):
R SmartKey in position 1in the ignition lock:
the parking lamps are switched on or off
automatically depending on the brightness
of the ambient light.
R With the engine running: if you have
activated the daytime running lamps
function via the on-board computer, the
daytime running lamps or the low-beam
headlamps and parking lamps are switched
on or off automatically depending on the
brightness of the ambient light.
X To switch on automatic headlamp
mode: turn the light switch to Ã.
The daytime running lamps improve the
visibility of your vehicle during the day. The
daytime running lamps function is required by
law in Canada. It cannot therefore be
deactivated.
When the engine is running and the vehicle is
stationary: if you move the selector lever from
a drive position to P, the daytime running
lamps/low-beam headlamps go out after
three minutes.
When the engine is running, the vehicle is
stationary and in high ambient light
brightness :ifyou turn the light switch
to T, you turn on the daytime running
lamps and parking lamps. If the engine is running and you turn the light
switch to
L, the manual settings take
precedence over the daytime running lamps.
Low-beam headlamps G
WARNING
If the light switch is set to Ãand it is foggy,
snowing or there is poor visibility, the low-
beam headlamps will not come on
automatically. This could endanger you and
others. In such situations turn the light switch
to L.
The automatic headlamp feature is only an
aid. The driver is responsible for the vehicle's
lighting at all times.
Even if the light sensor does not detect that
is dark, the parking lamps and low-beam
headlamps switch on when the SmartKey is
inserted into the ignition lock and the light
switch is set to the Lposition. This is a
particularly useful function in the event of rain
and fog.
X To switch on the low-beam headlamps:
turn the SmartKey in the ignition lock to
position 2or start the engine.
X Turn the light switch to L.
The green Lindicator lamp in the
instrument cluster lights up.
Front fog lamps
In conditions where visibility is poor due to
fog, snow or rain, the fog lamps improve
visibility as well as making it easier for other
road users to see you. They can be operated
together with the parking lamps or together
with the parking lamps and low-beam
headlamps.
X To switch on the front fog lamps: turn
the SmartKey in the ignition lock to position
2 or start the engine.
X Turn the light switch to LorÃ. Exterior lighting
97Lights and windshiel dwipers Z
Page 101 of 336
X
Press the Nbutton.
The green Nindicator lamp in the
instrument cluster lights up.
X To switch off the front fog lamps: press
the N button.
The green Nindicator lamp in the
instrument cluster goes out.
Only vehicles with frontf og lamps are
equipped with the "fog lamp" function;
information on the fog lamp function for
vehicles with Intelligent Light System
(Y page 100).
Rear fog lamp
The rear fog lamp improves visibility of your
vehicle for the traffic behind in the event of
heavy fog. Please take note of the country-
specific regulations for the use of rear fog
lamps.
X To switch on the rear fog lamp: turn the
SmartKey in the ignition lock to position 2
or start the engine.
X Turn the light switch to LorÃ.
X Press the Rbutton.
The yellow Rindicator lamp in the
instrument cluster lights up.
X To switch off the rear fog lamp: press the
R button.
The yellow Rindicator lamp in the
instrument cluster goes out.
Parking lamps
! If the battery has been excessively
discharged, the parking lamps or standing
lamps are automatically switched off to
enable the next engine start.A lways park
your vehicle safely and sufficiently lit
according to legal standards. Avoid the
continuous use of the Tparking lamps
for several hours. If possible, switch on the
X right or the Wleft standing lamp.
X To switch on: turn light switch to T.
The green Tindicator lamp in the
instrumen tcluster lights up. Standing lamps
Switching on the standin
glamps ensures the
corresponding side of the vehicle is
illuminated.
X To switch on the standing lamps: the
SmartKey is not in the ignition lock or it is
in position 0.
X Turn the light switch to W(left-hand side
of the vehicle) or X(right-hand side of
the vehicle). Combination switch
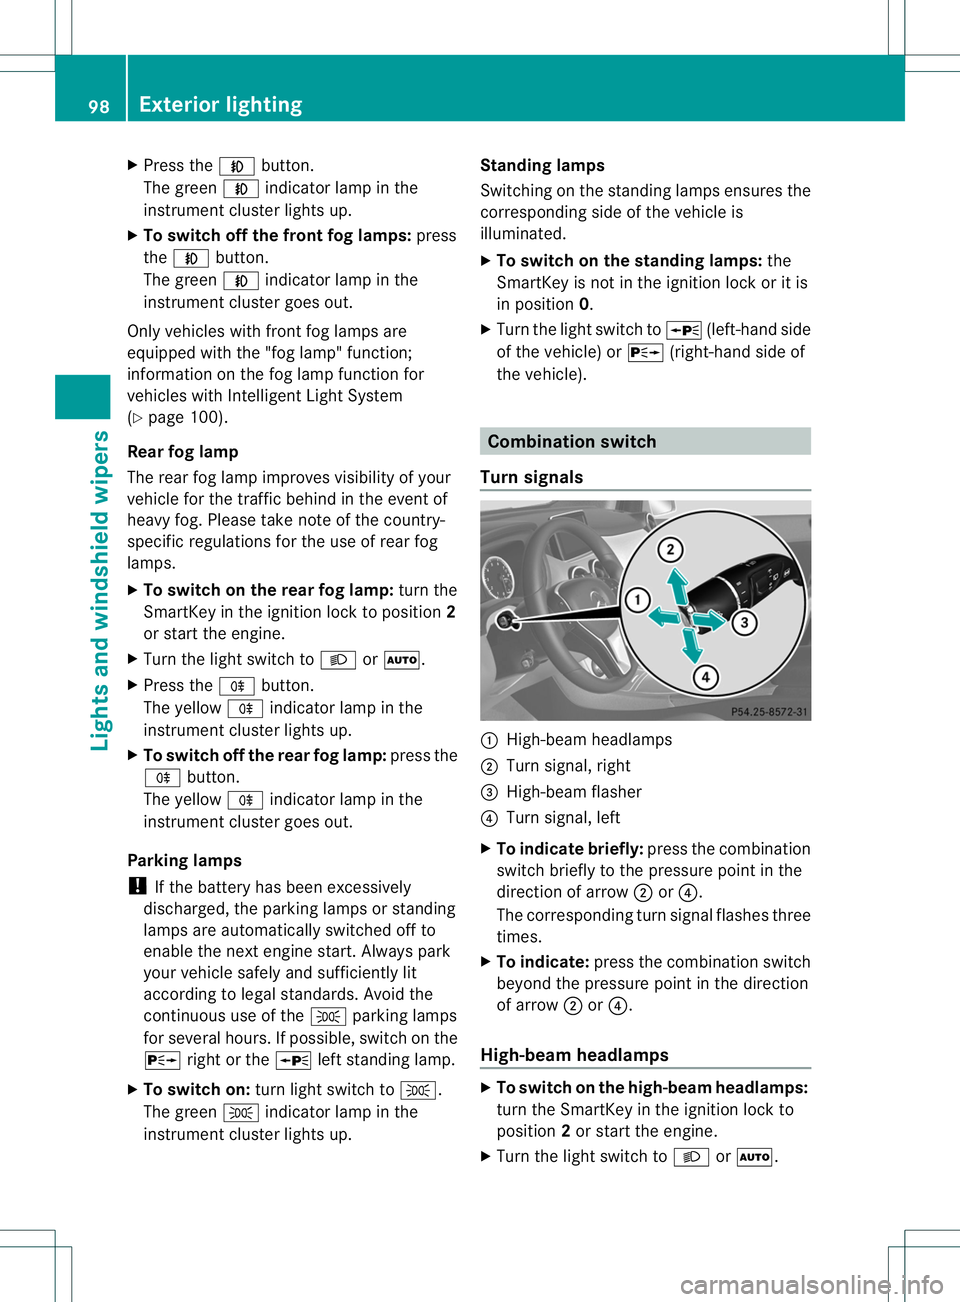
Turn signals :
High-beam headlamps
; Turn signal, right
= High-beam flasher
? Turn signal, left
X To indicate briefly: press the combination
switch briefly to the pressure pointint he
direction of arrow ;or?.
The corresponding turn signal flashes three
times.
X To indicate: press the combination switch
beyond the pressure point in the direction
of arrow ;or?.
High-beam headlamps X
To switch on the high-beam headlamps:
turn the SmartKey in the ignition lock to
position 2or start the engine.
X Turn the light switch to LorÃ. 98
Exterior lightingLights and windshield wipers
Page 103 of 336
Active:
R
if you are driving at speeds below
25mph (40 km/h) and switch on the turn
signal or tur nthe steering wheel.
R if you are driving at speeds between
25mph (40 km/h) and45mph (70 km/h)
and turn the steering wheel
Not active: if you are driving at speeds above
25 mph (40 km/h) or switch off the turn
signals or turn the steering wheel to the
straight-ahead position.
The cornering light function may remain lit for
a short time, but is automatically switched off
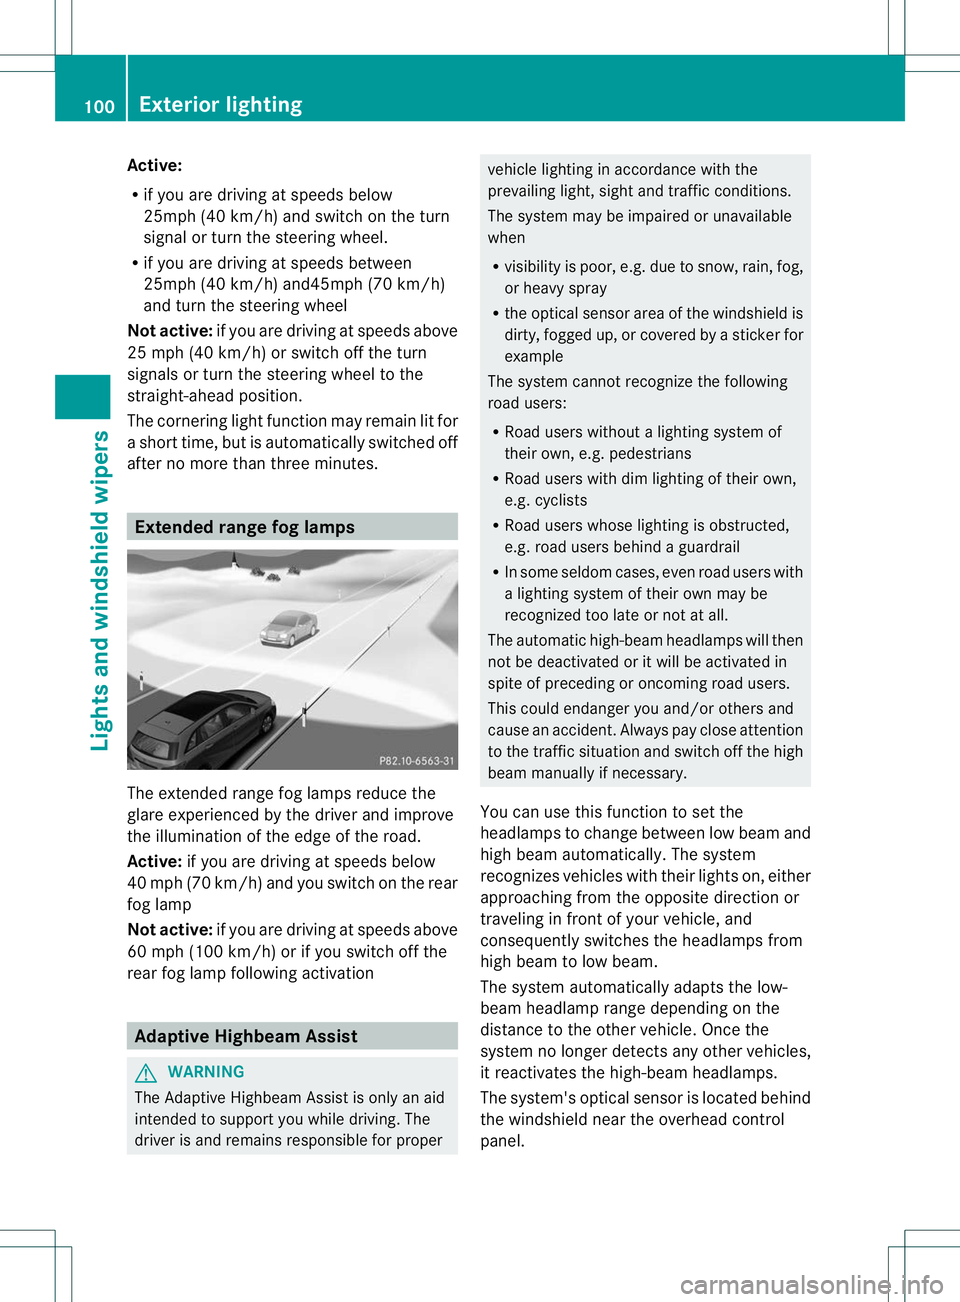
after no more than three minutes. Extended range fog lamps
The extended range fog lamps reduce the
glare experienced by the driver and improve
the illumination of the edge of the road.
Active:
if you are driving at speeds below
40 mph (70 km/h) and you switch on the rear
fog lamp
Not active: if you are driving at speeds above
60 mph (100 km/h) or if you switch off the
rear fog lamp following activation Adaptive Highbeam Assist
G
WARNING
The Adaptive Highbeam Assist is only an aid
intended to support you while driving. The
driver is and remains responsible for proper vehicle lighting in accordance with the
prevailing light, sight and traffic conditions.
The system may be impaired or unavailable
when
R
visibility is poor, e.g. due to snow, rain, fog,
or heavy spray
R the optical sensor area of the windshield is
dirty, fogged up, or covered by a sticker for
example
The system cannot recognize the following
road users:
R Road users without a lighting system of
their own, e.g. pedestrians
R Road users with dim lighting of their own,
e.g. cyclists
R Road users whose lighting is obstructed,
e.g. road users behind a guardrail
R In some seldom cases, even road users with
a lighting system of their own may be
recognized too late or not at all.
The automatic high-beam headlamps will then
not be deactivated or it will be activated in
spite of preceding or oncoming road users.
This could endanger you and/or others and
cause an accident. Always pay close attention
to the traffic situation and switch off the high
beam manually if necessary.
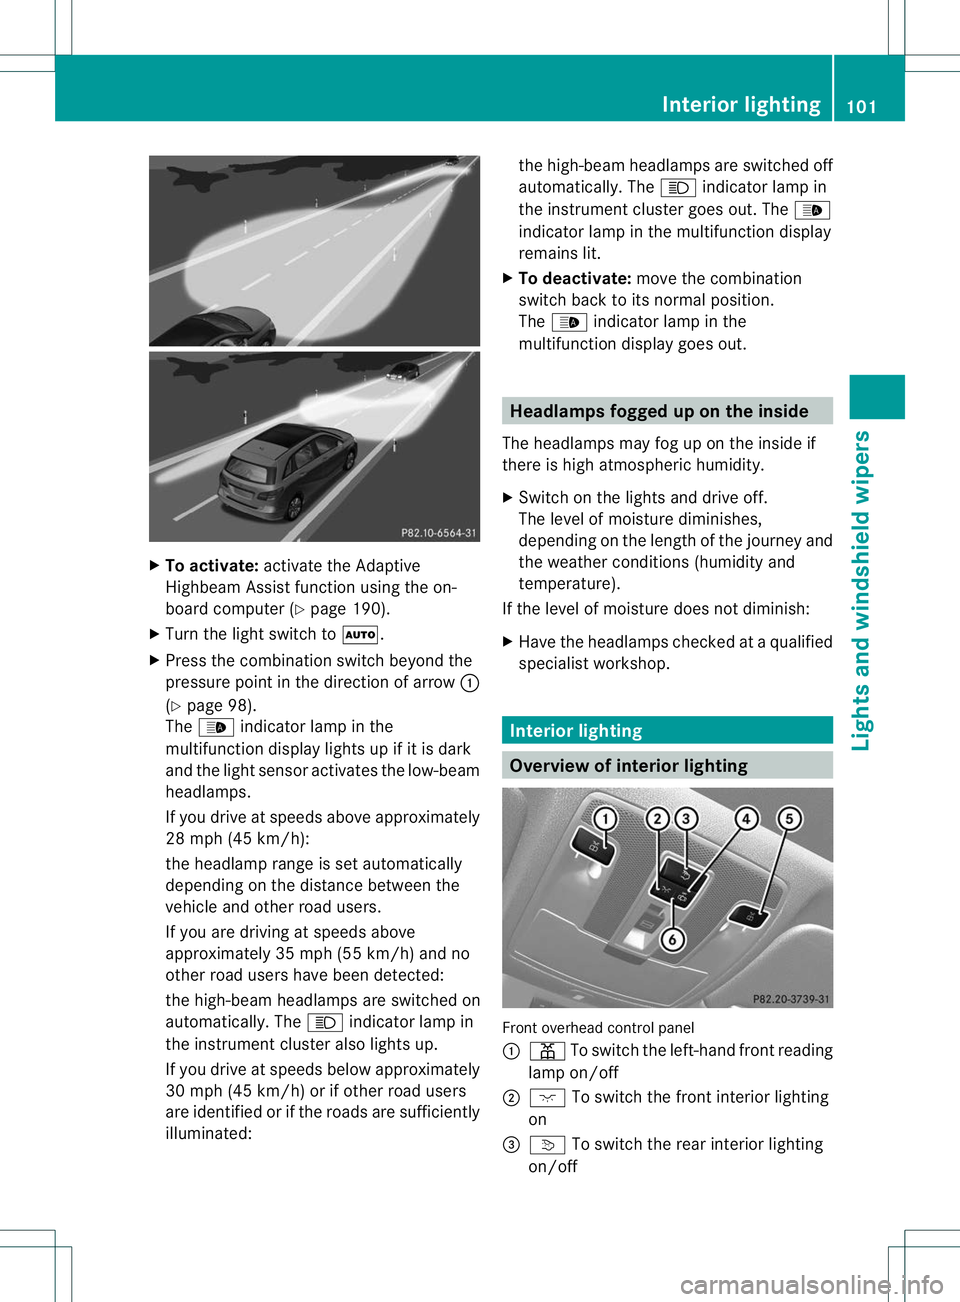
You can use this function to set the
headlamps to change between low beam and
high beam automatically .The system
recognizes vehicles with their lights on, either
approaching from the opposite direction or
traveling in front of your vehicle, and
consequently switches the headlamps from
high beam to low beam.
The system automatically adapts the low-
beam headlamp range depending on the
distance to the other vehicle. Once the
system no longer detects any other vehicles,
it reactivates the high-beam headlamps.
The system's optical sensor is located behind
the windshield near the overhead control
panel. 100
Exterior lightingLights and windshield wipers
Page 104 of 336
X
To activate: activate the Adaptive
Highbea mAssist function using the on-
board computer (Y page 190).
X Turn the light switch to Ã.
X Press the combination switch beyond the
pressure point in the direction of arrow :
(Y page 98).
The _ indicator lamp in the
multifunction display lights up if it is dark
and the light sensor activates the low-beam
headlamps.
If you drive at speeds above approximately
28 mph (45 km/h):
the headlamp range is set automatically
depending on the distance between the
vehicle and other road users.
If you are driving at speeds above
approximately 35 mph (55 km/h) and no
other road users have been detected:
the high-beam headlamps are switched on
automatically. The Kindicator lamp in
the instrument cluster also lights up.
If you drive at speeds below approximately
30 mph (45 km/h) or if other road users
are identified or if the roads are sufficiently
illuminated: the high-beam headlamps are switched off
automatically. The
Kindicator lamp in
the instrument cluster goes out. The _
indicator lamp in the multifunction display
remains lit.
X To deactivate: move the combination
switch back to its normal position.
The _ indicator lamp in the
multifunction display goes out. Headlamps fogged up on the inside
The headlamps may fog up on the inside if
there is high atmospheric humidity.
X Switch on the lights and drive off.
The level of moisture diminishes,
depending on the length of the journey and
the weather conditions (humidity and
temperature).
If the level of moisture does not diminish:
X Have the headlamps checked at a qualified
specialist workshop. Interior lighting
Overview of interior lighting
Front overhead control panel
:
p To switch the left-hand front reading
lamp on/off
; c To switch the front interior lighting
on
= v To switch the rear interior lighting
on/off Interior lighting
101Lights and windshield wipers Z
Page 107 of 336
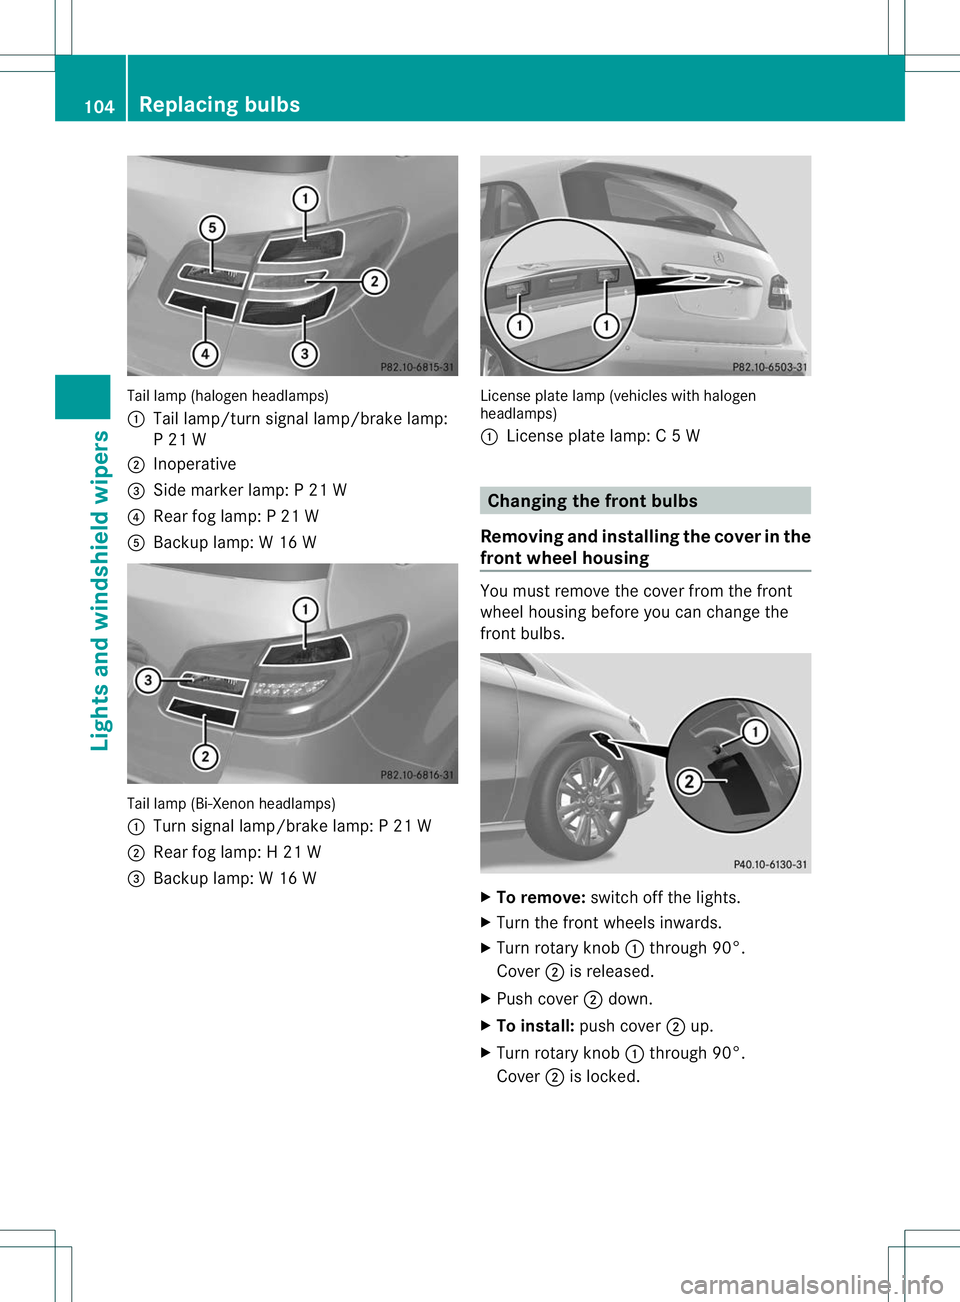
Tail lamp (halogen headlamps)
:
Tail lamp/turn signal lamp/brake lamp:
P 21 W
; Inoperative
= Side marker lamp: P 21 W
? Rear fog lamp: P 21 W
A Backup lamp: W 16 W Tail lamp (Bi-Xenon headlamps)
:
Turn signal lamp/brake lamp: P 21 W
; Rear fog lamp: H 21 W
= Backup lamp: W 16 W License plate lamp (vehicles with halogen
headlamps)
:
License plate lamp: C 5W Changing the front bulbs
Removing and installing th ecover in the
front wheel housing You must remove the cover from the front
wheel housing before you can change the
frontb
ulbs. X
To remove: switch off the lights.
X Turn the fron twheels inwards.
X Turn rotary knob :through 90°.
Cover ;is released.
X Push cover ;down.
X To install: push cover ;up.
X Turn rotary knob :through 90°.
Cover ;is locked. 104
Replacing bulbsLights and windshield wipers