2013 MERCEDES-BENZ B-CLASS SPORTS stop start
[x] Cancel search: stop startPage 7 of 336

1, 2, 3 ...
12 Vsocket
see Sockets A
ABS (Anti-lock Braking System) Display message ............................ 194
Function/notes ................................ 59
Important safety notes ....................59
Warning lamp ................................. 220
Activating/deactivating cooling
with air dehumidification .................118
Active Parking Assist Display message ............................ 211
Function/notes ............................. 165
Important safety notes ..................164
Active Service System
see ASSYST PLUS
ADAPTIVE BRAKE ................................. 64
Adaptive Brake Assist Display message ............................ 201
Function/notes ................................ 61
Adaptive brake lamps .........................63
Adaptive Highbeam Assist Display message ............................ 206
Function/notes ............................. 100
Switching on/off (on-board
computer) ...................................... 190
Additional speedometer ...................189
Additives (engine oil) ........................327
Airb ags
Deployment ..................................... 37
Front air bag (driver, front
passenger )....................................... 41
Important safety notes ....................39
Knee bag .......................................... 42
Safety guidelines ............................. 38
Side impact airb ag.......................... 42
Windo wcurtain air bag .................... 42
Air-conditioning system
see Climate control
Airv ents
Important safet ynotes .................. 123
Rea r............................................... 124
Setting ........................................... 123Setting the center air vents
...........123
Setting the side air vents ...............124
Alarm system
see ATA (Anti-Theft Alarm system)
Anti-loc kbraking system
see ABS (Anti-lock Braking System)
Anti-theft alarm system
see ATA (Anti-Theft Alarm system)
Anti-theft system
Interio rmotion sensor ..................... 66
Ashtray ............................................... 242
Assistance menu (on-board
computer) .......................................... 187
ASSYST PLUS Displaying a service message ........264
Hiding a service message ..............264
Notes ............................................. 264
Resetting the service interval
display. .......................................... 264
Service message ............................ 264
Special service requirements ......... 265
ATA (Anti-Theft Alarm system)
Activating/deactivating ...................65
Function .......................................... .65
Switching off the alarm ....................65
ATTENTIO NASSIST
Activating/deactivating .................188
Display message ............................ 209
Function/notes ............................. 171
Audio menu (on-board computer) ....185
Audio system see separate operating instructions
Authorized Centers
see Qualified specialist workshop
Authorized Mercedes-Benz Center
see Qualified specialist workshop
Authorized workshops
see Qualified specialist workshop
AUTO lights
Display message ............................ 205
see Lights
Automatic engine start (ECO start/
stop function) .................................... 129
Automatic engine switch-off (ECO
start/stop function) ..........................129
Automatic headlamp mode ................97 4
Index
Page 12 of 336
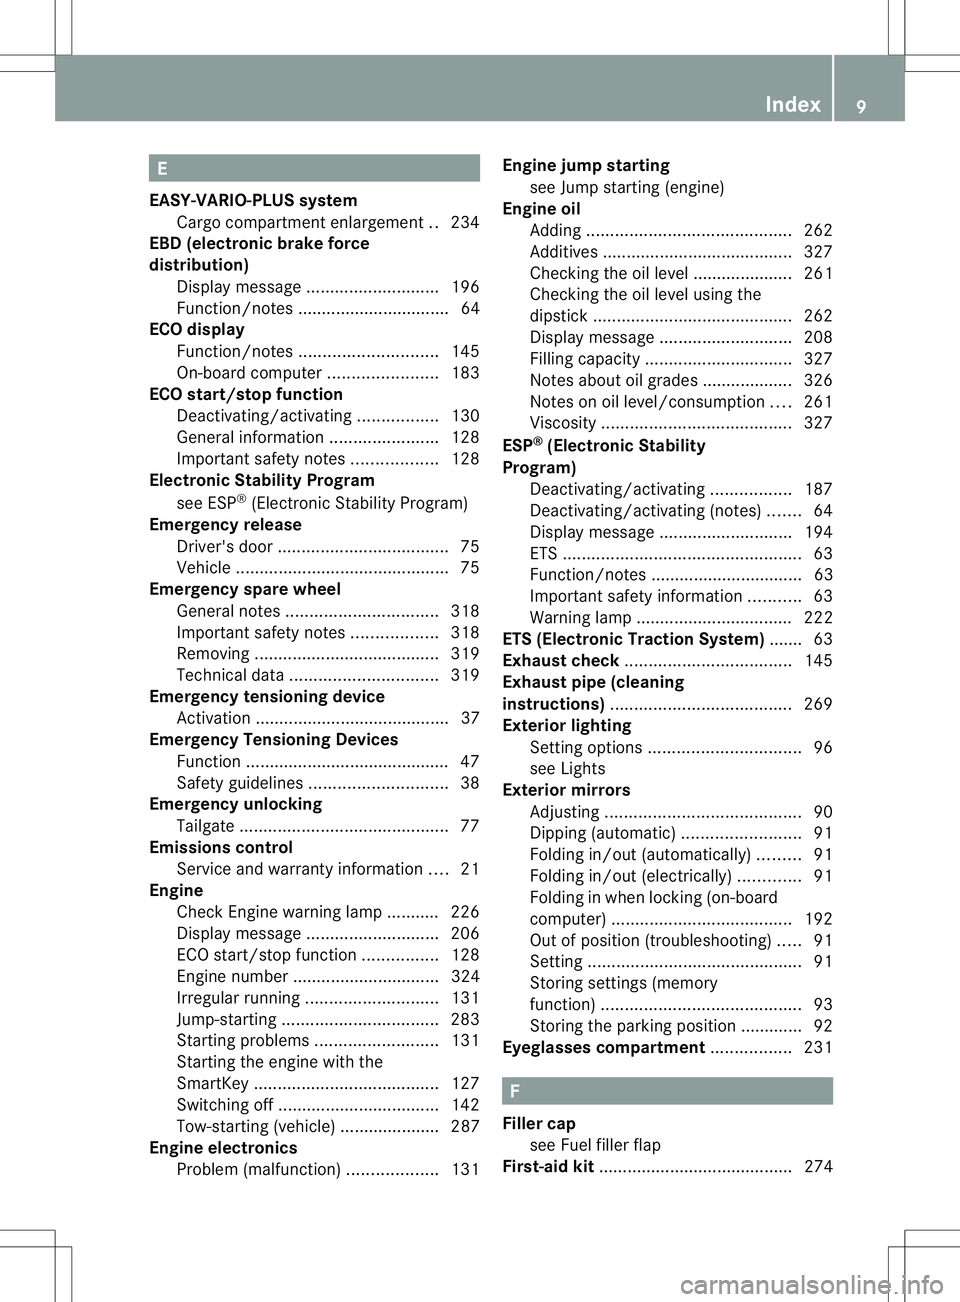
E
EASY-VARIO-PLUS system Cargo compartment enlargement ..234
EBD (electronic brake force
distribution)
Display message ............................ 196
Function/notes ................................ 64
ECO display
Function/notes ............................. 145
On-board computer .......................183
ECO start/stop function
Deactivating/activating .................130
General information .......................128
Important safety notes ..................128
Electronic Stability Program
see ESP ®
(Electroni cStability Program)
Emergenc yrelease
Driver's door .................................... 75
Vehicle ............................................. 75
Emergency spare wheel
General notes ................................ 318
Important safety notes ..................318
Removing ....................................... 319
Technical data ............................... 319
Emergency tensioning device
Activation ......................................... 37
Emergency Tensioning Devices
Function .......................................... .47
Safety guidelines. ............................ 38
Emergency unlocking
Tailgate ............................................ 77
Emissions control
Service and warranty information ....21
Engine
Check Engine warning lamp ........... 226
Display message ............................ 206
ECO start/stop function ................128
Engine number ............................... 324
Irregularr unning............................ 131
Jump-starting ................................. 283
Starting problems ..........................131
Starting the engine with the
SmartKey ....................................... 127
Switching off .................................. 142
Tow-starting (vehicle) ..................... 287
Engine electronics
Problem (malfunction) ...................131Engine jump starting
see Jump starting (engine)
Engine oil
Adding ........................................... 262
Additives ........................................ 327
Checking the oil level ..................... 261
Checking the oil level using the
dipstick .......................................... 262
Display message ............................ 208
Filling capacity ............................... 327
Notes about oil grades ................... 326
Notes on oil level/consumption ....261
Viscosity ........................................ 327
ESP ®
(Electronic Stability
Program) Deactivating/activating .................187
Deactivating/activating (notes) .......64
Display message ............................ 194
ETS .................................................. 63
Function/notes ................................ 63
Important safety information ...........63
Warning lamp ................................. 222
ETS (Electronic Traction System) ....... 63
Exhaus tcheck ................................... 145
Exhaus tpipe (cleaning
instructions) ...................................... 269
Exterior lighting Setting options ................................ 96
see Lights
Exterior mirrors
Adjusting ......................................... 90
Dipping (automatic) .........................91
Folding in/out( automatically).........91
Folding in/out( electrically).............91
Folding in whenl ocking (on-board
computer) ...................................... 192
Out of position (troubleshooting) .....91
Setting ............................................. 91
Storing settings (memory
function) .......................................... 93
Storing the parking position ............. 92
Eyeglasses compartment .................231 F
Fille rcap
see Fuel filler flap
First-aid kit ......................................... 274 Index
9
Page 33 of 336
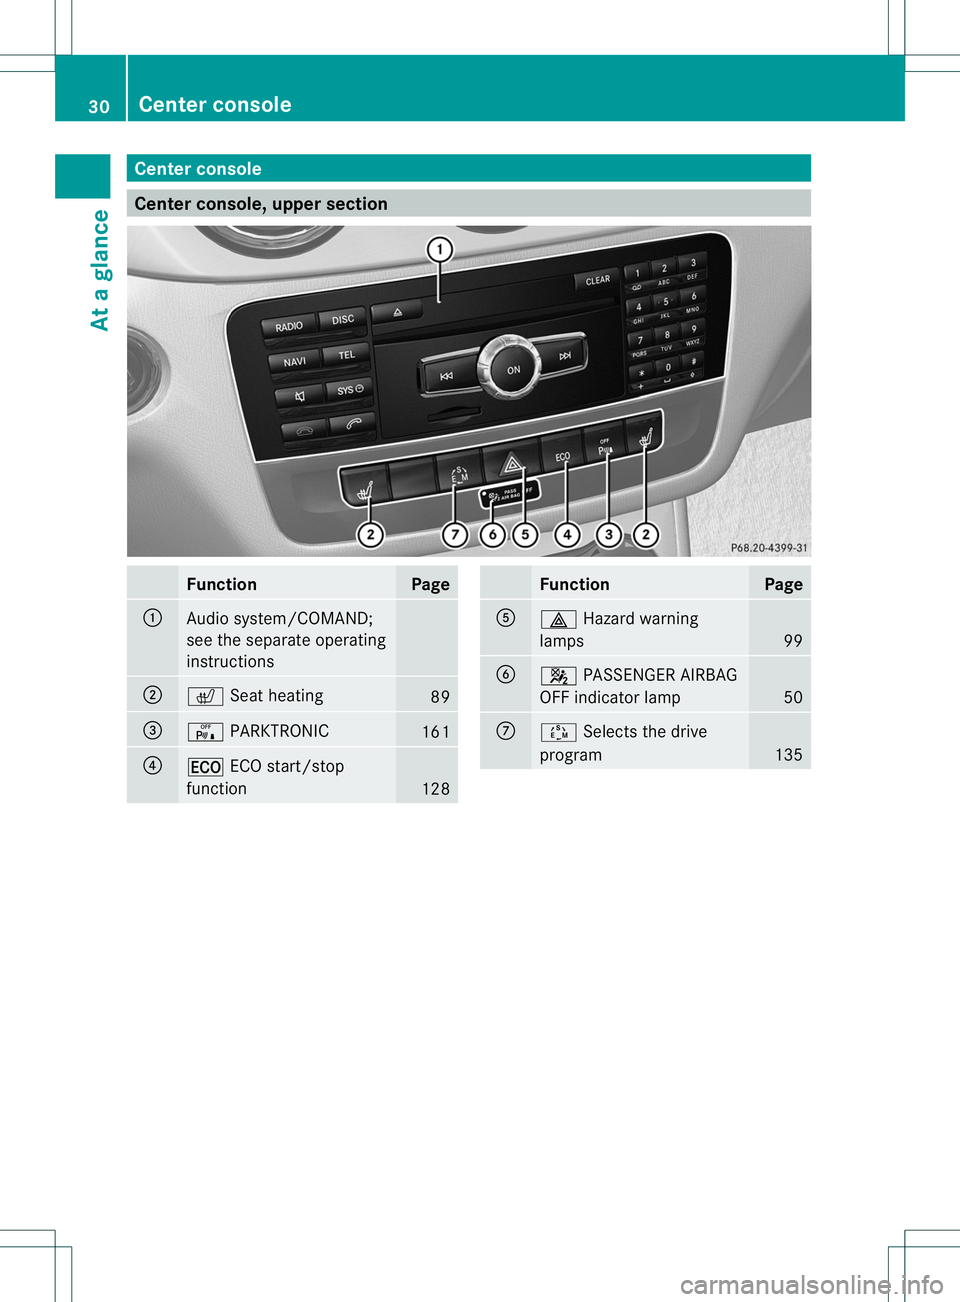
Center console
Center console, upper section
Function Page
:
Audio system/COMAND;
see the separate operating
instructions
;
c
Seat heating 89
=
c
PARKTRONIC 161
?
¤
ECO start/stop
function 128 Function Page
A
£
Hazard warning
lamps 99
B
4
PASSENGER AIRBAG
OFF indicator lamp 50
C
Ú
Selects the drive
program 13530
Center consoleAt a glance
Page 49 of 336
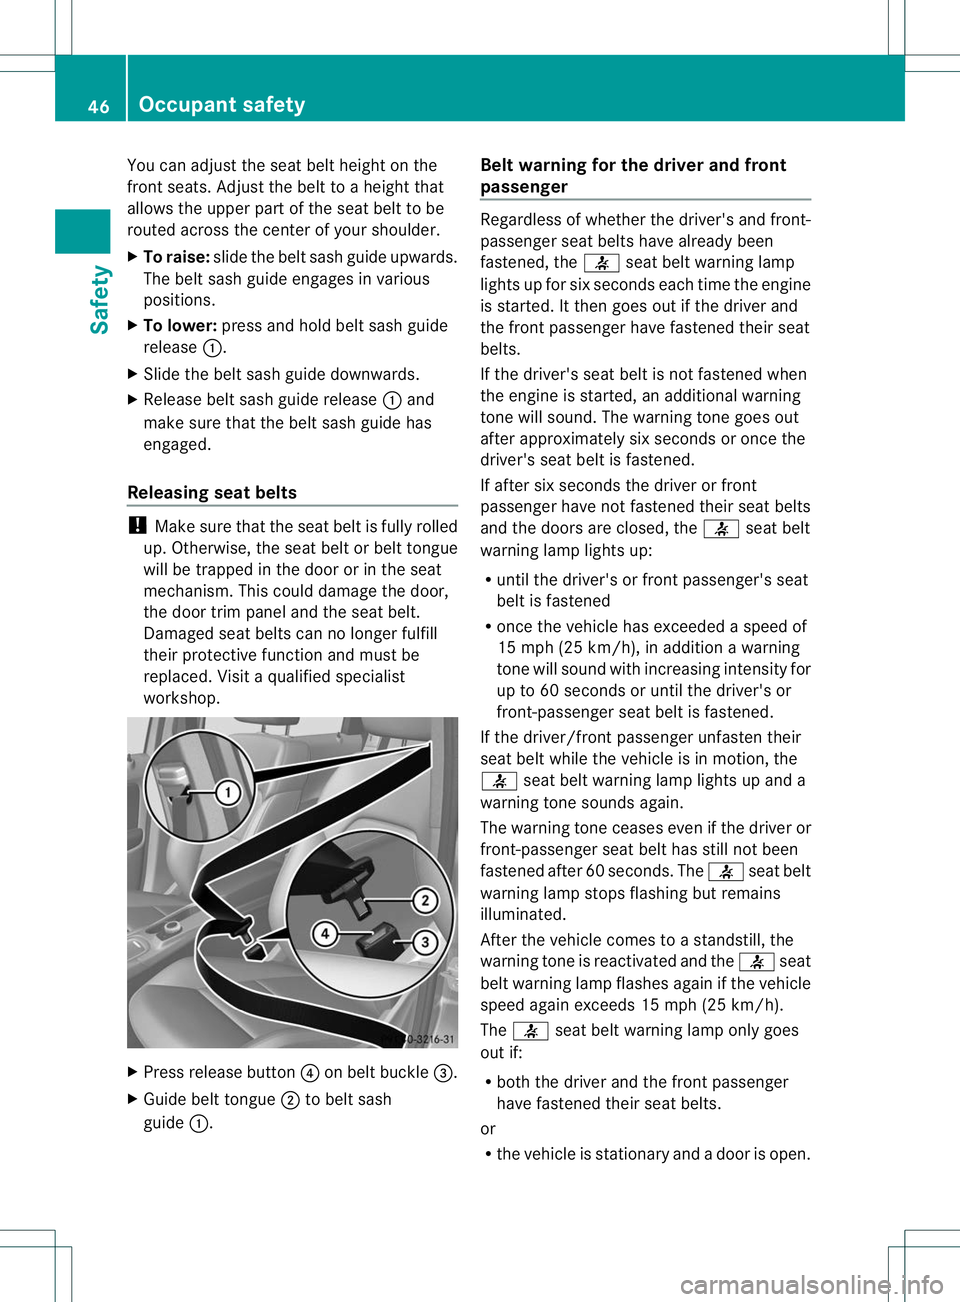
You can adjust the seat belt height on the
front seats
.Adjust the belt to a height that
allows the upper part of the seat belt to be
routed across the center of your shoulder.
X To raise: slide the belt sash guide upwards.
The belt sash guide engages in various
positions.
X To lower: press and hold belt sash guide
release :.
X Slide the belt sash guide downwards.
X Release belt sash guide release :and
make sure that the belt sash guide has
engaged.
Releasing seat belts !
Make sure that the seat belt is fully rolled
up. Otherwise, the seat belt or belt tongue
will be trapped in the door or in the seat
mechanism. This could damage the door,
the door trim panel and the seat belt.
Damaged seat belts can no longer fulfill
their protective function and must be
replaced. Visit a qualified specialist
workshop. X
Press release button ?on belt buckle =.
X Guide belt tongue ;to belt sash
guide :. Belt warning for the driver and front
passenger Regardless of whether the driver's and front-
passenger seat belts have already been
fastened, the
7seat belt warning lamp
lights up for six seconds each time the engine
is started. It then goes out if the driver and
the frontp assenger have fastened their seat
belts.
If the driver's seat belt is notf astened when
the engine is started, an additional warning
tone will sound. The warning tone goes out
after approximately six seconds or once the
driver's seat belt is fastened.
If after six seconds the driver or front
passenger have notf astened their seat belts
and the doors are closed, the 7seat belt
warning lamp lights up:
R until the driver's or fron tpassenger's seat
belt is fastened
R once the vehicle has exceeded a speed of
15 mph (25 km/h), in addition a warning
tone will sound with increasing intensity for
up to 60 seconds or until the driver's or
front-passenger seat belt is fastened.
If the driver/front passenger unfasten their
seat belt while the vehicle is in motion, the
7 seat belt warning lamp lights up and a
warning tone sounds again.
The warning tone ceases evenift he driver or
front-passenger seat belt has still not been
fastened after 60 seconds. The 7seat belt
warning lamp stops flashing but remains
illuminated.
After the vehicle comes to a standstill, the
warning tone is reactivated and the 7seat
belt warning lamp flashes again if the vehicle
speed again exceeds 15 mph (25 km/h).
The 7 seat belt warning lamp only goes
out if:
R both the driver and the front passenger
have fastened their seat belts.
or
R the vehicle is stationary and a door is open. 46
Occupant safetySafety
Page 81 of 336
&
button on the SmartKey, the anti-
entrapment feature will not operate. Opening and closing the side
windows
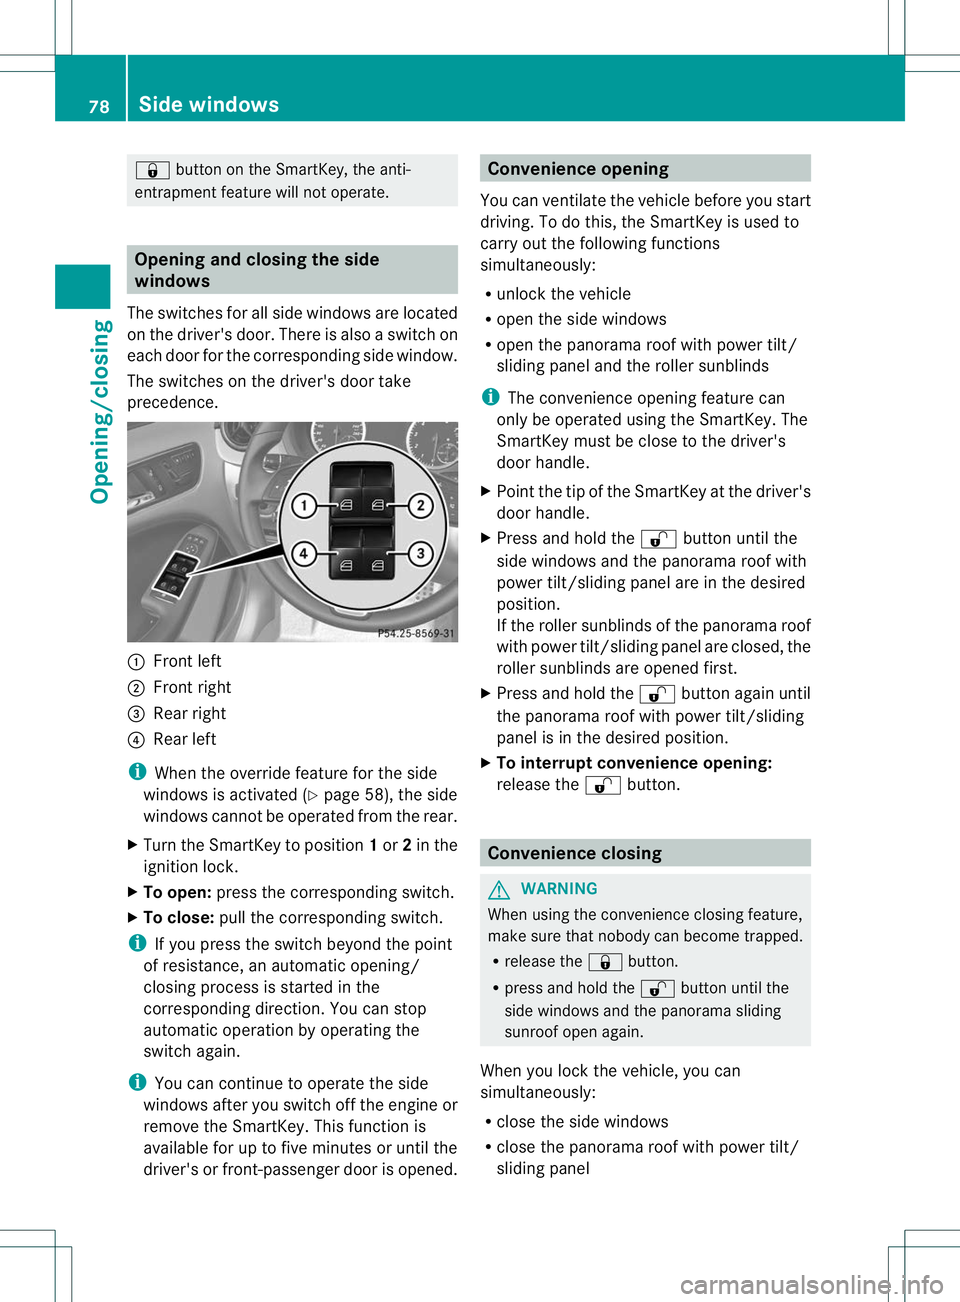
The switches for all side windows are located
on the driver's door. There is also a switch on
each door for the corresponding side window.
The switches on the driver's door take
precedence. :
Front left
; Front right
= Rear right
? Rear left
i When the override feature for the side
windows is activated (Y page 58), the side
windows cannot be operated from the rear.
X Turn the SmartKey to position 1or 2in the
ignition lock.
X To open: press the corresponding switch.
X To close: pull the corresponding switch.
i If you press the switch beyond the point
of resistance, an automatic opening/
closing process is started in the
corresponding direction. You can stop
automatic operation by operating the
switch again.
i You can continue to operate the side
windows after you switch off the engine or
remove the SmartKey. This function is
available for up to five minutes or until the
driver's or front-passenger door is opened. Convenience opening
You can ventilate the vehicle before you start
driving .To do this, the SmartKey is used to
carry out the following functions
simultaneously:
R unlock the vehicle
R open the side windows
R open the panorama roof with power tilt/
sliding panel and the roller sunblinds
i The convenience opening feature can
only be operated using the SmartKey. The
SmartKey must be close to the driver's
door handle.
X Point the tip of the SmartKey at the driver's
door handle.
X Press and hold the %button until the
side windows and the panorama roof with
power tilt/sliding panel are in the desired
position.
If the roller sunblinds of the panorama roof
with power tilt/sliding panel are closed, the
roller sunblinds are opened first.
X Press and hold the %button again until
the panorama roof with power tilt/sliding
panel is in the desired position.
X To interrupt convenience opening:
release the %button. Convenience closing
G
WARNING
When using the convenience closing feature,
make sure that nobody can become trapped.
R release the &button.
R press and hold the %button until the
side windows and the panorama sliding
sunroof open again.
When you lock the vehicle, you can
simultaneously:
R close the side windows
R close the panorama roof with power tilt/
sliding panel 78
Side windowsOpening/closing
Page 83 of 336
Sliding sunroof
Important safety notes
In the following section, the term "sliding
sunroof" refers to the panorama roof with
power tilt/sliding panel. G
WARNING
When opening or closing the sliding sunroof,
make sure that there is no danger of anyone
being harmed by the opening/closing
procedure.
The sliding sunroof is equipped with
automatic operation and the anti-entrapment
feature. If the movement of the sliding sunroof
is blocked during the closing procedure, the
sliding sunroof will stop and open slightly.
The sliding sunroof operates differently when
the sliding sunroof switch is pressed and held.
See the "Problems with the sliding sunroof"
section for more details.
The opening/closing procedure of the sliding
sunroof can be immediately halted by
releasing the sliding sunroof switch or, if the
sliding sunroof switch was moved past the
resistance point and released, by moving the
sliding sunroof switch in any direction. G
WARNING
The sliding sunroof is made out of glass. In the
event of an accident, the glass may shatter.
This may result in an opening in the roof.
In a vehicle rollover, occupants not wearing
their seat belts or not wearing them properly
may be thrown out of the opening. Such an
opening also presents a potential for injury for
occupants wearing their seat belts properly,
as entire body parts or portions of them may
protrude from the passenger compartment.
! Only open the sliding sunroof if it is free
of snow and ice. Otherwise, malfunctions
may occur.
Do not allow anything to protrude from the
sliding sunroof. Otherwise, the seals could
be damaged. !
The weather can change abruptly. It could
start to rain or snow. Make sure that the
sliding sunroof is closed when you leave the
vehicle. The vehicle electronics can be
damaged if water enters the vehicle
interior.
i Resonance noises can occur in addition
to the usual airflow noises when the sliding
sunroof is open. They are caused by minor
pressure fluctuations in the vehicle interior.
Change the position of the sliding sunroof
or open a side window slightly to reduce or
eliminate these noises. Operating the panorama roof with
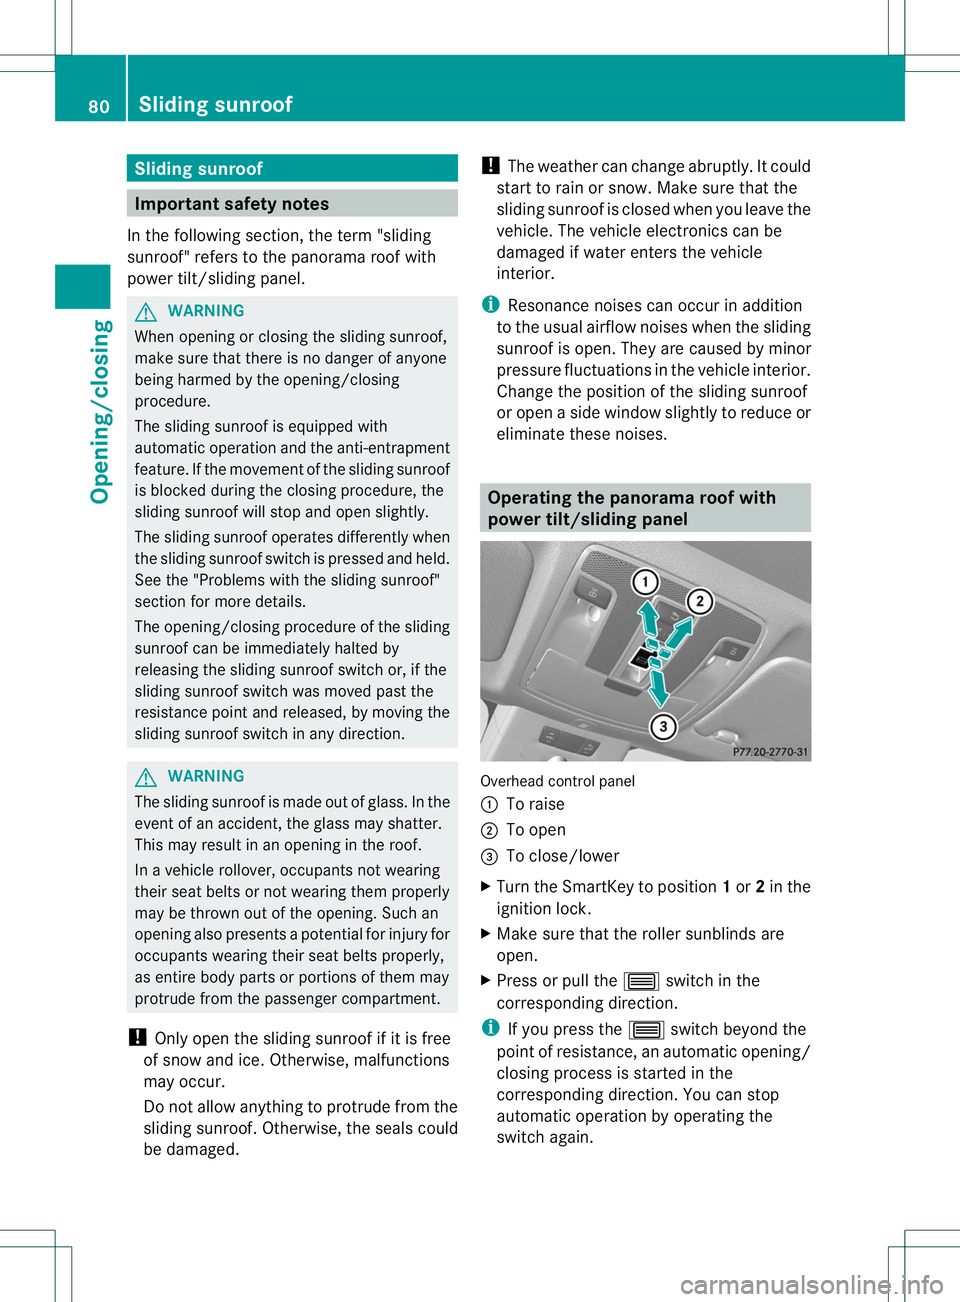
power tilt/sliding panel
Overhead control panel
:
To raise
; To open
= To close/lower
X Turn the SmartKey to position 1or 2in the
ignition lock.
X Make sure that the roller sunblinds are
open.
X Press or pull the 3switch in the
corresponding direction.
i If you press the 3switch beyond the
point of resistance, an automatic opening/
closing process is started in the
corresponding direction. You can stop
automatic operation by operating the
switch again. 80
Sliding sunroofOpening/closing
Page 84 of 336
The automatic raising feature is available
only when the panorama roof with power
tilt/sliding panel is closed.
i You can continue to operate the
panorama roof with power tilt/sliding
panel after switching off the engine or
removing the SmartKey. This function
remains active for five minutes or until you
open a front door. Operating the roller sunblinds for the
panorama roof with power tilt/sliding
panel
Important safety notes G
WARNING
When opening or closing the roller sunblinds,
make sure that no one can be injured.
The roller sunblinds have automatic operation
and an anti-entrapment feature. If the roller
sunblinds are blocked during the closing
procedure, the anti-entrapment feature stops
the roller sunblinds and they open again
slightly.
The opening and closing of the roller
sunblinds can be terminated immediately by
releasing the button .Inautomatic operation,
press the butto nbriefly in any directio nto
stop the roller sunblinds.
The roller sunblinds shield the vehicle interior
from sunlight. The two roller sunblinds can
only be opened and closed together when the
panorama roof with power tilt/sliding panel
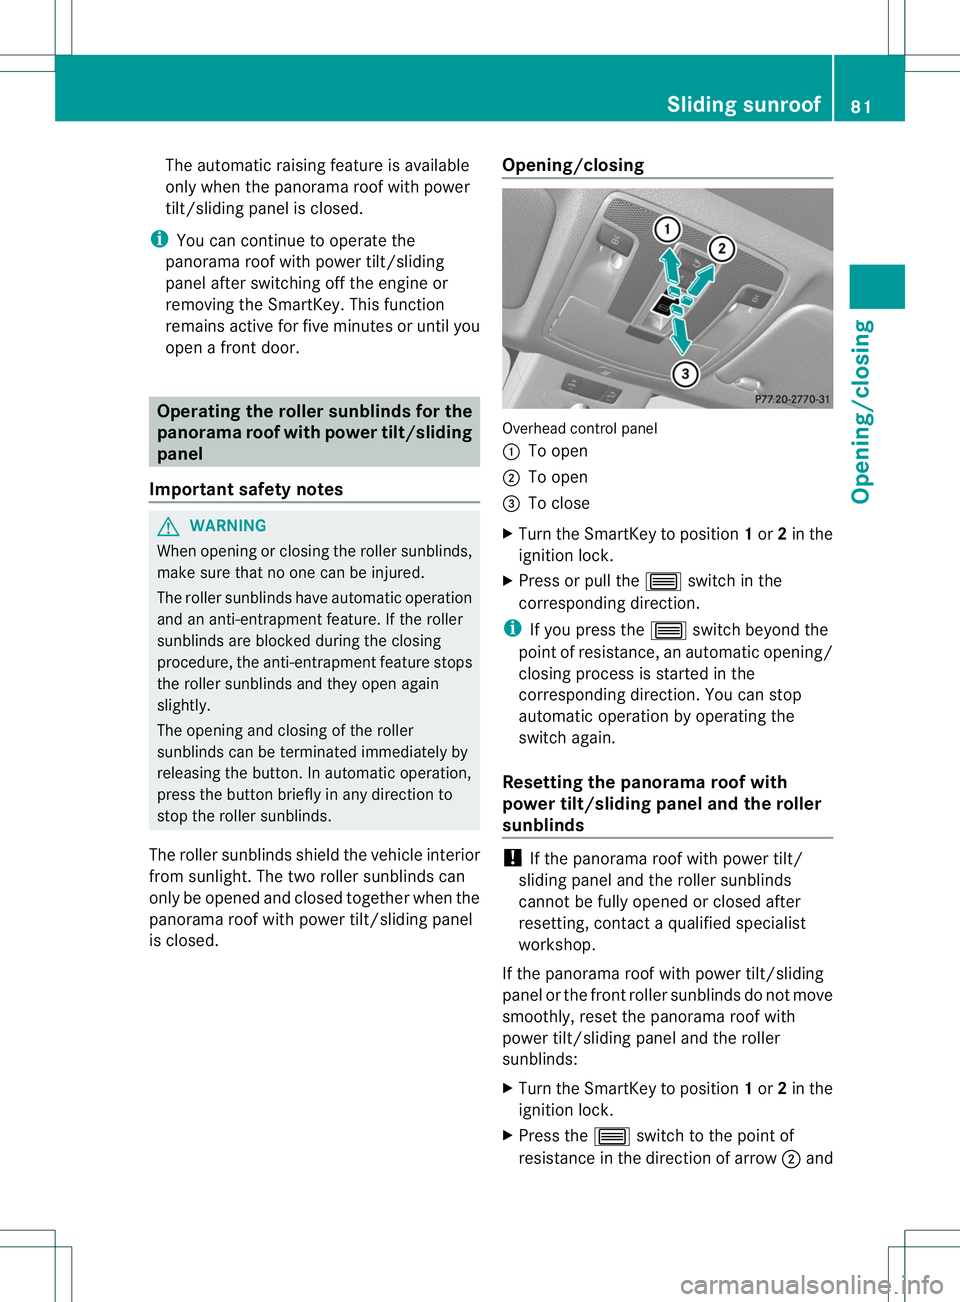
is closed. Opening/closing Overhead control panel
:
To open
; To open
= To close
X Turn the SmartKey to position 1or 2in the
ignition lock.
X Press or pull the 3switch in the
corresponding direction.
i If you press the 3switch beyond the
point of resistance, an automatic opening/
closing process is started in the
corresponding direction. You can stop
automatic operation by operating the
switch again.
Resetting the panorama roof with
power tilt/sliding panel and the roller
sunblinds !
If the panorama roof with power tilt/
sliding panel and the roller sunblinds
cannot be fully opened or closed after
resetting, contact a qualified specialist
workshop.
If the panorama roof with power tilt/sliding
panel or the front roller sunblinds do not move
smoothly, reset the panorama roof with
power tilt/sliding panel and the roller
sunblinds:
X Turn the SmartKey to position 1or 2in the
ignition lock.
X Press the 3switch to the point of
resistance in the direction of arrow ;and Sliding sunroof
81Opening/closing Z
Page 131 of 336
i
If the transmission oil temperature is
below Ò4‡( Ò20 †) , you can only shift from
position Pwhen the engine is running.
X Depress the brake pedal and keep it
depressed.
X Shif tthe transmission to position Dor R.
X Release the brake pedal.
X Carefully depress the accelerator pedal.
The electric parking brake (Y page 142) is
automatically released.
The red !indicator lamp in the
instrumentc luster goes out.
i The vehicle locks centrally once you have
pulled away. The locking knobs in the doors
drop down.
You can open the doors fro mthe inside at
any time.
You can also deactivate the automatic
locking feature (Y page 191).
i Upshifts take place at higher engine
speeds after a cold start. This helps the
catalytic converter to reach its operating
temperature more quickly.
Hill starta ssist G
WARNING
After a short time, hill start assist will no
longer brake your vehicle and it could roll
away. There is a risk of an accident and injury.
Therefore, quickly move your foot from the
brake pedal to the accelerator pedal. Never
leave the vehicle when it is held by hill start
assist.
Hill start assist helps you when pulling away
forwards or in reverse on an uphill gradient.
It holds the vehicle for a short time after you
have removed your foot from the brake pedal.
This gives you enough time to move your foot
from the brake pedal to the accelerator pedal
and to depress it before the vehicle begins to
roll. X
Take your foot off the brake pedal.
The vehicle is then held for about a second.
X Pull away.
Hill start assist will not function if:
R you are pulling away on a level road or on
a downhill gradient.
R the transmission is in position N.
R the electric parking brake is applied.
R ESP ®
is malfunctioning. ECO start/stop function
Important safety notes G
WARNING
If the engine is switched off automatically and
you exit the vehicle, the engine is restarted
automatically. The vehicle may begin moving.
There is a risk of accident and injury.
If you wish to exit the vehicle, always turn off
the ignition and secure the vehicle against
rolling away.
General notes If the
¤ symbol is shown in the
multifunction display, the ECO start/stop
function switches the engine off
automatically when the vehicle stops.
The engine starts automatically when the
driver wants to pull away again. The ECO
start/stop function thereby helps you to
reduce the fuel consumption and emissions
of your vehicle.
The stop/start function is automatically
activated each time you start the engine with
the SmartKey.
If the ECO start/stop function has been
manually deactivated (Y page 130) or a
malfunction has caused the system to be
deactivated, the ¤symbol is not
displayed. 128
DrivingDriving and parking