2013 MERCEDES-BENZ B-CLASS SPORTS hood release
[x] Cancel search: hood releasePage 109 of 336
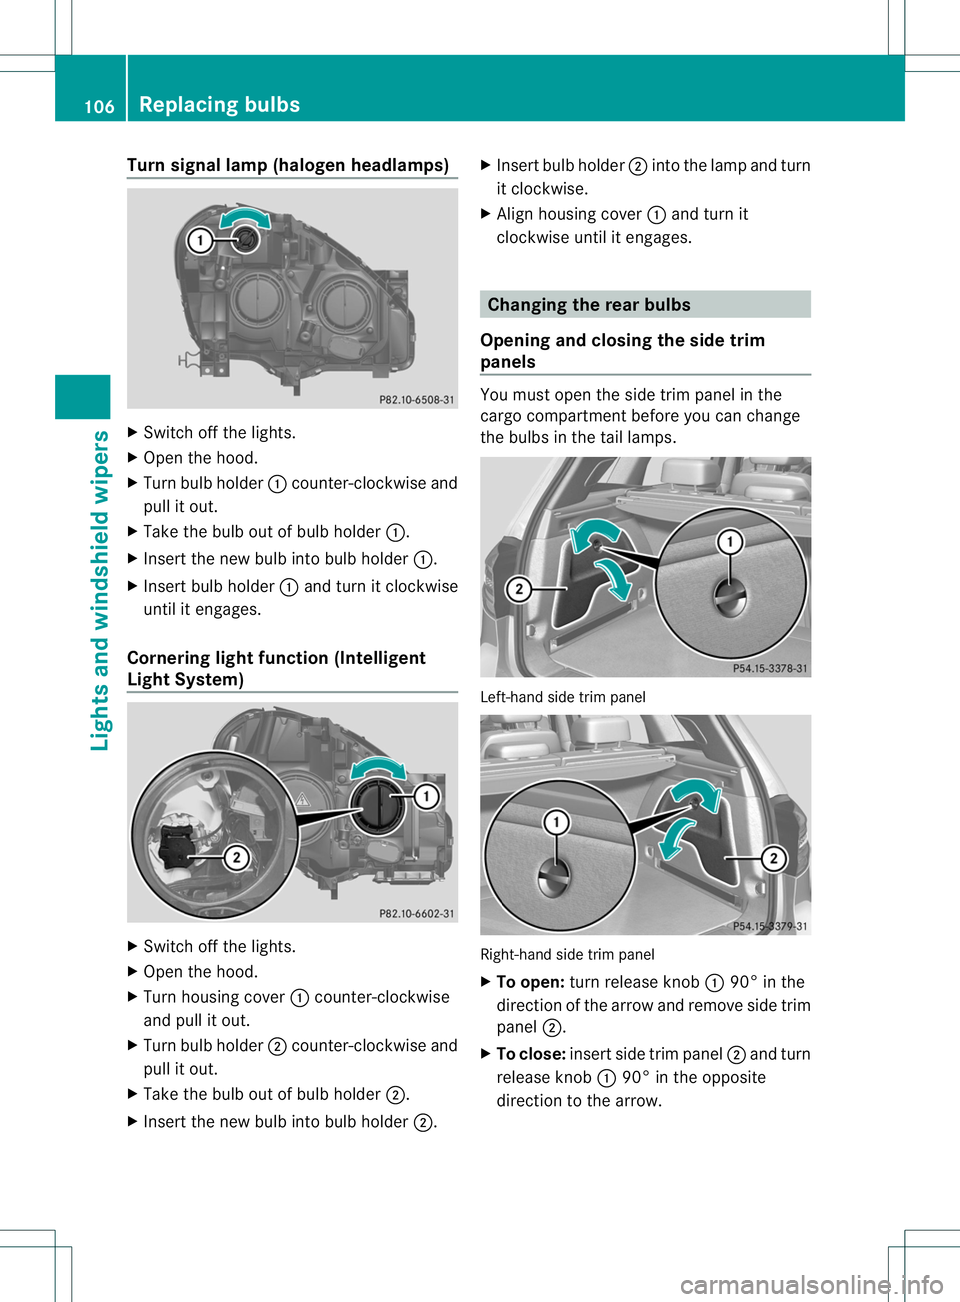
Turn signal lamp (halogen headlamps)
X
Switch off the lights.
X Open the hood.
X Turn bulb holder :counter-clockwise and
pull it out.
X Take the bulb ou tofbulb holder :.
X Inser tthe new bulb into bulb holder :.
X Insert bulb holder :and turn it clockwise
until it engages.
Cornering light function (Intelligent
Light System) X
Switch off the lights.
X Open the hood.
X Turn housing cover :counter-clockwise
and pull it out.
X Turn bulb holder ;counter-clockwise and
pull it out.
X Take the bulb out of bulb holder ;.
X Insert the new bulb into bulb holder ;.X
Insert bulb holder ;into the lamp and turn
it clockwise.
X Align housing cover :and turn it
clockwise until it engages. Changing the rear bulbs
Opening and closing the side trim
panels You must open the side trim panel in the
cargo compartment before you can change
the bulbs in the tail lamps.
Left-hand side trim panel
Right-hand side trim panel
X
To open: turn release knob :90° in the
direction of the arrow and remove side trim
panel ;.
X To close: insert side trim panel ;and turn
release knob :90° in the opposite
direction to the arrow. 106
Replacing bulbsLights and windshield wipers
Page 113 of 336
For this reason, you shoul
dalways switch
off the windshield wipers in dry weather.
Vehicles with arain sensor: in theÄor
Å position, the appropriate wiping
frequency is automatically set according to
the intensity of the rain. In the Åposition,
the rains ensor is more sensitive than in
the Ä position, causing the windshield
wipers to wipe more frequently. Switching the rear window wiper on/
off
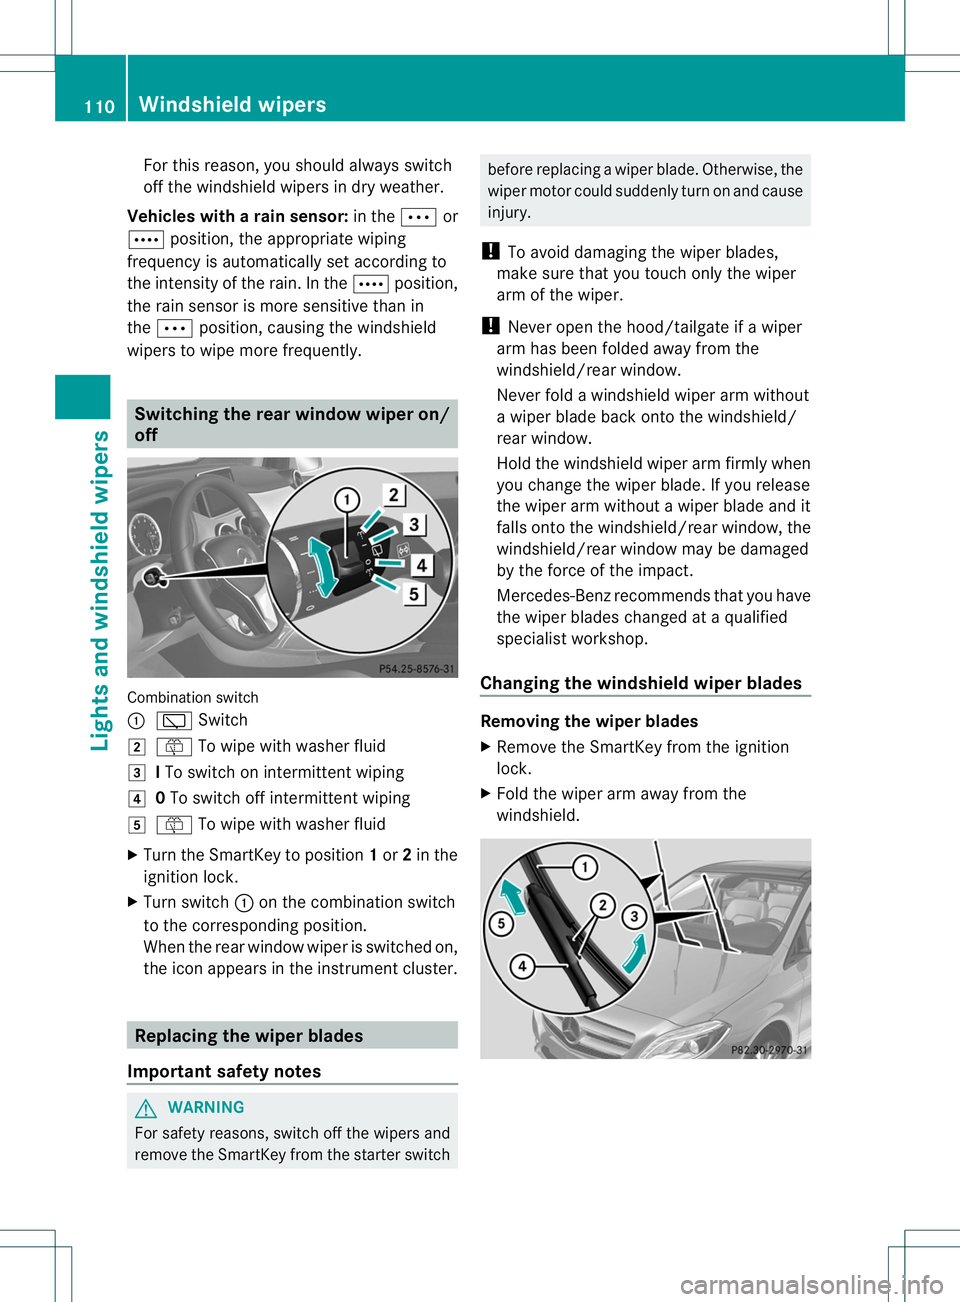
Combination switch
:
è Switch
2 ô To wipe with washer fluid
3 ITo switch on intermittent wiping
4 0To switch off intermittent wiping
5 ô To wipe with washer fluid
X Turn the SmartKey to position 1or 2in the
ignition lock.
X Turn switch :on the combination switch
to the corresponding position.
When the rear window wiper is switched on,
the icon appears in the instrument cluster. Replacing the wiper blades
Important safety notes G
WARNING
For safety reasons, switch off the wipers and
remove the SmartKey from the starter switch before replacing a wiper blade. Otherwise, the
wiper motor could suddenly turn on and cause
injury.
! To avoid damaging the wiper blades,
make sure that you touch only the wiper
arm of the wiper.
! Never open the hood/tailgate if a wiper
arm has been folded away from the
windshield/rear window.
Never fold a windshield wiper arm without
a wiper blade back onto the windshield/
rear window.
Hold the windshield wiper arm firmly when
you change the wiper blade. If you release
the wiper arm without a wiper blade and it
falls onto the windshield/rear window, the
windshield/rear window may be damaged
by the force of the impact.
Mercedes-Benzr ecommends that you have
the wiper blades changed at aqualified
specialist workshop.
Changing the windshield wiper blades Removing the wiper blades
X
Remove the SmartKey from the ignition
lock.
X Fold the wiper arm away from the
windshield. 110
Windshiel
dwipersLights and windshield wipers
Page 132 of 336
Automatic engine switch-off
General notes
The ECO start/stop function is operational
and the
¤symbol is displayed in the
multifunction display, if:
R the indicator lamp in th eECO butto nis lit
green.
R the outside temperature is within the
comfort range.
R the engine is at normal operating
temperature.
R the set temperature for the vehicle interior
has been reached.
R the battery is sufficiently charged.
R the system detects that the windshield is
not fogged up when the air-conditioning
system is switched on.
R the hood is closed.
R the driver's door is closed and the driver's
seat belt is fastened.
If conditions for automatic engine switch-off
have not been fulfilled, the ¤symbol will
not be shown.
i All of the vehicle's systems remain active
when the engine has been stopped
automatically.
i The engine can be switched off
automatically a maximum of four times
(first stop and three subsequent stops) in
succession. Automatic engine switch-off is
possible againo nce the ECO symbol
appears in the multifunctio ndisplay.
i During automatic engine switch-off, the
climate control system only operates at a
reduced capacity. If you require full climate
control capacity, the ECO start/stop
function can be deactivated by pressing the
ECO button (Y page 130).
Vehicles with automatic transmission
If the vehicle is braked to a standstill in Dor
N, the ECO start/stop function switches off
the engine automatically. i
You can still activate the HOLD function
when the vehicle is stationary, even if the
engine has been switched off
automatically. It is then not necessary to
continue applying the brakes during the
automatic stop phase. When you depress
the accelerator pedal, the engine starts
automatically and the braking effect of the
HOL Dfunction is deactivated. Depress the
accelerato rpedal carefully, as the engine
must be started first.
Automatic engine start General notes
The engine starts automatically if:
R
you switch off the ECO start/stop function
by pressing the ECO button.
R you engage reverse gear R.
R the vehicle starts to roll.
R the brake system requires this.
R the temperature in the vehicle interior
deviates from the set range.
R the system detects moisture on the
windshield when the air-conditioning
system is switched on.
R the charge level of the battery is too low.
R the driver's seat belt is removed or the
driver's door is opened.
Vehicles with automatic transmission
The engine is started automatically if you:
R release the brake pedal when HOLD is not
activated and the transmission is in
position Dor N
R depress the accelerator pedal
R move the transmission out of position P.
i Shifting the transmission to position P
does not start the engine.
i If you shift the transmission from Rto D,
the ECO start/stop function is available
again as soon as the ¤symbol
reappears in the multifunction display. Driving
129Driving and parking Z
Page 259 of 336
X
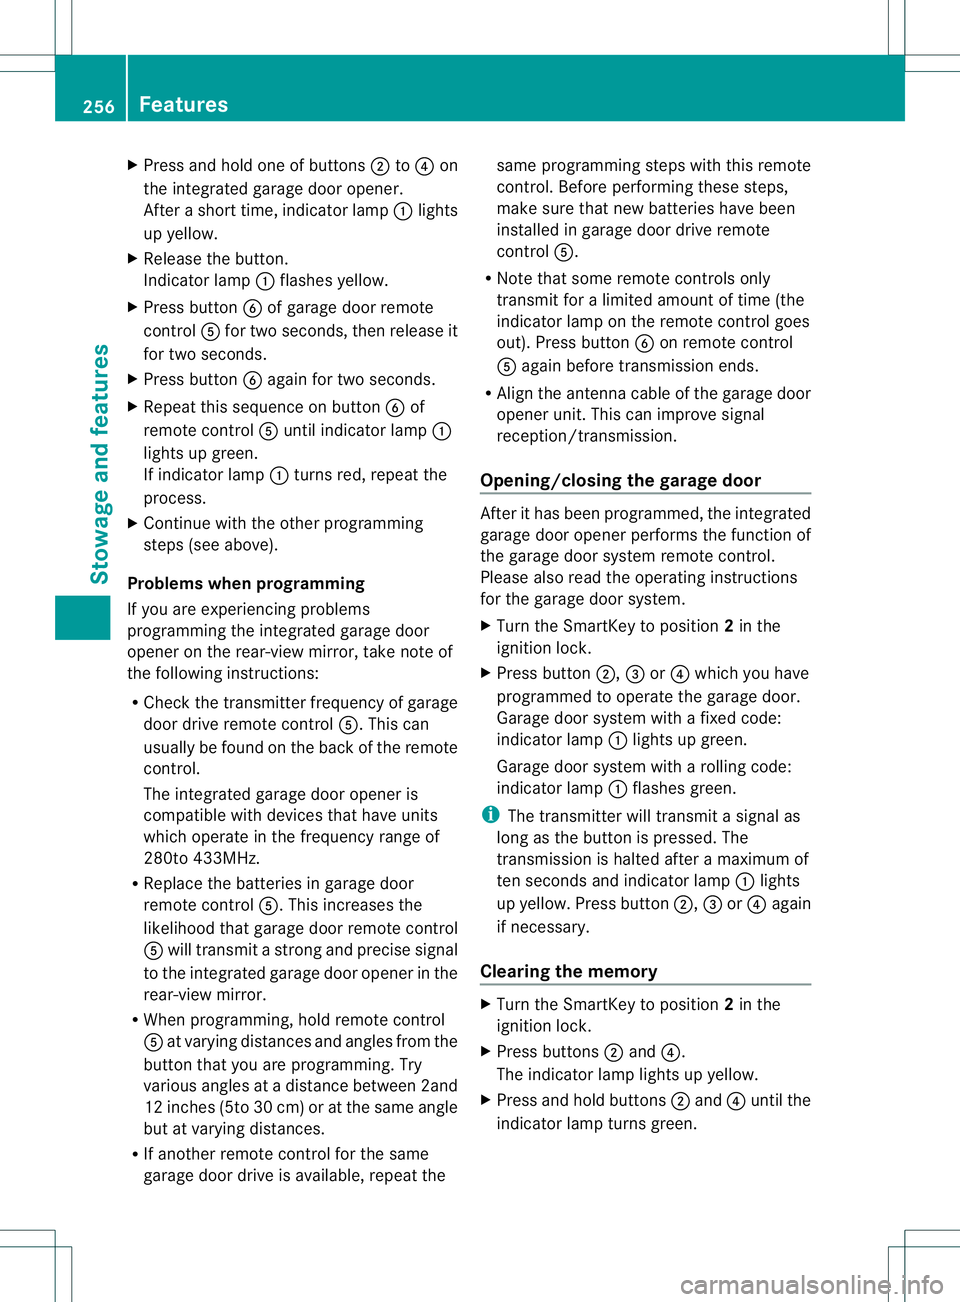
Press and hold one of buttons ;to? on
the integrated garage door opener.
After a short time, indicator lamp :lights
up yellow.
X Release the button.
Indicator lamp :flashes yellow.
X Press button Bof garage door remote
control Afor two seconds, then release it
for two seconds.
X Press button Bagain for two seconds.
X Repeat this sequence on button Bof
remote control Auntil indicator lamp :
lights up green.
If indicator lamp :turns red, repeat the
process.
X Continue with the other programming
steps (see above).
Problems when programming
If you are experiencing problems
programming the integrated garage door
opener on the rear-view mirror, take note of
the following instructions:
R Check the transmitter frequency of garage
door drive remote control A.This can
usually be found on the back of the remote
control.
The integrated garage door opener is
compatible with devices that have units
which operate in the frequency range of
280to 433MHz.
R Replace the batteries in garage door
remote control A.This increases the
likelihood that garage door remote control
A will transmit a stronga nd precise signal
to the integrated garage door opene rinthe
rear-view mirror.
R When programming, hold remote control
A at varying distances and angles from the
button that you are programming. Try
various angles at a distance between 2and
12 inches (5to 30 cm) or at the same angle
but at varying distances.
R If another remote control for the same
garage door drive is available, repeat the same programming steps with this remote
control. Before performing these steps,
make sure that new batteries have been
installed in garage door drive remote
control
A.
R Note that some remote controls only
transmit for a limited amount of time (the
indicator lamp on the remote control goes
out). Press button Bon remote control
A again before transmission ends.
R Align the antenna cable of the garage door
opener unit. This can improve signal
reception/transmission.
Opening/closing the garage door After it has been programmed, the integrated
garage door opener performs the function of
the garage door system remote control.
Please also read the operating instructions
for the garage door system.
X
Turn the SmartKey to position 2in the
ignition lock.
X Press button ;,=or? which you have
programmed to operate the garage door.
Garage door system with a fixed code:
indicator lamp :lights up green.
Garage door system with a rolling code:
indicator lamp :flashes green.
i The transmitter will transmit a signal as
long as the button is pressed. The
transmission is halted after a maximum of
ten seconds and indicator lamp :lights
up yellow. Press button ;,=or? again
if necessary.
Clearing the memory X
Turn the SmartKey to position 2in the
ignition lock.
X Press buttons ;and ?.
The indicator lamp lights up yellow.
X Press and hold buttons ;and ?until the
indicator lamp turns green. 256
FeaturesStowage and features
Page 263 of 336
Useful information
i This Operator's Manual describes all
models and all standard and optional
equipment of your vehicle available at the
time of publication of the Operator's
Manual. Country-specific differences are
possible. Please note that your vehicle may
not be equipped with all features
described. This also applies to safety-
related systems and functions.
i Please read the information on qualified
specialist workshops (Y page 23).Engine compartment
Hood
Opening the hood G
WARNING
Do not pull the release lever while the vehicle
is in motion. Otherwise, the hood could be
forced open by passing air flow.
This could cause the hood to come loose and
injure you and/oro thers.G
WARNING
Do not open the hood when the engine is
overheated. You could be seriously injured.
Observe the coolant temperature gauge to
determine whether the engine may be
overheated. If you see flames or smoke
coming from the engine compartment, move
away fro mthe vehicle. Wait until the engine
has cooled. If necessary, call the fire
department. G
WARNING
There is a risk of injury if the hood is open,
even if the engine is not running.
Some engine components can become very
hot.
To avoid the risk of burns, only touch those
components described in the Operator's
Manual and observe the relevant safety notes. G
WARNING
To avoid injury, stay clear of moving parts
when the hood is open and the engine is
running.
The radiator fan may continue to run for
approximately 30seconds or may even restart
after the engine has been switched off. For
this reason, you must not reach into the fan
rotation area. G
WARNING
The engine is equipped with a transistorized
ignition system. Because of the high voltage,
it is dangerous to touch any components
(ignition coils, spark plug sockets, diagnostic
socket) of the ignition system:
R with the engine running
R while starting the engine
R when the ignition is switched on and the
engine is turned manually G
WARNING
The windshield wipers and wiper linkage
could be set in motion.
When the hood is open, you or others could
be injured by the wiper linkage.
Make sure that the windshield wipers are
switched off and that the key has been pulled
out of the ignition lock before opening the
hood.
! Make sure that the windshield wipers are
not folded away from the windshield. You
could otherwise damage the windshield
wipers or the hood. 260
Engine compartmentMaintenance and care
Page 264 of 336
X
Make sure that the windshield wipers are
switched off.
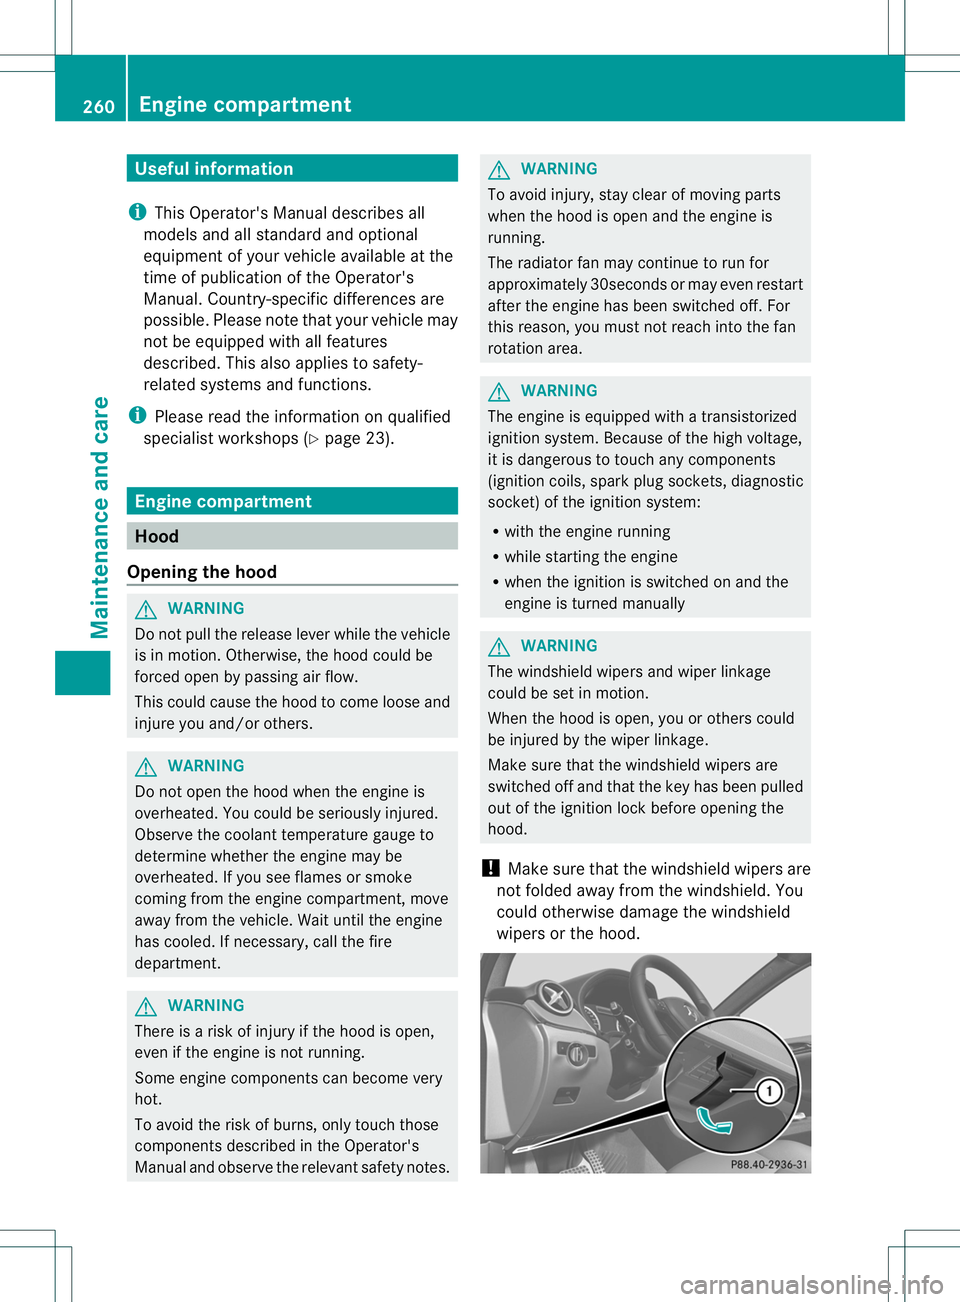
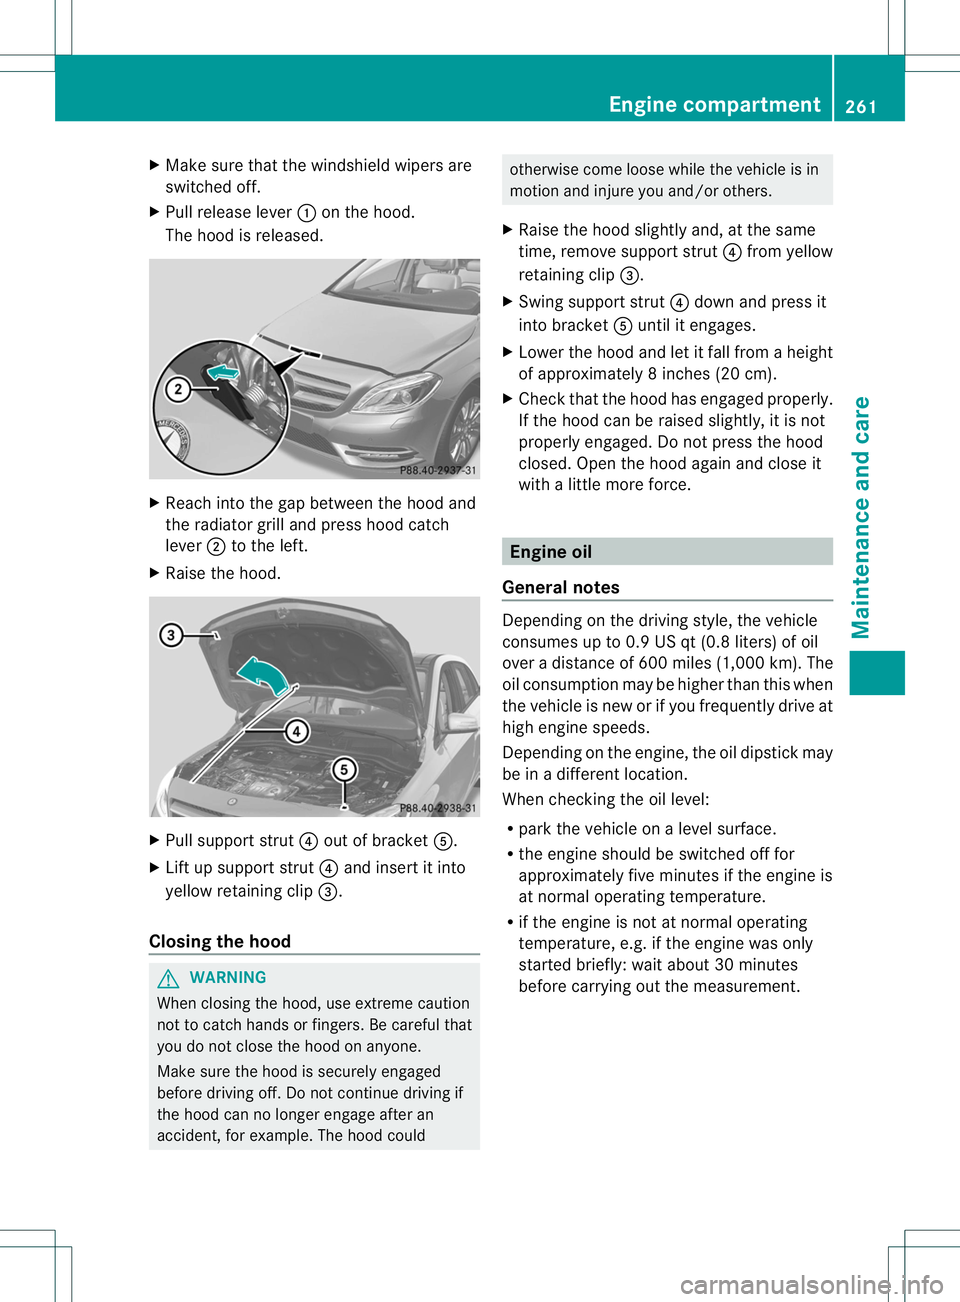
X Pull release lever :on the hood.
The hood is released. X
Reach into the gap between the hood and
the radiator grill and press hood catch
lever ;to the left.
X Raise the hood. X
Pull support strut ?out of bracket A.
X Lift up support strut ?and insert it into
yellow retaining clip =.
Closing the hood G
WARNING
When closing the hood, use extreme caution
not to catch hands or fingers. Be careful that
you do not close the hood on anyone.
Make sure the hood is securely engaged
before driving off. Do not continue driving if
the hood can no longer engage after an
accident, for example. The hood could otherwise come loose while the vehicle is in
motion and injure you and/or others.
X Raise the hood slightly and, at the same
time, remove support strut ?from yellow
retaining clip =.
X Swing support strut ?down and press it
into bracket Auntil it engages.
X Lower the hood and let it fall from a height
of approximately 8inche s(20 cm).
X Check that the hood has engaged properly.
If the hood can be raised slightly, it is not
properly engaged. Do not press the hood
closed. Open the hood again and close it
with a little more force. Engine oil
General notes Depending on the driving style, the vehicle
consumes up to 0.9 US qt (0.8 liters) of oil
over
adistanc eof600 miles (1,000 km). The
oil consumption may be higher than this when
the vehicle is new or if you frequently drive at
high engine speeds.
Depending on the engine, the oil dipstic kmay
be in a different location.
When checking the oil level:
R park the vehicle on a level surface.
R the engine should be switched off for
approximately five minutes if the engine is
at normal operating temperature.
R if the engine is not at normal operating
temperature, e.g.ift he engine was only
started briefly: wait about 30 minutes
before carrying out the measurement. Engine compartment
261Maintenance and care Z