2013 MERCEDES-BENZ B-CLASS SPORTS fold seats
[x] Cancel search: fold seatsPage 17 of 336
Reading lamp
..................................... 101
Rear compartment Setting the airv ents...................... 124
Rear fog lamp
Changing bulbs .............................. 107
Display message ............................ 204
Switching on/off .............................. 98
Rear lamps
Changing bulbs .............................. 107
Rear seat
Adjusting the angle of the
backrests ....................................... 236
Folding the backrestf orwards/
back (vehicles without the EASY-
VARIO-PLUS system) .....................234
Folding the backrest forwards/
back (vehicles with the EASY-
VARIO-PLUS system) .....................235
Fore-and-aft adjustment ................237
Rear view camera
Cleaning instructions .....................269
Function/notes ............................. 168
Switching on/off ........................... 169
Rear-view mirror
Anti-glare (manual). .........................90
Dipping (automatic) .........................91
Rear window defroster
Problem (malfunction) ...................122
Switching on/off ........................... 122
Rear window wiper
Replacing the wiper blade .............. 111
Switching on/off ........................... 110
Refueling
Fuel gauge ....................................... 27
Important safety notes ..................139
Refueling process. .........................140
see Fuel
Remote control
Garage door opene r....................... 253
Programming (garage door
opener) .......................................... 254
Reserve (fuel tank)
see Fuel
Reserve fuel
Display message ............................ 208
Warning lamp ................................. 226
see Fuel
Residual heat (climate control) ........122 Restraint system
see SRS (Supplemental Restraint
System)
Roadside Assistance (breakdown) ....21
Roller sunblind Opening/closing .............................. 81
Panorama roof with power tilt/
sliding panel ..................................... 81
Roof carrier ........................................ 240
Roof lining and carpets (cleaning
guidelines) ......................................... 271
Roof load (maximum) ........................329
Route (navigation) see Route guidance (navigation)
Route guidance (navigation) ............184 S
Safety Childrenint he vehicle..................... 47
Child restraint systems ....................47
Safety systems
see Driving safety systems
Seat
Folding the backrest (rear
compartment) forwards/back
(vehicles without the EASY-
VARIO-PLUS system) .....................234
Folding the backrest (rear
compartment) forwards/back
(vehicles with the EASY-VARIO-
PLUS system) ................................ 235
Seat belts
Adjusting the height ......................... 45
Belt force limiters ............................ 47
Cleaning ......................................... 271
Correct usage .................................. 44
Emergency Tensioning Devices ....... .47
Fastening ......................................... 45
Important safety guidelines .............43
Releasing ......................................... 46
Safety guidelines ............................. 38
Warning lamp ................................. 218
Warning lamp (function) ................... 46
Seats
Adjusting (electrically). ....................87
Adjusting (manually). .......................8614
Index
Page 36 of 336
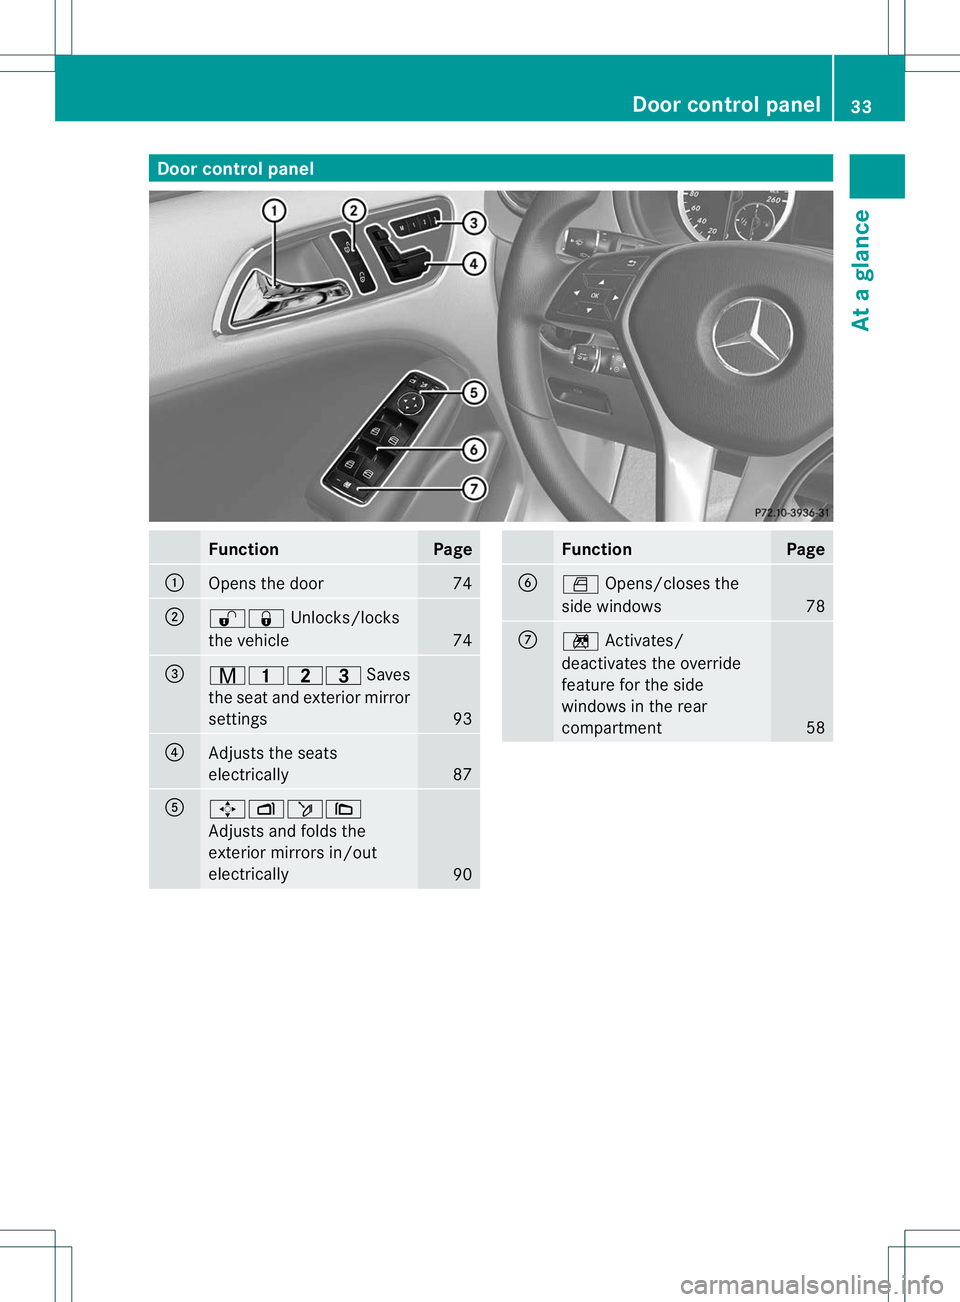
Door control panel
Function Page
:
Opens the door 74
;
%&
Unlocks/locks
the vehicle 74
=
r45=
Saves
the seat and exterio rmirror
settings 93
?
Adjusts the seats
electrically
87
A
7Zö\
Adjusts and folds the
exterior mirrors in/out
electrically
90 Function Page
B
W
Opens/closes the
side windows 78
C
n
Activates/
deactivates the override
feature for the side
windows in the rear
compartment 58Door control panel
33At a glance
Page 55 of 336
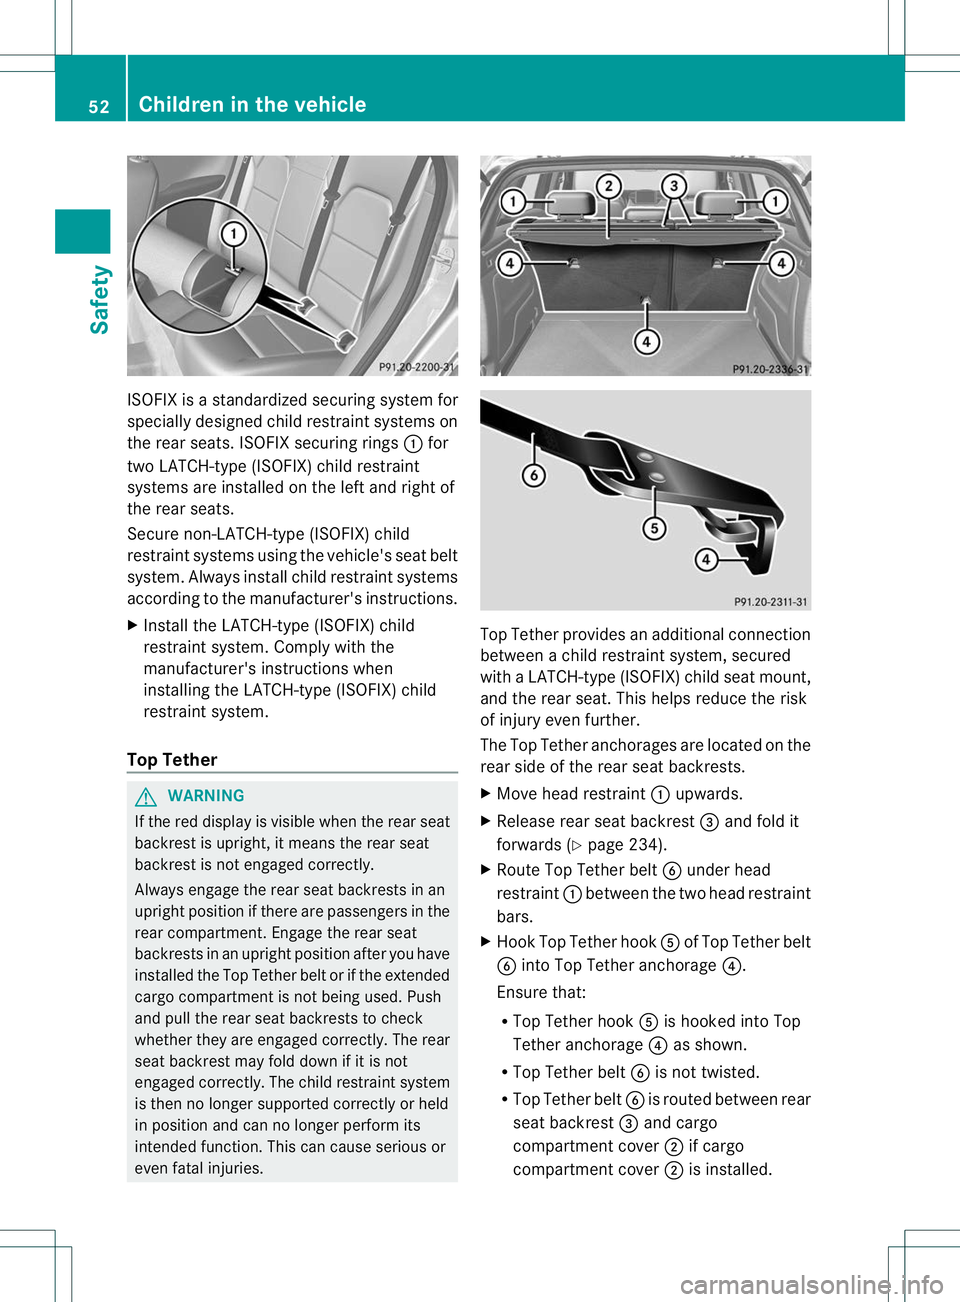
ISOFIX is a standardized securing system for
specially designed child restraint systems on
the rear seats. ISOFIX securing rings
:for
two LATCH-type (ISOFIX) child restraint
systems are installed on the left and right of
the rear seats.
Secure non-LATCH-type (ISOFIX) child
restraint systems using the vehicle's seat belt
system. Always install child restraint systems
according to the manufacturer's instructions.
X Install the LATCH-type (ISOFIX) child
restraint system. Complyw ith the
manufacturer's instructions when
installing the LATCH-type (ISOFIX) child
restraint system.
Top Tether G
WARNING
If the red display is visible when the rear seat
backrest is upright, it means the rear seat
backrest is not engaged correctly.
Always engage the rear seat backrests in an
upright position if there are passengers in the
rear compartment. Engage the rear seat
backrests in an upright position after you have
installed the Top Tether belt or if the extended
cargo compartmen tis not being used. Push
and pull the rear seat backrests to check
whether they are engaged correctly. The rear
seat backrest may fold down if it is not
engaged correctly. The child restraint system
is then no longer supported correctly or held
in position and can no longer perform its
intended function. This can cause serious or
even fatal injuries. Top Tether provides an additional connection
between a child restraint system, secured
with a LATCH-type (ISOFIX) child seat mount,
and the rear seat. This helps reduce the risk
of injury even further.
The Top Tether anchorages are located on the
rear side of the rear seat backrests.
X
Move head restraint :upwards.
X Release rear seat backrest =and fold it
forwards (Y page 234).
X Route Top Tether belt Bunder head
restraint :between the two head restraint
bars.
X Hook Top Tether hook Aof Top Tether belt
B into Top Tether anchorage ?.
Ensure that:
R Top Tether hook Ais hooked into Top
Tether anchorage ?as shown.
R Top Tether belt Bis not twisted.
R Top Tether belt Bis routed between rear
seat backrest =and cargo
compartment cover ;if cargo
compartment cover ;is installed. 52
Children in the vehicleSafety
Page 89 of 336
!
To avoid damage to the seats and the seat
heating, observe the following information:
R keep liquids from spilling on the seats. If
liquid is spilled on the seats, dry them as
soon as possible.
R if the seat covers are damp or wet, do not
switch on the seat heating. The seat
heating should also not be used to dry
the seats.
R clean the seat covers as recommended;
see the "Interior care" section.
R do not transport heavy loads on the
seats. Do not place sharp objects on the
seat cushions, e.g. knives, nails or tools.
The seats should only be occupied by
passengers, if possible.
R when the seat heating is in operation, do
not cover the seats with insulating
materials, e.g. blankets, coats, bags,
seat covers, child seats or booster seats.
! Make sure that there are no objects in the
footwell or behind the seats when resetting
the seats. There is a risk that the seats
and/or the objects could be damaged.
i The head restraints in the front and rear
seats can be removed.
For more information, contact a qualified
specialist workshop.
i Further related subjects:
R cargo compartment enlargement
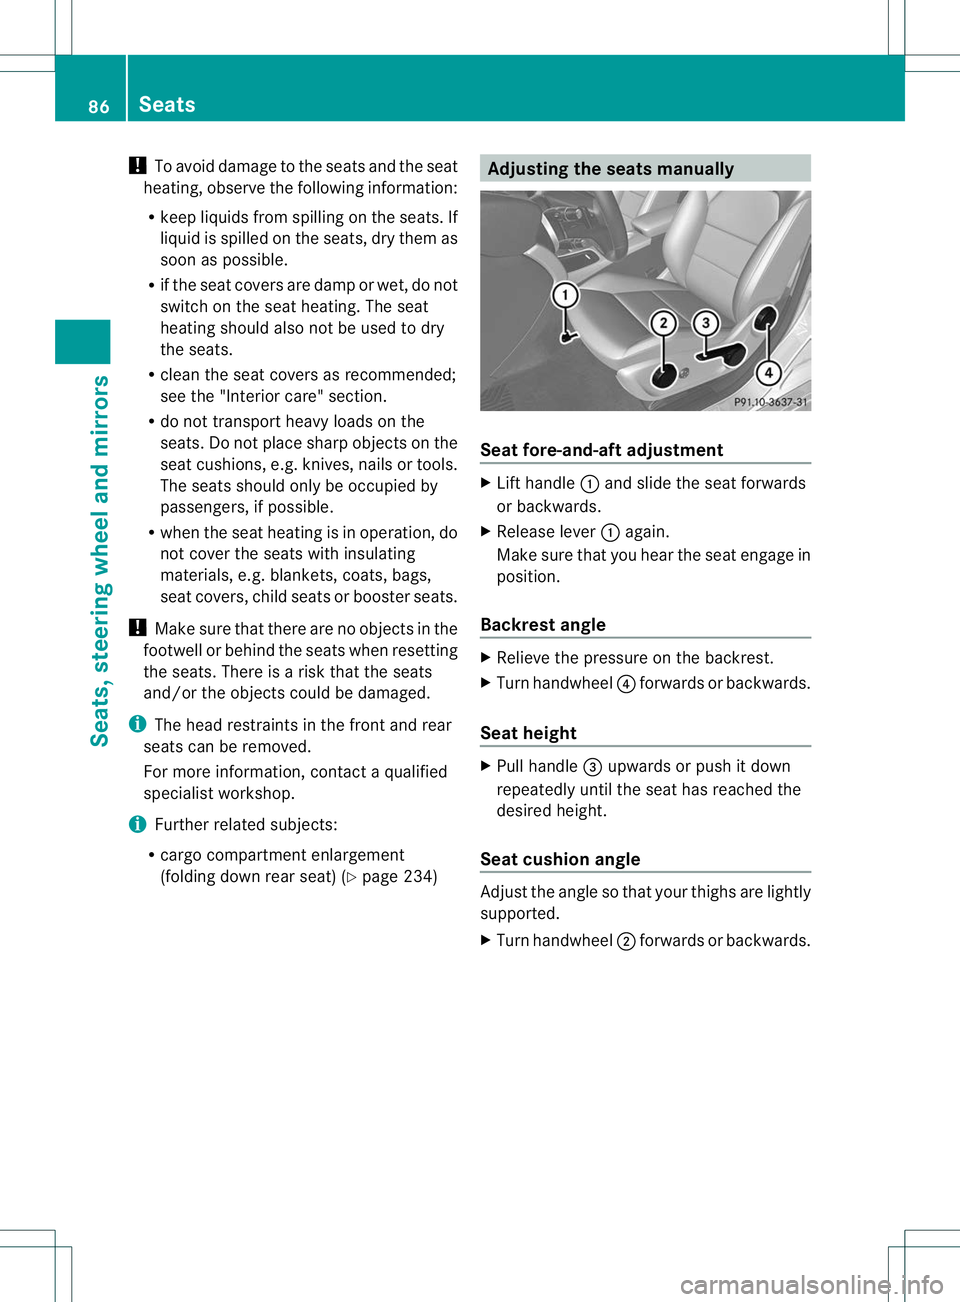
(folding down rear seat) (Y page 234) Adjusting the seats manually
Seat fore-and-aft adjustment
X
Lift handle :and slide the seat forwards
or backwards.
X Release lever :again.
Make sure that you hear the seat engage in
position.
Backrest angle X
Relieve the pressure on the backrest.
X Turn handwheel ?forwards or backwards.
Seat height X
Pull handle =upwards or push it down
repeatedly until the seat has reached the
desired height.
Seat cushion angle Adjust the angle so that your thighs are lightly
supported.
X
Turn handwheel ;forwards or backwards. 86
SeatsSeats, steering wheel and mirrors
Page 91 of 336
Keep the area around head restraints clear of
articles (e.g. clothing) to not obstruct the
folding operation of the head restraints.
G
WARNING
For yourp rotection, drive only with properly
positioned head restraints.
Adjust the head restraint in such a way that it
is as close to the head as possible and the
center of the head restraint supports the back
of the head at eye level .This will reduce the
potential for injury to the head and neck in the
event of an accident or similar situation.
With a rear seat occupied, make sure to move
the respective head restraint up from the
lowest non-use position and have the
occupant adjust the head restraint properly.
Do not drive the vehicle without the seat head
restraints installed when the rear seats are
occupied. Head restraints are intended to
help reduce injuries during an accident.
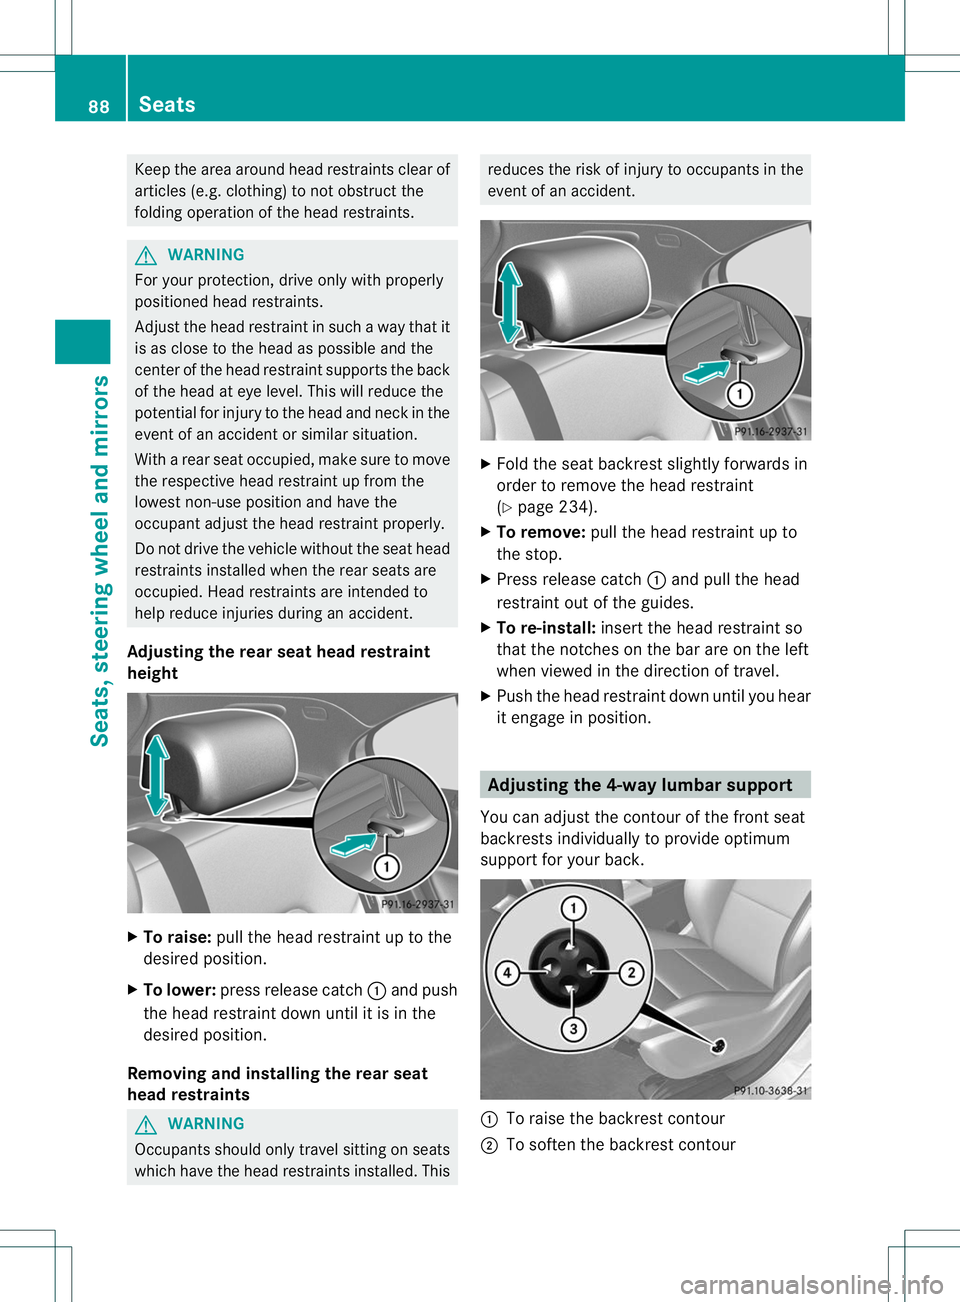
Adjusting the rear seat head restraint
height X
To raise: pull the head restraint up to the
desired position.
X To lower: press release catch :and push
the head restraint down until it is in the
desired position.
Removing and installing the rear seat
head restraints G
WARNING
Occupants should only travel sitting on seats
which have the head restraints installed. This reduces the risk of injury to occupants in the
event of an accident.
X
Fold the seat backrest slightly forwards in
order to remove the head restraint
(Y page 234).
X To remove: pull the head restraint up to
the stop.
X Press release catch :and pull the head
restraint out of the guides.
X To re-install: insert the head restraint so
that the notches on the bar are on the left
when viewed in the direction of travel.
X Push the head restraint down until you hear
it engage in position. Adjusting the 4-way lumbar support
You can adjust the contour of the front seat
backrests individually to provide optimum
support for your back. :
To raise the backrest contour
; To soften the backrest contour 88
SeatsSeats, steering wheel and mirrors
Page 94 of 336
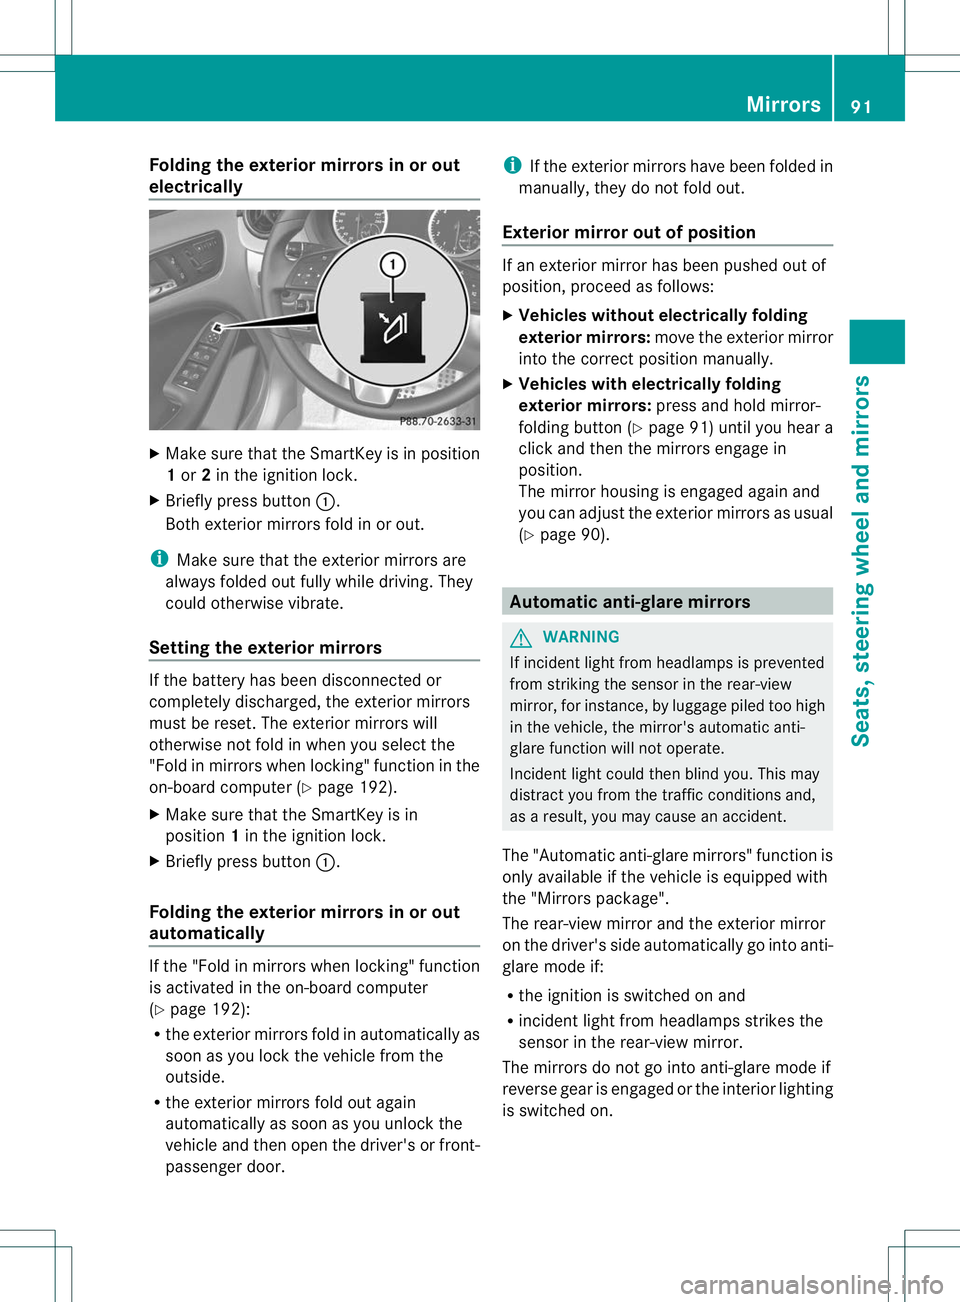
Folding the exterior mirrors in or out
electrically
X
Make sure that the SmartKey is in position
1or 2in the ignition lock.
X Briefly press button :.
Both exterior mirrors fold in or out.
i Make sure that the exterior mirrors are
always folded out fully while driving .They
could otherwise vibrate.
Setting the exterior mirrors If the battery has been disconnected or
completely discharged, the exterior mirrors
must be reset. The exterior mirrors will
otherwise not fold in when you select the
"Fold in mirrors when locking" function in the
on-board computer (Y
page 192).
X Make sure that the SmartKey is in
position 1in the ignition lock.
X Briefly press button :.
Folding the exterior mirrors in or out
automatically If the "Fold in mirrors when locking" function
is activated in the on-board computer
(Y
page 192):
R the exterior mirrors fold in automatically as
soon as you lock the vehicle from the
outside.
R the exterior mirrors fold out again
automatically as soon as you unlock the
vehicle and then open the driver's or front-
passenger door. i
If the exterior mirrors have been folded in
manually, they do not fold out.
Exterior mirror out of position If an exterior mirror has been pushed out of
position, proceed as follows:
X
Vehicles without electrically folding
exterior mirrors: move the exterior mirror
into the correct position manually.
X Vehicles with electrically folding
exterior mirrors: press and hold mirror-
folding button (Y page 91) until you hear a
click and then the mirrors engage in
position.
The mirror housing is engaged again and
you can adjust the exterior mirrors as usual
(Y page 90). Automatic anti-glare mirrors
G
WARNING
If incident light from headlamps is prevented
from striking the sensor in the rear-view
mirror, for instance, by luggage piled too high
in the vehicle, the mirror's automatic anti-
glare function will not operate.
Incident light could then blind you. This may
distract you from the traffic conditions and,
as a result, you may cause an accident.
The "Automatic anti-glare mirrors" function is
only available if the vehicle is equipped with
the "Mirrors package".
The rear-view mirror and the exterior mirror
on the driver's side automatically go into anti-
glare mode if:
R the ignition is switched on and
R incident light from headlamps strikes the
sensor in the rear-view mirror.
The mirrors do not go into anti-glare mode if
reverse gear is engaged or the interior lighting
is switched on. Mirrors
91Seats, steering wheel and mirrors Z
Page 233 of 336
Useful information
i This Operator's Manual describes all
models and all standard and optional
equipment of your vehicle available at the
time of publication of the Operator's
Manual. Country-specific differences are
possible. Please note that your vehicle may
not be equipped with all features
described. This also applies to safety-
related systems and functions.
i Please read the information on qualified
specialist workshops (Y page 23).Loading guidelines
G
WARNING
Always faste nitems being carried as securely
as possible using cargo tie-down rings and
fastening materials appropriate for the weight
and size of the load.
In an accident, durin ghard braking or sudden
maneuvers, loose items will be thrown around
inside the vehicle .This can cause injury to
vehicle occupants unless the items are
securely fastened in the vehicle.
To help avoid personal injury during a collision
or sudden maneuver, exercise care when
transporting cargo. Do not pile luggage or
cargo higher than the seat backrests.
Never drive a vehicle with the tailgate open.
Deadly carbon monoxide (CO) gases may
enter vehicle interior resulting in
unconsciousness and death.
The handling characteristics of a laden
vehicle are dependent on the distribution of
the load within the vehicle. For this reason,
you should observe the following notes when
transporting a load:
R when transporting a load, never exceed the
maximum permissible gross vehicle weight
or the gross axle weight rating of the
vehicle (including occupants). The values are specified on the vehicle identification
plate on the B-pillar of the driver's door.
R position heavy loads as far forwards as
possible and as low down in the cargo
compartmenta s possible.
R the load must not protrude above the upper
edge of the seat backrests.
R always place the load against the rear or
front seat backrests. Make sure that the
seat backrests are securely locked into
place.
R hook in the cargo net when loading.
R the maximum load capacity of the stowage
well under the cargo compartment floor is
55 lbs (25 kg).
R always place the load behind unoccupied
seats if possible.
R secure the load with sufficiently strong and
wear-resistant tie-downs. Pad sharp edges
for protection.
! Do not position the load on one part of the
folding cargo compartment floor only. The
maximum load capacity of the folding cargo
compartment floor is 220 lbs (100 kg).
Distribute the weight evenly to avoid
damaging the cargo compartment floor.
Place a solid board under the load if
necessary. Please note that the load on the
cargo compartment floor will be increased
when the load is lashed down. Stowage areas
Stowage space
Important safety notes G
WARNING
To help avoid personal injury during a collision
or sudden maneuver, exercise care when
storing objects in the vehicle. Put luggage or
cargo in the cargo compartment if possible.
Do not pile luggage or cargo higher than the
seat backrests. 230
Stowage areasStowage and features
Page 237 of 336
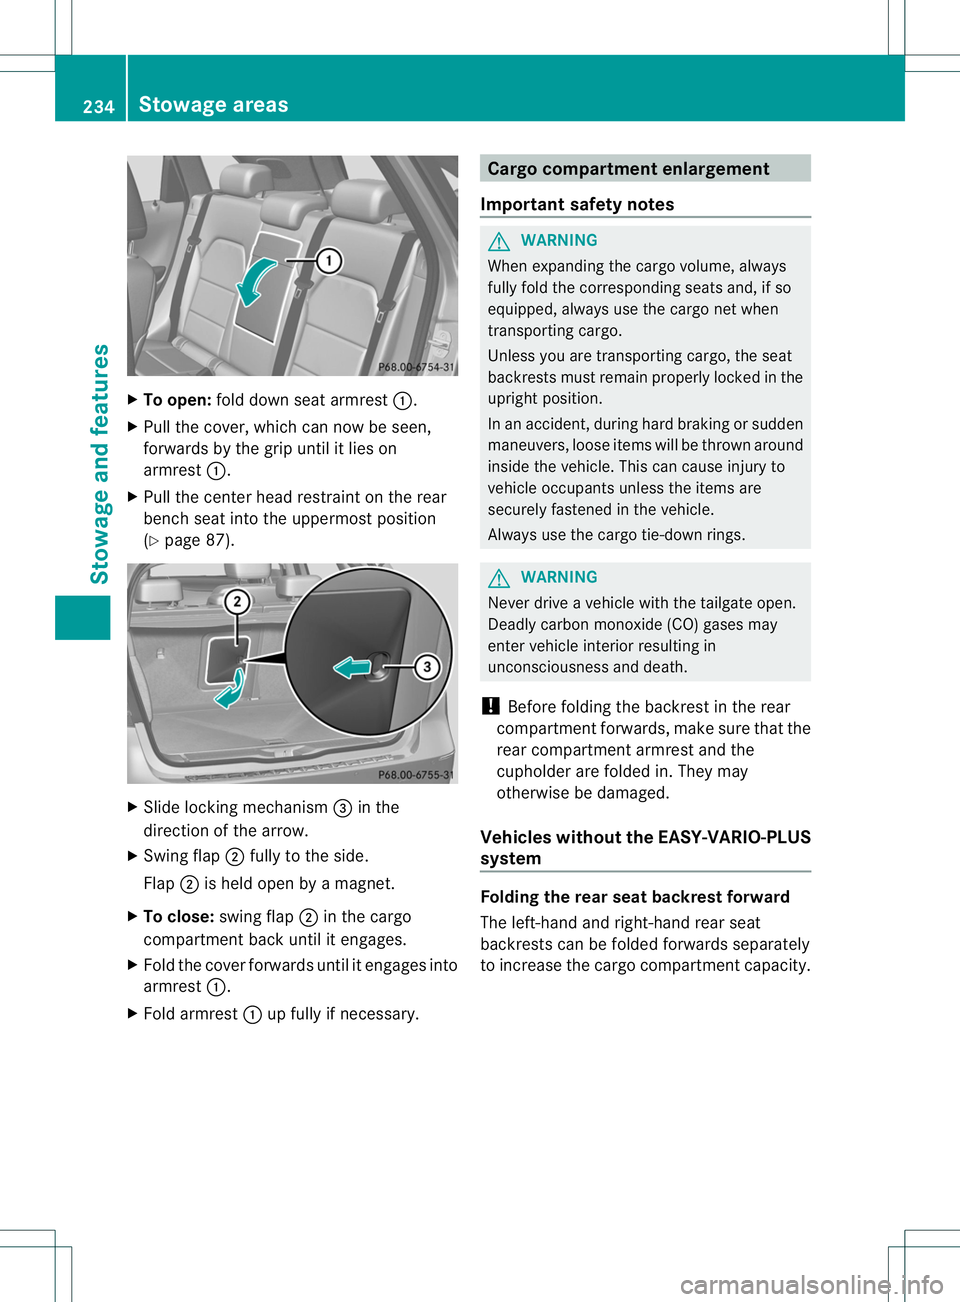
X
To open: fold down sea tarmrest :.
X Pull the cover, which can now be seen,
forwards by the grip until it lies on
armrest :.
X Pull the center head restraint on the rear
bench seat into the uppermost position
(Y page 87). X
Slide locking mechanism =in the
direction of the arrow.
X Swing flap ;fully to the side.
Flap ;is held open by a magnet.
X To close: swing flap ;in the cargo
compartment back until it engages.
X Fold the cover forwards until it engages into
armrest :.
X Fold armrest :up fully if necessary. Cargo compartment enlargement
Important safety notes G
WARNING
When expanding the cargo volume, always
fully fold the corresponding seats and, if so
equipped, always use the cargo net when
transporting cargo.
Unless you are transporting cargo, the seat
backrests must remai nproperly locked in the
upright position.
In an accident, during hard braking or sudden
maneuvers, loose items will be thrown around
inside the vehicle. This can cause injury to
vehicle occupants unless the items are
securely fastened in the vehicle.
Always use the cargo tie-dow nrings. G
WARNING
Never drive a vehicle with the tailgate open.
Deadly carbo nmonoxide (CO) gases may
enter vehicle interior resulting in
unconsciousness and death.
! Before folding the backrest in the rear
compartment forwards, make sure that the
rear compartment armrest and the
cupholder are folded in. They may
otherwise be damaged.
Vehicles without the EASY-VARIO-PLUS
system Folding the rear seat backrest forward
The left-hand and right-hand rear seat
backrests can be folded forwards separately
to increase the cargo compartment capacity.234
Stowage areasStowage and features