2013 MERCEDES-BENZ B-CLASS SPORTS wiper blades
[x] Cancel search: wiper bladesPage 9 of 336

Sea
tcover ..................................... 270
Sensors ......................................... 269
Steering wheel ............................... 270
Trim pieces .................................... 270
Washing by hand ........................... 266
Wheels ........................................... 267
Windows ........................................ 268
Wiper blades .................................. 268
Wooden trim .................................. 270
Cargo compartment cover ...............237
Cargo compartment enlargement ...234
Important safety notes ..................234
Notes on use ................................. 236
Cargo compartment floor
Height adjustment .........................240
Opening/closing ............................ 239
Stowag ewell (under) ..................... 239
Cargo net
Attaching ....................................... 239
Important safety information .........238
Cargo tie down rings .........................237
Car wash (care) ................................. 265
Center console Lowe rsection .................................. 31
Uppe rsection .................................. 30
Central locking
Automatic locking (on-board
computer) ...................................... 191
Locking/unlocking (SmartKey) ........68
Changing bulbs
Brake lamps ................................... 107
Cornering light function .................106
High-beam headlamps ...................105
Important safety notes ..................102
License plate lighting .....................109
Low-beam headlamps ....................105
Overview of bul btypes .................. 103
Parking lamps ................................ 105
Rea rfog lamp ................................ 107
Removing/replacing the cover
(front wheel arch) .......................... 104
Reversing lamps ............................ 107
Standing lamps (front) ...................105
Tai llamps ...................................... 107
Turn signals (front) ......................... 106
Turn signals (rear) ..........................107Child-proof locks
Important safety notes ....................58
Rea rdoors ....................................... 58
Children
In the vehicle ................................... 47
Restraint systems ............................ 47
Child seat
Automatic recognition .....................50
LATCH-type (ISOFIX) child seat
anchors ............................................ 51
On the front-passenger sea t............ 49
Problem (malfunction) .....................54
Recommendations ...........................56
Suitable positions ............................ 54
Top Tether ....................................... 52
Cigarette lighter ................................ 243
Climate control Automatic climate control (dual-
zone) .............................................. 117
Controlling automatically ...............119
Cooling with aird ehumidification..118
Defrosting the windows .................121
Defrosting the windshield ..............121
Dual-zone automatic climate
control ........................................... 115
Important safety notes ..................114
Indicator lamp ................................ 119
Notes on using automatic climate
control ................................... 115, 117
Overview of systems ......................114
Problems with cooling with air
dehumidification ............................ 119
Problem with the rear window
defroster ........................................ 122
Setting the aird istribution.............120
Setting the airflow .........................120
Setting the airv ents...................... 123
Setting the temperature ................119
Switching air-recirculation mode
on/off ............................................ 122
Switching on/off ........................... 118
Switching residual hea ton/off ......122
Switching the rear window
defroster on/off ............................ 122
Switching the ZONE function on/
off .................................................. 1206
Index
Page 22 of 336
Windshield
Defrosting ...................................... 121
Windshiel dwasher fluid
see Windshield washer system
Windshiel dwasher system
Adding washer fluid .......................263
Filling capacity ............................... 329
Notes ............................................. 328
Windshiel dwipers
Problem (malfunction) ...................111
Rea rwindow wiper ........................ 110
Replacing the wiper blades ............110
Switching on/off ........................... 109
Winte rdriving
Slippery roa dsurface s................... 149
Snow chains .................................. 295
Winter operation
General notes ................................ 294
Winter tires
M+S tires ....................................... 294
Wiper blades
Cleaning ......................................... 268
Important safety notes ..................110
Replacing (rea rwindow) ................ 111
Replacing (windshield). ..................110
Wooden trim (cleaning
instructions) ...................................... 270
Workshops see Qualified specialist workshop Index
19
Page 112 of 336
X
Position trim Band engage it in place by
tapping it with your hand, starting from the
outside.
X Clip in the lower section of handle :again.
X Inser tand engage the uppe rsection of
handle =into lower section :.
License plate lamp X
Switch off the lights.
X Open the tailgate.
X Position a screwdriver on lamp lens :
from the outside.
X Lever out lamp lens :and remove it.
X Replace the bulb.
X Inser tlamp lens :into the license plate
lamp and press it in until it engages. Windshield wipers
Switching the windshield wipers on/
off
G
WARNING
The windshield will notl onger be wiped
properly if the wiper blades are worn. This
could prevent you from observing the traffic
conditions, thereby causing an accident.
Replace the wiper blades twice a year, ideally
in spring and fall.
! Do not operate the windshield wipers
when the windshield is dry, as this could
damage the wiper blades. Moreover, dust
that has collected on the windshield can scratch the glass if wiping takes place when
the windshield is dry.
If it is necessary to switch on the windshield
wipers in dry weather conditions, always
use washer fluid when operating the
windshield wipers.
! If the windshield wipers leave smears on
the windshield after the vehicle has been
washed in an automatic car wash, wax or
other residues may be the reason for this.
Clean the windshield using washer fluid
after washing the vehicle in an automatic
car wash. Combination switch
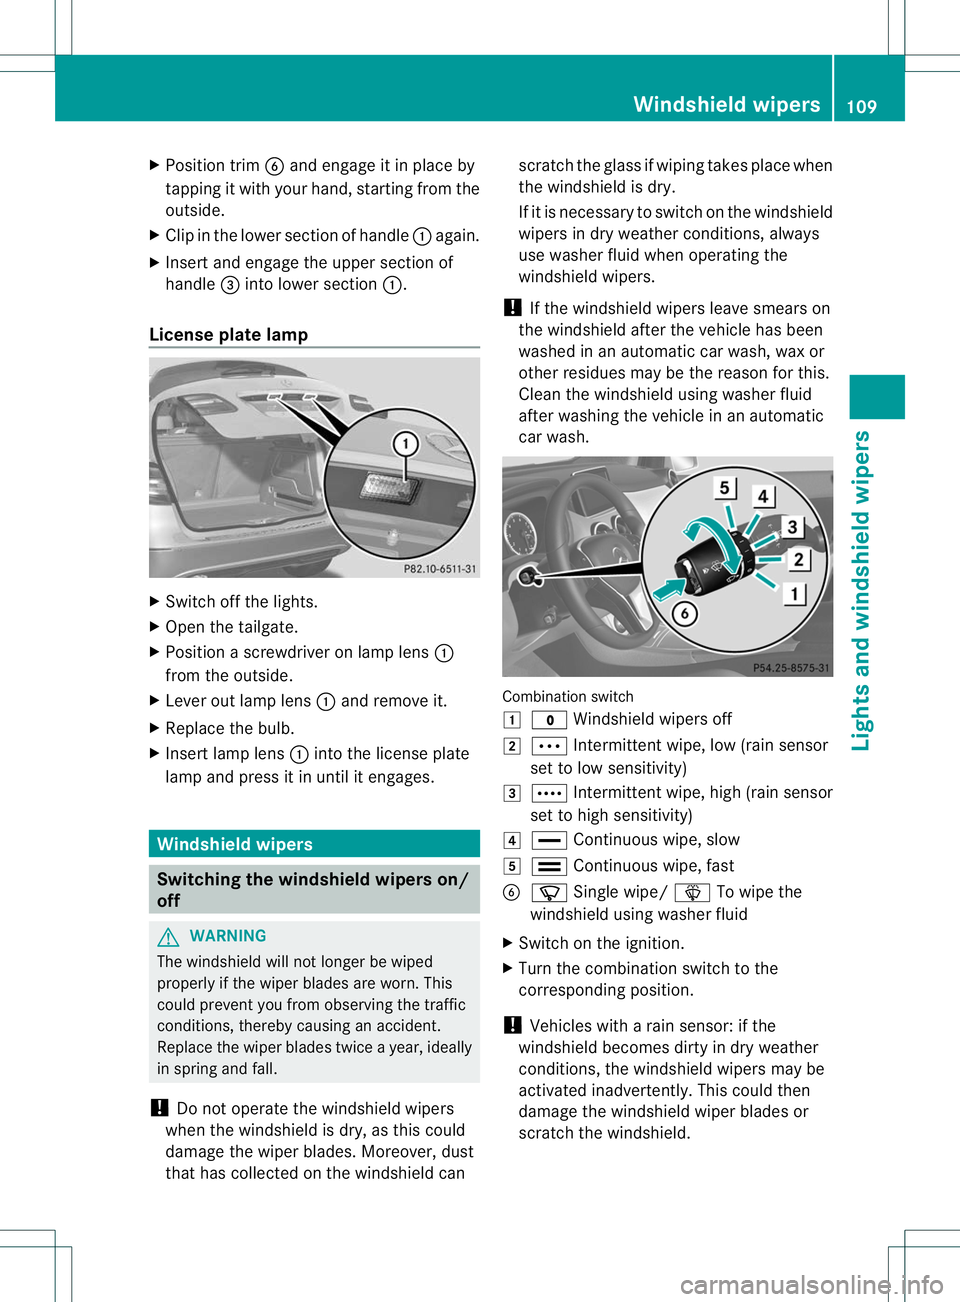
1
$ Windshield wipers off
2 Ä Intermittent wipe, low (rain sensor
set to low sensitivity)
3 Å Intermittent wipe, high (rain sensor
set to high sensitivity)
4 ° Continuous wipe, slow
5 ¯ Continuous wipe, fast
B í Single wipe/ îTo wipe the
windshield using washer fluid
X Switch on the ignition.
X Turn the combination switch to the
corresponding position.
! Vehicles with a rain sensor: if the
windshield becomes dirty in dry weather
conditions, the windshield wipers may be
activated inadvertently. This could then
damage the windshield wiper blades or
scratch the windshield. Windshield wipers
109Lights and windshiel dwipers Z
Page 113 of 336
For this reason, you shoul
dalways switch
off the windshield wipers in dry weather.
Vehicles with arain sensor: in theÄor
Å position, the appropriate wiping
frequency is automatically set according to
the intensity of the rain. In the Åposition,
the rains ensor is more sensitive than in
the Ä position, causing the windshield
wipers to wipe more frequently. Switching the rear window wiper on/
off
Combination switch
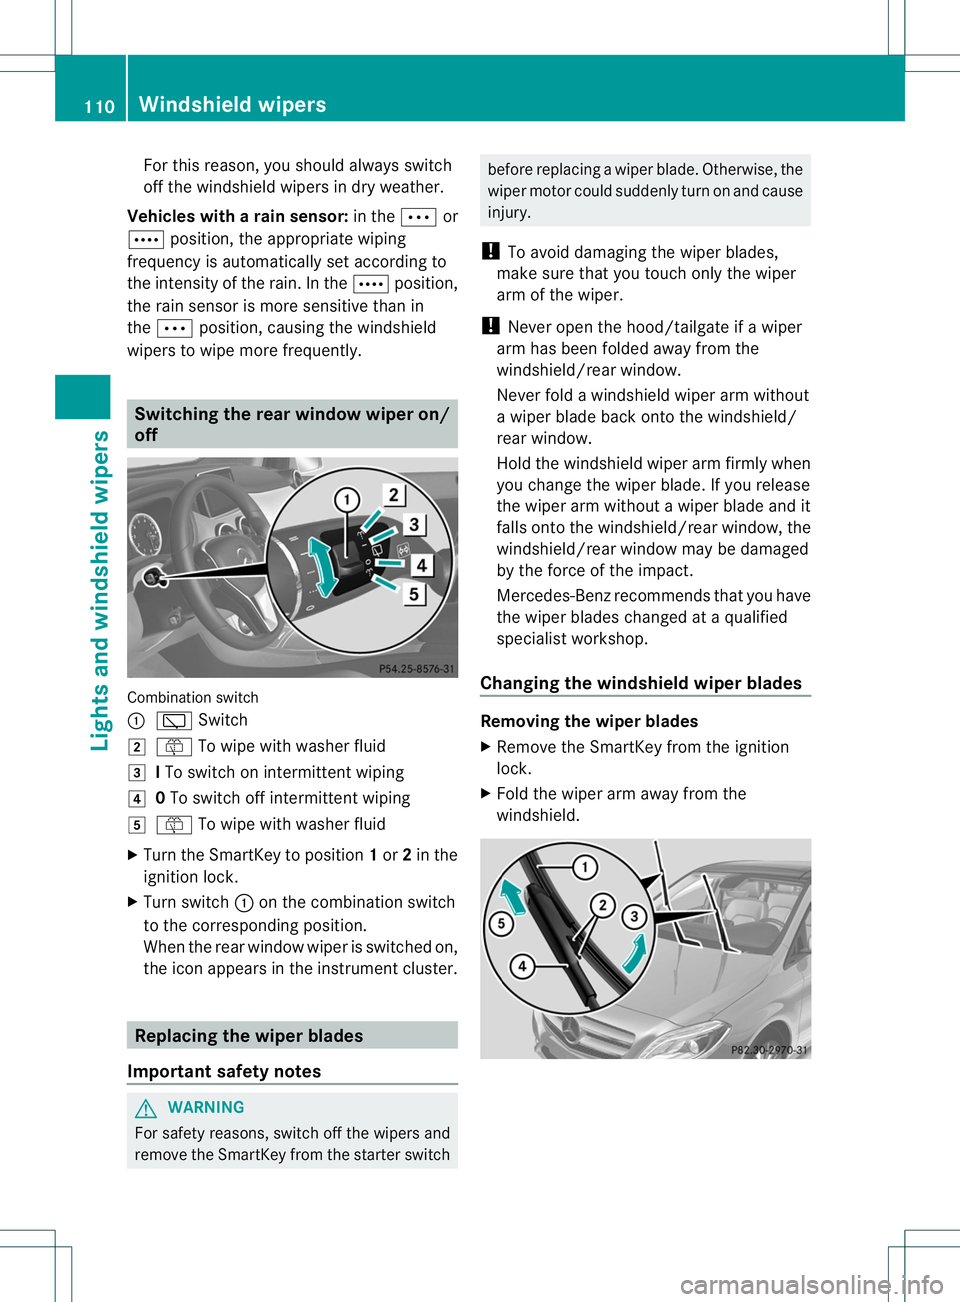
:
è Switch
2 ô To wipe with washer fluid
3 ITo switch on intermittent wiping
4 0To switch off intermittent wiping
5 ô To wipe with washer fluid
X Turn the SmartKey to position 1or 2in the
ignition lock.
X Turn switch :on the combination switch
to the corresponding position.
When the rear window wiper is switched on,
the icon appears in the instrument cluster. Replacing the wiper blades
Important safety notes G
WARNING
For safety reasons, switch off the wipers and
remove the SmartKey from the starter switch before replacing a wiper blade. Otherwise, the
wiper motor could suddenly turn on and cause
injury.
! To avoid damaging the wiper blades,
make sure that you touch only the wiper
arm of the wiper.
! Never open the hood/tailgate if a wiper
arm has been folded away from the
windshield/rear window.
Never fold a windshield wiper arm without
a wiper blade back onto the windshield/
rear window.
Hold the windshield wiper arm firmly when
you change the wiper blade. If you release
the wiper arm without a wiper blade and it
falls onto the windshield/rear window, the
windshield/rear window may be damaged
by the force of the impact.
Mercedes-Benzr ecommends that you have
the wiper blades changed at aqualified
specialist workshop.
Changing the windshield wiper blades Removing the wiper blades
X
Remove the SmartKey from the ignition
lock.
X Fold the wiper arm away from the
windshield. 110
Windshiel
dwipersLights and windshield wipers
Page 114 of 336
X
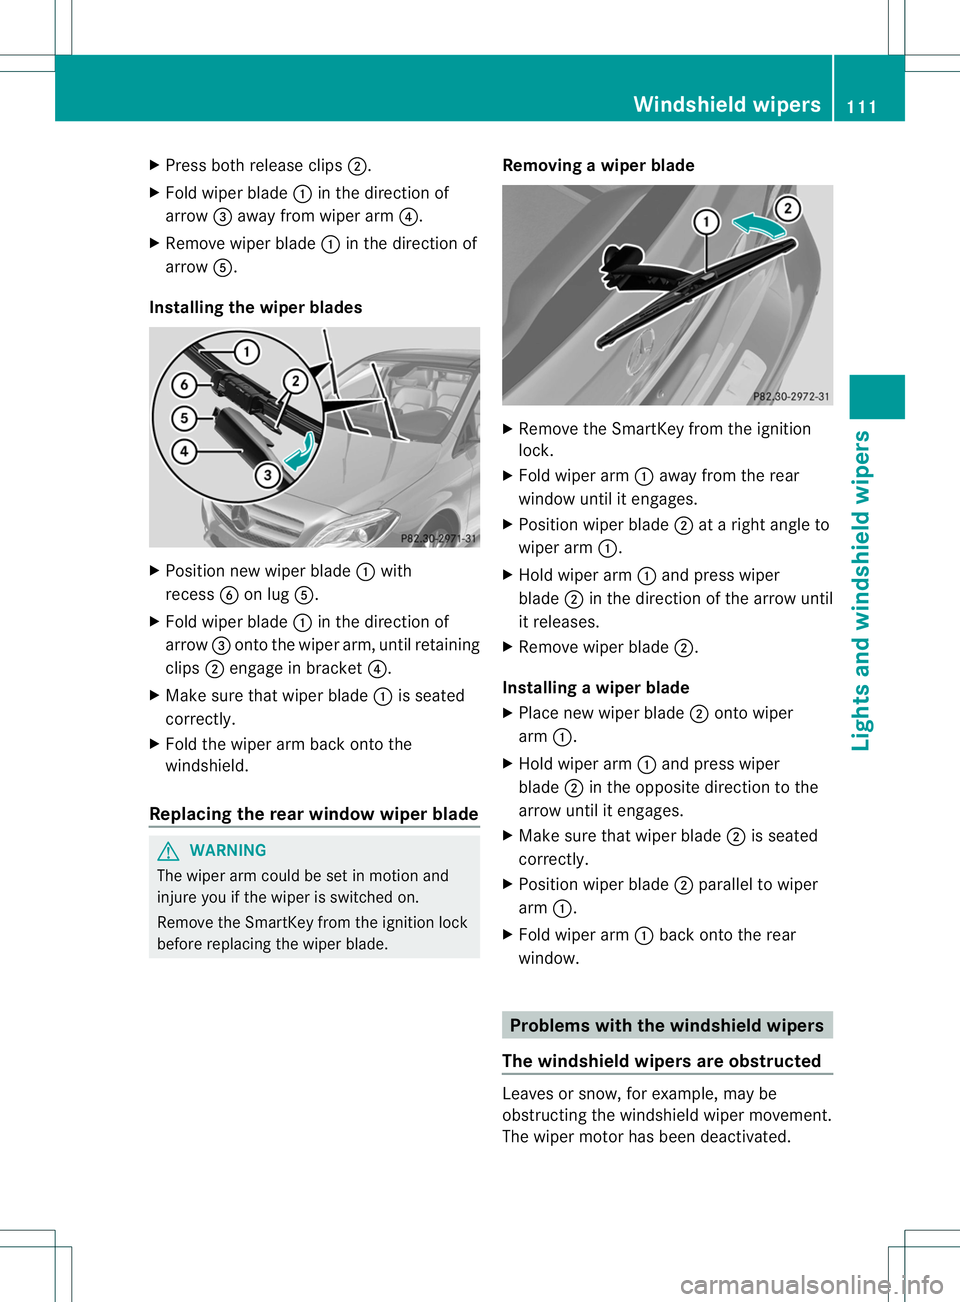
Press both release clips ;.
X Fold wiper blade :in the direction of
arrow =away from wiper arm ?.
X Remove wiper blade :in the direction of
arrow A.
Installing the wiper blades X
Position new wiper blade :with
recess Bon lug A.
X Fold wiper blade :in the direction of
arrow =onto the wiper arm, until retaining
clips ;engage in bracket ?.
X Make sure that wiper blade :is seated
correctly.
X Fold the wiper arm back onto the
windshield.
Replacing the rear window wiper blade G
WARNING
The wiper arm could be set in motion and
injure you if the wiper is switched on.
Remove the SmartKey from the ignition lock
before replacing the wiper blade. Removing
awiper blade X
Remove the SmartKey from the ignition
lock.
X Fold wiper arm :away from the rear
window until it engages.
X Position wiper blade ;at a right angle to
wiper arm :.
X Hold wiper arm :and press wiper
blade ;in the direction of the arrow until
it releases.
X Remove wiper blade ;.
Installing awiper blade
X Place new wiper blade ;onto wiper
arm :.
X Hold wiper arm :and press wiper
blade ;in the opposite direction to the
arrow until it engages.
X Make sure that wiper blade ;is seated
correctly.
X Position wiper blade ;parallel to wiper
arm :.
X Fold wiper arm :back onto the rear
window. Problems with the windshield wipers
The windshield wipers are obstructed Leaves or snow, for example, may be
obstructing the windshield wiper movement.
The wiper motor has been deactivated. Windshield wipers
111Lights and windshield wipers Z
Page 269 of 336
G
WARNING
The vehicle is braked when the HOLD function
or DISTRONIC PLUS is activated. Therefore,
deactivate the HOLD function and DISTRONIC
PLUS before the vehicle is washed in an
automatic car wash.
! Never cleany our vehicle in a Touchless
Automatic Car Wash as these use special
cleaning agents. These cleaning agents can
damage the paintwork or plastic parts.
! Make sure that the automatic
transmission is in position Nwhen washing
your vehicle in a tow-through car wash. The
vehicle could be damaged if the
transmission is in another position.
! Make sure that:
R the side windows and the sliding sunroof
are fully closed.
R the ventilation/heating is switched off
(the OFF button has been pressed/the
airflow control is set to position 0).
R the windshield wiper switch is in position
0.
Otherwise, the vehicle might be damaged.
You can wash the vehicle in an automatic car
wash from the very start.
If the vehicle is very dirty, pre-wash it before
cleaning it in an automatic car wash.
After using an automatic car wash, wipe off
wax from the windshield and the wiper
blades. This will prevent smears and reduce
wiping noises caused by residue on the
windshield.
Washing by hand In some countries, washing by hand is only
allowed at wash bays that are specially
designed for this purpose. Observe the legal
requirements in all countries concerned.
X
Do not use hot water and do not wash the
vehicle in direct sunlight.
X Use a soft sponge to clean. X
Use a mild cleaning agent, such as a car
shampoo approved by Mercedes-Benz.
X Thoroughly hose down the vehicle with a
gentle jet of water.
X Do not point the water jet directly towards
the air inlet.
X Use plenty of water and rinse out the
sponge frequently.
X Rinse the vehicle with clean water and dry
thoroughly with a chamois.
X Do not let the cleaning agent dry on the
paintwork.
When using the vehicle in winter, remove all
traces of road salt deposits carefully and as
soon as possible.
Power washers G
WARNING
Do not use power washers with circular-jet
nozzles (dirt grinders) to clean your vehicle, in
particular the tires. You could otherwise
damage the tires and cause an accident.
! Always maintain a distance of at least
11.8i n (30cm) between the vehicle and the
powerw asher nozzle. Information about
the correct distance is available from the
equipmen tmanufacturer.
Move the power washe rnozzle around
when cleaning your vehicle.
Do not aim directly at any of the following:
R tires
R door gaps, roof gaps, joints, etc.
R electrical components
R battery
R connectors
R lights
R seals
R trim
R ventilation slots
Damaged seals or electrical components
can lead to leaks or failures. 266
CareMaintenance and care
Page 271 of 336
These notes also apply to light alloy wheels
with a clear matte finish.
i
The vehicle should preferably be washed
by hand using a soft sponge, car shampoo
and plenty of water.
i Use only insect remover and car shampoo
from the range of recommended and
approved Mercedes-Benz care products.
Cleaning the windows G
WARNING
Switch off the windshield wipers and remove
the SmartKey from the ignition lock before
cleaning the windshield or the wiper blades.
The windshield wipers could otherwise move
and injure you.
! Only fold the windshield wipers away from
the windshield when vertical. Otherwise,
you will damage the hood.
! Do not use dry cloths, abrasive products,
solvents or cleaning agents containing
solvents to clean the inside of the windows.
Do not touch the insides of the windows
with hard objects, e.g. an ice scraper or
ring. There is otherwise a risk of damaging
the windows.
! Clean the water drainage channels of the
windshield and the rear window at regular
intervals. Deposits such as leaves, petals
and pollen may under certain
circumstances prevent water from draining
away.T his can lead to corrosion damage
and damage to electronic components.
X Cleant he inside and outside of the
windows with a damp cloth and a cleaning
agent that is recommended and approved
by Mercedes-Benz.
Cleaning the wiper blades G
WARNING
Switch off the windshield wipers and remove
the SmartKey from the ignition lock before cleaning the windshield or the wiper blades.
The windshield wipers could otherwise move
and injure you.
! Only fold the windshield wipers away from
the windshield when vertical. Otherwise,
you will damage the hood.
! Do not pull the wiper blade. Otherwise,
the wiper blade could be damaged.
! Do not clean wiper blades too often and
do not rub them too hard. Otherwise, the
graphite coating could be damaged. This
could cause wiper noise.
X Fold the windshield wiper arms away from
the windshield.
X Carefully clean the wiper blades with a
damp cloth.
X Fold the windshield wiper arms back again
before switching on the ignition.
! Hold the wiper arm securely when folding
back. The windshield could be damaged if
the wiper arm smacks against it suddenly.
Cleaning the exterior lighting !
Only use cleaning agents or cleaning
cloths which are suitable for plastic light
lenses. Unsuitable cleaning agents or
cleaning cloths could scratch or damage
the plastic light lenses.
X Cleant he plastic lenses of the exterior
lighting using a wet sponge and a mild
cleaning agent, e.g. Mercedes-Ben zcar
shampoo or cleaning cloths.
Cleaning the mirror turn signals !
Only use cleaning agents or cleaning
cloths that are suitable for plastic lenses.
Unsuitable cleaning agents or cleaning
cloths could scratch or damage the plastic
lenses of the mirror tur nsignals.
X Clean the plasti clenses of the mirror turn
signals in the exterior mirror housing using
a wet sponge and a mild cleaning agent, 268
CareMaintenance and care