2013 MERCEDES-BENZ B-CLASS SPORTS instrument panel
[x] Cancel search: instrument panelPage 18 of 336

Adjusting the 4-way lumbar
support
............................................ 88
Adjusting the head restraint ............87
Cleaning the cover .........................270
Correct driver's seat position ........... 84
Important safety notes ....................85
Seat heating problem ......................89
Storing settings (memory
function) .......................................... 93
Switching sea theating on/off .........89
Sensors (cleaning instructions) .......269
Service see ASSYST PLUS
Service menu (on-board computer) .189
Service products Brake fluid ..................................... 327
Coolant (engine) ............................ 327
Engine oil ....................................... 326
Fuel ................................................ 324
Important safety notes ..................324
Washer fluid .................................. .328
Service work
see ASSYST PLUS
Settings
Factory (on-board computer) .........192
On-board computer .......................189
Setting the air distribution ...............120
Setting the airflow ............................120
Side impact air bag .............................42
Side marker lamp (display
message) ............................................ 205
Side windows Cleaning ......................................... 268
Convenience closing feature ............78
Convenience opening feature ..........78
Important safety information ...........77
Opening/closing .............................. 78
Problem (malfunction) .....................79
Resetting ......................................... 79
Sliding sunroof
see Panorama roof with power
tilt/sliding panel
SmartKey
Changing the battery .......................70
Changing the programming .............69
Checking the battery .......................70
Convenience closing feature ............78
Convenience opening feature ..........78 Display message
............................ 218
Door central locking/unlocking .......68
Important safety notes ....................68
Loss ................................................. 72
Mechanical key ................................ 69
Positions (ignition lock) .................127
Problem (malfunction) .....................72
Starting the engine ........................127
SmartKey positions (ignition lock) ..127
Snow chains ...................................... 295
Sockets Center console .............................. 244
Luggage compartment ...................245
Points to observe before use .........244
Rea rcompartmen t......................... 245
Specialist workshop ............................ 23
Speed, controlling see Cruise control
Speedometer
Activating/deactivating the
additional speedometer .................189
Digita l............................................ 183
In the Instrument cluster .................27
Segments ...................................... 179
Selecting the unit of
measurement ................................ 189
see Instrument cluster
SRS (Supplemental Restraint
System)
Display message ............................ 201
Introduction ..................................... 37
Warning lamp ................................. 225
Warning lamp (function) ................... 37
Standing lamps
Changing bulbs .............................. 105
Display message ............................ 204
Switching on/off .............................. 98
Starting (engine) ................................ 127
STEE RCONTROL .................................. 64
Steering (display message) ..............217
Steering wheel Adjusting (manually). .......................89
Button overview ............................... 29
Buttons (on-board computer) ......... 180
Cleaning ......................................... 270
Important safety notes ....................89
Paddle shifters ............................... 136
Steering wheel paddle shifters ........136 Index
15
Page 28 of 336
Cockpit
................................................. 26
Instrumentc luster.............................. 27
Multifunction steering wheel .............29
Center console .................................... 30
Overhea dcontrol panel ...................... 32
Door control panel .............................. 33 25At a glance
Page 29 of 336
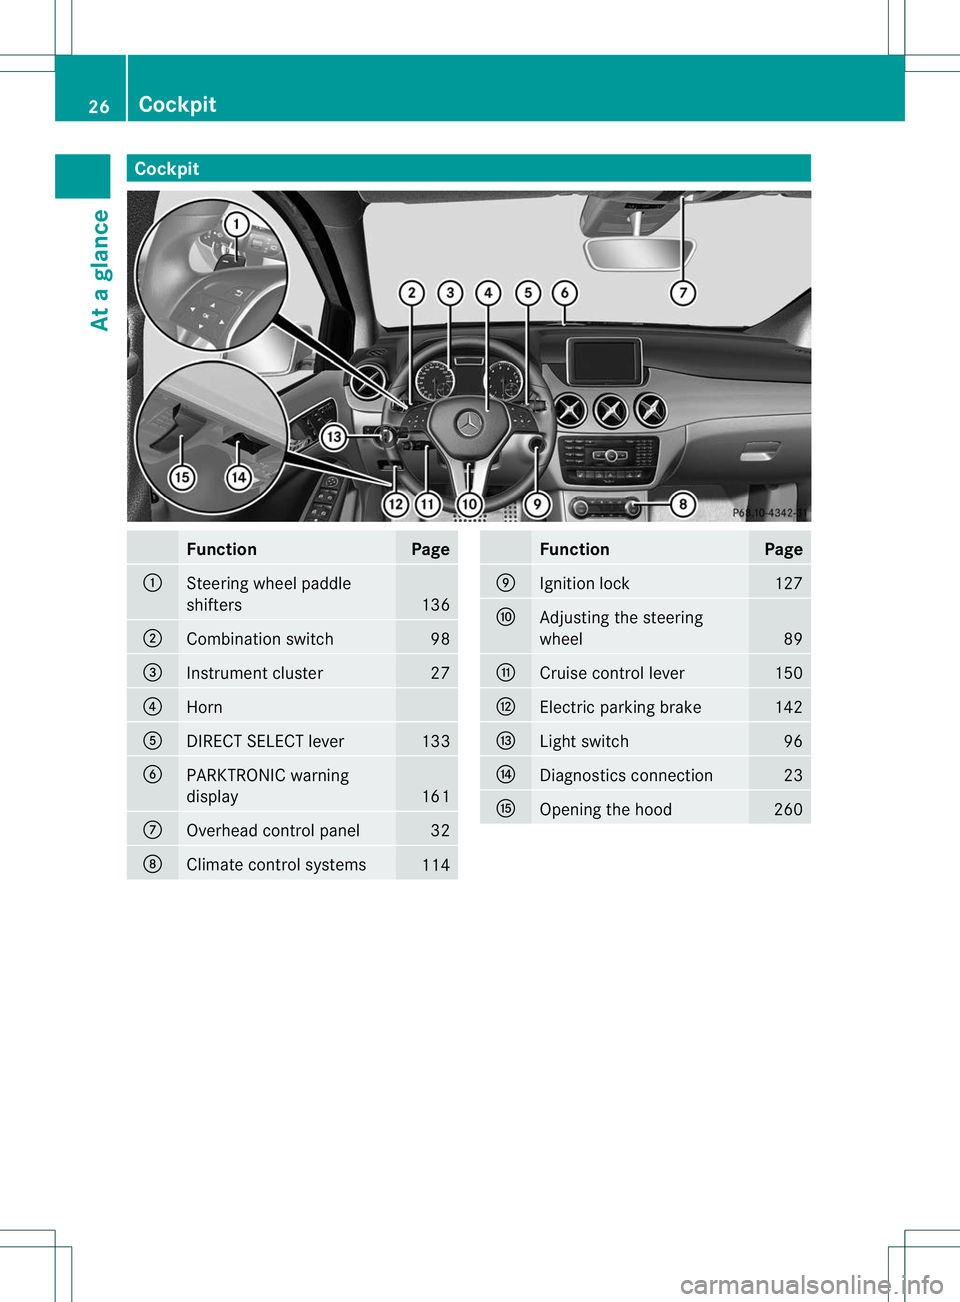
Cockpit
Function Page
:
Steering wheel paddle
shifters
136
;
Combination switch 98
=
Instrument cluster 27
?
Horn
A
DIRECT SELECT lever 133
B
PARKTRONIC warning
display
161
C
Overhead control panel 32
D
Climate control systems
114 Function Page
E
Ignition lock 127
F
Adjusting the steering
wheel
89
G
Cruise control lever 150
H
Electric parking brake 142
I
Ligh
tswitch 96
J
Diagnostics connection 23
K
Opening the hood 26026
CockpitAt a glance
Page 42 of 336
R
Do not install additional trim material, seat
covers, badges, etc. to the:
-padded steering wheel boss
- knee bag covers
- front-passenge rair bag cover
- outer side of front seat bolsters
- outer side of rear bench seat backrest
seat bolsters
- roof lining trim
R Do not install additional electrical/
electronic equipment on or near SRS
components and wiring.
R Keep area betwee nair bags and occupants
free of objects (e.g. packages, purses,
umbrellas, etc.).
R Do not hang items such as coat hangers
from the coat hooks or handles over the
door. These items may be thrown around in
the vehicle and cause head and other
injuries when the window curtain air bag is
deployed.
R Air bag system components will be hot after
an air bag has inflated. Do not touch them.
R Never place your feet on the instrument
panel, dashboard, or on the seat. Always
keep both feet on the floor in front of the
seat.
R Improper repair work on the SRS creates a
risk of rendering the SRS inoperative or
causing unintended air bag deployment.
Work on the SRS must therefore only be
performed by qualified technicians.
Contact an authorized Mercedes-Benz
Center.
R For your protection and the protection of
others, when scrapping the air bag unit or
ETD, our safety instructions must be
followed. These instructions are available
fro ma ny authorized Mercedes-Benz
Center.
R Given the considerable deployment speed,
required inflation volume, and the material
of the ai rbags, there is the possibility of
abrasions or other, potentially more serious
injuries resulting from air bag deployment. If you sell your vehicle
,Mercedes-Benz
strongly recommends that you inform the
subsequent owner that the vehicle is
equipped with SRS. Also, refer them to the
applicable section in the Operator's Manual. Air bags
Important safety notes G
WARNING
Air bags are designed to reduce the incidence
of injuries and fatalities in certain situations:
R frontal impacts (driver's and front-
passenger fronta ir bags and driver's knee
bag)
R side impacts (side impact air bags and
window curtain air bags)
R rollover (window curtain air bags)
However, no system available today can
completely eliminate injuries and fatalities.
When the air bags are deployed, a small
amount of powder is released .The powder
generally does not constitute a health hazard
and does not indicate that there is a fire in the
vehicle. In order to prevent potential
breathing difficulties, you should leave the
vehicle as soon as it is safe to do so. If you
have any breathing difficulty but cannot get
out of the vehicle after the air bag inflates,
then get fresh air by opening a window or
door. G
WARNING
In order to reduce the potential danger of
injuries caused during the deployment of the
front air bags, the driver and front passenger
must always be correctly seated and wear
their seat belts.
For maximum protection in the event of a
collision, you must always be in the normal
seat position with your back against the
backrest. Fasten your seat belt and make sure
that it is correctly positioned on your body. Occupant safety
39Safety
Z
Page 47 of 336
Columbia, the U.S. territories and all
Canadian provinces.
Even where this is nott
he case, all vehicle
occupants should have their seat belts
fastened when the vehicle is in motion.
i See "Children in the vehicle"
(Y page 47) for further information on
infants and children traveling in the vehicle
as well as on child restraint systems.
Proper use of the seat belts G
WARNING
USE SEAT BELTS PROPERLY
R Seat belts can only work when used
properly. Never wear seat belts in any other
way than as described in this section, as
that could result in serious injuries in the
event of an accident.
R Each occupant should wear their seat belt
at all times, because seat belts help reduce
the likelihood of and potential severity of
injuries in accidents, including rollovers.
The integrated restraint system includes
SRS (driver front air bag, driver's side knee
bag, front-passenger front air bag, side
impact air bags, window curtain air bags for
the side windows), Emergency Tensioning
Devices, seat belt force limiters, and front
seat knee bolsters.
The system is designed to enhance the
protection offered to properly belted
occupants in certain frontal (front air bags,
driver's side knee bag and ETDs) and side
(side impact air bags, window curtain air
bags, and ETDs) impacts which exceed
preset deployment thresholds and in
certain rollovers (window curtain air bags
and ETDs).
R Never wear the shoulder belt under your
arm, across your neck or off your shoulder.
In a frontal crash, your body would move
too far forward. That would increase the
chance of head and neck injuries. The seat
belt would also apply too much force to the
ribs or abdomen, which could severely injure internal organs such as your liver or
spleen.
Adjust the seat belt so that the shoulder
section is located as close as possible to
the middle of the shoulder. It should not
touch the neck.N
ever pass the shoulder
portion of the seat belt under your arm. For
this purpose, you can adjust the height of
the seat belt outlet.
R Position the lap belt as low as possible on
your hips and not across the abdomen. If
the lap belt is positioned across your
abdomen, it could cause serious injuries in
a crash.
R Never wear seat belts over rigid or
breakable objects in or on your clothing,
such as eyeglasses, pens, keys etc., as
these might cause injuries.
R Make sure the seat belt is always fitted
snugly. Take special care of this when
wearing loose clothing.
R Never use a seat belt for more than one
person at a time. Do not fasten a seat belt
around a person and another person or
other objects at the same time.
R Seat belts should not be worn twisted. In a
crash, you would not have the full width of
the seat belt to distribut eimpact forces.
The twisted seat belt against yourb ody
could cause injuries.
R Pregnant women should also always use a
lap-shoulder belt. The lap belt portion
should be positioned as low as possible on
the hips to avoid any possible pressure on
the abdomen.
R Place the seat backrest in a position that is
as upright as possible.
R Check your seat belt during travel to make
sure it is properly positioned.
R Never place your feet on the instrument
panel, dashboard, or on the seat. Always
keep both feet on the floor in front of the
seat.
R When using a seat belt to secure infant
restraints, toddler restraints, or children in 44
Occupant safetySafety
Page 104 of 336
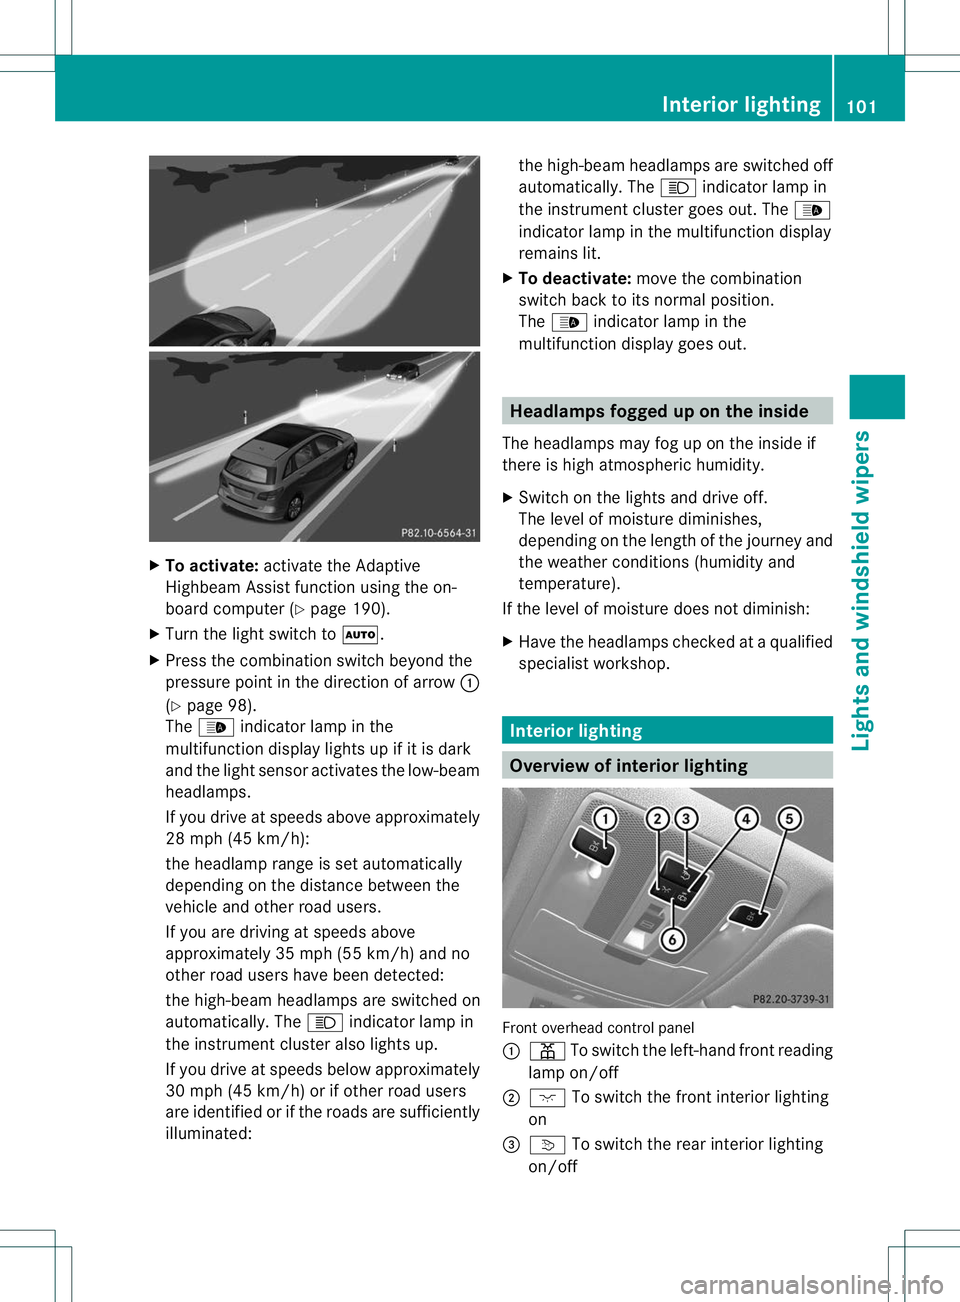
X
To activate: activate the Adaptive
Highbea mAssist function using the on-
board computer (Y page 190).
X Turn the light switch to Ã.
X Press the combination switch beyond the
pressure point in the direction of arrow :
(Y page 98).
The _ indicator lamp in the
multifunction display lights up if it is dark
and the light sensor activates the low-beam
headlamps.
If you drive at speeds above approximately
28 mph (45 km/h):
the headlamp range is set automatically
depending on the distance between the
vehicle and other road users.
If you are driving at speeds above
approximately 35 mph (55 km/h) and no
other road users have been detected:
the high-beam headlamps are switched on
automatically. The Kindicator lamp in
the instrument cluster also lights up.
If you drive at speeds below approximately
30 mph (45 km/h) or if other road users
are identified or if the roads are sufficiently
illuminated: the high-beam headlamps are switched off
automatically. The
Kindicator lamp in
the instrument cluster goes out. The _
indicator lamp in the multifunction display
remains lit.
X To deactivate: move the combination
switch back to its normal position.
The _ indicator lamp in the
multifunction display goes out. Headlamps fogged up on the inside
The headlamps may fog up on the inside if
there is high atmospheric humidity.
X Switch on the lights and drive off.
The level of moisture diminishes,
depending on the length of the journey and
the weather conditions (humidity and
temperature).
If the level of moisture does not diminish:
X Have the headlamps checked at a qualified
specialist workshop. Interior lighting
Overview of interior lighting
Front overhead control panel
:
p To switch the left-hand front reading
lamp on/off
; c To switch the front interior lighting
on
= v To switch the rear interior lighting
on/off Interior lighting
101Lights and windshield wipers Z