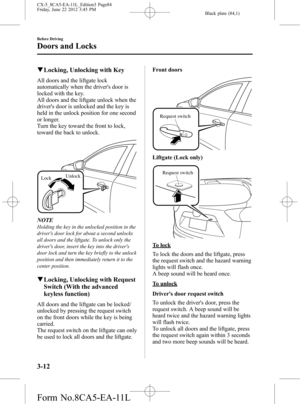
Page 393 of 488

Black plate (393,1)
5. Place the jack under the jack-up
position closest to the tire being
changed with the jack head squarely
under the jack-up point.
Jacking position
6. Continue raising the jack head
gradually by rotating the screw with
your hand until the jack head is
inserted into the jack-up position.
Tire blocks
Jacking position
WARNING
Use only the front and rear jacking
positions recommended in this manual:
Attempting to jack the vehicle in
positions other than those
recommended in this manual is
dangerous. The vehicle could slip off
the jack and seriously injure or even
kill someone. Use only the front and
rear jacking positions recommended
in this manual.
Do not jack up the vehicle in a position
other than the designated jack-up
position or place any objects on or
under the jack:
Jacking up the vehicle in a position
other than the designated jack-up
position or placing objects on or
under the jack is dangerous as it
could deform the vehicle body or the
vehicle could fall off the jack
resulting in an accident.
Use only the jack provided with your
Mazda:
Using a jack that is not designed for
your Mazda is dangerous. The vehicle
could slip off the jack and seriously
injure someone.
Never place objects under the jack:
Jacking the vehicle with an object
under the jack is dangerous. The jack
could slip and someone could be
seriously injured by the jack or the
falling vehicle.
If Trouble Arises
Flat Tire
7-9
CX-5_8CA5-EA-11L_Edition3 Page393
Friday, June 22 2012 3:48 PM
Form No.8CA5-EA-11L
Page 394 of 488

Black plate (394,1)
7. Insert the jack lever and attach the lug
wrench to tire jack.
8. Turn the jack handle clockwise and
raise the vehicle high enough so that
the spare tire can be installed. Before
removing the lug nuts, make sure your
Mazda is firmly in position and that it
cannot slip or move.
WARNING
Do not jack up the vehicle higher than
is necessary:
Jacking up the vehicle higher than is
necessary is dangerous as it could
destabilize the vehicle resulting in an
accident.
Do not start the engine or shake the
vehicle while it is jacked up:
Starting the engine or shaking the
vehicle while it is jacked up is
dangerous as it could cause the
vehicle to fall off the jack resulting in
an accident.
Never go under the vehicle while it is
jacked up:
Going under the vehicle while it is
jacked up is dangerous as it could
result in death or serious injury if the
vehicle were to fall off the jack.
9. Remove the lug nuts by turning them
counterclockwise; then remove the
wheel and center cap.
7-10
If Trouble Arises
Flat Tire
CX-5_8CA5-EA-11L_Edition3 Page394
Friday, June 22 2012 3:48 PM
Form No.8CA5-EA-11L
Page 395 of 488

Black plate (395,1)
qLocking Lug Nuts
If your vehicle has optional antitheft
wheel lug nuts, one on each wheel will
lock the tires and you must use a special
key to unlock them. This key is attached
to the lug wrench and is stored with the
spare tire. Register them with the lock
manufacturer by filling out the card
provided in the glove compartment and
mailing it in the accompanying envelope.
If you lose this key, consult an Authorized
Mazda Dealer or use the lock
manufacturer's order form, which is with
the registration card.
Special key Antitheft lug nut
To remove an antitheft lug nut
1. Obtain the key for the antitheft lug nut.
2. Place the key on top of the nut, and be
sure to hold the key square to it. If you
hold the key at an angle, you may
damage both key and nut. Do not use a
power impact wrench.
3. Place the lug wrench on top of the key
and apply pressure. Turn the wrench
counterclockwise.
To install the nut
1. Place the key on top of the nut, and be
sure to hold the key square to it. If you
hold the key at an angle, you may
damage both key and nut. Do not use a
power impact wrench.
2. Place the lug wrench on top of the key,
apply pressure, and turn it clockwise.
qMounting the Spare Tire
1. Remove dirt and grime from the
mounting surfaces of the wheel and
hub, including the hub bolts, with a
cloth.
WARNING
Make sure the mounting surfaces of
the wheel, hub and lug nuts are clean
before changing or replacing tires:
When changing or replacing a tire,
not removing dirt and grime from the
mounting surfaces of the wheel, hub
and hub bolts is dangerous. The lug
nuts could loosen while driving and
cause the tire to come off, resulting in
an accident.
2. Mount the spare tire.
If Trouble Arises
Flat Tire
7-11
CX-5_8CA5-EA-11L_Edition3 Page395
Friday, June 22 2012 3:48 PM
Form No.8CA5-EA-11L
Page 396 of 488

Black plate (396,1)
3. Install the lug nuts with the beveled
edge inward; tighten them by hand.
WARNING
Do not apply oil or grease to lug nuts
and bolts and do not tighten the lug
nuts beyond the recommended
tightening torque:
Applying oil or grease to lug nuts and
bolts is dangerous. The lug nuts
could loosen while driving and cause
the tire to come off, resulting in an
accident. In addition, lug nuts and
bolts could be damaged if tightened
more than necessary.
4. Turn the lug wrench counterclockwise
and lower the vehicle. Use the lug
wrench to tighten the nuts in the order
shown.
If you are unsure of how tight the nuts
should be, have them inspected at an
Authorized Mazda Dealer.
Nut tightening torque
N·m (kgf·m, ft·lbf)108―147
(12―14, 80―108)
WARNING
Always securely and correctly tighten
the lug nuts:
Improperly or loosely tightened lug
nuts are dangerous. The wheel could
wobble or come off. This could result
in loss of vehicle control and cause a
serious accident.
Be sure to reinstall the same nuts you
removed or replace them with metric
nuts of the same configuration:
Because the wheel studs and lug nuts
on your Mazda have metric threads,
using a non-metric nut is dangerous.
On a metric stud, it would not secure
the wheel and would damage the
stud, which could cause the wheel to
slip off and cause an accident.
5.(Aluminum wheel equipped vehicle)
Remove the center cap by tapping it
with the lug wrench.
6. Store the damaged tire, using the tire
hold-down bolt to hold it in place.
Tire hold-down bolt
7-12
If Trouble Arises
Flat Tire
CX-5_8CA5-EA-11L_Edition3 Page396
Friday, June 22 2012 3:48 PM
Form No.8CA5-EA-11L
Page 397 of 488
Black plate (397,1)
7. Remove the tire blocks and store the
tools and jack.
8. Check the inflation pressure. Refer to
Tires on page 9-7.
9. Have the flat tire repaired or replaced
as soon as possible.
WARNING
Do not drive with any tires that have
incorrect air pressure:
Driving on tires with incorrect air
pressure is dangerous. Tires with
incorrect pressure could affect
handling and result in an accident.
When you check the regular tires' air
pressure, check the spare tire, too.
NOTE
To prevent the jack and tool from rattling, store
them properly.
If Trouble Arises
Flat Tire
7-13
CX-5_8CA5-EA-11L_Edition3 Page397
Friday, June 22 2012 3:48 PM
Form No.8CA5-EA-11L
Page 398 of 488

Black plate (398,1)
Jump-Starting
Jump-starting is dangerous if done incorrectly. So follow the procedure carefully. If you
feel unsure about jump-starting, we strongly recommend that you have a competent service
technician do the work.
WARNING
Follow These Precautions Carefully:
To ensure safe and correct handling of the battery, read the following precautions
carefully before using the battery or inspecting it.
Do not allow the positive () terminal to contact any other metal object that
could cause sparks:
Flames and sparks near open battery cells are dangerous. Hydrogen gas, produced
during normal battery operation, could ignite and cause the battery to explode. An
exploding battery can cause serious burns and injuries. When working near a
battery, do not allow metal tools to contact the positive (
) or negative ()
terminal of the battery.
Keep all flames, including cigarettes, and sparks away from open battery
cells:
Flames and sparks near open battery cells are dangerous. Hydrogen gas, produced
during normal battery operation, could ignite and cause the battery to explode. An
exploding battery can cause serious burns and injuries.
Do not jump-start a frozen battery or one with a low fluid level:
Jump-starting a frozen battery or one with a low fluid level is dangerous. It may
rupture or explode, causing serious injury.
Connect the negative cable to a good ground point away from the battery:
Connecting the end of the second jumper cable to the negative (
) terminal of the
discharged battery is dangerous.
A spark could cause the gas around the battery to explode and injure someone.
Route the jumper cables away from parts that will be moving:
Connecting a jumper cable near or to moving parts (cooling fans, belts) is dangerous.
The cable could get caught when the engine starts and cause serious injury.
7-14
If Trouble Arises
Battery Runs Out
CX-5_8CA5-EA-11L_Edition3 Page398
Friday, June 22 2012 3:48 PM
Form No.8CA5-EA-11L
Page 399 of 488

Black plate (399,1)
CAUTION
Use only a 12 V booster system. You can damage a 12 V starter, ignition system, and
other electrical parts beyond repair with a 24 V power supply (two 12 V batteries in
series or a 24 V motor generator set).
Connect cables in numerical order and disconnect in reverse order.
Jumper cables
Booster battery
Discharged battery
1. Remove the battery cover.
2. Make sure the booster battery is 12 V
and that its negative terminal is
grounded.3. If the booster battery is in another
vehicle, do not allow both vehicles to
touch. Turn off the engine of the
vehicle with the booster battery and all
unnecessary electrical loads in both
vehicles.
4. Connect the jumper cables in the exact
sequence as in the illustration.
lConnect one end of a cable to the
positive terminal on the discharged
battery (1).
lAttach the other end to the positive
terminal on the booster battery (2).
lConnect one end of the other cable
to the negative terminal of the
booster battery (3).
lConnect the other end to the ground
point indicated in the illustration
away from the discharged battery
(4).
If Trouble Arises
Battery Runs Out
7-15
CX-5_8CA5-EA-11L_Edition3 Page399
Friday, June 22 2012 3:48 PM
Form No.8CA5-EA-11L
Page 400 of 488
Black plate (400,1)
5. Start the engine of the booster vehicle
and run it a few minutes. Then start the
engine of the other vehicle.
6. When finished, carefully disconnect the
cables in the reverse order described in
the illustration.
7. If the battery cover has been removed,
install it in the reverse order of
removal.
NOTE
Verify that the covers are securely installed.
7-16
If Trouble Arises
Battery Runs Out
CX-5_8CA5-EA-11L_Edition3 Page400
Friday, June 22 2012 3:48 PM
Form No.8CA5-EA-11L