Page 73 of 316

the warranty. Always read the manufactur
er installation instructions that came with
your roof rack system when you install the
attachments.
(D Tips
When installing a factory-supplied roof
rack system on the roof railing, the ESC
w ill adapt itself to a different center of
gravity.
Attachment points
The roof rack can only be attached at the
marked locations.
N It>
~ ci: co
"'
Fig. 78 Roof rack attachment points
Attach the roof rack only at the attachment
poi nts on the roof railing. On the inside of the
roof railing there are two holes for attaching
the rear end of the roof rack. To prevent con
fusing the front and rear roof rack attach
ments, there are three holes on the left and
two holes on the right for mounting the front
part of the roof rack
9 fig. 78.
The roof racks have a sticker on the left side
underneath to identify front and rear.
A WARNING
When installing the roof rack, make sure
the sticker is on the left side of the vehicle
and faces the stamped arrow in the drive
direction.
.
Seats and storage 71
Installing a roof rack
• u•
---·~- ~~- ~
Fig. 79 Roof railing: positioning the roof rack
Fig. 80 Roof railing: installing a roof rack
The roof rack set consists of a front and rear
roof rack, the cover profile and a socket
wrench.
.,. Open the cap
(D ¢ fig. 80.
.,. Before mounting the roof rack, use the
socket wrench @and loosen the left and
right screw in the direction of @.
.,. Clean the attachment points on the roof
railing as well as the roof rack rubber wash
ers @.
.,. Carefully place the roof rack ove r the holes
in the roof railing
<=>fig. 79.
.,. Place the pins @ into the holes. The claw®
must engage into the edge of the roof rail
ing .
.,. Make sure the rubber washer © lays flat on
the roof railing.
.,. Tighten the left and right screws using the
socket wrench @in direct ion @.
.,. To reach the
4 ft lb (6 Nm) tightening spec
ification needed, both arrows on the socket
wrench must align .
.,. Repeat this procedure on the second roof
rack.
Page 74 of 316

7 2 Seats and storage
A WARNING
Check all the roof rack connections each
time before each trip and re-tighten or re
adjust if necessary. If you are going to be
driving or rough terrain, you will have to
check the attachments more often.
If you
do not do this, the risk of your luggage
coming loose and falling off is greater.
The pins and the roof rack claws must en gage securely into the holes and into the
edge of the roof railing when you tighten
the screws!
(j) Tips
You can adjust the width of the roof rack
by using a hexagon wrench and turning the
screws on the top. Let your authorized
Audi dealer help you with this.
Installing the attachments
Fig. 81 Roof railing: install ing cove r profile into th e
roof rack
Installing the attachments
.,. Remove the cap@¢ fig. 81 .
.,. Slide the attachment into the T-groove (i).
.,. Tighten the attachment accord ing to the
roof rack installation instructions.
.,. Close the cap.
Installing the cover profile
.,. Seal the openings in the T-groove 0 with
the cover profi le @ after having installing
the attachments.
., N ;g
er .,
'° .,.
If you not want to use the attachment, seal
the whole T-groove
(i) with the cover profile
®·
.,. Cut the cover profile to the length needed,
if necessary.
Roof load
The cargo on the roof must be securely at
tached. Handling characteristics change
when cargo is transported.
The permissible roof load for your vehicle is
165 lbs (75 kg). The roof load is the total of
the weight of the roof rack, the attachments
and the cargo you are carrying.
A WARNING
-The cargo must be securely attached on
the roof rack, otherwise you risk an acci
dent.
- Distribute the load as evenly as possible
and do not make the roof rack wider than
the maximum permitted.
- You must under no circumstances exceed
the permissible roof load, the permissi ble axle loads and the permissible overall
weight of your vehicle - risk of an acci
dent.
- Mount the attachments to the roof rack
only after you have placed the roof rack
on the vehicle.
- Consider that when transporting heavy
objects or one with a large surface, the
handling characteristics change due to
shift in the center of gravity or the great
er surface exposed to the wind. So adapt
your driving and your speed to prevailing
conditions. We recommend that you do not drive faster than 80 mph (130 km/
h).
- Mounting a roof rack changes the height
of your vehicle . Keep this in mind when
parking your vehicle in your garage, or
when driving through a tunnel or under
an overpass.
~
Page 75 of 316

CD Note
-Make sure the rear lid does not hit the
cargo on the roof rack when you open it.
On vehicles with automatic rear lid/trunk
lid operation" you may have to adjust the
open position of the rear lid
c::> page 44.
-Remove the roof rack and attachment
before taking your vehicle through an au
tomatic car wash to avoid damage.
@ For the sake of the environment
As a result of the increased wind resist
ance created by a roof rack, your vehicle is
using fuel unnecessarily. So remove the
roof rack after using it.
Beverage holders
Fig. 82 Center conso le : Front cupholders
Fig . 83 Beverage storage in the rear armrest
Front cupholders
• You can accommodate two beverages in this
storage
c::> fig. 82.
Opening rear beverage holders
• To open the rear cupholder, press on the
symbol~
@ c::> fig. 83.
Seats and storage 73
Holding beverages at the rear
• To adjust the arm @, swing it in the d irec
tion of the arrow.
• Place the beverage in the holder and release
the arm. The arm swings back by its elf and
automatically secures the beverage.
Closing the rear cupholders
• To close the rear cupholder, press on the
center section between the two arms and
push the cupho lder in the slot as far as it
will go.
The holding arm must be adjusted such that it
lies closely against the cupholder.
A maximum of two beverages can be placed in
the center armrest.
A WARNING
Spilled hot liquid can cause an accident
and personal injury.
-
-Never carry any beverage conta iners with
hot liquids, such as hot coffee or hot tea,
in the vehicle while it is moving . In case
of an acc ident, sudden braking or other
vehicle movement, hot liquid could spill,
causing scalding burns. Spilled hot liquid
can also cause an accident and personal injury.
- Use only soft cups in the cupholder. Hard
cups and glasses can cause injury in an
accident.
- Never use the cupholder or adapter as an
ashtray - risk of fire.
CD Note
Only drink containers with lids should be
carried in the cupholder. liquid could spill
out and damage your vehicle's electronic
equipment or stain the upholstery, etc.
Page 76 of 316

7 4 Seats and storage
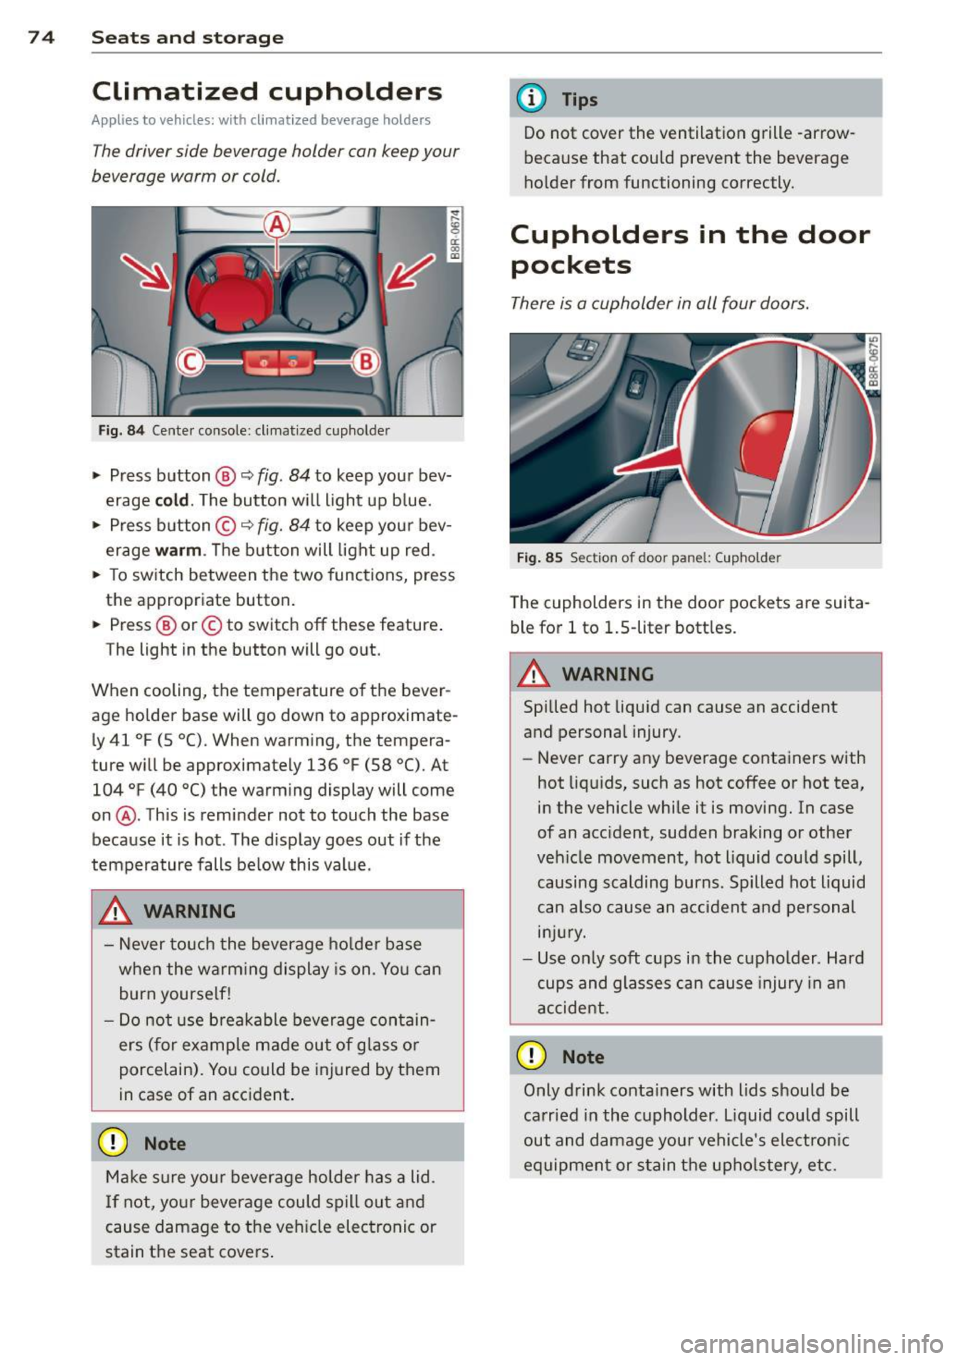
Climatized cupholders
Appl ies to vehicles: wit h clim atized beverage holders
The driver side beverage holder can keep your
beverage warm or cold.
Fi g. 8 4 Center console: cl imat ized cupholder
.,. Press button ®~ fig. 84 to keep you r bev
erage
cold . The button w ill light up b lue .
.,. Press button ©~
fig. 84 to keep your bev
erage
warm . The button will light up red .
.,. To sw itch between the two func tions, press
the appropriate button.
.,. Press ® or© to switch off these feature .
The light in the button will go o ut.
When cooling, the temperature of the bever
age holde r base will go down to approximate
l y 41
°F (5 °C). When warming, the tempera
ture w ill be approximately 136
°F (58 °(). At
104
°F (40 °() the warm ing display will come
on @. This is reminder not to touch the base
because it is hot . The disp lay goes out if the
temperature falls be low this value.
_& WARNING
- Never to uch the beverage ho lde r base
when the warm ing display is on. Yo u can
burn yourse lf!
- Do not use breakable beverage con tain
ers (for example made out of glass o r
porcelain). Yo u could be injured by them
in case of an acc ident.
(D Note
Ma ke sure you r beverage holder has a lid.
I f not, yo ur beverage could spill out and
cause damage to t he ve hicle elec tronic or
stain th e seat cove rs .
-
(D Tips
Do not cover the ventilation grille -arrow
because that could prevent the beverage
ho lder from functioning correctly.
Cupholders in the door
pockets
There is a cupholder in all four doors.
F ig . 85 Sect ion of door panel: (upholder
The cupholders in the doo r pockets are suita
ble for
l to 1.5-liter bott les.
.&_ WARNING
-==
Spilled hot liquid can cause an accident
and personal injury.
-
- Never carry any beverage containers with
hot liq uids, such as hot coffee or hot tea,
in the vehicle while it is moving. In case
of an accident, sudden braking or othe r
veh icle movement, hot liquid could spill,
causing scalding burns. Spilled hot liquid
can also cause an a ccident and pe rsonal
in jur y.
- Use on ly soft cups in the cupholder . Hard
cups and glasses can cause injury in a n
accident.
0 Note
Only drink conta iners with lids should be
ca rried in the cuphold er. L iquid could spill
out and damage you r vehicle's electron ic
equipment or stain the upho lstery, etc.
Page 77 of 316

Ashtray
Fig. 86 Center console: front ashtray
Opening the ashtray
.,. Slide the cover open .
Closing the ashtray
.,. Tap the lid to close the ashtray automatical
ly.
Removing ashtray insert
.,. Re lease the ashtray insert by sliding the
switch @c:>
fig. 86 to the right .
.,. Remove the ashtray insert@
c:> fig. 86 .
Reinstalling ashtray insert
.,. Press the ashtray insert into its holder .
_& WARNING
Never put waste paper in the ashtray . Hot
ashes or othe r hot objects in the ashtray
cou ld set waste paper on fire.
Cigarette Lighter/
Socket
Cigarette lighter
Fig. 87 Ce nter console: c igarette lighter
Seats and storage 75
.,. Press the cigarette lighter in .
.,. Remove the cigarette lighter when it pops
out .
The cigarette lighter should only be used as a
power source for the compressor from the in
flatable spare tire/tire repair kit* when abso
lutely necessary.
_& WARNING
The cigarette lighter only works when the ignition is switched on. Incorrect usage
can lead to ser ious injuries or burns. For
this reason, ch ildren should never be left
unattended in the vehicle because this in
creases the risk of injury.
12-volt sockets
Electrical accessories can be connected to ev
ery 12-volt socket.
Fig. 88 Section of the t rim pane l of the luggage com
partme nt: 12-volt socket
Fig. 89 Center console: 12-volt socket
I er a, m
.,. Open the socket cover c:> fig. 88 or c:> fig . 89 .
.,. Insert the plug of the electrical device into
the socket. .,.
Page 78 of 316

76 Seats and storage
The 12-volt sockets can be used for electrical
accessories. The power input must not exceed
120 watts.
There is an additional 12-volt socket in the
center console. Before you purchase any accessories, always
read and follow the information in
~ page 29 7, Additional accessories and parts
replacement.
A WARNING
The power outlets and therefore the elec
trical accessories connected to them oper ate only with the ignition on. Improper use
of the outlets or of electrical accessories
can lead to serious injuries or cause a fire.
For this reason, children should never be
left unattended in the vehicle -they could
be injured!
(D Note
To avoid damaging the socket, only use
plugs that fit properly .
{D) Tips
When the engine is off and accessories are
still plugged in and are on, the vehicle bat
tery can still be drained .
Storage
General overview
There are numerous places to store items in
your vehicle.
Glove compartment 9 page 76
Cooling box in glove compart-
9 page 77
ment
Storage compartment in the
roof
Multi-use attachment
Coat hooks
Storage in the door panels
Storage net in footwell
9page 77
9page 77
9page 78
-
Storage net in the front seat
backs
Storage net in luggage com
partment
A WARNING
--
- Always remove objects from the instru
ment panel. Any items not put away
could slide around inside the vehicle
while driving or when accelerating or
when applying the brakes or when driv ing around a corner.
- When you are driving make sure that
anything you may have placed in the cen
ter console or other storage locations
cannot fall out into the footwells. In case
of sudden braking you would not be able
to brake or accelerate.
- Any pieces of clothing that you have
hung up must not interfere with the driv
er's view. The coat hooks are designed
only for lightweight clothing. Never hang
any clothing with hard, pointed or heavy
objects in the pockets on the coat hooks .
During sudden braking or in an accident -
especially if the airbag is deployed -
these objects could injure any passen
gers inside the vehicle.
Glove compartment
The glove compartment is illuminated and
can be locked .
Fig. 90 Glov e co mpartm ent
To open glove compartment
.,. Pull the handle in the direction of the arrow
9 fig. 90 and swing the cover down to open . ..,.
Page 79 of 316

To close glove compartment
• Push the glove compartment lid upward un-
ti l the lock engages.
There are holders for a pen and a pad of paper in the glove compartment lid.
On the right side in the glove compartment is
a holder with the key body into which the
emergency key must be cl ipped to be able to
start the vehicle .
A WARNING
To reduce the risk of personal injury in an
accident or sudden stop, a lways keep the
glove compartment closed whi le driving.
Cooling box in glove compartment
The cooling box works only when the air-con
ditioning is in cooling mode.
Fig. 91 Glove box w ith cool ing box open and switc hed
on
" Open the glove compartment c::> page 76,
fig. 90.
" Turn the rotary switch @counter-clockwise
to switch the coo ling on. The symbols on the
rotary switch must be displayed
c::> fig. 91 ac
cordingly .
• Turn the rotary sw itch @clockwise to
switch the cooling off .
T he cooling box works only in the cooling
mode. If the climate contro l is in the heating
mode, we recommend switching the cooling
box off .
Seats and storage 77
Storage compartment in the roof
""'
11111
Fig. 92 Storage pocket in the roof
" To open the lid you have to touch the bar
c> fig . 92 (Arrow). The lid opens automati
cally .
" To close the lid, push it up until it engages .
A WARNING
Always keep the lid closed while driv ing to
reduce the ris k of injury dur ing a sudden
braking maneuver or in the event of an ac
cident .
Multi-use attachment
Light objects can be secured on the multi-use
attachment.
Fig. 93 Passenger footwell: mult i-use attachment
Unfold the hook in the direction of the arrow
¢ fig . 93.
A WARNING
Maximum load on the multi-use attach
ment: 22 lbs (10 kg) . Heavier objects are
not adequately secured . There is risk of
personal injury .
Page 80 of 316
78 Seats and storage
@ Tips
Other accessories or objects such as an
umbrella from the Audi accessories pro
grams can be secured on the multi-use at
tachment.
Coat hooks
Fig. 94 Coat hooks at rear doors
A WARNING
-Hang clothes in such a way that they do
not impair the driver's vis ion.
- The coat hooks must only be used for
lightweight clothing. Do not leave any
heavy or sharp edged objects in the pock
ets which may interfere with the side cur
tain airbag deployment and can cause
personal injury in a crash.
- Do not use coat hangers for hanging
clothing on the coat hooks as this can in
terfere with proper deployment of the
side curtain airbags in an accident.
- Do not hang heavy objects on the coat
hooks, as they could cause personal in
jury in a sudden stop.