2012 MERCEDES-BENZ SL ROADSTER tow bar
[x] Cancel search: tow barPage 59 of 637
Have roll bars checked immediately at a quali-
fied specialist workshop. G
WARNING
If you place objects or clothing on the roll bar covers, these could impair roll bar extension.
The roll bars may then not protect the vehicle occupants as intended. In addition, objects
could endanger the vehicle occupants when
the roll bar is extending. This poses an
increased risk of injury or even fatal injury.
Ensure that the movement area of the roll bar covers is kept clear. Always stow all objects in
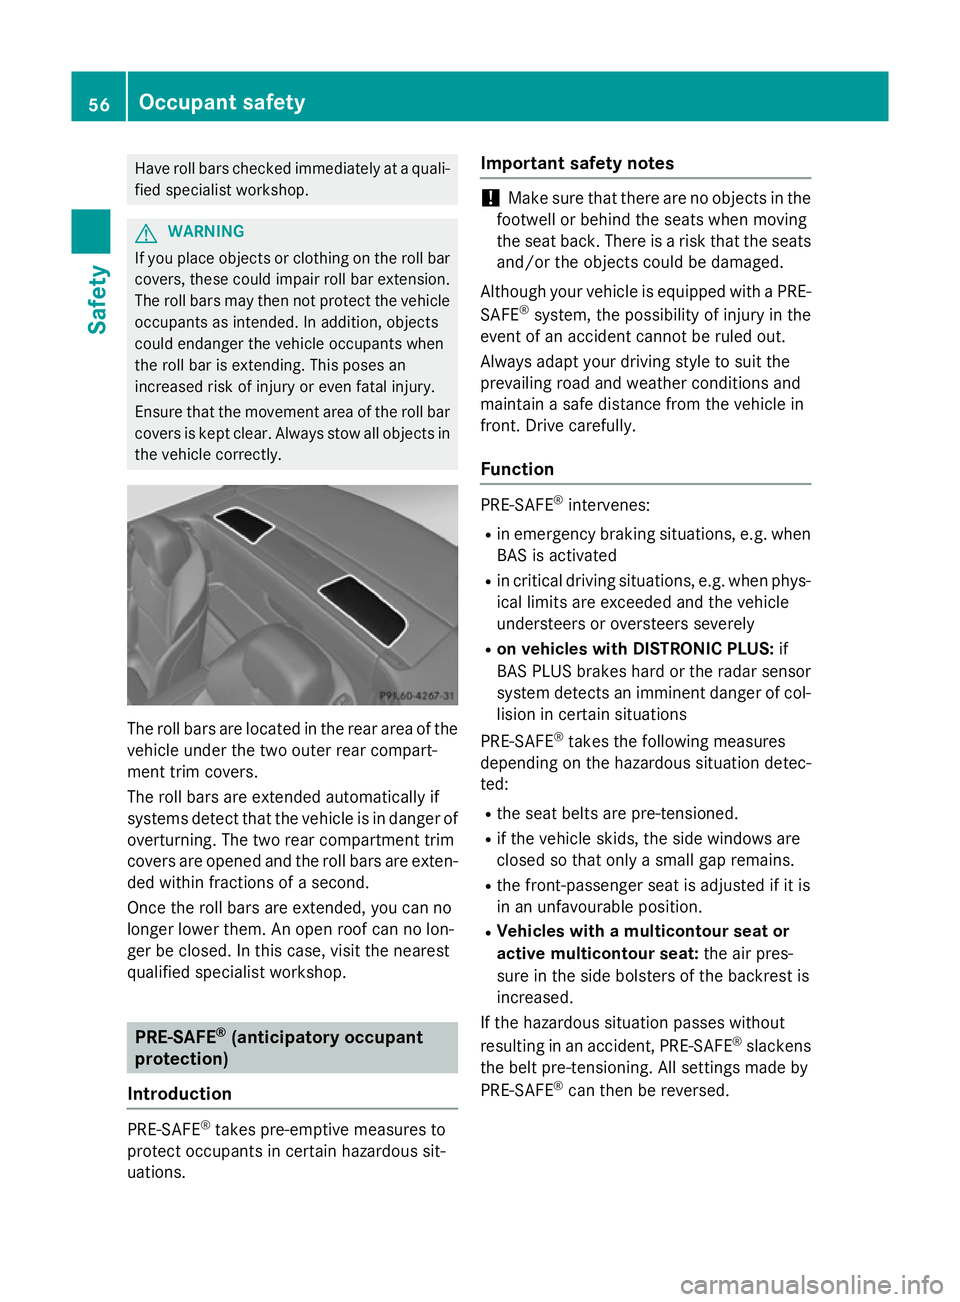
the vehicle correctly. The roll bars are located in the rear area of the
vehicle under the two outer rear compart-
ment trim covers.
The roll bars are extended automatically if
systems detect that the vehicle is in danger of
overturning. The two rear compartment trim
covers are opened and the roll bars are exten- ded within fractions of a second.
Once the roll bars are extended, you can no
longer lower them. An open roof can no lon-
ger be closed. In this case, visit the nearest
qualified specialist workshop. PRE-SAFE
®
(anticipatory occupant
protection)
Introduction PRE-SAFE
®
takes pre-emptive measures to
protect occupants in certain hazardous sit-
uations. Important safety notes !
Make sure that there are no objects in the
footwell or behind the seats when moving
the seat back. There is a risk that the seats and/or the objects could be damaged.
Although your vehicle is equipped with a PRE-
SAFE ®
system, the possibility of injury in the
event of an accident cannot be ruled out.
Always adapt your driving style to suit the
prevailing road and weather conditions and
maintain a safe distance from the vehicle in
front. Drive carefully.
Function PRE-SAFE
®
intervenes:
R in emergency braking situations, e.g. when
BAS is activated
R in critical driving situations, e.g. when phys-
ical limits are exceeded and the vehicle
understeers or oversteers severely
R on vehicles with DISTRONIC PLUS: if
BAS PLUS brakes hard or the radar sensor
system detects an imminent danger of col- lision in certain situations
PRE-SAFE ®
takes the following measures
depending on the hazardous situation detec-
ted:
R the seat belts are pre-tensioned.
R if the vehicle skids, the side windows are
closed so that only a small gap remains.
R the front-passenger seat is adjusted if it is
in an unfavourable position.
R Vehicles with a multicontour seat or
active multicontour seat: the air pres-
sure in the side bolsters of the backrest is
increased.
If the hazardous situation passes without
resulting in an accident, PRE-SAFE ®
slackens
the belt pre-tensioning. All settings made by
PRE-SAFE ®
can then be reversed. 56
Occupant safetySafety
Page 119 of 637
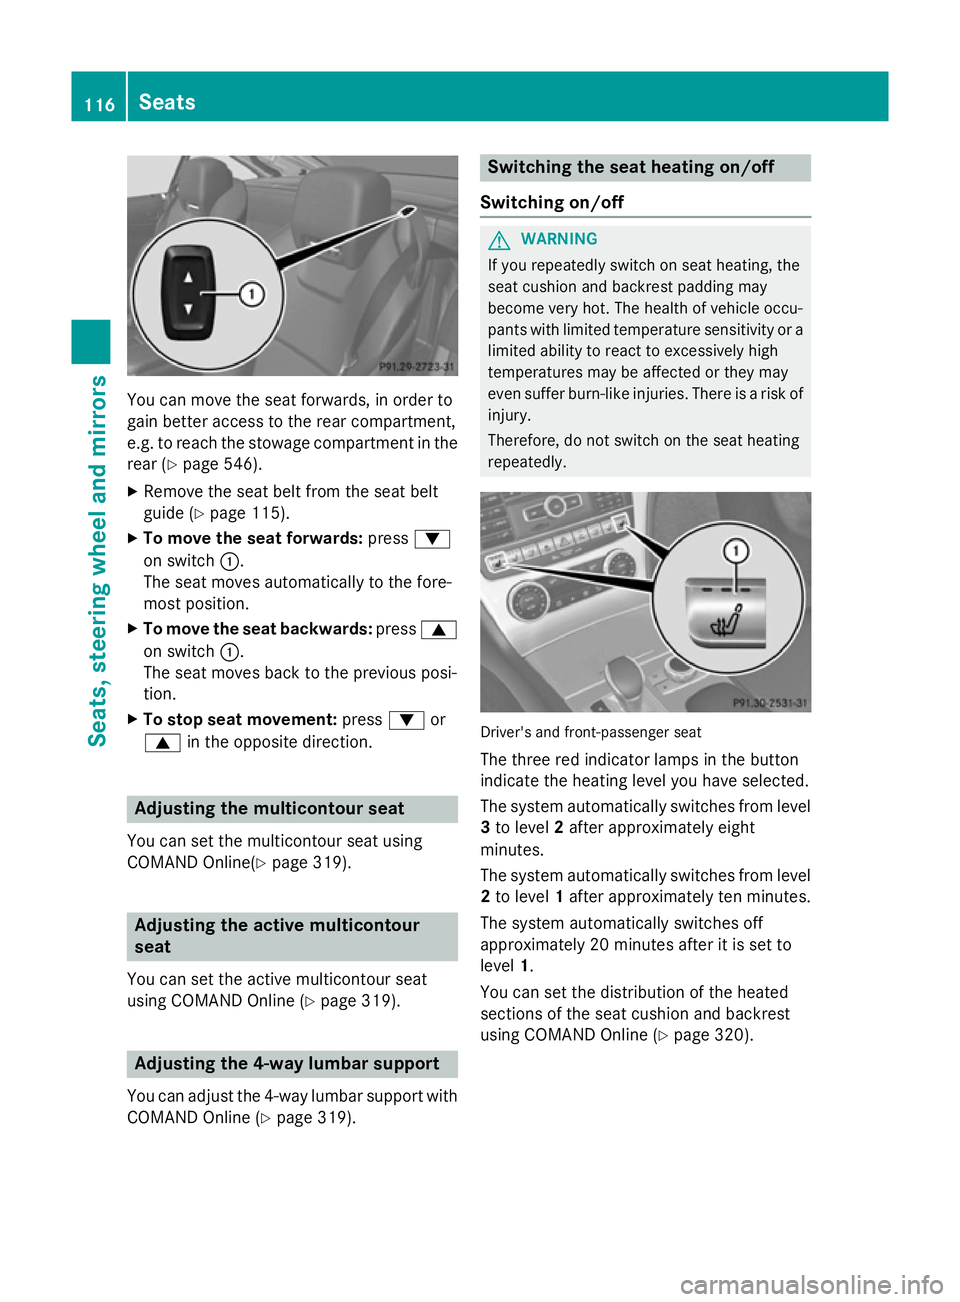
You can move the seat forwards, in order to
gain better access to the rear compartment,
e.g. to reach the stowage compartment in the
rear (Y page 546).
X Remove the seat belt from the seat belt
guide (Y page 115).
X To move the seat forwards: press:
on switch :.
The seat moves automatically to the fore-
most position.
X To move the seat backwards: press9
on switch :.
The seat moves back to the previous posi-
tion.
X To stop seat movement: press:or
9 in the opposite direction. Adjusting the multicontour seat
You can set the multicontour seat using
COMAND Online(Y page 319).Adjusting the active multicontour
seat
You can set the active multicontour seat
using COMAND Online (Y page 319).Adjusting the 4-way lumbar support
You can adjust the 4-way lumbar support with COMAND Online (Y page 319). Switching the seat heating on/off
Switching on/off G
WARNING
If you repeatedly switch on seat heating, the
seat cushion and backrest padding may
become very hot. The health of vehicle occu-
pants with limited temperature sensitivity or a limited ability to react to excessively high
temperatures may be affected or they may
even suffer burn-like injuries. There is a risk of
injury.
Therefore, do not switch on the seat heating
repeatedly. Driver's and front-passenger seat
The three red indicator lamps in the button
indicate the heating level you have selected.
The system automatically switches from level 3 to level 2after approximately eight
minutes.
The system automatically switches from level
2 to level 1after approximately ten minutes.
The system automatically switches off
approximately 20 minutes after it is set to
level 1.
You can set the distribution of the heated
sections of the seat cushion and backrest
using COMAND Online (Y page 320).116
SeatsSeats, steering wheel and mirrors
Page 121 of 637
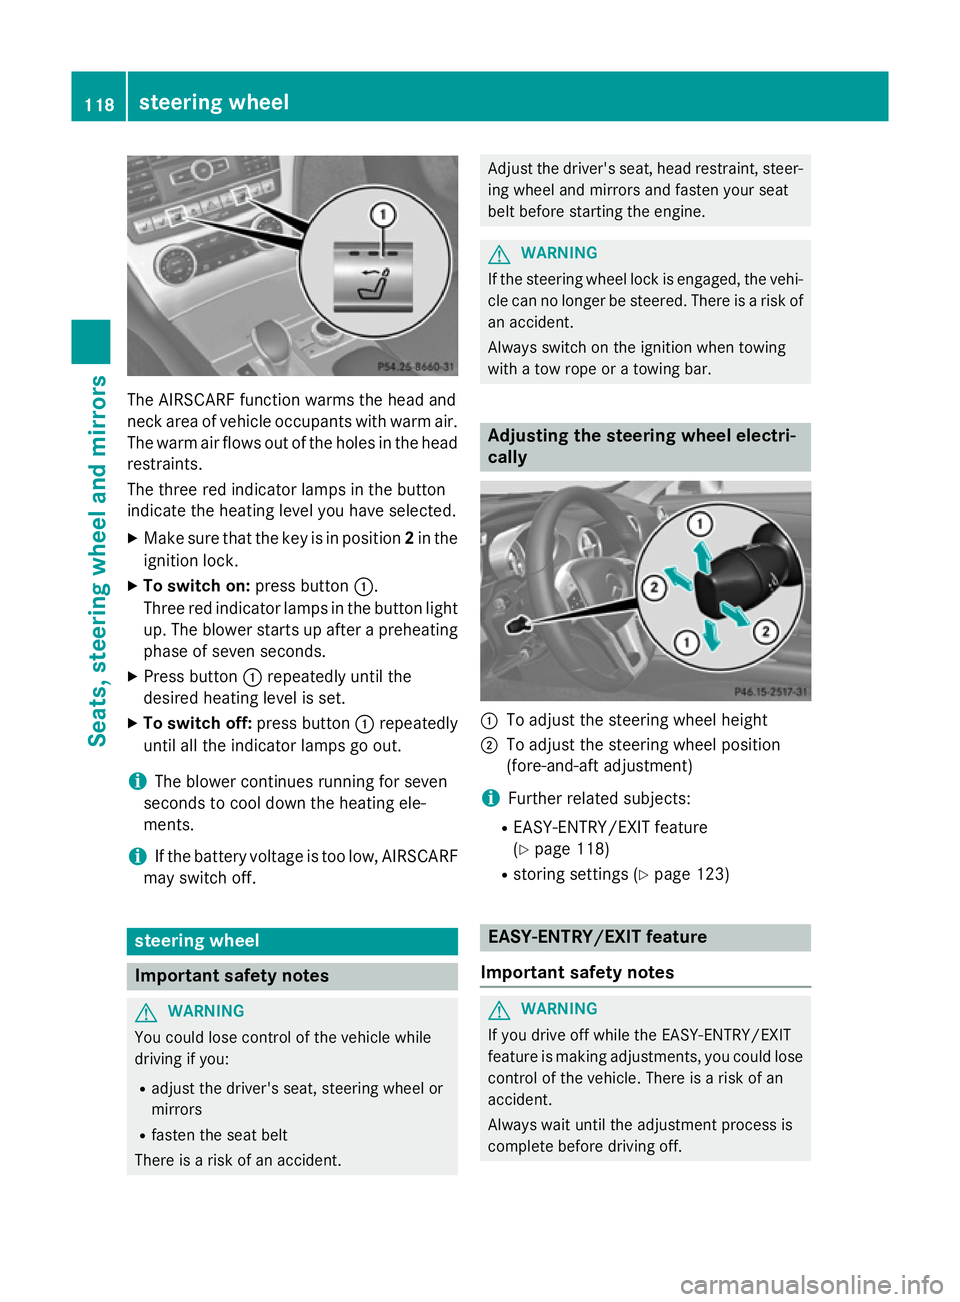
The AIRSCARF function warms the head and
neck area of vehicle occupants with warm air.
The warm air flows out of the holes in the head restraints.
The three red indicator lamps in the button
indicate the heating level you have selected.
X Make sure that the key is in position 2in the
ignition lock.
X To switch on: press button:.
Three red indicator lamps in the button light up. The blower starts up after a preheating
phase of seven seconds.
X Press button :repeatedly until the
desired heating level is set.
X To switch off: press button:repeatedly
until all the indicator lamps go out.
i The blower continues running for seven
seconds to cool down the heating ele-
ments.
i If the battery voltage is too low, AIRSCARF
may switch off. steering wheel
Important safety notes
G
WARNING
You could lose control of the vehicle while
driving if you:
R adjust the driver's seat, steering wheel or
mirrors
R fasten the seat belt
There is a risk of an accident. Adjust the driver's seat, head restraint, steer-
ing wheel and mirrors and fasten your seat
belt before starting the engine. G
WARNING
If the steering wheel lock is engaged, the vehi- cle can no longer be steered. There is a risk of
an accident.
Always switch on the ignition when towing
with a tow rope or a towing bar. Adjusting the steering wheel electri-
cally
:
To adjust the steering wheel height
; To adjust the steering wheel position
(fore-and-aft adjustment)
i Further related subjects:
R EASY-ENTRY/EXIT feature
(Y page 118)
R storing settings (Y page 123) EASY-ENTRY/EXIT feature
Important safety notes G
WARNING
If you drive off while the EASY-ENTRY/EXIT
feature is making adjustments, you could lose
control of the vehicle. There is a risk of an
accident.
Always wait until the adjustment process is
complete before driving off. 118
steering wheelSeats, steering wheel and mirrors
Page 211 of 637
sharp angle. Otherwise, you may damage
the wheels or tyres.
Active Parking Assist may also display spaces not suitable for parking, e.g.:
R parking or stopping prohibitions
R in front of driveways or entrances and exits
R unsuitable surfaces
Parking tips:
R on narrow roads, drive as closely as possi-
ble past the parking space.
R parking spaces that are littered or over-
grown might be identified or measured
incorrectly.
R parking spaces that are partially occupied
by trailer drawbars might not be identified
as such or be measured incorrectly.
R snowfall or heavy rain may lead to a parking
space being measured inaccurately.
R pay attention to the PARKTRONIC
(Y page 205) warning messages during the
parking procedure.
R at any time, you can intervene in the steer-
ing procedure to correct it. Active Parking
Assist will then be cancelled.
R when transporting a load which protrudes
from your vehicle, you should not use
Active Parking Assist.
R never use Active Parking Assist when snow
chains are fitted.
R make sure that the tyre pressures are
always correct. This has a direct influence
on the parking characteristics of the vehi-
cle.
Parking Important safety notes
Objects located above the height range of
Active Parking Assist will not be detected
when the parking space is measured. These
are not taken into account when the parking
procedure is calculated, e.g. overhanging
loads, tail sections or loading ramps of goods vehicles. In some circumstances, Active Park- ing Assist may therefore guide you into the
parking space too early. G
WARNING
If objects are located above the detection
range, Active Parking Assist may start to steer into the parking space too soon. As a result,
you could cause a collision. There is a risk of
an accident.
If objects are located above the detection
range, stop the vehicle and switch Active
Parking Assist off. G
WARNING
Active Parking Assist merely aids you by inter- vening actively in the steering. There is a risk
of accident if you do not apply the brakes
yourself.
Always apply the brakes yourself when park-
ing and manoeuvring.
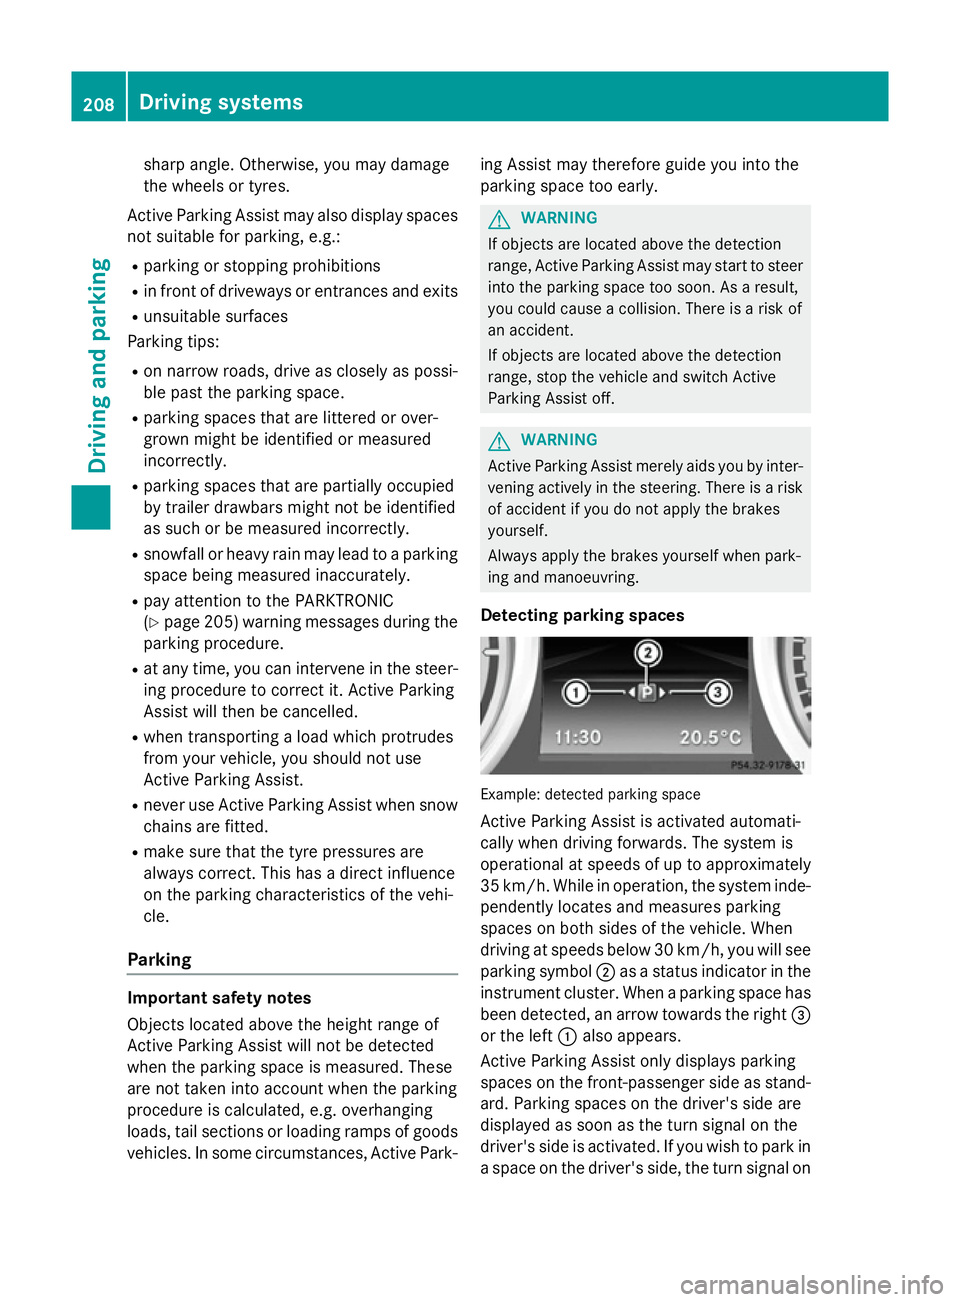
Detecting parking spaces Example: detected parking space
Active Parking Assist is activated automati-
cally when driving forwards. The system is
operational at speeds of up to approximately 35 km/h. While in operation, the system inde- pendently locates and measures parking
spaces on both sides of the vehicle. When
driving at speeds below 30 km/h, you will see
parking symbol ;as a status indicator in the
instrument cluster. When a parking space has
been detected, an arrow towards the right =
or the left :also appears.
Active Parking Assist only displays parking
spaces on the front-passenger side as stand- ard. Parking spaces on the driver's side are
displayed as soon as the turn signal on the
driver's side is activated. If you wish to park in
a space on the driver's side, the turn signal on 208
Driving systemsDriving and parking
Page 215 of 637
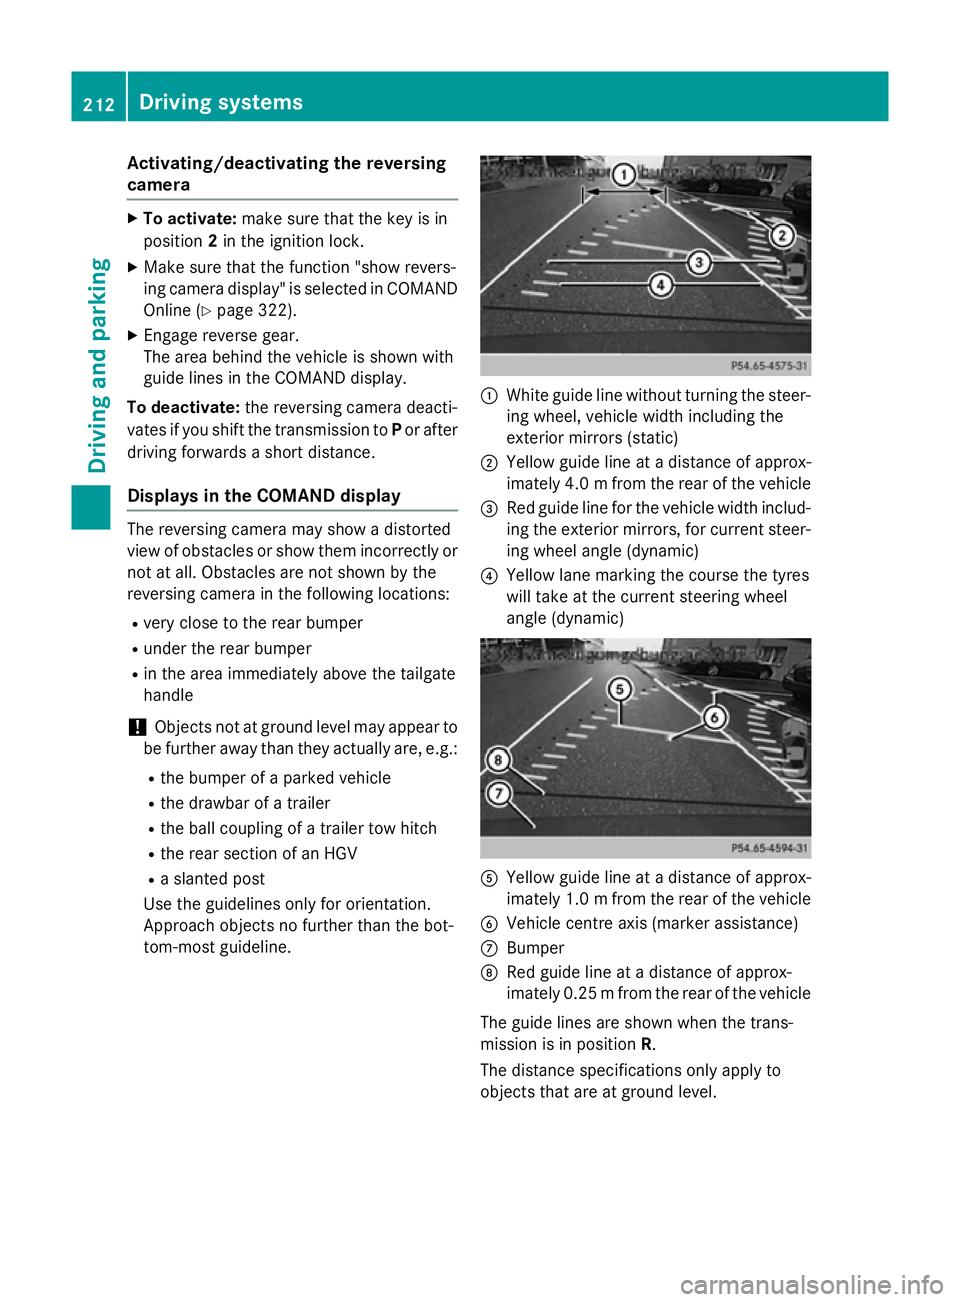
Activating/deactivating the reversing
camera X
To activate: make sure that the key is in
position 2in the ignition lock.
X Make sure that the function "show revers-
ing camera display" is selected in COMAND Online (Y page 322).
X Engage reverse gear.
The area behind the vehicle is shown with
guide lines in the COMAND display.
To deactivate: the reversing camera deacti-
vates if you shift the transmission to Por after
driving forwards a short distance.
Displays in the COMAND display The reversing camera may show a distorted
view of obstacles or show them incorrectly or
not at all. Obstacles are not shown by the
reversing camera in the following locations:
R very close to the rear bumper
R under the rear bumper
R in the area immediately above the tailgate
handle
! Objects not at ground level may appear to
be further away than they actually are, e.g.:
R the bumper of a parked vehicle
R the drawbar of a trailer
R the ball coupling of a trailer tow hitch
R the rear section of an HGV
R a slanted post
Use the guidelines only for orientation.
Approach objects no further than the bot-
tom-most guideline. :
White guide line without turning the steer-
ing wheel, vehicle width including the
exterior mirrors (static)
; Yellow guide line at a distance of approx-
imately 4.0 mfrom the rear of the vehicle
= Red guide line for the vehicle width includ-
ing the exterior mirrors, for current steer- ing wheel angle (dynamic)
? Yellow lane marking the course the tyres
will take at the current steering wheel
angle (dynamic) A
Yellow guide line at a distance of approx-
imately 1.0 mfrom the rear of the vehicle
B Vehicle centre axis (marker assistance)
C Bumper
D Red guide line at a distance of approx-
imately 0.25 mfrom the rear of the vehicle
The guide lines are shown when the trans-
mission is in position R.
The distance specifications only apply to
objects that are at ground level. 212
Driving systemsDriving and parking
Page 308 of 637
Changing the character set
While making an entry in the input menu
(Y page 404):
X Select the psymbol and press Wto
confirm.
R ABC
ABC (upper/lower case)
R 123 123 (digits)
R Other
Other (special characters such as @, €,
etc.)
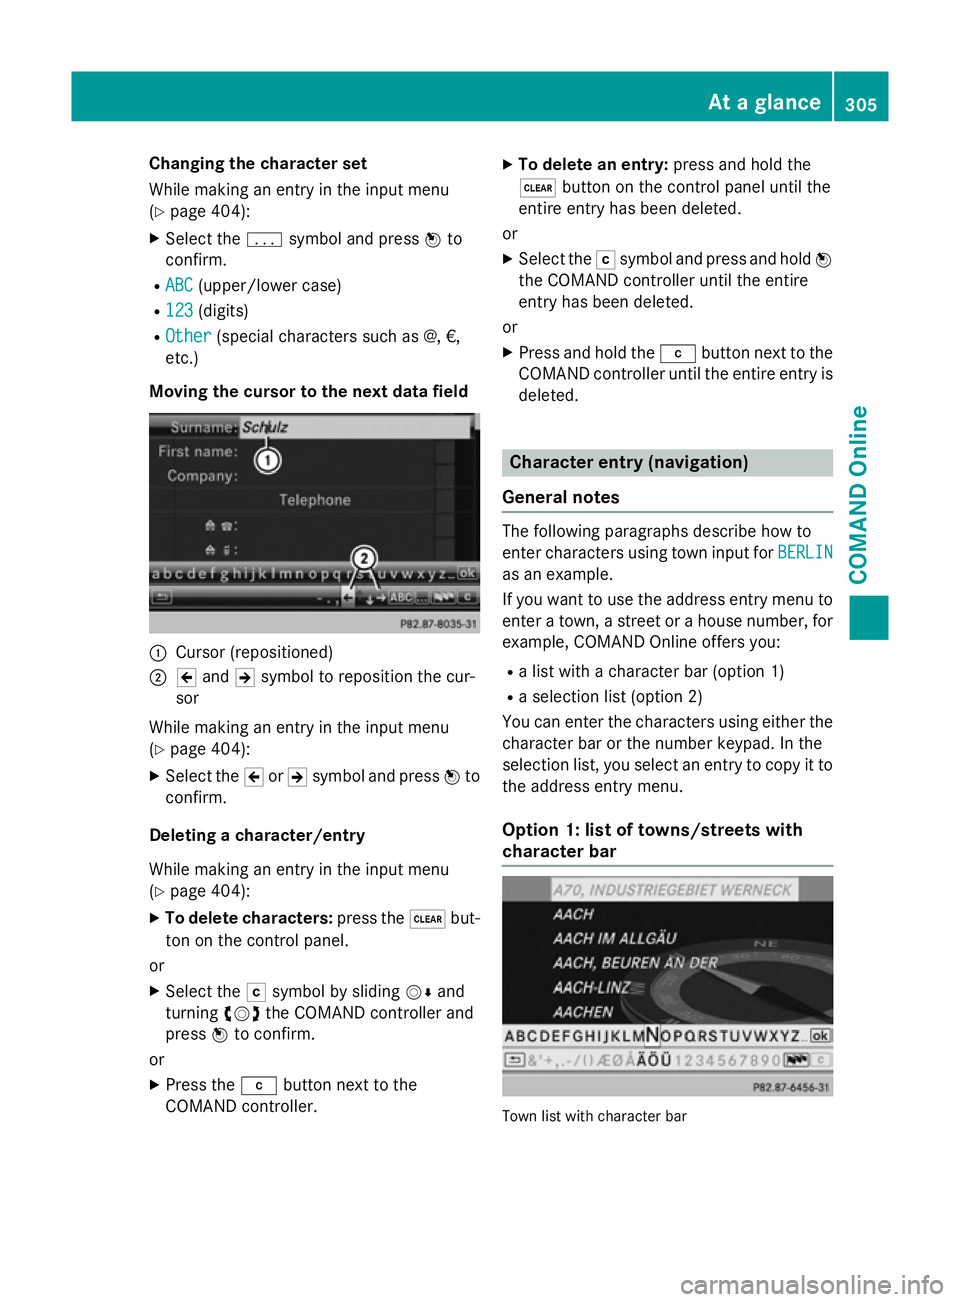
Moving the cursor to the next data field :
Cursor (repositioned)
; 2 and 3symbol to reposition the cur-
sor
While making an entry in the input menu
(Y page 404):
X Select the 2or3 symbol and press Wto
confirm.
Deleting a character/entry
While making an entry in the input menu
(Y page 404):
X To delete characters: press the$but-
ton on the control panel.
or
X Select the Fsymbol by sliding VÆand
turning cVdthe COMAND controller and
press Wto confirm.
or X Press the jbutton next to the
COMAND controller. X
To delete an entry: press and hold the
$ button on the control panel until the
entire entry has been deleted.
or X Select the Fsymbol and press and hold W
the COMAND controller until the entire
entry has been deleted.
or
X Press and hold the jbutton next to the
COMAND controller until the entire entry is deleted. Character entry (navigation)
General notes The following paragraphs describe how to
enter characters using town input for BERLIN BERLIN
as an example.
If you want to use the address entry menu to enter a town, a street or a house number, for
example, COMAND Online offers you:
R a list with a character bar (option 1)
R a selection list (option 2)
You can enter the characters using either the character bar or the number keypad. In the
selection list, you select an entry to copy it tothe address entry menu.
Option 1: list of towns/streets with
character bar Town list with character bar At a glance
305COMAND Online Z
Page 309 of 637
X
Call up the town list with the character bar
(Y page 327).
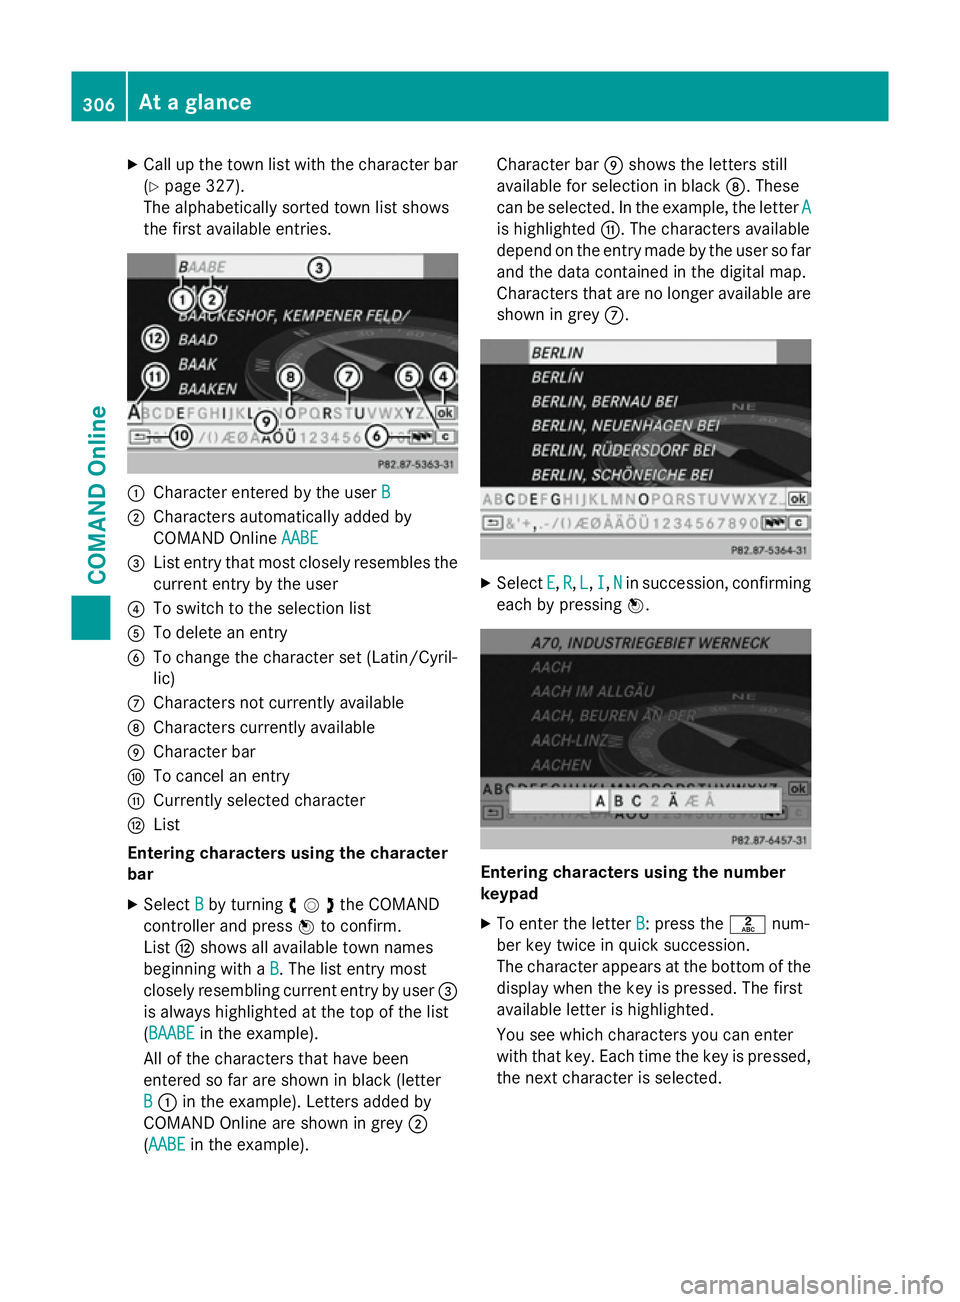
The alphabetically sorted town list shows
the first available entries. :
Character entered by the user B
B
; Characters automatically added by
COMAND Online AABE
AABE
= List entry that most closely resembles the
current entry by the user
? To switch to the selection list
A To delete an entry
B To change the character set (Latin/Cyril-
lic)
C Characters not currently available
D Characters currently available
E Character bar
F To cancel an entry
G Currently selected character
H List
Entering characters using the character
bar
X Select B
B by turning cVdthe COMAND
controller and press Wto confirm.
List Hshows all available town names
beginning with a B
B. The list entry most
closely resembling current entry by user =
is always highlighted at the top of the list
(BAABE BAABE in the example).
All of the characters that have been
entered so far are shown in black (letter
B
B : in the example). Letters added by
COMAND Online are shown in grey ;
(AABE AABE in the example). Character bar
Eshows the letters still
available for selection in black D. These
can be selected. In the example, the letter A A
is highlighted G. The characters available
depend on the entry made by the user so far and the data contained in the digital map.
Characters that are no longer available are
shown in grey C. X
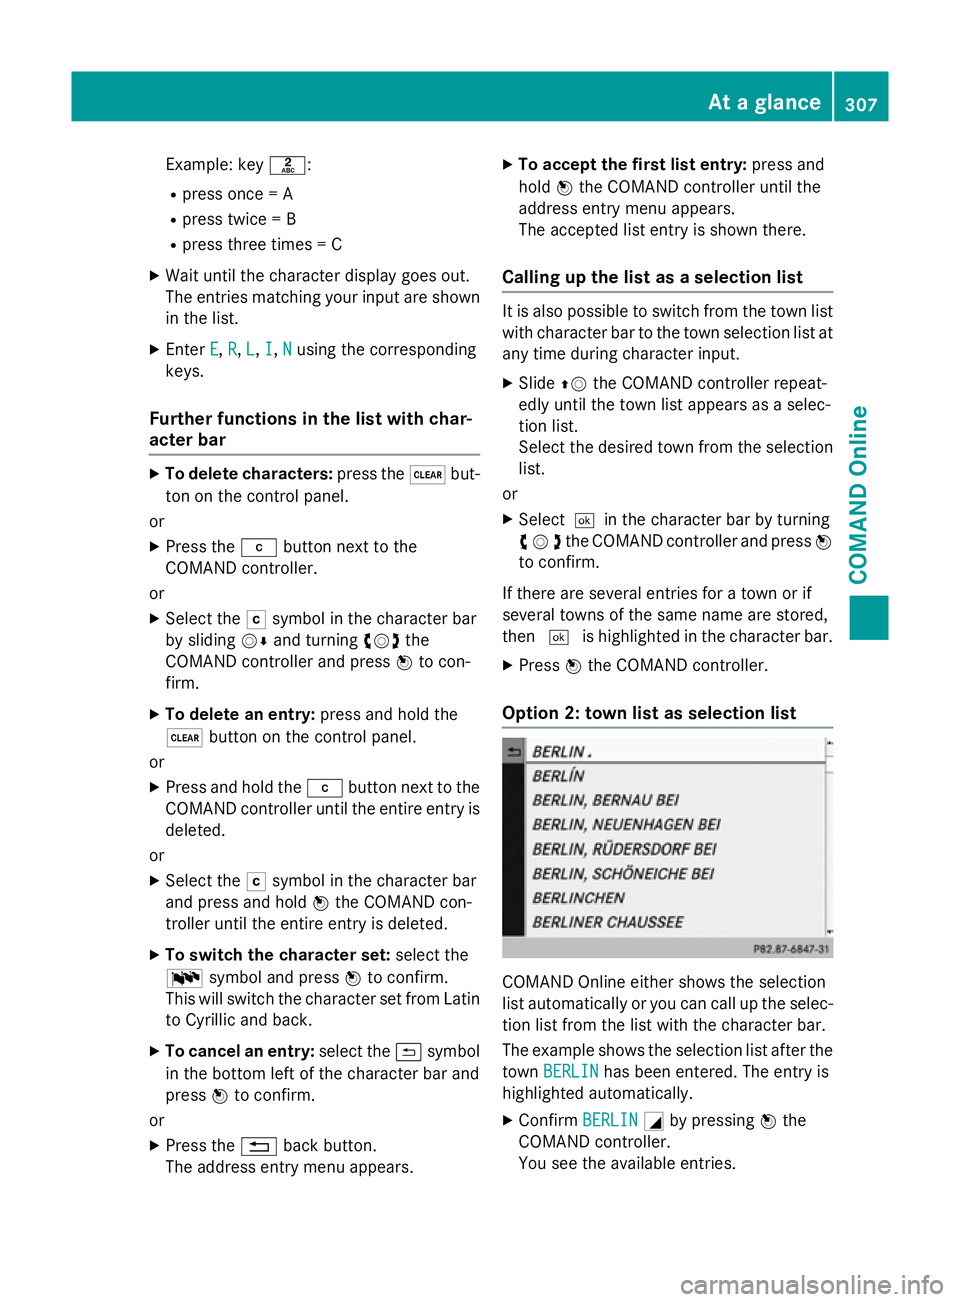
Select E E,R
R, L
L, I
I,N
Nin succession, confirming
each by pressing W. Entering characters using the number
keypad
X To enter the letter B
B: press thelnum-
ber key twice in quick succession.
The character appears at the bottom of the
display when the key is pressed. The first
available letter is highlighted.
You see which characters you can enter
with that key. Each time the key is pressed,
the next character is selected. 306
At a glanceCOMAND Online
Page 310 of 637
Example: key
l:
R press once = A
R press twice = B
R press three times = C
X Wait until the character display goes out.
The entries matching your input are shown
in the list.
X Enter E
E, R
R,L
L,I
I,N
Nusing the corresponding
keys.
Further functions in the list with char-
acter bar X
To delete characters: press the$but-
ton on the control panel.
or
X Press the jbutton next to the
COMAND controller.
or
X Select the Fsymbol in the character bar
by sliding VÆand turning cVdthe
COMAND controller and press Wto con-
firm.
X To delete an entry: press and hold the
$ button on the control panel.
or
X Press and hold the jbutton next to the
COMAND controller until the entire entry is deleted.
or
X Select the Fsymbol in the character bar
and press and hold Wthe COMAND con-
troller until the entire entry is deleted.
X To switch the character set: select the
B symbol and press Wto confirm.
This will switch the character set from Latin to Cyrillic and back.
X To cancel an entry: select the&symbol
in the bottom left of the character bar and
press Wto confirm.
or
X Press the %back button.
The address entry menu appears. X
To accept the first list entry: press and
hold Wthe COMAND controller until the
address entry menu appears.
The accepted list entry is shown there.
Calling up the list as a selection list It is also possible to switch from the town list
with character bar to the town selection list atany time during character input.
X Slide ZVthe COMAND controller repeat-
edly until the town list appears as a selec-
tion list.
Select the desired town from the selection
list.
or
X Select¬ in the character bar by turning
cVdthe COMAND controller and press W
to confirm.
If there are several entries for a town or if
several towns of the same name are stored,
then ¬ is highlighted in the character bar.
X Press Wthe COMAND controller.
Option 2: town list as selection list COMAND Online either shows the selection
list automatically or you can call up the selec- tion list from the list with the character bar.
The example shows the selection list after the
town BERLIN BERLIN has been entered. The entry is
highlighted automatically.
X Confirm BERLIN
BERLINGby pressing Wthe
COMAND controller.
You see the available entries. At a glance
307COMAND Online Z