2012 MERCEDES-BENZ SL ROADSTER tow bar
[x] Cancel search: tow barPage 343 of 637
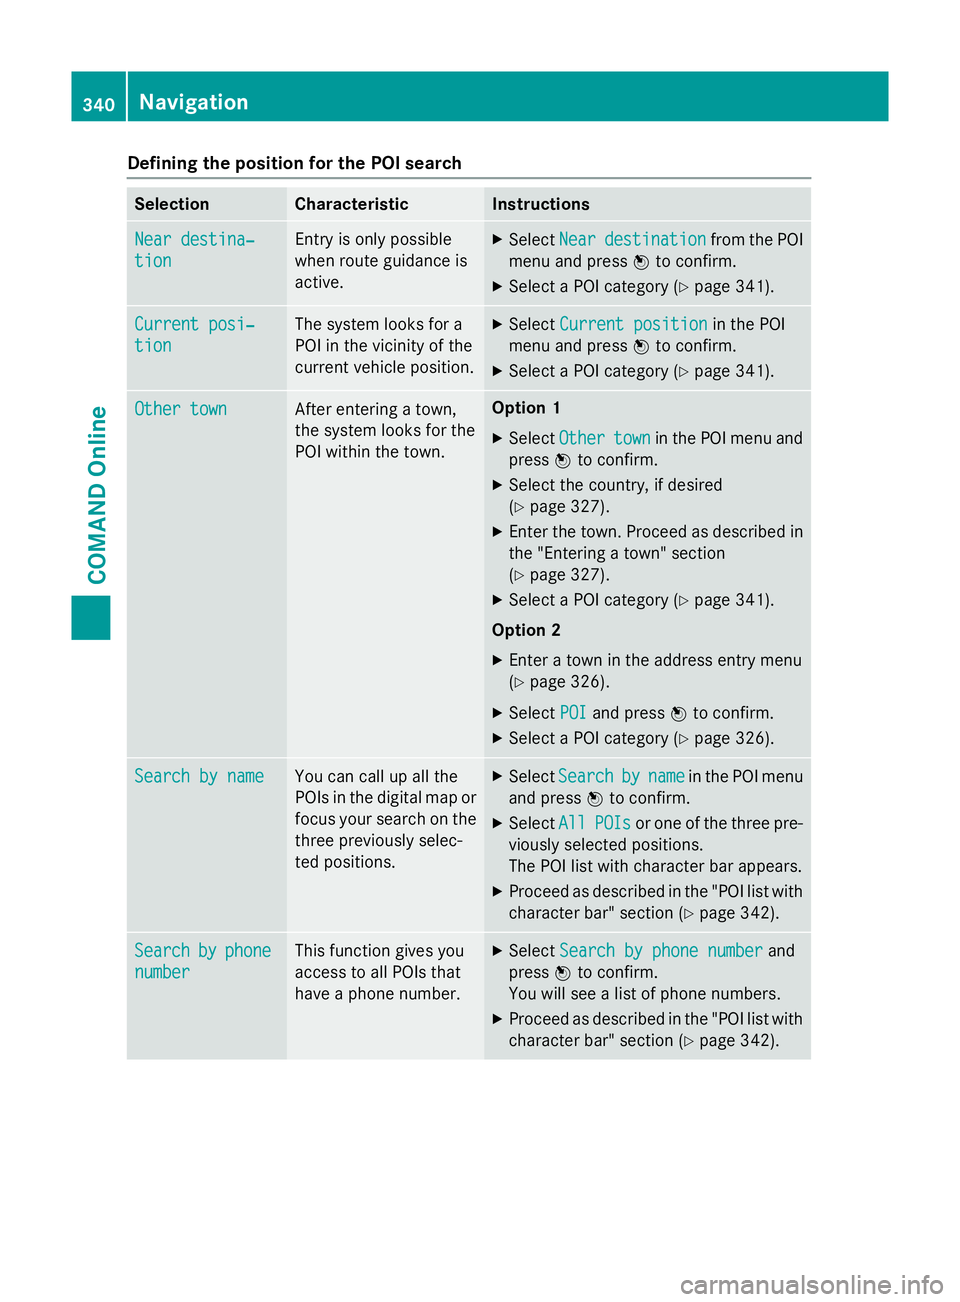
Defining the position for the POI search
Selection Characteristic Instructions
Near destina‐
Near destina‐
tion tion Entry is only possible
when route guidance is
active. X
Select Near Neardestination
destination from the POI
menu and press Wto confirm.
X Select a POI category (Y page 341).Current posi‐
Current posi‐
tion tion The system looks for a
POI in the vicinity of the
current vehicle position. X
Select Current position Current position in the POI
menu and press Wto confirm.
X Select a POI category (Y page 341).Other town
Other town After entering a town,
the system looks for the
POI within the town. Option 1
X Select Other Other town
townin the POI menu and
press Wto confirm.
X Select the country, if desired
(Y page 327).
X Enter the town. Proceed as described in
the "Entering a town" section
(Y page 327).
X Select a POI category (Y page 341).
Option 2
X Enter a town in the address entry menu
(Y page 326).
X Select POI POIand press Wto confirm.
X Select a POI category (Y page 326).Search by name
Search by name You can call up all the
POIs in the digital map or
focus your search on the three previously selec-
ted positions. X
Select Search Search by
byname
name in the POI menu
and press Wto confirm.
X Select All
AllPOIs
POIs or one of the three pre-
viously selected positions.
The POI list with character bar appears.
X Proceed as described in the "POI list with
character bar" section (Y page 342).Search Search
by
byphone
phone
number
number This function gives you
access to all POIs that
have a phone number. X
Select Search by phone number Search by phone number and
press Wto confirm.
You will see a list of phone numbers.
X Proceed as described in the "POI list with
character bar" section (Y page 342).340
NavigationCOMAND Online
Page 345 of 637
The search results display the following infor-
mation:
R an arrow that shows the linear direction to
the POI
R the linear distance to the POI
R the name of the POI
i The arrow and linear distance to the des-
tination are not visible if you have entered a POI after entering another town.
The arrow is also not shown when search-
ing for a POI in the vicinity of the destina-
tion.
Depending on the POI selected,
COMAND Online uses different reference
points in determining the linear distance to
the destination:
R vicinity of current position: the linear dis-
tance is the distance from the current
vehicle position to the POI.
R vicinity of destination: the linear distance
is the distance of the POI from the des-
tination entered.
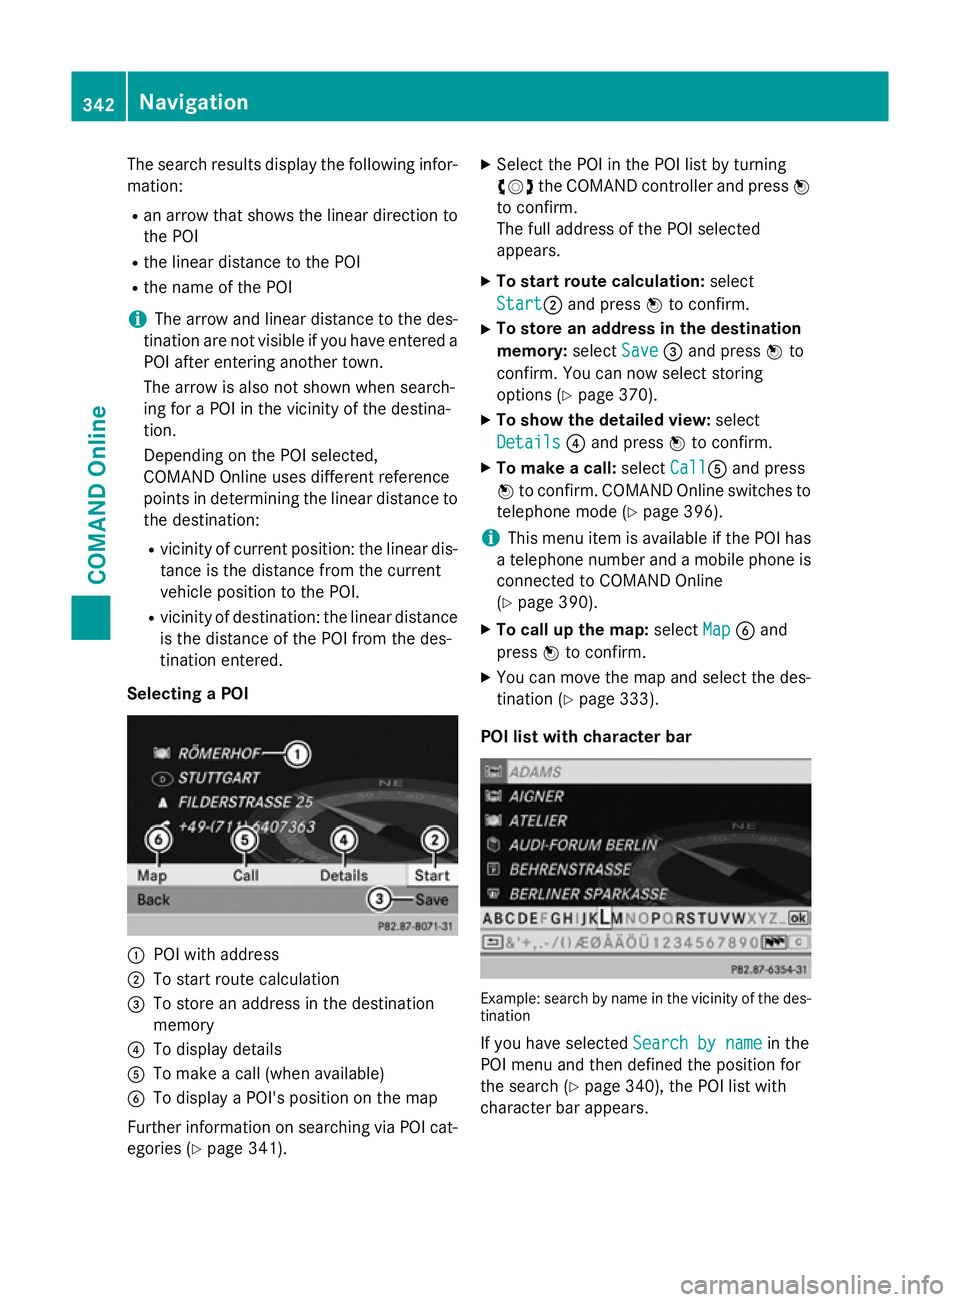
Selecting a POI :
POI with address
; To start route calculation
= To store an address in the destination
memory
? To display details
A To make a call (when available)
B To display a POI's position on the map
Further information on searching via POI cat-
egories (Y page 341). X
Select the POI in the POI list by turning
cVd the COMAND controller and press W
to confirm.
The full address of the POI selected
appears.
X To start route calculation: select
Start Start; and press Wto confirm.
X To store an address in the destination
memory: selectSave Save=and press Wto
confirm. You can now select storing
options (Y page 370).
X To show the detailed view: select
Details Details ?and press Wto confirm.
X To make a call: selectCall
CallA and press
W to confirm. COMAND Online switches to
telephone mode (Y page 396).
i This menu item is available if the POI has
a telephone number and a mobile phone is
connected to COMAND Online
(Y page 390).
X To call up the map: selectMap
Map Band
press Wto confirm.
X You can move the map and select the des-
tination (Y page 333).
POI list with character bar Example: search by name in the vicinity of the des-
tination
If you have selected Search by name Search by namein the
POI menu and then defined the position for
the search (Y page 340), the POI list with
character bar appears. 342
NavigationCOMAND Online
Page 371 of 637
cVd
COMAND controller and press Wto
confirm.
X Select Read traffic messages auto‐
Read traffic messages auto‐
matically
matically and pressWto confirm.
The function is switched on Oor off ª,
depending on the previous status. Destination memory
Home address (My address) Entering the home address via address
entry
X Proceed as described under "Adopting an
address book entry as a home address"
(Y page 368). Confirm My Address
My Address by
pressing W.
X To enter the home address for the first
time: confirm New entry
New entry by pressing W.
X To change the home address: select
Change
Change in the menu showing the home
address by turning cVdthe COMAND con-
troller and press Wto confirm.
X Confirm New entry
New entry by pressing W.
X In both cases, enter the home address as a
destination, e.g. as a town, street and
house number (Y page 327). Then, save the
home address (Y page 330).
Adopting an address book entry as a
home address
X To switch to navigation mode: press the
Ø button.
X To show the menu: pressWthe COMAND
controller.
X Select Destination
Destination in the navigation sys-
tem menu bar by turning cVdthe
COMAND controller and press Wto con-
firm.
X Select From memory
From memory and pressWto con-
firm.
You will see the destination memory list
either with the character bar (option 1) or
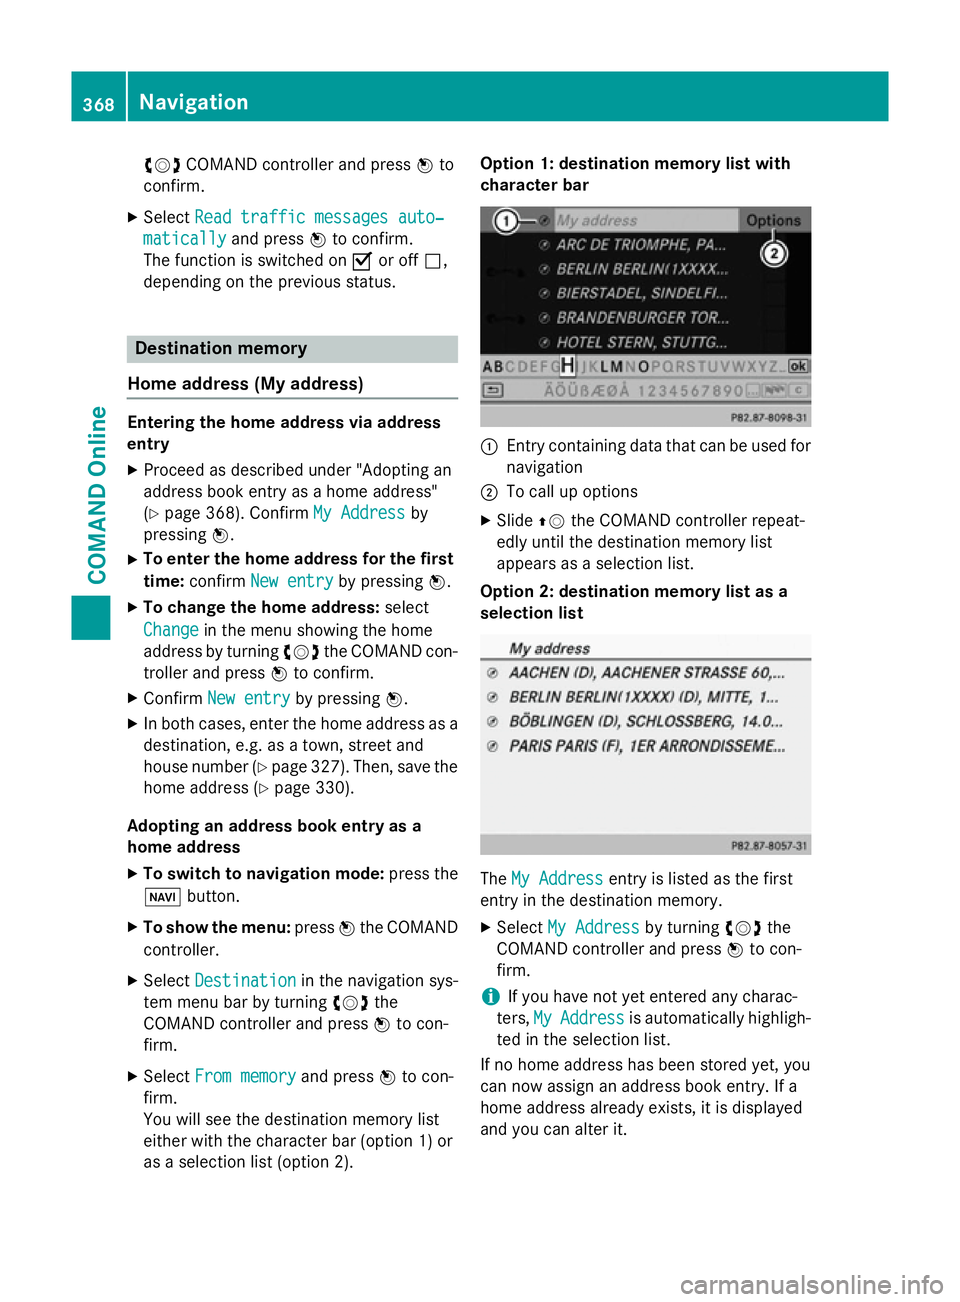
as a selection list (option 2). Option 1: destination memory list with
character bar
:
Entry containing data that can be used for
navigation
; To call up options
X Slide ZVthe COMAND controller repeat-
edly until the destination memory list
appears as a selection list.
Option 2: destination memory list as a
selection list The
My Address My Address entry is listed as the first
entry in the destination memory.
X Select My Address
My Address by turningcVdthe
COMAND controller and press Wto con-
firm.
i If you have not yet entered any charac-
ters, My MyAddress
Address is automatically highligh-
ted in the selection list.
If no home address has been stored yet, you
can now assign an address book entry. If a
home address already exists, it is displayed
and you can alter it. 368
NavigationCOMAND Online
Page 380 of 637
X
Select Navi
Naviin the main function bar by
sliding ZVand turning cVdthe COMAND
controller and press Wto confirm.
X Select Map
Map settings
settings and pressWto con-
firm.
The map settings menu appears.
X Select Topographic map Topographic map and pressWto
confirm.
Depending on the previous status, switch
the option on Oor off ª.
The topographic map uses different colours
to depict elevation. The colour key generally
reflects the topography's dominant vegeta-
tion or the ground's perceived colour when
seen from the air, for example:
R green (grass) for lowland
R yellow, brown (woodland) for hills
R grey (stone) and white (snow) for moun-
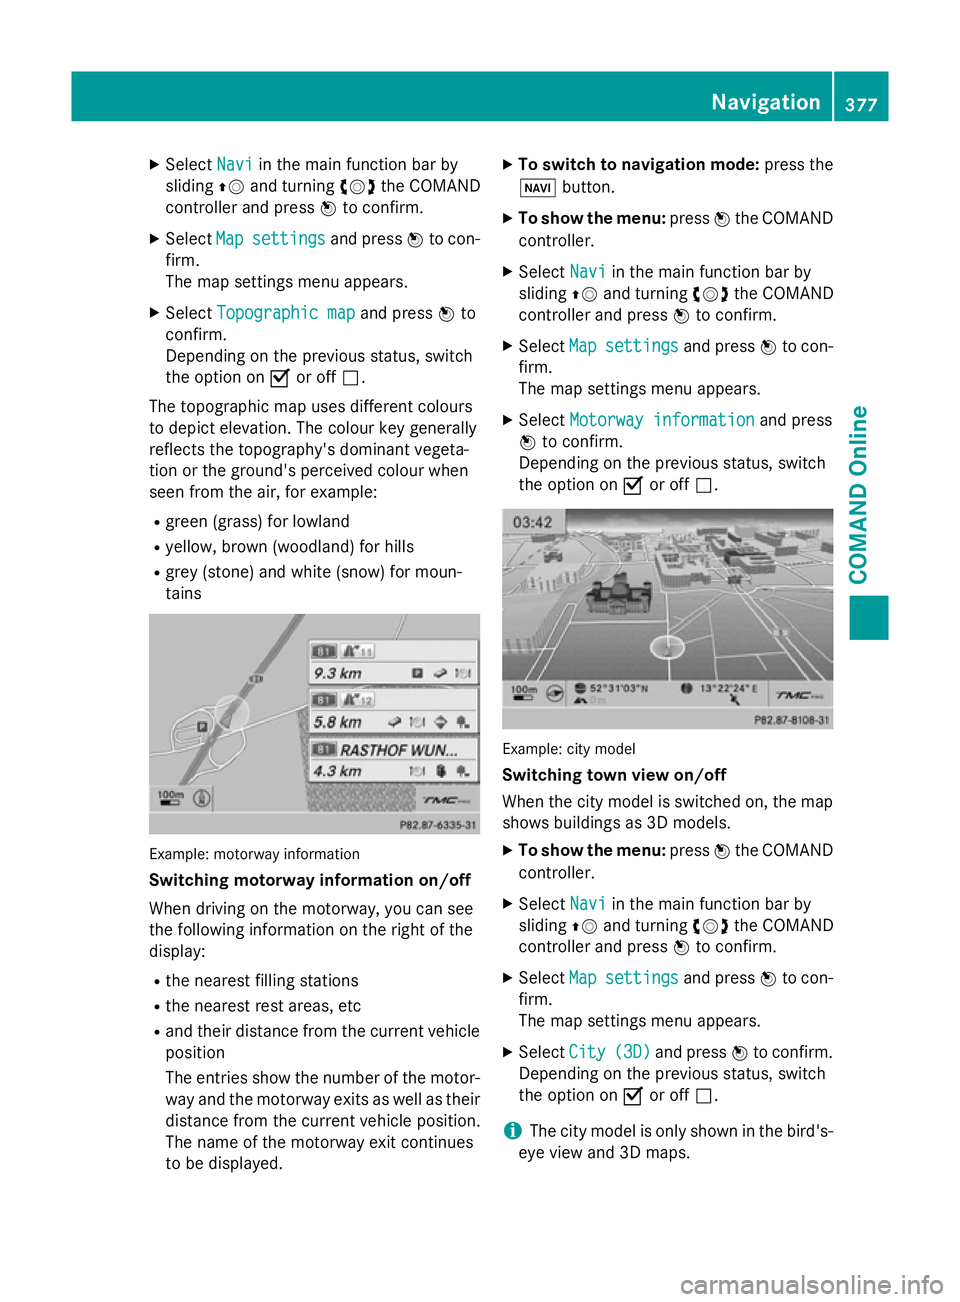
tains Example: motorway information
Switching motorway information on/off
When driving on the motorway, you can see
the following information on the right of the
display:
R the nearest filling stations
R the nearest rest areas, etc
R and their distance from the current vehicle
position
The entries show the number of the motor- way and the motorway exits as well as their
distance from the current vehicle position.
The name of the motorway exit continues
to be displayed. X
To switch to navigation mode: press the
Ø button.
X To show the menu: pressWthe COMAND
controller.
X Select Navi
Navi in the main function bar by
sliding ZVand turning cVdthe COMAND
controller and press Wto confirm.
X Select Map Mapsettings
settings and pressWto con-
firm.
The map settings menu appears.
X Select Motorway information Motorway information and press
W to confirm.
Depending on the previous status, switch
the option on Oor off ª. Example: city model
Switching town view on/off
When the city model is switched on, the map
shows buildings as 3D models.
X To show the menu: pressWthe COMAND
controller.
X Select Navi Naviin the main function bar by
sliding ZVand turning cVdthe COMAND
controller and press Wto confirm.
X Select Map
Mapsettings
settings and pressWto con-
firm.
The map settings menu appears.
X Select City City(3D)
(3D)and press Wto confirm.
Depending on the previous status, switch
the option on Oor off ª.
i The city model is only shown in the bird's-
eye view and 3D maps. Navigation
377COMAND Online Z
Page 381 of 637
It is available for the 50
mand 100 mmap
scales.
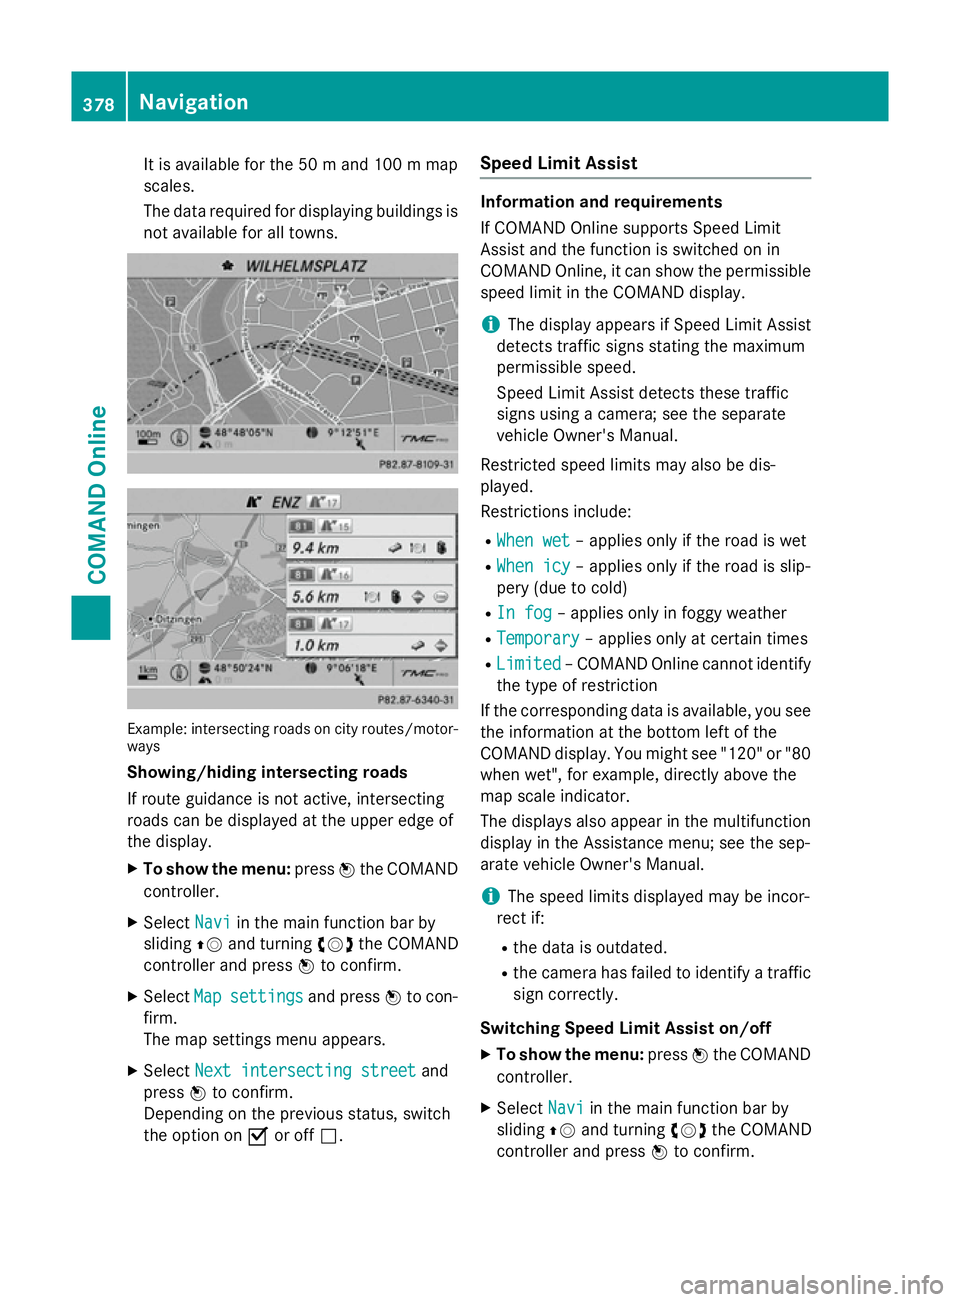
The data required for displaying buildings is not available for all towns. Example: intersecting roads on city routes/motor-
ways
Showing/hiding intersecting roads
If route guidance is not active, intersecting
roads can be displayed at the upper edge of
the display.
X To show the menu: pressWthe COMAND
controller.
X Select Navi
Navi in the main function bar by
sliding ZVand turning cVdthe COMAND
controller and press Wto confirm.
X Select Map
Map settings settings and pressWto con-
firm.
The map settings menu appears.
X Select Next intersecting street Next intersecting street and
press Wto confirm.
Depending on the previous status, switch
the option on Oor off ª. Speed Limit Assist Information and requirements
If COMAND Online supports Speed Limit
Assist and the function is switched on in
COMAND Online, it can show the permissible
speed limit in the COMAND display.
i The display appears if Speed Limit Assist
detects traffic signs stating the maximum
permissible speed.
Speed Limit Assist detects these traffic
signs using a camera; see the separate
vehicle Owner's Manual.
Restricted speed limits may also be dis-
played.
Restrictions include: R When wet
When wet – applies only if the road is wet
R When icy When icy – applies only if the road is slip-
pery (due to cold)
R In fog
In fog – applies only in foggy weather
R Temporary
Temporary – applies only at certain times
R Limited
Limited – COMAND Online cannot identify
the type of restriction
If the corresponding data is available, you see
the information at the bottom left of the
COMAND display. You might see "120" or "80 when wet", for example, directly above the
map scale indicator.
The displays also appear in the multifunction
display in the Assistance menu; see the sep-
arate vehicle Owner's Manual.
i The speed limits displayed may be incor-
rect if:
R the data is outdated.
R the camera has failed to identify a traffic
sign correctly.
Switching Speed Limit Assist on/off
X To show the menu: pressWthe COMAND
controller.
X Select Navi Naviin the main function bar by
sliding ZVand turning cVdthe COMAND
controller and press Wto confirm. 378
NavigationCOMAND Online
Page 467 of 637
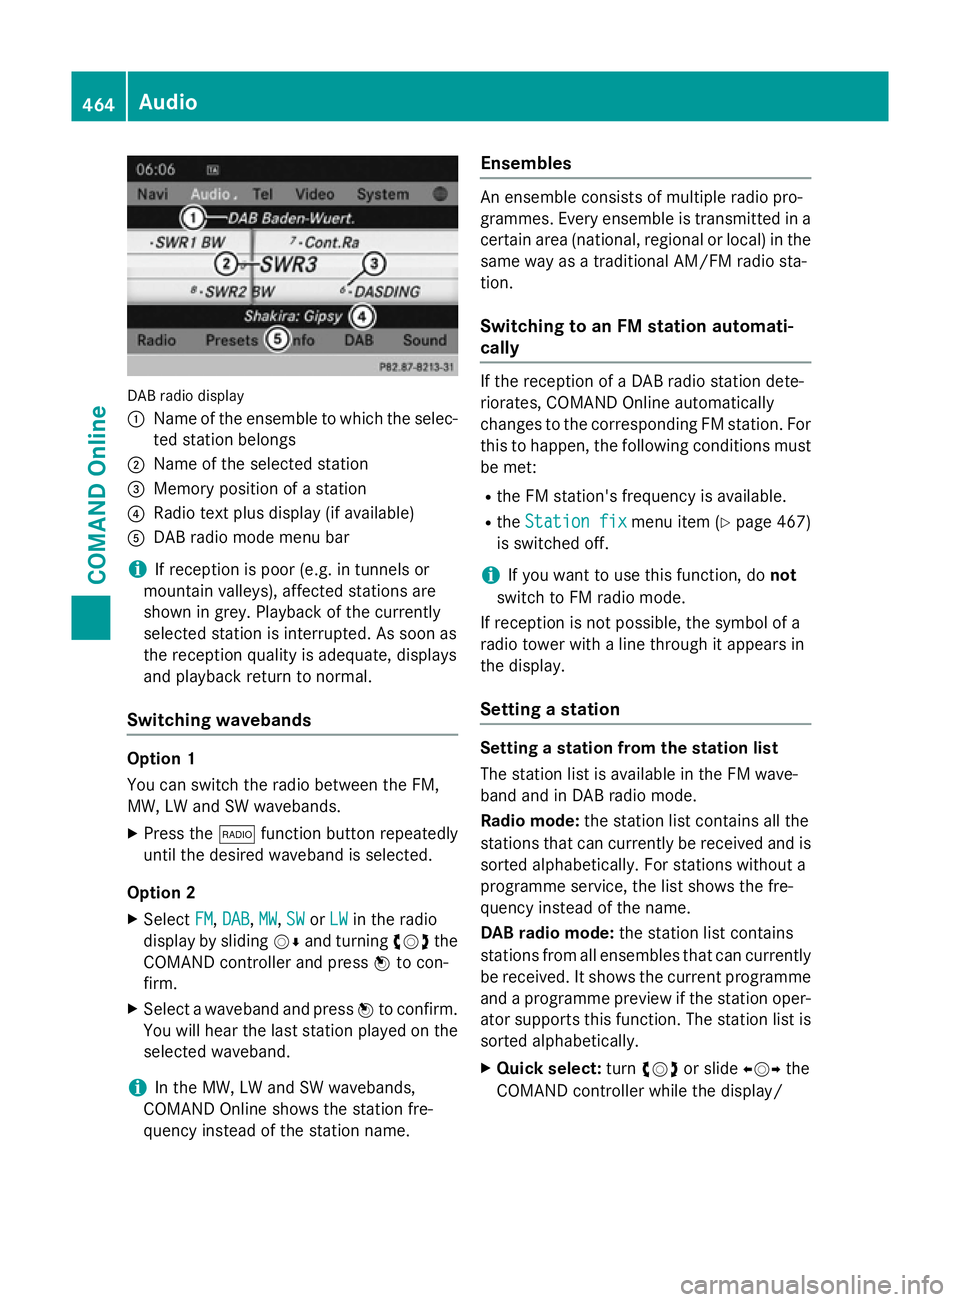
DAB radio display
:
Name of the ensemble to which the selec-
ted station belongs
; Name of the selected station
= Memory position of a station
? Radio text plus display (if available)
A DAB radio mode menu bar
i If reception is poor (e.g. in tunnels or
mountain valleys), affected stations are
shown in grey. Playback of the currently
selected station is interrupted. As soon as
the reception quality is adequate, displays
and playback return to normal.
Switching wavebands Option 1
You can switch the radio between the FM,
MW, LW and SW wavebands.
X Press the $function button repeatedly
until the desired waveband is selected.
Option 2
X Select FM FM,DAB
DAB ,MW
MW, SW
SWorLW
LW in the radio
display by sliding VÆand turning cVdthe
COMAND controller and press Wto con-
firm.
X Select a waveband and press Wto confirm.
You will hear the last station played on the
selected waveband.
i In the MW, LW and SW wavebands,
COMAND Online shows the station fre-
quency instead of the station name. Ensembles An ensemble consists of multiple radio pro-
grammes. Every ensemble is transmitted in a
certain area (national, regional or local) in the same way as a traditional AM/FM radio sta-
tion.
Switching to an FM station automati-
cally If the reception of a DAB radio station dete-
riorates, COMAND Online automatically
changes to the corresponding FM station. For
this to happen, the following conditions must be met:
R the FM station's frequency is available.
R the Station fix Station fix menu item (Ypage 467)
is switched off.
i If you want to use this function, do
not
switch to FM radio mode.
If reception is not possible, the symbol of a
radio tower with a line through it appears in
the display.
Setting a station Setting a station from the station list
The station list is available in the FM wave-
band and in DAB radio mode.
Radio mode:
the station list contains all the
stations that can currently be received and is sorted alphabetically. For stations without a
programme service, the list shows the fre-
quency instead of the name.
DAB radio mode: the station list contains
stations from all ensembles that can currently
be received. It shows the current programme and a programme preview if the station oper-
ator supports this function. The station list is
sorted alphabetically.
X Quick select: turncVd or slide XVYthe
COMAND controller while the display/ 464
AudioCOMAND Online
Page 503 of 637
Special considerations when using MP3
players
Up to 8 directory levels with up to 1,000
tracks per directory are supported.
Do not use USB extension leads or adapters. They can impair functionality.
i DRM (Digital Rights Management) protec-
ted files are not supported by the Media
Interface. Audio AUX mode
Notes on audio AUX mode The varying volumes of external audio sour-
ces can mean that system messages (e.g.
traffic and navigation announcements) are
played at a noticeably increased volume. If
necessary, deactivate the system messages
or adjust their volume manually.
You can connect an external audio source
(AUX) to COMAND Online.
Depending on the vehicle model series the
connection is made via a jack in the storage
compartment in the centre console or via the
USB port (Y page 472).
If COMAND Online is equipped with a Media
Interface, external audio sources are connec-
ted using the cable set provided. The cable
set then replaces the audio AUX socket. The
connections for the Media Interface are loca- ted in the stowage compartment in the centre
console.
i You can find more information on the
Internet at http://www.mercedes-
benz.com/connect and in the "Media
Interface mode" section (Y page 494).
Switching to audio AUX mode Switching on with the function button
The external device is connected to the audio
AUX input.
X Press the hfunction button one or more
times. By pressing the function button repeatedly,
you can change the operating mode in the
following order:
R audio CD/DVD/MP3 (disc)
R memory card mode
R MUSIC REGISTER
R USB memory
R Media Interface or audio AUX mode
R operation with Bluetooth ®
audio
Switching on with the audio menu
When you connect an external audio source,
audio AUX is not selected automatically.
X Select Audio
Audio in the main function bar by
sliding ZVand turning cVdthe COMAND
controller and press Wto confirm.
If AUX mode was the last mode selected, it
will now be active.
If another audio source is switched on, you
can now switch to audio AUX mode in the
audio menu.
X Select Audio
Audio usingZVand press Wto
confirm.
The audio menu appears.
X Select Aux Auxby turning cVdand press Wto
confirm.
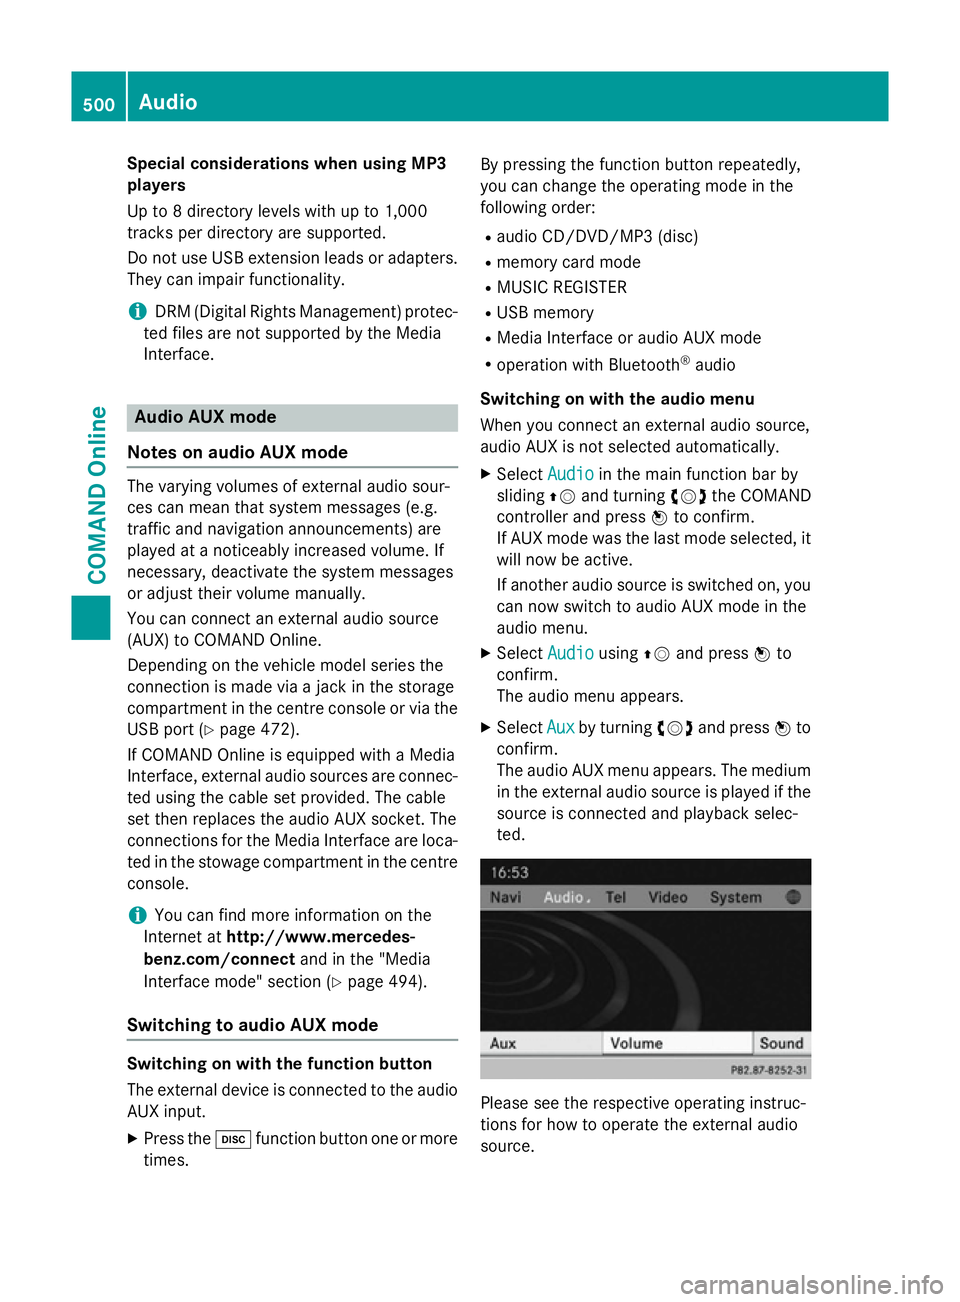
The audio AUX menu appears. The medium in the external audio source is played if the
source is connected and playback selec-
ted. Please see the respective operating instruc-
tions for how to operate the external audio
source.500
AudioCOMAND Online
Page 505 of 637
Basic settings
Adjusting the brightness, contrast or
colour The following describes the TV, video DVD
and video AUX modes.
X In TV or video DVD mode, press Wthe
COMAND controller.
The menu is shown.
X Select TV TV,DVD-V DVD-V orAux
Aux by turning cVdthe
COMAND controller and press Wto con-
firm.
A menu appears.
X Select Brightness Brightness, Contrast ContrastorColour
Colour
by turning cVdthe COMAND controller
and press Wto confirm.
X Set the value between - 5 and + 5 and press
W to confirm.
Changing the picture format The following describes the TV, video DVD
and video AUX modes.
X In TV or video DVD mode, press Wthe
COMAND controller.
The menu is shown.
X Select TV TV,DVD-V
DVD-V orAux
Aux by turning cVdthe
COMAND controller and press Wto con-
firm.
A menu appears.
X Select Automatic Automatic ,16:9 optimised
16:9 optimised ,4:3
4:3
or Widescreen
Widescreen and pressWto confirm.
The dot in front of the entry indicates the
currently selected format.
X Select a setting by turning cVdthe
COMAND controller and press Wto con-
firm. TV mode
Reception quality Portable electronic devices in the vehicle may
seriously impair TV reception. The TV tuner is designed to receive digital TV
channels compliant with the DVB-T standard. If the reception deteriorates, the TV receiver
automatically switches to an alternative digi-
tal frequency transmitting the same pro-
gramme content with better reception.
i In some countries, DVB-T may not be
available, or may not be available in all
areas.
The constantly changing reception conditions
while the vehicle is in motion can interrupt the signal. If the reception is too poor,
COMAND Online can mute the sound and
freeze or hide the picture. To indicate this, an
icon of a radio tower with a line through it
appears in the display.
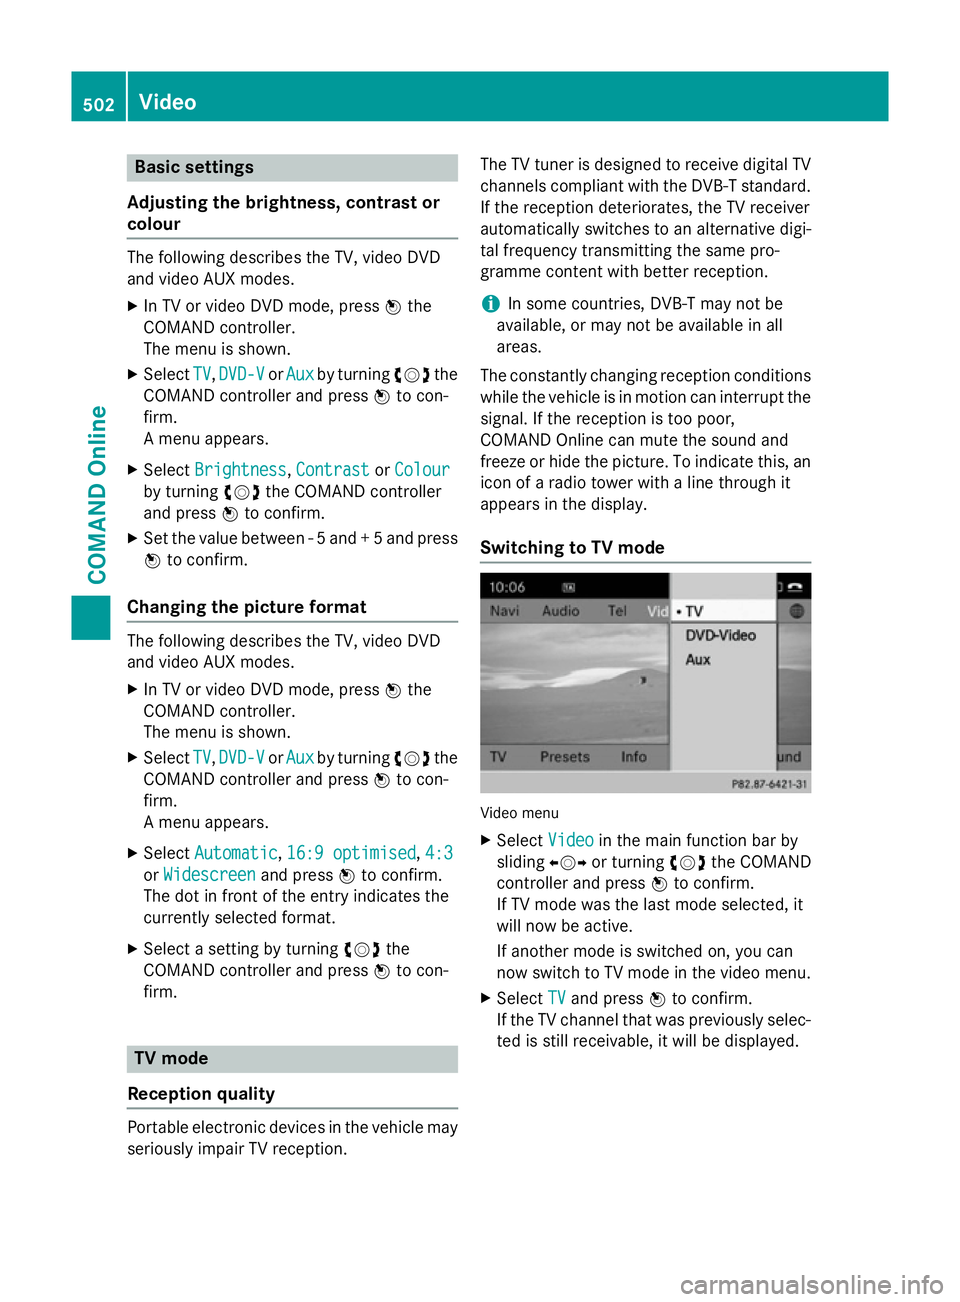
Switching to TV mode Video menu
X Select Video Videoin the main function bar by
sliding XVYor turning cVdthe COMAND
controller and press Wto confirm.
If TV mode was the last mode selected, it
will now be active.
If another mode is switched on, you can
now switch to TV mode in the video menu.
X Select TV
TV and press Wto confirm.
If the TV channel that was previously selec-
ted is still receivable, it will be displayed. 502
VideoCOMAND Online