Page 57 of 316

Wiper and washer system
Switching the windshield wipers on
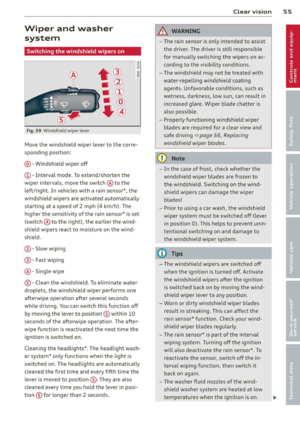
Fig. S9 W indshield w iper leve r
Move the windshield wiper lever to the corre
spond ing pos ition:
@ -Windshie ld w iper off
(D -Interva l mode. To extend/shorten the
wipe r intervals , move the switch @ to the
left/right. In veh icles with a rain sensor*, the
windshie ld wipers are act ivated automat ically
start ing at a speed of 2 mp h (4 km/h) . The
h igher the sensitivity of the rain sensor* is set
(switch @ to the right), the earlier the wind
shie ld wipers react to mois ture on the wi nd
shield.
@ -Slow wiping
®-Fast wiping
©-Sing le wipe
® -Clean the wi ndshield . T o e liminate water
d ro pl ets , the w indshield wiper performs one
afterwipe operation after several seconds
while driving. You can switch this function off
by mov ing the lever to position ® within 10
seconds of the afterw ipe operation . The after
wipe function is reactivated the next time the
ignit io n is switched on .
C lea ning the headlights *. The headlight wash
er system* only functions when the light is
switched on . The headlights are automatically
cleaned the first t ime and every fifth time the
lever is moved to position ®· T hey are also
cleaned every time you hold the lever in posi
tion ® for longer than 2 seconds. Clear vi
sion 55
A WARNING
- The rain sensor is only intended to assist
the dr iver. The driver is st ill responsible
for manually switch ing the wipers on ac
cording to the visibility cond it ions .
- The windsh ield may not be treated with
wate r-repell ing windsh ield coating
age nts. Unfavo rable cond it io ns, such as
we tness, dar kne ss, low sun, can result in
increased glare. Wiper blade chatter is
also possib le .
- Prope rly f unct ion ing windsh ield wiper
blades are req uired for a clea r view and
safe driving
~ page 56, Replacing
windshield wiper blades .
(D Note
-In the case of fros t, check whethe r the
w indshield wiper blades are frozen to
t he windsh ield. Sw itch ing on the wind
shield wipe rs can damage the wiper
blades!
- Prior to using a car wash, the windshield
wiper system must be switched off ( lever
in posit ion 0). Th is helps to prevent unin
tentional switch ing on and damage to
the windsh ield wiper system.
(D Tips
- The windshield w ipers are switched off
when the ign it ion is turned off. Act ivate
the windsh ield wipers after the ignition
is switched bac k on by moving the wind
shield w iper lever to any position .
- Worn or d irty windshield wipe r blades
result in streaking . This ca n affect the
rain sensor* funct ion . Check yo ur wind
shield wiper blades regularly.
- T he ra in sensor* is part of the interval
w ip ing system. Turning off the ignition
w ill also deactivate the ra in se nsor* . To
reactiva te the sensor, swit ch off the in
terval wiping function, then switch it
back on aga in .
- Th e washer f luid no zz les o f the w ind
shield washer system are heated at low
temperatures when the ignition is on .
Page 58 of 316

56 Clear vis ion
- When stopping temporarily, e .g. at a
traffic light , the set speed of the wind·
s h ield wipers is automatically red uced by
one speed.
Service position
Th e windshi eld wiper blades ore replaced in
the service position.
Fig. 6 0 Service pos it ion
The serv ice position is set in the rad io or
MMI* .
,. If the wiper bl ades are no t fro zen to the
wind shield , bring the windshield wiper lever
to the basic position @¢
page 55, fig. 59.
,. Se lect : Function button
IC ARI > Windshield
wi per s> Serv ice po siti on.
- On · changing the windsh ield wiper blades
can only be done if you bring the wiper arms
to the serv ice position
9 fig . 60. You will al
so avoid paint damage to the hood when
working on the wipe rs in this po sitio n.
- Off · the w indshield wipers are moved to
their initial position aga in.
(D Note
Never maneuve r your vehicle with the
front windshield wipe r arms ra ised since
they will automat ica lly be moved back to
t heir bas ic posi tion above a speed of 3
mph (6 km/h) and can sc ra tch the hood.
@ Tips
- You can also use the servic e pos ition, for
example , if you want to protect the
windsh iel d from icing by using a cover . -
The service position automatically
switches to
Off when you operate the
w indshield wiper lever, or speed exceeds
3 mph (6 km/h).
Replacing windshield wiper blades
Wiper blad es in good condition help ke ep the
windshield clear .
Fig . 6 1 Re movin g the w ipe r bl ade
Removing the wiper bl ade
,. Bring the w indshield wipers to the service
position ¢
page 56.
,. lift the windsh ield wiper arm up from the
w indshield .
,. Press the lock ing knob @¢
fig. 61 on the
w iper blade. Ho ld the wiper blade firmly.
.,, .... .., 0 rr: ig
,. Remove the wipe r blade in the di rect ion of
the arrow.
Attaching the wiper blade
,. Insta ll the new w iper blade in the reta iner
on the wiper arm @ unt il you hear it click in ·
t o p lace on the w iper arm .
,. Place the wiper arm back on the windsh ield.
-
- Clean your wiper blades regu larly with a
w indshie ld washer so lution to prevent
streaking.
If the w iper blades are very
d irty, for example with insects, carefully
clean the wiper blades with a sponge or a
soft br ush .
- For your safety, you should replace the
wiper blades once or twice a year . See
your author ized Audi dealer for replace·
men t bla d es.
Page 59 of 316

CD Note
-The windshield wiper blades must only
be replaced when in the serv ice position
<=> page 56! Otherwise, you risk damag
i ng the pa int on t he hood or the wind
s hi eld wiper motor.
- To he lp prevent damage to the wiper sys
tem, a lways loosen blades which are fr o
zen to the windsh ield befo re ope rat ing
wipe rs.
- To he lp prevent damage to w ipe r blades,
do no t use gasoline, ke rose ne, pa int
t hi nn er, or o the r so lvents on or near t he
wipe r blades .
- To he lp prevent damage to the wiper
a rms or other components, do not at
temp t to move the wipers by han d.
@ Tips
Commercial hot waxes applied by a uto
mat ic car washes affect the how easily the
g la ss surfa ce can be cleaned.
Mirrors
Adjusting the exterior mirrors
Fig. 62 Forward sectio n of driver's armrest : power mir
ro r contro ls
Adjusting e xterio r mirrors
• Rotate the knob to the© posit ion (driver 's
exter ior mirror) or to the® pos ition (pas
senger's exter io r mir ror) ¢
fig. 62.
• Rotate the knob and the mirror so t hat you
have a clear view to t he rear.
Heated mirrors
• Ro tate the knob to pos it io n @ . Clear vi
sion 5 7
Depend ing on the o utside temperature, the
mirro r sur faces are heated until the ig nition is
switched off -even if the knob is no longer in
pos ition @.
You are we ll-advised to fold the ex ter ior mir
rors in when maneuvering in tight spaces o r
when leaving the car parked close to other ve
hicles.
Memory for e xterior mirrors*
On vehicles wi th memory for t he drive r's sea t,
the cur rent setting for the exter ior mir ro rs is
automat ica lly stored a long with the seat posi
tion
¢page 65.
Tilt function for the passenger's mirror* (only w ith memory fo r exterior mirror s)
When the reverse gear is e ngaged, the mirro r
surface tilts downward slightly if the setting
i s for the passenger's mirror (knob in pos ition
® ¢fig . 62). This allows you to see the curb
dur ing parallel parking .
The mirror returns to its initial position as
soon as reverse gear is disengaged and veh icle
speed is above about 9 mph
(15 km/h) . The
mirror also retur ns to its init ial position if the
switch is moved to the dr iver's ex terior m irror
© or the ignition is sw itched off .
If the pos ition of the mirror surface is
c hanged on a tilted mirro r, this new position
will be automatically ass igned to th e remote
key w hen the veh icle is taken o ut of reverse
gear.
CD Note
Cu rved mirror surfaces (co nvex o r sph eri
ca l*) increase your f ie ld of view . Remem
b er that ve hicl es o r othe r ob jects w ill ap
p ear sm aller and farthe r away t han when
seen in a fla t mirro r. If you use t his mirror
to estimate distances of fo llowing vehicles
when chan ging lanes, you could est imate
i ncorrect ly and cause an accident.
Page 60 of 316

58 Clear vis ion
@ Tips
If there shou ld be a malfunction in the
electrical system, you can still adjust the
exterior mirrors by pressing the edge of
the mirror .
Dimming the mirrors
N
..
-
" ~==============~ l8
Fig. 63 Aut oma tic d imm ing re arview mirror*
Manual anti -glar e adju stm ent
.. Move the small lever (located on the bot
tom edge of the mirror) to the rear.
Automaticall y dimming mirrors *
.. To d im the rearv iew mirror and both exteri
or mirrors, p ress the @button. The d iode
@ turns on . The rearview and exterior m ir
rors dim automatically when light shines on
them, for example from head lights on ave
hicle to the rear .
A WARNING
Electrolyte fluid can leak from automatic
dimming mirrors if the glass is broken.
Electrolyte fluid can irritate skin, eyes and
respi ratory system .
- Repeated or prolonged exposure to elec
trolyte can cause irritation to the resp ira
tory system, espec ially among people
with asthma or other respiratory cond i
t ions. Get fres h air immedia tely by leav
ing t he vehicle or, if that is not possible,
o pen windows and doors all the way.
- If elec trolyte gets in to the eyes, flush
them thoro ughly with large amounts of
clean water for at least 15 min utes;
medica l attention is recommended .
-If electrolyte contacts skin, flush affect
ed area with clean water for at least 15 minutes and then wash affected area
with soap and water; medical attention is recommended . Thoroughly wash af
fected clothing and shoes before reuse.
- If swallowed and person is conscious,
rinse mouth with water for at least 15
minutes. Do not induc e vomiting unless
instructed to do so by medi cal professio
na l. Get medical attention immediately .
(D Note
Liquid electrolyte leaking from b roken m ir
r o r glass w ill damage any plastic surfaces
i t comes in contac t with. Clean up spilled
electrolyte imme diately wi th clean water
and a sponge .
(D Tips
-Switching off the dimming function of
the inside rear view mir ror also deacti
va tes the automatic dimming func tion of
the exterior mirrors .
- The automatic dimming m irrors do not
dim when the interior lighting is turned
on or the reverse gear is selected .
- Au toma tic dimm ing for t he mirror on ly
operates properly if the sun shade * for
the rear window is not in use or the light
striking the inside mirror is not hindered
by other objects .
Page 61 of 316

Digital compass
Activating or deactivating the compass
Applies to vehicles: with digital compass
The direction is displayed on the interior rear
view mirror.
Fig. 64 Ins ide rear view mirror: digital compass acti
vated
.,.. To activate or deactivate, hold the@ but
ton down until the red display appears or
disappears.
The digital compass only works with the igni
tion turned on. The directions are displayed as
initials:
N (North), NE (Northeast), E (East),
SE (Southeast), S (South), SW (Southwest),
W (West), NW (Northwest).
(D Tips
To avo id inaccurate directions, do not al
low any remote controls, electrical sys
tems, or metal parts close to the mirror. Clear vision 59
Setting the magnetic deflection zone
Applies to vehicles: with digital compass
The
correct magnetic deflection zone must be
set in order to display the directions correctly.
Fig . 65 North America: magnetic defle ction zone
bo undaries
.,.. Hold the@ q page 59, fig. 64 button down
until the number of the set magnetic deflec
tion zone appears on the interior rear view mirror.
.,.. Adjust the magnetic deflection zone by re
peatedly pressing on the@ button. The set
mode automatically deactivates after a few
seconds.
Calibrating the compass
Applies to vehicles: with digital compass
The compass has to be recalibrated if the dis
play is wrong or inaccurate .
.,.. Hold the@ button down until the letter C
is displayed on the interior rear view mirror .
.,.. Dr ive in a circle at a speed of about 6 mph
(10 km/h) unti l a direction is shown on the
interior rear view mirror.
Page 62 of 316
60 Clear vis ion
A WARNING
The d igital compass is to be used as a di
rectional a id on ly. Even though you may
want to look at it wh ile you are driv ing, you
must sti ll pay attention to t raffic, road and
weather conditions as we ll as other possi
ble hazards.
-
Page 63 of 316

Seats and storage
General recommen
dations
Why is your seat adjustment so important?
The safety belts and the airbag system can
only provide maximum protection if the front
seats are correctly adjusted.
There are various ways of adjusting the front
seats to provide safe and comfortable support
for the driver and the front passenger. Adjust
your seat properly so that :
- you can easily and quick ly reach all the
switches and controls in the instrument
panel
- your body is properly supported thus reduc ing physical stress and fatigue
- the safety belts and airbag system can offe r
maximum protection
¢ page 162.
In the following sections, you will see exactly
how you can best adjust your seats .
There are special regulations and instructions
for installing a child safety seat on the front passenger's seat. Always follow the informa
tion regard ing child safety provided in
¢ page 186, Child Safety.
A WARNING
Incorrect seating position of the driver and
all other passengers can result in serious
personal injury.
- Always keep your feet on the f loor when
the vehicle is in motion -never p ut your
feet on top of the instrument panel, out
of the w indow or on top of the seat cush
ion. Th is applies especially to the passen
gers . If your seating position is incorrect,
you increase the r isk of injury in the case
of sudden braking or an acc ident. If the
airbag inflates and the seating position
is incorrect, this could result in persona l
injury or even death.
- It is important for bo th the driver and
front passenger to keep a distance of a t
Seat s an d sto rage 61
least 10 inches (25 cm) between them
selves and the steering wheel and/or in
strument panel. If you're s itting any
closer than th is, the airbag system can
not protect you properly. In addition, the
front seats and head restraints must be
adjusted to your body height so that t hey
can give you maximum protect ion.
- Always try to keep as much distance as
possible between yourself and the s teer
ing wheel o r instrument pane l.
- Do not adjust the driver's or front pas
senger's seat whi le the vehicle is moving.
Your sea t may move unexpected ly, caus
ing sudden loss of vehicle cont rol and
personal injury . If you adjust yo ur seat
while the veh icle is moving, yo u are out
of posit ion.
Driver's seat
The correct seat position is important for safe
and relaxed driving.
We recommend that you adjus t the dr iver's
seat in the fo llowing manner:
.,. Adjust t he seat in fore and aft direction so
that you can easily push the peda ls to the
floor wh ile keeping your knees s lightly bent
i:::> A in Why is your seat adjustment so im
portant? on page 61.
.,. Adjust the seatback so that when you sit
w ith your back against the seatback, you can
still grasp the top of the steering wheel.
.,. Adjust the head restraint so the upper edge
is as even as possible with the top of your head . If that is not poss ible , try to adjust
the head res traint so that it is as close to
this pos ition as possib le
i:::> page 67.
A WARNING
Never place any objects in the dr iver's foot
well. An object could get into the pedal
area and interfere with pedal funct ion . In
case of sudden braking or an acc ident, you
wo uld not be able to brake or accelerate.
Page 64 of 316

62 Seats and storage
Front passenger's seat
Always move the front passenger seat into
the rearmost position.
To avoid contact with the airbag while it is de
ploying, do not sit any closer to the instru
ment panel than necessa ry and always wear
the three-point safety belt provided adjusted
correctly. We recommend that you adjust the
passenger's seat i n the fol low ing ma nner:
"' Bring the backrest up to an (almost) upright
posit ion.
Do not ride w ith the seat reclined .
"' Adjust the head restraint so the upper edge
i s as even a s poss ible with the top of yo ur
head.
If that is not possible, try to adjust
the head rest raint so that it is as close to
this position as possible ¢
page 67.
"' Place your feet on the floor in front of the
passenger's seat .
Adjusting front seats
manually
Seat adjustment controls
Applies to vehicles: with man uaUy adjustable seats
The seat has several adjustmen ts.
Fig . 66 Contro ls on the drive r's seat
Some the controls shown are only installed in
certain model versions or are supplied as an
option.
Controls
CD Fore -and-aft adjustment
@ Upper thigh support*
@ Adjusting seat c ush ion angle*
@ Adjusting lumbar support *
® Adjust ing seat height
@ Adjusting seatback ang le
Adjusting the seat
Appl ies to vehicles: wit h manually adjustable seats
Position and shape of the seat can be adj ust
ed manually to ensure safe and comfortable
seating .
Read and fo llow the warning notices¢ & be
f ore you adjust yo ur seat.
Fore-and-aft adjustment
"' Pull the lever CD¢ page 62, fig . 66 up and
push the seat to the desired position .
"' Release the lever CD and cont in ue to move
t he seat until it loc ks in to pl ace.
Lengthening or shortening upper thigh
support*
"' Lift the b utton @under the seat cush ion.
The fron t seat cush ion moves forw ard under
spri ng force .
"' Push the seat c ushion back when yo u have
fi nished using it .
Adjusting seat cushion angle*
"' Pull or push the lever@¢ page 62, fig. 66
up or down (pumping mo tion).
Ad justing the curvature of the lumbar
support*
"' Push the swi tc h plate @) forward o r bac k
ward to increase o r reduce the curvature.
Ad justing the height of the lumbar
support*
"' Push the switc h plate @) up or dow n to po
sit ion the curva ture h igher or lower.
Raising or lowering seat height
"' Pull or push the lever®¢ page 62, fig . 66
up or down (pumping motion).
Adju sting seatback angle
"' Remove we ight from the seatback (do not
lean against it).
"' Turn th e hand wheel@¢
page 62 , fig . 66
to adjust the angle of the seatback accord -
ing ly.
Iii>