Page 129 of 316

Rocking back and forth to becom e
un stuc k
~ Shift on ly between D and R when the vehi
cle is at a full stop and the e ngine is r unni ng
at idle speed .
Stopping
~ Press and ho ld the brake pedal unti l the ve
hicle has come to a complete stop .
~ Keep the brake pedal depressed so that the
vehicle cannot roll forward or backward
while it is idling¢ &_.
~ Once stopped, do not depress the accelera
tor pedal to rev up the engine ¢&_ .
Parkin g
~ Press and ho ld the brake pedal unti l the ve
hicle has come to a complete stop.
~ Set the parking brake firmly¢ page 97,
Parking.
~ Press and hold the release button in these
lector lever handle, move the selector lever
into
P a nd the n let go of the release button
¢,&_ .
The selector lever must be in Nor P. If one of
the dr iving pos it ions is engaged a safety
sw itch w ill prevent the engine from be ing
started. See also ¢
page 92.
Before you move the selecto r lever from the P
position, you must always apply the brake
pedal before and whi le dep ress ing t he button
i n the hand le of the se lec to r lever .
A WARNING
-Unintended ve hicle movement can cause
serious injury.
- When the selector lever is i n a dr iving
position, the ve hicle may creep, even at
i dl e speed . Therefo re do not release
the par king brake or foot b rake until
you are re ady to move, because powe r
is transmit ted to the whee ls as soon as
a dr iving position is engaged.
- Do not ac celera te while selecti ng a
d riving posi tion. At th is time the en
g ine must be at idle speed so t hat un-
Tran sm iss ion 12 7
due stress is not placed on the clutches
in the transmiss ion.
- Remember: Even when stopped briefly
with the automatic transmission in D,S
or R, eng ine power is being transmit
ted to the wheels. Your veh icle cou ld
"creep" forward or backward. When
stopped, keep the b rake pedal fu lly de
pressed and use the pa rking brake if
ne cessary to keep the vehicle from ro ll
i ng.
- I f the selecto r lever is un intent ionally
moved into N while you are dr iv ing, t ake
your foo t off the accelerator ped al and
wait for the engine to retu rn to idle
speed before se lecting a driving position .
- Never sh ift into
R or P when the vehicle is
in motion.
- Never get out of the driver's seat when
the engine is running.
- If you m ust ge t out of the vehicle, move
the selector lever secure ly into the P po
sition and apply the pa rking brake firmly.
- If t he eng ine mus t rem ain r unning , neve r
have any driving posit ion engaged w hen
checking under the hood. Make sure the
selector lever has securely engaged and
is locked in P w ith the park ing brake
firm ly set¢
page 230, Engine compart
ment.
Othe rwise, any inc rease in engine
speed may set the vehicle in motion,
even with the park ing brake applied .
Page 130 of 316

128 Transmi ssion
Selector lever positions
Ap plies to vehicles: wit h au to mat ic tra nsmi ssio n
This section describes the selector lever posi
tions and driving ranges .
Fig. 144 D isp lay in the inst rume nt cluster: selector
lever in position P
The selector lever position engaged appears
next to the selector lever as well as in the in
strument cluster display .
P - P ark
In this selector lever position the transmis
sion is mechanically locked. Engage
P only
when the vehicle is
completely stopped q .&
in Driving the automatic transmission on
page 127 .
To shift in or out of position P, you must first
press and hold the brake pedal and then press
the release button in the selector lever handle
while moving the selector lever to or from
P .
You can sh ift out of this pos ition only with the
ignit io n on.
R - Rev ers e
The transmission will automat ically select the
l o west gear ratio when you shift into reverse .
Select
R on ly when the vehicle is at a full stop
and the eng ine is running at idle speed ¢.& in
Driving the automatic transmission on
page 127.
Before you move the selector lever to R , press
both the button in the handle of the selector
lever
and the brake pedal at the same time.
When the ignit ion is on, the backup l ights illu
minate when the selector lever is moved into
R .
N -Neutral
The transm iss ion is in neut ral in this pos ition.
S h ift to this position fo r standing with the
brakes applied
¢ page 129 .
When the vehicle is stat ionary or at speeds
below 3 mph (5 km/h), yo u must always app ly
the foo tbrake be fore and whi le moving the
lever o ut of
N .
D -Normal position fo r driving forward
Position Dis fo r normal city and highway driv
i ng .
It ranges from zero to top speed and a ll
gears shift automatically, depend ing on en
gine load, driving speed and automatically se
lected shift programs.
When the vehicle is stat ionary or at speeds
below 3 mph (5 km/h), yo u must always app ly
the foot brake befo re and while moving the
lever to
D out of N .
In certa in circ umstances it may be advanta
geous to temporar ily sw itch to the manua l
shift program to manua lly select gear ratios
to match specific driving conditions
¢ page 130 .
S - Sport position*
Select t his posi tion fo r spo rtier pe rformance.
In this pos ition, the transmission will not up
shift as soon, a llowing the vehicle to use the
increased power available at higher engine
speeds to achieve livelier acceleration .
When the vehicle is stationary or at speeds
below 3 mph (5 km/h), yo u must always app ly
the foot brake before and while moving the l ever to
S out of N .
A WARNING ,__
Read and follow all WARNINGS ¢ .& in
Driving the automatic transmission on
page 127 .
(D Note
-
Coasting downhill with the transm ission in
N and the eng ine not running wi ll result in
damage to the automatic transmission
and possibly the cata lytic converter.
Page 131 of 316

Automatic Shift Lock (ASL)
Applies to vehicles: with a utomat ic transm ission
The Automatic Shift Lock safeguards you
against accidentally shi~ing into a forward or
the reverse gear and causing the vehicle to
move unintentionally .
;_ '"''1
·- I , . ,......._
W'.o ,)
Fig. 145 Shift gate: selector lever lock positions and
in terlock b utto n highlighted
The selector lever lock is released as follows:
.. Turn the ignition on.
.. Step on the brake pedal.
At the same time
press and hold the interlock button on the
s ide of the gear selector knob
c::> fig. 145
with your thumb until you have moved the
selector lever to the desired position.
Automatic selector lever lock
The select or lever is Locked in the P and N po
sitions when the ignition is turned on. To
move the lever from these positions the driver
must depress the brake pedal. As a reminder
to the driver, the following warning appears in
the instrument cluster display when the selec
tor is in
P and N:
When stationary apply footbrake while se
lecting gear
A time delay element prevents the selector
lever from locking when it is moved through
the
N position (going from R to D ). The lock
ing element will lock the selector lever if the
lever is left in N (Neutral) for more than ap
proximately 1 second , without the brake ped
a l being pressed.
At speeds above about 3 mph (5 km/h) the
Automatic Shift Lock is automatically deacti
vated in the
N position.
Transmission 129
Interlock button
The lock button on the selector lever prevents
the lever from being accidentally shifted into
certain positions. Pressing this button deacti
vates the selector lever lock. Depending on
the direction of the shift, the selector lever
locks at different positions. The positions are
highlighted in the illustration
c::> fig . 145.
Ignition key safety interlock
The key cannot be removed from the ignition
unless the selector lever is in the
P park posi
tion. When the ignition key is removed, the
se lec tor Lever will be locked in the
P position.
Kick-down
App lies to vehicles: with automatic transmission
The kick-down feature allows the vehicle to
generate maximum acceleration .
When you press the accelerator pedal beyond
the resistance point that is reached at full
throttle, the transmission will select a lower
gear ratio based on vehicle speed and engine
RPM . The engine RPM will be controlled to
produce maximum vehicle acceleration as
long as you continue to press the accelerator
pedal beyond this resistance point.
.&, WARNING
Be careful when using the kick-down fea
ture on slippery roads. Rapid acceleration
may cause the vehicle to skid .
Dynamic shift program (DSP)
Applies to vehicles: wit h automatic transmission
The automatic transmission is electronically
controlled.
-
The transmission is self adapting and will au
tomatically
select the best sh ift program suit
ed to the driving conditions and driving style .
The transmission will select one of the
econo
my
programs when you drive at a steady
speed or a gradually changing speed w ithout
heavy acceleration. This achieves optimum ..,.
Page 132 of 316

130 Transmi ssion
fuel efficiency, with ear ly upshifting and
de layed downshifting.
The transmission will a utomat ica lly select the
s port y shift prog rams when you drive at high
e r speeds, or w ith heavy acceleration and fre
quent ly changing speeds. Upshifts are de layed
to make full use of eng ine power. Downsh ift
ing takes p lace at h igher engine speeds than
in the economy programs .
The selection of the most suitab le shift pro
gram is a cont inuous, automatic process. The
driver can also make the transmission switch
to a sporty program by quickly pressing down
the gas pedal.
This causes the transmission to shift down to
a lower gear to achieve rapid acceleration, e.g.
for quickly passing another vehicle. You do not need to press the gas pedal into the kick -down
range . After the transmission has upshifted,
the orig inal program is se lected acco rding to
your d riving s tyle.
A n addit ional shift program allows the auto
mat ic transm iss ion to select the proper gear
for uphill and downhill gradients .
This keeps the transmission from shifting up
a nd down unnecessar ily on hills . The trans
miss ion will shift down to a lowe r gear when
the dr iver presses the brake pedal on a down
hill grad ient. This makes use of t he b raking ef
fe ct of the eng ine wi thout the need to shift
down manua lly. Manual shift program
Applies to
vehicles: with automatic transmission
Using the manual shift program you can
manually select gears .
Fig . 14 6 Ce nter conso le: sh ift ing the t iptron ic m an ua l·
l y
F ig. 14 7 Disp lay: manu al shi ft p rog ra m , se lected gear
hi ghlight ed
Switching to manual shift program
.,. Push the selector lever to the right from
D.
As soon as the transmiss ion has sw itched
over, the se lected gea r appears in the dis
p lay .
To upshift .,. Push the selecto r lever forwa rd to the p lus
position
0 ¢ fig . 146 .
To down shift
.,. Push the lever to the minus pos ition
0 -
When accelerating, t he transmission will au
tomatica lly shift into the next gear before the
engine reaches its maximum RPM.
If you apply a light throttle whe n accelerat-
ing, tiptronic wi ll automatica lly shift from 1st
to 2nd gear to save fuel. If you apply a heavy
throttle , the transm iss ion wi ll stay in 1st gear .,.
Page 133 of 316

until near maxim um RPM is reached, or unt il
the driver shifts into 2nd gear .
I f y ou ta ke your foo t off the acceler ator ped al
when dr iving down a steep in cline, tiptronic
will downshift from the se lected gea r into the
next lowe r gear until it reaches 1st gea r,
based on road speed and eng ine RPM. A uto
mat ic downshifting is interrupted as soon as
you apply the thrott le aga in.
@ Tips
- When yo u shift into the next lower gear,
t h e transmiss io n will downs hift only
when there is no possibility of over-rev
v ing the e ngine.
- When t he kick-down comes on, the
transmission will sh ift down to a lower
gear, d epe nding on vehicle a nd e ngine
s peeds .
- tiptron ic is inoperative when the trans
mission is in th e fail-safe mode .
Steering wheel with tiptronic
Applies to vehicles: with tiptronic steer ing wheel
The shift buttons on the steering wheel allow
the driver to shift gears manually .
Fig. 148 S tee rin g w hee l: S hift buttons
• To downshift, to uch the button on the left
0 -
• To upsh ift, touch the but ton on the rig ht
0 -
The s hift buttons are ac tivated when the se
l ecto r lever is in
D , S or in the manual shift
p rog ram (tiptron ic) .
Transm ission 131
O f course, you can continue to use the manua l
s h ift pr ogram with the selector lever on the
cente r co nsole.
Transmission malfunction
Applies to vehicles: wit h automatic transmission
[O] Transmission : please press the brake ped
al and select the position again
Press the bra ke pedal and select the desired
selector lever position again. You can then
continue driving.
[O] Transmi ssion hot: please modify driving
style
T he trans mission tempe ra tur e has increased
s ignifica ntly due to t he spor ty dr ivin g manner .
Drive in a less sporty ma nner until the tem
perature returns to the normal range and the
indicator light switches o f.
[O] Transmission malfunction: You can con
tinue driv ing
T here is a system malfunc tion in the transm is
s io n. You may con tinu e dr ivin g. D rive to yo ur
a utho rize d Au di dea le r or qu alified repa ir fa
c ility soon to have the ma lfunction corrected .
[O] Transmission malfunction: Limited driv
ing functionality
T he re is a system mal func tion in the t ransmis
s io n. The transm iss ion is swi tching to emer
gency m ode . Th is mode o nly shifts into cer
t ain gears o r will no longer shi ft at all. The en
g ine m ay sta ll. Drive to you r author ized Audi
dealer or qualif ied repair facility immediately
to have the malfunction corrected .
[O] Transmission malfunction: Stop and shift
to P
Do n ot continue dr iving. Se lect t he P selector
lever posi tion an d see your au thori zed A udi
de aler or qu alified re pair facili ty for assis
ta nc e.
(D Note
If th e tra ns missi on swit ches to emer gen cy
mode, y ou sh oul d tak e th e ve hicl e to an
IJll>
Page 134 of 316

132 Transmi ssion
authorized Audi dealership as soon as pos
sible to have the condition corrected .
Emergency release of the selector lever
Applies to vehicles: wit h automatic transmiss ion
If the vehicle's power supply fails, the selec
tor lever con be released in on emergency.
Fig. 14 9 Remo vin g asht ray inse rt
Fig . 150 Eme rge ncy re le ase for se lec to r lever
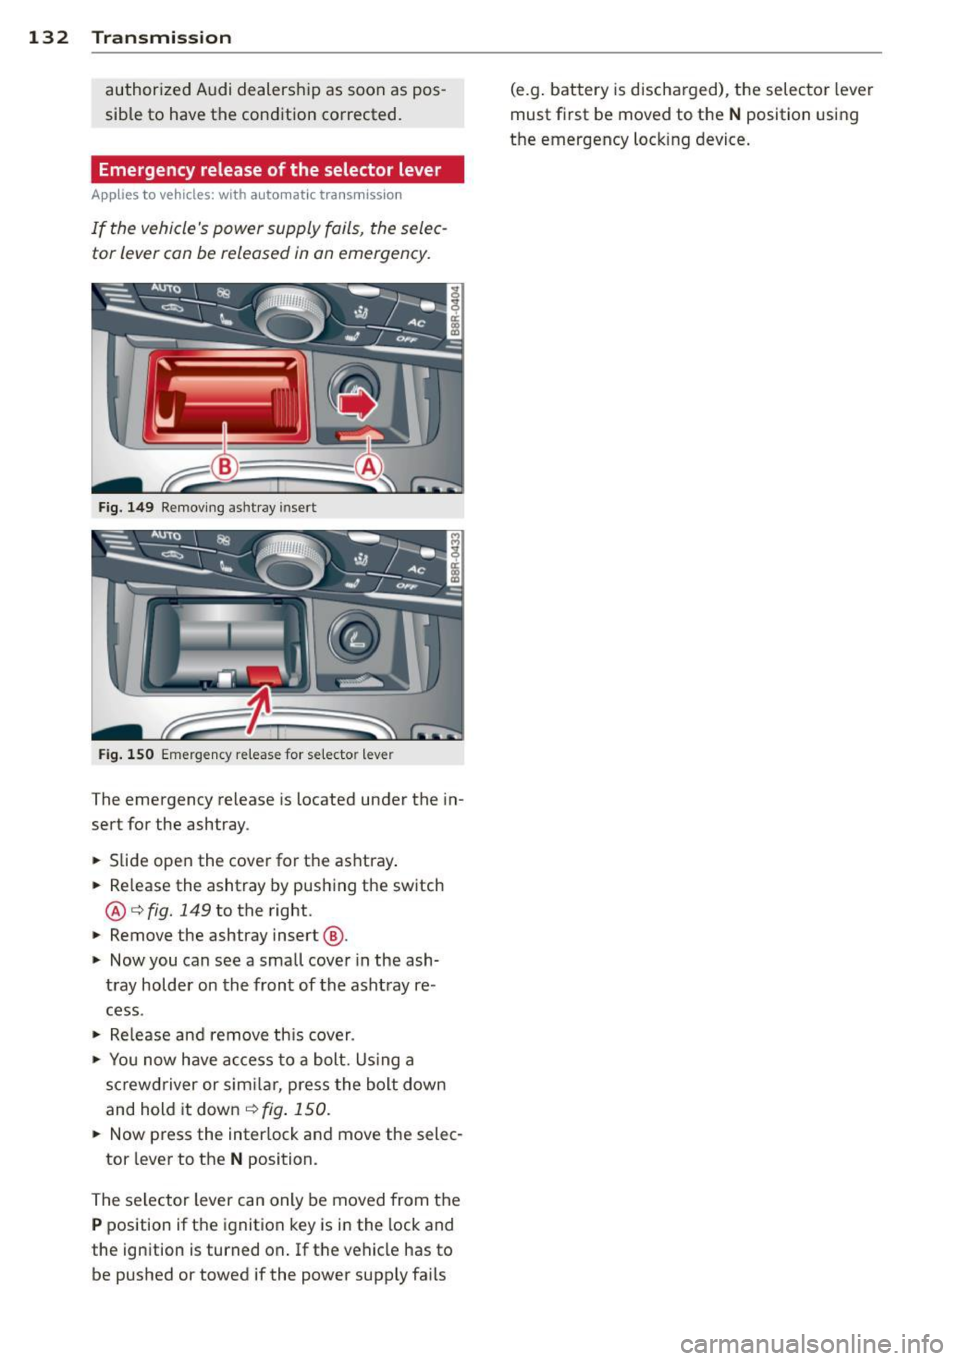
The emergency release is located under the in
sert for the ashtray.
• Slide open the cover for the ashtray .
• Re lease the ashtray by push ing the sw itch
@ c> fig. 149 to the right.
• Remove the ashtray insert @.
• Now you can see a small cove r in the ash
tray holder on the front of the ashtray re
cess .
• Re lease and remove th is cover .
• You now have ac cess to a bolt. Us ing a
sc rewdriver or sim ilar, press the bolt down
and hold it down ¢
fig. 150.
• Now press the inter lock and move the selec-
tor lever to the
N position.
The selector lever can only be moved from the
P position if the ignition key is in the lock and
the ignition is turned on .
If th e vehicle has to
be pushed o r towed if the power supp ly fa ils (e.g
. battery is discha rged) , the selector lever
must first be moved to the
N pos ition using
the emergency lock ing device.
Page 135 of 316

Park assist
Parking system
Applies to vehicles: with parking system
Different park assist systems may be used for
parking or maneuvering, depending on the
vehicle's features.
Parking system (rear)*:
For the parking system (rear), the acoustic
park assist system is installed in the rear of
the vehicle
¢ page 133.
The rear parking assist system uses ultrasonic
sensors to determine the distance of the vehi
cle from a detected obstacle. There are a total
of four sensors located on the rear bumper
(two in the middle and two on the sides) .
Parking system (rear, with rear view
camera)*:
For the parking system (rear, with rear view
camera),
the rear acoustic park assist system
is integrated in the rear of the vehicle and the
rear view camera is integrated in the rear lid
¢page 136.
The parking system (rear , with rear view cam
era)
uses ultrasonic sensors to determine the
distance of the vehicle from a detected obsta
cle . There are a total of four sensors located
on the rear bumper (two in the m iddle and
two on the sides).
Parking system (rear)
Rear acoustic park assist
App lies to vehicles: with parking system (rear)
The rear acoustic park assist warns you of ob
stacles or objects behind your car.
Description
The rear acoust ic parking assist system deter
mines the distance of the vehicle from an ob
stacle using ultrasonic sensors. There are 4
sensors in the rear bumper.
The range at which the sensors start to meas
ure is
about :
Park assist 133
To the side 2 ft (0.60 m)
Center rear 5.2 ft (1.60 m)
Activation
Acoustic parking assist is activated automati
ca lly when
reverse gear is engaged. A brief
tone confirms that the system is activated.
Warning tones
Distance warning is given by warning tones
which are generated by the rear signal genera
tor. The vo lume and the pitch of the warning
tones can be adjusted in the MMI*
¢page 134.
Reversing
Distance warning when reversing starts when
an obstacle is detected in the range of the
parking assist system . As the distance de
creases, the time interval between the aud ible
tones becomes shorter.
When the distance is less than 1 ft (0.30 m),
the tone becomes continuous. At this point
you should stop backing up.
Please note that low objects already signalled
by a warning can disappear from the system's
detection range and will not continue to be
signalled.
If the distance to an obstacle remains the
same, the volume of the distance warning is
gradually reduced after about 4 seconds. Ap
proaching another obstacle will result in the
distance warning sounding at the normal vol
ume again.
Malfunctions in the system
If a warning tone is audible for about five sec
onds when you turn on the ignition, there is a
malfunction in the system. Have the problem
corrected by your authorized Audi dealer.
Keep the sensors in the rear bumper clean and
free from ice so that the acoustic park assist system can function properly. .,..
Page 136 of 316

134 Park ass is t
& WARNING
- Sensors have d ead spaces in which ob
jects cannot be detected. Be espec ially
alert for small children and animals,
since they are not a lways detected by the
senso rs.
- T he acoust ic park ing system is not a sub
st itute fo r the driver's own caut io n and
alertnes s. Ul timate responsib ility always
remains wi th the driver during par king
and similar maneuve rs . Always watch
where you are dr iving.
- You should always adjust the vo lume and
frequency of the warning to nes so that
yo u can easily hear the acoustic distance
warning even if the radio is p laying, the
air-cond it ioner blower is on High or there
is a high leve l of outside noise.
- Check t he settings w henever a nyone
e lse h as dr ive n the vehicle before you.
(D Note
- Remembe r that low obstacles for whic h
a warn ing has a lready be en iss ued may
"dive" below the system's sensing zone if
t h e ve hicle is being b acked up closer. In
t hi s case, the warn ing sound shut ting off
does
not indicate that yo u have cleared
the obstacle . Instead, impact is immi
nent.
- Objects such as trai ler hitches, c hains,
narrow posts or fences covered by a t hin
l ayer of pa int may not a lways be detect
ed by the system . They can still damage
you r vehicle witho ut wa rning .
@ Tips
Keep the sensors in the rear bumper clean
a nd free of snow and ice so that the acous
tic parking assist system can funct io n
prope rly .
Adjusting the warning tones
Applies to vehicles: with parking system (rear)
The warning tones can be adjusted in the
MMI* .
.. Select: !CAR !> Parking system .
- Rear volume -
rear sensor vo lume
- Rear frequency -rear sensor freque ncy
- In-car entertainment fader -when the park-
ing sys tem is swi tc hed o n, the vo lume of the
active audio source is lowered .
T he newly ad justed value is briefly hea rd from
the sig nal gener ator. T he set tings are a uto
m at ic ally s tored and ass igned to the m aster
key with remote cont ro l.
Parking system (rear,
with rear view camera)
Introduction
Applies to vehicles: with parking system (rear, with rear
view camera)
Fig. 1 51 Parking mod e 1: reve rse pa rking
Fig. 1 52 Parking mod e 2: pa ra ll el par king
Vehicles w ith the parking system are equippe d
with a
rear view camera in addition to the
acoustic parking system .