Page 49 of 316

.. Turn the key to position ¢ fig. 45 @until a ll
the windows have reached the desired posi
t ion and the panoramic tilt ing sunroof is t ilt
ed .
Convenience closing feature
.. Use the emergency key or pull the mechani
ca l key out of the master key ¢
page 39 .
.. Turn the key in the lock of the driver's door
to the lock position ® until the windows
and the panoramic tilting sunroof are closed
¢ ,& .
When the panoramic ti lting sunroof is tilted/
closed, the electric sun shade* is also opened/
closed.
A WARNING
- Never close the windows and thepanor
amic tilting sunroof inattentively and
without checking -there is risk of injury .
- You must always watch when the win dows are being raised so that no one can
be trapped. If you release the key, the
closing action is immediate ly canceled .
- Always read and heed WARNING ¢
IJ::,. in
General description on page 40.
Correcting window regulator
malfunction
After disconnecting the vehicle battery, the
one-touch up and down feature must be acti
vated again.
.. Pull and hold the power w indow switch un
til the window is completely closed.
.. Re lease the switch.
.. Pu ll the switch again for one second. The
automatic clos ing/opening is now reactivat
ed .
Opening and closing 47
Valet parking
Through the "valet parking" feature the lug
gage compartment of your vehicle is secured
from unauthorized access during the valet
parking service .
Fig . 46 Vale t parking button
With "valet parking " activated, the rear lid
cannot be opened.
.,. Take the mechanical key out of the master
key
r::!;> page 39.
.. Open the glove box¢ page 77 and acti
vate¢
fig. 46 the "valet parking" feature by
pressing the
! VALET I button. The indicator
light in the switch illuminates.
.. Close the glove box and lock it with the me
chanica l key .
.. Lock both rear seatbacks with the mechani
cal key ¢
page 72.
.,. Lock the luggage compartment pass
through with the mechan ica l key
¢ page 72.
.. Leave the master key with the service per
sonne l for parking and keep the mechanica l
key with you .
When the "va let parking" feature is activated:
- the unlocking button for the rear lid
~ in
the driver's door is inact ive
- the button~ on the master key is inactive
- the opening handle in the rear lid is inactive.
The vehicle can be driven and locked and un
locked with the master key. Access to the lug
gage compartment is b locked.
When the valet parking feature is activated,
the message
Valet parking activated appears II>
Page 50 of 316

48 Openin g and clo sing
in the instrument cluster display when you
switch the ignition on .
Panoramic tilting
sunroof
Tilting and closing
"'
" co 00
F ig. 47 Section of headline r: Sw itch fo r panoram ic t ilt ·
ing sunroof
., To tilt the panoramic tilting sunroof, press
the switch briefly .
., To close the panoramic tilting sunroof, pull
the switch briefly .
., To set an intermediate pos ition, press/pull
the switch until the roof reaches the des ired
pos it ion .
After the ignit ion is swi tched off, you can st ill
operate the Panorama for about 10 minutes .
As soon as the driver's or passenger's door is
opened, the sw itch is inoperative .
Sun blind
The sun blind can be opened and closed man
ually in any position.
A WARNING
Pay careful attention when clos ing the
panoramic tilting sunroof - otherwise seri
ous inju ry could result! For this reason, al
ways remove the ignition key when leaving the vehicle.
- Never leave ch ildren o r persons requ iring
assi stan ce a lone in the vehicle, especi ally
when they c ould access the veh icle keys.
Unsupervised use of the keys can res ult
in t he engine being started or use of ve
hicle systems such as the power win -dows, etc. w
hich could res ult in serious
in jury. The doors could be locked with
the remote key, delaying he lp in an
emergency.
- The panoramic tilting sunroof w ill con
tinue to operate until the ign ition key
has bee n removed and one of the front
doors has been opened.
(D Note
A lways close your panoramic t ilting sun
roof when leav ing your vehicle. Sudden
r ain can cause damage to the inte rior
equipment of yo ur vehicle, particular ly the
electronic equipment .
@ Tips
-Information on convenience opening/
closing
~ page 46 .
Emergency closing of the panoramic
tilting sunroof
If the s unroof detects an object in its path
when it is closing, it wi ll open aga in automati
ca lly. In this case, you can close the roof with
the power emergency closing function .
., Within five seconds after the sunroo f opens
automatically, pu ll the switch until the roof
closes.
Page 51 of 316

Clear vision Lights
· r/.· Switching the lights on and off
Fig . 48 Instr ument pane l: Head light control switch
Switching on AUTO - Automatic headlight
control*
• Turn the light switch to AUTO ¢ fig. 48.
Tu rning on th e side ma rker light s
• Turn the head light contro l switch to :oo~.
Switching on low beams
• Turn the head light control sw itch to gD .
Swi tching off the lights
• Turn the head light control switch to 0.
The low beams only illuminate with the igni
tion turned on.
With the s ide marker lights or headlights
switched on, the symbol next to the light
switch illuminates
:oo:.
AUTO -Automatic headlight control*
With the switch in the AUTO position, the low
beams are swi tched on automatically depend
ing on the ambient light, for example in a tun
ne l, at dusk and when it is raining or snowing.
When the low beams are switched on, the
:oo:
symbol comes on. The low beams remain
switched on regardless of the ambient light
when you turn on the fog lights .
When you turn
off the ignition, the low beams
are automatically switched
off.
On vehicles w ith a rain sensor* the headlights
switch on automatica lly after a few wind-
Clear vi sion 49
shield wiper passes. However, the instrument
lighting will not be switched on.
Wi th a utomatic head light cont ro l, you also
have the high-beam function available. How
ever, if you have not switched high beams
back to low beams while driving with auto
matic headlight control, only the low beams
come on the next time yo u turn on automatic
headlight control. In order to return to high
beams aga in, you first have to pull the high
beam lever back to the normal position and
then push the lever forward .
Light sensor* malfunction
In the event of a light sensor* ma lfunction,
the driver is not ified in the instrument cluster
display:
l;I Automat ic d rivi ng light s/automati c wip
ers defect ive
For safety reasons, the low beams are turned
on permanently with the switch in
AUTO.
However, you can continue to turn the lights
on and
off using the light switch . Have the
light sensor checked as soon as possible at an
authorized Aud i dealer or other qualified
workshop.
A WARNING
Automatic h eadlights are only intended to
assist the d river. They do not relieve the
driver of his responsib ility to che ck the
headlights and to turn them on manually
according to the current light and visibility
conditions. For example, fog cannot be de
tected by the light sensors. So a lways
switch on the headlights gD under these
weather conditions and when driving in
the dark.
(D Tips
- The light sensor* for headlight control is
located in the rear view mirror mount.
You should therefore not apply any stick
ers to the windshield in th is area in order
to prevent malfunct ions or fai lures .
- The sensitivity level for the light sensor*
set at t he factory can be changed in the ..,_
Page 52 of 316

50 Clear vis ion
MM I* men u r=> page 50 in the automat
ic driving Lights function .
- When you remove your key from the igni
tion wh ile the vehicle's lights a re turned
on, a buzze r sounds as long as the driv
er's door is open.
- Please obey all laws when using t he
li ghting systems described here .
- The coming home/leaving home func
tion * is availab le only with the sw itch in
the AUTO position.
Fog lights
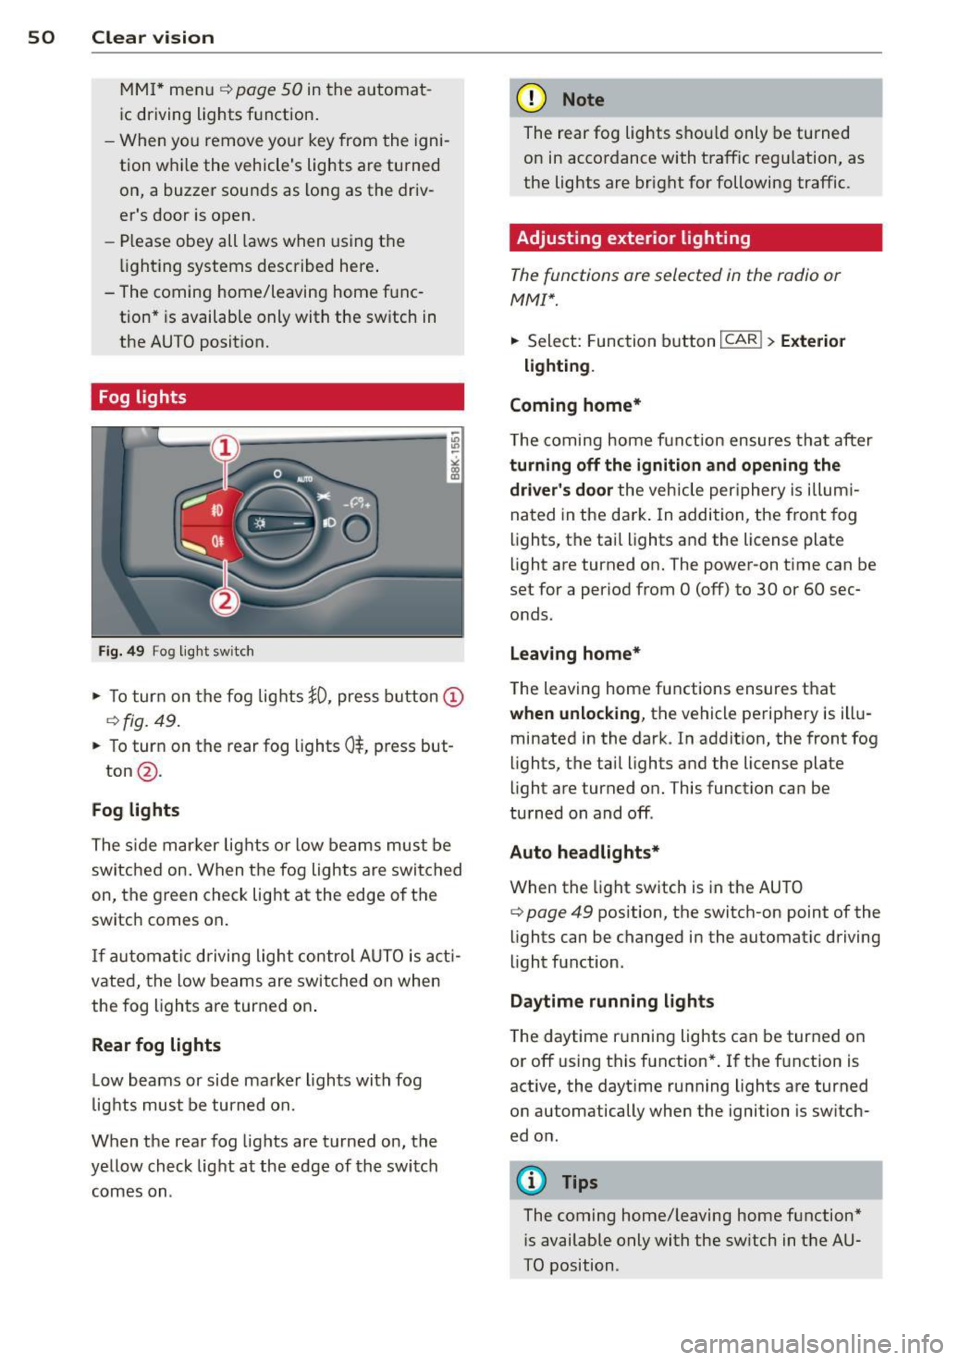
F ig. 49 F og light sw itch
,. To turn on the fog lights JO, press button @
r=>fig. 49.
,. To turn on the rear fog lights Ot press but-
ton @.
Fog lights
The s ide mar ker Lig hts or low beams must be
switched on. When the fog Lights are switched
on, the g reen check Light at the edge of the
switch comes on .
If autom atic driving light control AUTO is act i
vated, t he low beams are switched on when
the fog l igh ts are turned on .
Rear fog lights
Low beams or side marker Lights with fog
l ight s must be turned on.
When the rear fog lights are turned on, the
yellow check light at the edge of the switch
comes on .
(D Note
The rear fog Lights sho uld only be turned
on in accordance with traff ic regu lation, as
the lights are bright for following traffic .
Adjusting exterior lighting
The functions are selected in the radio or
MM!*.
,. Select: Function b utton ICAR ! > Exterio r
lighting .
Coming home*
T he coming home funct ion ensures tha t after
turning off the ignition and opening the
driver' s door
the veh icle per iphery is illum i
nated in the da rk . I n addition, the front fog
lights, the tai l lights and the License plate
li ght are turned on. The power -on t ime can be
set for a per iod from O (off) to 30 or 60 sec
onds.
Leav ing home*
The leaving home functions ensures that
when unlo cking , the vehicle perip hery is illu
minated in the dark . In add it ion, the front fog
lights, the tail Lights and the license plate
light are turned on. This function can be
tu rned on and off .
Auto headlights*
When the light switch is in the AUTO
r=> page 49 position, the switch-on point of the
lights can be changed in the automatic driving
li ght function.
Daytime running lights
The daytime r unning lights can be turned on
or off using this function* . If the f unction is
active, the dayt ime runn ing lights are turned
on automatically when the ignition is sw itch
ed on .
(D Tips
The coming home/leaving home function*
i s available only with the sw itch in t he AU
TO position .
Page 53 of 316

Daytime running lights
When you turn on the ignition the daytime
ru nning lights will com e on automatically.
USA mode ls
The daytime runni ng lights are activated when
the light switch
c:> page 49, fig. 48 is in the 0
position or the AUTO pos ition (only in daylight
conditions). The daytime running lights func
tion can be turned on and off in the rad io or
M MI* menu
Exterior light ing c:> page 50 .
Canada model s
The daytime run ning lights are activated when
the light switch
c:> page 49, fig. 48 is in the 0
position, oooc position or the AUTO posit io n
(o nly in daylight cond it ions) . T he daytime run
ni ng lig hts fu nction cannot be tu rned off.
_& WARNING
N ever u se day time ru nning ligh ts to see
w here y ou are goin g. They are no t bright
e n oug h an d wi ll not l et yo u see far enou gh
ahead for safety, especia lly at dusk o r
w hen it is dark. Be aware of cha nges in
outs ide light conditions when you are driv
ing and respond by sw itching on your low
beams
jD.
(D Note
Always be aware of changes in outside light conditions while you are driving. Re
spond in time to fading daylight by turn
ing the light switch to position
jD (or
"AUTO")
to turn on your headlights .
-
Clear vision 51
Instrument lighting
The basic brightness of the illumination for
the instruments, the center console and the
display can be adjusted.
Fi g. S O Instrument light ing
.,. Press t he knob to re lease i t.
.. Rotating the kno b to the r ight"+" w ill in
crease t he basic brightness when it is da rk .
.. Rotating the knob to the left"-" will de
crease the basic brightness when it is dark.
.,. Pressing the knob will prevent u nintention
al c hanges .
(D Tips
The ill umination for the instrument cluste r
li ghts up whenever you switc h on the igni
tion w ith th e vehicle headlights off. As the
d ay ligh t fad es, th e inst ru m ent cluste r illu
mina tio n lik ewise dims a utomatic a lly a nd
will g o out comp le tely whe n the o utsi de
ligh t is very low . This feature is me ant to
r emi nd you to switch o n the hea dlights
whe n outs ide lig ht conditions beco me
p oor .
Xenon headlights
App lies to vehicles : wit h xe non head lig hts
After starting the eng ine, the xenon head
li ghts are automatically adjusted to the load
and angle of the veh icle (for example, dur ing
acce lerat io n an d bra ki ng) . Th is prevents on
com ing t raff ic fro m experiencing un necess ary
he ad light glare from y our xe non headli ghts.
If the system is not ope rat ing properly, a
warning symbol in the Auto-Ch eck Control is
displayed
c:> page 36.
Page 54 of 316

52 Clear vis ion
Adaptive light
App lies to vehicles: with adaptive lig ht
When driving around bends, the relevant area
of the road is better illuminated .
Fig. S1 Adaptive light whe n dr iving
The benefit of adaptive l ight is that the c urve
and the edge of the road are better illuminat
ed
c:::> fig . 51. Dynamic adaptive light is con
trolled a utomatica lly, depending on vehicle
speed and steering wheel angle.
When driving around bends, the headlights
are contro lled according to steering wheel an
g le. So that there is no black hole ahead of the
vehicle, the two main beams pivot at different
angles.
(D Tips
The system works above a speed of about
6 mph (10 km/h).
Emergency flashers
The emergency flashers makes other moto
rists aware that you or your vehicle ore in an
emergency situation.
F ig. S2 Eme rgency flasher switc h
.. Press the switch J}. c:::> fig . 52 to turn the
eme rgency flashers on or
off.
When the emergency flashers are on, all four
turn signals blink at the same time. The turn
s ignal indicator lights
RII in the instrument
cluster, as well as the light in the emergency
flasher sw itch
J}. blink likewise. The emergen
cy flashers a lso work when the ignition is
tu rned
off.
The emergency flashers will turn on automat i
cally if you are in an accident where the airbag
has deployed .
@ Tips
You should turn on the emergency f lashers
when:
- you are the last vehicle standing in a traf
fic jam so that any other vehicles coming
can see you, or when
- your vehicle has broken down or you are
in an emergency situation, or when
- your vehicle is be ing towed by a tow
truck or if you are towing another vehicle beh ind you.
Turn signals and high beam lever
The lever on the left side of the steering col
umn is used to operate the turn signals and
the high beam as well as the headlight flash
er .
t
'
Fi g. S3 Tu rn signal and high bea m lever
The turn signa l and hig h beam lever has the
f o llow ing funct ions:
Turn signals ¢ ¢
.. Lift the leve r up a ll the way c:::> fig . 53 (D to
use t he right turn s ignals, or push the lever
down a ll th e way @to use the left tur n sig-
na ls. ..,
Page 55 of 316

Auto-blink
• Move the lever (up or down) just to the
point of resistance to use the turn signa ls
for as long as you need them, for example
when changing lanes .
• Move the lever (up or down) just to the
point of resistance and then release it right
away to make the turn signals blink
three
times .
You can use th is feature for example
when changing lanes on highways .
High beam ~D
• Push the lever forward @ to switch on the
high beam.
• Pull the lever back towards you to switch off
the high beam .
Headlight flasher ~D
• Pull the lever toward the steering wheel@
to use the headlight flasher.
Notes on these features
- The turn signals only work with the ignition
turned on. The indicator lights
R or Bin
the instrument cluster also blink.
- After you have turned a corner, the turn sig
nal switches off automatica lly.
- Th e
high beam works only when the head
lights are on. The indicator light
II in the
instrument cluster illuminates when the
high beams are on.
- The
headlight flasher works only as long as
you hold the lever -even if there are no
lights switched on. The indicator light
II in
the instrument cluster illum inates when you
use the head light flasher.
(D Note
Do not use the high beam or headlight
flasher if you know that these could blind
oncoming traffic.
Clear vision 53
Interior Lights
Front interior lights
The front interior lights also contain reading
lights for the driver and passenger .
Fig. 54 Headliner: Front inter ior lights
The rocker switch@ ~ fig. 54 for operating
the interior lighting has the follow ing f unc
tions:
Door contact switch
.,.. Place the switch @ in the m iddle position .
Interior light switched on
• Place the sw itch @ in position I.
Interior light switched off
• Place the switch @ in position 0.
Front reading lights ~
.,.. Press one of the switches @ to turn the
r ig ht or left read ing l ight on or off.
With the door contact switch turned on, the i nterior lights tu rn on as soon as you un lock
the vehicle or open the doors. The lighting is
also turned on when the ignit ion key is re
moved. The lights go out about 30 seconds af
ter the doors are closed . When the vehicle is
locked or when the ignition is turned on, the
interior lights are turned off.
When a door is open, the interior lights are
turned off after about 10 minutes to prevent
draining of the battery.
T he brigh tness of the ligh ts is controlled au
tomatically by a dimmer when they are
switched on and off.
Page 56 of 316

54 Clear vis ion
Rear interior lights
There are reading lights in the rear for the
passengers.
Fi g. 55 Headliner: Rear read ing lights
The reading lights are switched on and off us
ing the but tons
~~-
Vision
Sun visors
Using the sun visors makes driving safer.
Fig. 56 Sun viso r
The sun visors for the dr iver and passenger
can be pulled out of the ir brackets in the cen
ter of the vehicle and turned towards the the doors
q fig. 56 (D .
Vanity mirror
The vanity mir rors on the sun visors are cov
e red. When the l id is opened @, the m irror
light in the headline r turns on automa tically.
It tur ns off when the lid is closed and the visor
i s folded up again.
Sun shade
Applies to vehicles: with sun shade
'ii,) ~Clf • -----
Fig . 57 with MMJ: Button for rear window su n s hade
F ig . 58 without MMI: Button for rear window sun
s h ade
"' To extend/retract the rear window sun
shade, press the bu tton
0 ¢ fig. 58 . In ve
hicles with MM I*, the bu tton is l ocated
above the climate c ontrol system¢
fig. 57.
The rea r window sun shade can be set in the
MM I* so that it retracts autom atically when
dr iv ing in reverse. Sele ct
!CAR !> Wind ow >
Rear wind ow sun shade > On
to do this. The
s u n shade is extended again as soon as the ve
hicle is traveling forward at a speed greater
than 9 mph (1S km/h) if the ignition has not
been switched off in the meant ime. The cur
rent setting is automatically stored and as
s igned to the remote key .
@ Tips
-Pressing the button likl severa l times
consecutive ly can trigge r the overload
protect ion . The sun shade can on ly be ex
t ended/retracted agai n after a brief wait
ing period.
- The rear window sun shade only func
tions when the vehicle interior is warmer
t han 14°F (- 10°().