Page 305 of 436

Windshield fogged on the outside XSwitch the windshield wipers on
( Y page 253).
If the automatic mode of the climate control
is switched off:
XPress button _ repeatedly until one of
the following symbols P or O
appears in display H (Y page 298).
Maximum cooling MAX COOL
MAX COOL is only available in U.S. vehicles.
MAX COOL is only operational when the
engine is running.
You can use this setting to provide the fastest
possible cooling of the vehicle interior (when
windows are closed).
XActivating: Press button Ù.
The indicator lamp in the button comes on.
The climate control switches automatically to
the following functions:
R maximum cooling
R maximum blowing power
R the air recirculation mode is switched on
XDeactivating: Press button Ù again.
The indicator lamp in the button goes out.
The previous settings are once again in
effect.
i To switch the maximum cooling function
off, you can also press button ^, Ã
or ¬ .
Air recirculation mode
Switch to air recirculation mode to prevent
unpleasant odors from entering the vehicle
from the outside (e. g. before driving through
a tunnel). This setting cuts off the intake of
outside air and recirculates the air in the
passenger compartment.
GWarning!
Fogged windows impair visibility,
endangering you and others. If the windows
begin to fog on the inside, switching off the
air recirculation mode immediately should
clear interior window fogging. If interior
window fogging persists, make sure the air
conditioning is activated, or press button
¬ .
XActivating: Press button g.
The indicator lamp in the button comes on.
i The air recirculation mode is activated
automatically at high outside
temperatures.
The indicator lamp in button g is not lit
when the air recirculation mode is switched
on automatically.
A quantity of outside air is added after
approximately 30 minutes.
XDeactivating: Press button g again.
The indicator lamp in the button goes out.
i The manually selected air recirculation
mode is deactivated automatically:
R after 5 minutes if the outside
temperature is below approximately
41‡ (5†)
R after 5 minutes if the air conditioning is
turned off
R after 30 minutes if the outside
temperature is above approximately
41‡ (5†)
Using driver-side settings for
passenger side
This feature is only available in Canada
vehicles.
You can use the settings of the driver’s side,
such as temperature, air volume and air
distribution, for the passenger side.
Climate control system303Controls in detailBA 197 USA, CA Edition A 2011; 1; 27, en-UShereepeVersion: 3.0.3.52010-03-24T15:31:10+01:00 - Seite 303Z
Page 306 of 436

XActivating: Adjust the air temperature, air
volume and air distribution.
XPress button ¸.
The indicator lamp in the button comes on.
The driver-side settings are used for the
passenger side.
XDeactivating: Press button ¸ again.
The indicator lamp in the button goes out.
Rear window defroster
GWarning!
Any accumulation of snow and ice should be
removed from the rear window before driving.
Visibility could otherwise be impaired,
endangering you and others.
The rear window defroster uses a large
amount of power. To keep the battery drain
to a minimum, switch off the defroster as
soon as the rear window is clear. The
defroster is switched off automatically after
some time of operation depending on the
outside temperature.
XSwitch on the ignition.XSwitching on: Press button ¤.
The indicator lamp in the button comes on.
XSwitching off: Press button ¤ again.
The rear window defroster switches off when
the battery voltage is too low. Too many
electrical consumers may be operating
simultaneously.
XSwitch off consumers that are currently not
needed if required.
Loading and storing
Parcel net
GWarning!
The parcel net is intended for storing light-
weight items only, such as road maps, mail,
etc.
Heavy objects, objects with sharp edges, or
fragile objects may not be transported in the
parcel net. In an accident, during hard
braking, or sudden maneuvers, they could be
thrown around inside the vehicle and cause
injury to vehicle occupants.
The parcel net cannot protect transported
goods in the event of an accident.
A parcel net is located in the passenger
footwell.
Storage compartments
GWarning!
To help avoid personal injury during a collision
or sudden maneuver, exercise care when
storing objects in the vehicle. Put luggage or
cargo in the trunk if possible.
Keep compartment lids closed. This will help
to prevent stored objects from being thrown
about and injuring vehicle occupants during
Rbraking
Rvehicle maneuvers
Ran accident
Glove box
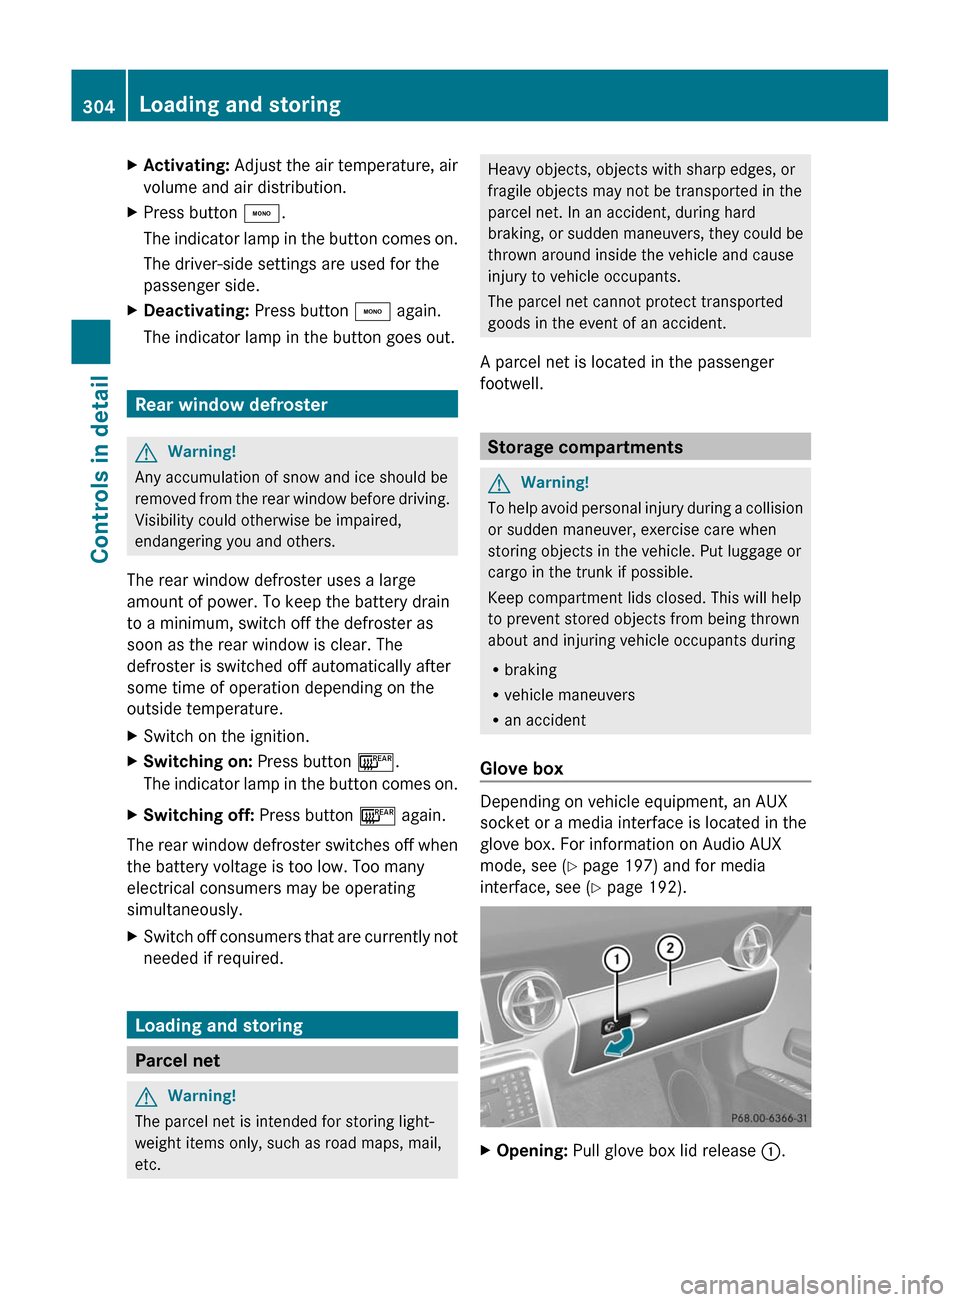
Depending on vehicle equipment, an AUX
socket or a media interface is located in the
glove box. For information on Audio AUX
mode, see (Y page 197) and for media
interface, see (Y page 192).
XOpening: Pull glove box lid release :.304Loading and storingControls in detail
BA 197 USA, CA Edition A 2011; 1; 27, en-UShereepeVersion: 3.0.3.52010-03-24T15:31:10+01:00 - Seite 304
Page 307 of 436

XClosing: Push glove box lid ; upwards
until it engages.
Locking/unlocking the glove box
separately
You can lock the glove box, e.g. when the
vehicle is in the shop for service.
The glove box can only be locked or unlocked
with the mechanical key.
XRemove the mechanical key from the
SmartKey (Y page 397).
XInsert the mechanical key into the glove
box lock.
XLocking: Turn mechanical key to position
2.
XUnlocking: Turn mechanical key to
position 1.
XRemove mechanical key from the glove box
lock.
Front storage compartment in center
console
Depending on vehicle equipment, your
vehicle may equipped with an ashtray instead
of a storage compartment.
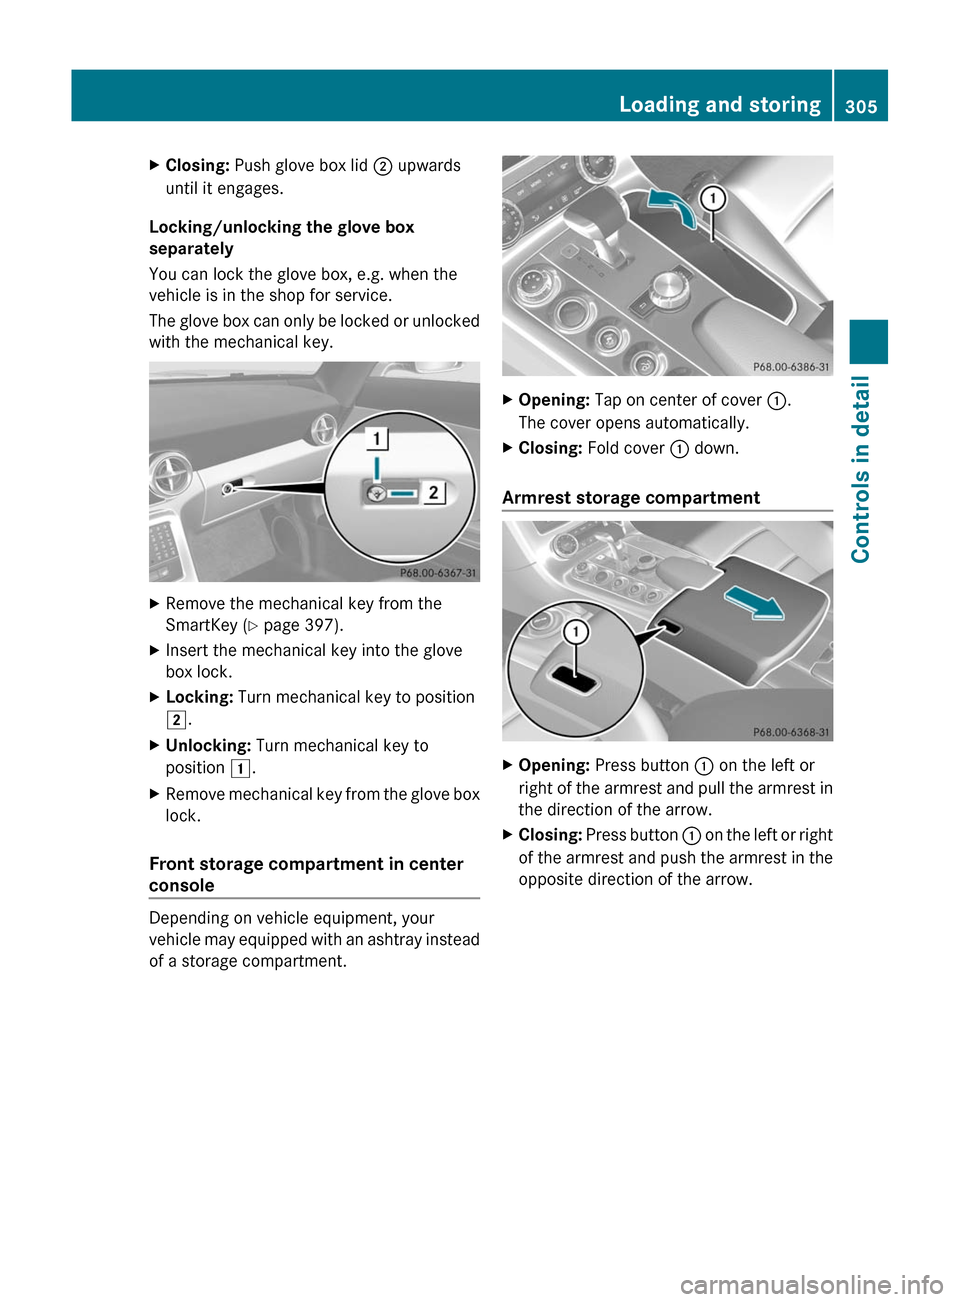
XOpening: Tap on center of cover :.
The cover opens automatically.
XClosing: Fold cover : down.
Armrest storage compartment
XOpening: Press button : on the left or
right of the armrest and pull the armrest in
the direction of the arrow.
XClosing: Press button : on the left or right
of the armrest and push the armrest in the
opposite direction of the arrow.
Loading and storing305Controls in detailBA 197 USA, CA Edition A 2011; 1; 27, en-UShereepeVersion: 3.0.3.52010-03-24T15:31:10+01:00 - Seite 305Z
Page 308 of 436

Rear storage compartment in center
console
XPress button :.
The cover opens automatically.
Storage pocket on the rear panel
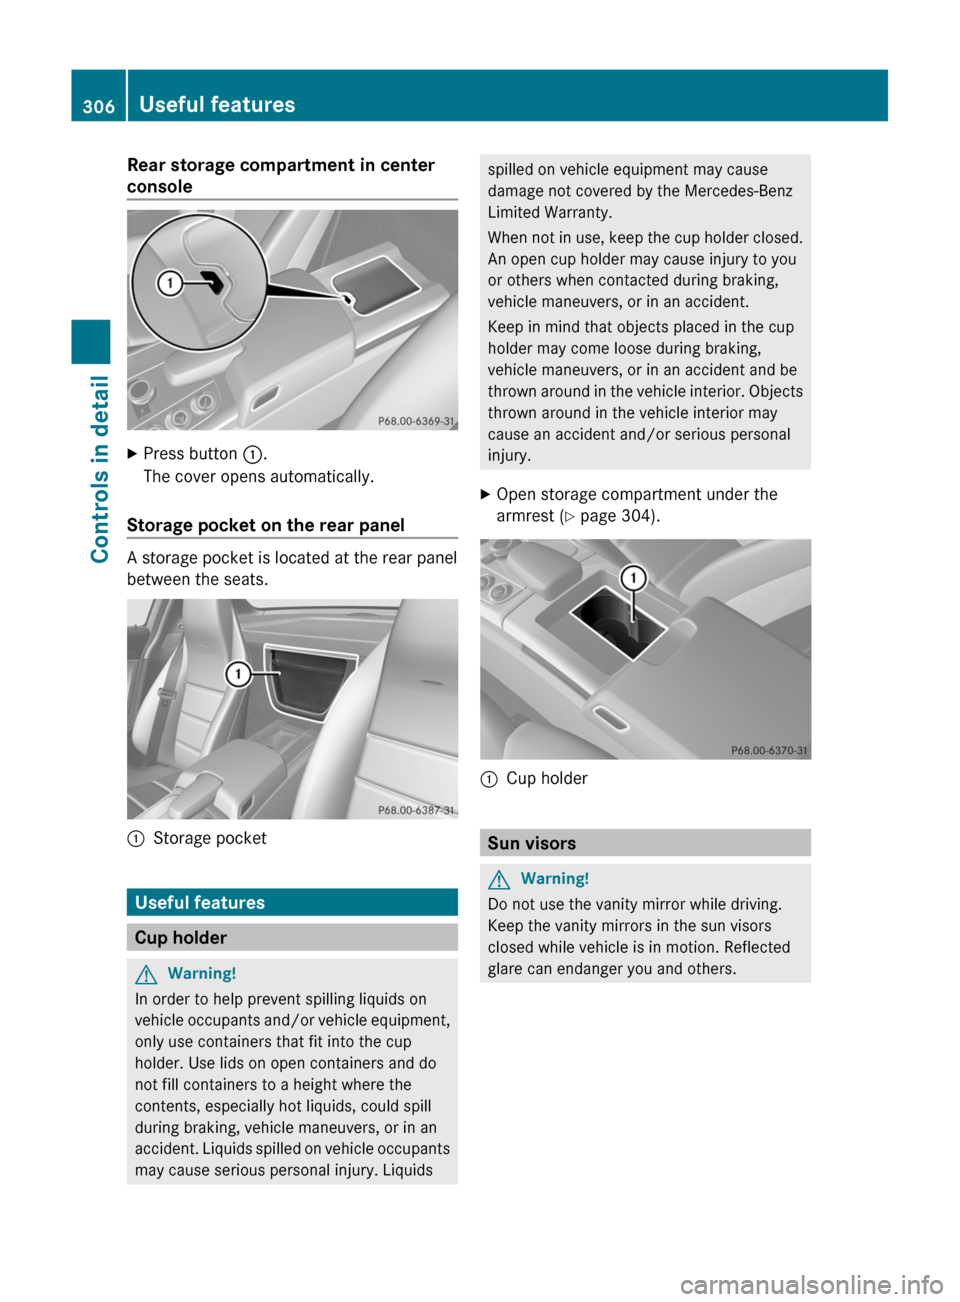
A storage pocket is located at the rear panel
between the seats.
:Storage pocket
Useful features
Cup holder
GWarning!
In order to help prevent spilling liquids on
vehicle occupants and/or vehicle equipment,
only use containers that fit into the cup
holder. Use lids on open containers and do
not fill containers to a height where the
contents, especially hot liquids, could spill
during braking, vehicle maneuvers, or in an
accident. Liquids spilled on vehicle occupants
may cause serious personal injury. Liquids
spilled on vehicle equipment may cause
damage not covered by the Mercedes-Benz
Limited Warranty.
When not in use, keep the cup holder closed.
An open cup holder may cause injury to you
or others when contacted during braking,
vehicle maneuvers, or in an accident.
Keep in mind that objects placed in the cup
holder may come loose during braking,
vehicle maneuvers, or in an accident and be
thrown around in the vehicle interior. Objects
thrown around in the vehicle interior may
cause an accident and/or serious personal
injury.
XOpen storage compartment under the
armrest (Y page 304).:Cup holder
Sun visors
GWarning!
Do not use the vanity mirror while driving.
Keep the vanity mirrors in the sun visors
closed while vehicle is in motion. Reflected
glare can endanger you and others.
306Useful featuresControls in detail
BA 197 USA, CA Edition A 2011; 1; 27, en-UShereepeVersion: 3.0.3.52010-03-24T15:31:10+01:00 - Seite 306
Page 309 of 436

:Vanity mirror lamp;Mounting=Holder, e.g. for gas cards?Vanity mirrorAVanity mirror cover
Glare through the windshield
XFlip sun visor down when you experience
glare.
Glare through a door window
XClose vanity mirror cover A if opened.XDisengage sun visor from mounting ;.XPivot sun visor to the side.XAdjust sun visor by pushing or pulling.
Vanity mirror
Vanity mirror lamp : only functions when
the sun visor is engaged in mounting ;.
XFlip sun visor down.XLift up vanity mirror cover A.
Vanity mirror lamp : comes on.
Ashtray
Depending on vehicle equipment, your
vehicle may equipped with a storage
compartment instead of an ashtray.
XOpening: Tap on center of cover :.
The cover opens automatically.
XRemoving ashtray insert: Press ashtray
insert ; forward in the direction of the
arrow.
XRemove ashtray insert ;.XReinstalling ashtray insert: Place ashtray
insert into the holder and push it in the
opposite direction of the arrow until it
engages.
XClosing: Fold cover : down.
Cigarette lighter
GObserve Safety notes, see page 57.GWarning!
Never touch the heating element or sides of
the lighter; they are extremely hot. Hold the
knob only.
Make sure any children traveling with you do
not injure themselves or start a fire with the
hot cigarette lighter.
Useful features307Controls in detailBA 197 USA, CA Edition A 2011; 1; 27, en-UShereepeVersion: 3.0.3.52010-03-24T15:31:10+01:00 - Seite 307Z
Page 310 of 436

If the engine is off and the cigarette lighter is
being used extensively, the vehicle battery
may become discharged.
XSwitch on the ignition.XOpening: Tap on center of cover :.
The cover opens automatically.
XPush in cigarette lighter ;.
Cigarette lighter ; will pop out
automatically when hot.
XTake out cigarette lighter ;.XReinsert cigarette lighter ; in its socket
after use.
Power outlet
The power outlets can be used to
accommodate 12V DC electrical accessories
(e.g. auxiliary lamps, mobile phone chargers)
up to a maximum of 15 A (180 W).
If the engine is off and the power outlets are
being used extensively, the vehicle battery
may become discharged.
XSwitch on the ignition.
Power outlet in glove box
XOpen the glove box (Y page 304).:Power outlet
Power outlet in center console
Depending on vehicle equipment, your
vehicle may equipped with a cigarette lighter
instead of a power outlet.
XOpening: Tap on center of cover :.
The cover opens automatically.
XFlip up cover ; and insert electrical plug
(cigarette lighter type).
mbrace
In Canada, the system is referred to as Tele
Aid (Telematic Alarm Identification on
Demand).
! In order to activate the mbrace system, a
subscriber agreement must be completed.
To ensure your system is activated and
operational, please press Information
button ï to perform the acquaintance
call. Failure to complete either of these
308Useful featuresControls in detail
BA 197 USA, CA Edition A 2011; 1; 27, en-UShereepeVersion: 3.0.3.52010-03-24T15:31:10+01:00 - Seite 308
Page 311 of 436

steps may result in a system that is not
activated.
If you have any questions regarding
activation, please call the Response Center
at 866-990-9007 (USA only) or
1-888-923-8367 (Canada only).
Shortly after the completion of your mbrace
acquaintance call, you will receive an account
number via email. You will also receive a two-
part welcome kit via mail that will provide
your account and Personal Identification
Number (PIN). You will only need the PIN once
to access the mbrace account section in
“Owners Online” at
http://www.MBUSA.com (USA only).
The mbrace system is available if
R it has been activated and is operational.
Activation requires a subscription for
monitoring services, connection and
cellular air time
R vehicle battery power is available
R the relevant cellular phone network and
GPS signals are available
i Location of the vehicle on a map is only
possible if the vehicle is able to receive
signals from the GPS satellite network and
pass the information on to the Response
Center.
The mbrace system
The mbrace system consists of three types of
response:
R Automatic and manual emergency
R Roadside Assistance
R Information
To adjust the speaker volume during a
mbrace call do the following:
XPress button W or X on the
multifunction steering wheel.
or
XUse the volume adjustment button on your
COMAND system.Be sure to check “Owners Online” at
http://www.MBUSA.com (USA only) for
more information and a description of all
available features.
System self-test
The system performs a self-test after you
have switched on the ignition.
GWarning!
A malfunction in the system has been
detected if any or all of the following
conditions occur:
R The indicator lamp in the SOS button does
not come on during the system self-test.
R The indicator lamp in the wrench button
F does not come on during the system
self-test.
R The indicator lamp in the Information
button ï does not come on during the
system self-test.
R The indicator lamp in the SOS button,
wrench button F, or Information button
ï remains illuminated constantly in red
after the system self-test.
R The message Tele Aid Inoperative or
Tele Aid Not Activated appears in the
multifunction display after the system self-
test.
If a malfunction is indicated as outlined above,
the system may not operate as expected. In
case of an emergency, help will have to be
summoned by other means.
Have the system checked at the nearest
Mercedes-Benz Center or contact the
Response Center at 866-990-9007 (USA
only) or 1-888-923-8367 (Canada only) as
soon as possible.
Emergency calls
! In order to activate the mbrace system, a
subscriber agreement must be completed.
To ensure your system is activated and
operational, please press Information
button ï to perform the acquaintance
Useful features309Controls in detailBA 197 USA, CA Edition A 2011; 1; 27, en-UShereepeVersion: 3.0.3.52010-03-24T15:31:10+01:00 - Seite 309Z
Page 312 of 436

call. Failure to complete either of these
steps may result in a system that is not
activated.
If you have any questions regarding
activation, please call the Response Center
at 866-990-9007 (USA only) or
1-888-923-8367 (Canada only).
An emergency call is initiated automatically
following an accident in which the Emergency
Tensioning Devices (ETDs) or air bags have
deployed.
i An automatically initiated mbrace
emergency call cannot be canceled.
An emergency call can also be initiated
manually ( Y page 310).
Once the emergency call is in progress, the
indicator lamp in the SOS button will begin to
flash. The message Connecting Call
appears in the multifunction display and the
COMAND system is muted. When the
connection is established, the message
Call Connected appears in the
multifunction display.
All information relevant to the emergency,
such as the location of the vehicle
(determined by the GPS satellite location
system), vehicle model, identification number
and color are generated.
A voice connection between the Response
Center and the occupants of the vehicle will
be established automatically soon after the
emergency call has been initiated. The
Response Center will attempt to determine
the nature of the emergency more precisely,
provided they can speak to an occupant of
the vehicle.
i If no vehicle occupant responds,
emergency services will be sent to the
vehicle immediately.GWarning!
If the indicator lamp in the SOS button is
flashing continuously and there was no voice
connection to the Response Center
established, then the mbrace system could
not initiate an emergency call (e.g. the
relevant cellular phone network is not
available).
The message Call Failed appears in the
multifunction display for approximately
10 seconds.
Should this occur, assistance must be
summoned by other means.
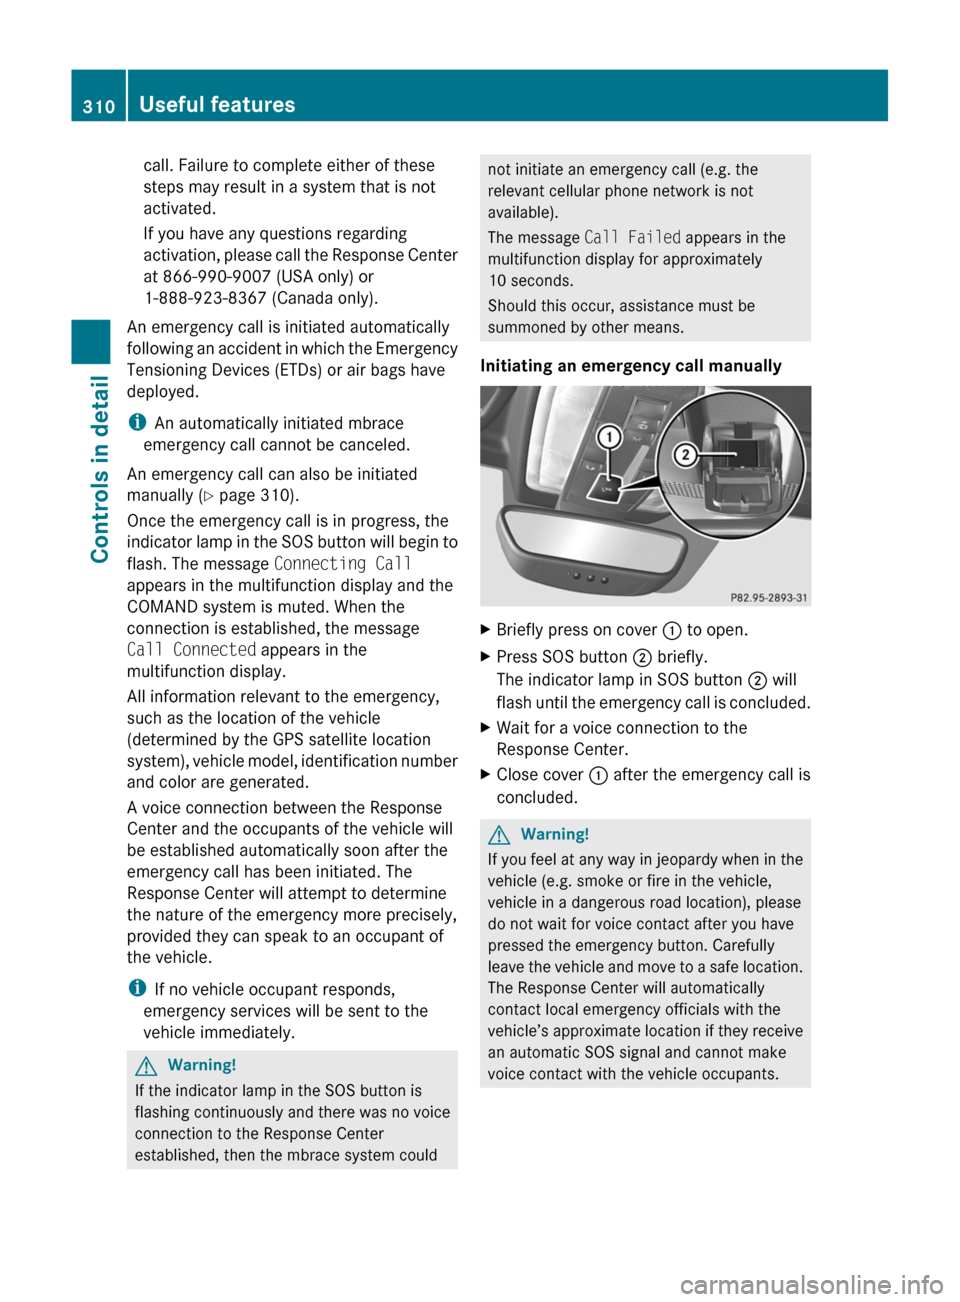
Initiating an emergency call manually XBriefly press on cover : to open.XPress SOS button ; briefly.
The indicator lamp in SOS button ; will
flash until the emergency call is concluded.XWait for a voice connection to the
Response Center.XClose cover : after the emergency call is
concluded.GWarning!
If you feel at any way in jeopardy when in the
vehicle (e.g. smoke or fire in the vehicle,
vehicle in a dangerous road location), please
do not wait for voice contact after you have
pressed the emergency button. Carefully
leave the vehicle and move to a safe location.
The Response Center will automatically
contact local emergency officials with the
vehicle’s approximate location if they receive
an automatic SOS signal and cannot make
voice contact with the vehicle occupants.
310Useful featuresControls in detail
BA 197 USA, CA Edition A 2011; 1; 27, en-UShereepeVersion: 3.0.3.52010-03-24T15:31:10+01:00 - Seite 310