Page 65 of 207

Seats and Storage
64
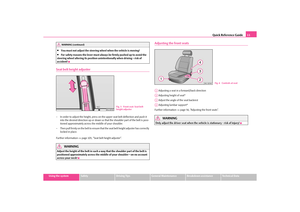
Lashing eyesYou can use the mounts which can be fitted in the openings in the body (Octavia)
page 64, fig. 64 or the mounts for fixing nets (Combi) fig. 65 , the eyes are located
on the luggage compartment floor.
You can also attach a floor fixing net* to these eyes for holding small objects.
The floor fixing net* together with the instal lation instruction are stowed in a container
under the floor covering of the luggage compartment behind the spare wheel.
WARNING
The load to be transported must be fixed in place in such a way that it cannot
move during the journey and when braking.
If the items of luggage or objects are attached to the lashing eyes with
unsuitable or damaged lashing straps, inju ries can occur in the event of braking
manoeuvres or accidents. In order to prevent the items of luggage being
thrown forward, always use suitable lash ing straps which are firmly attached to
the lashing eyes.
Fixing nets - Net programme Octavia*Fixing examples of th e fixing net as double horizontal pocket fig. 66 and floor net
fig. 67 .
Fig. 64 Luggage compartment:
Lashing eyes (Octavia)Fig. 65 Luggage compartment:
Lashing eyes (Combi)
WARNING (continued)
Fig. 66 Fixing net: Double hori-
zontal pocketFig. 67 Fixing net: double hori-
zontal pocket, floor fixing net
s2rc.book Page 64 Thursd ay, April 22, 2010 10:58 AM
Page 66 of 207

Seats and Storage65
Using the system
Safety
Driving Tips
General Maintenance
Breakdown assistance
Technical Data
The fixing net and the installation instruction are located in a container under the floor
covering of the luggage compartment behind the spare wheel.
WARNING
The whole strength of the net makes it possible to load the pocket with objects
of up to 1.5 kg in weight. Heavy objects are not secured sufficiently - risk of
injury and net damage!
Caution
Do not place any objects with sharp edges in the nets - risk of net damage.Fixing nets - Net programme Combi*
Fixing examples of th
e fixing net as double vertical pocket fig. 68 and floor net
fig. 69 .
The fixing net and the installation instructio n are located in a container under the floor
covering of the luggage compartment behind the spare wheel.
WARNING
The whole strength of the net makes it possible to load the pocket with objects
of up to 1.5 kg in weight. Heavy objects are not secured sufficiently - risk of
injury and net damage!
Caution
Do not place any objects with sharp edge s in the nets - risk of net damage.Fixing floor covering of the luggage compartmentA plastic hook is located on the handle of the luggage compartment cover. When
handling the spare wheel, you can fix the ra ised floor covering with the hook on the
frame of the luggage compartment fig. 70 .
Fig. 68 Fixing net: Double
vertical pocketFig. 69 Fixing net: Floor net
Fig. 70 Luggage compartment:
Fixing of the floor covering
(Combi)
s2rc.book Page 65 Thursd ay, April 22, 2010 10:58 AM
Page 67 of 207

Seats and Storage
66
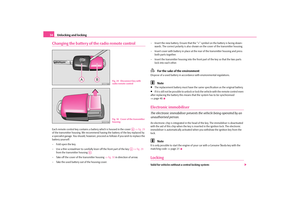
Luggage compartment cover (Octavia)
You can use the luggage compartment cover behind the head
restraints for storing light and soft items.The luggage compartment cover can be removed as required if one must transport
bulky goods.
– Unhook the support straps fig. 71 .
– Place the cover in the horizontal position.
– Pull the cover out of the holder horizontally to the rear.
– Install again by pushing the luggage compartment cover forwards into the holder and hanging the support straps on the boot lid.
You can stow the removed luggage compartment cover behind the rear seat backrest.
WARNING
No objects should be placed on the luggage compartment cover, the vehicle
occupants could be endangered if ther e is sudden braking or the vehicle
collides with something.
Caution
Please ensure that the heating elements of the rear window heater are not damaged
as a result of objects placed in this area.
Note
Opening the tailgate also lifts up the luggage compartment cover.Foldable luggage compartment cover (Combi)Pulling out– Pull the foldable luggage compartment cover in direction of arrow fig. 72 .
– Hang the luggage compartment cover in the recesses on the side of the luggage compartment.Folding– Pull the foldable cover out of the recesses, the cover is folded up.Removing– Have the foldable luggage compartment cover removed to transport bulky goods by pressing on the side of the cross rod in direction of arrow and taking it out
by moving it in direction of arrow fig. 72 .
WARNING
No objects should be placed on the luggage compartment cover.
Fig. 71 Removing the luggage
compartment cover
A1
A2
A2
A1
Fig. 72 Luggage compartment:
removing the foldable luggage
compartment cover
A1
A2
s2rc.book Page 66 Thursday, April 22, 2010 10:58 AM
Page 68 of 207

Seats and Storage67
Using the system
Safety
Driving Tips
General Maintenance
Breakdown assistance
Technical Data
Caution
Please ensure that the heating elements of the rear window heater and the foldable
luggage compartment cover are not damaged as a result of objects placed in this
area.Variable loading floor* (Combi)The variable loading floor makes it easier to handle bulky goods and creates an even
luggage compartment floor when the rear seats are folded forward. The maximum
permissable surface load of the variable loading floor is 75 kg.
Removing the variable loading floor– Unlock the loading floor by turning the lo cking bolts by approx. 90° to the left
fig. 73 .
– Fold together the loading floor and take it out by moving in direction of arrow.Remove carrier rails– Unlock the carrier rails by turning the arbor-mounted fixing eyes to the right by approx. 90° and take out the carrier rails.Install carrier rails– Place the carrier rails in the original po sition and attach them with the aid of the
mountable fixing eyes by turning to the left by approx. 90° at the fixed eyes of
the body.Installing the variable loading floor– Place the loading floor once folded together onto the carrier rails.
– Fold open the loading floor.
– Lock the loading floor by turning the locking bolts by approx. 90° to the right.
WARNING
Pay attention when installing that the carrier rails and the variable loading
floor are correctly fixed, otherw ise the occupants are at risk.
Fig. 73 Variable loading floorFig. 74 Luggage compartment:
Remove carrier rails
AA
AB
AC
ABAC
AA
s2rc.book Page 67 Thursday, April 22, 2010 10:58 AM
Page 69 of 207

Seats and Storage
68
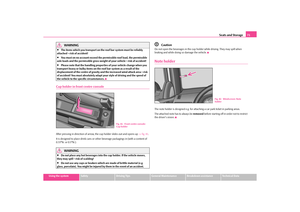
Divide the luggage compartment with variable loading floor*The luggage compartment can be divided with the variable loading floor.
– Lift up a par t of the loading floor with the handle and secure it by moving it into the
grooves fig. 75 .Net partition (Combi)*Use the net partition behind the rear seatsThe net partition can either be installed behind the rear seats or behind the front seats.
Before using the net partition, remove the foldable cover page 66.
Pulling out– Pull the net partition out of the housing at an angle of about 45° in direction of
the boot lid at the loop .
– Insert the cross rod into the mount first on the one side and push the cross rod forwards.
– In the same way, fix the cross rod to the other side of the vehicle, mount .Folding– Push the cross rod first of all on the one side and then on the other side towards the rear.
– Take the cross rod out of the mounts .
– Roll the net partition at an angle of approx. 45° towards the boot lid in the housing , so that it does not roll up automatically .
WARNING
First check for yourself that the cross road is inserted into the mounts in
the front position!
Using the net partition behind the front seats
Fig. 75 Divide the luggage
compartmentFig. 76 Pull out the net partition
AB
AA
AC
AC
AC
AB
AC
Fig. 77 Pull out the net partition
s2rc.book Page 68 Thursd ay, April 22, 2010 10:58 AM
Page 70 of 207

Seats and Storage69
Using the system
Safety
Driving Tips
General Maintenance
Breakdown assistance
Technical Data
Pulling out– Fold the rear seats forwards page 60
– Pull the net partiton net at the plate out of the housing page 68, fig. 77 .
– Insert the cross rod into the mount first on the one side and push the cross rod forwards.
– In the same way, fix the cross rod to the other side of the vehicle, mount .Folding– Pull the cross rod back slightly, first on the one side then on the other side and take the cross rod out of the mounts fig. 78 .
– Hold the cross rod in such a way that the luggage net partition can roll up slowly
and without damage into the housing .
– Fold the rear seats back into their original position.
WARNING
The belt locks and the belts must be in their original position after folding
back the seat cushions and the seat backrests - they must be ready to use.
The seat backrests must be securely interlocked in position so that no
objects in the luggage compartment ca n slide into the passenger compartment
if there is sudden braking - risk of injury!
First check for yourself that the cross road is inserted into the mounts in
the front position!
Removing and installing net partition housingRemoving– Fold the rear seats forwards page 60
– Open the right rear door.
– Push the net partition housing in the di rection of arrow up to the stop and
take it out of the mounts of the seat backrest in direction of arrow .Installing– Position the net partition housing into the mounts of the rear seat backrests.
– Push the luggage net partition housing in the opposite direction of arrow as far
as the stop.
– Fold the rear seats back into their original position.
Fig. 78 Roll up net partition
AA
AB
AC
AC
AC
AB
WARNING (continued)
AC
Fig. 79 Rear seats: Net partition
housing
AB
A1
A2
A1
s2rc.book Page 69 Thursd ay, April 22, 2010 10:58 AM
Page 71 of 207

Seats and Storage
70
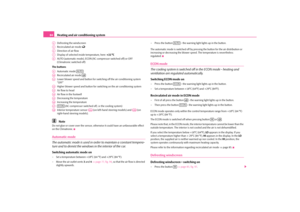
The roof rack*DescriptionPay attention to the following points if you wish to transport luggage or other items on
the roof of your vehicle:
A special roof luggage rack system was de veloped for the vehicle, that is why you
should only use a roof luggage rack which has been released for use by Škoda Auto.
The base carrier is the basis for a comple te roof luggage rack system. Separate
additional holders are required for safety reasons for transporting luggage, bikes, surf-
boards, skis and boats.
The basic version of the roof luggage ra ck system and further components are
obtainable as accessories from the specialist garages.Caution
If you use other roof rack systems or if th e roof bars are not properly fitted, then
any damage which may result to your car is not covered by the warranty agreements.
It is therefore essential to pay attention to the fitting instructions supplied with the roof
luggage rack system.
On models fitted with a power sliding/tilting roof, ensure that the opened
sliding/tilting roof does not strike any items of luggage transported on the roof.
Ensure that the opened boot lid does not collide with the roof load.For the sake of the environment
The increased aerodynamic drag results in a higher fuel consumption. One should
therefore take off the roof bar system after use.
Note
A roof rail is obtainable from a specialist garage if hasn't been fitted onto an estate car
at the works, which carries out the professional fitting.
Lashing points (Octavia)Installing– The plastic caps fig. 80 can be removed by inserting a thin screwdriver into the
recess of the caps and carefully leve r out the caps to avoid paint damage.
– The feet are inserted into the openings of the roof bars.
Note
Pay attention to the information regarding assembly and disassembly in the
attached instructions.
If you have any questions, plea se contact a specialist garage.
The figure is not valid for an estate car.
Roof loadDistribute weight evenly over the roof lu ggage rack system. The maximum permissible
roof load (including roof rack system) of 75 kg and the maximum permissible total
weight of the vehicle should not be exceeded.
You cannot make full use of th e permissible roof load if you use a roof luggage rack
system with a lower load carr ying capacity. The load transported on the roof luggage
rack system must not exceed the weight limit which is stated in the fitting instructions.
Fig. 80 Attachment points for
base roof carrier
s2rc.book Page 70 Thursday, April 22, 2010 10:58 AM
Page 72 of 207

Seats and Storage71
Using the system
Safety
Driving Tips
General Maintenance
Breakdown assistance
Technical Data
WARNING
The items which you transport on the roof bar system must be reliably
attached - risk of accident!
You must on no account exceed the pe rmissible roof load, the permissible
axle loads and the permissible gross weight of your vehicle - risk of accident!
Please note that the handling properties of your vehicle change when you
transport heavy or bulky items on the roof bar system as a result of the
displacement of the centre of gravity an d the increased wind attack area - risk
of accident! You must absolutely adapt your style of driving and the speed of
the vehicle to the sp ecific circumstances.
Cup holder in front centre consoleAfter pressing in direction of arrow, the cup holder slides out and opens up fig. 81 .
It is designed to place drink cans or othe r beverage packagings in (with a content of
0.33°ltr. or 0.5°ltr.).
WARNING
Do not place any hot beverages into th e cup holder. If the vehicle moves,
they may spill - risk of scalding!
Do not use any cups or beakers which are made of brittle material (e.g.
glass, porcelain). You might be injured by them in the event of an accident.
Caution
Do not open the beverages in the cup holder while driving. They may spill when
braking and while doing so damage the vehicle.Note holderThe note holder is designed e.g. for attaching a car park ticket in parking areas.
The attached note has to always be removed before starting off in order not to restrict
the driver's vision.
Fig. 81 Front centre console:
Cup holder
Fig. 82 Windscreen: Note
holder
s2rc.book Page 71 Thursd ay, April 22, 2010 10:58 AM