Page 177 of 207
Breakdown assistance
176
– Depress the clutch pedal fully when the engine fires and take the vehicle out of
gear.
WARNING
There is high risk of having an accident when tow-starting a vehicle, when for
example the towed vehicle ru ns into the towing vehicle.
Caution
Vehicles which are fitted with a catalytic converter should not be tow-started over a
distance of more than 50 metres. Unburnt fu el may get into the catalytic converter and
damage it.Towing in a vehicle fitted with a manual gearboxPlease refer to the additional instructions page 174.
The vehicle can be towed in with a tow bar or a tow rope or with the front or rear
wheels raised. The maximum towing speed is 50 km/h.s2rc.book Page 176 Thursday, April 22, 2010 10:58 AM
Page 178 of 207

Fuses and light bulbs177
Using the system
Safety
Driving Tips
General Maintenance
Breakdown assistance
Technical Data
Fuses and light bulbsElectric fusesReplacing fuses
Defect fuses must be replaced.Individual electrical circuits are protected by fuses. The fuses are located on the left
side of the dash panel behind the safety cover and under the cover in the engine
compartment on the left.
– Switch the ignition off and also the electrical component affected.
– Use a screwdriver to take off the fuse cover on the side of the dash panel fig. 169
or the fuse cover in the engine compartment page 178.
– Find out which fuse belongs to the relevant component page 179, “Fuse assign-
ment in the dash panel”, page 178, “Fuse assignment in engine compartment -
version 1” or page 179, “Fuse assignment in engine compartment - version 2”.
– Take the plastic clip out of it s fixture in the fuse cover, insert it onto the respective
fuse and pull out this fuse.
– Defect fuses can be detected by their melted metal strips. Replace the defect fuse by a new fuse of the same ampere number.
– Fit on the fuse cover again. We recommend that you always have the
small box of replacement fuses in your
vehicle. You can obtain repl acement fuses from the range of Škoda original parts or
from a specialist garage
7).
Colour coding of fuses
Caution
Never attempt to “repair” fuses and also do not replace them with a fuse of a higher
amperage - risk of fire! This may also caus e damage at another part of the electrical
system.
Have the electrical system checked as quickly as possible by a specialist garage if a
newly inserted fuse blows again after a short time.
Fig. 169 Fuse cover: left side of
the dash panel
7)The small box with replacement fuses is part of the basic equipping of the vehicle in some coun-
tries.
Colour
Maximum amperage
light brown
5
brown
7,5
red
10
blue
15
yellow
20
white
25
green
30
s2rc.book Page 177 Thursday, April 22, 2010 10:58 AM
Page 179 of 207

Fuses and light bulbs
178
Fuse cover in engine compartment
The fuse box in the engine compartment exists in two different versions.
You can determine which version your vehicle is fitted with after
removing the fuse cover at the location of the fuses.On some vehicles, the battery cover must be removed before removing the fuse cover
page 155.Opening the cover– Press together the interlocks of the fuse cover simultaneously in direction of arrow
fig. 170 and fold down the cover in direction of arrow .Closing the cover– Closing the cover takes place in the reverse order.
Fuse assignment in engine compartment - version 1Certain electrical components are only stan dard on certain vehicle model versions or
only suppliable as optional equipment for certain models.
Fig. 170 Battery cover in the
engine compartment
AA
AB
No.
Power consumer
Amperes
1
Pump for ABS
30
2
Valves for ABS
30
3
Radiator fan 1st stage
30
4
Glow plugs for heating the cool ant, relay for secondary air
pump
50
5
Engine control unit
50
6
Radiator fan 2nd stage
40
7
Main fuse of the interior
110
8
Dynamo
110 / 150
a)
a)Depending on the engine type and equipment.
Fig. 171 Schematic representa-
tion of fuse box in engine
compartment - version 1
s2rc.book Page 178 Thursday, April 22, 2010 10:58 AM
Page 180 of 207

Fuses and light bulbs179
Using the system
Safety
Driving Tips
General Maintenance
Breakdown assistance
Technical Data
Fuse assignment in engine compartment - version 2Certain electrical components are only standard on certain vehicle model versions or
only suppliable as optional equipment for certain models.
Fuse assignment in the dash panelCertain electrical components are only stan dard on certain vehicle model versions or
only suppliable as optional equipment for certain models.
No.
Power consumer
Amperes
1
Pump for ABS
30
2
Va lve s for AB S
30
3
Radiator fan 1st stage
30
4
Glow plugs for heating the coolant, relay for secondary air
pump
50
5
Engine control unit
50
6
Radiator fan 2nd stage
40
7
Main fuse of the interior
110
8
Dynamo
110 / 150
a)
a)Depending on the engine type and equipment.
Fig. 172 Schematic representa-
tion of fuse box in engine
compartment - version 2
No.
Power consumer
Amperes
1
Heating of the exterior mirrors, relay for cigarette lighter,
power seats and washing nozzles
10
2
Turn signal lights, Xenon headlight
10
3
Lighting in storage compartment
5
4
Licence plate light
5
5
Seat heating, Climatronic, circulating air flap, exterior mir-
ror heater, cruise control system
7,5
6
Central locking system
5
7
Reversing light, sensors for parking aid
10
8
Phone
5
9
ABS, ESP
5
10
Ignition, S-contact
a)
10
11
Instrument cluster
5
12
Power supply of the self-diagnosis
7,5
Fig. 173 Schematic representa-
tion of the fuse carrier in the
dash panel
s2rc.book Page 179 Thursday, April 22, 2010 10:58 AM
Page 181 of 207

Fuses and light bulbs
180
Electrically adjustable seats are protected by automatic circuit breakers, which
switch on again automatically after a few seconds after the overload has been
eliminated.BulbsChanging bulbsThe relevant lamp must always be switch ed off before a light bulb is replaced.
Defect light bulbs should only be replaced with light bulbs of the same type. The desig-
nation is located on the light socket or the glass bulb.
Changing certain bulbs is not something whic h you can do yourself, but requires to be
done by a specialist. Other parts of the vehi cle must be removed in order to change the
13
Brake lights
10
14
Interior lighting, central locking system, interior lighting
(without central locking system)
10
15
Instrument cluster, steering angle sender, rear mirror
5
16
Air conditioning system
10
17
Heated windscreen washer nozzles
daylight driving lights
5
30
18
Right main beam
10
19
Left main beam
10
20
Right low beam, headlight range adjustment
15
21
Low beam on the left
15
22
Right parking light
5
23
Left parking light
5
24
Front window wiper, motor for wash pump
20
25
Air blower, air conditioning system, Climatronic
25
26
Rear window heater
25
27
Rear window wiper
15
28
Fuel pump
15
29
Control unit: Petrol engine
control unit: Diesel engine
15
10
30
Electric sliding/tilting roof
20
31
Not assigned
32
Petrol engine - injection valves
diesel engine - injection pump, control unit
10
30
33
Headlight cleaning system
20
34
Petrol engine: Control unit
diesel engine: Control unit
10
10
No.
Power consumer
Amperes
35
Trailer socket, power socket in the luggage compartment
30
36
Fog lights
15
37
Petrol engine: Control unit
diesel engine: Control unit
20
5
38
Luggage compartment light, central locking system, inte-
rior lighting
15
39
Hazard warning light system
15
40
Horn
20
41
Cigarette lighter
15
42
Radio, mobile phone
15
43
Petrol engine: Control unit
diesel engine: Control unit
10
10
44
Seat heaters
15
a)For power consumers, e.g. the radio, which can be operated with the ignition switched off as
long as the ignition key is not withdrawn.No.
Power consumer
Amperes
s2rc.book Page 180 Thursday, April 22, 2010 10:58 AM
Page 182 of 207

Fuses and light bulbs181
Using the system
Safety
Driving Tips
General Maintenance
Breakdown assistance
Technical Data
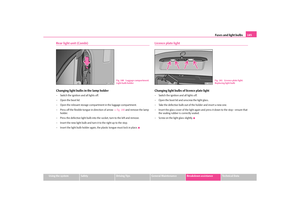
light bulbs. This applies, in particular, to
bulbs which can only be reached from the
engine compartment.
We therefore recommend that you have any bulbs changed by a specialist garage or,
in exceptional cases, by calling on other professional assistance.
Please note that the engine compartment is a hazardous area page 148.
We recommend that you always have a small box of replacement bulbs in your vehicle.
You can obtain replacement bulbs from Škoda original accessories or from a specialist
garage
8).
A stowage place for the bulbs is located in the box in the spare wheel*.
Fitted with a xenon headlight
Change of bulbs on vehicles with Xenon lights (low beam lights, parking lights and
main beam lights) should be und ertaken by a specialist garage.
Bulb - Overview
WARNING
Light bulbs H4 and H1 are pressurise d and may burst when changing the
bulb - risk of injury!
It is recommended to wear gloves and safety glasses when changing a bulb.
Gas discharge bulbs* (xenon bulbs) op erate with a high voltage, profes-
sional knowledge is required - danger to life!Caution
Do not take hold of the glass bulb with naked fingers (even the smallest amount of dirt
reduces the working life of the light bulb). Use a clean cloth, serviette or something
similar.
Note
This Owner's Manual only describes the replacement of bulbs where it is assumed that
no major complications will arise. Other li ght bulbs should be replaced by your
specialist garage.
8)The small box with replacement bulbs is part of th e basic equipping of the vehicle in some coun-
tries.Front headlight
Halogen headlight
Xenon headlight
Low beam light
H4
D2S
Main beam light
H4
H1
Parking lights
W5W
Tu r n s i g n a l s
PY21W
Fog lights
H3
Rear light unit
Bulb (Octavia)
Bulb (Combi)
Reversing light
P21W
P21W
Tu r n s i g n a l s
PY21W
PY21W
Brake lights
P21W
P21/5W
Parking lights
P21/4W
P21/5W
Fog lights
P21/4W
P21W
Others
Bulb (Octavia)
Bulb (Combi)
Side turn signal lights
WY5W
WY5W
Licence plate light
W5W
W5W
3. Brake light
W2, 3W
LED
Interior lighting
C10W
C10W
Reading light
W5W
W5W
Luggage compartment light
C5W
C10W
Storage compartment light -
front passenger side
C3W
C3W
Interior mirror light
W2, 3W
W2, 3W
s2rc.book Page 181 Thursday, April 22, 2010 10:58 AM
Page 183 of 207

Fuses and light bulbs
182
Main headlight with coverBefore changing the light bulb for the low beam and main beam light or the light bulb
for the parking light, remove the protective cover from the rear part of the headlight.Removing cover– Switch the ignition and all lights off.
– Open the bonnet.
– Press off the circlip from the cover an d fold it in the direction of arrow fig. 174 .
– Remove the cover of the headlight by pu lling towards the middle of the vehicle.
Installation takes place in the reverse order.
Parking light at the frontChange the light bulb for the parking light– Switch the ignition and all lights off.
– Open the bonnet.
– Remove the cover of the headlight.
– Pull the lamp holder with light bulb for the parking light out of the headlight fig. 175 .
– Take the faulty bulb out of the fixture and insert a new one.
– Insert the lamp holder with new light bulb into of the headlight.
– Insert the cover of the headlight.
Fig. 174 Removing cover
Fig. 175 Change the light bulb
for the parking light
s2rc.book Page 182 Thursday, April 22, 2010 10:58 AM
Page 184 of 207

Fuses and light bulbs183
Using the system
Safety
Driving Tips
General Maintenance
Breakdown assistance
Technical Data
Main beam light and low beam lightChange light bulb for main beam light and low beam light– Switch the ignition and all lights off.
– Open the bonnet.
– Remove the cover of the headlight.
– Hold the sprung wire clamp and disconnect the plug .
– Unhook the sprung wire clamp by pressing in direction of the light bulb and
fold it in direction of arrow.
– Remove the light bulb and insert the new light bulb in such a way that the fixing
lugs of the light bulb socket fit into the recesses at the reflector.
– Fold the sprung wire clamp over the lamp ho lder and press it until it locks into the
holder.
– Plug in plug.
– Insert the cover of the headlight.
Note
Get the headlight setting checked by a specialist garage after replacing the light bulb.
Fog lights*Change light bulbs for fog lights– Switch the ignition and all lights off.
– Open the bonnet.
– Turn the plastic cover of the headlight towards the middle of the vehicle and
remove it.
– Disconnect the plug connector .
– Unhook the sprung wire clamp out of the slots of the lamp housing and fold it down.
– Remove the halogen lamp with cable. Insert the new halogen lamp in such a way that the fixing lugs on the reflector lie in the corresponding recesses in the light
socket.
– Close the sprung wire clamp over the ligh t socket. Press together the sprung wire
clamp and lock together again.
– Plug in plug.
– Insert the plastic cover.
Note
Get the headlight setting checked by a specia list garage after replacing the light bulb.
Fig. 176 Change light bulbs for
main beam lights and low beam
lights
AB
AA
AB
A1
Fig. 177 Change light bulbs for
fog lights
ABAA
s2rc.book Page 183 Thursday, April 22, 2010 10:58 AM