2010 SKODA OCTAVIA TOUR Columbus Navigation System Manual
-
 1
1 -
 2
2 -
 3
3 -
 4
4 -
 5
5 -
 6
6 -
 7
7 -
 8
8 -
 9
9 -
 10
10 -
 11
11 -
 12
12 -
 13
13 -
 14
14 -
 15
15 -
 16
16 -
 17
17 -
 18
18 -
 19
19 -
 20
20 -
 21
21 -
 22
22 -
 23
23 -
 24
24 -
 25
25 -
 26
26 -
 27
27 -
 28
28 -
 29
29 -
 30
30 -
 31
31 -
 32
32 -
 33
33 -
 34
34 -
 35
35 -
 36
36 -
 37
37 -
 38
38 -
 39
39 -
 40
40 -
 41
41 -
 42
42 -
 43
43 -
 44
44 -
 45
45 -
 46
46 -
 47
47 -
 48
48 -
 49
49 -
 50
50 -
 51
51 -
 52
52 -
 53
53 -
 54
54 -
 55
55 -
 56
56 -
 57
57 -
 58
58 -
 59
59 -
 60
60 -
 61
61 -
 62
62 -
 63
63 -
 64
64 -
 65
65 -
 66
66 -
 67
67 -
 68
68 -
 69
69 -
 70
70 -
 71
71 -
 72
72 -
 73
73 -
 74
74 -
 75
75 -
 76
76 -
 77
77 -
 78
78 -
 79
79 -
 80
80 -
 81
81 -
 82
82 -
 83
83 -
 84
84 -
 85
85 -
 86
86 -
 87
87 -
 88
88 -
 89
89 -
 90
90 -
 91
91 -
 92
92 -
 93
93 -
 94
94 -
 95
95 -
 96
96 -
 97
97 -
 98
98 -
 99
99 -
 100
100 -
 101
101 -
 102
102 -
 103
103 -
 104
104 -
 105
105 -
 106
106 -
 107
107 -
 108
108 -
 109
109 -
 110
110 -
 111
111 -
 112
112 -
 113
113 -
 114
114 -
 115
115 -
 116
116 -
 117
117 -
 118
118 -
 119
119 -
 120
120 -
 121
121 -
 122
122 -
 123
123 -
 124
124 -
 125
125 -
 126
126 -
 127
127 -
 128
128 -
 129
129 -
 130
130 -
 131
131 -
 132
132 -
 133
133 -
 134
134 -
 135
135 -
 136
136 -
 137
137 -
 138
138 -
 139
139 -
 140
140 -
 141
141 -
 142
142 -
 143
143 -
 144
144 -
 145
145 -
 146
146 -
 147
147 -
 148
148 -
 149
149 -
 150
150 -
 151
151 -
 152
152 -
 153
153 -
 154
154 -
 155
155 -
 156
156 -
 157
157 -
 158
158 -
 159
159 -
 160
160 -
 161
161 -
 162
162 -
 163
163 -
 164
164 -
 165
165 -
 166
166 -
 167
167 -
 168
168 -
 169
169 -
 170
170 -
 171
171 -
 172
172 -
 173
173 -
 174
174 -
 175
175 -
 176
176 -
 177
177 -
 178
178 -
 179
179 -
 180
180 -
 181
181 -
 182
182 -
 183
183 -
 184
184 -
 185
185 -
 186
186 -
 187
187 -
 188
188 -
 189
189 -
 190
190 -
 191
191 -
 192
192 -
 193
193 -
 194
194 -
 195
195 -
 196
196 -
 197
197 -
 198
198 -
 199
199 -
 200
200 -
 201
201 -
 202
202 -
 203
203 -
 204
204 -
 205
205 -
 206
206
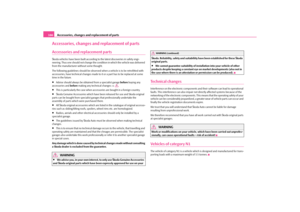
 Columbus Navigation System Manual Fuses and light bulbs
184
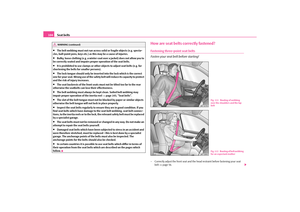
Turn signal light at the frontChanging light bulb for turn signal light (at the front)– Switch the ignition and all lights off.
– Open the bonnet.
– Unscrew the screw")
 Columbus Navigation System Manual Fuses and light bulbs185
Using the system
Safety
Driving Tips
General Maintenance
Breakdown assistance
Technical Data
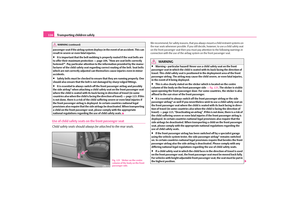
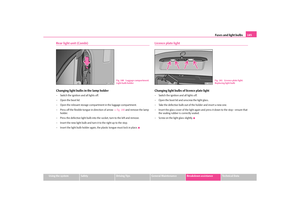
Rear light unit (Combi)Changing light bulbs in the lamp holder– Switch the ignit")
 Columbus Navigation System Manual Fuses and light bulbs
186
s2rc.book Page 186 Thursday, April 22, 2010 10:58 AM")
 Columbus Navigation System Manual Technical Data187
Using the system
Safety
Driving Tips
General Maintenance
Breakdown assistance
Technical Data
Te c h n i c a l D a t aTechnical DataGeneral informationThe details given in the offici")
 Columbus Navigation System Manual Technical Data
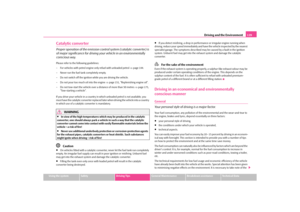
188Gearbox code, paint number, interior eq uipment number, engine output, engine
code
Partial description of the vehicle
Vehicle identification number (VIN)
The vehicle identification")
 Columbus Navigation System Manual Technical Data189
Using the system
Safety
Driving Tips
General Maintenance
Breakdown assistance
Technical Data
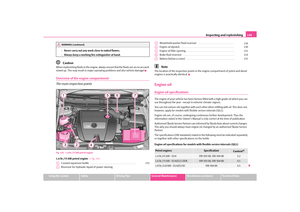
DimensionsDimensions (mm)
OCTAVIA
COMBI
Length
4507
4513
Width
1731
1731
Width including")
 Columbus Navigation System Manual Technical Data
190
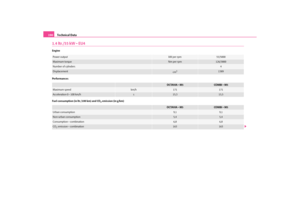
1.4 ltr./55 kW - EU4Engine
Performances
Fuel consumption (in ltr./100 km) and CO
2 emission (in g/km)
Power output
kW per rpm
55/5000
Maximum torque
Nm per rpm
126/3800
Number of cy")
 Columbus Navigation System Manual Technical Data191
Using the system
Safety
Driving Tips
General Maintenance
Breakdown assistance
Technical Data
Capacities (in liter)
Weight (in kg)
Fuel tank capaci
ty/of which spare
55/7
Reservoir fo")