2010 MERCEDES-BENZ SLS COUPE engine
[x] Cancel search: enginePage 268 of 361
Running-in notes
............................... 266
Refuelling ........................................... 266
Engine compartment ........................267
Tyres and wheels .............................. 270
Winter operation ............................... 275
Driving tips ........................................ 277
Driving abroad ................................... 279
Service ............................................... 279
Care .................................................... 280 265Operation
BA 197 ECE RE 2010/6a; 1; 2, en-GB
sabbaeu
Version: 3.0.3.6 2010-05-07T14:19:43+02:00 - Seite 265
Page 269 of 361
Running-in notes
The first 1500 km
G
Ris
kofa ccident
New brake pads/linings only have optimal
braking performance after several hundred
kilometres .Until then, compensate for this by
applying greate rforce to the brake pedal. This
also applies when brake pads/linings or
brake discs have been changed.
If you treat the engine with sufficient care
from the very start,y ou will be rewarded with
excellent performance for the remainder of
the engine's life.
R You should therefore drive at varying road
and engine speeds for the first 1500 km.
R Do not drive faster than 140 km/h for the
first 1500 km.
R Only bring the engine up to a maximum
speed of 4500 rpm for a brief period.
R Avoid heavy loads, e.g. driving at full throt-
tle, during this time. Do not exceed 2
/ 3 of
the maximum permissible engine speed for
each gear.
R When driving in the manual drive program
M, change gear in good time.
R Do not use RACE START.
R Do not shift down a gear manually in order
to brake.
R Try to avoid depressing the accelerator
pedal beyond the pressure point (kick-
down).
R Only select shift range restriction 3,2or
1 when driving slowly, such as in moun-
tainous terrain.
After 1500 km, you may gradually bring the
vehicle up to full road and engine speeds.
i You should also observe these notes on
running in if the engine or the transmission
on your vehicle has been replaced. Refuelling
Refuelling
G
Risk of explosion
Fuel is highly flammable. Fire, naked flames
and smoking are therefore prohibited when
handling fuels.
Switch off the engine before refuelling. G
Risk of injury
Do not come into contact with fuels.
It is hazardous to your health if your skin
comes into direct contact with fuels or you
breathe in fuel vapours.
! Do not use diesel to refuel vehicles with a
petrol engine. Even small amounts of diesel
result in damage to the injection system.
Damage resulting from adding diesel is not
covered by the warranty.
! If the wrong fuel has been added by mis-
take, do not switch on the ignition. If you
do, the fuel could enter the fuel lines. The
fuel tank and the fuel lines must then be
drained. Informaqualified specialist work-
shop and have the fuel tank and the fuel
lines drained completely.
When you open or close the vehicle with the
key, the fuel filler flap is automatically
unlocked or locked.
The position of the fuel filler cap is to the rear
on the right .The position of the fuel filler cap
is displayed in the instrumentc luster0007.
The arrow nex tto the filling pump indicates
the side of the vehicle. 266
RefuellingOperation
BA 197 ECE RE 2010/6a; 1; 2, en-GB
sabbaeu
Version: 3.0.3.6 2010-05-07T14:19:43+02:00 - Seite 266
Page 270 of 361
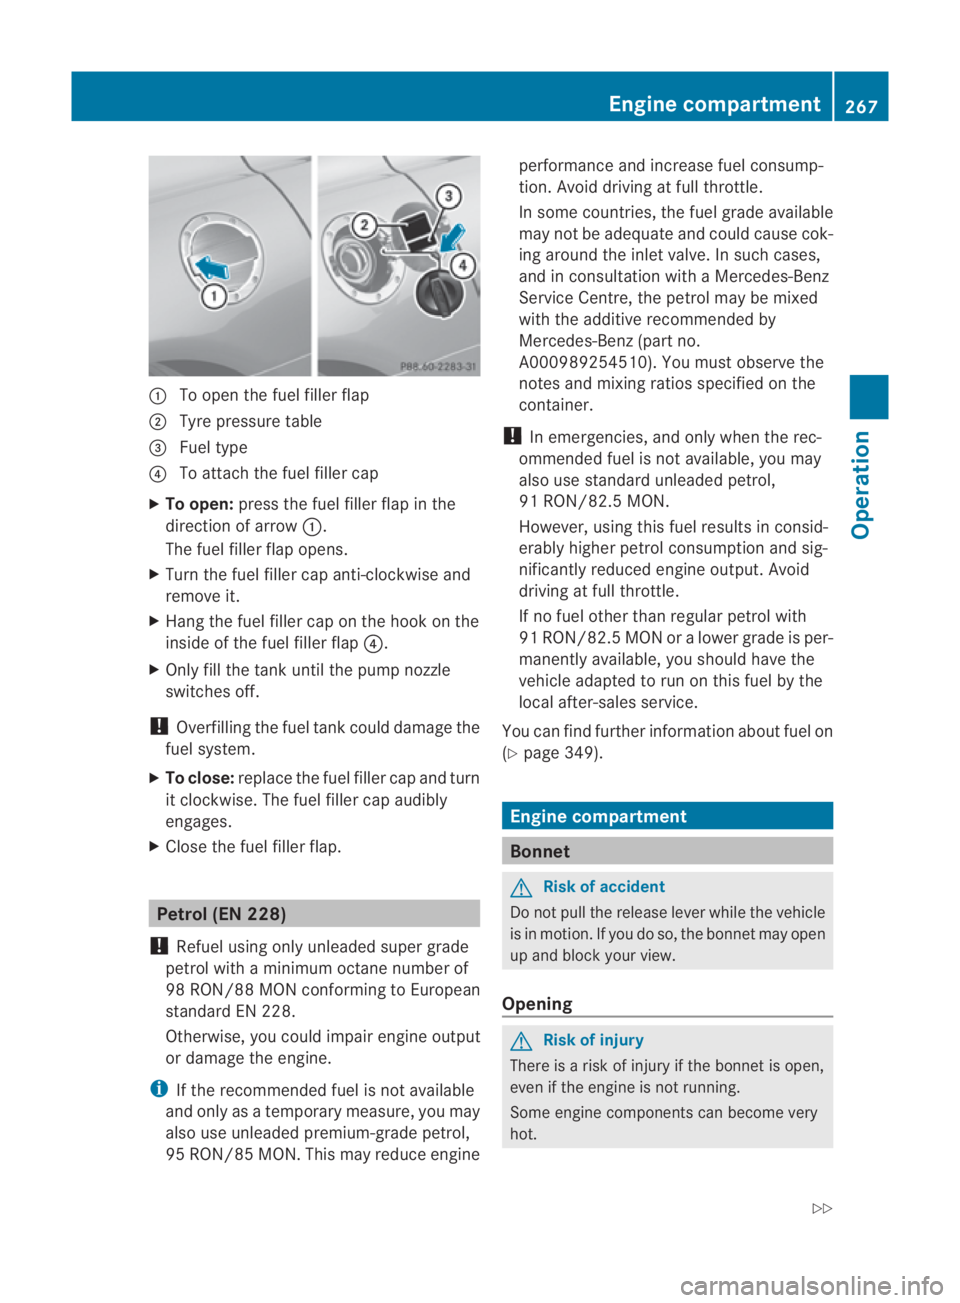
0001
To open the fuel filler flap
0002 Tyre pressure table
0015 Fuel type
0014 To attach the fuel filler cap
X To open: press the fuel filler flap in the
direction of arrow 0001.
The fuel filler flap opens.
X Turn the fuel filler cap anti-clockwise and
remove it.
X Hang the fuel filler cap on the hook on the
inside of the fuel filler flap 0014.
X Only fill the tank until the pump nozzle
switches off.
! Overfilling the fuel tank could damage the
fuel system.
X To close: replace the fuel filler cap and turn
it clockwise. The fuel filler cap audibly
engages.
X Close the fuel filler flap. Petrol (EN 228)
! Refuel using only unleaded super grade
petrol with a minimum octane number of
98 RON/88 MON conforming to European
standard EN 228.
Otherwise, you could impair engine output
or damage the engine.
i If the recommended fuel is not available
and only as a temporary measure, you may
also use unleaded premium-grade petrol,
95 RON/85 MON. This may reduce engine performance and increase fuel consump-
tion. Avoid driving at full throttle.
In some countries, the fuel grade available
may not be adequate and could cause cok-
ing around the inlet valve. In such cases,
and in consultation with
aMercedes-Benz
Service Centre, the petrol may be mixed
with the additive recommended by
Mercedes-Benz( part no.
A000989254510). You must observe the
notes and mixing ratios specified on the
container.
! In emergencies, and only when the rec-
ommended fuel is not available, you may
also use standard unleaded petrol,
91 RON/82.5 MON.
However, using this fuel results in consid-
erably higher petrol consumption and sig-
nificantly reduced engine output. Avoid
driving at full throttle.
If no fuel other than regular petrol with
91 RON/82.5 MON or a lower grade is per-
manently available, you should have the
vehicle adapted to run on this fuel by the
local after-sales service.
You can find further information about fuel on
(Y page 349). Engine compartment
Bonnet
G
Risk of accident
Do not pull the release lever while the vehicle
is in motion .Ifyou do so, the bonnet may open
up and block your view.
Opening G
Risk of injury
There is a risk of injury if the bonnet is open,
even if the engine is not running.
Some engine components can become very
hot. Engine compartment
267Operation
BA 197 ECE RE 2010/6a; 1; 2, en-GB
sabbaeu Version: 3.0.3.6 2010-05-07T14:19:43+02:00 - Seite 267 Z
Page 271 of 361
To avoid the risk of burns, only touch those
components described in the Owner's Manual
and observe the relevant safety notes. G
Risk of injury
The radiator fan between the radiator and the
engine can start automatically, even if the key
has been removed from the ignition lock. For
this reason, you must not reach into the fan
rotation area. Otherwise, you could be
injured.
The electronic ignition system uses high volt-
age. For this reason, you must never touch
ignition system components (ignition coil,
ignition cable, spark plug connector or test
socket) while:
R the engine is running.
R the engine is being started.
R the ignition is switched on and the engine
is being cranked by hand.
X Make sure that the windscreen wipers are
switched off. G
Risk of injury
The windscreen wipers and wiper linkage
could be set in motion.
When the bonnet is open, you or others could
be injured by the wiper linkage.
Make sure that the windscreen wipers are
switched off. Remove the key or make sure
that no ignition position has been selected
with KEYLESS-GO. All indicator lights must be
off in the instrument cluster.
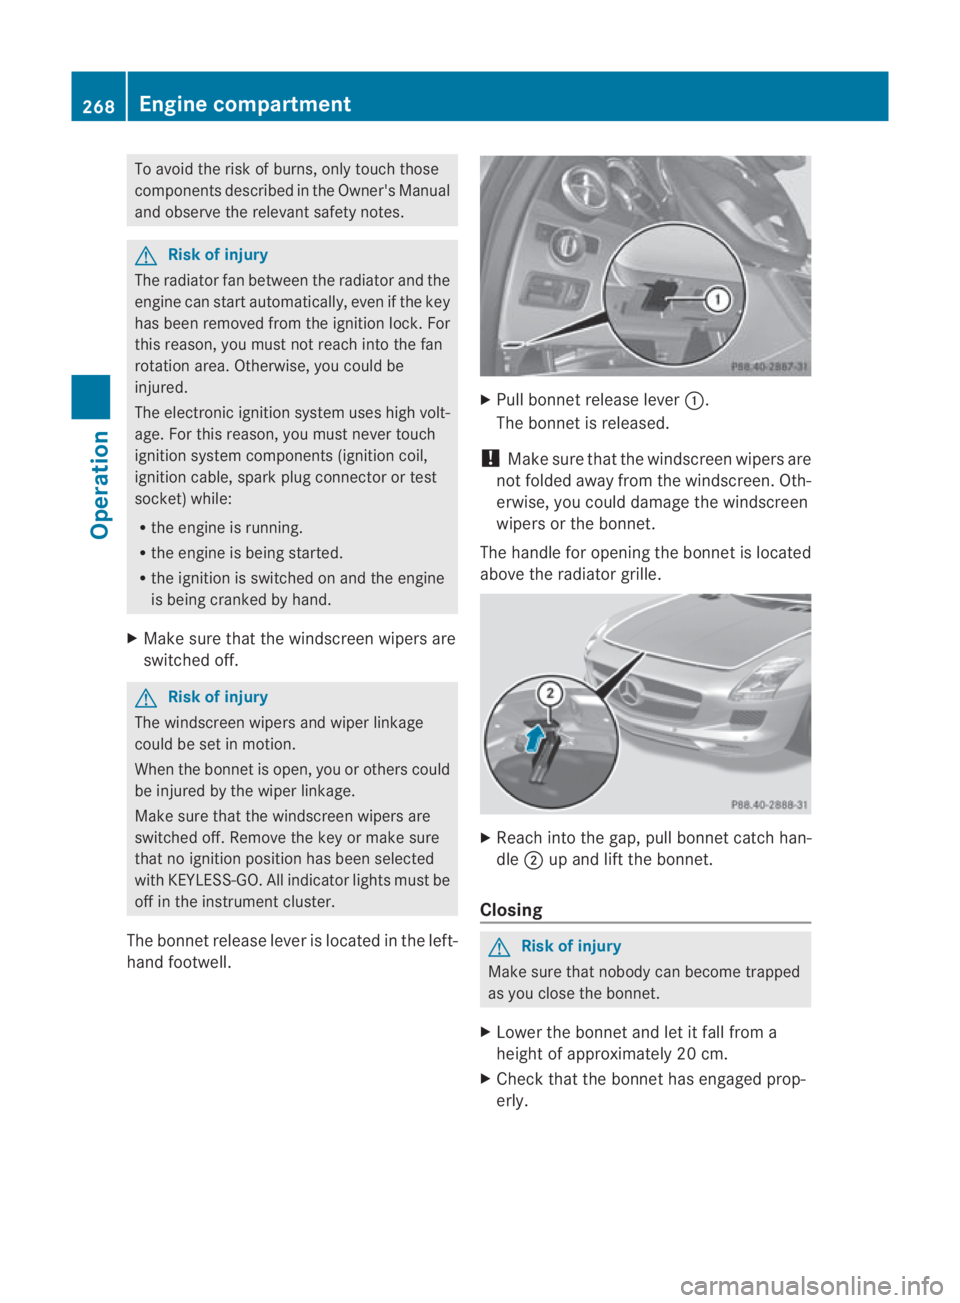
The bonnet release lever is located in the left-
hand footwell. X
Pull bonnet release lever 0001.
The bonnet is released.
! Make sure that the windscreen wipers are
not folded away from the windscreen .Oth-
erwise, you could damage the windscreen
wipers or the bonnet.
The handle for opening the bonnet is located
above the radiato rgrille. X
Reach into the gap, pull bonnet catch han-
dle 0002up and lift the bonnet.
Closing G
Risk of injury
Make sure that nobody can become trapped
as you close the bonnet.
X Lower the bonnet and let it fall from a
height of approximately 20 cm.
X Check that the bonnet has engaged prop-
erly. 268
Engine compartmentOperation
BA 197 ECE RE 2010/6a; 1; 2, en-GB
sabbaeu
Version: 3.0.3.6
2010-05-07T14:19:43+02:00 - Seite 268
Page 272 of 361
i
If the bonnet can be raised slightly, it is
not properly engaged. Open it again and
close it with a little more force. Engine oil
Depending on driving style, the vehicle con-
sumes a maximum of 0.8 l oil per 1000 km.
The oil consumption may be highert han this
when the vehicle is new or if you frequently
drive at high engine speeds.
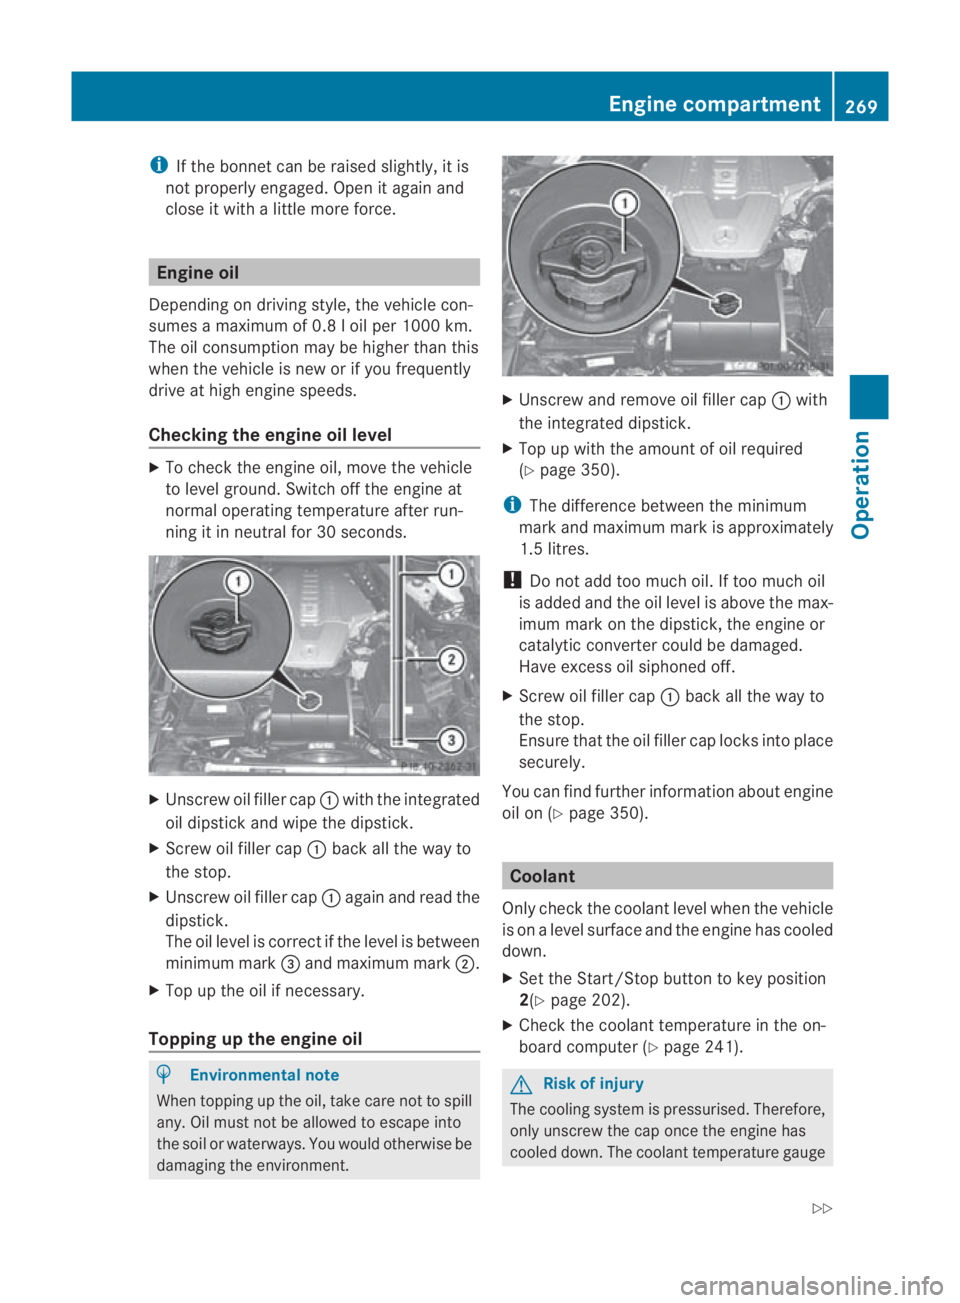
Checking the engine oil level X
To check the engine oil, move the vehicle
to level ground. Switch off the engine at
normal operating temperature after run-
ning it in neutral for 30 seconds. X
Unscrew oil filler cap 0001with the integrated
oil dipstick and wipe the dipstick.
X Screw oil filler cap 0001back all the way to
the stop.
X Unscrew oil filler cap 0001again and read the
dipstick.
The oil level is correct if the level is between
minimum mark 0015and maximum mark 0002.
X Top up the oil if necessary.
Topping up the engine oil H
Environmental note
When topping up the oil, take care not to spill
any. Oil must not be allowed to escape into
the soil or waterways. You would otherwise be
damaging the environment. X
Unscrew and remove oil filler cap 0001with
the integrated dipstick.
X Top up with the amount of oil required
(Y page 350).
i The difference between the minimum
mark and maximum mark is approximately
1.5 litres.
! Do not add too much oil. If too much oil
is added and the oil level is above the max-
imum mark on the dipstick, the engine or
catalytic converter could be damaged.
Have excess oil siphoned off.
X Screw oil filler cap 0001back all the way to
the stop.
Ensure that the oil filler cap locks into place
securely.
You can find further information about engine
oil on (Y page 350). Coolant
Only check the coolant level when the vehicle
is on a level surface and the engine has cooled
down.
X Set the Start/Stop button to key position
2(Y page 202).
X Check the coolant temperature in the on-
board computer (Y page 241). G
Risk of injury
The cooling system is pressurised. Therefore,
only unscrew the cap once the engine has
cooled down. The coolant temperature gauge Engine compartment
269Operation
BA 197 ECE RE 2010/6a; 1; 2, en-GB
sabbaeu Version: 3.0.3.6 2010-05-07T14:19:43+02:00 - Seite 269 Z
Page 273 of 361
must display less than 70
†.Otherwise, you
could be scalded if hot coolant escapes.
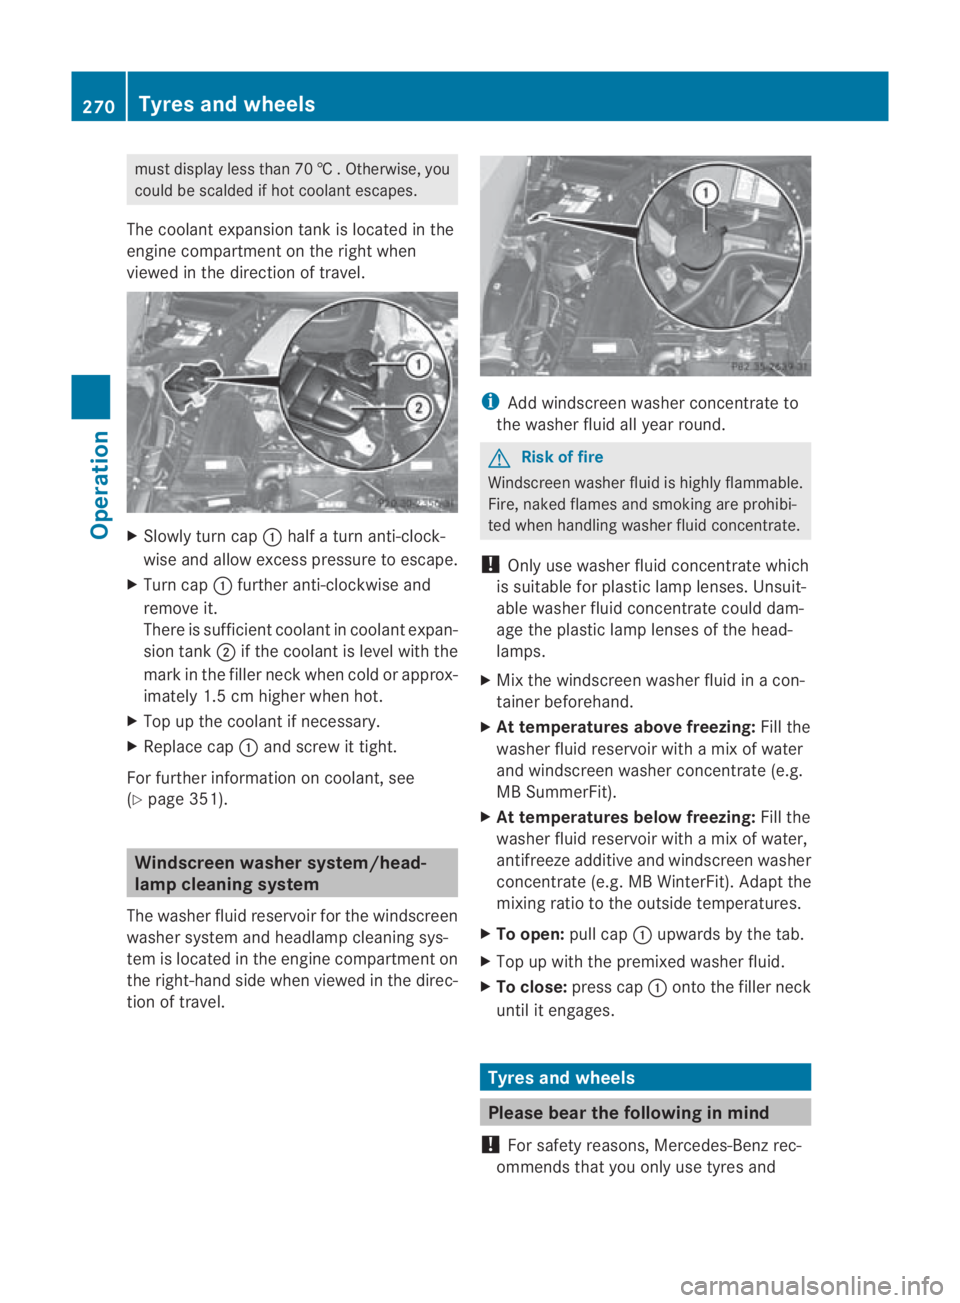
The coolant expansio ntank is located in the
engine compartment on the right when
viewed in the direction of travel. X
Slowly tur ncap 0001 half a turn anti-clock-
wise and allow excess pressure to escape.
X Turn cap 0001further anti-clockwise and
remove it.
There is sufficient coolan tincoolant expan-
sion tank 0002if the coolant is level with the
mark in the filler neck when cold or approx-
imately 1.5 cm higher when hot.
X Top up the coolant if necessary.
X Replace cap 0001and screw it tight.
For further information on coolant, see
(Y page 351). Windscreen washer system/head-
lamp cleaning system
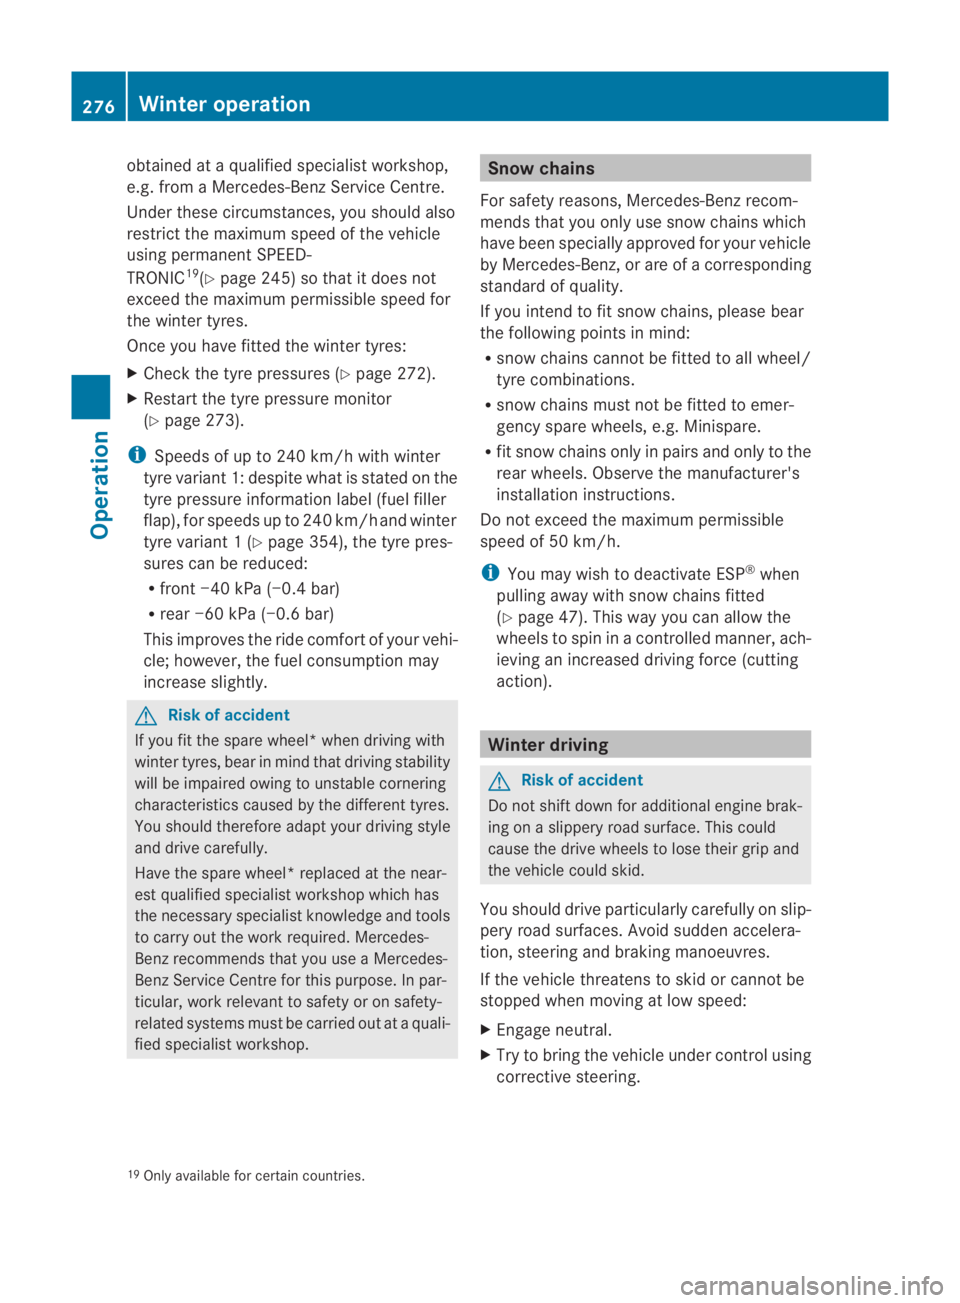
The washer fluid reservoir for the windscreen
washer system and headlamp cleaning sys-
tem is located in the engine compartment on
the right-hand side when viewed in the direc-
tion of travel. i
Add windscreen washer concentrate to
the washer fluid all year round. G
Risk of fire
Windscreen washer fluid is highly flammable.
Fire, naked flames and smoking are prohibi-
ted when handling washer fluid concentrate.
! Only use washer fluid concentrate which
is suitable for plastic lamp lenses. Unsuit-
able washer fluid concentrate could dam-
age the plastic lamp lenses of the head-
lamps.
X Mix the windscreen washer fluid in a con-
tainer beforehand.
X At temperatures above freezing: Fill the
washer fluid reservoir with amix of water
and windscreen washer concentrate (e.g.
MB SummerFit).
X At temperatures below freezing: Fill the
washer fluid reservoir with amix of water,
antifreeze additive and windscreen washer
concentrate (e.g. MB WinterFit). Adapt the
mixing ratio to the outside temperatures.
X To open: pull cap0001upwards by the tab.
X Top up with the premixed washer fluid.
X To close: press cap 0001onto the filler neck
until it engages. Tyres and wheels
Please bear the following in mind
! For safety reasons, Mercedes-Ben zrec-
ommends that you only use tyres and 270
Tyres and wheelsOperation
BA 197 ECE RE 2010/6a; 1; 2, en-GB
sabbaeu
Version: 3.0.3.6 2010-05-07T14:19:43+02:00 - Seite 270
Page 279 of 361
obtained at a qualified specialist workshop,
e.g. from a Mercedes-Benz Service Centre.
Under these circumstances, you should also
restrict the maximum speed of the vehicle
using permanent SPEED-
TRONIC 19
(Y page 245) so that it does not
exceed the maximum permissible speed for
the winter tyres.
Once you have fitted the winter tyres:
X Check the tyre pressures (Y page 272).
X Restart the tyre pressure monitor
(Y page 273).
i Speeds of up to 240 km/h with winter
tyre variant 1: despite what is stated on the
tyre pressure information label (fuel filler
flap), for speeds up to 240 km/ha nd winter
tyre variant 1 (Y page 354), the tyre pres-
sures can be reduced:
R front −40 kPa (−0.4 bar)
R rear −60 kPa (−0.6 bar)
This improves the ride comfort of your vehi-
cle; however, the fuel consumption may
increase slightly. G
Ris
kofa ccident
If you fit the spare wheel* when driving with
winter tyres, bear in mind that driving stability
will be impaired owing to unstable cornering
characteristics caused by the differen ttyres.
You should therefore adapt your driving style
and drive carefully.
Have the spare wheel* replaced at the near-
est qualified specialist workshop which has
the necessary specialist knowledge and tools
to carry out the wor krequired. Mercedes-
Benz recommends that you use a Mercedes-
Benz Service Centre for this purpose. In par-
ticular, work relevant to safety or on safety-
related systems must be carried out at a quali-
fied specialist workshop. Snow chains
For safety reasons, Mercedes-Benz recom-
mends that you only use snow chains which
have been specially approved for your vehicle
by Mercedes-Benz, or are of a corresponding
standard of quality.
If you intend to fit snow chains, please bear
the following points in mind:
R snow chains cannot be fitted to all wheel/
tyre combinations.
R snow chains must not be fitted to emer-
gency spare wheels, e.g. Minispare.
R fit snow chains only in pairs and only to the
rear wheels. Observe the manufacturer's
installation instructions.
Do not exceed the maximum permissible
speed of 50 km/h.
i You may wish to deactivate ESP ®
when
pulling away with snow chains fitted
(Y page 47). This way you can allow the
wheels to spin in a controlled manner, ach-
ieving an increased driving force (cutting
action). Winter driving
G
Risk of accident
Do not shift down for additional engine brak-
ing on a slippery road surface. This could
cause the drive wheels to lose their grip and
the vehicle could skid.
You should drive particularly carefully on slip-
pery road surfaces. Avoid sudden accelera-
tion, steering and braking manoeuvres.
If the vehicle threatens to skid or cannot be
stopped when moving at low speed:
X Engage neutral.
X Try to bring the vehicle under control using
corrective steering.
19 Only available for certain countries. 276
Winter operationOperation
BA 197 ECE RE 2010/6a; 1; 2, en-GB
sabbaeu
Version: 3.0.3.6 2010-05-07T14:19:43+02:00 - Seite 276
Page 280 of 361
Driving tips
Coasting wit
hthe engine switched off G
Risk of accident
Never switch the engine off while the vehicle
is in motion.
There is no power assistance for the steering
and the service brake whe nthe engine is not
running.
You will require considerably more effort to
steer and brake and you could therefore lose
control of the vehicle and cause an accident. Applying the brakes
G
Risk of accident
Do not change down for additional engine
braking on a slippery road surface. This could
cause the drive wheels to lose their grip and
the vehicle could skid. G
Risk of accident
Make sure that other road users are not
endangered by your braking.
Downhill gradients On long and steep downhill gradients, espe-
cially if the vehicle is laden, you must shift to
a lower shift range in good time.
i This also applies if you have activated
cruise control or SPEEDTRONIC.
This will use the braking effect of the engine,
so less braking will be required to maintain
the speed. This relieves the load on the brake
system and prevents the brakes from over-
heating and wearing too quickly. If you need
additional braking, depress the brake pedal
repeatedly rather than continuously.
Heavy and light loads If the brakes have been subjected to a heavy
load, do not stop the vehicle immediately, but drive on for a short while. This allows the air-
flow to cool the brakes more quickly. G
Risk of accident
Never depress the brake pedal continuously
while the vehicle is in motion, e.g. never cause
the brakes to rub by applying constant slight
pedal pressure. This causes the brake system
to overheat, increases the braking distance
and can lead to the brakes failing completely.
If the brakes have been used only moderately,
you should occasionally test their effective-
ness. To do this, brake more firmly from a
higher speed. This improves the grip of the
brakes.
Wet roads If driving in heavy rain for a prolonged period
of time without braking, there may be a
delayed reaction from the brakes when brak-
ing for the first time. This may also occur after
the vehicle has been washed.
You have to depress the brake pedal more
firmly. Maintain a greater distance from the
vehicle in front.
After driving on a wet road or having the vehi-
cle washed, brake firmly while paying atten-
tion to the traffic conditions. This will warm
up the brake discs, thereby drying them more
quickly and protecting them against corro-
sion.
Limited braking performance on salted
roads
G
Risk of accident
The layerofs alt on thebrake discs and the
brake pads/linings may caus eadelay in the
braking effect, resulting in a significantly lon-
ger braking distance, which could lead to an
accident.
To avoid this danger, you should:
R occasionally brake carefully, without put-
ting other road users at risk, when you are
driving on salted roads. This helps to Driving tips
277Operation
BA 197 ECE RE 2010/6a; 1; 2, en-GB
sabbaeu Version: 3.0.3.6 2010-05-07T14:19:43+02:00 - Seite 277 Z