2010 MERCEDES-BENZ SLS COUPE engine
[x] Cancel search: enginePage 245 of 361
X
Press 0008or000E to select Interm.
Time.
X Press the 000Abutton to confirm.
The intermediate time is displayed for five
seconds.
Starting a new lap
It is possible to store a maximum of sixteen
laps.
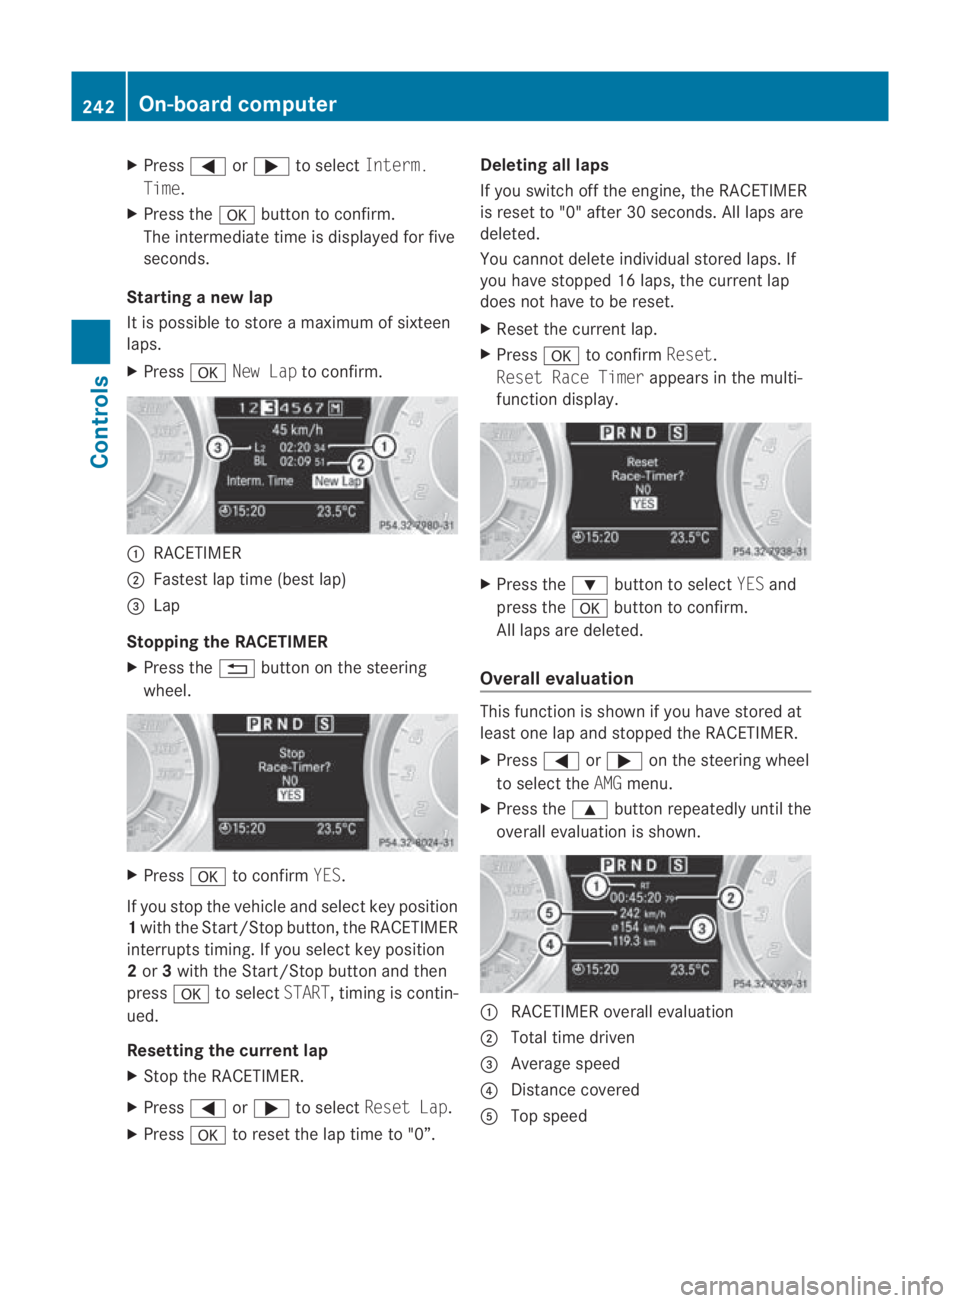
X Press 000ANew Lap to confirm. 0001
RACETIMER
0002 Fastest lap time (best lap)
0015 Lap
Stopping the RACETIMER
X Press the 0001button on the steering
wheel. X
Press 000Ato confirm YES.
If you stop the vehicle and select key position
1 with the Start/Stop button, the RACETIMER
interrupts timing .Ifyou select key position
2 or 3with the Start/Stop button and then
press 000Ato select START, timing is contin-
ued.
Resetting the current lap
X Stop the RACETIMER.
X Press 0008or000E to select Reset Lap.
X Press 000Ato reset the lap time to "0”. Deleting all laps
If you switch off the engine, the RACETIMER
is reset to "0" after 30 seconds. All laps are
deleted.
You cannot delete individual stored laps. If
you have stopped 16 laps, the current lap
does not have to be reset.
X
Reset the current lap.
X Press 000Ato confirm Reset.
Reset Race Timer appears in the multi-
function display. X
Press the 000Cbutton to select YESand
press the 000Abutton to confirm.
All laps are deleted.
Overall evaluation This function is shown if you have stored at
least one lap and stopped the RACETIMER.
X
Press 0008or000E on the steering wheel
to select the AMGmenu.
X Press the 000Fbutton repeatedly until the
overall evaluation is shown. 0001
RACETIMER overall evaluation
0002 Total time driven
0015 Average speed
0014 Distance covered
0012 Top speed 242
On-board computerControls
BA 197 ECE RE 2010/6a; 1; 2, en-GB
sabbaeu
Version: 3.0.3.6 2010-05-07T14:19:43+02:00 - Seite 242
Page 246 of 361
Lap evaluation
This function is only available if you have
stored at least two laps and have stopped the
RACETIMER.
X Press 0008or000E on the steering wheel
to selec tthe AMG menu.
X Press the 000Fbutton repeatedly until the
lap evaluation is shown.
Each lap is shown in a separate submenu.
The fastest lap is indicated by flashing sym-
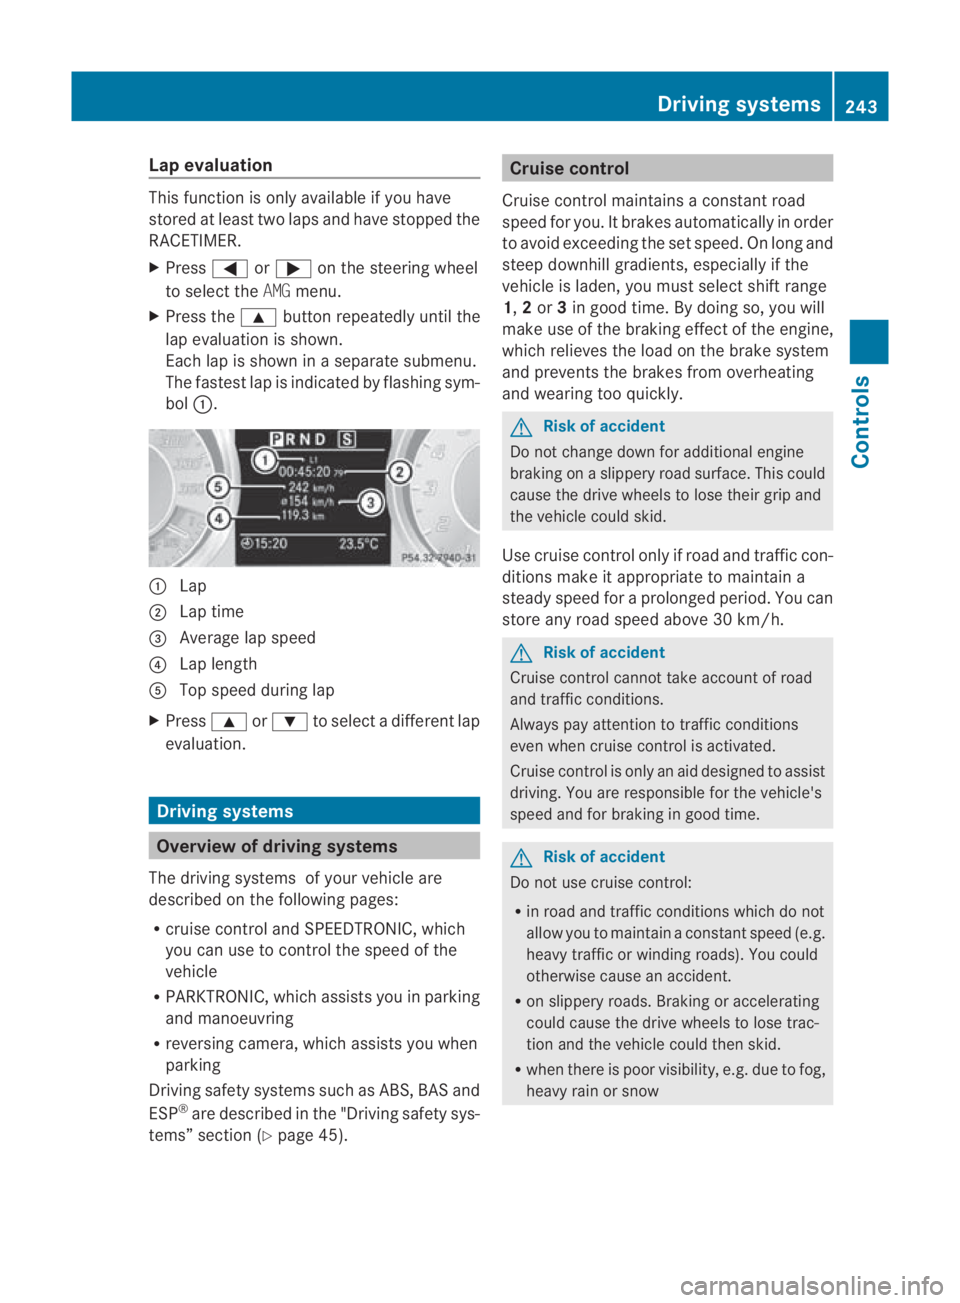
bol 0001. 0001
Lap
0002 Lap time
0015 Average lap speed
0014 Lap length
0012 Top speed during lap
X Press 000For000C to select a different lap
evaluation. Driving systems
Overview of driving systems
The driving systems of your vehicle are
described on the following pages:
R cruise control and SPEEDTRONIC, which
you can use to control the speed of the
vehicle
R PARKTRONIC, which assists you in parking
and manoeuvring
R reversing camera, which assists you when
parking
Driving safety systems such as ABS, BAS and
ESP ®
are described in the "Driving safety sys-
tems” section (Y page 45). Cruise control
Cruise control maintains a constant road
speed for you. It brakes automatically in order
to avoid exceeding the set speed. On long and
steep downhill gradients, especially if the
vehicle is laden, you must select shift range
1, 2or 3in good time. By doing so, you will
make use of the braking effect of the engine,
which relieves the load on the brake system
and prevents the brakes from overheating
and wearing too quickly. G
Risk of accident
Do not change down for additional engine
braking on a slippery road surface. This could
cause the drive wheels to lose their grip and
the vehicle could skid.
Use cruise control only if road and traffic con-
ditions make it appropriate to maintain a
steady speed for a prolonged period. You can
store any road speed above 30 km/h. G
Risk of accident
Cruise control cannot take account of road
and traffic conditions.
Always pay attention to traffic conditions
even when cruise control is activated.
Cruise control is only an aid designed to assist
driving. You are responsible for the vehicle's
speed and for braking in good time. G
Risk of accident
Do not use cruise control:
R in road and traffic conditions which do not
allow you to maintain a constant speed (e.g.
heavy traffic or winding roads). You could
otherwise cause an accident.
R on slippery roads. Braking or accelerating
could cause the drive wheels to lose trac-
tion and the vehicle could then skid.
R when there is poor visibility, e.g. due to fog,
heavy rain or snow Driving systems
243Controls
BA 197 ECE RE 2010/6a; 1; 2, en-GB
sabbaeu Version: 3.0.3.6 2010-05-07T14:19:43+02:00 - Seite 243 Z
Page 248 of 361
Setting
aspeed X
Press the cruise control lever to the pres-
sure point up 0001for a highe rspeed or
down 0014for a lower speed.
X Keep the cruise control lever pressed until
the desired speed is reached.
X Release the cruise control lever.
The new speed is stored.
i Cruise control is not deactivated if you
depress the accelerator pedal. For exam-
ple, if you accelerate briefly to overtake,
cruise control adjusts the vehicle's speed
to the last speed stored after you have fin-
ished overtaking.
Making adjustments in 1 km/h incre-
ments X
Press the cruise control lever to the pres-
sure point, up 0001for a higher speed or
down 0014for a lower speed.
The last speed stored is increased or
reduced.
Making adjustments in 10 km/h incre-
ments X
Briefly press the cruise control lever
beyond the pressure point, up 0001for a
higher speed or down 0014for a lower speed.
The last speed stored is increased or
reduced.
Deactivating cruise control There are several ways to deactivate cruise
control:
X
Briefly press the cruise control lever for-
wards 0013.
or
X Brake or
X
Briefly press the cruise control lever in the
direction of arrow 0012.
Variable SPEEDTRONIC is selected. LIM
indicator lamp 0002in the cruise contro llever
lights up.
Cruise control is automatically deactivated if:
R you press the electric parking brake han-
dle.
R you are driving at less than 30 km/h.
R ESP ®
intervenes or you deactivate ESP ®
.
R you shift the transmission to Nwhile the
vehicle is in motion.
If cruise control is deactivated, you will hear
a warning tone. The “Cruise control
off” message is displayed in the multifunc-
tion display for approximately five seconds.
i The last speed stored is cleared when you
switch off the engine. SPEEDTRONIC
SPEEDTRONIC brakes automatically so that
you do not exceed the set speed. On long and
steep downhill gradients, especially if the
vehicle is laden, you must select shift range
1, 2or 3in good time. By doing so, you will
make use of the brakin geffect of the engine,
which relieves the load on the brake system
and prevents the brakes from overheating
and wearing too quickly. If you need addi-
tional braking, depress the brake pedal
repeatedly rather than continuously. G
Risk of accident
Never depress the brake peda lcontinuously
while the vehicle is in motion, e.g. never cause
the brakes to rub by applying constant slight
pedal pressure. This causes the brake system
to overheat, increases the braking distance
and can lead to the brakes failing completely. G
Risk of accident
Do not change down for additional engine
braking on a slippery road surface. This could Driving systems
245Controls
BA 197 ECE RE 2010/6a; 1; 2, en-GB
sabbaeu Version: 3.0.3.6 2010-05-07T14:19:43+02:00 - Seite 245 Z
Page 249 of 361
cause the drive wheels to los
etheir grip and
the vehicle could skid.
You can set a variable or permanent limit
speed:
R variable for speed limits, e.g. in built-up
areas
R permanent for long-term speed restric-
tions, e.g. when driving with winter tyres
fitted (Y page 247) G
Risk of accident
Speedtronic is only an aid designed to assist
driving. You are responsible for the vehicle's
speed and for braking in good time.
i The speed indicated in the speedometer
may differ slightly from the limit speed
stored.
Variable SPEEDTRONIC You can operate cruise control and variable
SPEEDTRONIC with the cruise control lever.
The LIM indicator lamp on the cruise control
lever indicates which system you can select:
R LIM indicator lamp off:
Cruise control
R LIM indicator lamp lit:
Variable SPEEDTRONIC
You can use the cruise control lever to limit
the speed to any speed above 30 km/h while
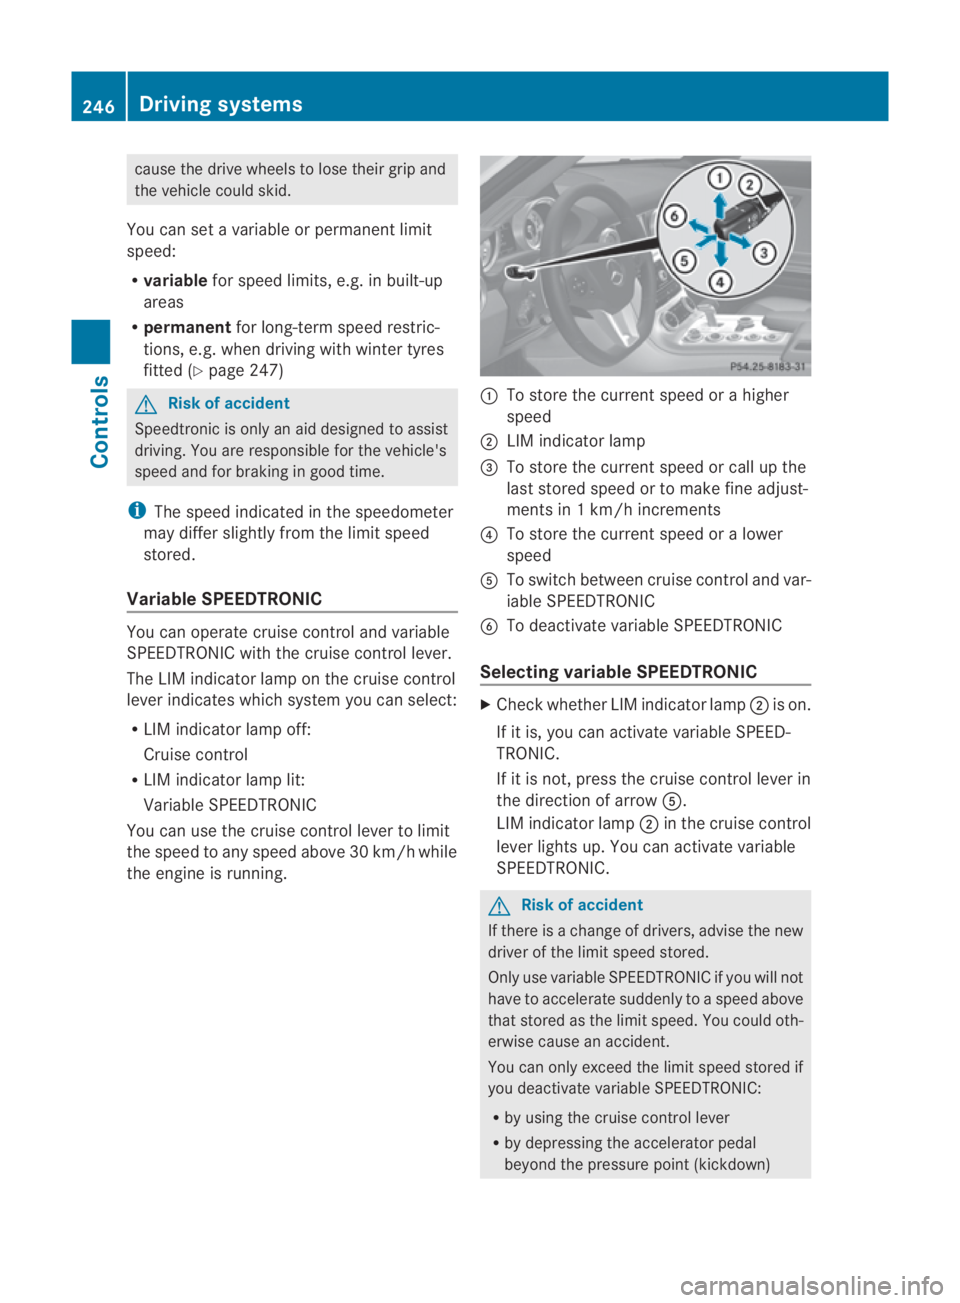
the engine is running. 0001
To store the current speed or a higher
speed
0002 LIM indicator lamp
0015 To store the current speed or call up the
last stored speed or to make fine adjust-
ments in 1 km/h increments
0014 To store the current speed or a lower
speed
0012 To switch between cruise control and var-
iable SPEEDTRONIC
0013 To deactivate variable SPEEDTRONIC
Selecting variable SPEEDTRONIC X
Check whether LIM indicator lamp 0002is on.
If it is, you can activate variable SPEED-
TRONIC.
If it is not, press the cruise control lever in
the direction of arrow 0012.
LIM indicator lamp 0002in the cruise control
lever lights up. You can activate variable
SPEEDTRONIC. G
Risk of accident
If there is a change of drivers, advise the new
driver of the limit speed stored.
Only use variable SPEEDTRONIC if you will not
have to accelerate suddenly to a speed above
that stored as the limit speed. You could oth-
erwise cause an accident.
You can only exceed the limit speed stored if
you deactivate variable SPEEDTRONIC:
R by using the cruise control lever
R by depressing the accelerator pedal
beyond the pressure point (kickdown) 246
Driving systemsControls
BA 197 ECE RE 2010/6a; 1; 2, en-GB
sabbaeu
Version: 3.0.3.6 2010-05-07T14:19:43+02:00 - Seite 246
Page 250 of 361
It is not possible to deactivate variable
SPEEDTRONIC by braking.
Storing the current speed You can use the cruise control lever to limit
the speed to any speed above 30 km/h while
the engine is running.
X Press the cruise control lever to the pres-
sure point up 0001or down 0014.
The current speed is stored. You will see
the stored speed in the multifunction dis-
play.
The stored speed is shown in the lowers ec-
tion of the multifunction display.
Storing the current speed or calling up
the last stored speed G
Risk of accident
Only select a stored speed if you know what
that speed is and whether it is suitable for the
current driving and traffic situation. Other-
wise, sudden braking could endanger you or
others.
X Briefly pull the cruise control lever towards
you 0015.
Making adjustments in 1 km/h incre-
ments X
Briefly press the cruise control lever to the
pressure point, up 0001for a higher speed or
down 0014for a lower speed.
or
X Keep the cruise control lever pressed to the
pressure point until the desired speed is
set. Press the cruise control lever up 0001for
a higher speed or down 0014for a lower
speed. Making adjustments in 10 km/h incre-
ments X
Briefly press the cruise control lever
beyond the pressure point, up 0001for a
higher speed or down 0014for a lower speed.
or
X Keep the cruise control lever pressed
beyond the pressure point until the desired
speed is set. Press the cruise control lever
up 0001 for a higher speed or down 0014for a
lower speed.
Deactivating variable SPEEDTRONIC There are several ways to deactivate variable
SPEEDTRONIC:
X
Briefly press the cruise control lever for-
wards 0013.
or
X Briefly press the cruise control lever in the
direction of arrow 0012.
LIM indicator lamp 0002in the cruise control
lever goes out. Variable SPEEDTRONIC is
deactivated.
Variable SPEEDTRONIC is deactivated auto-
matically when you depress the accelerator
pedal beyond the pressure point (kickdown),
but only if your curren tspeed does not differ
by more than 20 km/ hfrom the stored speed.
You will hearawarning tone if this is the case.
i It is not possible to deactivate variable
SPEEDTRONIC by braking.
i The last speed stored is cleared when you
switch off the engine.
Permanent SPEEDTRONIC i
Permanen tSPEEDTRONIC is only availa-
ble for certain countries.
You can use the on-board computer to limit
the speed permanently to avalue between
160 km/h (e.g. for driving on winter tyres)
and 240 km/h. Driving systems
247Controls
BA 197 ECE RE 2010/6a; 1; 2, en-GB
sabbaeu Version: 3.0.3.6
2010-05-07T14:19:43+02:00 - Seite 247 Z
Page 252 of 361
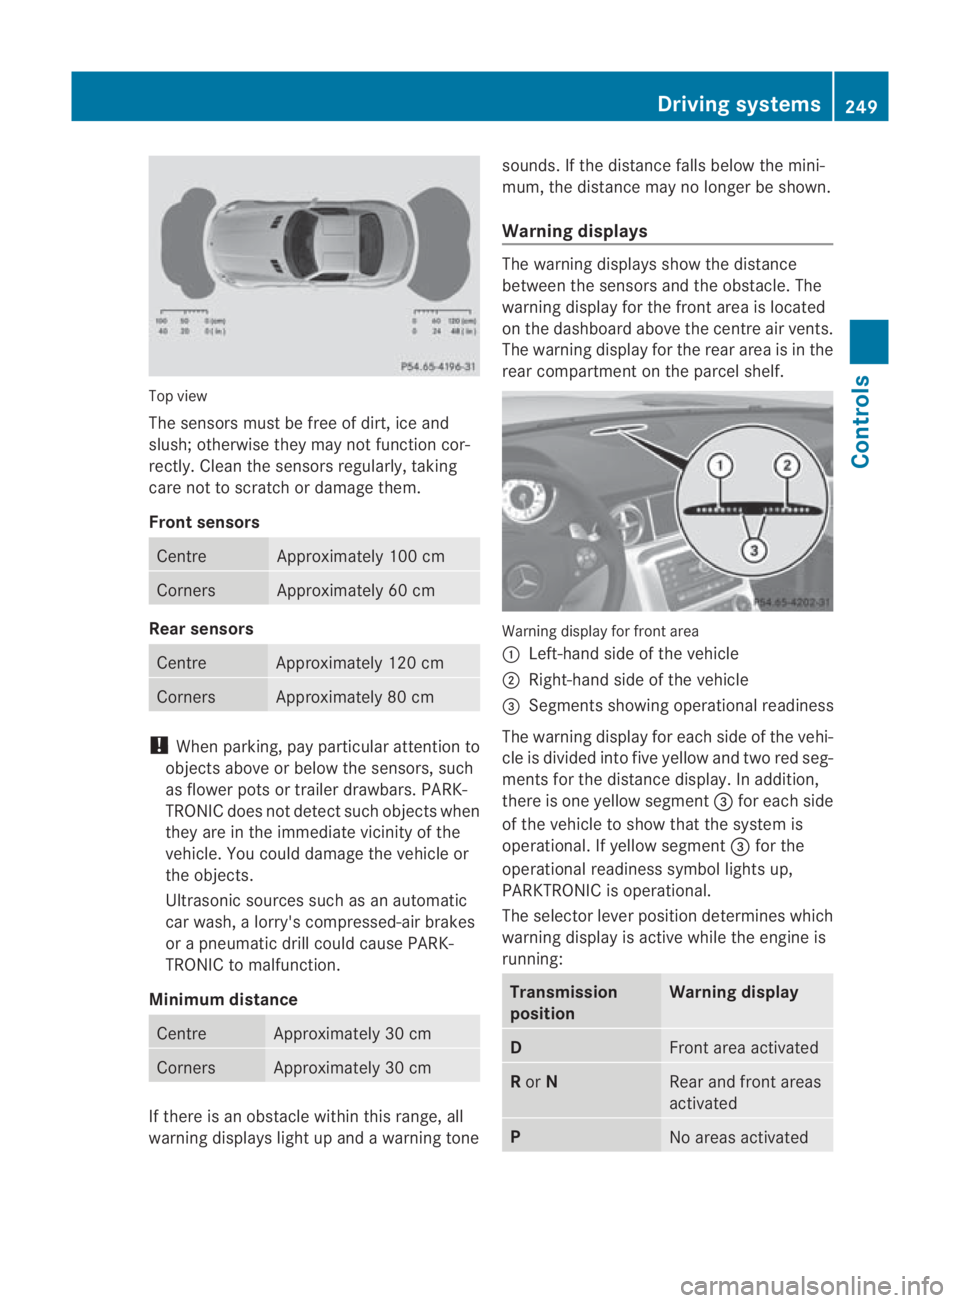
Top view
The sensors must be free of dirt, ice and
slush; otherwise they may not function cor-
rectly. Clean the sensors regularly, taking
care not to scratch or damage them.
Front sensors Centre Approximately 100 cm
Corners Approximately 60 cm
Rear sensors
Centre Approximately 120 cm
Corners Approximately 80 cm
!
When parking, pay particular attention to
objects above or below the sensors, such
as flower pots or trailer drawbars. PARK-
TRONIC does not detect such objects when
they are in the immediate vicinity of the
vehicle. You could damage the vehicle or
the objects.
Ultrasonic sources such as an automatic
car wash, a lorry's compressed-air brakes
or a pneumatic drill could cause PARK-
TRONIC to malfunction.
Minimum distance Centre Approximately 30 cm
Corners Approximately 30 cm
If there is an obstacle within this range, all
warning displays light up and a warning tone sounds. If the distance falls below the mini-
mum, the distance may no longer be shown.
Warning displays The warning displays show the distance
between the sensors and the obstacle. The
warning display for the front area is located
on the dashboard above the centre air vents.
The warning display for the rear area is in the
rear compartment on the parcel shelf.
Warning display for front area
0001
Left-hand side of the vehicle
0002 Right-hand side of the vehicle
0015 Segments showing operational readiness
The warning display for each side of the vehi-
cle is divided into five yellow and two red seg-
ments for the distance display .Inaddition,
there is one yellow segment 0015for each side
of the vehicle to show that the system is
operational. If yellow segment 0015for the
operational readiness symbol lights up,
PARKTRONIC is operational.
The selector lever position determines which
warning display is active while the engine is
running: Transmission
position Warning display
D
Front area activated
R
or N Rear and front areas
activated
P
No areas activatedDriving systems
249Controls
BA 197 ECE RE 2010/6a; 1; 2, en-GB
sabbaeu Version: 3.0.3.6 2010-05-07T14:19:43+02:00 - Seite 249 Z
Page 254 of 361
You can also switch off the display of the area
behind the vehicle in the COMAND display.
Climate control
General notes
THERMOTRONIC 2-zone automatic climate
control controls the temperature and the
humidity of the vehicle interior and filters out
undesirable substances fro mthe air.
THERMOTRONIC 2-zone automatic climate
control is only operational when the engine is
running. Optimum operation is achieved only
when you drive with the side windows closed.
i When the weather is warm, ventilate the
vehicle for a brief period. This will speed up
the cooling process and the desired vehicle
interior temperature will be reached more
quickly.
i The integrated filter can filter out most
particles of dust and completely filters out
pollen. Aclogged filter reduces the amount
of air supplied to the vehicle interior .For
this reason, you should always observe the
interval for replacing the filter, which is
specified in the Service Booklet .As it
depends on environmental conditions, e.g.
heavy air pollution, the interval may be
shorter than stated in the Service Booklet. G
Risk of accident
Observe the settings recommended on the
following pages. Otherwise, the windows
could mist up. This may obstruct your view of
the traffic situation and, as a result, you may
cause an accident. Climate control
251Controls
BA 197 ECE RE 2010/6a; 1; 2, en-GB
sabbaeu Version: 3.0.3.6 2010-05-07T14:19:43+02:00 - Seite 251 Z
Page 256 of 361
R
Only use air-recirculation mode briefly, e.g. if there are unpleasant outside odours or when
in a tunnel. The windows could otherwise mist up as in air-recirculation mode no fresh air
is drawn into the vehicle.
R Use the "MONO" function if you want to adopt the temperature and air distribution set-
tings from the driver's side for all air-conditioning zones. The indicator lamp in the
0005 button lights up. Switching climate control on/off
i When climate control is switched off, the
air supply and air circulation are also
switched off. Only select this setting briefly;
otherwise, the windows may mist up.
i Activate climate control primarily using
the 0001 button (Y page 252).
X Select key position 2with the Start/Stop
button.
X To activate: press the0001button.
The indicator lamp in the 0001button lights
up. Airflow and air distribution are set to
automatic mode.
or
X Press the 0006button.
The indicator lamp in the 0006button goes
out. The previously selected settings come
into effect again.
X To deactivate: press the0006button.
The indicator lamp in the 0006button lights
up. Switching cooling with air dehumidi-
fication on/off
The cooling with air dehumidification function
is only available when the engine is running.
The air inside the vehicle is cooled and dehu-
midified according to the temperature selec-
ted. G
Risk of accident
If the "cooling with air dehumidification" func-
tion is deactivated, the air inside the vehicle
will not be cooled (during warm weather) or
dehumidified. The windows could mist up more quickly. This may prevent you from
observing the traffic conditions, thereby caus-
ing an accident.
Condensation may drip from the underside of
the vehicle when THERMOTRONIC is in cool-
ing mode.
X To activate: press the0004button.
The indicator lamp in the 0004button lights
up.
X To deactivate: press the0004button.
The indicator lamp in the 0004button goes
out. The cooling with air dehumidification
function has a delayed switch-off feature. Setting climate control to automatic
In automatic mode, the set temperature is
controlled automatically. The system auto-
matically regulates the temperature of the
dispensed air, the airflow and the air distri-
bution.
Automatic mode will achieve optimal opera-
tion if cooling with air dehumidification is also
activated. If desired, cooling with air dehu-
midification can be deactivated.
X Select key position 2with the Start/Stop
button.
X Set the desired temperature.
X To activate: press the0001button.
The indicator lamp in the 0001button lights
up. Automatic air distribution and airflow
are activated.
X To deactivate: press the0001button.
The indicator lamp in the 0001button goes
out. Automatic air distribution and airflow
are deactivated. Climate control
253Controls
BA 197 ECE RE 2010/6a; 1; 2, en-GB
sabbaeu Version: 3.0.3.6 2010-05-07T14:19:43+02:00 - Seite 253 Z