2010 MERCEDES-BENZ SLS COUPE mirror controls
[x] Cancel search: mirror controlsPage 202 of 361
Doors
.................................................. 200
Opening/closing the boot ................201
Key positions .................................... 202
Seats .................................................. 203
Steering wheel .................................. 206
Mirrors ............................................... 207
Memory functions* ...........................210
Seat belts ........................................... 210
Lights ................................................. 214
Windscreen wipers ...........................217
Side windows .................................... 218
Driving and parking ..........................220
AMG SPEEDSHIFT DCT 7-speed
sports transmission .........................223
Instrument cluster ............................229
On-board computer ..........................230
Driving systems ................................ 243
Climate control ................................. 251
Loading and stowing ........................257
Features ............................................. 259 199Controls
BA 197 ECE RE 2010/6a; 1; 2, en-GB
sabbaeu
Version: 3.0.3.6 2010-05-07T14:19:43+02:00 - Seite 199
Page 210 of 361
X
Push release lever 0001down completely.
The steering column is unlocked.
X Adjust the steering wheel to the desired
position.
X Push release lever 0001up completely.
The steering column is locked.
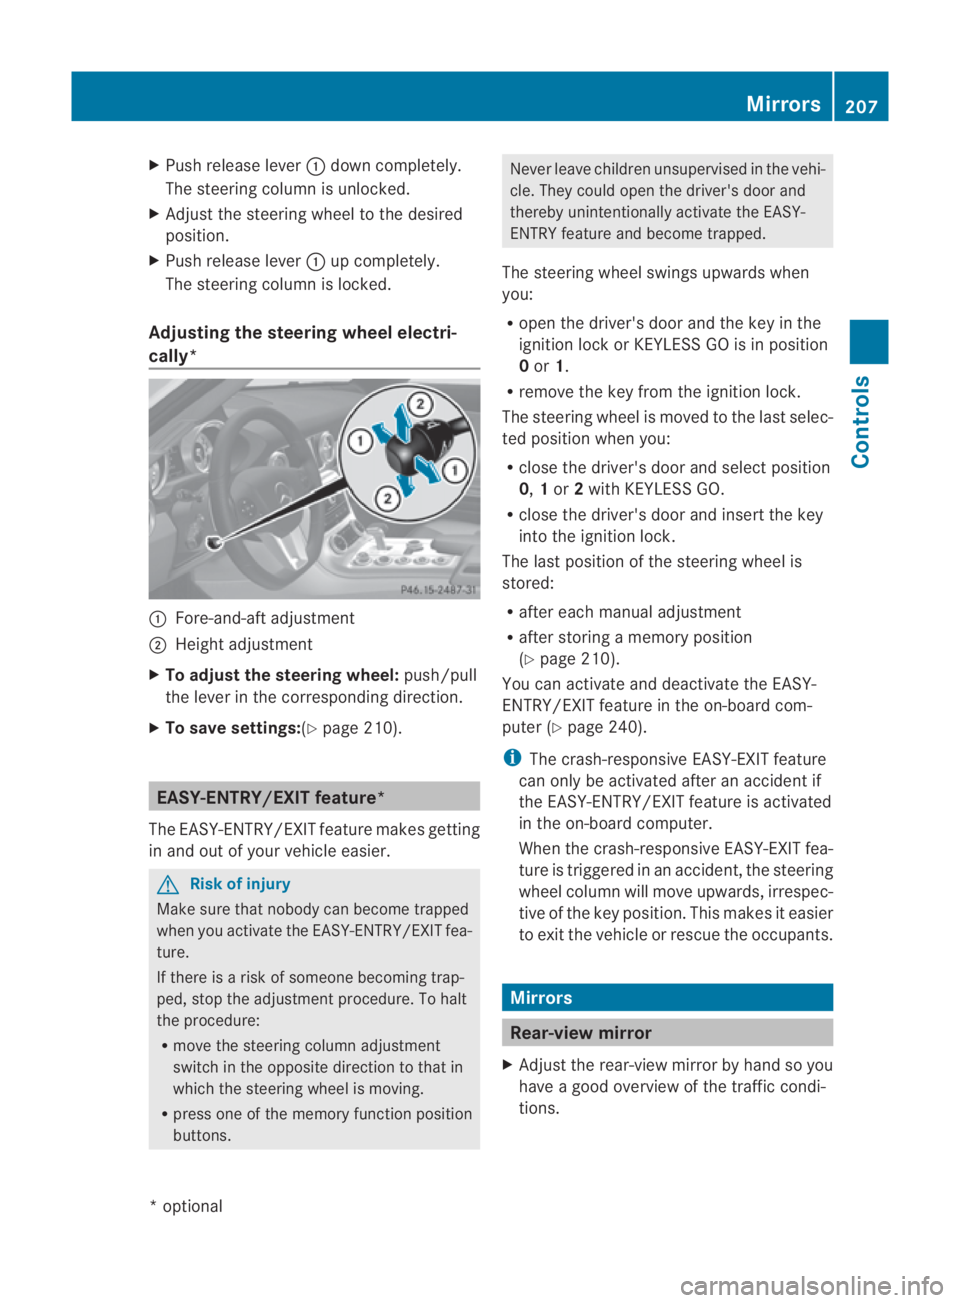
Adjusting the steering wheel electri-
cally* 0001
Fore-and-aft adjustment
0002 Height adjustment
X To adjust the steering wheel: push/pull
the lever in the corresponding direction.
X To save settings: (Ypage 210). EASY-ENTRY/EXIT feature*
The EASY-ENTRY/EXIT feature makes getting
in and out of your vehicle easier. G
Risk of injury
Make sure that nobody can become trapped
when you activate the EASY-ENTRY/EXIT fea-
ture.
If there is a risk of someone becoming trap-
ped, stop the adjustmen tprocedure. To halt
the procedure:
R move the steering column adjustment
switch in the opposite directio nto that in
which the steering wheel is moving.
R press one of the memory function position
buttons. Never leave children unsupervised in the vehi-
cle. They could open the driver's door and
thereby unintentionally activate the EASY-
ENTRY feature and become trapped.
The steering wheel swings upwards when
you:
R open the driver's door and the key in the
ignition lock or KEYLESS GO is in position
0or 1.
R remove the key from the ignition lock.
The steering wheel is moved to the last selec-
ted position when you:
R close the driver's door and select position
0, 1or 2with KEYLESS GO.
R close the driver's door and insert the key
into the ignition lock.
The last position of the steering wheel is
stored:
R after each manual adjustment
R after storing a memory position
(Y page 210).
You can activate and deactivate the EASY-
ENTRY/EXIT feature in the on-board com-
puter (Y page 240).
i The crash-responsive EASY-EXIT feature
can only be activated after an accident if
the EASY-ENTRY/EXIT feature is activated
in the on-board computer.
When the crash-responsive EASY-EXIT fea-
ture is triggered in an accident, the steering
wheel column will move upwards, irrespec-
tive of the key position. This makes it easier
to exit the vehicle or rescue the occupants. Mirrors
Rear-view mirror
X Adjust the rear-view mirror by hand so you
have a good overview of the traffic condi-
tions. Mirrors
207Controls
*optional
BA 197 ECE RE 2010/6a; 1; 2, en-GB
sabbaeu
Version: 3.0.3.6 2010-05-07T14:19:43+02:00 - Seite 207 Z
Page 211 of 361
Rear-view mirror (manual anti-dazzle)
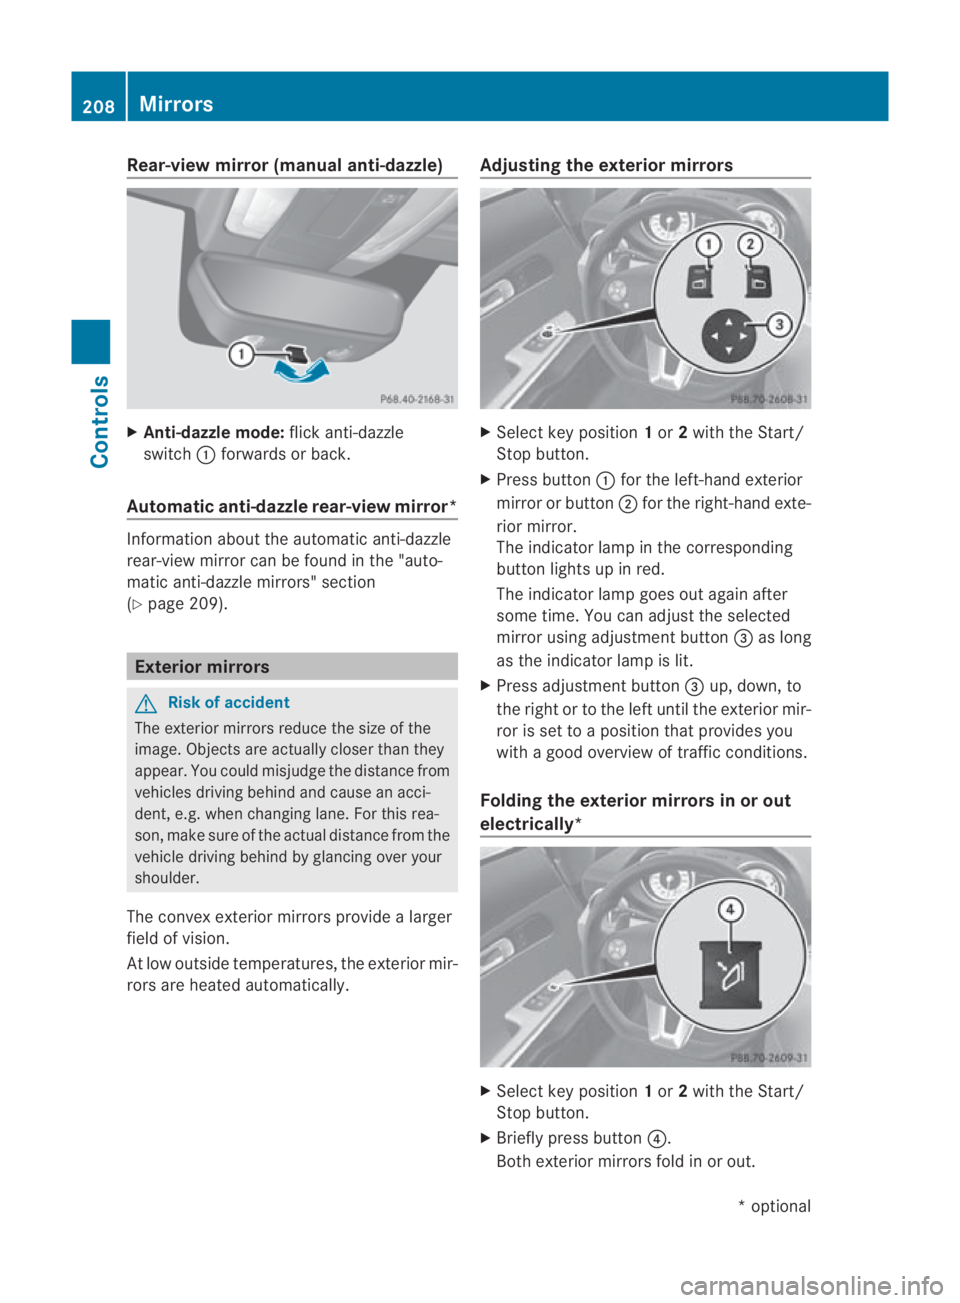
X
Anti-dazzle mode: flick anti-dazzle
switch 0001forwards or back.
Automatic anti-dazzle rear-vie wmirror* Information about the automatic anti-dazzle
rear-view mirror can be found in the "auto-
matic anti-dazzle mirrors" section
(Y page 209). Exterior mirrors
G
Risk of accident
The exterior mirrors reduce the size of the
image. Objects are actually close rthan they
appear. You could misjudge the distance from
vehicles driving behind and cause an acci-
dent, e.g. when changing lane. For this rea-
son, make sure of the actual distance from the
vehicle driving behind by glancing over your
shoulder.
The convex exterior mirrors provide a larger
field of vision.
At low outside temperatures, the exterior mir-
rors are heated automatically. Adjusting the exterior mirrors X
Select key position 1or 2with the Start/
Stop button.
X Press button 0001for the left-hand exterior
mirror or button 0002for the right-hand exte-
rior mirror.
The indicator lamp in the corresponding
button lights up in red.
The indicator lamp goes out again after
some time. You can adjust the selected
mirror using adjustment button 0015as long
as the indicator lamp is lit.
X Press adjustment button 0015up, down, to
the right or to the left until the exterior mir-
ror is set to a position that provides you
with a good overview of traffic conditions.
Folding the exterior mirrors in or out
electrically* X
Select key position 1or 2with the Start/
Stop button.
X Briefly press button 0014.
Both exterior mirrors fold in or out. 208
MirrorsControls
*o
ptional
BA 197 ECE RE 2010/6a; 1; 2, en-GB
sabbaeu
Version: 3.0.3.6 2010-05-07T14:19:43+02:00 - Seite 208
Page 212 of 361
i
If you are driving faster than 47 km/h, you
can no longer fold in the exterior mirrors.
Make sure that the exterior mirrors are
always folded out fully while the vehicle is
in motion, as they may otherwise vibrate.
Resetting the exterio rmirrors If the battery has been disconnected or com-
pletely discharged, the exterior mirrors must
be reset .The exterior mirrors will otherwise
not fold in when you select the "Fold in mir-
rors when locking" function in the on-board
computer (Y page 240).
X Select key position 1with the Start/Stop
button.
X Briefly press button 0014.
Folding the exterior mirrors in/out
automatically* If the "Fold in mirrors when locking" function
is activated in the on-board computer
(Y
page 240):
R the exterior mirrors fold in automatically as
soon as you lock the vehicle from the out-
side.
R the exterior mirrors fold out again automat-
ically as soon as you unlock the vehicle and
then open the driver's or front-passenger
door.
i If you have activated this function and fold
in the exterior mirrors using button 0014, they
will not be folded out automatically .You
can then only fold out the exterior mirrors
using button 0014. Automatic anti-dazzle mirrors*
The rear-view mirror and the exterior mirror
on the driver's side automatically go into anti-
dazzle mode if the ignition is switched on and
incident light from headlamps strikes the sen-
sor in the rear-view mirror.
The mirrors do not go into anti-dazzle mode if
reverse gear is engaged. G
Risk of accident
If incident light from headlamps is prevented
from striking the sensor in the rear-view mir-
ror, for instance, by luggage piled too high in
the vehicle, the mirror's automatic anti-dazzle
function will not operate.
Incident light could then dazzle you. This may
distract you from the traffic conditions, and
as a result, you may cause an accident .Inthis
case, adjust the rear-view mirror manually. Parking position for the exterior mir-
ror on the front-passenger side
To make it easier to park, you can set and
store the front-passenger side exterior mirror
position in such a way that you can see the
rear wheel on that side as soon as you engage
reverse gear.
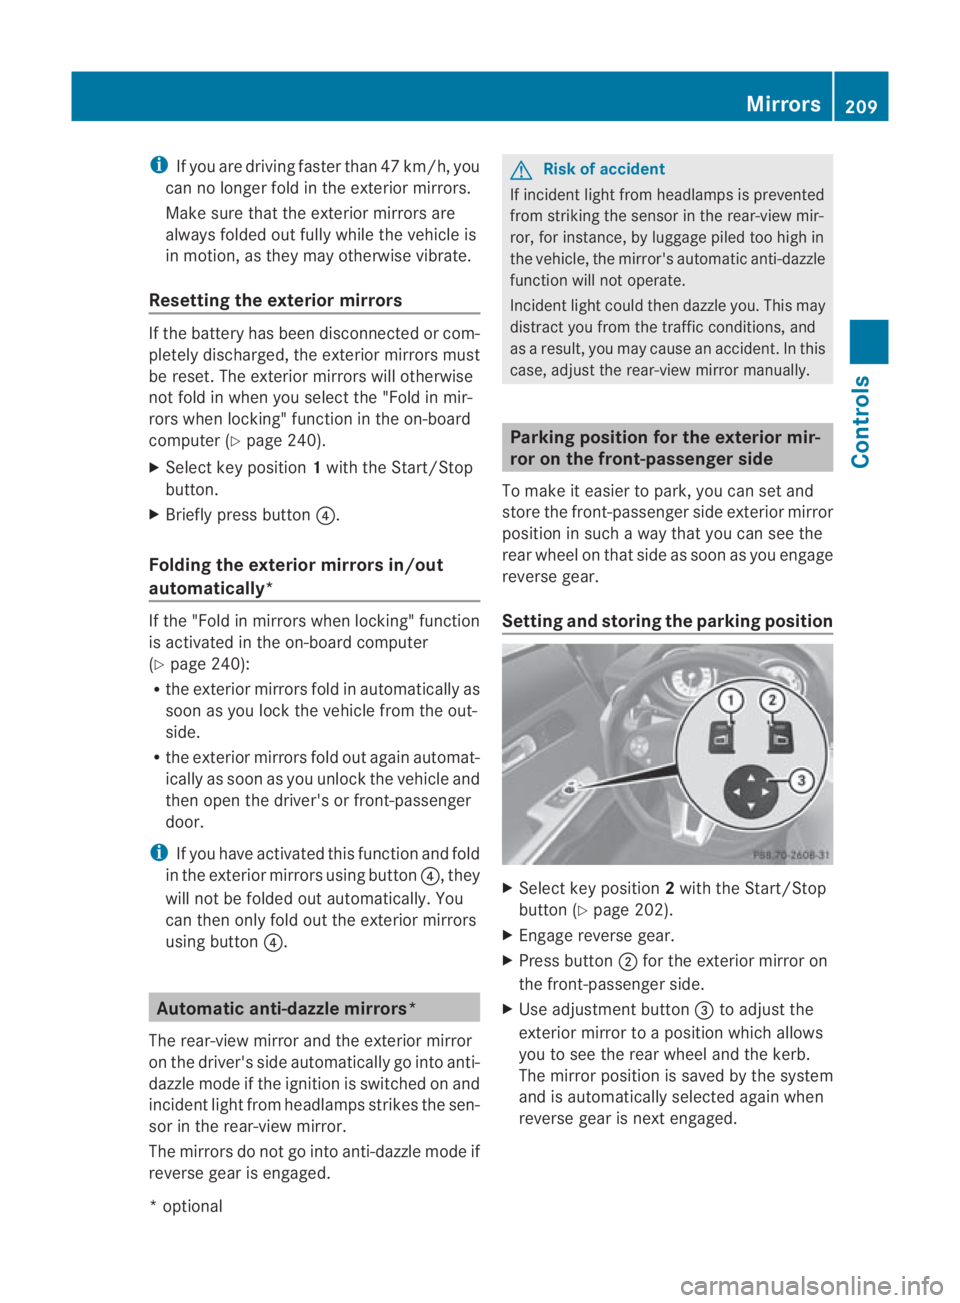
Setting and storing the parking position X
Select key position 2with the Start/Stop
button (Y page 202).
X Engage reverse gear.
X Press button 0002for the exterior mirror on
the front-passenger side.
X Use adjustment button 0015to adjust the
exterior mirror to a position which allows
you to see the rear wheel and the kerb.
The mirror position is saved by the system
and is automatically selected again when
reverse gear is next engaged. Mirrors
209Controls
*optional
BA 197 ECE RE 2010/6a; 1; 2, en-GB
sabbaeu
Version: 3.0.3.6 2010-05-07T14:19:43+02:00 - Seite 209 Z
Page 213 of 361
Calling up
astore dparking position set-
ting X
Select key position 2with the Start/Stop
button (Y page 202).
X Engage reverse gear.
The exterior mirror on the front-passenger
side moves to the stored parking position.
The exterior mirror on the front-passenger
side moves back to its original position:
R as soon as you exceed a speed of
10 km/h
R about ten seconds after you have disen-
gaged reverse gear
R if you press button 0001for the exterior mir-
ror on the driver's side Memory functions*
Storing settings
Using the memory function, you can store up
to three different settings, e.g. for three dif-
ferent people.
You can save the following settings as a single
memory preset:
R sea tand backres tposition
R driver's side: steering wheel position
R driver's side: position of the exterior mir-
rors on the driver's and front-passenger
sides G
Risk of injury
The memory function can still be used when
the key has been removed. For this reason,
children should never be left unsupervised in
the vehicle. They could otherwise become
trapped when adjusting the seat or the steer-
ing wheel. G
Risk of accident
Only use the memory function on the driver's
side when the vehicle is stationary. Other-
wise, you could be distracted from the traffic
conditions by the steering wheel and seat moving of their own accord, and as a result
cause an accident.
X
Select key position 2with the Start/Stop
button.
X Adjust the seat (Y page 204).
X On the driver's side, adjust the steering
wheel (Y page 206) and the mirrors
(Y page 208).
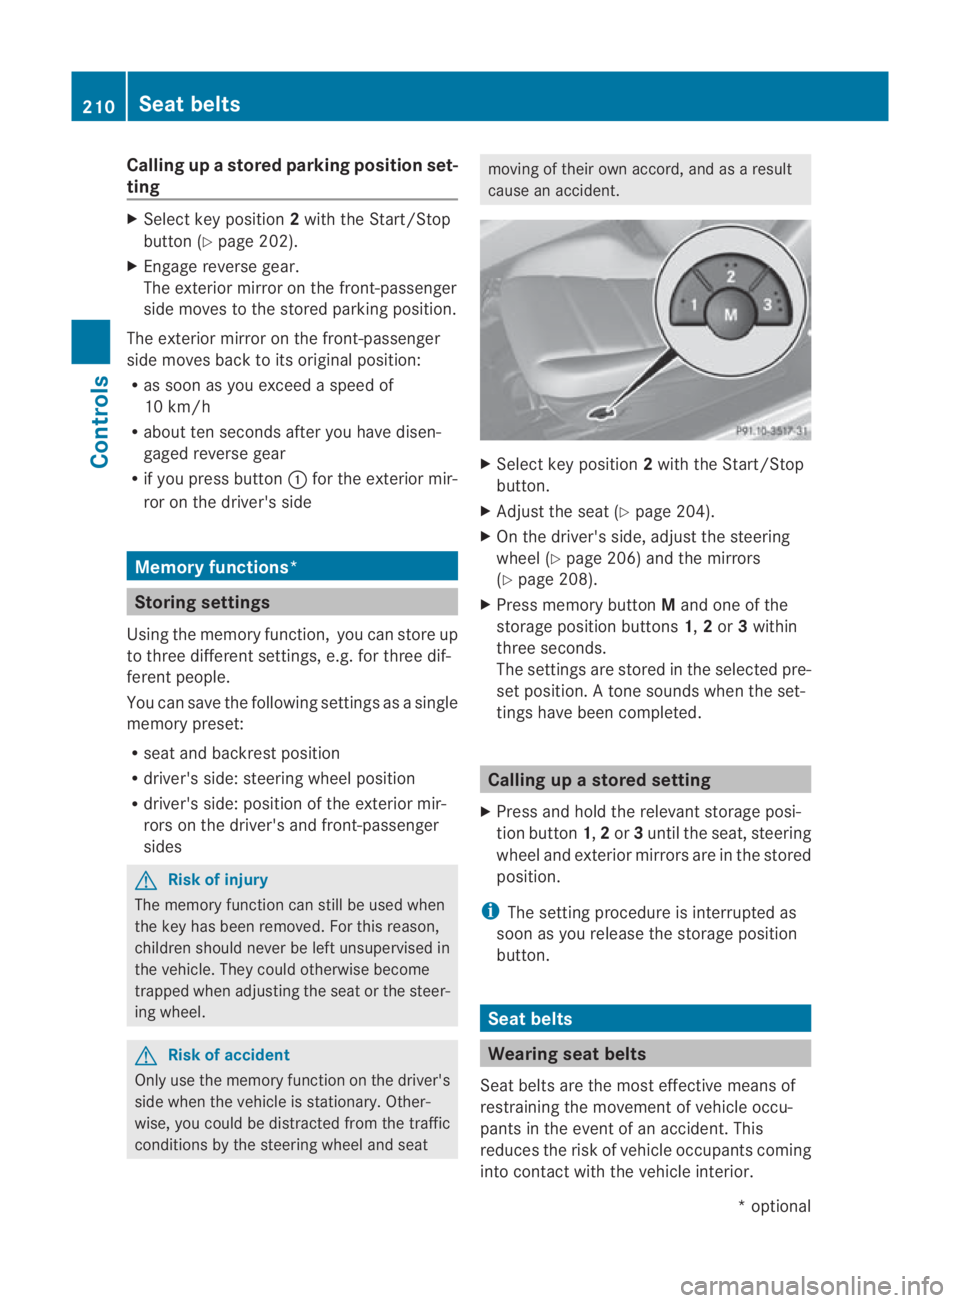
X Press memory button Mand one of the
storage position buttons 1,2or 3within
three seconds.
The settings are stored in the selected pre-
set position. Atone sounds when the set-
tings have been completed. Calling up
astore dsetting
X Press and hold the relevant storage posi-
tio nb utton 1,2or 3until the seat, steering
wheel and exterio rmirrors are in the stored
position.
i The setting procedure is interrupted as
soon as you release the storage position
button. Seat belts
Wearing seat belts
Seat belts are the most effective means of
restraining the movement of vehicle occu-
pants in the event of an accident. This
reduces the risk of vehicle occupants coming
into contact with the vehicle interior. 210
Seat beltsControls
*o
ptional
BA 197 ECE RE 2010/6a; 1; 2, en-GB
sabbaeu
Version: 3.0.3.6 2010-05-07T14:19:43+02:00 - Seite 210
Page 243 of 361
Vehicle
Set permanent SPEEDTRONIC with
Limit
speed (winter tyres):(Y page 247).
Acoustic confirmation when locking and
unlocking the vehicle
You can use the Acoustic Lock function to
determine whethe rthere is an acoustic con-
firmation when locking and unlocking the
vehicle.
X Press the 0008or000E button on the steer-
ing wheel to select the Settingsmenu.
X Press the 000Cor000F button to select the
VEHICLE submenu.
X Press the 000Abutton to confirm.
X Press 000Cor000F to select the Acous‐
tic Lock function.
You will see the selected setting: onor
off.
X Press the 000Abutton to save the setting.
Convenience Activating/deactivating the EASY-
ENTRY/EXIT feature*
You can use the Easy Entry/Exit function
to activate or deactivate the easy-entry/exit
feature (Y page 207). G
Risk of injury
The steering wheel moves when the EASY-
ENTRY/EXIT feature is active. There is a risk
of occupants becoming trapped. Before acti-
vating the EASY-ENTRY/EXIT feature, make
sure that nobody can become trapped.
Do not leave children unsupervised in the
vehicle, even if they are secured in a child
restraint system. The children could open the
driver's door and thereby unintentionally acti-
vate the EASY-ENTRY/EXIT feature and
become trapped. X
Press the 0008or000E button on the steer-
ing wheel to select the Settingsmenu.
X Press the 000Cor000F button to select the
CONVENIENCE submenu.
X Press the 000Abutton to confirm.
X Press the 000Cor000F button to select the
Easy Entry/Exit feature.
You will see the selected setting: onor
off.
X Press the 000Abutton to save the setting.
Switching the fold in mirrors when lock-
ing* function on/off
If you switch on the Auto. fold infunction,
the exterior mirrors fold in when you lock the
vehicle. When you unlock the vehicle and then
open the driver's or front-passenger door, the
exterior mirrors fold out again.
If you have switched the function on and you
fold the exterior mirrors in using the button
on the door (Y page 208), they will not fold
out automatically .The exterior mirrors can
then only be folded out using the button on
the door.
X Press the 0008or000E button on the steer-
ing wheel to select the Settingsmenu.
X Press the 000Cor000F button to select the
CONVENIENCE submenu.
X Press the 000Abutton to confirm.
X Press the 000Cor000F button to select the
Auto. fold in function.
You will see the selected setting: onor
off.
X Press the 000Abutton to save the setting.
restoring the factory settings For safety reasons, not all functions are reset:
the
Limit Speed (winter tyres) function
in permanent SPEEDTRONIC can only be set
in the VEHICLE submenu. If you want to reset
the Daytime driving lights function in
the Light submenu, you have to select key
position 1with the Start/Stop button. 240
On-board computerControls
*o
ptional
BA 197 ECE RE 2010/6a; 1; 2, en-GB
sabbaeu
Version: 3.0.3.6 2010-05-07T14:19:43+02:00 - Seite 240
Page 253 of 361
One or more segments light up as the vehicle
approaches an obstacle, depending on the
vehicle's distance from the obstacle. From
the sixth segment onwards, you will hear an
intermittent warning tone; from the seventh
segment onwards, you will hear a continuous
warning tone for a maximum of two seconds.
This indicates that you have now reached the
minimum distance.
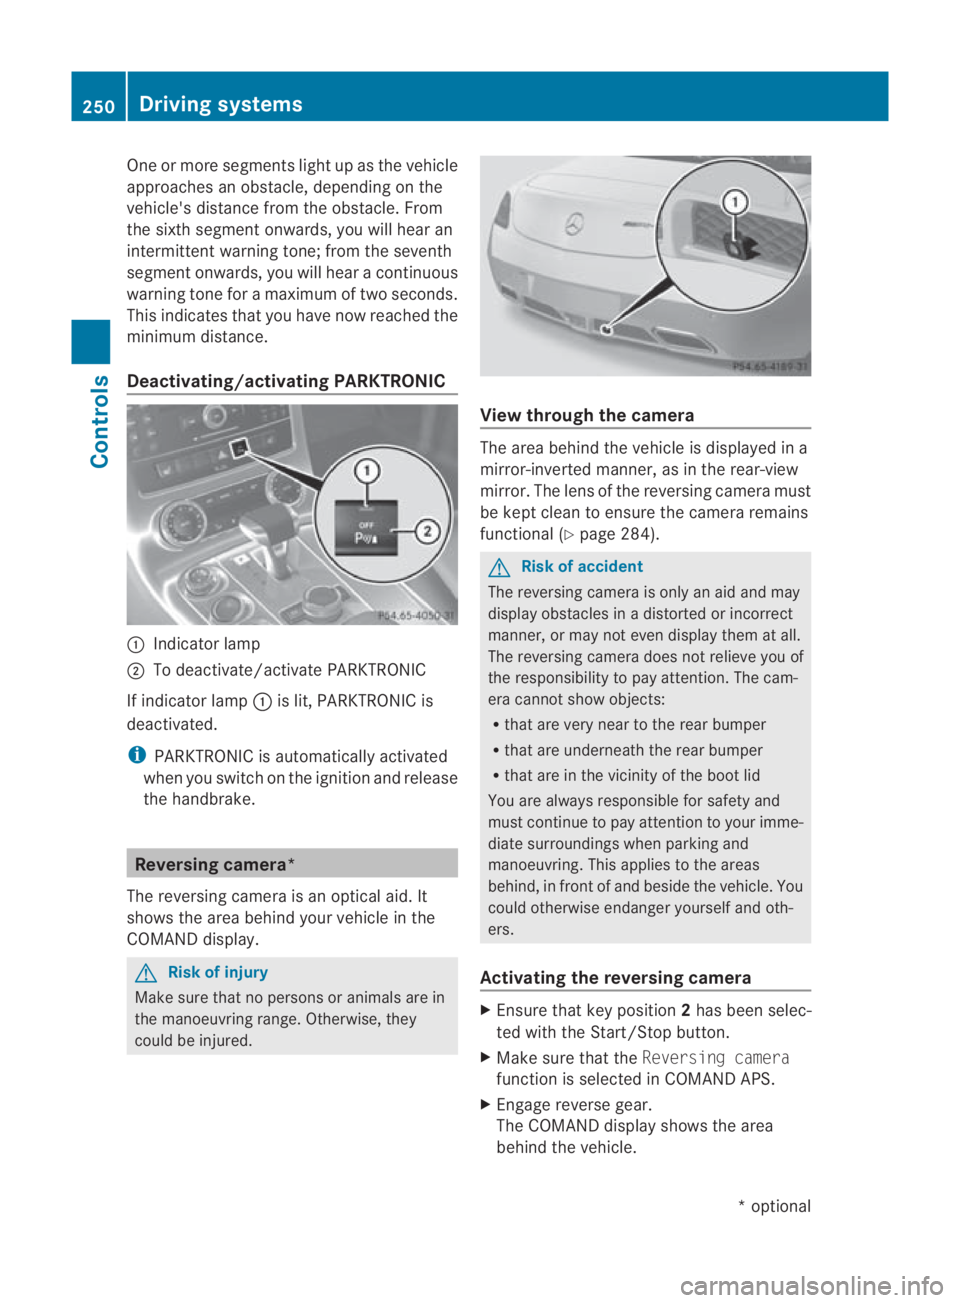
Deactivating/activating PARKTRONIC 0001
Indicator lamp
0002 To deactivate/activate PARKTRONIC
If indicator lamp 0001is lit, PARKTRONIC is
deactivated.
i PARKTRONIC is automatically activated
when you switch on the ignition and release
the handbrake. Reversing camera*
The reversing camera is an optical aid. It
shows the area behind your vehicle in the
COMAND display. G
Risk of injury
Make sure that no persons or animals are in
the manoeuvring range. Otherwise, they
could be injured. View through the camera
The area behind the vehicle is displayed in a
mirror-inverted manner, as in the rear-view
mirror. The lens of the reversing camera must
be kept clean to ensure the camera remains
functional (Y
page 284). G
Risk of accident
The reversing camera is only an aid and may
display obstacles in a distorted or incorrect
manner, or may not even display them at all.
The reversing camera does not relieve you of
the responsibility to pay attention. The cam-
era cannot show objects:
R that are very near to the rear bumper
R that are underneath the rear bumper
R that are in the vicinity of the boot lid
You are always responsible for safety and
must continue to pay attention to your imme-
diate surroundings when parking and
manoeuvring. This applies to the areas
behind, in front of and beside the vehicle. You
could otherwise endanger yourselfa nd oth-
ers.
Activating the reversing camera X
Ensure tha tkey position 2has been selec-
ted with the Start/Stop button.
X Make sure that the Reversing camera
function is selected in COMAND APS.
X Engage reverse gear.
The COMAND display shows the area
behind the vehicle. 250
Driving systemsControls
*o
ptional
BA 197 ECE RE 2010/6a; 1; 2, en-GB
sabbaeu
Version: 3.0.3.6 2010-05-07T14:19:43+02:00 - Seite 250
Page 262 of 361
R
brake sharply
R change direction suddenly
R are involved in an accident
Only use the cup holders for containers of a
suitable size and which have lids. Otherwise,
the drinks could spill.
Cup holders should not be used for hot drinks.
Otherwise, you may scald yourself. X
Open the armrest (Y page 258).
Cup holders 0001are located under the arm-
rest. Luggage net in the front-passenger
footwell
G
Risk of injury
Only place lightweight objects in the luggage
net. Do not use it to transport heavy, sharp-
edged or fragile objects. The luggage net can-
not secure the objects sufficiently in the event
of an accident. Features
Sun visors
G
Risk of accident
Keep the mirrors in the sun visors covered
while driving .You could otherwise be dazzled,
which may impair your view of traffic condi-
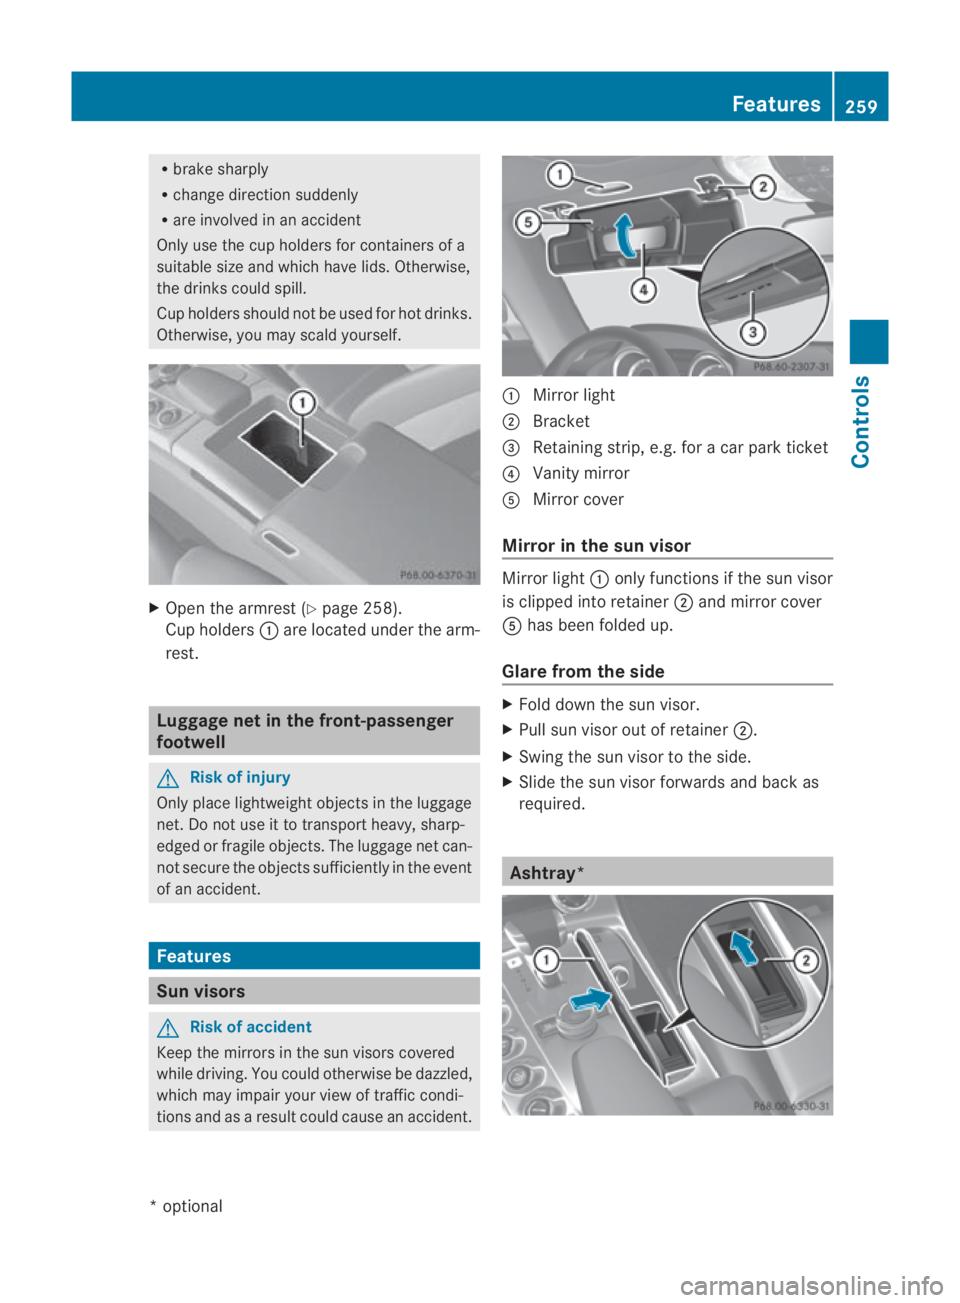
tions and as a result could cause an accident. 0001
Mirror light
0002 Bracket
0015 Retaining strip, e.g. for a car park ticket
0014 Vanity mirror
0012 Mirror cover
Mirror in the sun visor Mirror light
0001only functions if the sun visor
is clipped into retainer 0002and mirror cover
0012 has been folded up.
Glare from the side X
Fold down the sun visor.
X Pull sun visor out of retainer 0002.
X Swing the sun visor to the side.
X Slide the sun visor forwards and back as
required. Ashtray* Features
259Controls
*optional
BA 197 ECE RE 2010/6a; 1; 2, en-GB
sabbaeu
Version: 3.0.3.6 2010-05-07T14:19:43+02:00 - Seite 259 Z