G
Risk of injury
An unsecured or an incorrectly positioned
load increases the ris kofinjury for the child
and all othe roccupants, during:
R an accident
R a braking manoeuvre
R a sudde nchange of direction
Do not carry heavy or hard objects inside the
vehicle unless they are secured. You will find
further information in the index under "Prac-
tical tips".
Child restraint systems Mercedes-Ben
zrecommends that you only
use the child restraint systems listed at
(Y page 45). G
Risk of injury
To reduce the risk of serious or even fatal
injury to the child in the event of a sudden
change in direction, braking or an accident:
R children less than 1.50 m tall and under
twelve years of age must always be secured
in special child restraint systems on a suit-
able vehicle seat. This is necessary
because the seat belts are not designed for
children of this size.
R if you secure a forward-facing child
restraint system without automatic child
seat recognition to the front-passenger
seat, you must move the front-passenger
seat as far back as possible.
R children must never travel sitting on the lap
of another occupant. Due to the forces
occurring in the event of a sudden change
of direction, heavy braking or an accident,
it would not be possible to restrain the
child. The child could be thrown against
parts of the vehicle interior and be seriously
or even fatally injured. G
Risk of injury
The child restraint system cannot perform its
protective function if it is not correctly fitted
to a suitable vehicle seat. The child cannot be restrained in the event of an accident, heavy
braking or sudden changes of direction. The
child could be seriously or even fatally injured.
For this reason, when fitting a child restraint
system, observe the manufacturer's installa-
tion instructions and the correct use of the
child restraint system.
The entire base of the child restraint system
must always rest on the seat cushion. There-
fore, never place objects, e.g. a cushion,
under the child restraint system.
Only use child restraint systems with the orig-
inal cover designed for them. Only replace
damaged covers with genuine Mercedes-Benz
covers.
When possible, only use child restraint sys-
tems which have been approved for use in
Mercedes-Benz vehicles.
Child seat on the front-passenger seat Warning notice on the front-passenger sun visor
Warning symbol for a rearward-facing child
restraint system Occupant safety
41Safety
BA 197 ECE RE 2010/6a; 1; 2, en-GB
sabbaeu Version: 3.0.3.6 2010-05-07T14:19:43+02:00 - Seite 41 Z
X
Turn the jack back to the out-of-use posi-
tion and stow it in the boot again with the
rest of the wheel-changing tools. Emergency spare wheel*
G
Risk of accident
The wheel dimensions and tyre size of the
emergency spare wheel differ from those of
the standard wheels.
Your vehicle's handling characteristics will
change when driving with a collapsible emer-
gency spare wheel. Adapt your style of driving
accordingly.
The collapsible emergency spare wheel may
only be used for a short time. Do not exceed
the maximum speed of 80 km/h and do not
deactivate ESP ®
. G
Risk of accident
Have the collapsible emergenc yspare wheel
replaced as soon as possible at a qualified
specialist workshop which has the necessary
specialist knowledge and tools to carry out
the work required. Mercedes-Benz recom-
mends that you use a Mercedes-Benz Service
Centre for this purpose. In particular, work
relevant to safety or on safety-related sys-
tems must be carried out at a qualified spe-
cialist workshop.
Never drive the vehicle with more than one
collapsible emergency spare wheel fitted.
Inflating the collapsible emergency
spare wheel 25 G
Risk of accident
Pump up the collapsible emergency spare
wheel before lowering the vehicle. You could
otherwise damage the wheel rim.
X Remove the electric air pump from the boot
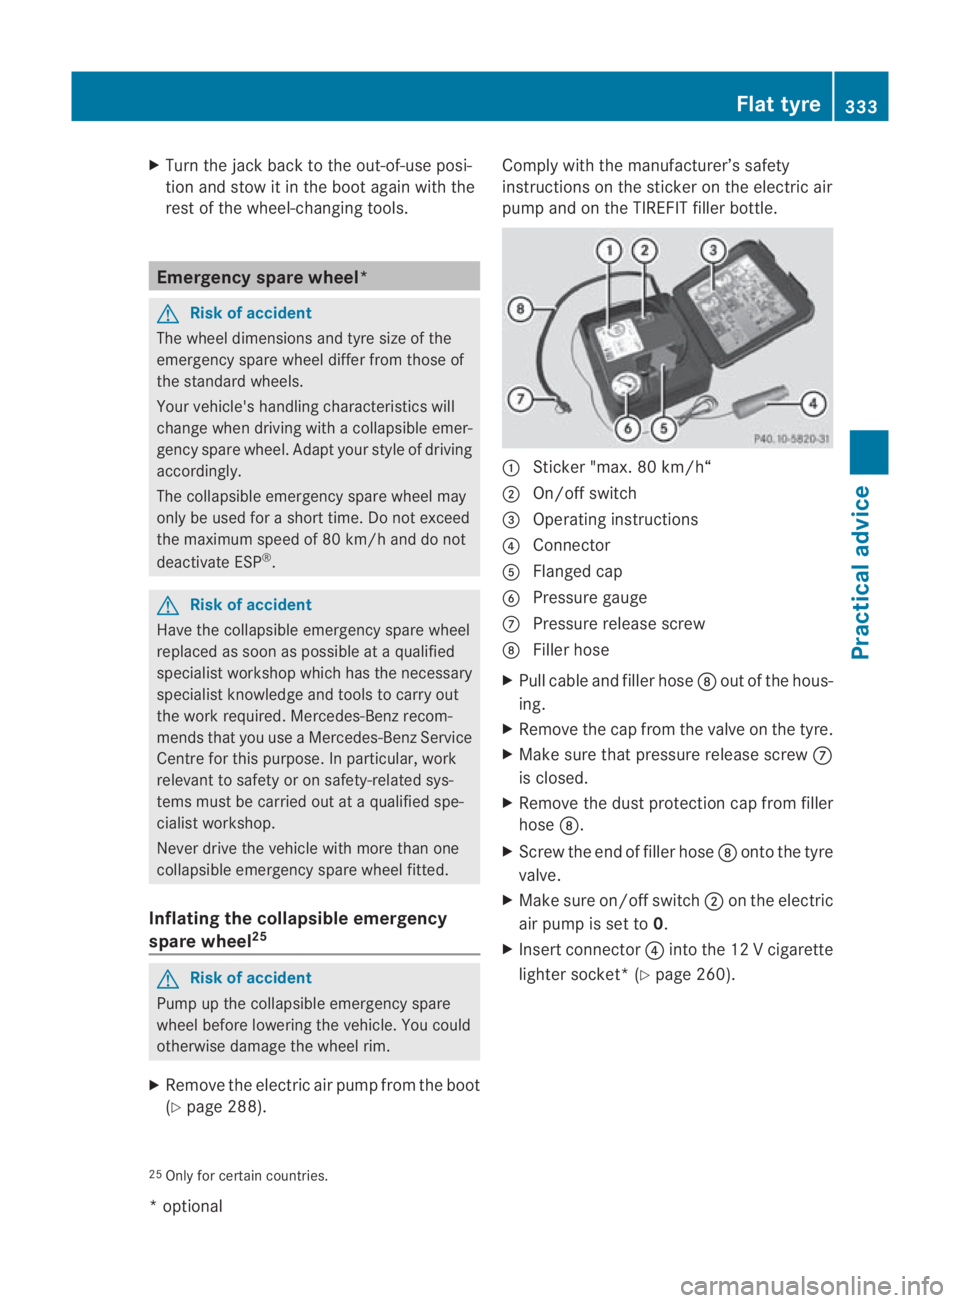
(Y page 288). Comply with the manufacturer’s safety
instructions on the sticker on the electric air
pump and on the TIREFIT filler bottle.
0001
Sticker "max. 80 km/h“
0002 On/off switch
0015 Operating instructions
0014 Connector
0012 Flanged cap
0013 Pressure gauge
000A Pressure release screw
000B Filler hose
X Pull cable and filler hose 000Bout of the hous-
ing.
X Remove the cap from the valve on the tyre.
X Make sure that pressure release screw 000A
is closed.
X Remove the dust protection cap from filler
hose 000B.
X Screw the end of filler hose 000Bonto the tyre
valve.
X Make sure on/off switch 0002on the electric
air pump is set to 0.
X Insert connector 0014intothe 12 V cigarette
lighter socket*( Ypage 260).
25 Only for certain countries. Flat tyre
333Practical advice
*optional
BA 197 ECE RE 2010/6a; 1; 2, en-GB
sabbaeu Version: 3.0.3.6 2010-05-07T14:19:43+02:00 - Seite 333 Z