2010 MERCEDES-BENZ SLS COUPE child lock
[x] Cancel search: child lockPage 9 of 361
Trim strips
..................................... 285
Windows ........................................ 283
Wiper blades .................................. 283
Care products .................................... 280
CD Cop yprotection ............................. 167
Disc ............................................... 167
General information .......................167
Multisession .................................. 166
Playback options ........................... 178
Selecting amedium ....................... 175
Selecting atrack ............................ 176
CD/DVD
Ejecting .......................................... 170
Loading .......................................... 168
CD player/CD changer
Operating (on-board computer) .....235
Central locking
Key ................................................ 200
Central unlocking
Key ................................................ 200
Centre
Entering ........................................... 98
Centre console
Lowe rsection .................................. 30
Uppe rsection .................................. 29
Changing awheel
see Flat tyre
Changing bulbs
Headlamps .................................... .323
Tai llamp ........................................ 324
Changing direction ............................112
Announcement phase ....................112
Change of direction phase .............112
Preparation phase .........................112
Character entry ................................... 64
Charge maintenance socket ............264
Children In the vehicle ................................... 40
Restraint system .............................. 41
Child seat
Automatic recognition .....................42
Automatic recognition (malfunc-
tion) ............................................... 307
Child sea tlock ................................. 45
Display message ............................ 291Recommendations
...........................45
Suitable positions ............................ 44
Child seat lock ..................................... 45
Cigarette lighter ................................ 260
Cleaning agents ................................. 280
Cockpit Overview .......................................... 23
COMAND
Basi cfunction s................................ 67
Components .................................... 55
Switching on/off .............................. 67
COMAND controller .............................59
COMAND control panel .......................57
COMAND display ................................. 55
Cleaning ......................................... 284
Cleaning instructions .......................57
Setting ............................................. 72
COMAND operating system ................ 55
Constant headlamp mode see Daytime driving lights ..............238
Control menu
Showing/hiding ............................. 193
Convenience closing feature ............219
Convenience opening feature ..........219
Coolant Checking the leve l......................... 269
Display message ............................ 299
Mixture ratio .................................. 351
Copy protection (CD/DVD) ...............167
Country Selecting .......................................... 93
Crosshair
Hiding .............................................. 84
Crosshair position
Saving ...................................... 84, 127
Cruise control .................................... 243
Display message ............................ 293
Cup holder ......................................... 258
Current fuel consumption (on-
board computer) ............................... 233 D
DAB Sub-programme ............................. 165
DAB radio mode
Switching to ................................... 1586
Index BA 197 ECE RE 2010/6a; 1; 2, en-GB
sabbae uV ersion: 3.0.3.6
2010-05-07T14:19:43+02:00 - Seite 6
Page 12 of 361
F
Fast forward/rewind ................176, 194
Faul tmessage
see Display message .....................289
Fire extinguisher ............................... 289
First-aid kit ......................................... 289
Flat tyre Equipment ..................................... 325
Preparing the vehicle .....................325
TIREFIT kit ...................................... 326
Floormat ............................................ .264
Folders Selecting (MP3 mode )................... 176
Fording ............................................... 278
Frequencies Telephone ...................................... 347
Frequency entry
Manual .......................................... .162
Front airbag ......................................... 38
Front-passenger airbag ....................... 38
Fron tpassenge rkneebag ................... 39
Fuel ..................................................... 349
Loss ............................................... 314
Petrol ............................................. 267
Fuel consumption
Current (on-board computer) .........233
Notes ............................................. 349
Fuel filler flap
Opening/closing ............................ 266
Fuel gauge ............................................ 25
Fuel level Calling up the range (on-board
computer) ...................................... 233
Gauge .............................................. 25
Fuel line
Malfunction ................................... .314
Fuel tank
Defect ............................................ 314
Function restrictions
Addres sbook ........................ 151, 154
Music Register ............................... 183
Using the telephone ....................... 128
Video DVD mode ........................... 191
Fuse allocation chart ........................342
Fuse box Front-passenger footwell ...............342
Rea r............................................... 342Fuses
.................................................. 342 G
Garage door Opening/closing (with the remote
control) .......................................... 263
Garage door opener ..........................262
Clearing the memory .....................264
Programming the remote control ...262
Gear indicator .................................... 227
Gearshift program SETUP (on-board computer) ..........241
Genuine parts .................................... 346
Glove compartment ..........................257
Locking and unlocking (sepa-
rately) ............................................ 257
Gracenote ®
Media Database ............177 H
Hands-free microphone Switching on/off ........................... 146
Headbag ............................................... 40
Headlamp cleaning system ..............270
Headlamps Cleaning ......................................... 283
Cleaning system ............................ 217
Misting up ...................................... 317
Heating
see Air conditioning
High-pressure cleaners ....................282
Hill start assist .................................. 221
Home address see My address
HomeLink ®
see Garage door opener
House number
Entering ........................................... 99 I
Ignition lock ............................... 203, 258
Immobiliser .......................................... 49
Indicator and warning lamps ...........308
Air conditioning (malfunction) ........307
Automatic child sea trecognition
(malfunction) ................................. 307
Engine diagnostics .........................310 Index
9 BA 197 ECE RE 2010/6a; 1; 2, en-GB
sabbae uV ersion: 3.0.3.6
2010-05-07T14:19:43+02:00 - Seite 9
Page 43 of 361
They are deployed:
R
on the side on which an impact occurs
R at the start of an accident with a high rate
of lateral vehicle deceleration or accelera-
tion, e.g. in a side impact
R independently of seat belt use
R independently of the fronta irbags
R independently of the belt tensioners
R on the front-passenger side if the seat
occupancy recognition detects that the
front-passenger seat is occupied
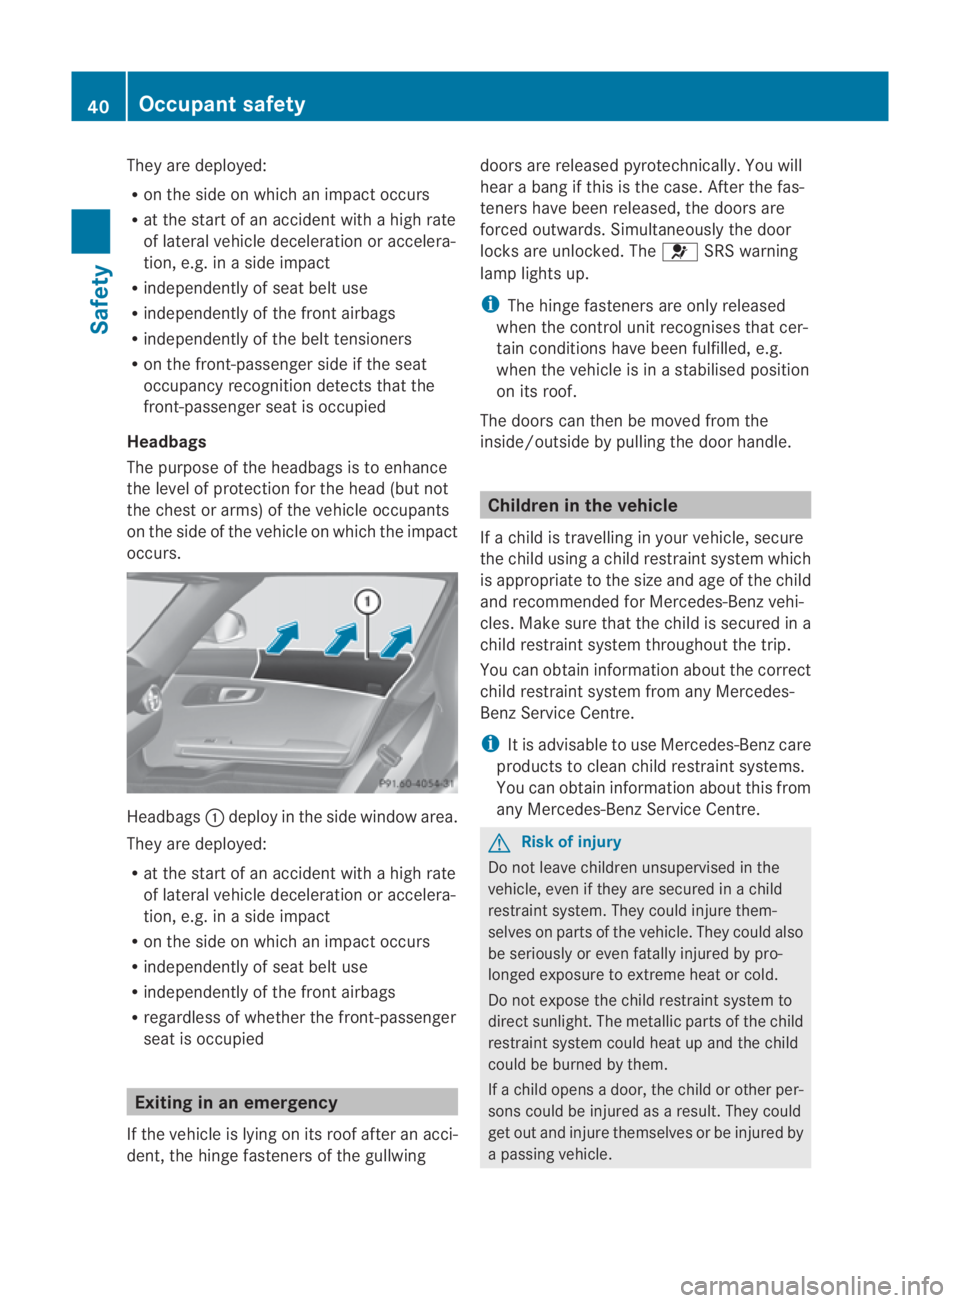
Headbags
The purpose of the headbags is to enhance
the level of protection for the head (but not
the ches torarms) of the vehicle occupants
on the side of the vehicle on which the impact
occurs. Headbags
0001deploy in the side windo warea.
They are deployed:
R at the start of an accident with a high rate
of lateral vehicle deceleratio noraccelera-
tion, e.g. in a side impact
R on the side on which an impact occurs
R independently of sea tbelt use
R independently of the fron tairbags
R regardless of whether the front-passenger
seat is occupied Exiting in an emergency
If the vehicle is lying on its roof after an acci-
dent, the hinge fasteners of the gullwing doors are released pyrotechnically. You will
hear a bang if this is the case. After the fas-
teners have been released, the doors are
forced outwards. Simultaneously the door
locks are unlocked. The
0018SRS warning
lamp lights up.
i The hinge fasteners are only released
when the control unit recognises that cer-
tain conditions have been fulfilled, e.g.
when the vehicle is in a stabilised position
on its roof.
The doors can then be moved from the
inside/outside by pulling the door handle. Children in the vehicle
If a child is travelling in your vehicle, secure
the child using a child restraint system which
is appropriate to the size and age of the child
and recommended for Mercedes-Ben zvehi-
cles. Make sure that the child is secured in a
child restraint system throughout the trip.
You can obtain information about the correct
child restraint system from any Mercedes-
Benz Service Centre.
i It is advisable to use Mercedes-Benzc are
products to clean child restraint systems.
You can obtain informatio nabout this from
any Mercedes-Benz Service Centre. G
Risk of injury
Do not leave children unsupervised in the
vehicle, even if they are secured in a child
restraint system. They could injure them-
selves on parts of the vehicle. They could also
be seriously or even fatally injured by pro-
longed exposure to extreme heat or cold.
Do not expose the child restraint system to
direct sunlight .The metallic parts of the child
restraint system could heat up and the child
could be burned by them.
If a child opens a door, the child or other per-
sons could be injured as a result. They could
get out and injure themselves or be injured by
a passing vehicle. 40
Occupant safetySafety
BA 197 ECE RE 2010/6a; 1; 2, en-GB
sabbaeu
Version: 3.0.3.6 2010-05-07T14:19:43+02:00 - Seite 40
Page 48 of 361
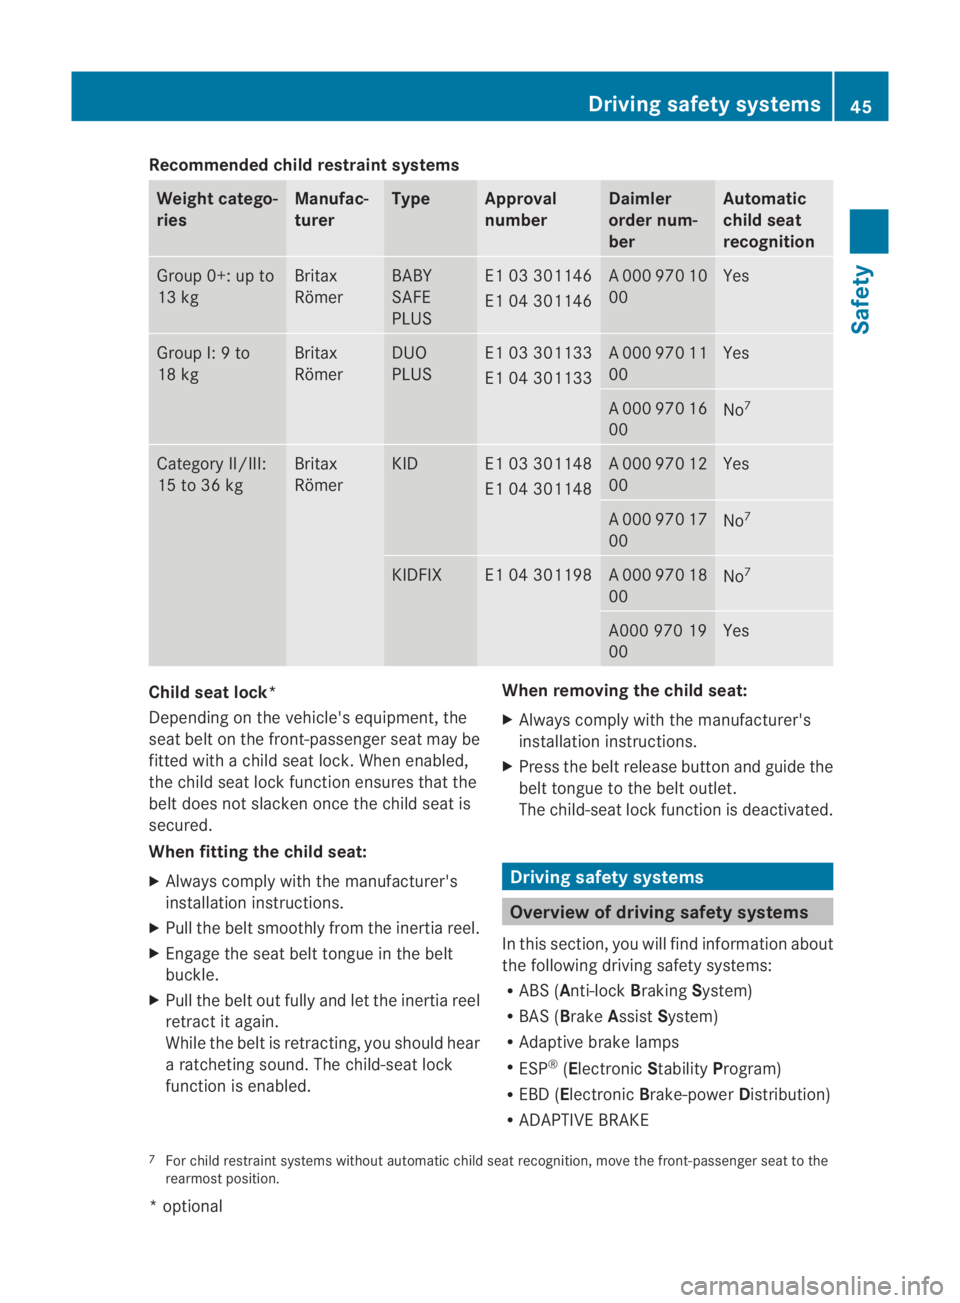
Recommended child restraint systems
Weight catego-
ries Manufac-
turer Type Approval
number Daimler
order num-
ber Automatic
child seat
recognition
Group 0+: up to
13 kg Britax
Römer BABY
SAFE
PLUS E1 03 301146
E1 04 301146 A 000 970 10
00 Yes
Group I: 9 to
18 kg Britax
Römer DUO
PLUS E1 03 301133
E1 04 301133 A 000 970 11
00 Yes
A 000 970 16
00
No
7 Category II/III:
15 to 36 kg Britax
Römer KID E1 03 301148
E1 04 301148 A 000 970 12
00 Yes
A 000 970 17
00
No
7 KIDFIX E1 04 301198 A 000 970 18
00
No
7 A000 970 19
00 Yes
Child seat lock*
Depending on the vehicle's equipment, the
sea
tbelt on the front-passenger seat may be
fitted with a child seat lock. When enabled,
the child seat lock function ensures that the
belt does not slacken oncet he child seat is
secured.
When fitting the child seat:
X Always comply with the manufacturer's
installation instructions.
X Pull the belt smoothly from the inertia reel.
X Engage the seat belt tongue in the belt
buckle.
X Pull the belt out fully and let the inertia reel
retract it again.
While the belt is retracting, you should hear
a ratcheting sound. The child-seat lock
function is enabled. When removing the child seat:
X
Always comply with the manufacturer's
installation instructions.
X Press the belt release button and guide the
belt tongue to the belt outlet.
The child-seat lock function is deactivated. Driving safety systems
Overview of driving safety systems
In this section, you will find information about
the following driving safety systems:
R ABS ( Anti-lock BrakingSystem)
R BAS ( Brake Assist System)
R Adaptive brake lamps
R ESP ®
(Electronic StabilityProgram)
R EBD ( Electronic Brake-power Distribution)
R ADAPTIVE BRAKE
7 For child restraint systems without automatic child seat recognition, move the front-passenger seat to the
rearmost position. Driving safety systems
45Safety
*optional
BA 197 ECE RE 2010/6a; 1; 2, en-GB
sabbaeu
Version: 3.0.3.6 2010-05-07T14:19:43+02:00 - Seite 45 Z
Page 203 of 361
Doors
Opening/closing from the outside
G
Risk of accident
If children are lef tunsupervised in the vehicle,
they could:
R open a door from inside the vehicle at any
time, eve nifithas been locked
R start the vehicle using akey which has been
left in the vehicle
R release the parking brake
They could thereby endanger themselves and
others. Never leave children unsupervised in
the vehicle. Always take the key with you
when leaving the vehicle, even if you are only
leaving it for a short time.
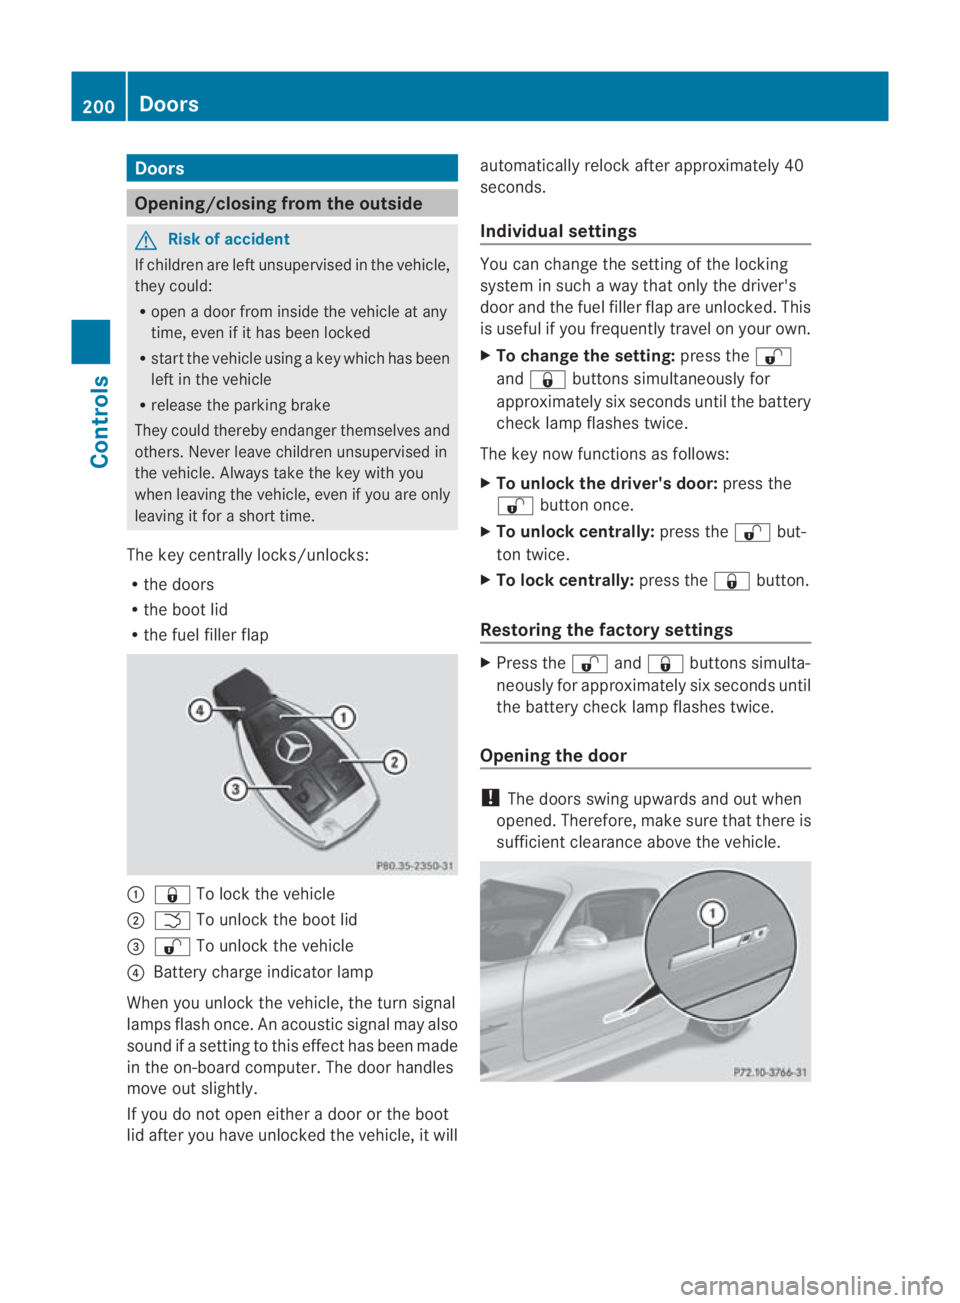
The key centrally locks/unlocks:
R the doors
R the boot lid
R the fuel filler flap 0001
0009 To lock the vehicle
0002 0002 To unlock the boot lid
0015 000B To unlock the vehicle
0014 Battery charge indicator lamp
When you unlock the vehicle, the turn signal
lamps flash once. An acoustic signal may also
sound if a setting to this effec thas been made
in the on-board computer. The door handles
move out slightly.
If you do no topen either a door or the boot
lid after you have unlocked the vehicle, it will automatically relock after approximately 40
seconds.
Individual settings You can change the setting of the locking
system in such a way that only the driver's
door and the fuel filler flap are unlocked. This
is useful if you frequently travel on your own.
X To change the setting: press the000B
and 0009 buttons simultaneously for
approximately six seconds until the battery
chec klamp flashes twice.
The key now functions as follows:
X To unlock the driver's door: press the
000B button once.
X To unlock centrally: press the000Bbut-
ton twice.
X To lock centrally: press the0009button.
Restoring the factory settings X
Press the 000Band0009 buttons simulta-
neously for approximately six seconds until
the battery check lamp flashes twice.
Opening the door !
The doors swing upwards and out when
opened. Therefore, make sure that there is
sufficient clearance above the vehicle. 200
DoorsControls
BA 197 ECE RE 2010/6a; 1; 2, en-GB
sabbaeu
Version: 3.0.3.6
2010-05-07T14:19:43+02:00 - Seite 200
Page 206 of 361
If you depress the brake pedal and press the
Start/Stop button, the engine starts immedi-
ately.
If there is a key in the ignition lock, it has pri-
ority over the KEYLESS-GO start function. X
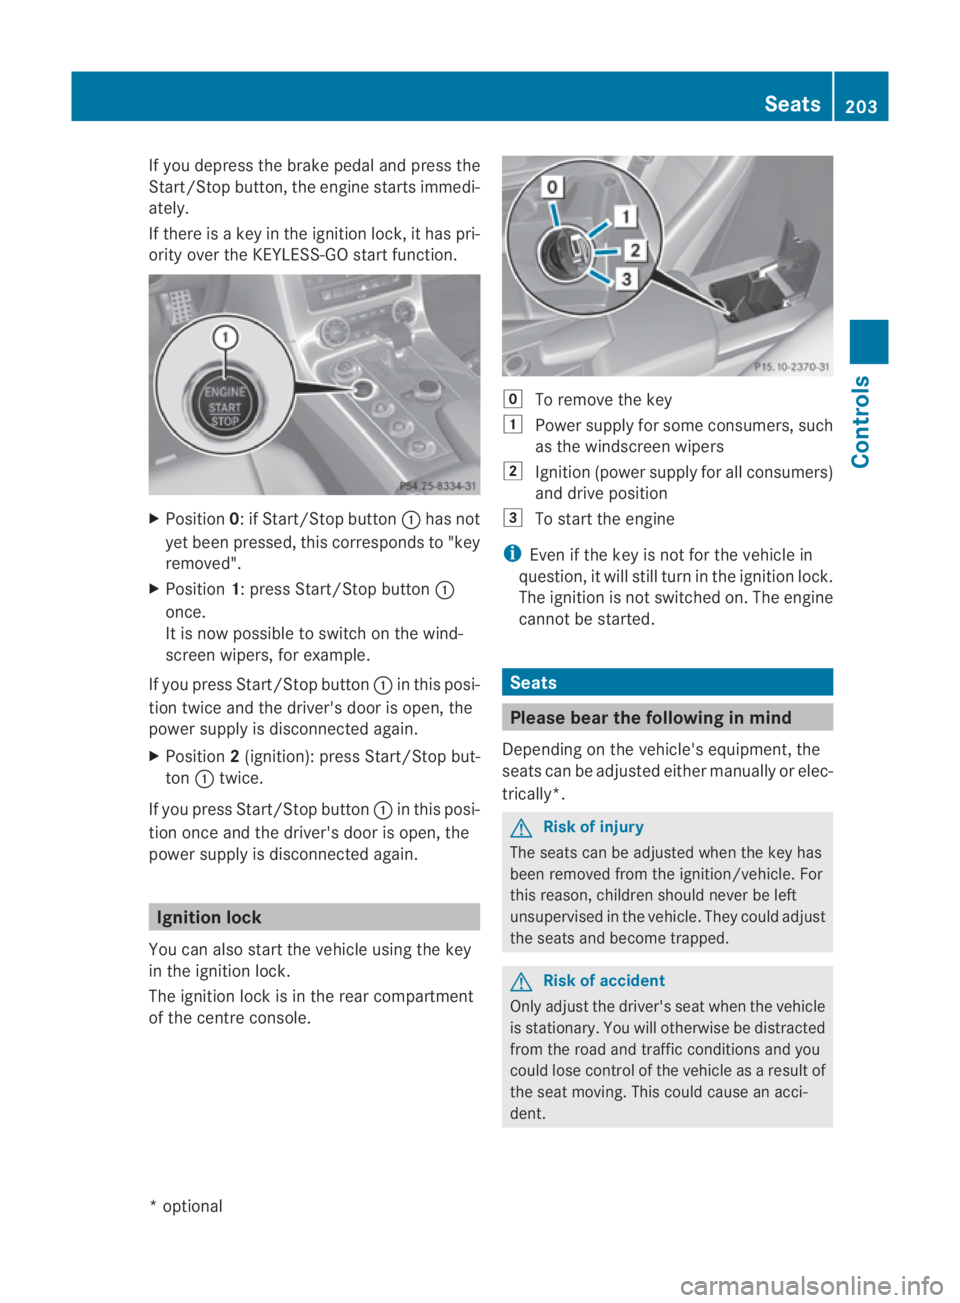
Position 0: if Start/Stop button 0001has not
yet been pressed, this corresponds to "key
removed".
X Position 1: press Start/Stop button 0001
once.
It is now possible to switch on the wind-
screen wipers, for example.
If you press Start/Stop button 0001in this posi-
tion twice and the driver's door is open, the
powers upply is disconnected again.
X Position 2(ignition): press Start/Stop but-
ton 0001twice.
If you press Start/Stop button 0001in this posi-
tion once and the driver's door is open, the
power supply is disconnected again. Ignition lock
You can also start the vehicle using the key
in the ignition lock.
The ignition lock is in the rear compartment
of the centre console. 0008
To remove the key
0003 Power supply for some consumers, such
as the windscree nwipers
0004 Ignition (power supply for all consumers)
and drive position
0005 To start the engine
i Even if the key is not for the vehicle in
question, it will still tur ninthe ignition lock.
The ignition is not switched on. The engine
cannot be started. Seats
Please bear the following in mind
Depending on the vehicle's equipment, the
seats can be adjusted either manually or elec-
trically*. G
Risk of injury
The seats can be adjusted when the key has
been removed from the ignition/vehicle. For
this reason, children should never be left
unsupervised in the vehicle. They could adjust
the seats and become trapped. G
Risk of accident
Only adjust the driver's seat when the vehicle
is stationary. You will otherwise be distracted
from the road and traffic conditions and you
could lose control of the vehicle as a result of
the seat moving. This could cause an acci-
dent. Seats
203Controls
*optional
BA 197 ECE RE 2010/6a; 1; 2, en-GB
sabbaeu
Version: 3.0.3.6 2010-05-07T14:19:43+02:00 - Seite 203 Z
Page 209 of 361
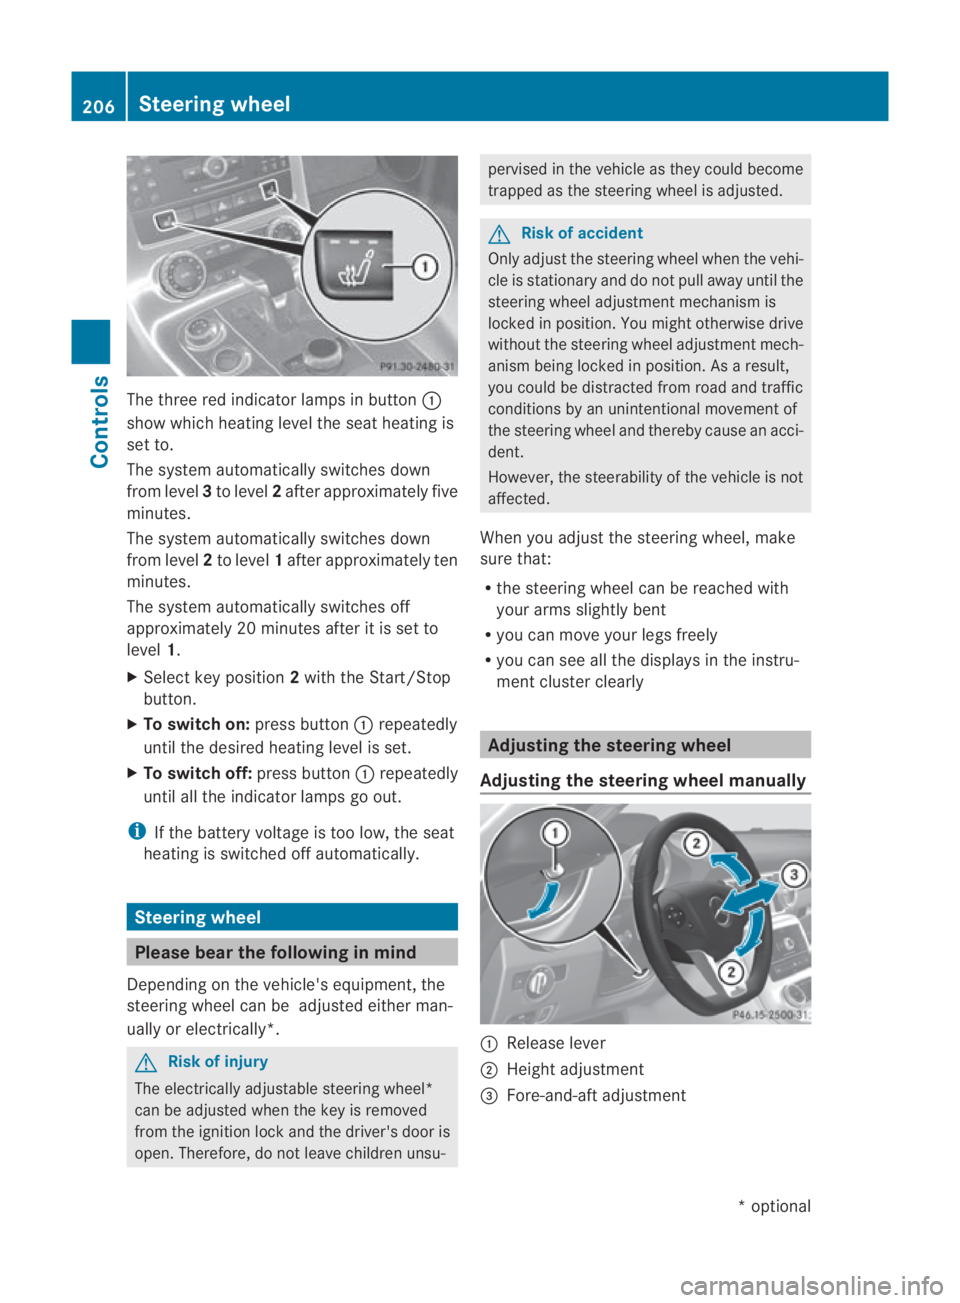
The three red indicator lamps in button
0001
show which heating level the seat heating is
set to.
The system automatically switches down
from level 3to level 2after approximately five
minutes.
The system automatically switches down
from level 2to level 1after approximately ten
minutes.
The system automatically switches off
approximately 20 minutes after it is set to
level 1.
X Select key position 2with the Start/Stop
button.
X To switch on: press button0001repeatedly
until the desired heating level is set.
X To switch off: press button0001repeatedly
until all the indicator lamps go out.
i If the battery voltage is too low, the seat
heating is switched off automatically. Steering wheel
Please bear the following in mind
Depending on the vehicle's equipment, the
steering wheel can be adjusted either man-
ually or electrically*. G
Risk of injury
The electrically adjustable steering wheel*
can be adjusted whe nthe key is removed
from the ignition lock and the driver's door is
open. Therefore, do not leave children unsu- pervised in the vehicle as they could become
trapped as the steering wheel is adjusted.
G
Risk of accident
Only adjust the steering wheel when the vehi-
cle is stationary and do not pull away until the
steering wheel adjustment mechanism is
locked in position. You might otherwise drive
without the steering wheel adjustment mech-
anism being locked in position. As a result,
you could be distracted from road and traffic
conditions by an unintentional movement of
the steering wheel and thereby cause an acci-
dent.
However, the steerability of the vehicle is not
affected.
When you adjust the steering wheel, make
sure that:
R the steering wheel can be reached with
your arms slightly bent
R you can move your legs freely
R you can see all the displays in the instru-
ment cluster clearly Adjusting the steering wheel
Adjusting the steering wheel manually 0001
Release lever
0002 Height adjustment
0015 Fore-and-aft adjustment 206
Steering wheelControls
*o
ptional
BA 197 ECE RE 2010/6a; 1; 2, en-GB
sabbaeu
Version: 3.0.3.6 2010-05-07T14:19:43+02:00 - Seite 206
Page 210 of 361
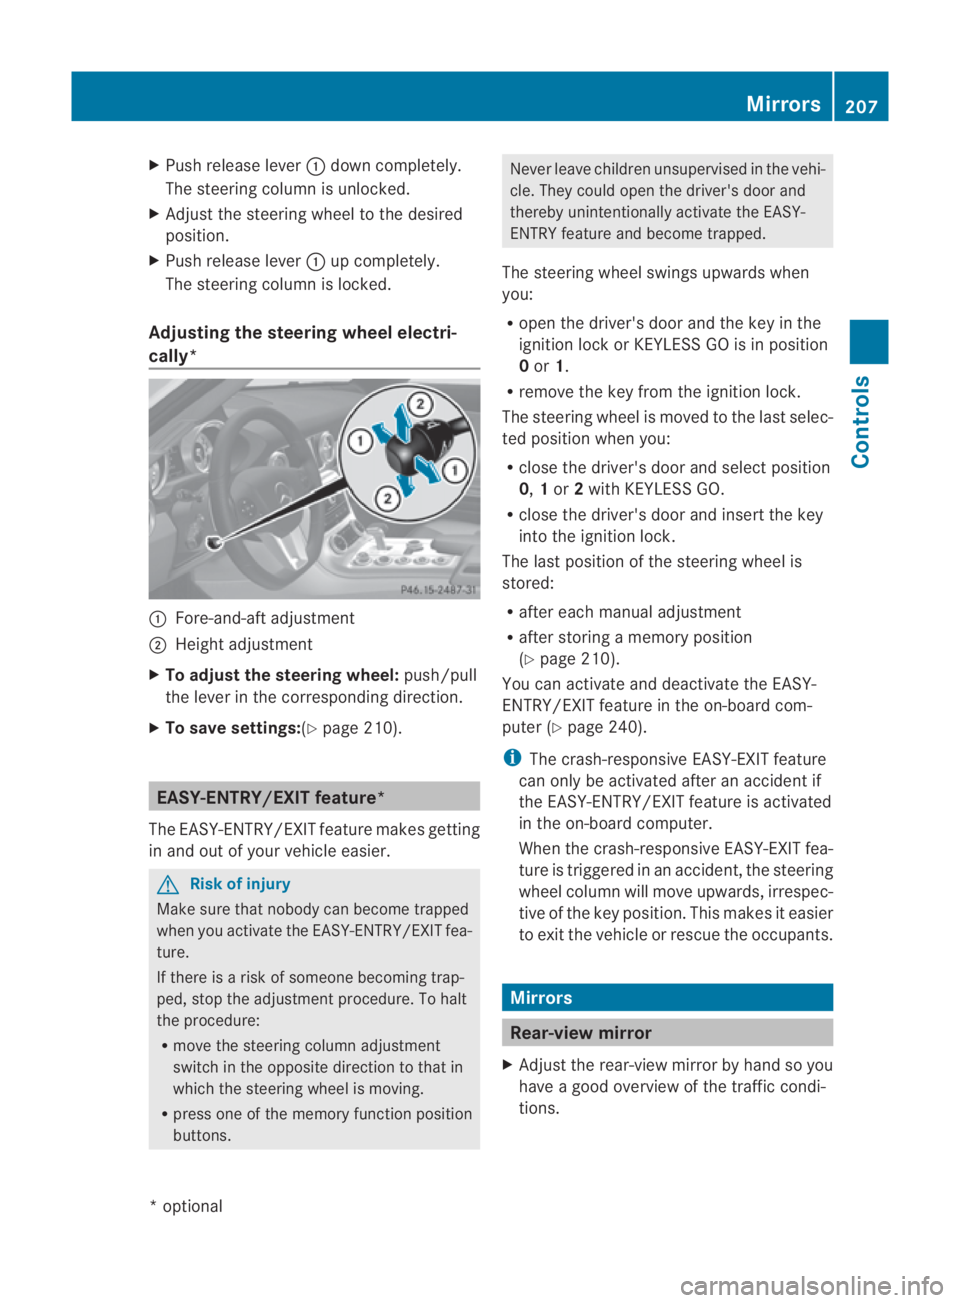
X
Push release lever 0001down completely.
The steering column is unlocked.
X Adjust the steering wheel to the desired
position.
X Push release lever 0001up completely.
The steering column is locked.
Adjusting the steering wheel electri-
cally* 0001
Fore-and-aft adjustment
0002 Height adjustment
X To adjust the steering wheel: push/pull
the lever in the corresponding direction.
X To save settings: (Ypage 210). EASY-ENTRY/EXIT feature*
The EASY-ENTRY/EXIT feature makes getting
in and out of your vehicle easier. G
Risk of injury
Make sure that nobody can become trapped
when you activate the EASY-ENTRY/EXIT fea-
ture.
If there is a risk of someone becoming trap-
ped, stop the adjustmen tprocedure. To halt
the procedure:
R move the steering column adjustment
switch in the opposite directio nto that in
which the steering wheel is moving.
R press one of the memory function position
buttons. Never leave children unsupervised in the vehi-
cle. They could open the driver's door and
thereby unintentionally activate the EASY-
ENTRY feature and become trapped.
The steering wheel swings upwards when
you:
R open the driver's door and the key in the
ignition lock or KEYLESS GO is in position
0or 1.
R remove the key from the ignition lock.
The steering wheel is moved to the last selec-
ted position when you:
R close the driver's door and select position
0, 1or 2with KEYLESS GO.
R close the driver's door and insert the key
into the ignition lock.
The last position of the steering wheel is
stored:
R after each manual adjustment
R after storing a memory position
(Y page 210).
You can activate and deactivate the EASY-
ENTRY/EXIT feature in the on-board com-
puter (Y page 240).
i The crash-responsive EASY-EXIT feature
can only be activated after an accident if
the EASY-ENTRY/EXIT feature is activated
in the on-board computer.
When the crash-responsive EASY-EXIT fea-
ture is triggered in an accident, the steering
wheel column will move upwards, irrespec-
tive of the key position. This makes it easier
to exit the vehicle or rescue the occupants. Mirrors
Rear-view mirror
X Adjust the rear-view mirror by hand so you
have a good overview of the traffic condi-
tions. Mirrors
207Controls
*optional
BA 197 ECE RE 2010/6a; 1; 2, en-GB
sabbaeu
Version: 3.0.3.6 2010-05-07T14:19:43+02:00 - Seite 207 Z