2010 MERCEDES-BENZ SLS COUPE remote start
[x] Cancel search: remote startPage 12 of 361
F
Fast forward/rewind ................176, 194
Faul tmessage
see Display message .....................289
Fire extinguisher ............................... 289
First-aid kit ......................................... 289
Flat tyre Equipment ..................................... 325
Preparing the vehicle .....................325
TIREFIT kit ...................................... 326
Floormat ............................................ .264
Folders Selecting (MP3 mode )................... 176
Fording ............................................... 278
Frequencies Telephone ...................................... 347
Frequency entry
Manual .......................................... .162
Front airbag ......................................... 38
Front-passenger airbag ....................... 38
Fron tpassenge rkneebag ................... 39
Fuel ..................................................... 349
Loss ............................................... 314
Petrol ............................................. 267
Fuel consumption
Current (on-board computer) .........233
Notes ............................................. 349
Fuel filler flap
Opening/closing ............................ 266
Fuel gauge ............................................ 25
Fuel level Calling up the range (on-board
computer) ...................................... 233
Gauge .............................................. 25
Fuel line
Malfunction ................................... .314
Fuel tank
Defect ............................................ 314
Function restrictions
Addres sbook ........................ 151, 154
Music Register ............................... 183
Using the telephone ....................... 128
Video DVD mode ........................... 191
Fuse allocation chart ........................342
Fuse box Front-passenger footwell ...............342
Rea r............................................... 342Fuses
.................................................. 342 G
Garage door Opening/closing (with the remote
control) .......................................... 263
Garage door opener ..........................262
Clearing the memory .....................264
Programming the remote control ...262
Gear indicator .................................... 227
Gearshift program SETUP (on-board computer) ..........241
Genuine parts .................................... 346
Glove compartment ..........................257
Locking and unlocking (sepa-
rately) ............................................ 257
Gracenote ®
Media Database ............177 H
Hands-free microphone Switching on/off ........................... 146
Headbag ............................................... 40
Headlamp cleaning system ..............270
Headlamps Cleaning ......................................... 283
Cleaning system ............................ 217
Misting up ...................................... 317
Heating
see Air conditioning
High-pressure cleaners ....................282
Hill start assist .................................. 221
Home address see My address
HomeLink ®
see Garage door opener
House number
Entering ........................................... 99 I
Ignition lock ............................... 203, 258
Immobiliser .......................................... 49
Indicator and warning lamps ...........308
Air conditioning (malfunction) ........307
Automatic child sea trecognition
(malfunction) ................................. 307
Engine diagnostics .........................310 Index
9 BA 197 ECE RE 2010/6a; 1; 2, en-GB
sabbae uV ersion: 3.0.3.6
2010-05-07T14:19:43+02:00 - Seite 9
Page 16 of 361
Deleting an entry
........................... 139
Importing an entry from the
mobile phone to the address
book .............................................. 141
PIN
Entering ......................................... 133
Plastic trim
Cleaning ......................................... 285
Playback options ..............178, 183, 189
Postcode Entering ........................................... 95
Power windows
see Side windows
Previous destinations .......................126
Pulling away ...................................... 220R
RACE START ....................................... 226
RACETIMER (on-board computer) ....241
Radio Selecting a statio n(on-board
computer) ...................................... 235
Radio mode
Radio Data System ........................164
Switching to ................................... 158
Range
Calling up (on-board computer) .....233
RDS
Switching on/off ........................... 164
RDS (Radio Data System) .................164
Interrupting an announcement ......164
RDS-TMC traffic reports
Displaying ...................................... 120
Read-aloud function ..........................122
Automatic ...................................... 123
Read-aloud speed
Setting ............................................. 73
Rear aerofoil ...................................... 261
Rear foglamp Display message ............................ 301
Rear-view mirror
Adjusting ....................................... 207
Anti-dazzle mode (automatic) ........209
Dipping (automatic) .......................208
Dipping (manual) ........................... 208
Rear window heating ........................256Rear wing
Display message .................... 305, 306
Redials ................................................ 145
Refuelling ........................................... 266
Remote control Garage door opene r....................... 262
Programming (garage door
opener) .......................................... 262
Reserve fuel ....................................... 349
Display message ............................ 305
Fuel tank ........................................ 349
Warning lamp ................................. 312
Resetting
Factory settings ............................... 78
Restraint system
For children ..................................... 41
See SRS ........................................... 35
Rev counter ........................................ 230
Reversing camera ............................. 250
Cleaning ......................................... 284
Showing/hiding the image .............. .70
Switching on .................................. 250
Reversing lamps
Display message ............................ 301
Road
Entering ........................................... 97
Route
see Route guidance .......................234
Route browser ................................... 118
Route calculation .............................. 101
Route guidance .................................. 111
Cancel ........................................... 119
Continu e........................................ 119
Destination reached ......................115
Following a vehicle transportation ...79
Lane recommendations .................113
Off-road ......................................... 115
On-board computer .......................234
Route mode
Setting ............................................. 85
Route options
Setting ............................................. 86
Route type
Setting ............................................. 85 Index
13 BA 197 ECE RE 2010/6a; 1; 2, en-GB
sabbae uV ersion: 3.0.3.6
2010-05-07T14:19:43+02:00 - Seite 13
Page 205 of 361
X
Reach into the gap and pull up the boo tlid. G
Risk of injury
Make sure that nobody can become trapped
when closing the boot lid. X
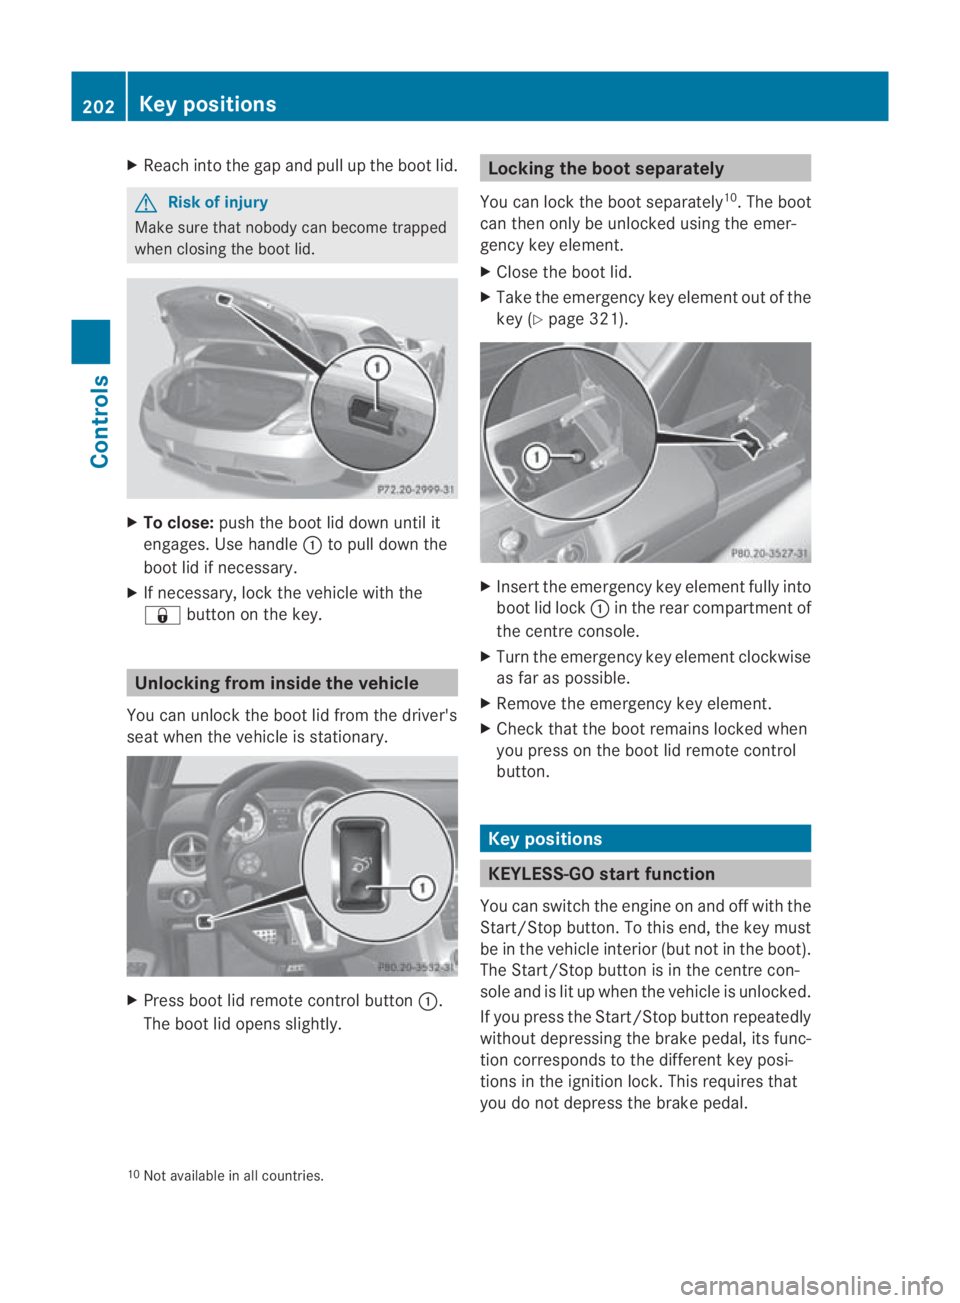
To close: push the boot lid down until it
engages. Use handle 0001to pull down the
boot lid if necessary.
X If necessary, lock the vehicle with the
0009 button on the key. Unlocking from inside the vehicle
You can unlock the boot lid from the driver's
seat when the vehicle is stationary. X
Press boot lid remote control button 0001.
The boot lid opens slightly. Locking the boot separately
You can lock the boot separately 10
.T he boot
can then only be unlocked using the emer-
gency key element.
X Close the boot lid.
X Take the emergency key element out of the
key (Y page 321). X
Insert the emergency key element fully into
boot lid lock 0001in the rear compartment of
the centre console.
X Turn the emergency key element clockwise
as far as possible.
X Remove the emergency key element.
X Check that the boot remains locked when
you press on the boot lid remote control
button. Key positions
KEYLESS-GO startf
unction
You can switch the engine on and off with the
Start/Stop button. To this end, the key must
be in the vehicle interio r(but not in the boot).
The Start/Stop button is in the centre con-
sole and is lit up when the vehicle is unlocked.
If you press the Start/Stop button repeatedly
without depressing the brake pedal, its func-
tion corresponds to the differen tkey posi-
tions in the ignition lock. This requires that
you do not depress the brake pedal.
10 Not available in all countries. 202
Key positionsControls
BA 197 ECE RE 2010/6a; 1; 2, en-GB
sabbaeu
Version: 3.0.3.6 2010-05-07T14:19:43+02:00 - Seite 202
Page 265 of 361
If there is
arisk of entrapment, sto pretracting
the rear aerofoil. To do so, release the button.
The rear aerofoil extends again.
Never leave children unsupervised in the vehi-
cle. They could inadvertently retract the
extended rear aerofoil. Somebody could
become trapped.
! Do not enter an automatic car wash with
the rear aerofoil extended. Otherwise, the
rear aerofoil may be damaged.
Only extend the rear aerofoil in order to
wash it by hand. Retract it again when you
have finished cleaning it.
You can extend the rear spoiler manually at
speeds below 120 km/h.
X Close the boot lid.
X Select key position 2with the Start/Stop
button.
X Press button 0001.
The rear spoiler is extended.
Button 0001flashes until the rear spoiler has
extended and then lights up in red.
You can retract the rear spoiler manually at
speeds below 120 km/h.
X At speeds between 120 km/h and
80 km/h: briefly press button 0001.
Button 0001flashes until the rear spoiler has
retracted and then goes out.
X At speeds below 80 km/h: press and hold
button 0001until the rear spoiler is fully
retracted.
Button 0001flashes until the rear spoiler has
retracted and then goes out.
Rear spoiler retracts manually
appears in the display.
i If you release button 0001while retracting
the rear spoiler, it extends again automati-
cally. Garage door opener*
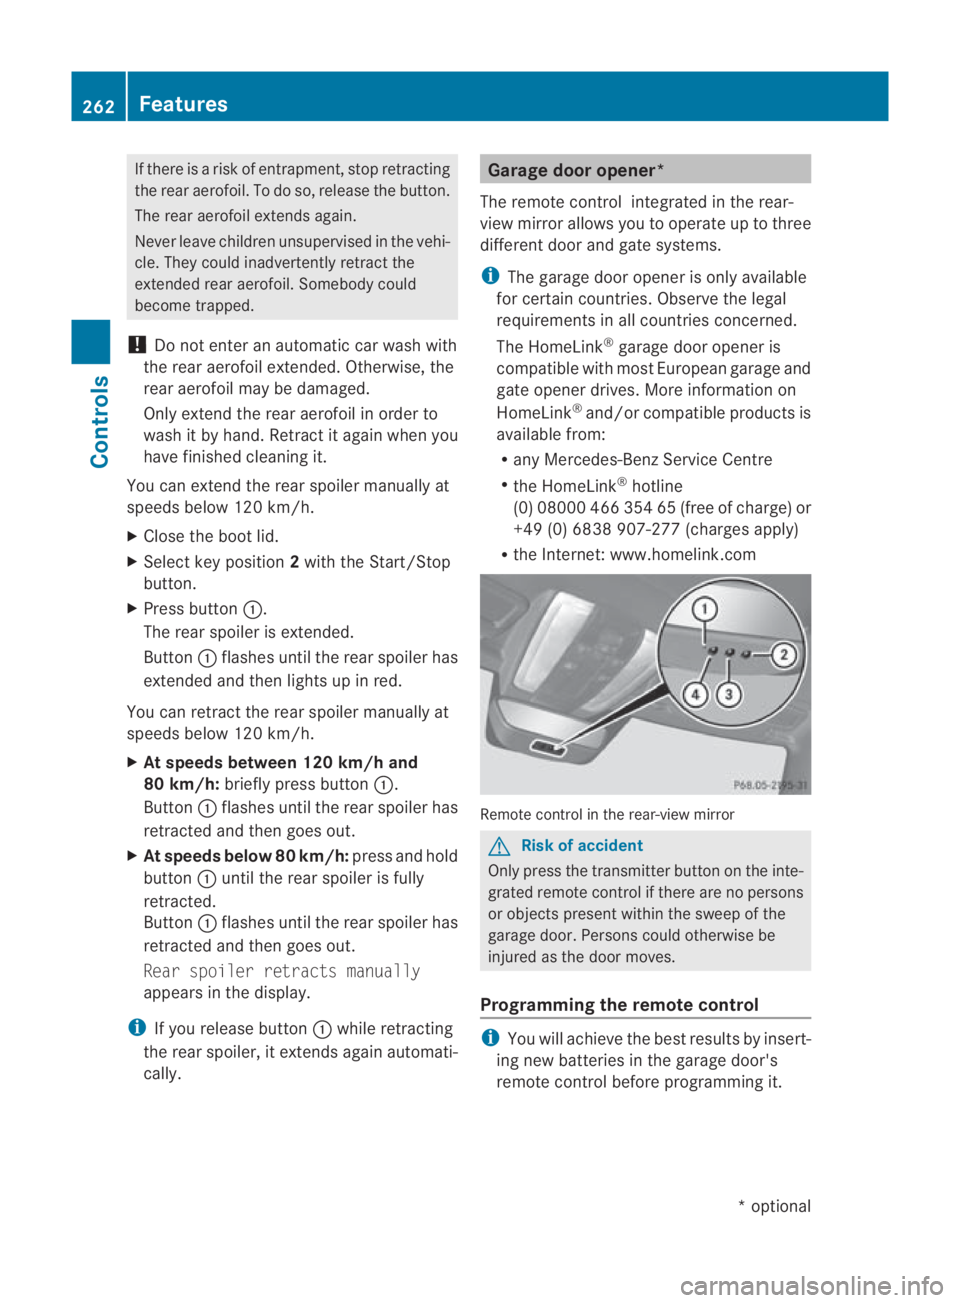
The remote control integrated in the rear-
view mirror allows you to operate up to three
differen tdoor and gate systems.
i The garage door opener is only available
for certain countries. Observe the legal
requirements in all countries concerned.
The HomeLink ®
garage door opener is
compatible with most European garage and
gate opener drives. More information on
HomeLink ®
and/or compatible products is
available from:
R any Mercedes-Benz Service Centre
R the HomeLink ®
hotline
(0) 08000 466 354 65 (free of charge) or
+49 (0) 6838 907-277 (charges apply)
R the Internet: www.homelink.com Remote control in the rear-view mirror
G
Risk of accident
Only press the transmitter button on the inte-
grated remote control if there are no persons
or objects present within the sweep of the
garage door. Persons could otherwise be
injured as the door moves.
Programming the remote control i
You will achieve the best results by insert-
ing new batteries in the garage door's
remote control before programming it. 262
FeaturesControls
*o
ptional
BA 197 ECE RE 2010/6a; 1; 2, en-GB
sabbaeu
Version: 3.0.3.6 2010-05-07T14:19:43+02:00 - Seite 262
Page 266 of 361
X
Erase the memory of the integrated remote
control ( Ypage 264) before programming
it for the first time.
X Select key position 2with the Start/Stop
button ( Ypage 202).
X Press and hold one of transmitter but-
tons 0002to0014 on the integrated remote
control.
Indicator lamp 0001starts to flash after a
short while. It flashes abou tonce a second.
i Indicato rlamp 0001flashes immediately
the first time the transmitte rbutton is pro-
grammed. If this transmitter button has
already been programmed, indicator
lamp 0001will only start flashing at a rate of
once a second after 20 seconds have
elapsed.
X Keep the transmitte rbuttons depressed.
X Point the transmitter of the garage door's
remote control towards th eleft-hand side
of the rear-view mirror from a distance of 5
to 20 cm.
i The distance between the garage door's
remote control and the integrated garage
door opener depends on the system of the
garage door drive. You might require sev-
eral attempts. You should test every posi-
tion for at least 20 seconds before trying
another position.
X Keep the transmitter button on the garage
door's remote control depressed until indi-
cator lamp 0001starts to flash rapidly.
The programming was successful if indica-
tor lamp 0001flashes rapidly.
X Release the transmitter buttons on the
garage door's remote control and the inte-
grated remote control.
If indicator lamp 0001goes out after approx-
imately 20 seconds and did not flash rapidly
before this:
X Release the transmitter buttons on the
integrated and portable remote controls.
X Repeat the programming procedure. When
doing so, change the distance between the garage door's remote control and the trans-
mitter buttons in the rear-view mirror.
i If the garage door system works with a
rolling code, after programming, you must
synchronise the remote control integrated
in the rear-view mirror with the garage door
system receiver.
You will find further information in the
garage door opening system' soperating
instructions, e.g. the sections on "Synchro-
nising the transmitter" or "Registering a
new transmitter". You can also call the hot-
line mentioned above.
Opening or closing the garage door Once programmed, the integrated remote
control will assume the function of the garage
door system's remote control. Please read
the operating instructions for the garage door
system.
X
Select key position 2with the Start/Stop
button (Y page 202).
X Press the transmitter button on the rear-
view mirror that you have programmed to
operate the garage door.
Garage door system with fixed code: indi-
cator lamp 0001lights up continuously.
Garage door system with rolling code: indi-
cator lamp 0001flashes briefly and then lights
up for approximately two seconds. This is
repeated for up to 20 seconds.
i The transmitter will transmit a signal for
as long as the transmitter button is being
pressed. The transmission will be halted
after a maximum of 20 seconds and indi-
cator lamp 0001will flash. Press the trans-
mitter button again, if necessary. Features
263Controls
BA 197 ECE RE 2010/6a; 1; 2, en-GB
sabbaeu Version: 3.0.3.6 2010-05-07T14:19:43+02:00 - Seite 263 Z
Page 267 of 361
Deleting the remote control memory
X
Selec tkey position 2with the Start/Stop
button (Y page 202).
X Press and hold transmitter buttons 0002
and 0014for approximately 20 seconds until
indicator lamp 0001flashes rapidly.
The memory is cleared.
i You should clear the remot econtrol mem-
ory before selling the vehicle. Charge maintenance socket*
The charge maintenance socket is located in
the boot on the left-hand side. It is designed
solely for connecting a trickle charger. A
trickle charger can be obtained from a
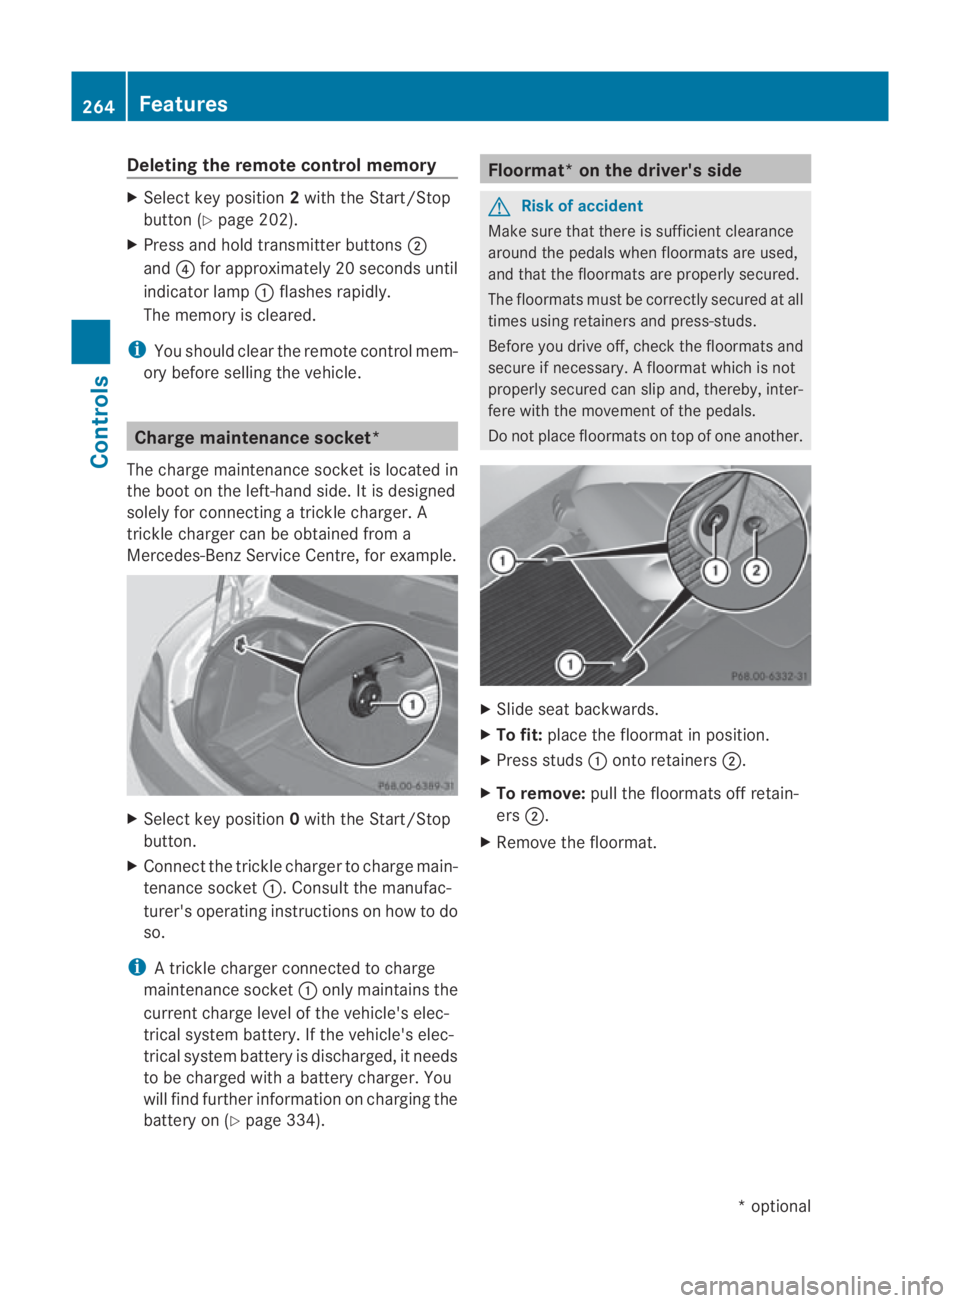
Mercedes-Benz Service Centre, for example. X
Select key position 0with the Start/Stop
button.
X Connect the trickle charger to charge main-
tenance socket 0001. Consult the manufac-
turer's operating instructions on how to do
so.
i A trickle charger connected to charge
maintenance socket 0001only maintains the
current charge level of the vehicle's elec-
trical system battery. If the vehicle's elec-
trical system battery is discharged, it needs
to be charged with a battery charger. You
will find further information on charging the
battery on (Y page 334). Floormat* on the driver's side
G
Risk of accident
Make sure that there is sufficient clearance
around the pedals when floormats are used,
and that the floormats are properly secured.
The floormats must be correctly secured at all
times using retainers and press-studs.
Before you drive off, check the floormats and
secure if necessary. Afloormat which is not
properly secured can slip and, thereby, inter-
fere with the movemen tofthe pedals.
Do not place floormats on top of one another. X
Slide seat backwards.
X To fit: place the floormat in position.
X Press studs 0001onto retainers 0002.
X To remove: pull the floormats off retain-
ers 0002.
X Remove the floormat. 264
FeaturesControls
*o
ptional
BA 197 ECE RE 2010/6a; 1; 2, en-GB
sabbaeu
Version: 3.0.3.6 2010-05-07T14:19:43+02:00 - Seite 264