2010 MERCEDES-BENZ SLS COUPE engine
[x] Cancel search: enginePage 119 of 361
message, a directio
narrow and the distance
to the destination or to the intermediate stop,
if this was configured (Y page 104). The direc-
tional arrow shows the linea rdirection of the
destination. The distance and the estimated
arrival time are displayed in grey in this case.
The route is highlighted blue, starting from
the last recognised street the vehicle was on
before it left the map.
As soon as the vehicle is back on a digitised
road, the distance to the destination appears,
based on the calculated route. Route guid-
ance continues in the usual way.
Route guidance from an off-map loca-
tion to adestination If the vehicle position is outside the area cov-
ered by the digital map, then the vehicle is in
an off-map location. COMAND is also able to
guide you to a destination even from such a
location.
At the start of route guidance you will see the
Off road message, a directio narrow and the
linea rdistance to the destination or to the
intermediate stop, if this has been config-
ured. The arrow shows the compass heading
to the road left last.
The route is highlighted blue fro mthe nearest
road known to the system.
As soon as the vehicle is back on a road
known to the system, route guidance contin-
ues in the usual way.
Off-road during route guidance Due to roadworks, for example, there may be
differences between the data on the digital
map and the actual course of the road.
In such cases, the system will temporarily be
unable to locate the vehicle position on the
digital map and thus considers the vehicle to
be in an off-road position.
You will see the Off roadmessage in the
display, a direction arrow and the distance to
the destination or to the intermediate stop, if
this was configured. As soon as the system can assign the vehicle
position to the map again, route guidance
continues in the usual way. Navigation announcements
i Audible navigation announcements are
muted during a telephone call.
If you have missed an announcement, you can
call up the current announcement at any
time.
X To call up the current announcement:
select 0025in the map display with the menu
system (Y page 83) shown.
X To switch off navigation announce-
ments: during the announcement, press
and hold the 000Bbutton.
You will briefly see the message: The
guidance instructions have been
muted.
X To switch navigation announcements
on again manually: select0025in the map
display with menu system displayed.
or
X Start a new route calculation
(Y page 101).
or
X Switch COMAND on again or start the
engine.
i COMAND switches the navigation
announcements on automatically if it
receives RDS-TMC traffic announcements
during dynamic route guidance
(Y page 119) and starts recalculating the
route.
X To adjust the volume of the announce-
ments: adjust the volume during the auto-
matic announcement (Y page 67).
or
X Call up an announcemen tmanually using
Navi00040025 and adjust the volume.116
Navigation system (route guidance)COMAND APS
BA 197 ECE RE 2010/6a; 1; 2, en-GB
sabbaeu
Version: 3.0.3.6
2010-05-07T14:19:43+02:00 - Seite 116
Page 204 of 361
X
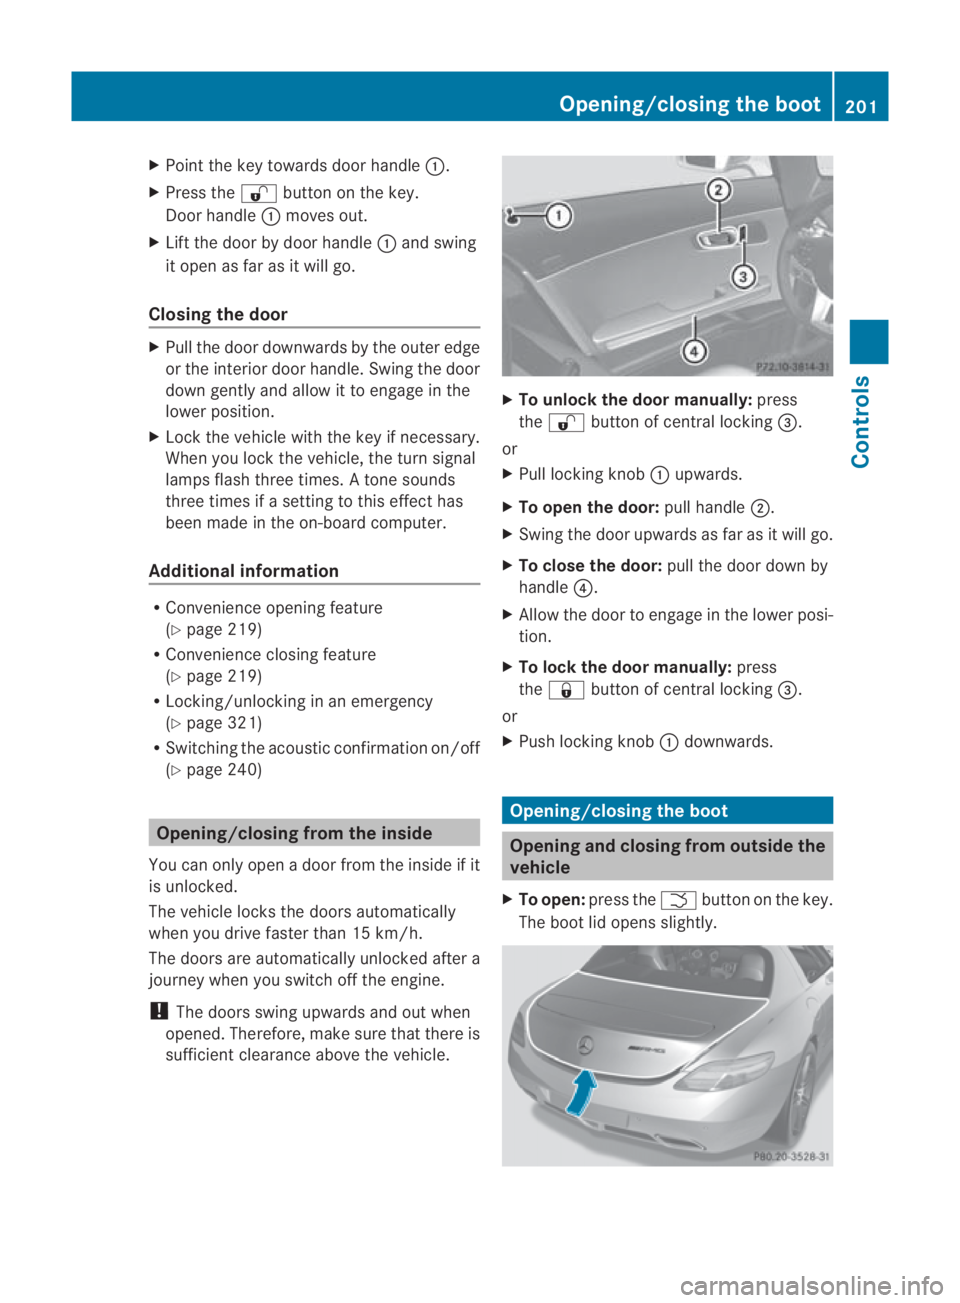
Point the key towards door handle 0001.
X Press the 000Bbutton on the key.
Door handle 0001moves out.
X Lift the door by door handle 0001and swing
it open as far as it will go.
Closing the door X
Pull the door downwards by the outer edge
or the interior door handle. Swing the door
down gently and allow it to engage in the
lower position.
X Lock the vehicle with the key if necessary.
When you lock the vehicle, the turn signal
lamps flash three times. Atone sounds
three times if a setting to this effect has
been made in the on-board computer.
Additional information R
Convenience opening feature
(Y page 219)
R Convenience closing feature
(Y page 219)
R Locking/unlocking in an emergency
(Y page 321)
R Switching the acoustic confirmation on/off
(Y page 240) Opening/closing from the inside
You can only open a door from the inside if it
is unlocked.
The vehicle locks the doors automatically
when you drive faster than 15 km/h.
The doors are automatically unlocked after a
journey when you switch off the engine.
! The doors swing upwards and out when
opened. Therefore, make sure that there is
sufficient clearance above the vehicle. X
To unlock the door manually: press
the 000B button of central locking 0015.
or
X Pull locking knob 0001upwards.
X To open the door: pull handle0002.
X Swing the door upwards as far as it will go.
X To close the door: pull the door down by
handle 0014.
X Allow the door to engage in the lower posi-
tion.
X To lock the door manually: press
the 0009 button of central locking 0015.
or
X Push locking knob 0001downwards. Opening/closing the boot
Opening and closing from outside the
vehicle
X To open: press the 0002button on the key.
The boot lid opens slightly. Opening/closing the boot
201Controls
BA 197 ECE RE 2010/6a; 1; 2, en-GB
sabbaeu Version: 3.0.3.6 2010-05-07T14:19:43+02:00 - Seite 201 Z
Page 205 of 361
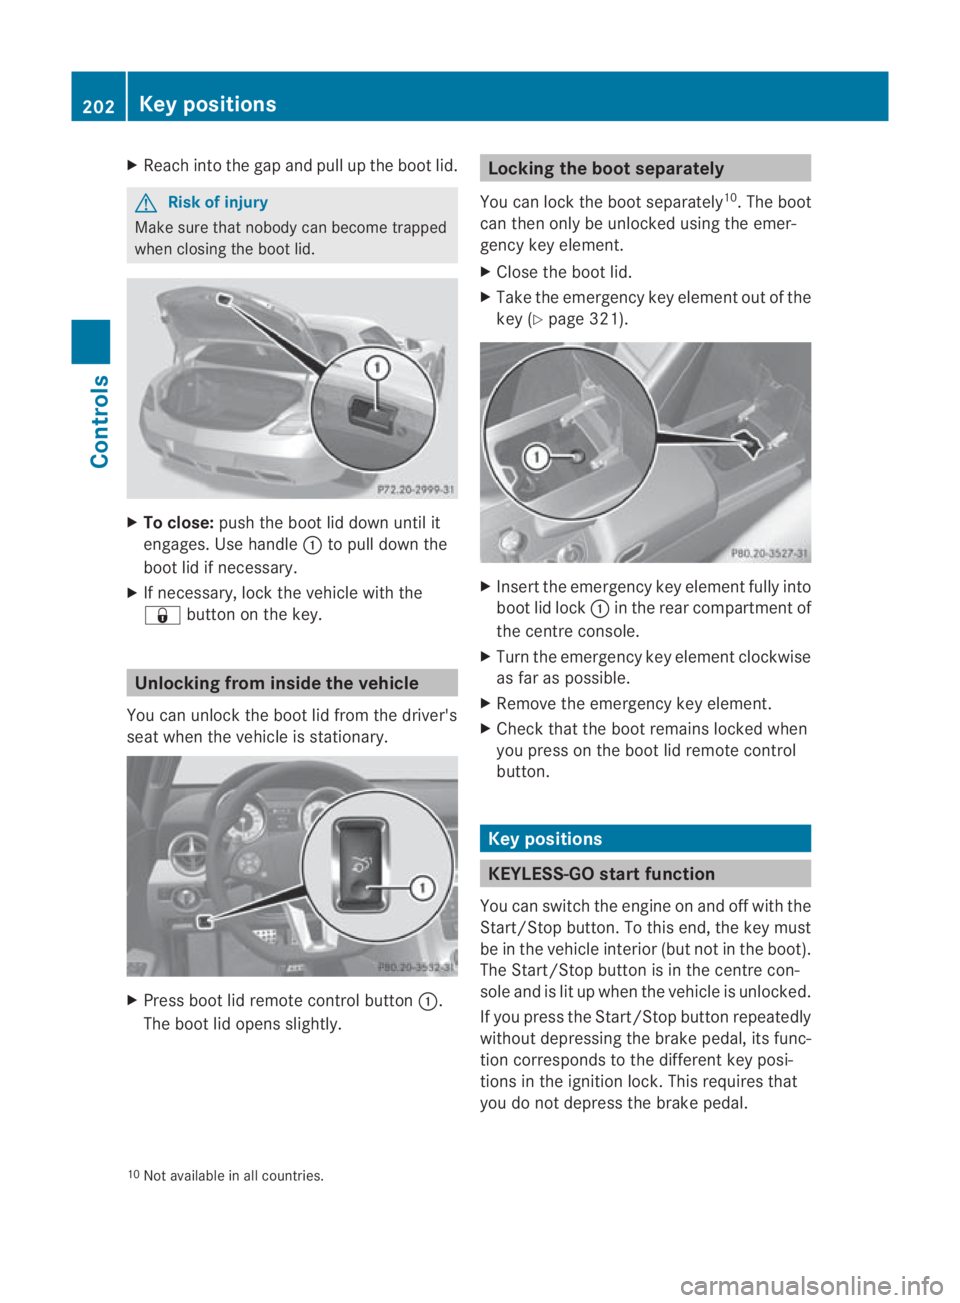
X
Reach into the gap and pull up the boo tlid. G
Risk of injury
Make sure that nobody can become trapped
when closing the boot lid. X
To close: push the boot lid down until it
engages. Use handle 0001to pull down the
boot lid if necessary.
X If necessary, lock the vehicle with the
0009 button on the key. Unlocking from inside the vehicle
You can unlock the boot lid from the driver's
seat when the vehicle is stationary. X
Press boot lid remote control button 0001.
The boot lid opens slightly. Locking the boot separately
You can lock the boot separately 10
.T he boot
can then only be unlocked using the emer-
gency key element.
X Close the boot lid.
X Take the emergency key element out of the
key (Y page 321). X
Insert the emergency key element fully into
boot lid lock 0001in the rear compartment of
the centre console.
X Turn the emergency key element clockwise
as far as possible.
X Remove the emergency key element.
X Check that the boot remains locked when
you press on the boot lid remote control
button. Key positions
KEYLESS-GO startf
unction
You can switch the engine on and off with the
Start/Stop button. To this end, the key must
be in the vehicle interio r(but not in the boot).
The Start/Stop button is in the centre con-
sole and is lit up when the vehicle is unlocked.
If you press the Start/Stop button repeatedly
without depressing the brake pedal, its func-
tion corresponds to the differen tkey posi-
tions in the ignition lock. This requires that
you do not depress the brake pedal.
10 Not available in all countries. 202
Key positionsControls
BA 197 ECE RE 2010/6a; 1; 2, en-GB
sabbaeu
Version: 3.0.3.6 2010-05-07T14:19:43+02:00 - Seite 202
Page 206 of 361
If you depress the brake pedal and press the
Start/Stop button, the engine starts immedi-
ately.
If there is a key in the ignition lock, it has pri-
ority over the KEYLESS-GO start function. X
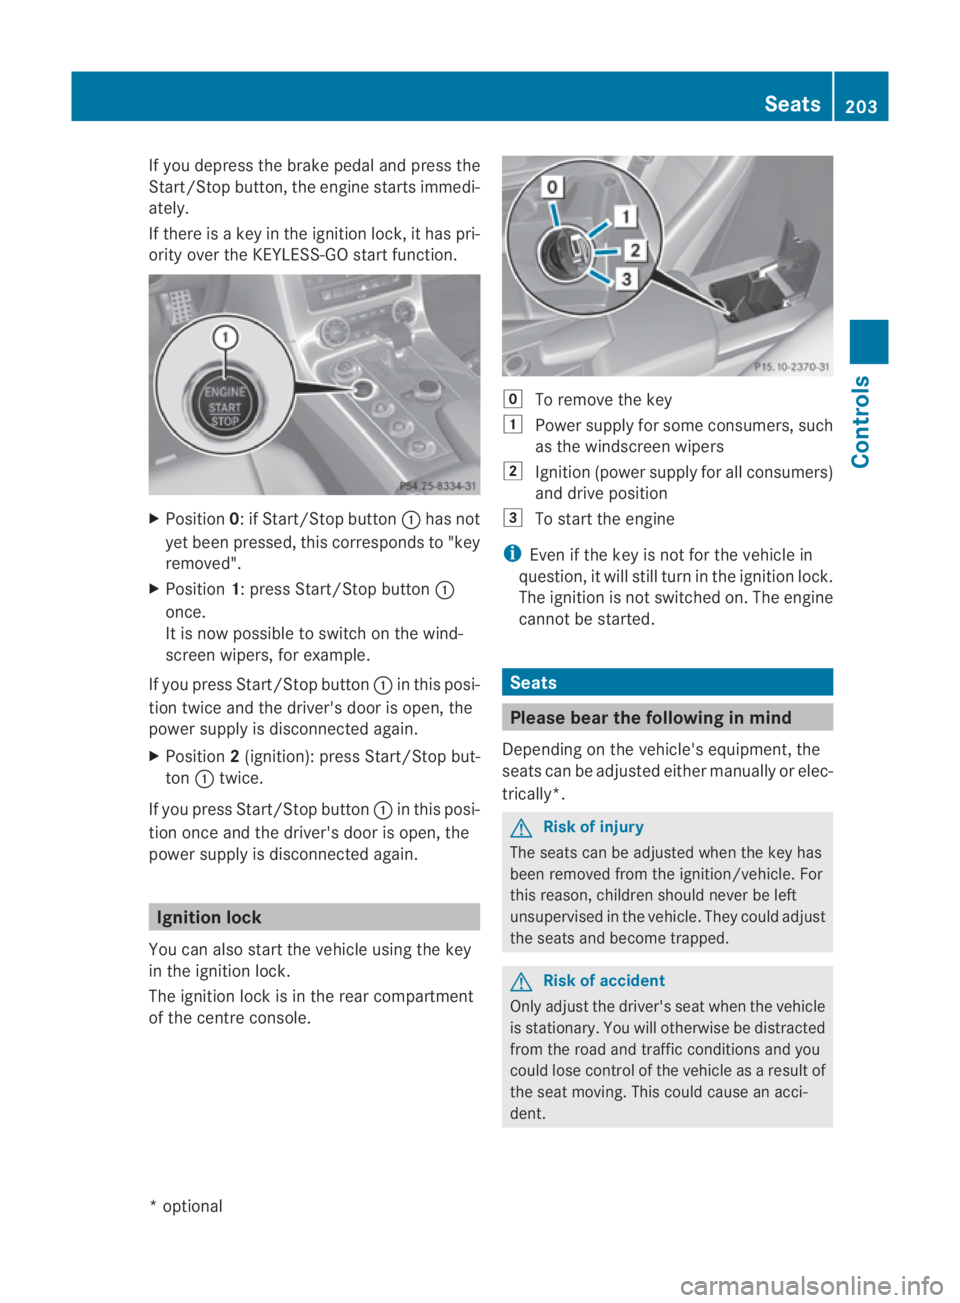
Position 0: if Start/Stop button 0001has not
yet been pressed, this corresponds to "key
removed".
X Position 1: press Start/Stop button 0001
once.
It is now possible to switch on the wind-
screen wipers, for example.
If you press Start/Stop button 0001in this posi-
tion twice and the driver's door is open, the
powers upply is disconnected again.
X Position 2(ignition): press Start/Stop but-
ton 0001twice.
If you press Start/Stop button 0001in this posi-
tion once and the driver's door is open, the
power supply is disconnected again. Ignition lock
You can also start the vehicle using the key
in the ignition lock.
The ignition lock is in the rear compartment
of the centre console. 0008
To remove the key
0003 Power supply for some consumers, such
as the windscree nwipers
0004 Ignition (power supply for all consumers)
and drive position
0005 To start the engine
i Even if the key is not for the vehicle in
question, it will still tur ninthe ignition lock.
The ignition is not switched on. The engine
cannot be started. Seats
Please bear the following in mind
Depending on the vehicle's equipment, the
seats can be adjusted either manually or elec-
trically*. G
Risk of injury
The seats can be adjusted when the key has
been removed from the ignition/vehicle. For
this reason, children should never be left
unsupervised in the vehicle. They could adjust
the seats and become trapped. G
Risk of accident
Only adjust the driver's seat when the vehicle
is stationary. You will otherwise be distracted
from the road and traffic conditions and you
could lose control of the vehicle as a result of
the seat moving. This could cause an acci-
dent. Seats
203Controls
*optional
BA 197 ECE RE 2010/6a; 1; 2, en-GB
sabbaeu
Version: 3.0.3.6 2010-05-07T14:19:43+02:00 - Seite 203 Z
Page 216 of 361
tinuously or flash. In addition, there may be a
warning tone.
The
0019 seat belt warning lamp goes ou tand
the warning tone ceases when the driver and
the front passenge rhave fastened their seat
belts.
For certain countries only: regardless of
whether the driver or th efront passenger
have fastened their seat belts, the 0019seat
beltw arning lamp lights up for six seconds
after the engine is started. It then goes out
when the driver and fron tpassenger have
already fastened their seat belts.
i Further information about the 0019seat
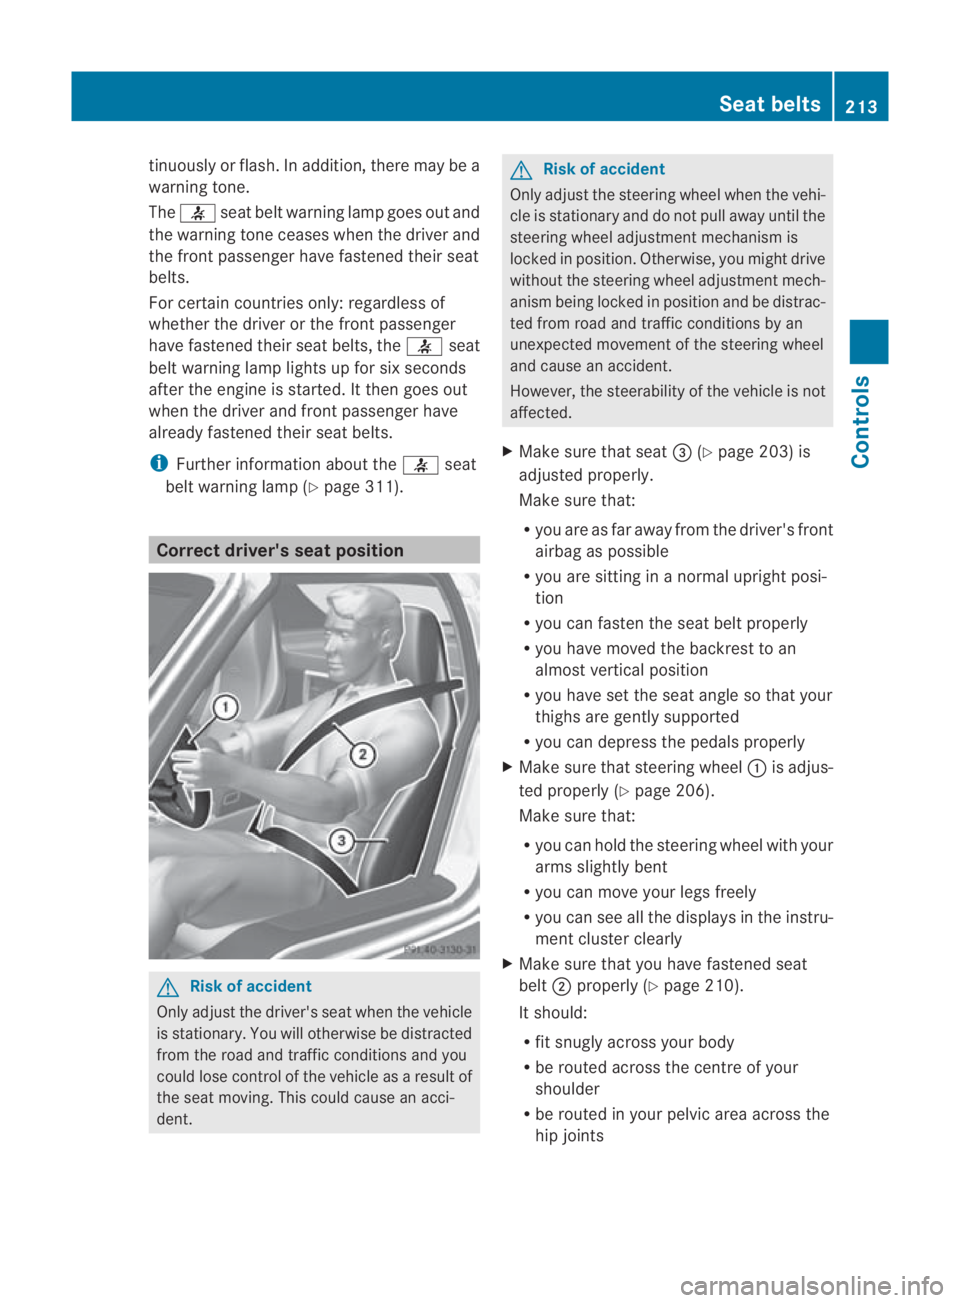
belt warning lamp (Y page 311).Correct driver's seat position
G
Ris
kofa ccident
Only adjust the driver' sseat when the vehicle
is stationary. You will otherwise be distracted
from the road and traffic conditions and you
could lose control of the vehicle as a result of
the seat moving. This could cause an acci-
dent. G
Risk of accident
Only adjust the steering wheel when the vehi-
cle is stationary and do not pull away until the
steering wheel adjustment mechanism is
locked in position .Otherwise, you might drive
withou tthe steering wheel adjustment mech-
anism being locked in position and be distrac-
ted from road and traffic conditions by an
unexpected movement of the steering wheel
and cause an accident.
However, the steerability of the vehicle is not
affected.
X Make sure that seat 0015(Ypage 203) is
adjusted properly.
Make sure that:
R you are as far away from the driver's front
airbag as possible
R you are sitting in a normal upright posi-
tion
R you can fasten the seat belt properly
R you have moved the backrest to an
almost vertical position
R you have set the seat angle so that your
thighs are gently supported
R you can depress the pedals properly
X Make sure that steering wheel 0001is adjus-
ted properly (Y page 206).
Make sure that:
R you can hold the steering wheel with your
arms slightly bent
R you can move your legs freely
R you can see all the displays in the instru-
ment cluster clearly
X Make sure that you have fastened seat
belt 0002properly (Y page 210).
It should:
R fit snugly across your body
R be routed across the centre of your
shoulder
R be routed in your pelvic area across the
hip joints Seat belts
213Controls
BA 197 ECE RE 2010/6a; 1; 2, en-GB
sabbaeu Version: 3.0.3.6 2010-05-07T14:19:43+02:00 - Seite 213 Z
Page 217 of 361
Lights
Exterior lighting
Notes For reasons of safety, Mercedes-Ben
zrecom-
mends that you drive with the lights switched
on even during the daytime. In some coun-
tries, operation of the headlamps varies due
to legal requirements and self-imposed obli-
gations .Inthese countries, the daytime driv-
ing lights are automatically switched on when
the engine is started.
i The dipped-beamh eadlamps are asym-
metrical. In countries in which traffic drives
on the opposite side of the road to the
country where the vehicle is registered,
oncoming traffic may be dazzled. Have the
headlamps changed to symmetrical dipped
beam when driving in these countries. You
can obtain information about this from any
Mercedes-Benz Service Centre.
The exterior lighting (except for the parking
lamps/side lamps) switches off automatically
when the ignition is switched off.
! Switch off the side lamps and parking
lamp when you leave the vehicle. This pre-
vents the battery from discharging. 214
LightsControls
BA 197 ECE RE 2010/6a; 1; 2, en-GB
sabbaeu
Version: 3.0.3.6 2010-05-07T14:19:43+02:00 - Seite 214
Page 218 of 361
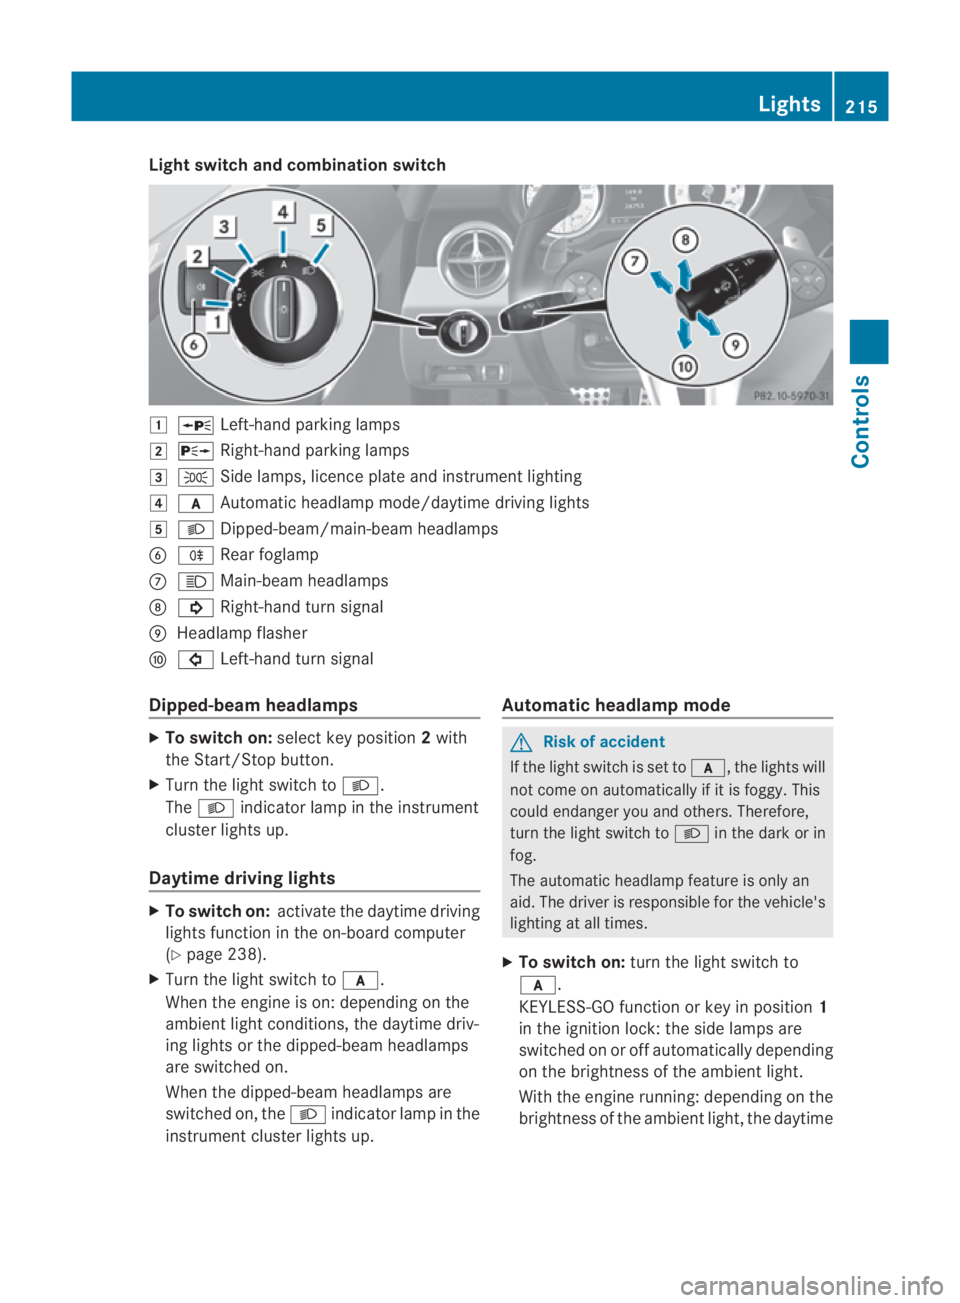
Light switch and combination switch
0003
0010 Left-hand parking lamps
0004 0013 Right-hand parking lamps
0005 000E Side lamps, licence plate and instrumen tlighting
0006 000D Automatic headlamp mode/daytime driving lights
0007 000B Dipped-beam/main-beam headlamps
0013 000D Rear foglamp
000A 0009 Main-beam headlamps
000B 000B Right-hand tur nsignal
000C Headlamp flasher
000D 0007 Left-hand turn signal
Dipped-beam headlamps X
To switch on: selectkey position 2with
the Start/Stop button.
X Turn the light switch to 000B.
The 000B indicator lamp in the instrument
cluster lights up.
Daytime driving lights X
To switch on: activate the daytime driving
lights function in the on-board computer
(Y page 238).
X Turn the light switch to 000D.
When the engine is on: depending on the
ambient light conditions, the daytime driv-
ing lights or the dipped-beam headlamps
are switched on.
When the dipped-beam headlamps are
switched on, the 000Bindicator lamp in the
instrument cluster lights up. Automatic headlamp mode G
Risk of accident
If the light switch is set to 000D, the lights will
not come on automatically if it is foggy. This
could endanger you and others. Therefore,
turn the light switch to 000Bin the dark or in
fog.
The automatic headlamp feature is only an
aid. The driver is responsible for the vehicle's
lighting at all times.
X To switch on: turn the light switch to
000D.
KEYLESS-GO function or key in position 1
in the ignition lock: the side lamps are
switched on or off automatically depending
on the brightness of the ambient light.
With the engine running: depending on the
brightness of the ambient light, the daytime Lights
215Controls
BA 197 ECE RE 2010/6a; 1; 2, en-GB
sabbaeu Version: 3.0.3.6 2010-05-07T14:19:43+02:00 - Seite 215 Z
Page 219 of 361
driving lights
12
or the dipped-beam head-
lamps (in addition to the side lamps) are
switched on or off automatically.
When the dipped-beam headlamps are
switched on, the 000Bindicator lamp in the
instrument cluster lights up.
Rear foglamps i
If you switch off the engine (KEYLESS-GO
function or key in position 1in the ignition
lock) and then restart the engine, the pre-
vious settings for the rear foglamp take
effec tagain.
X Select key position 2with the Start/Stop
button or start the engine.
X Turn the light switch to 000Bor000D 13
.
X To switch on: press the000Dbutton.
The yellow 000Dindicator lamp in the
instrument cluster lights up.
X To switch off: press the000Dbutton.
The yellow 000Dindicator lamp in the
instrument cluster goes out.
Main-beam headlamps X
Select key position 2with the Start/Stop
button or start the engine.
X To switch on: turn the light switch to
000B.
X Press the combination switch beyond the
pressure point in the direction of arrow
000A(Y page 215).
The 0009 indicator lamp in the instrument
cluster lights up.
X To deactivate: move the combination
switch back to its normal position.
The 0009 indicator lamp in the instrument
cluster goes out. Turn signals X
Select key position 2with the Start/Stop
button.
X To indicate briefly: press the combination
switch briefly in the direction of arrow 000B
or 000D(Y page 215).
The corresponding turn signal flashes three
times.
X To indicate: push the combination switch
beyond the pressure point in the direction
of arrow 000Bor000D(Y page 215).
The corresponding turn signal indicator
lamp (000B or0007) flashes in the instru-
ment cluster.
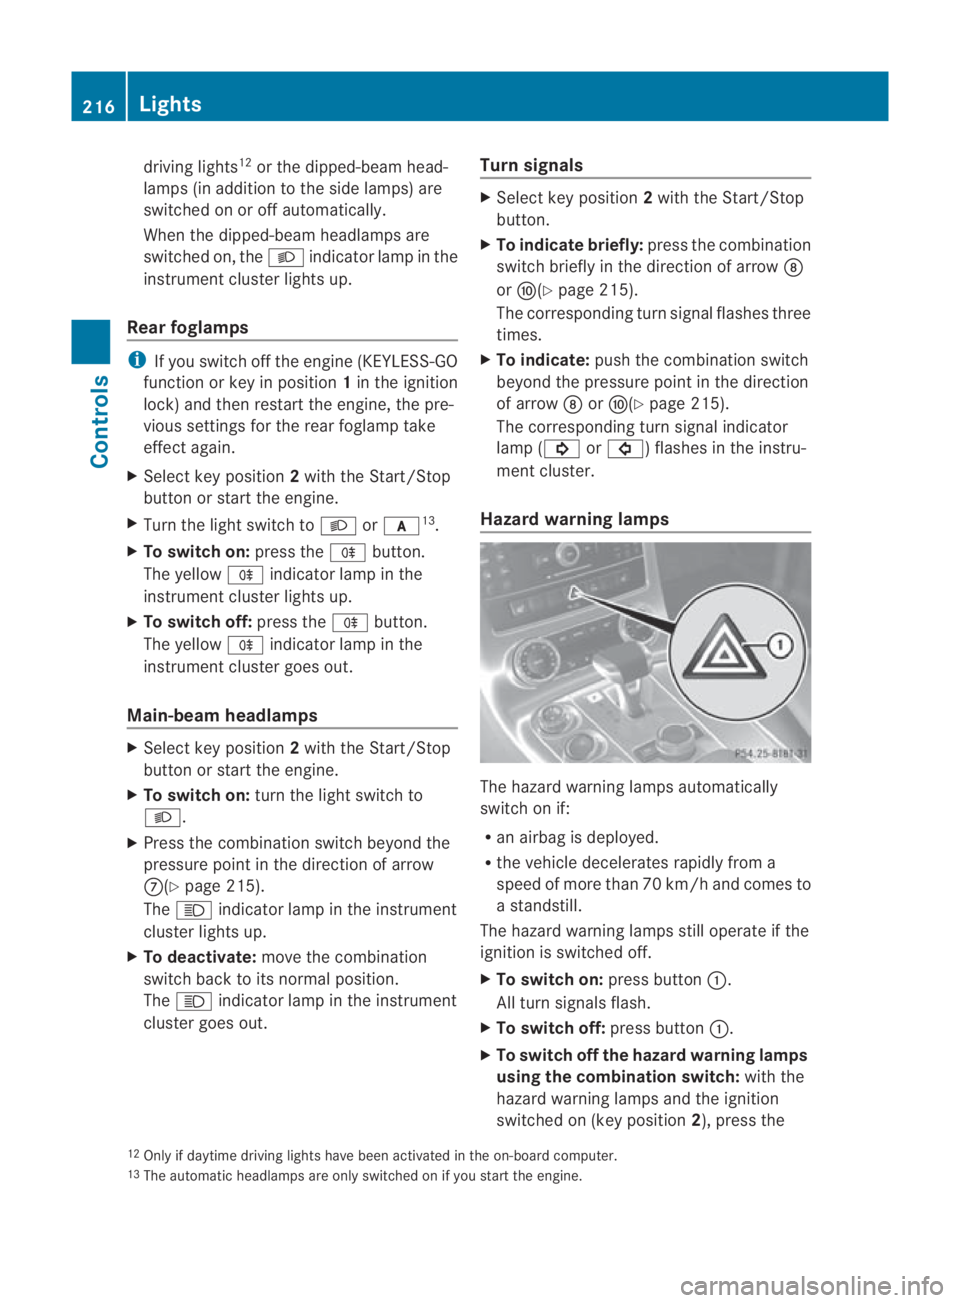
Hazard warning lamps The hazard warning lamps automatically
switch on if:
R
an airbag is deployed.
R the vehicle decelerates rapidly from a
speed of more than 70 km/ha nd comes to
a standstill.
The hazard warning lamps still operate if the
ignition is switched off.
X To switc hon:press button 0001.
All turn signals flash.
X To switch off: press button0001.
X To switch off the hazard warning lamps
using the combination switch: with the
hazard warning lamps and the ignition
switched on (key position 2), press the
12 Only if daytime driving lights have been activated in the on-board computer.
13 The automatic headlamps are only switched on if you start the engine. 216
LightsControls
BA 197 ECE RE 2010/6a; 1; 2, en-GB
sabbaeu
Version: 3.0.3.6 2010-05-07T14:19:43+02:00 - Seite 216