2010 MERCEDES-BENZ SLS COUPE engine
[x] Cancel search: enginePage 282 of 361
waves. This may cause the maximum per-
missible water depth to be exceeded.
Failure to observe these notes may result
in damage to the engine, electrical systems
and transmission.
Driving abroad
Please bear the following in mind
An extensive Mercedes–Benz Service net-
work is also available in other countries. The
Service Hotline's curren ttelephone numbers
for use when you are abroad are to be found
in the "Service24h" chapter of the Service
Booklet.
Only low-octane fuel is available in certain
countries.
You can find further information about fuel
grades on (Y page 266). Symmetrical dipped-beam head-
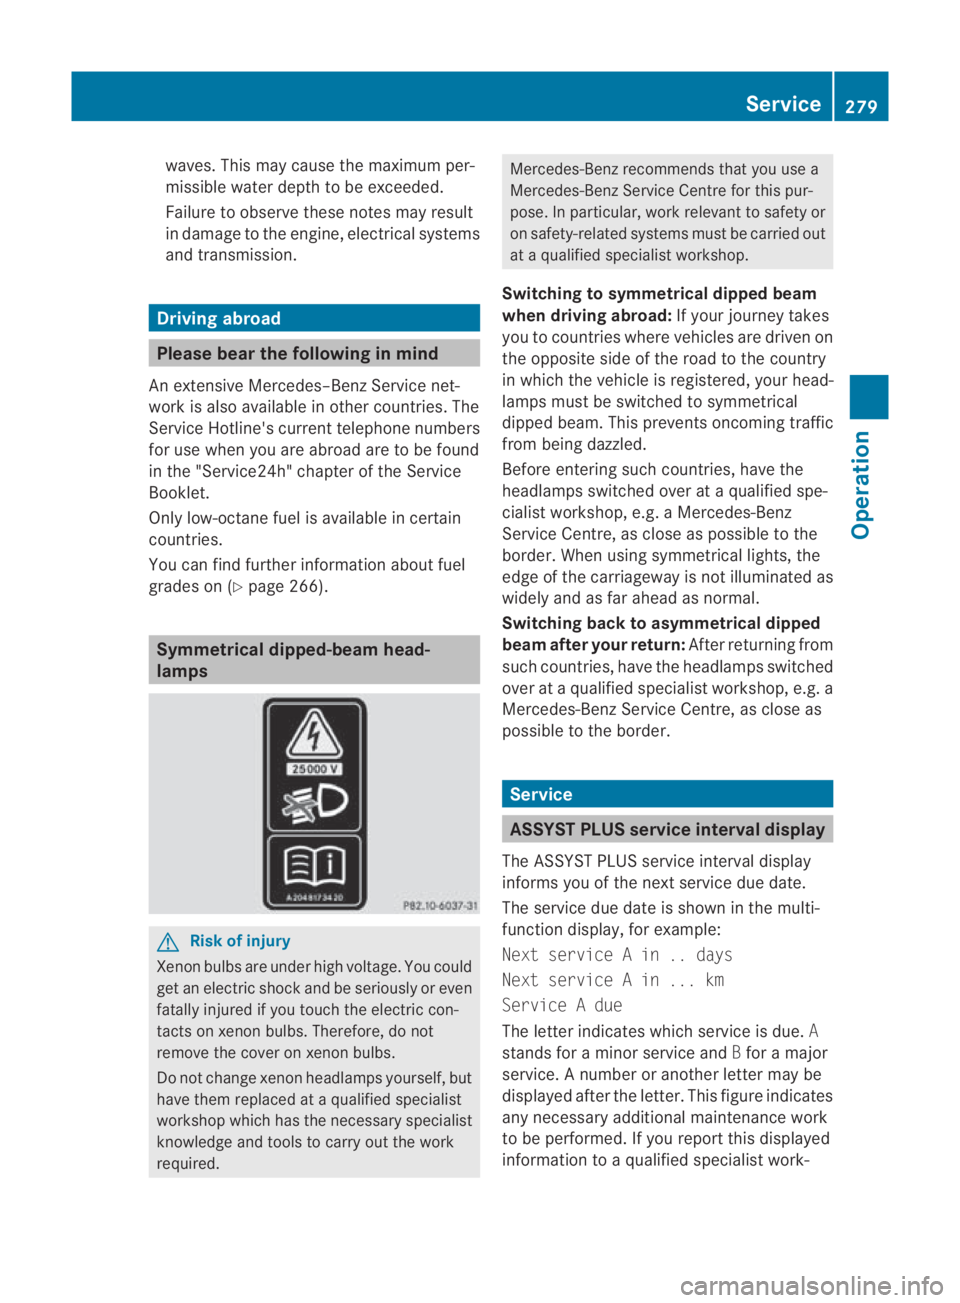
lamps
G
Risk of injury
Xenon bulbs are under high voltage. You could
get an electric shock and be seriously or even
fatally injured if you touch the electric con-
tacts on xenon bulbs. Therefore, do not
remove the cover on xenon bulbs.
Do not change xenon headlamps yourself, but
have them replaced at a qualified specialist
workshop which has the necessary specialist
knowledge and tools to carry out the work
required. Mercedes-Benz recommends that you use a
Mercedes-Benz Service Centre for this pur-
pose. In particular, work relevant to safety or
on safety-related systems must be carried out
at a qualified specialist workshop.
Switching to symmetrical dipped beam
when driving abroad: If your journey takes
you to countries where vehicles are driven on
the opposite side of the road to the country
in which the vehicle is registered, your head-
lamps must be switched to symmetrical
dipped beam. This prevents oncoming traffic
from being dazzled.
Before entering such countries, have the
headlamps switched over at a qualified spe-
cialist workshop, e.g. a Mercedes-Benz
Service Centre, as close as possible to the
border. When using symmetrical lights, the
edge of the carriageway is not illuminated as
widely and as far ahead as normal.
Switching back to asymmetrical dipped
beam after your return: After returning from
such countries, have the headlamps switched
over at a qualified specialist workshop, e.g. a
Mercedes-BenzS ervice Centre, as close as
possible to the border. Service
ASSYST PLUS service interval display
The ASSYST PLUS service interval display
informs you of the nexts ervice due date.
The service due date is shown in the multi-
function display, for example:
Next service A in .. days
Next service A in ... km
Service A due
The letter indicates which service is due. A
stands for a minor service and Bfor a major
service. A number or another letter may be
displayed after the letter. This figure indicates
any necessary additional maintenance work
to be performed. If you report this displayed
information to a qualified specialist work- Service
279Operation
BA 197 ECE RE 2010/6a; 1; 2, en-GB
sabbaeu Version: 3.0.3.6 2010-05-07T14:19:43+02:00 - Seite 279 Z
Page 284 of 361
Exterio
rcare
Automatic car wash G
Risk of accident
Braking efficiency is reduced after washing
the vehicle. This could cause an accident.
After the vehicle has bee nwashed, brake
firmly while paying attention to the traffic con-
ditions. This will warm up the brake discs,
thereby drying them mor equickly. Afte rwash-
ing the vehicle, drive particularly carefully
until the brakes are dry and braking power has
been fully restored.
You can wash the vehicle in an automatic car
wash from the very start.
If the vehicle is very dirty, pre-wash it before
cleaning it in an automatic car wash.
! When washing your vehicle in a tow-
through car wash, use the key instead of
the Start/Stop button.
Start the engine .Move the transmission
selector lever to N. Switch the engine off
again and make sure that you then leave
the key in position 2.You may otherwise
damage the vehicle, the transmission or
the car wash.
Check the transmission position in the
instrument cluster.
! Before switching off the engine, shift the
transmission to N. If you open the driver's
or front-passenger door, the transmission
remains in this position for up to 30
minutes if the key is in the ignition, even if
the engine is switched off. If you do not shift
the transmission to Nbeforehand, it shifts
automatically to parking position Pand
locks the wheels if the driver's or front-
passenger door is opened and the engine
is switched off. This may damage the vehi-
cle, the transmission or the car wash. !
Before driving into an automatic car wash,
make sure that it is suitable for the dimen-
sions of the vehicle. In particular, make
sure that:
R there is enough ground clearance
between the vehicle underbody and the
guide rails of the automatic car wash.
R the clearance width of the automatic car
wash is sufficient, particularly the width
of the guide rails
R you enter the automatic car wash
straight and in the centre of the guide
rails in order to avoid damaging the tyres
or wheel rims.
Fold in the exterior mirrors before the vehi-
cle is washed. The exterior mirrors could
otherwise be damaged.
! Make sure that the side windows are com-
pletely closed, that the ventilation/heater
blower is fully turned off and that the wind-
screen wiper switch is set to 0.Otherwise,
the rain/light senso rmay be activated, trig-
gering unintended wiper movements. This
could cause damage to the vehicle.
! In portal car washes, the windscree nwip-
ers may be moved up the windscreen by the
cleaning brushes when the ignition is
switched off.
Set the Start/Stop button to key position
2 to reset the windscreen wipers to their
original position.
! Vehicles with a mat tfinish*:
Do not use wash programs with a hot wax
treatment under any circumstances.
After using an automatic car wash, wipe off
wax and drying agents fro mthe windscreen
and the wiper blades. This will prevent smears
and reduce wiping noises caused by residue
on the windscreen. Care
281Operation
*optional
BA 197 ECE RE 2010/6a; 1; 2, en-GB
sabbaeu
Version: 3.0.3.6 2010-05-07T14:19:43+02:00 - Seite 281 Z
Page 286 of 361
Cleaning paintwork
Scratches, corrosive deposits, areas affected
by corrosio nand damage caused by inade-
quate care canno talways be completely
repaired. In such cases, visit a qualified spe-
cialist workshop immediately, e.g. a
Mercedes-Benz Service Centre.
X Remove the following types of dirt immedi-
ately, whilst avoiding rubbin gtoo hard.
Soak:
R insect remains with insect remover
R bird droppings with water
and rinse off the treated surface after-
wards.
Remove:
R tree resin, oils, fuels and greases by rub-
bing gently with a cloth soaked in petro-
leum ether or lighter fluid
R tar stain with tar remover
R wax with silicone remover
! Do not affix:
R stickers
R films
R magnetic plates or similar items
to painted surfaces. Otherwise, you could
damage the paintwork.
Cleaning the windows X
Clean the inside and outside of the win-
dows with a damp cloth and a cleaning
product approved and recommended by
Mercedes-Benz.
! Clean the water drainage channels of the
windscreen and the rear window at regular
intervals. Under certain circumstances,
deposits such as leaves, petals and pollen
may prevent water from draining away
leading to corrosion damage. Cleaning wiper blades G
Risk of injury
Before cleaning the windscreen or wiper
blades, turn the key to position 0in the igni-
tion lock or press the Start/Stop button
repeatedly until all indicator lamps in the
instrument cluster have gone out. The wind-
screen wipers could otherwise move and
injure you.
! Only fold the windscreen wipers away
from the windscreen when vertical. Other-
wise, you will damage the bonnet.
! Do not clean the wiper blades too often
and do not rub them too hard, as this will
result in damage to the graphite coating.
This could cause wiper noise.
X Switch off the engine.
X Take your foot off the brake pedal.
X Set the windscreen wipers to posi-
tion 0014 on the combination switch.
X Press the Start/Stop button repeatedly
until the windscreen wipers start.
X When the wiper arms have reached a ver-
tical position: press the Start/Stop button.
X Fold the wiper arm away from the wind-
screen until it engages.
X Set the wiper blade at right angles to the
wiper arm.
X Clean the wiper blades carefully using a
damp cloth.
X Fold the windscreen wipers back again
before switching on the ignition.
Cleaning the headlamps X
Clean the plastic lenses of the headlamps
and rear lighting with a damp sponge and
windscreen washer fluid or cleaning cloths.
! Only use windscreen washer fluid or
cleaning cloths which are suitable for plas-
tic lamp lenses. Unsuitable windscreen
washer fluid or cleaning cloths could Care
283Operation
BA 197 ECE RE 2010/6a; 1; 2, en-GB
sabbaeu Version: 3.0.3.6 2010-05-07T14:19:43+02:00 - Seite 283 Z
Page 292 of 361
X
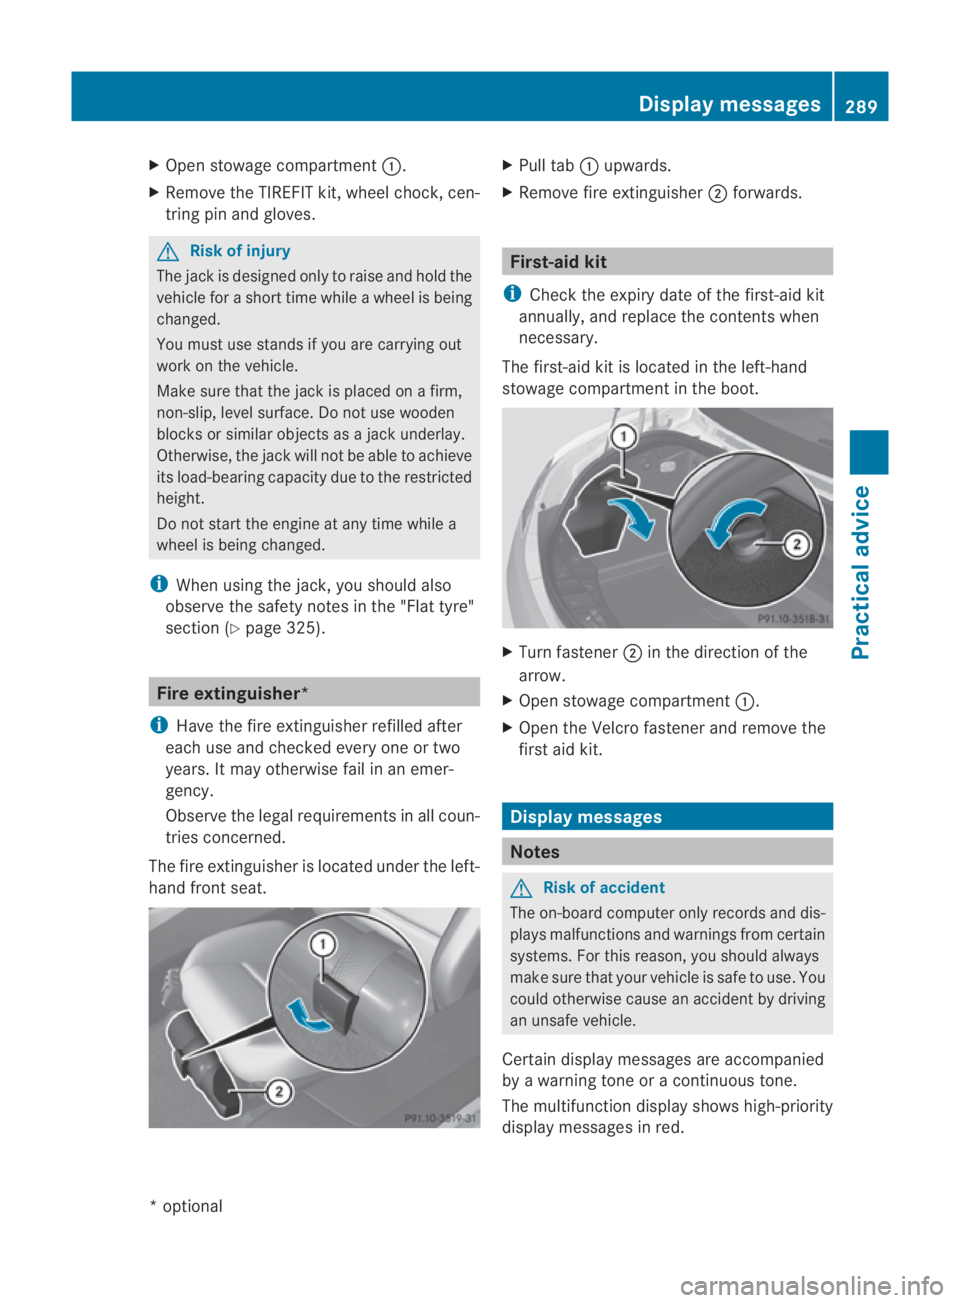
Open stowage compartment 0001.
X Remove the TIREFIT kit, wheel chock, cen-
tring pin and gloves. G
Risk of injury
The jack is designed only to raise and hold the
vehicle for a short time while a wheel is being
changed.
You must use stands if you are carrying out
work on the vehicle.
Make sure that the jack is placed on a firm,
non-slip, level surface. Do not use wooden
blocks or similaro bjects as a jack underlay.
Otherwise, the jack will not be able to achieve
its load-bearing capacity due to the restricted
height.
Do not start the engine at any time while a
wheel is being changed.
i When using the jack, you should also
observe the safety notes in the "Flat tyre"
section (Y page 325). Fire extinguisher*
i Have the fire extinguisher refilled after
each use and checked every one or two
years. It may otherwise fail in an emer-
gency.
Observe the legal requirements in all coun-
tries concerned.
The fire extinguisher is located under the left-
hand front seat. X
Pull tab 0001upwards.
X Remove fire extinguisher 0002forwards. First-aid kit
i Check the expiry date of the first-aid kit
annually, and replace the contents when
necessary.
The first-aid kit is located in the left-hand
stowage compartment in the boot. X
Turn fastener 0002in the direction of the
arrow.
X Open stowage compartment 0001.
X Open the Velcro fastener and remove the
first aid kit. Display messages
Notes
G
Risk of accident
The on-board computer only records and dis-
plays malfunctions and warnings from certain
systems .For this reason, you should always
make sure that your vehicle is safe to use. You
could otherwise cause an accident by driving
an unsafe vehicle.
Certain display messages are accompanied
by a warning tone or acontinuous tone.
The multifunction display shows high-priority
display messages in red. Display messages
289Practical advice
*optional
BA 197 ECE RE 2010/6a; 1; 2, en-GB
sabbaeu
Version: 3.0.3.6 2010-05-07T14:19:43+02:00 - Seite 289 Z
Page 296 of 361
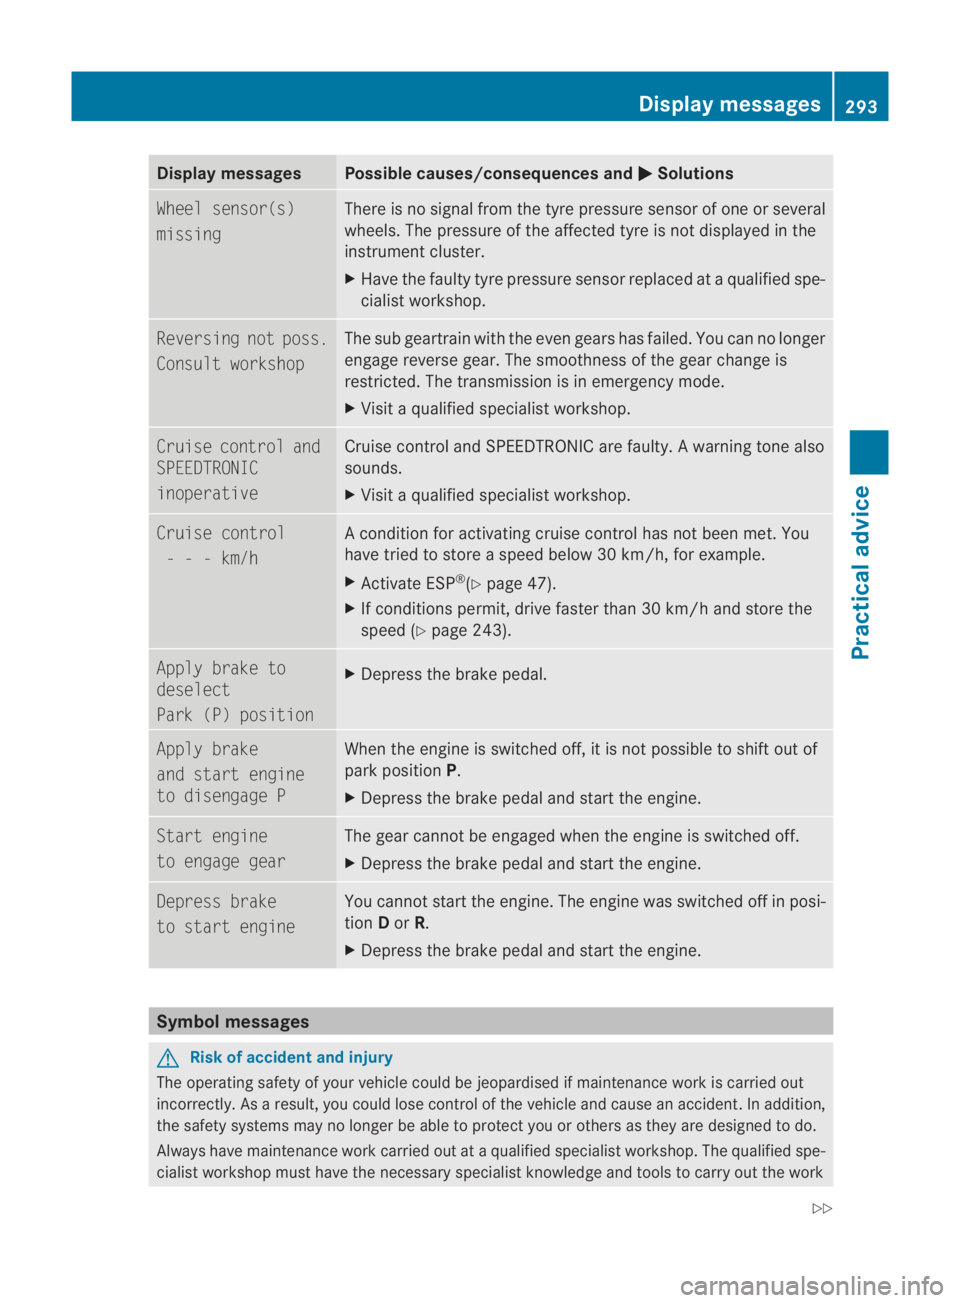
Display messages Possible causes/consequences and
0003 Solutions
Wheel sensor(s)
missing There is no signal from the tyre pressure sensor of one or several
wheels. The pressure of the affected tyre is no tdisplayed in the
instrument cluster.
X Have the faulty tyre pressure sensor replaced at a qualified spe-
cialist workshop. Reversing not poss.
Consult workshop The sub geartrain with the even gears has failed. You can no longer
engage reverse gear. The smoothness of the gear change is
restricted. The transmission is in emergency mode.
X Visit a qualified specialist workshop. Cruise control and
SPEEDTRONIC
inoperative Cruise control and SPEEDTRONIC are faulty. A warning tone also
sounds.
X
Visit a qualified specialist workshop. Cruise control
- - - km/h A condition for activating cruise control has not been met. You
have tried to store a speed below 30 km/h, for example.
X Activate ESP ®
(Y page 47).
X If conditions permit, drive faster than 30 km/h and store the
speed (Y page 243). Apply brake to
deselect
Park (P) position
X
Depress the brake pedal. Apply brake
and start engine
to disengage P When the engine is switched off, it is not possible to shift out of
park position
P.
X Depress the brake pedal and start the engine. Start engine
to engage gear The gear cannot be engaged when the engine is switched off.
X
Depress the brake pedal and start the engine. Depress brake
to start engine You cannot start the engine. The engine was switched off in posi-
tion Dor R.
X Depress the brake pedal and start the engine. Symbol messages
G
Risk of accident and injury
The operating safety of your vehicle could be jeopardised if maintenance work is carried out
incorrectly. As a result, you could lose control of the vehicle and cause an accident .Inaddition,
the safety systems may no longer be able to protect you or others as they are designed to do.
Always have maintenance work carried out at a qualified specialist workshop. The qualified spe-
cialist workshop must have the necessary specialist knowledge and tools to carry out the work Display messages
293Practical advice
BA 197 ECE RE 2010/6a; 1; 2, en-GB
sabbaeu Version: 3.0.3.6 2010-05-07T14:19:43+02:00 - Seite 293 Z
Page 298 of 361
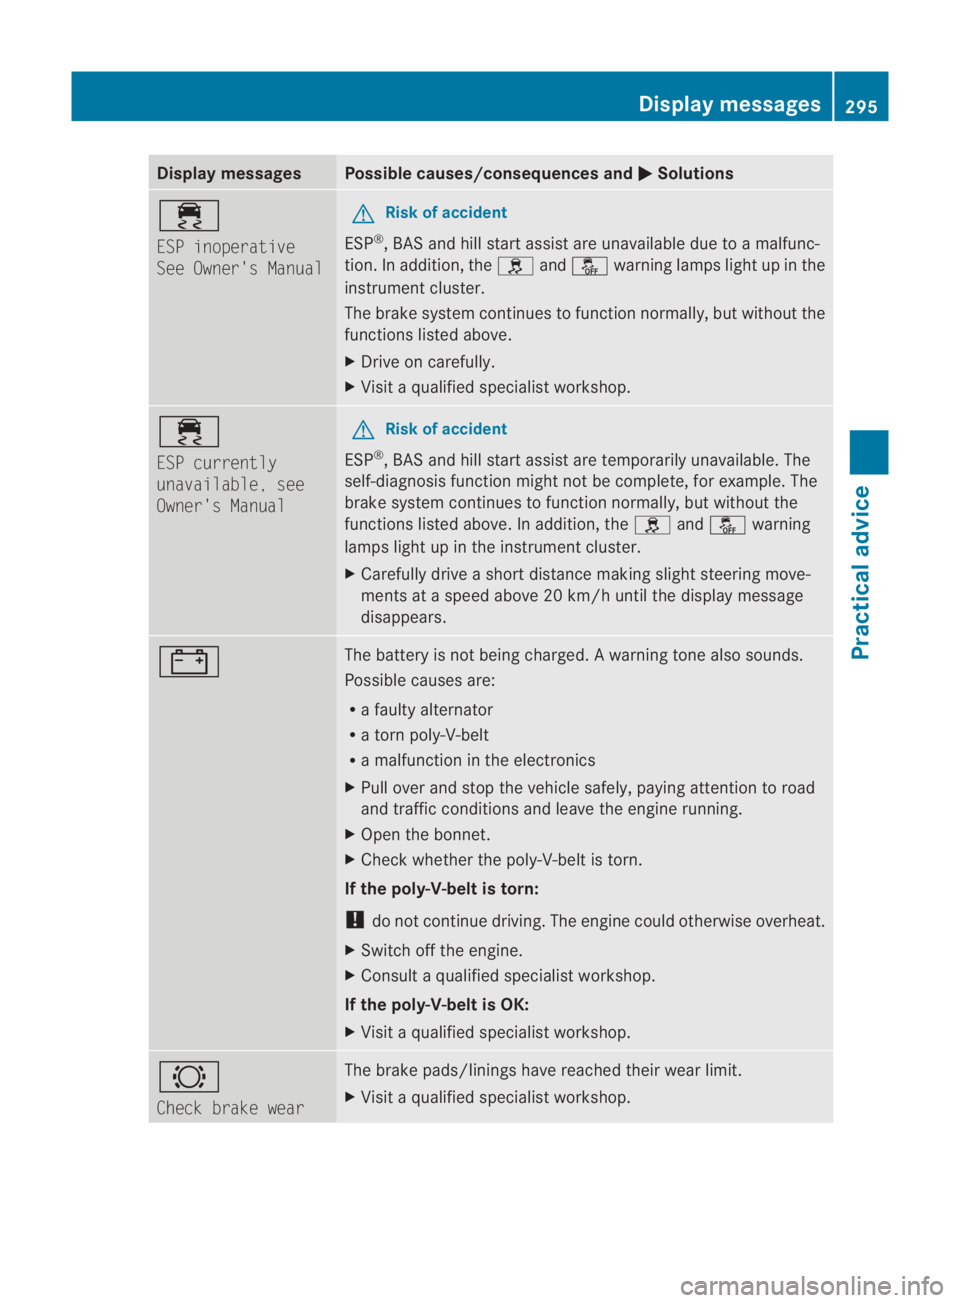
Display messages Possible causes/consequences and
0003 Solutions
0011
ESP inoperative
See Owner's Manual G
Risk of accident
ESP ®
, BA Sand hill start assist are unavailable due to amalfunc-
tion. In addition, the 0002and0001 warning lamps light up in the
instrument cluster.
The brake system continue sto function normally, but without the
functions listed above.
X Drive on carefully.
X Visit a qualified specialist workshop. 0011
ESP currently
unavailable, see
Owner's Manual G
Risk of accident
ESP ®
, BAS and hill start assist are temporarily unavailable. The
self-diagnosis function might not be complete, for example. The
brake system continues to function normally, but without the
functions listed above. In addition, the 0002and0001 warning
lamps light up in the instrument cluster.
X Carefully drive a short distance making slight steering move-
ments at a speed above 20 km/h until the display message
disappears. 000D The battery is not being charged.
Awarning tone also sounds.
Possible causes are:
R a faulty alternator
R a torn poly-V-belt
R a malfunction in the electronics
X Pull ove rand stop the vehicle safely, paying attentio nto road
and traffic conditions and leave the engine running.
X Open the bonnet.
X Check whether the poly-V-belt is torn.
If the poly-V-belt is torn:
! do not continue driving. The engine could otherwise overheat.
X Switch off the engine.
X Consult a qualified specialist workshop.
If the poly-V-belt is OK:
X Visit a qualified specialist workshop. 0006
Check brake wear The brake pads/linings have reached their wear limit.
X
Visit a qualified specialist workshop. Display messages
295Practical advice
BA 197 ECE RE 2010/6a; 1; 2, en-GB
sabbaeu Version: 3.0.3.6 2010-05-07T14:19:43+02:00 - Seite 295 Z
Page 301 of 361
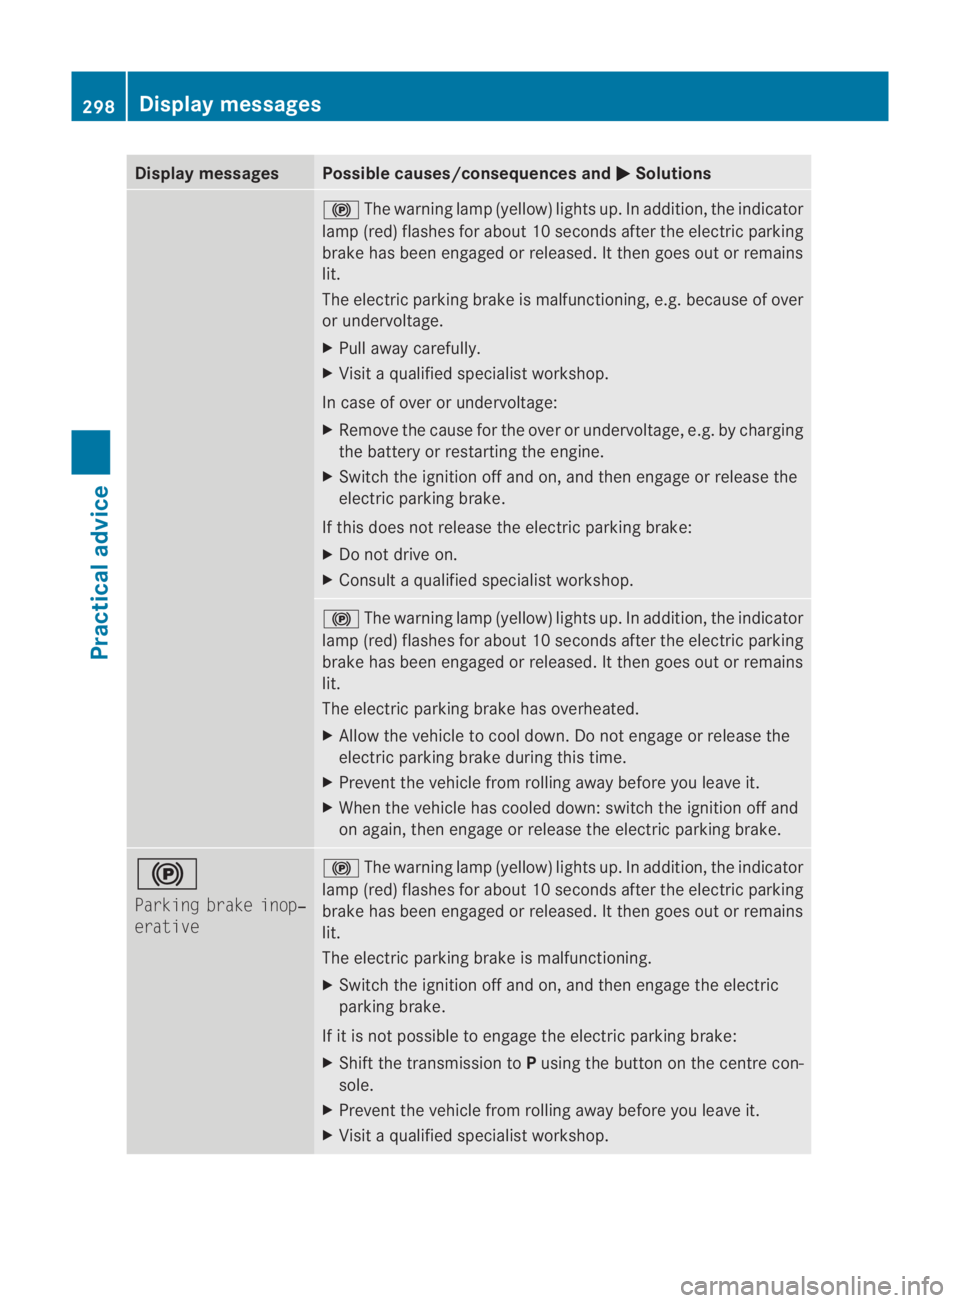
Display messages Possible causes/consequences and
0003 Solutions
0009
The warning lamp (yellow) lights up. In addition ,the indicator
lamp (red) flashes for about 10 seconds after the electric parking
brake has been engaged or released. It then goes out or remains
lit.
The electric parking brake is malfunctioning, e.g. because of over
or undervoltage.
X Pull away carefully.
X Visit a qualified specialist workshop.
In case of over or undervoltage:
X Remove the cause for the over or undervoltage, e.g. by charging
the battery or restarting the engine.
X Switch the ignition off and on, and then engage or release the
electric parking brake.
If this does not release the electric parking brake:
X Do not drive on.
X Consult a qualified specialist workshop. 0009
The warning lamp (yellow) lights up. In addition, the indicator
lamp (red) flashes for about 10 seconds after the electric parking
brake has been engaged or released. It then goes out or remains
lit.
The electric parking brake has overheated.
X Allow the vehicle to cool down. Do not engage or release the
electric parking brake during this time.
X Prevent the vehicle from rolling away before you leave it.
X When the vehicle has cooled down: switch the ignition off and
on again, then engage or release the electric parking brake. 0009
Parking brake inop‐
erative 0009
The warning lamp (yellow) lights up. In addition, the indicator
lamp (red) flashes for about 10 seconds after the electric parking
brake has been engaged or released. It then goes out or remains
lit.
The electric parking brake is malfunctioning.
X Switch the ignition off and on, and then engage the electric
parking brake.
If it is not possible to engage the electric parking brake:
X Shift the transmission to Pusing the button on the centre con-
sole.
X Prevent the vehicle from rolling away before you leave it.
X Visit a qualified specialist workshop. 298
Display messagesPractical advice
BA 197 ECE RE 2010/6a; 1; 2, en-GB
sabbaeu
Version: 3.0.3.6 2010-05-07T14:19:43+02:00 - Seite 298
Page 302 of 361
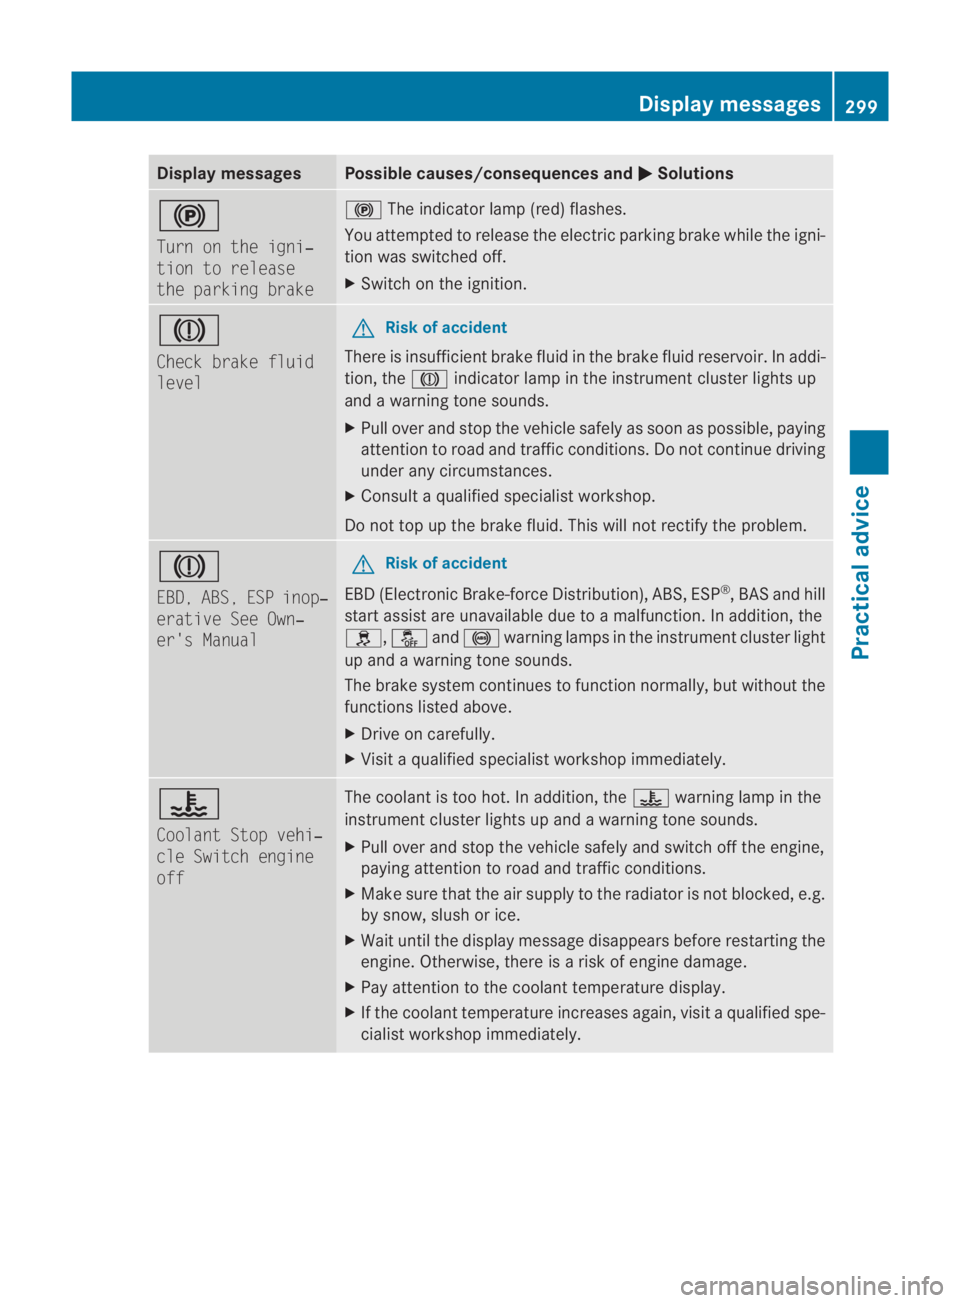
Display messages Possible causes/consequences and
0003 Solutions
0009
Turn on the igni‐
tion to release
the parking brake 0009
The indicato rlamp (red )flashes.
You attempted to release the electric parking brak ewhile the igni-
tion was switched off.
X Switch on the ignition. 0004
Check brake fluid
level G
Risk of accident
There is insufficient brake fluid in the brake fluid reservoir. In addi-
tion, the 0004indicator lamp in the instrumentc lusterlights up
and a warning tone sounds.
X Pull over and stop the vehicle safely as soon as possible, paying
attention to road and traffic conditions. Do not continue driving
under any circumstances.
X Consult a qualified specialist workshop.
Do not top up the brak efluid. This will not rectify the problem. 0004
EBD, ABS, ESP inop‐
erative See Own‐
er's Manual G
Risk of accident
EBD (Electronic Brake-force Distribution), ABS, ESP ®
, BA Sand hill
start assist are unavailable due to a malfunction. In addition, the
0002, 0001and0012 warning lamps in the instrument cluster light
up and a warning tone sounds.
The brake system continue sto function normally, but without the
functions listed above.
X Drive on carefully.
X Visit a qualified specialist workshop immediately. 000F
Coolant Stop vehi‐
cle Switch engine
off The coolant is too hot. In addition, the
000Fwarning lamp in the
instrument cluster lights up and a warning tone sounds.
X Pull over and stop the vehicle safely and switch off the engine,
paying attention to road and traffic conditions.
X Make sure that the air supply to the radiator is not blocked, e.g.
by snow, slush or ice.
X Wait until the display message disappears before restarting the
engine. Otherwise, there is a risk of engine damage.
X Pay attention to the coolant temperature display.
X If the coolant temperature increases again, visit a qualified spe-
cialist workshop immediately. Display messages
299Practical advice
BA 197 ECE RE 2010/6a; 1; 2, en-GB
sabbaeu Version: 3.0.3.6 2010-05-07T14:19:43+02:00 - Seite 299 Z