2010 MERCEDES-BENZ SLS COUPE engine
[x] Cancel search: enginePage 328 of 361
Replacing the wiper blades
G
Ris
kofa ccident
The windscreen will no tlonger be wiped prop-
erly if the wiper blades are worn. This could
prevent you from observing the traffic condi-
tions, thereby causing an accident .Replace
the wiper blades twice a year, ideally in spring
and autumn. G
Risk of accident
The wiper arms could start moving and cause
an injury if you leave the windscreen wipers
switched on.
Remove the key from the ignition lock before
replacing the wiper blades.
! To avoid damaging the windscreen wiper
blades, make sure that you touch only the
wiper arm of the windscreen wiper. Removing
Moving the wiper blades to avertical
position X
Switch off the engine.
X Take your foo toff the brake pedal.
X Set the windscreen wipers to posi-
tion 0014 on the combination switch.
X Press the Start/Stop button repeatedly
until the windscreen wipers start.
X When the wiper arms have reached a ver-
tical position, press the Start/Stop button.
X Fold the wiper arm away from the wind-
screen until it engages.
X Set the wiper blade at right angles to the
wiper arm. Removing the wiper blades X
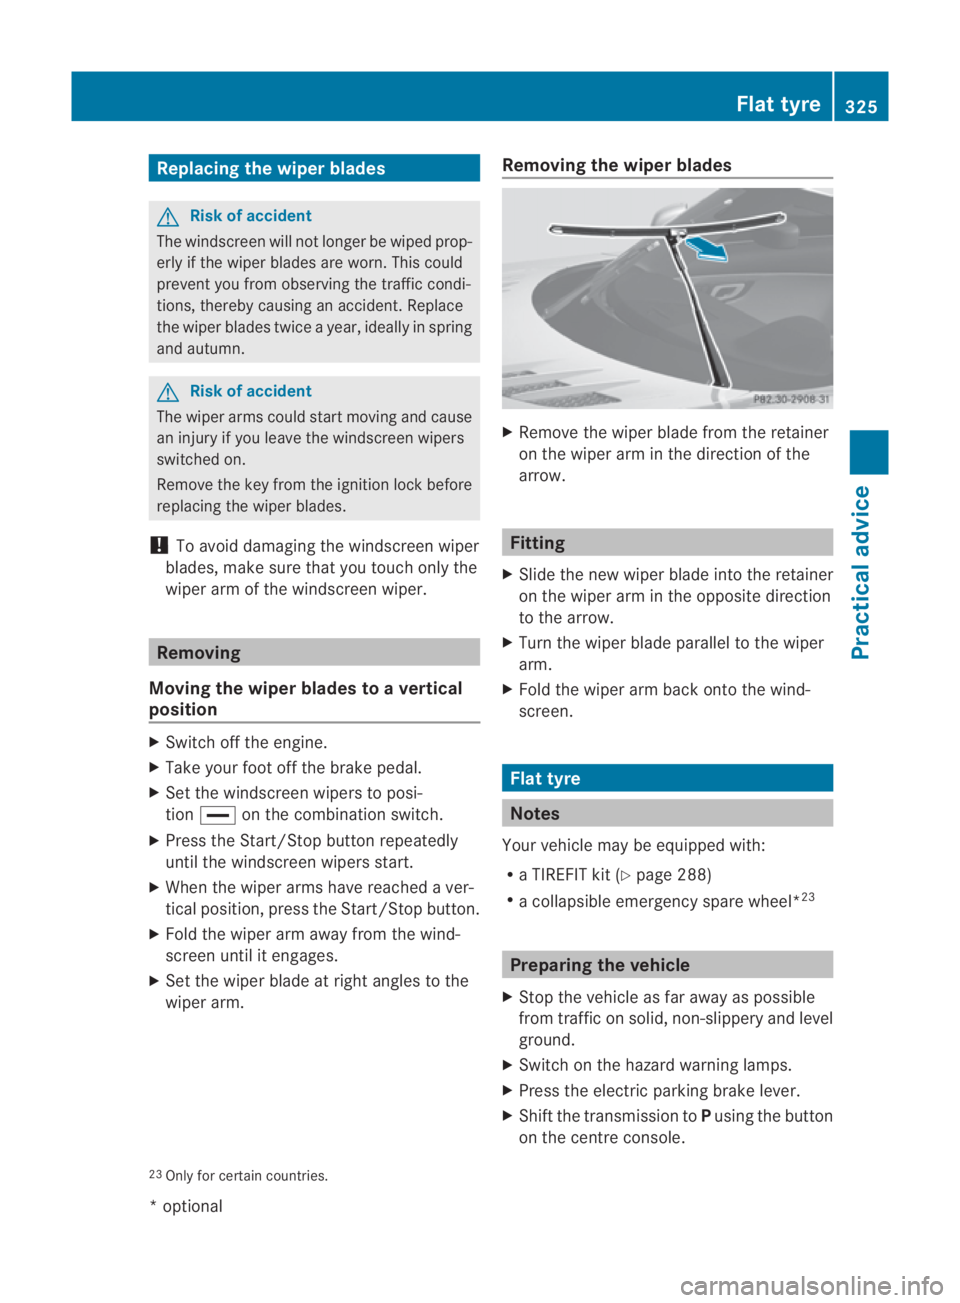
Remove the wiper blade from the retainer
on the wiper arm in the direction of the
arrow. Fitting
X Slide the new wiper blade into the retainer
on the wiper arm in the opposite direction
to the arrow.
X Turn the wiper blade parallel to the wiper
arm.
X Fold the wiper arm back onto the wind-
screen. Flat tyre
Notes
You rvehicle may be equipped with:
R a TIREFIT kit (Y page 288)
R a collapsible emergency spare wheel* 23 Preparing the vehicle
X Stop the vehicle as far away as possible
from traffic on solid, non-slippery and level
ground.
X Switch on the hazard warning lamps.
X Press the electric parking brake lever.
X Shift the transmission to Pusing the button
on the centre console.
23 Only for certain countries. Flat tyre
325Practical advice
*optional
BA 197 ECE RE 2010/6a; 1; 2, en-GB
sabbaeu Version: 3.0.3.6 2010-05-07T14:19:43+02:00 - Seite 325 Z
Page 329 of 361
X
Get all occupants out of the vehicle .Make
sure that they are no tendangered as they
ge to ut of the vehicle.
X Make sure that no one is near the danger
area whils tawheel is being changed. Any-
one who is not directly assisting in the
wheel change should, for example, stand
behind the barrier.
X Switch off the engine.
X Remove the key from the ignition lock.
X Get out of the vehicle.
X Close the driver’s door.
X Place the warning triangle ( Ypage 288) at
a suitable distance. Observe legal require-
ments. Using the TIREFIT kit
You can use the TIREFI Tkit to seal small
punctures, particularly those in the tyre tread.
You can use TIREFIT at outside temperatures
down to -40 †. G
Risk of accident
In the following situations ,your safety is at
particular risk and tyre sealant is unable to
provide breakdown assistance if:
R there are cuts or punctures in the tyre
greater than 4 mm
R the wheel rim is damaged
R you have driven at very low tyre pressures
or on a flat tyre
Do not drive any further. Consult a qualified
specialist workshop which has the necessary
specialist knowledge and tools to carry out
the work required.
Mercedes-Benz recommends that you use a
Mercedes-Benz Service Centre for this pur-
pose. In particular, work relevant to safety or
on safety-related systems must be carried out
at a qualified specialist workshop. X
Do not remove any foreign objects which
have penetrated the tyre, e.g. screws or
nails.
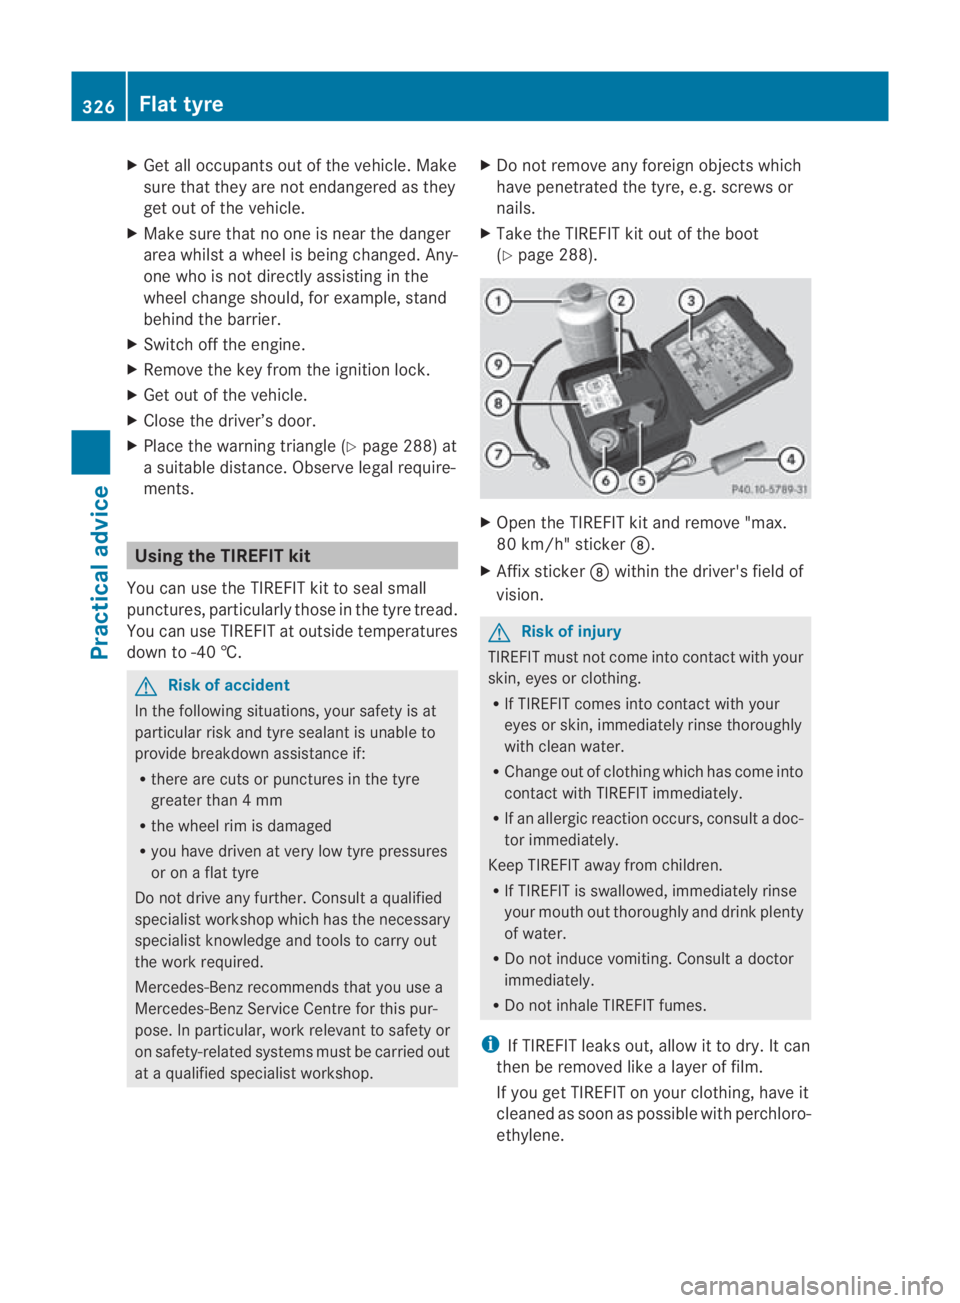
X Take the TIREFIT kit out of the boot
(Y page 288). X
Open the TIREFIT kit and remove "max.
80 km/h" sticker 000B.
X Affix sticker 000Bwithin the driver's field of
vision. G
Risk of injury
TIREFIT must not come into contact with your
skin, eyes or clothing.
R If TIREFIT comes into contact with your
eyes or skin, immediately rinse thoroughly
with clean water.
R Change out of clothing which has come into
contact with TIREFIT immediately.
R If an allergic reaction occurs, consult a doc-
tor immediately.
Keep TIREFIT away from children.
R If TIREFIT is swallowed, immediately rinse
your mouth out thoroughly and drink plenty
of water.
R Do not induce vomiting. Consult a doctor
immediately.
R Do not inhale TIREFIT fumes.
i If TIREFIT leaks out, allow it to dry. It can
then be removed like a layer of film.
If you get TIREFIT on your clothing, have it
cleaned as soon as possible with perchloro-
ethylene. 326
Flat tyrePractical advice
BA 197 ECE RE 2010/6a; 1; 2, en-GB
sabbaeu
Version: 3.0.3.6 2010-05-07T14:19:43+02:00 - Seite 326
Page 330 of 361
Comply with the manufacturer's safety
instructions on the tyr
einflatio ncompressor
label and on the TIREFIT filler bottle.
i You will also find operating instructions
0015 in the lid of the TIREFIT kit.
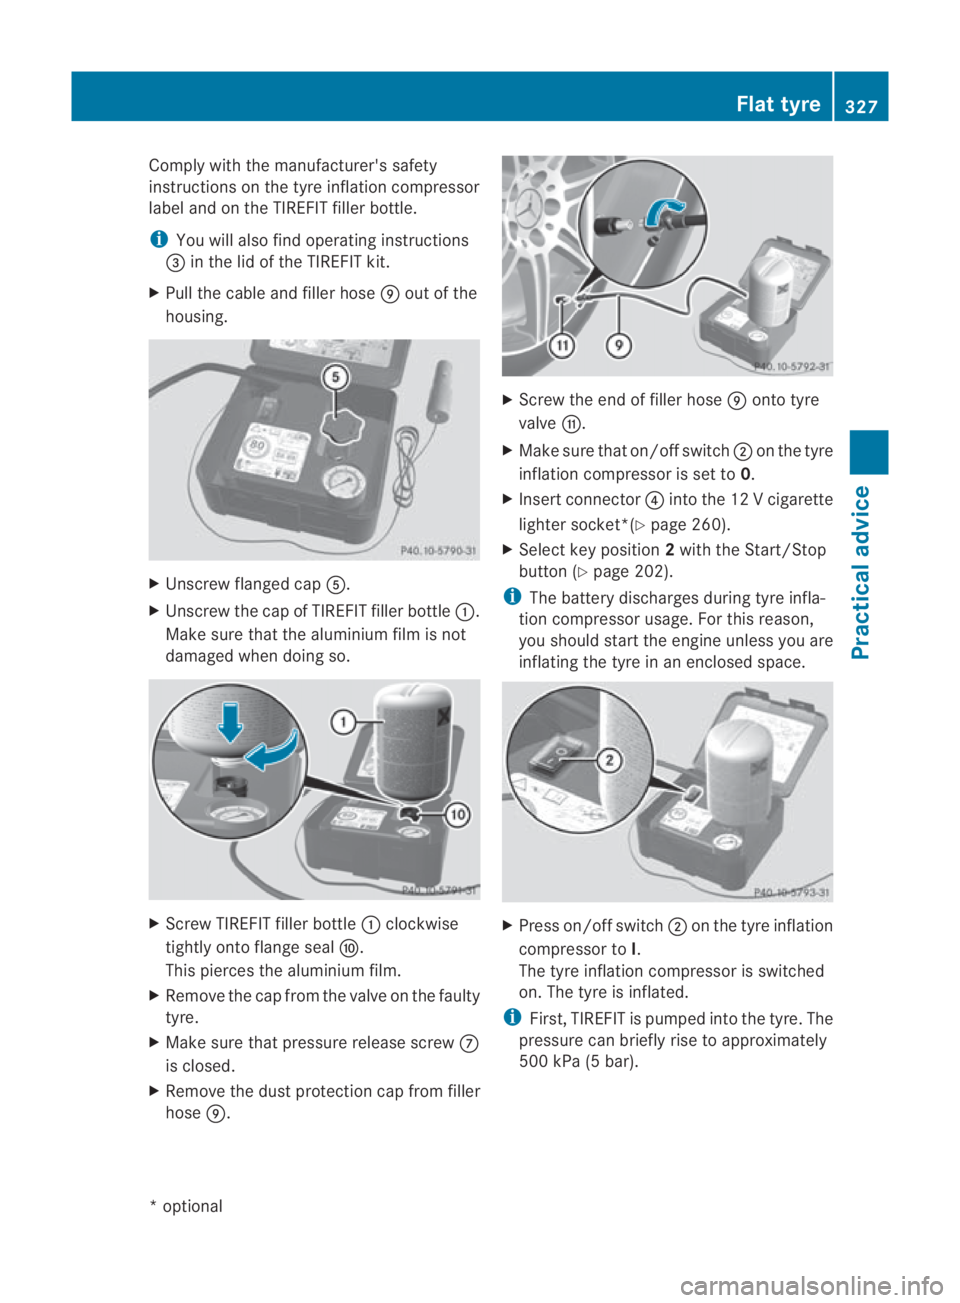
X Pull the cable and filler hose 000Cout of the
housing. X
Unscrew flanged cap 0012.
X Unscrew the cap of TIREFIT filler bottle 0001.
Make sure that the aluminium film is not
damaged when doing so. X
Screw TIREFIT filler bottle 0001clockwise
tightly onto flange seal 000D.
This pierces the aluminium film.
X Remove the cap from the valve on the faulty
tyre.
X Make sure that pressure release screw 000A
is closed.
X Remove the dust protection cap from filler
hose 000C. X
Screw the end of filler hose 000Conto tyre
valve 000E.
X Make sure that on/offs witch0002on the tyre
inflatio ncompressor is set to 0.
X Insert connector 0014into the 12 V cigarette
lighter socket*(Y page 260).
X Select key position 2with the Start/Stop
button (Y page 202).
i The battery discharges during tyre infla-
tion compressor usage. For this reason,
you should start the engine unless you are
inflating the tyre in an enclosed space. X
Press on/offs witch0002on the tyre inflation
compressor to I.
The tyre inflatio ncompressor is switched
on. The tyre is inflated.
i First, TIREFIT is pumped into the tyre. The
pressure can briefly rise to approximately
500 kPa (5 bar). Flat tyre
327Practical advice
*optional
BA 197 ECE RE 2010/6a; 1; 2, en-GB
sabbaeu
Version: 3.0.3.6 2010-05-07T14:19:43+02:00 - Seite 327 Z
Page 333 of 361
Securing the vehicle on level ground
X
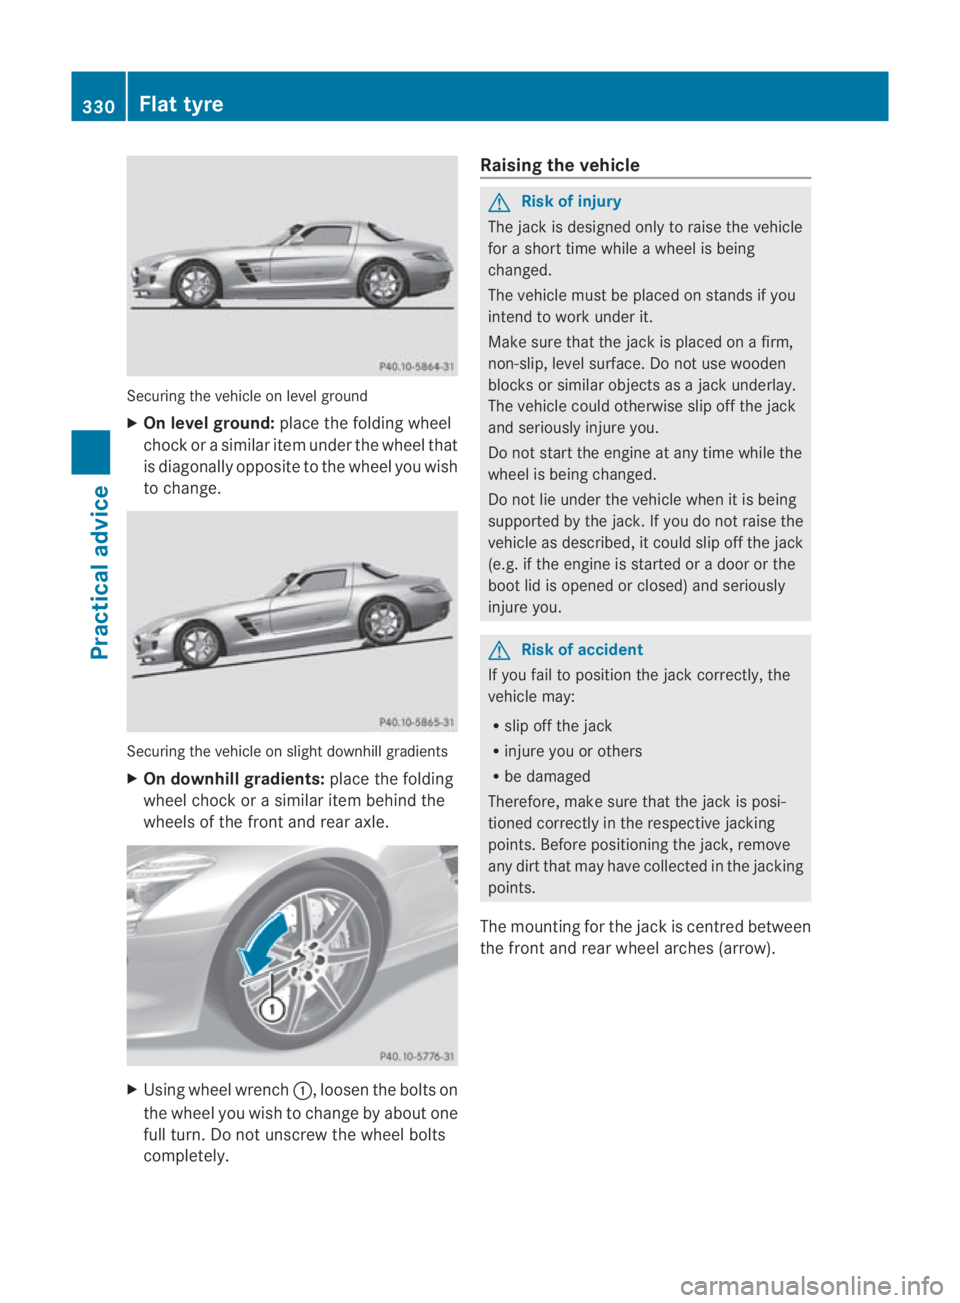
On level ground: place the folding wheel
chock or a similar item under the wheel that
is diagonally opposite to the wheel you wish
to change. Securing the vehicle on slight downhill gradients
X On downhill gradients: place the folding
wheel chock or a similar item behind the
wheels of the front and rea raxle. X
Using wheel wrench 0001, loosenthe bolts on
the wheel you wish to change by about one
full turn. Do not unscrew the wheel bolts
completely. Raising the vehicle G
Risk of injury
The jack is designed only to raise the vehicle
for a short time while awheel is being
changed.
The vehicle must be placed on stands if you
intend to work under it.
Make sure that the jack is placed on a firm,
non-slip, level surface. Do not use wooden
blocks or similar objects as a jack underlay.
The vehicle could otherwise slip off the jack
and seriously injure you.
Do not start the engine at any time while the
wheel is being changed.
Do not lie under the vehicle when it is being
supported by the jack. If you do not raise the
vehicle as described, it could slip off the jack
(e.g. if the engine is started or a door or the
boot lid is opened or closed) and seriously
injure you. G
Risk of accident
If you fail to position the jack correctly, the
vehicle may:
R slip off the jack
R injure you or others
R be damaged
Therefore, make sure that the jack is posi-
tioned correctly in the respective jacking
points. Before positioning the jack, remove
any dirt that may have collected in the jacking
points.
The mounting for the jack is centred between
the front and rear wheel arches (arrow). 330
Flat tyrePractical advice
BA 197 ECE RE 2010/6a; 1; 2, en-GB
sabbaeu
Version: 3.0.3.6 2010-05-07T14:19:43+02:00 - Seite 330
Page 338 of 361
gloves, an apron and a face
mask.
Immediately rinse acid
splashes off with clean
water. Consult a doctor if
necessary.
Wear eye protection.
Keep children away.
Observe this Owner's Man-
ual.
H
Environmental note
Do not dispose of batteries in the household
rubbish. Dispose of defective batteries in an
environmentally responsible manner. Take
them to a Mercedes-Benz Service Centre or
to a special collection point for old batteries. G
Risk of injury
For safety reasons, Mercedes-Benz recom-
mends that you only use batteries which have
been tested and approved for your vehicle by
Mercedes-Benz. These batteries provide
increased impact protection to prevent vehi-
cle occupants from suffering acid burns
should the battery be damaged in the event
of an accident.
To prevent acid burns, observe the following
safety notes when handling batteries:
R do not lean over the battery.
R do not place any metal objects on a battery.
Otherwise, you could cause a short circuit
and the battery's gas mixture could ignite.
R make sure that you do not create an elec-
trostatic charge, e.g. by wearing synthetic
clothing or as a result of friction on fabrics.
Therefore, you should not pull or slide the
battery over carpets or other synthetic
materials. R
never touch the battery first. To discharge
a possible electrostatic charge, step out of
the vehicle first and touch the bodywork.
R do not wipe the battery using a cloth. The
battery may explode as a result of electro-
static charge or due to flying sparks.
! Switch off the engine and ensure that no
ignition position has been selected before
detaching the battery terminals. All indica-
tor lights must be off in the instrument
cluster. Otherwise, you may destroy elec-
tronic components such as the alternator.
i Mercedes-Benz recommends that you
have work involving the battery, e.g.
removal, charging and replacement, car-
ried out at a qualified specialist workshop,
e.g. a Mercedes-Benz Service Centre.
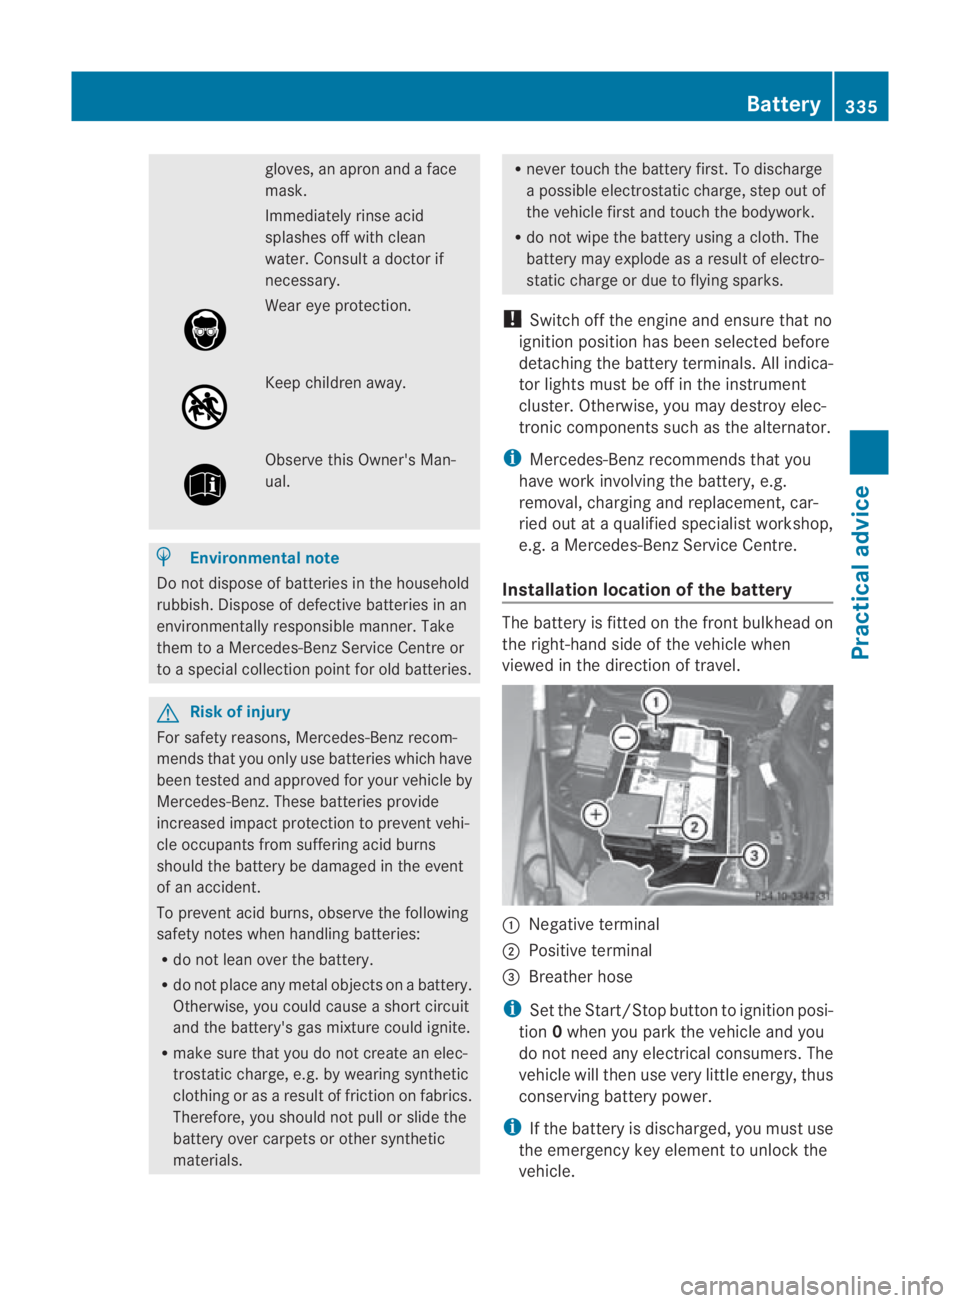
Installation location of the battery The battery is fitted on the front bulkhead on
the right-hand side of the vehicle when
viewed in the direction of travel.
0001
Negative terminal
0002 Positive terminal
0015 Breather hose
i Set the Start/Stop button to ignition posi-
tion 0when you park the vehicle and you
do not need any electrical consumers .The
vehicle will then use very little energy, thus
conserving battery power.
i If the battery is discharged, you must use
the emergency key element to unlock the
vehicle. Battery
335Practical advice
BA 197 ECE RE 2010/6a; 1; 2, en-GB
sabbaeu Version: 3.0.3.6 2010-05-07T14:19:43+02:00 - Seite 335 Z
Page 341 of 361
Jump-starting
If your vehicle's battery is discharged, the engine can be jump-started from another vehicle
or from an external battery using jump leads.
Observe the following points:
R you may only jump-start the vehicle when the engine and catalytic converter are cold.
R do not start the engine if the battery is frozen. Let the battery thaw first.
R jump-starting may only be performed from batteries with a nominal voltage of 12 V.
R only use jump leads which have a sufficient cross-section and insulated terminal clamps.
i Jump leads and further information about jump-starting can be obtained from any
Mercedes-Benz Service Centre.
! Avoid repeated and lengthy starting attempts. Only use the jump-starting procedure for
the battery in the engine compartment.
Do not use a rapid-charging device to start the engine. G
Risk of injury
There is a risk of acid burns when jump-starting a vehicle due to the gases which escape from
the battery. Do not lean over the battery while the engine is being jump-started. G
Risk of explosion
Gases escaping from the battery during jump-starting may cause minor explosions. Avoid cre-
ating sparks. Keep naked flames away from the battery, and do not smoke.
Comply with safety precautions and take protective measures when handling batteries. You will
find these under "Battery" in the index.
X Make sure that the two vehicles do not touch.
X Press the electric parking brake handle.
X Shift the transmission to Pwith the button in the centre console.
X Switch off all electrical consumers (e.g. radio, blower etc.).
X Open the bonnet (Y page 267).338
Jump-startingPractical advice
BA 197 ECE RE 2010/6a; 1; 2, en-GB
sabbaeu
Version: 3.0.3.6 2010-05-07T14:19:43+02:00 - Seite 338
Page 342 of 361
X
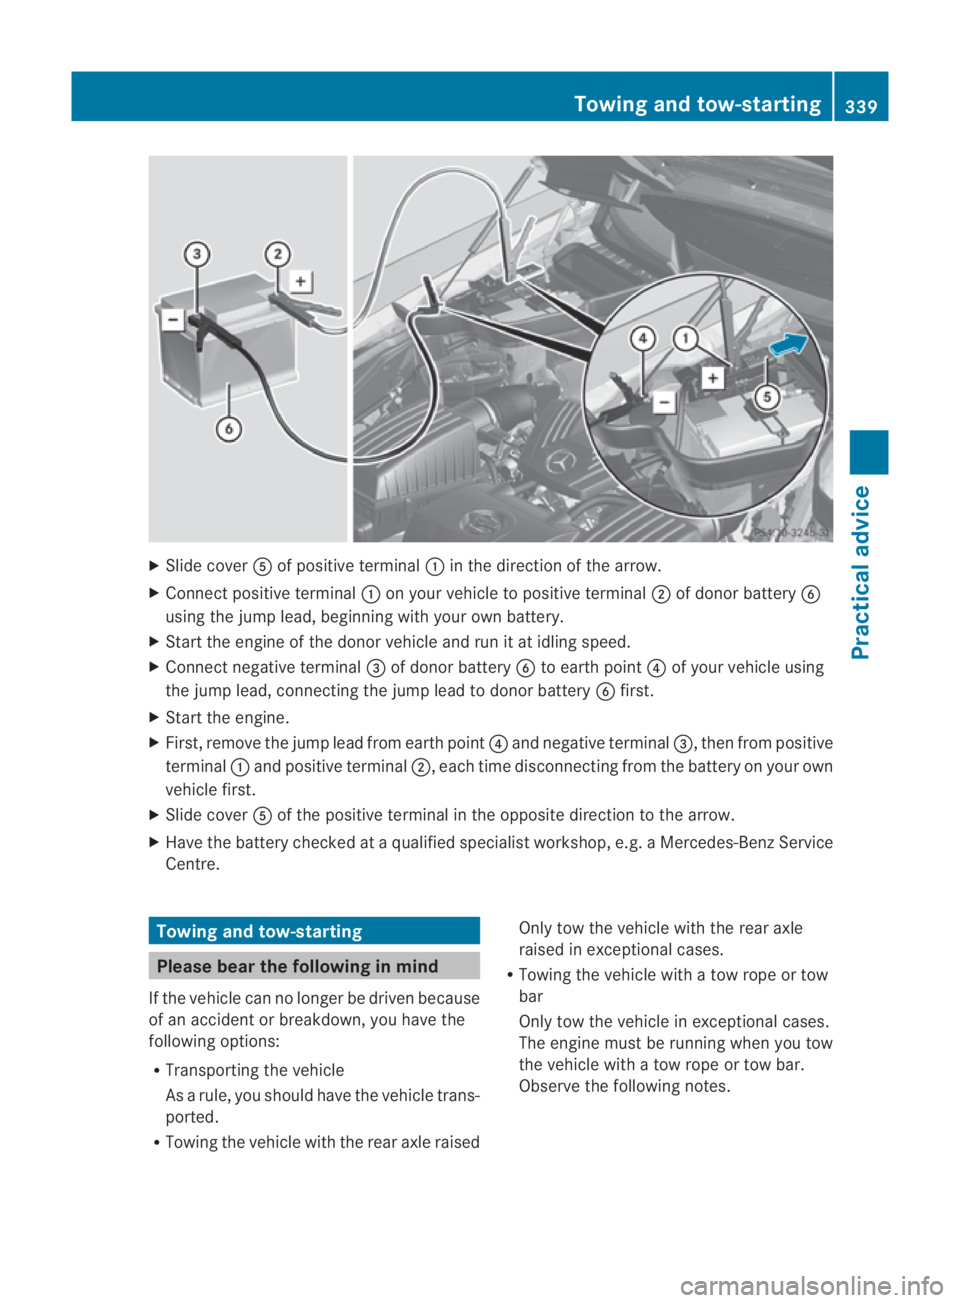
Slide cover 0012of positive terminal 0001in the direction of the arrow.
X Connect positive terminal 0001on your vehicle to positive terminal 0002of donor battery 0013
using the jump lead, beginning with your ow nbattery.
X Start the engine of th edonor vehicle and run it at idling speed.
X Connect negative terminal 0015of donor battery 0013to earth point 0014of your vehicle using
the jump lead, connectingt he jump lead to donor battery 0013first.
X Start the engine.
X First, remove the jump lead from earth point 0014and negative terminal 0015, then from positive
terminal 0001and positive terminal 0002, each time disconnecting from the battery on your own
vehicle first.
X Slide cover 0012of the positive terminal in the opposite direction to the arrow.
X Have the battery checked at a qualified specialist workshop, e.g. a Mercedes-Ben zService
Centre. Towing and tow-starting
Please bear the following in mind
If the vehicle can no longer be driven because
of an acciden torbreakdown, you have the
following options:
R Transporting the vehicle
As a rule, you should have the vehicle trans-
ported.
R Towing the vehicle with the rear axle raised Only tow the vehicle with the rear axle
raised in exceptional cases.
R Towing the vehicle with a tow rope or tow
bar
Only tow the vehicle in exceptional cases.
The engine must be running when you tow
the vehicle with a tow rope or tow bar.
Observe the following notes. Towing and tow-starting
339Practical advice
BA 197 ECE RE 2010/6a; 1; 2, en-GB
sabbaeu Version: 3.0.3.6
2010-05-07T14:19:43+02:00 - Seite 339 Z
Page 343 of 361
Towing the vehicle with the rear axle
raised !
The engine must be switched off (key in
ignition lock in position 0or position 1) if
the vehicle is being towed with the front
axle raised or if the parking brake is being
tested on a dynamometer. Otherwise,
intervention by ESP ®
could damage the
brake system.
Towing the vehicle with atow rope or
tow bar G
Ris
kofa ccident
If the brake system is malfunctioning, you
must use a rigid tow bar to tow the vehicle.
Before towing away, mak esure that the steer-
ing can be moved and is not locked.
If there is a malfunctio ninthe power supply
or the vehicle's electrical system, you must
not tow the vehicle. G
Risk of accident
The following can occur if the vehicle is towed:
R the engine may not start.
R the on-board electronics may fail.
R the battery voltage may drop too much.
In these cases, the rear axle will be locked.
As a result, you might lose control of the vehi-
cle, cause an accident and injure yourself and
others.
! Use the key instead of the Start/Stop
button when towing the vehicle.
Start the engine and keep it running. Turn
the key to position 2in the ignition. Set the
transmission selector lever to N.Make sure
that you then leave the key in position 2.
Chec kthe transmission position in the
instrument cluster. When towing the vehicle, proceed as follows:
X
Insert the key into the ignition lock
(Y page 203).
X Start the engine and leave the key in the
ignition.
X Move the transmission selector lever to N.
X Check the transmission position in the
instrumentc luster display (Y page 227).
X Leave the engine running during the entire
towing procedure.
Also observe the following notes:
R When towing, observe the legal require-
ments in all countries concerned.
R If the engine does not start, try jump-start-
ing it (Y page 338). Tow-starting the vehicle
is not permitted.
R If it is not possible to jump-star tthe vehicle,
have it transported to the nearest qualified
specialist workshop, e.g. aMercedes-Benz
Service Centre.
R If the transmission has been damaged,
have the vehicle transported to the nearest
qualified specialist workshop, e.g. a
Mercedes-Benz Service Centre. Observe
the display messages in the instrument
cluster.
R If you are towing the vehicle over a longer
distance, this must be done with the rear
axle raised.
! Make sure that the electric parking brake
is released. If the electric parking brake is
faulty, visit a qualified specialist workshop.
Mercedes-Benzr ecommends that you use
a Mercedes-Benz Service Centre.
! When towing, pull away slowly and
smoothly. If the tractive power is too high,
the vehicles could be damaged.
! Only secure the tow cable or towing bar
to the towing eyes. You could otherwise
damage the vehicle.
! Do not use the towing eye for recovery,
as this could damage the vehicle. If in
doubt, recover the vehicle with a crane. 340
Towing and tow-startingPractical advice
BA 197 ECE RE 2010/6a; 1; 2, en-GB
sabbaeu
Version: 3.0.3.6 2010-05-07T14:19:43+02:00 - Seite 340