2010 MERCEDES-BENZ SLS COUPE washer fluid
[x] Cancel search: washer fluidPage 17 of 361
S
Safety notes Using the telephone ....................... 128
Seat
Correct driver's seat position ........213
Storing settings ............................. 210
Seat adjustment ................................ 203
Seat belt Fastening ....................................... 210
Seat belts
Warning lamp ........................ 212, 311
Seat covers
Cleaning ......................................... 285
Seat heating ....................................... 205
Seats Adjusting (bucket seat) ..................205
Adjusting (electrically). ..................204
Adjusting (manually). .....................204
Seat adjustment ............................ 205
Seat ventilation
Malfunction indicator lamp ............307
Selector lever
Display message ............................ 291
Sensors
Cleaning ......................................... 284
Service indicator
see ASSYST PLUS service interval
displa y........................................... 279
Service products ............................... 349
Brake fluid ..................................... 351
Coolant .......................................... 351
Engine oil ....................................... 350
Fuel ................................................ 349
Windscreen washer fluid ................352
Settings
Calling up a stored setting .............210
Factory (on-board computer) .........240
On-board computer .......................238
SETUP (on-board computer) .............241
Sidebag ................................................ 39
Side windows Convenience closing ......................219
Convenience opening ....................219
Fault .............................................. 318
Opening/closing ............................ 218
Snow chains ...................................... 276
Socket ................................................ 260Sound
Switching on/off .............................. 67
Sound Modus ....................................... 68
Soun dsettings .................................... .67
Balance ............................................ 68
Special destination
Category ........................................ 106
Entering ......................................... 106
Entering using the map ..................110
Special destination icon
Setting ............................................. 85
Special destination list .....................109
Spee dlimiter
SPEEDTRONIC ............................... 245
Speedometer
Digital speedometer (on-board
computer) ...................................... 233
Selecting the display unit (on-
board computer) ............................ 238
Speedtronic ....................................... 245
Display message ............................ 293
Permanent ..................................... 247
Variabl e......................................... 246
SRS (Supplemental Restraint Sys-
tem) ...................................................... 35
Display message ............................ 304
Warning lamp ........................... 35, 309
Standard display (on-board com-
puter) ................................................. .233
Station list ......................................... 161
Station pre-sets ................................. 162
Stations Saving ............................................ 163
Tuning in ........................................ 161
Station search ................................... 162
Steering wheel Adjusting ....................................... 206
Adjusting (electrically). ..................207
Adjusting (manually). .....................206
Buttons (on-board computer) ......... 230
Storing settings ............................. 210
Steering wheel boss
Cleaning ......................................... 284
Steering wheel gearshift paddles ....227
Stowage compartment Rear stowage compartment ........... 258 14
Index BA 197 ECE RE 2010/6a; 1; 2, en-GB
sabbae uV ersion: 3.0.3.6
2010-05-07T14:19:43+02:00 - Seite 14
Page 20 of 361
Volume
Adjusting ......................................... 67
Phone call s...................................... 67
Traffi cannouncements ....................67 W
Warning and indicator lamps ABS (yellow) ................................... 308
ESP ®
........................................ 47, 308
ESP ®
OFF ....................................... 309
ESP ®
Sport .................................... 309
LIM (cruise control) ........................ 244
LIM (variable Speedtronic) .............246
Tyr ep ressure monitor ...................311
Warning tone ..................................... 312
Warning triangle ................................ 288
Washer fluid Display message ............................ 305
Washer fluid reservoir ..............270, 352
Filling capacity ............................... 352
Waveband
Switching (radio )............................ 160
Wearing seat belts ............................210
Wheel bolts Tightening torque ........................... 332
Wheel chock
Use ................................................ 329
Wheels
General notes ................................ 270
Interchanging ................................. 275
Windows
Cleaning ......................................... 283
see Side windows
Windscreen washe rfluid .................. 352
Topping up ..................................... 270
Windscreen washer system .....270, 352
Windscreen wipers ...........................217
Malfunction ................................... .317
Replacing the wiper blades ............325
Winte rdriving ............................ 275, 276
Winter tyres ....................................... 275
Limiting the speed (on-board com-
puter) ............................................. 248
Wiper blades
Cleaning ......................................... 283
Replacing ....................................... 325 Index
17 BA 197 ECE RE 2010/6a; 1; 2, en-GB
sabbae uV ersion: 3.0.3.6
2010-05-07T14:19:43+02:00 - Seite 17
Page 220 of 361
combination switch beyond the pressure
point in the direction of arrow 000Bor
000D(Y page 215).
The indicator lamp on the corresponding
side of the vehicle flashes.
The hazard warning lamps switch off auto-
matically afte rfull brak eapplication if the
vehicle reaches a speed of over 10 km/h
again. Headlamp cleaning system
The headlamps are cleaned automatically if
the "Wipe with washer fluid" function is oper-
ated 10 times while the lights are on and the
engine is running. The headlamps are cleaned
again every tenth time the windscreen is
wiped with washer fluid. When you switch off
the ignition, the automatic headlamp cleaning
system is reset and counting is resumed from
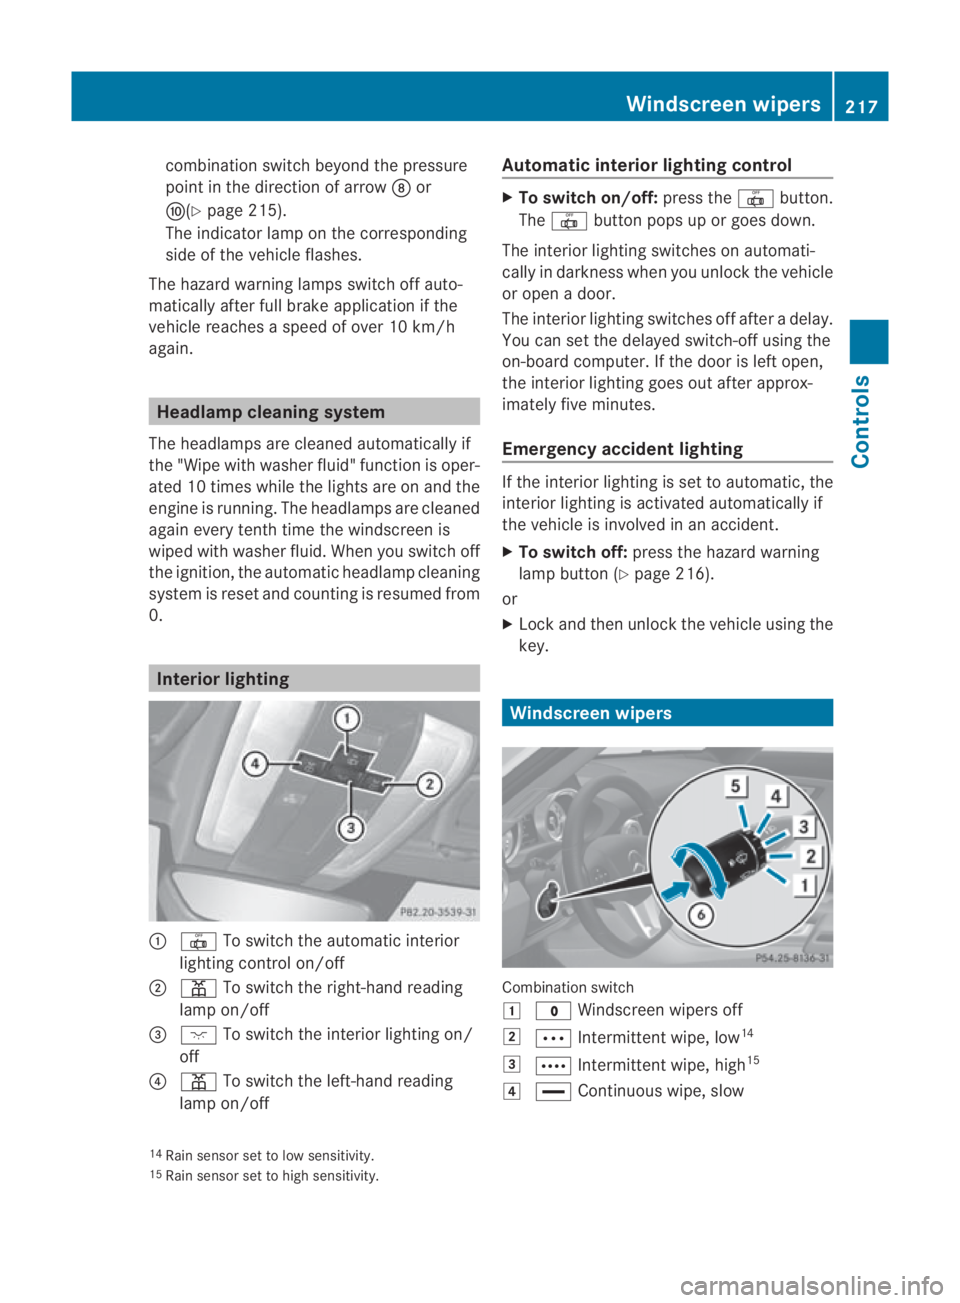
0. Interior lighting
0001
0015 To switch the automatic interior
lighting control on/off
0002 0002 To switch the right-han dreading
lamp on/off
0015 0007 To switch the interior lighting on/
off
0014 0002 To switch the left-hand reading
lamp on/off Automatic interior lighting control X
To switch on/off: press the0015button.
The 0015 button pops up or goes down.
The interior lighting switches on automati-
cally in darkness when you unlock the vehicle
or open a door.
The interior lighting switches off after a delay.
You can set the delayed switch-off using the
on-board computer. If the door is left open,
the interior lighting goes out after approx-
imately five minutes.
Emergency accident lighting If the interior lighting is set to automatic, the
interior lighting is activated automatically if
the vehicle is involved in an accident.
X
To switch off: press the hazard warning
lamp button (Y page 216).
or
X Lock and then unlock the vehicle using the
key. Windscreen wipers
Combination switch
0003
0010 Windscreen wipers off
0004 000A Intermittent wipe, low 14
0005 000C Intermittent wipe, high 15
0006 0014 Continuous wipe, slow
14 Rain sensor set to low sensitivity.
15 Rain sensor set to high sensitivity. Windscreen wipers
217Controls
BA 197 ECE RE 2010/6a; 1; 2, en-GB
sabbaeu Version: 3.0.3.6 2010-05-07T14:19:43+02:00 - Seite 217 Z
Page 221 of 361
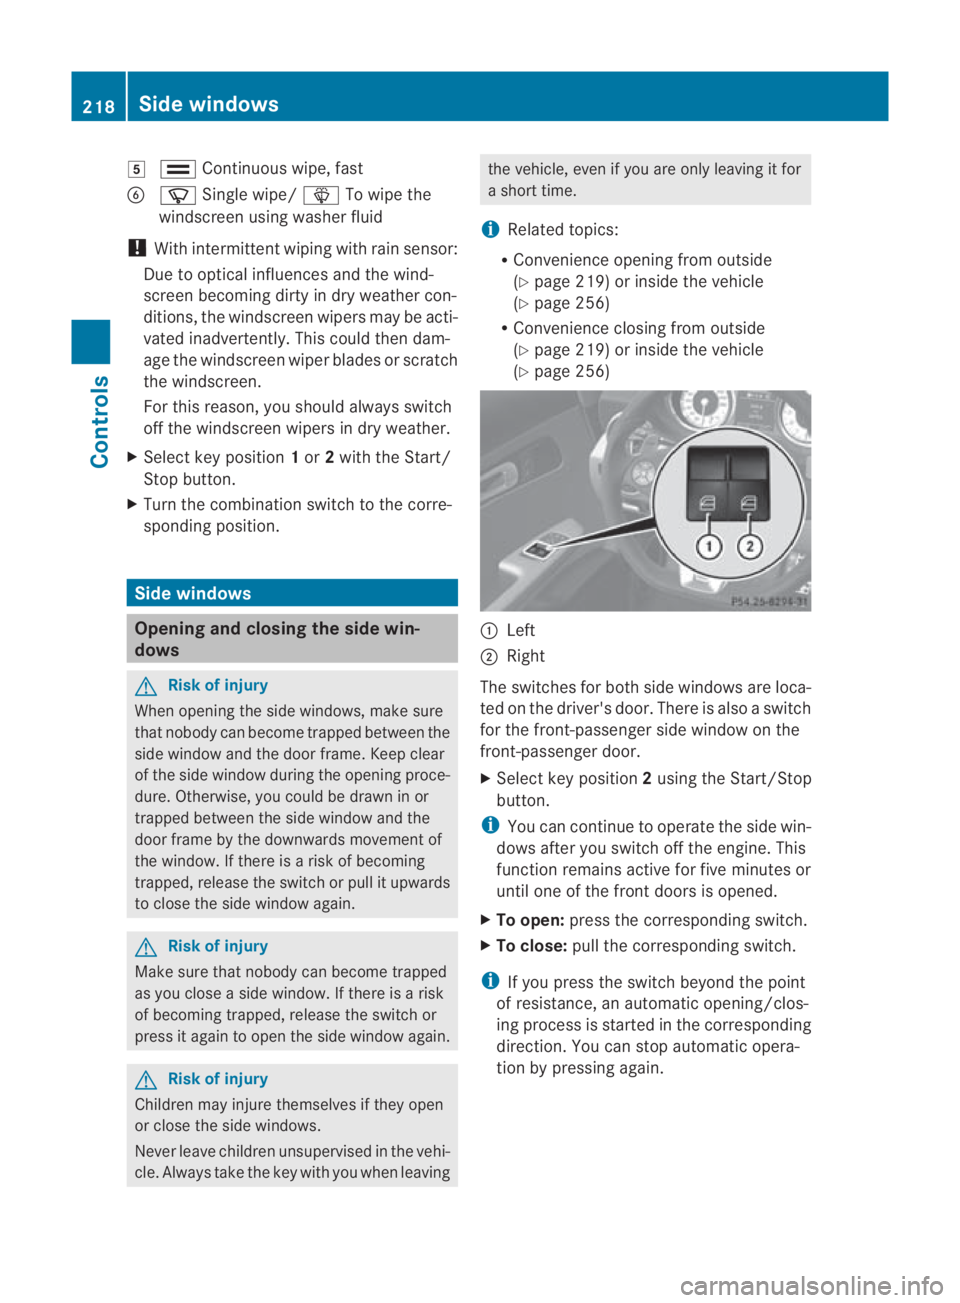
0007
000F Continuous wipe, fast
0013 000C Single wipe/ 0008To wipe the
windscree nusing washer fluid
! With intermittent wiping with rain sensor:
Due to optical influences and the wind-
screen becoming dirty in dry weather con-
ditions, the windscreen wipers may be acti-
vated inadvertently. This could then dam-
age the windscreen wiper blades or scratch
the windscreen.
For this reason, you should always switch
off the windscreen wipers in dry weather.
X Select key position 1or 2with the Start/
Stop button.
X Turn the combination switch to the corre-
sponding position. Side windows
Opening and closing the side win-
dows G
Risk of injury
When opening the side windows, make sure
that nobody can become trapped between the
side window and the door frame. Keep clear
of the side window during the opening proce-
dure. Otherwise, you could be drawn in or
trapped between the side window and the
door frame by the downwards movement of
the window. If there is a risk of becoming
trapped, release the switch or pull it upwards
to close the side window again. G
Risk of injury
Make sure that nobody can become trapped
as you close a side window. If there is a risk
of becoming trapped, release the switch or
press it againt o open the side window again. G
Risk of injury
Children may injure themselves if they open
or close the side windows.
Never leave children unsupervised in the vehi-
cle. Always take the key with you when leaving the vehicle, even if you are only leaving it for
a short time.
i Related topics:
R Convenience opening from outside
(Y page 219) or inside the vehicle
(Y page 256)
R Convenience closing from outside
(Y page 219) or inside the vehicle
(Y page 256) 0001
Left
0002 Right
The switches for both side windows are loca-
ted on the driver's door. There is also a switch
for the front-passenger side window on the
front-passenger door.
X Select key position 2using the Start/Stop
button.
i You can continue to operate the side win-
dows after you switch off the engine. This
function remains active for five minutes or
until one of the front doors is opened.
X To open: press the corresponding switch.
X To close: pull the corresponding switch.
i If you press the switch beyond the point
of resistance, an automatic opening/clos-
ing process is started in the corresponding
direction .You can stop automatic opera-
tion by pressing again. 218
Side windowsControls
BA 197 ECE RE 2010/6a; 1; 2, en-GB
sabbaeu
Version: 3.0.3.6 2010-05-07T14:19:43+02:00 - Seite 218
Page 273 of 361
must display less than 70
†.Otherwise, you
could be scalded if hot coolant escapes.
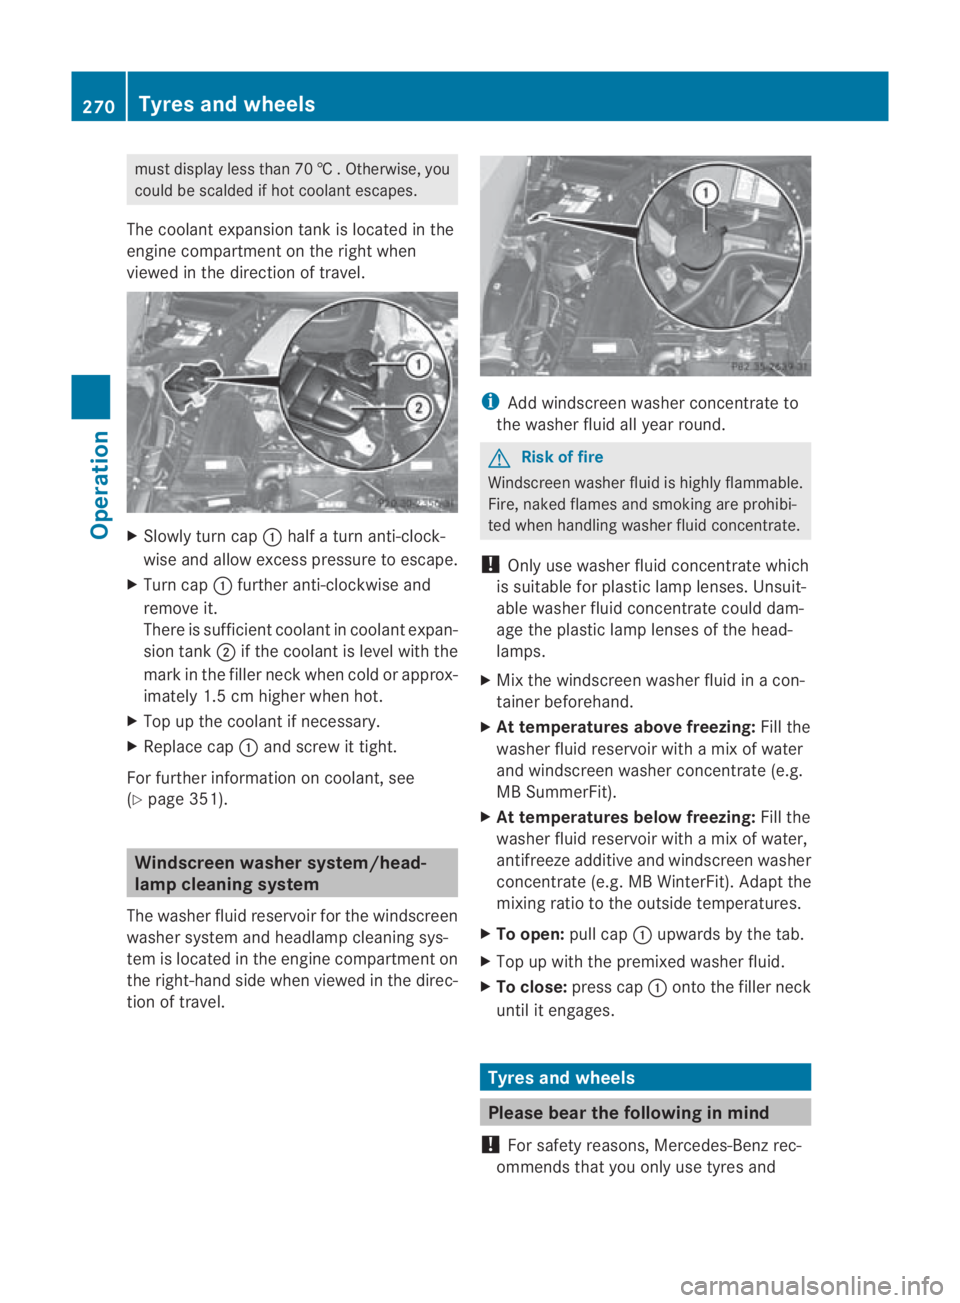
The coolant expansio ntank is located in the
engine compartment on the right when
viewed in the direction of travel. X
Slowly tur ncap 0001 half a turn anti-clock-
wise and allow excess pressure to escape.
X Turn cap 0001further anti-clockwise and
remove it.
There is sufficient coolan tincoolant expan-
sion tank 0002if the coolant is level with the
mark in the filler neck when cold or approx-
imately 1.5 cm higher when hot.
X Top up the coolant if necessary.
X Replace cap 0001and screw it tight.
For further information on coolant, see
(Y page 351). Windscreen washer system/head-
lamp cleaning system
The washer fluid reservoir for the windscreen
washer system and headlamp cleaning sys-
tem is located in the engine compartment on
the right-hand side when viewed in the direc-
tion of travel. i
Add windscreen washer concentrate to
the washer fluid all year round. G
Risk of fire
Windscreen washer fluid is highly flammable.
Fire, naked flames and smoking are prohibi-
ted when handling washer fluid concentrate.
! Only use washer fluid concentrate which
is suitable for plastic lamp lenses. Unsuit-
able washer fluid concentrate could dam-
age the plastic lamp lenses of the head-
lamps.
X Mix the windscreen washer fluid in a con-
tainer beforehand.
X At temperatures above freezing: Fill the
washer fluid reservoir with amix of water
and windscreen washer concentrate (e.g.
MB SummerFit).
X At temperatures below freezing: Fill the
washer fluid reservoir with amix of water,
antifreeze additive and windscreen washer
concentrate (e.g. MB WinterFit). Adapt the
mixing ratio to the outside temperatures.
X To open: pull cap0001upwards by the tab.
X Top up with the premixed washer fluid.
X To close: press cap 0001onto the filler neck
until it engages. Tyres and wheels
Please bear the following in mind
! For safety reasons, Mercedes-Ben zrec-
ommends that you only use tyres and 270
Tyres and wheelsOperation
BA 197 ECE RE 2010/6a; 1; 2, en-GB
sabbaeu
Version: 3.0.3.6 2010-05-07T14:19:43+02:00 - Seite 270
Page 286 of 361
Cleaning paintwork
Scratches, corrosive deposits, areas affected
by corrosio nand damage caused by inade-
quate care canno talways be completely
repaired. In such cases, visit a qualified spe-
cialist workshop immediately, e.g. a
Mercedes-Benz Service Centre.
X Remove the following types of dirt immedi-
ately, whilst avoiding rubbin gtoo hard.
Soak:
R insect remains with insect remover
R bird droppings with water
and rinse off the treated surface after-
wards.
Remove:
R tree resin, oils, fuels and greases by rub-
bing gently with a cloth soaked in petro-
leum ether or lighter fluid
R tar stain with tar remover
R wax with silicone remover
! Do not affix:
R stickers
R films
R magnetic plates or similar items
to painted surfaces. Otherwise, you could
damage the paintwork.
Cleaning the windows X
Clean the inside and outside of the win-
dows with a damp cloth and a cleaning
product approved and recommended by
Mercedes-Benz.
! Clean the water drainage channels of the
windscreen and the rear window at regular
intervals. Under certain circumstances,
deposits such as leaves, petals and pollen
may prevent water from draining away
leading to corrosion damage. Cleaning wiper blades G
Risk of injury
Before cleaning the windscreen or wiper
blades, turn the key to position 0in the igni-
tion lock or press the Start/Stop button
repeatedly until all indicator lamps in the
instrument cluster have gone out. The wind-
screen wipers could otherwise move and
injure you.
! Only fold the windscreen wipers away
from the windscreen when vertical. Other-
wise, you will damage the bonnet.
! Do not clean the wiper blades too often
and do not rub them too hard, as this will
result in damage to the graphite coating.
This could cause wiper noise.
X Switch off the engine.
X Take your foot off the brake pedal.
X Set the windscreen wipers to posi-
tion 0014 on the combination switch.
X Press the Start/Stop button repeatedly
until the windscreen wipers start.
X When the wiper arms have reached a ver-
tical position: press the Start/Stop button.
X Fold the wiper arm away from the wind-
screen until it engages.
X Set the wiper blade at right angles to the
wiper arm.
X Clean the wiper blades carefully using a
damp cloth.
X Fold the windscreen wipers back again
before switching on the ignition.
Cleaning the headlamps X
Clean the plastic lenses of the headlamps
and rear lighting with a damp sponge and
windscreen washer fluid or cleaning cloths.
! Only use windscreen washer fluid or
cleaning cloths which are suitable for plas-
tic lamp lenses. Unsuitable windscreen
washer fluid or cleaning cloths could Care
283Operation
BA 197 ECE RE 2010/6a; 1; 2, en-GB
sabbaeu Version: 3.0.3.6 2010-05-07T14:19:43+02:00 - Seite 283 Z
Page 308 of 361
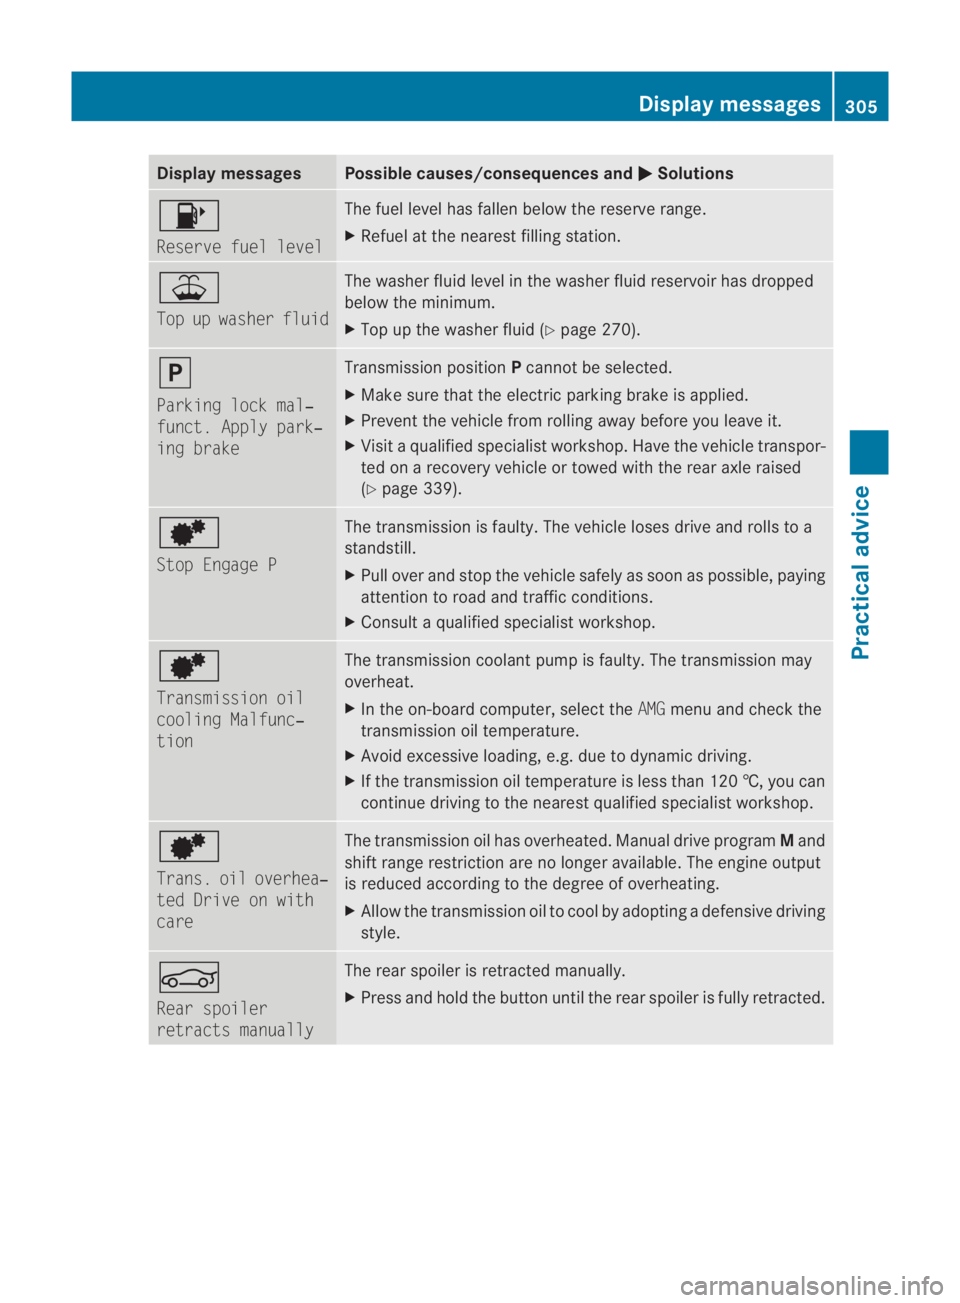
Display messages Possible causes/consequences and
0003 Solutions
0007
Reserve fuel level The fuel level has fallen belo
wthe reserve range.
X Refuel at the nearest filling station. 0016
Top up washer fluid The washer fluid level in the washer fluid reservoir has dropped
below the minimum.
X
Top up the washer fluid (Y page 270).0009
Parking lock mal‐
funct. Apply park‐
ing brake Transmission position
Pcannot be selected.
X Make sure that the electric parking brake is applied.
X Prevent the vehicle from rolling away before you leave it.
X Visit a qualified specialist workshop. Have the vehicle transpor-
ted on a recovery vehicle or towed with the rear axle raised
(Y page 339). 0001
Stop Engage P The transmission is faulty. The vehicle loses drive and rolls to a
standstill.
X
Pull over and stop the vehicle safely as soon as possible, paying
attention to road and traffic conditions.
X Consult a qualified specialist workshop. 0001
Transmission oil
cooling Malfunc‐
tion The transmission coolant pump is faulty. The transmission may
overheat.
X In the on-board computer, select the AMGmenu and check the
transmission oil temperature.
X Avoid excessive loading, e.g. due to dynamic driving.
X If the transmission oil temperature is less than 120 †, you can
continue driving to the nearest qualified specialist workshop. 0001
Trans. oil overhea‐
ted Drive on with
care The transmission oil has overheated. Manual drive program
Mand
shift range restriction are no longer available. The engine output
is reduced according to the degree of overheating.
X Allow the transmission oil to cool by adopting a defensive driving
style. 0005
Rear spoiler
retracts manually The rear spoiler is retracted manually.
X
Press and hold the button until the rear spoiler is fully retracted. Display messages
305Practical advice
BA 197 ECE RE 2010/6a; 1; 2, en-GB
sabbaeu Version: 3.0.3.6 2010-05-07T14:19:43+02:00 - Seite 305 Z
Page 320 of 361
Headlamps
Problem Possible causes/consequences and
0003 Solutions
The headlamps are mis-
ted up on the inside. Air humidity is very high.
X
Drive with the headlamps switched on.
The headlamps are demisted after a short distance. The headlamp housing is not properly sealed and moisture has
been able to enter.
X
Have the headlamps checked at a qualified specialist workshop. Windscreen wipers
Problem Possible causes/consequences and
0003 Solutions
The windscreen wipers
are jammed. Leaves or snow, for example, may be obstructing the windscreen
wiper movement. The wiper motor has been deactivated.
X
For safety reasons, you should remove the key from the ignition
lock.
X Remove the cause of the obstruction.
X Switch the windscreen wipers back on. The windscreen wipers
fail completely.
G
Risk of accident
The windscreen wiper drive is malfunctioning.
X Select another wiper speed on the combination switch.
X Have the windscreen wipers checked at a qualified specialist
workshop. The windscreen washer
fluid from the spray
nozzles no longer hits
the centre of the wind-
screen. The spray nozzles are misaligned.
X
Have the spray nozzles adjusted at a qualified specialist work-
shop. The wiper arms are on
the windscreen. The wiper arms have been moved by an external force.
X
Select key position 2(ignition) with the Start/Stop button.
The wiper arms move back downa utomatically. Troubleshooting
317Practical advice
BA 197 ECE RE 2010/6a; 1; 2, en-GB
sabbaeu Version: 3.0.3.6
2010-05-07T14:19:43+02:00 - Seite 317 Z