2010 MERCEDES-BENZ SLS COUPE spare tire
[x] Cancel search: spare tirePage 18 of 361

Stowage compartments
...................257
Armrest (under) ............................. 258
Cuph older..................................... 258
Glove compartment .......................257
Telephone compartment ................258
Submenu (on-board computer)
Convenience .................................. 240
Factory setting ............................... 240
Instrument cluster .........................238
Lights ............................................ .238
Standard displa y............................ 233
Vehicle .......................................... .240
Sub-programmes (DAB) ....................165
Summer and standard time Switching ......................................... 73
Summer opening
see Convenience opening
Sun visor ............................................ 259
Supplemental Restraint System see SRS ........................................... 35
See SRS ........................................... 35
Surround lighting
Switching on/off (on-board com-
puter) ............................................. 239
Switching off the alarm
ATA .................................................. 49
Syste mlanguage
Setting ............................................. 78
Syste mmenu....................................... 71
Syste msettings
Menu overview ................................ .71T
Tail lamps Display message ............................ 301
Tail pipes
Cleaning ......................................... 284
Tank
see Fuel tank
Tank capacity .................................... 349
Technical data ................................... 352
Emergency spare wheel .................355
Telephone
Accepting/ending call ...................144
Accepting or rejecting a waiting
call ................................................. 146
Ending an active call ......................146Entering phone numbers ................ 145
Incoming call
................................. 144
Outgoing call ................................. 144
Reception and transmission vol-
ume ............................................... 135
see Mobile phone .......................... 236
Sending DTMF tones ..................... .146
Single call ...................................... 145
Switching hands-free microphone
on/off ............................................ 146
Telephone basic menu
Bluetooth interface ........................132
Convenience telephony .................134
Telephone compartment ..................258
Telephone mode Redialling ....................................... 145
Telephone number
Entering ......................................... 144
Temperature
Engine oil ....................................... 229
Engine oil (on-board computer) ...... 241
Outside temperature ..................... .230
Transmissio noil (on-board com-
puter )............................................. 241
Text message (SMS) (convenience
telephone)
Calling the sende r.......................... 148
Deleting ......................................... 149
Incoming ........................................ 147
Read-aloud function .......................148
Reading .......................................... 148
Storing the sende rinthe address
book ...................................... 148, 149
THERMOTRONIC
Malfunction indicator lamp ............307
Tightening torque .............................. 332
Time Lap time (on-board computer) .......241
Setting ............................................. 72
Time format
Setting ............................................. 72
Timer (on-board computer) ..............241
Time zone Setting ............................................. 73
TIREFIT kit
Using ............................................. 326
TMCPro ............................................... 119 Index
15 BA 197 ECE RE 2010/6a; 1; 2, en-GB
sabbae uV ersion: 3.0.3.6
2010-05-07T14:19:43+02:00 - Seite 15
Page 275 of 361

the standard valve cap or other valve caps
approved by Mercedes-Benz for your vehi-
cle.
R You should regularly check the pressure of
all your tyres, particularly prior to long trips,
and correct the pressure as necessary
(Y page 272).
Notes on driving R
While driving, pay attentio nto vibrations,
noises and unusual handling characteris-
tics, e.g. pulling to one side. This may indi-
cate that the wheels or tyres are damaged.
If you suspect that a tyre is defective,
reduce your speed immediately. Stop the
vehicle as soon as possible to check the
wheels and tyres for damage. Hidden tyre
damage could also be causing the unusual
handling characteristics. If you find no
signs of damage, have the wheels and tyres
examined at a specialist workshop, for
example at a Mercedes-Benz Service
Centre.
R When parking your vehicle, make sure that
the tyres do not get deformed by the kerb
or other obstacles. If it is necessary to drive
over kerbs, speed humps or similar eleva-
tions, try to do so slowly and at an obtuse
angle. Otherwise, the tyres, particularly the
sidewalls, can get damaged. Direction of rotation
Tyres with a specified direction of rotation
have additional benefits, e.g. if there is a risk
of aquaplaning. You will only gain these ben-
efits if the correct direction of rotation is
observed.
An arrow on the tyre wall indicates its correct
direction of rotation. Tyre tread
G
Risk of accident
Bear in mind that:
R tyre grip decreases rapidly on wet roads
when the tread depth is less than 3mm.
Thus, you should replace tyres that have
insufficient tread.
R winter tyres should be replaced when the
tread depth is 4mmorless as they will no
longer provide adequate grip.
R the tread on a tyre may not wear evenly.
Thus, you should regularly check the tread
depth and the condition of the tread across
the entire width of all tyres. If necessary,
turn the steering wheel so that you can see
the tyre tread more easily.
You could otherwise lose control of the vehi-
cle and cause an acciden tdue to the reduced
grip of the tyres on the road. Tyre pressures
i You will find a table of tyre pressures for
various operating conditions on the inside
of your vehicle's fuel fille rflap.
The value specified in the technical data is
valid for the collapsible emergency spare
wheel* 18
. G
Risk of accident
Tyre pressure that is either too high or too low
has a negative effect on vehicle safety, which
could lead you to cause an accident .There-
fore, you should regularly check the pressure
of all the tyres, particularly prior to long trips,
and correct the pressure as necessary.
Use a suitable tyre pressure gauge to do this.
The outer appearance of a tyre does not per-
mit any reliable conclusion about the tyre
pressure. You can also check the tyre pres-
sure using the on-board computer.
18 Only for certain countries. 272
Tyres and wheelsOperation
*o
ptional
BA 197 ECE RE 2010/6a; 1; 2, en-GB
sabbaeu
Version: 3.0.3.6 2010-05-07T14:19:43+02:00 - Seite 272
Page 328 of 361

Replacing the wiper blades
G
Ris
kofa ccident
The windscreen will no tlonger be wiped prop-
erly if the wiper blades are worn. This could
prevent you from observing the traffic condi-
tions, thereby causing an accident .Replace
the wiper blades twice a year, ideally in spring
and autumn. G
Risk of accident
The wiper arms could start moving and cause
an injury if you leave the windscreen wipers
switched on.
Remove the key from the ignition lock before
replacing the wiper blades.
! To avoid damaging the windscreen wiper
blades, make sure that you touch only the
wiper arm of the windscreen wiper. Removing
Moving the wiper blades to avertical
position X
Switch off the engine.
X Take your foo toff the brake pedal.
X Set the windscreen wipers to posi-
tion 0014 on the combination switch.
X Press the Start/Stop button repeatedly
until the windscreen wipers start.
X When the wiper arms have reached a ver-
tical position, press the Start/Stop button.
X Fold the wiper arm away from the wind-
screen until it engages.
X Set the wiper blade at right angles to the
wiper arm. Removing the wiper blades X
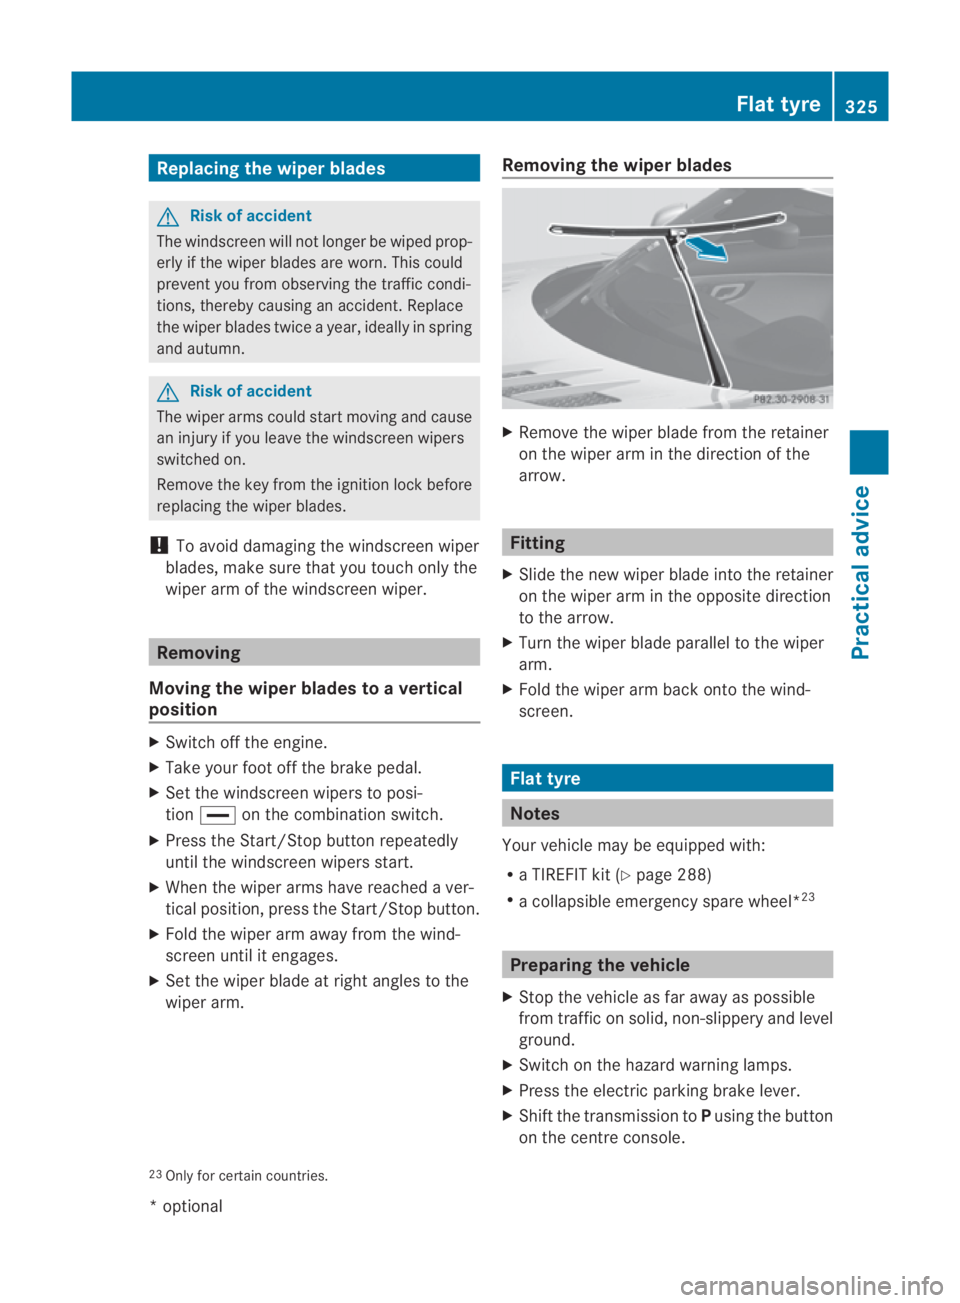
Remove the wiper blade from the retainer
on the wiper arm in the direction of the
arrow. Fitting
X Slide the new wiper blade into the retainer
on the wiper arm in the opposite direction
to the arrow.
X Turn the wiper blade parallel to the wiper
arm.
X Fold the wiper arm back onto the wind-
screen. Flat tyre
Notes
You rvehicle may be equipped with:
R a TIREFIT kit (Y page 288)
R a collapsible emergency spare wheel* 23 Preparing the vehicle
X Stop the vehicle as far away as possible
from traffic on solid, non-slippery and level
ground.
X Switch on the hazard warning lamps.
X Press the electric parking brake lever.
X Shift the transmission to Pusing the button
on the centre console.
23 Only for certain countries. Flat tyre
325Practical advice
*optional
BA 197 ECE RE 2010/6a; 1; 2, en-GB
sabbaeu Version: 3.0.3.6 2010-05-07T14:19:43+02:00 - Seite 325 Z
Page 336 of 361

X
Turn the jack back to the out-of-use posi-
tion and stow it in the boot again with the
rest of the wheel-changing tools. Emergency spare wheel*
G
Risk of accident
The wheel dimensions and tyre size of the
emergency spare wheel differ from those of
the standard wheels.
Your vehicle's handling characteristics will
change when driving with a collapsible emer-
gency spare wheel. Adapt your style of driving
accordingly.
The collapsible emergency spare wheel may
only be used for a short time. Do not exceed
the maximum speed of 80 km/h and do not
deactivate ESP ®
. G
Risk of accident
Have the collapsible emergenc yspare wheel
replaced as soon as possible at a qualified
specialist workshop which has the necessary
specialist knowledge and tools to carry out
the work required. Mercedes-Benz recom-
mends that you use a Mercedes-Benz Service
Centre for this purpose. In particular, work
relevant to safety or on safety-related sys-
tems must be carried out at a qualified spe-
cialist workshop.
Never drive the vehicle with more than one
collapsible emergency spare wheel fitted.
Inflating the collapsible emergency
spare wheel 25 G
Risk of accident
Pump up the collapsible emergency spare
wheel before lowering the vehicle. You could
otherwise damage the wheel rim.
X Remove the electric air pump from the boot
(Y page 288). Comply with the manufacturer’s safety
instructions on the sticker on the electric air
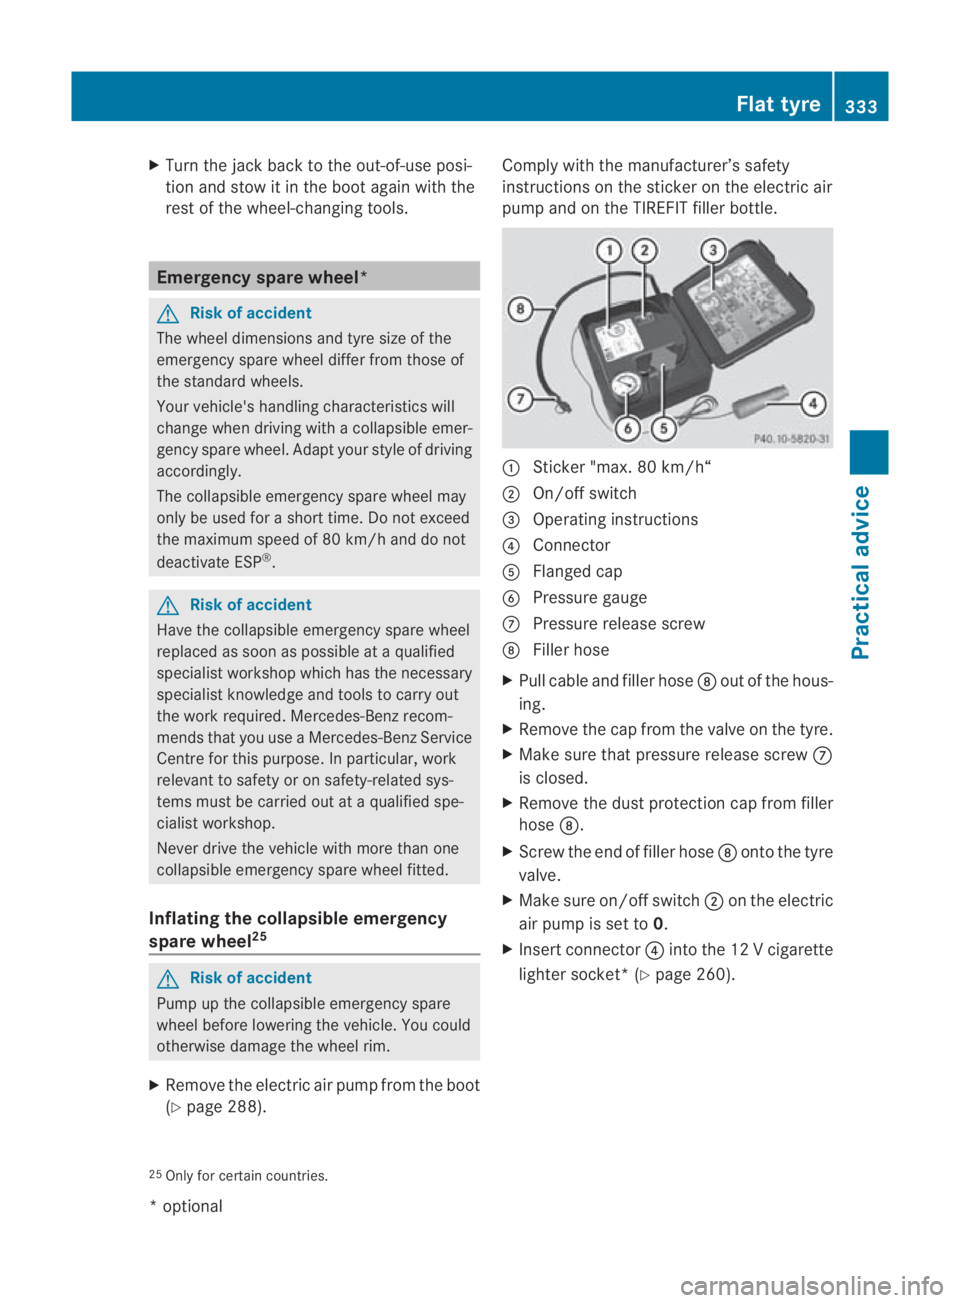
pump and on the TIREFIT filler bottle.
0001
Sticker "max. 80 km/h“
0002 On/off switch
0015 Operating instructions
0014 Connector
0012 Flanged cap
0013 Pressure gauge
000A Pressure release screw
000B Filler hose
X Pull cable and filler hose 000Bout of the hous-
ing.
X Remove the cap from the valve on the tyre.
X Make sure that pressure release screw 000A
is closed.
X Remove the dust protection cap from filler
hose 000B.
X Screw the end of filler hose 000Bonto the tyre
valve.
X Make sure on/off switch 0002on the electric
air pump is set to 0.
X Insert connector 0014intothe 12 V cigarette
lighter socket*( Ypage 260).
25 Only for certain countries. Flat tyre
333Practical advice
*optional
BA 197 ECE RE 2010/6a; 1; 2, en-GB
sabbaeu Version: 3.0.3.6 2010-05-07T14:19:43+02:00 - Seite 333 Z