2010 MERCEDES-BENZ SLS COUPE length
[x] Cancel search: lengthPage 120 of 361
Reducing volume during
anavigation
announcement The volume of an active radio of video source
can be automatically reduced during a navi-
gation announcement.
X To activate/deactivate the audio fade-
out: select Navi0004 Audio fadeout.
The function is switched on 0019or off 0004,
depending on the previous status.
Setting the volume manually
X Set the volume during a navigation
announcement.
or
X In the map display with the menu system
shown, select 0025and set the volume. Traffic jam function
i The traffic jam function avoids a blocked
sectio nofthe route ahead of you. You can
set the length of the blocked route section.
If possible, COMAND calculates a detour
around the blocked section of the route.
X Select Route0004Detour in map view with
the menu system displayed.
X To block a section of the route: select
Longer orShorter repeatedly until the
desired length has been set.
i The total length of the section that can be
blocked is defined by the digital map. The
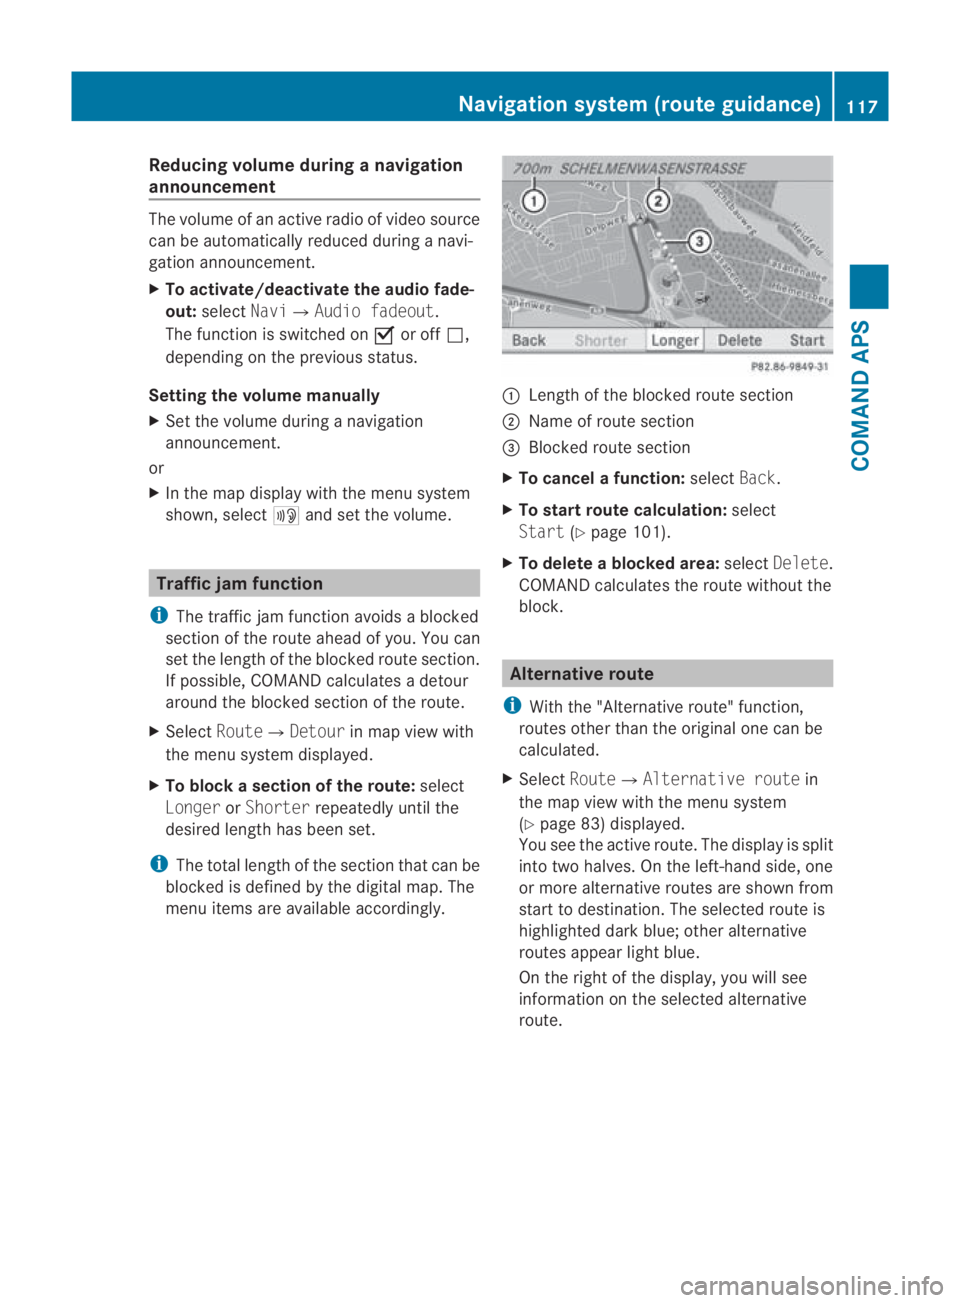
menu items are available accordingly. 0001
Length of the blocked route section
0002 Name of route section
0015 Blocked route section
X To cancel afunction: selectBack.
X To start route calculation: select
Start (Ypage 101).
X To delete a blocked area: selectDelete .
COMAND calculates the route without the
block. Alternative route
i With the "Alternative route" function,
routes other than the original one can be
calculated.
X Select Route0004 Alternative route in
the map view with the menu system
(Y page 83) displayed.
You see the active route. The display is split
into two halves. On the left-hand side, one
or more alternative routes are show nfrom
start to destination. The selected route is
highlighted dark blue; other alternative
routes appear light blue.
On the right of the display, you will see
information on the selected alternative
route. Navigation system (route guidance)
117COMAND APS
BA 197 ECE RE 2010/6a; 1; 2, en-GB
sabbaeu Version: 3.0.3.6
2010-05-07T14:19:43+02:00 - Seite 117 Z
Page 246 of 361
Lap evaluation
This function is only available if you have
stored at least two laps and have stopped the
RACETIMER.
X Press 0008or000E on the steering wheel
to selec tthe AMG menu.
X Press the 000Fbutton repeatedly until the
lap evaluation is shown.
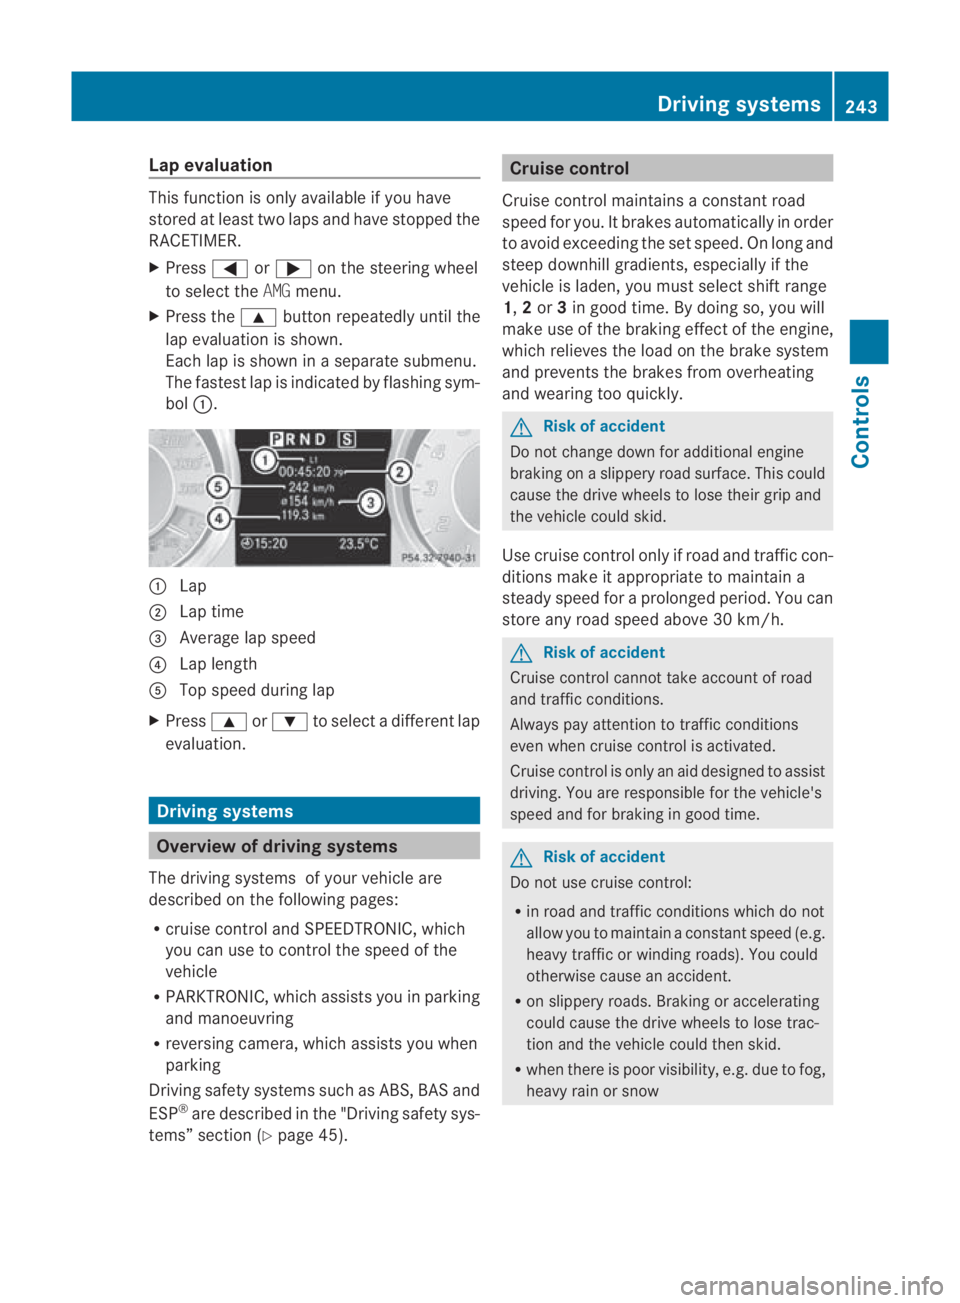
Each lap is shown in a separate submenu.
The fastest lap is indicated by flashing sym-
bol 0001. 0001
Lap
0002 Lap time
0015 Average lap speed
0014 Lap length
0012 Top speed during lap
X Press 000For000C to select a different lap
evaluation. Driving systems
Overview of driving systems
The driving systems of your vehicle are
described on the following pages:
R cruise control and SPEEDTRONIC, which
you can use to control the speed of the
vehicle
R PARKTRONIC, which assists you in parking
and manoeuvring
R reversing camera, which assists you when
parking
Driving safety systems such as ABS, BAS and
ESP ®
are described in the "Driving safety sys-
tems” section (Y page 45). Cruise control
Cruise control maintains a constant road
speed for you. It brakes automatically in order
to avoid exceeding the set speed. On long and
steep downhill gradients, especially if the
vehicle is laden, you must select shift range
1, 2or 3in good time. By doing so, you will
make use of the braking effect of the engine,
which relieves the load on the brake system
and prevents the brakes from overheating
and wearing too quickly. G
Risk of accident
Do not change down for additional engine
braking on a slippery road surface. This could
cause the drive wheels to lose their grip and
the vehicle could skid.
Use cruise control only if road and traffic con-
ditions make it appropriate to maintain a
steady speed for a prolonged period. You can
store any road speed above 30 km/h. G
Risk of accident
Cruise control cannot take account of road
and traffic conditions.
Always pay attention to traffic conditions
even when cruise control is activated.
Cruise control is only an aid designed to assist
driving. You are responsible for the vehicle's
speed and for braking in good time. G
Risk of accident
Do not use cruise control:
R in road and traffic conditions which do not
allow you to maintain a constant speed (e.g.
heavy traffic or winding roads). You could
otherwise cause an accident.
R on slippery roads. Braking or accelerating
could cause the drive wheels to lose trac-
tion and the vehicle could then skid.
R when there is poor visibility, e.g. due to fog,
heavy rain or snow Driving systems
243Controls
BA 197 ECE RE 2010/6a; 1; 2, en-GB
sabbaeu Version: 3.0.3.6 2010-05-07T14:19:43+02:00 - Seite 243 Z
Page 337 of 361
X
Select key position 2with the Start/Stop
button (Y page 202).
X Press on/of fswitch 0002on the electric air
pump to I.
The electric air pump is switched on. The
tyre is inflated.
X When the specified tyre pressure (see
Emergency spare wheel (Y page 355)) has
been reached, press on/off switch 0002on
the electric air pump to 0.
The electric air pump is switched off.
! Do not operate the electric air pump for
longer than ten minutes at a time without
a break .Itmay otherwise overheat.
The air pump can be operated again once
it has cooled down.
If the tyre pressure is higher than the value
specified:
X Open pressure release screw 000Auntil the
tyre pressure is correct.
X Remove fille rhose 000Bfrom the tyre valve.
X Stow the electric air pump in a safe and
accessible place in the vehicle.
Stowing aused collapsible emergency
spare wheel 25 If you want to store a collapsible emergency
spare wheel in the vehicle again, follow the
procedure described below. Otherwise, it will
not be possible to store it. We recommend
that this work is carried out at a specialist
workshop.
! Only place the collapsible emergency
spare wheel in the vehicle when it is dry.
Otherwise, moisture may remain in the
vehicle interior.
X Unscrew the valve cap with integrated
valve extractor from the valve.
X Unscrew the valve insert from the valve and
release the air. i
Fully deflating the tyres can take a few
minutes.
X Screw the valve insert back into the valve.
X Screw the valve cap back on.
X Put the tyre cover provided over the col-
lapsible emergency spare wheel.
X Store the collapsible emergency spare
wheel behind the front-passenger seat. Battery
Notes on the vehicle battery
In order for the battery to achieve the maxi-
mum possible service life, it must always be
sufficiently charged.
Have the battery charge checked more fre-
quently if you use the vehicle mainly for short
trips or if you leave it standing idle for a
lengthy period.
To preven tdamage from corrosion, only
replace the battery with one that has a central
ventilation cover.
Consult a Mercedes-Ben zService Centre if
you wish to leave your vehicle parked up for
a long period of time. G
Risk of injury
Comply with safety precautions and take pro-
tective measures when handling batteries. Risk of explosion
Fire, naked flames and
smoking are prohibited
when handling the battery.
Avoid creating sparks.
Battery acid is caustic.
Avoid contact with the skin,
eyes or clothing.
Wear suitable protective
clothing, in particular
25 Only for certain countries. 334
BatteryPractical advice
BA 197 ECE RE 2010/6a; 1; 2, en-GB
sabbaeu Version: 3.0.3.6 2010-05-07T14:19:43+02:00 - Seite 334
Page 341 of 361
Jump-starting
If your vehicle's battery is discharged, the engine can be jump-started from another vehicle
or from an external battery using jump leads.
Observe the following points:
R you may only jump-start the vehicle when the engine and catalytic converter are cold.
R do not start the engine if the battery is frozen. Let the battery thaw first.
R jump-starting may only be performed from batteries with a nominal voltage of 12 V.
R only use jump leads which have a sufficient cross-section and insulated terminal clamps.
i Jump leads and further information about jump-starting can be obtained from any
Mercedes-Benz Service Centre.
! Avoid repeated and lengthy starting attempts. Only use the jump-starting procedure for
the battery in the engine compartment.
Do not use a rapid-charging device to start the engine. G
Risk of injury
There is a risk of acid burns when jump-starting a vehicle due to the gases which escape from
the battery. Do not lean over the battery while the engine is being jump-started. G
Risk of explosion
Gases escaping from the battery during jump-starting may cause minor explosions. Avoid cre-
ating sparks. Keep naked flames away from the battery, and do not smoke.
Comply with safety precautions and take protective measures when handling batteries. You will
find these under "Battery" in the index.
X Make sure that the two vehicles do not touch.
X Press the electric parking brake handle.
X Shift the transmission to Pwith the button in the centre console.
X Switch off all electrical consumers (e.g. radio, blower etc.).
X Open the bonnet (Y page 267).338
Jump-startingPractical advice
BA 197 ECE RE 2010/6a; 1; 2, en-GB
sabbaeu
Version: 3.0.3.6 2010-05-07T14:19:43+02:00 - Seite 338
Page 355 of 361
Windscreen washe
rsystem
The headlamp cleaning system and wind-
screen washers ystem are both supplied from
the washer fluid reservoir.
Further information on windscree nwasher
fluid and its mixing ratio ( Ypage 270). Vehicle data
Vehicle dimensions
Vehicle length
(ECE)
4638 mm
Vehicle width
including exterior
mirrors
2078 mm
Vehicle height
29 1262 mm
Wheel base
2680 mm
Vehicle weights
Unladen weight
(according to
DIN)
30 1620 kg
Maximum boot
load
62 kg
Vehicle-specific weigh
tinformation can be
found on the vehicle identificatio nplate
(Y page 348). Boot lid opening dimensions
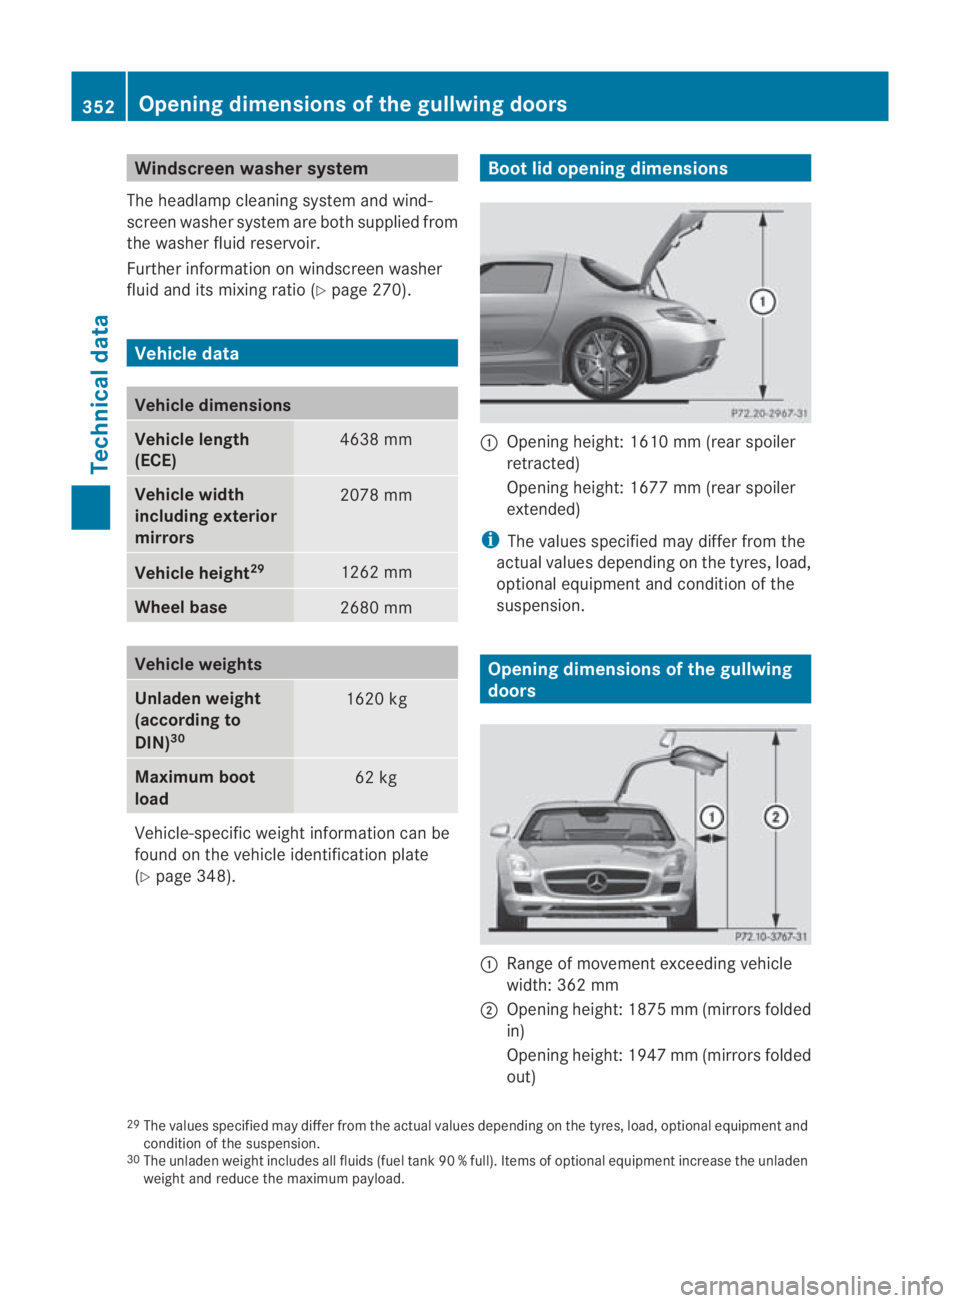
0001
Opening height :1610 mm (rea rspoiler
retracted)
Opening height: 167 7mm(rear spoiler
extended)
i The values specified may differ from the
actual values depending on the tyres, load,
optional equipment and condition of the
suspension. Opening dimensions of the gullwing
doors 0001
Range of movement exceeding vehicle
width: 362 mm
0002 Opening height: 1875 mm (mirrors folded
in)
Opening height: 1947 mm (mirrors folded
out)
29 The values specified may differ from the actual values depending on the tyres, load, optional equipment and
condition of the suspension.
30 The unladen weight includes all fluids (fuel tank 90 % full). Items of optional equipment increase the unladen
weight and reduce the maximu mpayload. 352
Opening dimensions of the gullwing doorsTechnical data
BA 197 ECE RE 2010/6a; 1; 2, en-GB
sabbae
uV ersion: 3.0.3.6
2010-05-07T14:19:43+02:00 - Seite 352