2010 MERCEDES-BENZ SLS COUPE seat memory
[x] Cancel search: seat memoryPage 10 of 361
Dashboard
Cleaning ........................................ .284
see Cockpit
see Instrument cluster
Dashboard lighting
see Instrument lighting ..................239
Date format
Setting ............................................. 72
Daytime driving lights ......................215
Display message ............................ 302
Switching on/off (on-board com-
puter) ............................................. 238
Delaye dswitch-off
Exterio rlighting (on-board com-
puter )............................................. 239
Interior lighting (on-board com-
puter) ............................................. 239
Delete button ....................................... 61
Deleting Call lists ......................................... 142
Destination
Deleting ................................. 126, 127
Entering from the destination
memory ......................................... 101
Entering from the list of last des-
tinations ......................................... 103
Entering using the map ..................103
Saving ............................................ 125
Destination entry
Specia ldestination ........................ 106
Destination information ...................118
Destination input ................................. 92
destination memory ..........................123
Destination memory Deleting an entry ........................... 126
My address .................................... 123
Storing adestination ..................... 125
Digital speedometer .........................233
Dipped-beam headlamps Display message ............................ 300
Symmetrical ................................... 279
Disc
CD/DVD ........................................ 167
MP3 ............................................... 166
Display
Adjusting the brightness ..................72
see Multifunctio ndisplay ............... 231Display design
Setting ............................................. 72
Display messages ............................. 289
ASSYST PLUS service interval dis-
pla y................................................ 279
Symbo lmessages .......................... 293
Text messages ............................... 291
Distance recorder
Total distance recorde r.................. 233
Trip meter ...................................... 233
Door
Display message .................... 294, 303
Emergency unlocking ..................... 322
Not unlocking the front-
passenger door .............................. 200
Opening (from the inside) ..............201
Unlocking all (factory setting) ........200
Door control panel
Overview .......................................... 32
Drinks holder
see Cuph older
Drive program .................................... 224
Manual .......................................... .229
Driver's airbag ..................................... 38
Driver's knee airbag ............................39
Driver's seat position ........................ 213
Driving abroad ................................... 279
Driving safety systems .......................45
ABS .................................................. 46
ADAPTIVE BRAKE ............................. 49
Adaptive brake lamps ......................46
BAS .................................................. 46
EBV .................................................. 49
ESP ®
................................................ 47
Driving systems ................................ 243
Cruise control ................................ 243
Parktroni c...................................... 248
Reversing camera ..........................250
Speedtronic ................................... 245
Driving tips
Braking .......................................... 277
Driving abroad ............................... 279
Driving on wet road s...................... 278
Fording .......................................... 278
Winter ............................................ 276
DTMF tones
Sending ......................................... 146 Index
7 BA 197 ECE RE 2010/6a; 1; 2, en-GB
sabbae uV ersion: 3.0.3.6
2010-05-07T14:19:43+02:00 - Seite 7
Page 71 of 361
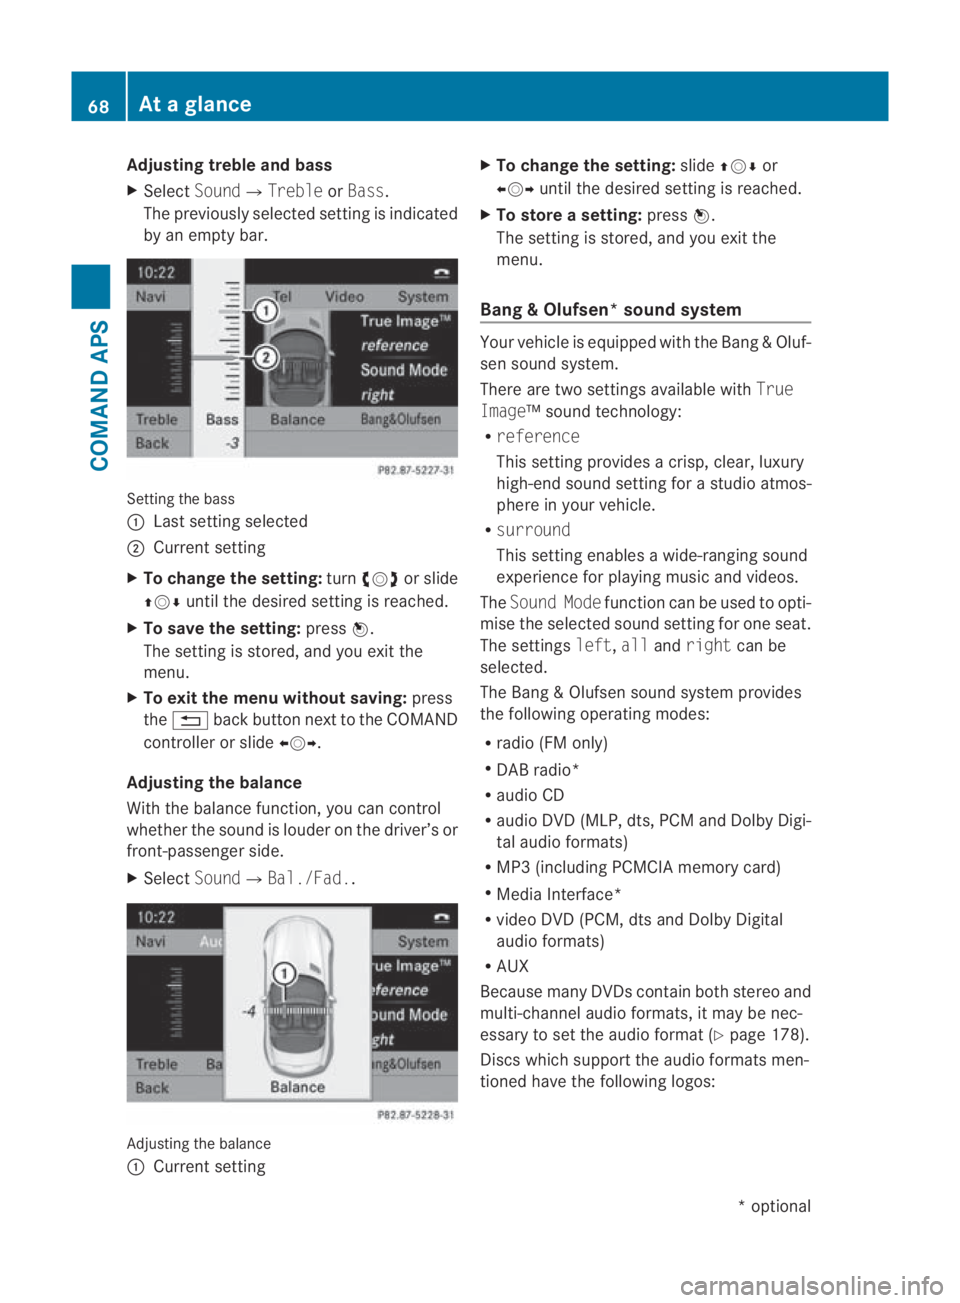
Adjusting treble and bass
X
Select Sound0004 TrebleorBass.
The previously selected setting is indicated
by an empty bar. Setting the bass
0001
Last setting selected
0002 Current setting
X To change the setting: turn002800130029 or slide
001F0013000D until the desired setting is reached.
X To save the setting: press0017.
The setting is stored, and you exit the
menu.
X To exit the menu without saving: press
the 0001 back butto nnext to the COMAND
controller or slide 002B0013002C.
Adjusting the balance
With the balance function, you can control
whether the sound is louder on the driver’s or
front-passenger side.
X Select Sound0004Bal./Fad.. Adjusting the balance
0001
Current setting X
To change the setting: slide001F0013000D or
002B0013002C until the desired setting is reached.
X To store asetting: press0017.
The setting is stored, and you exit the
menu.
Bang & Olufsen* sound system Your vehicle is equipped with the Bang
&Oluf-
sen sound system.
There are two settings available with True
Image™s ound technology:
R reference
This setting provides a crisp, clear, luxury
high-end sound setting for a studio atmos-
phere in your vehicle.
R surround
This setting enables a wide-ranging sound
experience for playing music and videos.
The Sound Mode function can be used to opti-
mise the selected sound setting for one seat.
The settings left,allandright can be
selected.
The Bang &Olufsen sound system provides
the following operating modes:
R radio (FM only)
R DAB radio*
R audio CD
R audio DV D(MLP, dts, PCM and Dolby Digi-
tal audio formats)
R MP3 (including PCMCIA memory card)
R Media Interface*
R video DVD (PCM, dts and Dolby Digital
audio formats)
R AUX
Because many DVDs contain both stereo and
multi-channel audio formats, it may be nec-
essary to set the audio format (Y page 178).
Discs which support the audio formats men-
tioned have the following logos: 68
At
ag lanceCOMAND APS
*optional
BA 197 ECE RE 2010/6a; 1; 2, en-GB
sabbaeu
Version: 3.0.3.6 2010-05-07T14:19:43+02:00 - Seite 68
Page 202 of 361
Doors
.................................................. 200
Opening/closing the boot ................201
Key positions .................................... 202
Seats .................................................. 203
Steering wheel .................................. 206
Mirrors ............................................... 207
Memory functions* ...........................210
Seat belts ........................................... 210
Lights ................................................. 214
Windscreen wipers ...........................217
Side windows .................................... 218
Driving and parking ..........................220
AMG SPEEDSHIFT DCT 7-speed
sports transmission .........................223
Instrument cluster ............................229
On-board computer ..........................230
Driving systems ................................ 243
Climate control ................................. 251
Loading and stowing ........................257
Features ............................................. 259 199Controls
BA 197 ECE RE 2010/6a; 1; 2, en-GB
sabbaeu
Version: 3.0.3.6 2010-05-07T14:19:43+02:00 - Seite 199
Page 207 of 361
G
Risk of injury
Make sure that nobody can become trapped
whe nyou adjust the seat.
Observe the notes concerning the airbag sys-
tem.
Secure children as recommended; see the
"Children in the vehicle" section.
! To avoid damage to the seats and the seat
heating, observe the following information:
R do not allow the seats to come into pro-
longed or excessive contact with any
type of fluid.
R if the seat covers are damp or wet, do not
switch on the seat heating. The seat
heating should also not to be used to dry
the seats.
R clean the seat covers as recommended;
see the " Interior care" section.
R do not transport heavy loads on the
seats. Do not place sharp objects on the
seat cushions, e.g. knives, nails or tools.
The seats should only be occupied by
passengers, if possible.
R do not cover the seat heating with insu-
lating materials while in operation, e.g.
covers, coats, bags, seat covers, child
seats or booster seats.
! When you move the seats, make sure that
there are no objects in the footwell or
behind the seats. Otherwise, you could
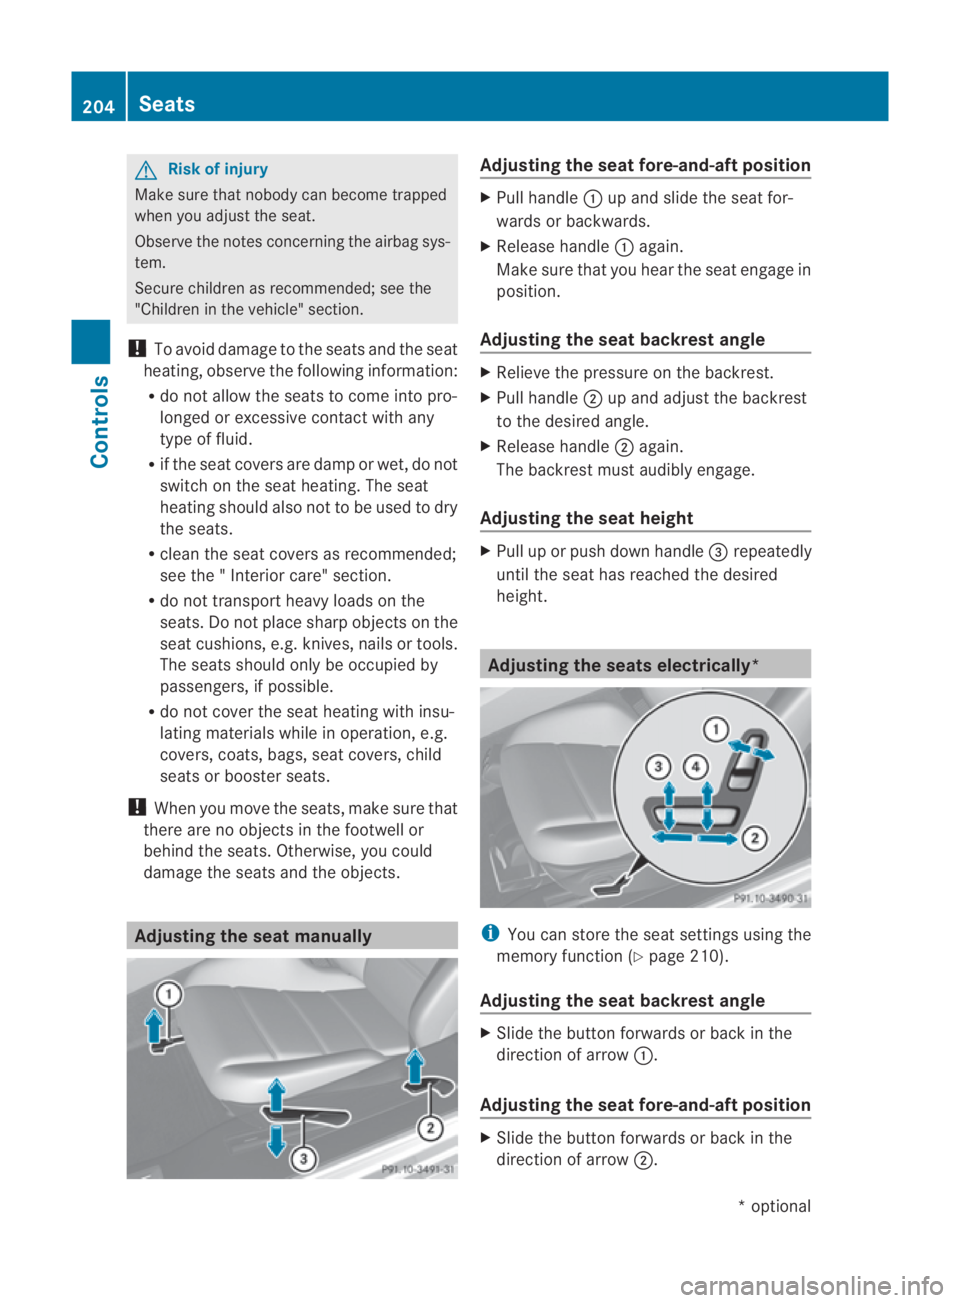
damage the seats and the objects. Adjusting the seat manually Adjusting the seat fore-and-aft position
X
Pull handle 0001up and slide the seat for-
wards or backwards.
X Release handle 0001again.
Make sure that you hear the seat engage in
position.
Adjusting the seat backrest angle X
Relieve the pressure on the backrest.
X Pull handle 0002up and adjust the backrest
to the desired angle.
X Release handle 0002again.
The backrest must audibly engage.
Adjusting the seat height X
Pull up or push down handle 0015repeatedly
until the seat has reached the desired
height. Adjusting the seats electrically*
i
You can store the seat settings using the
memory function (Y page 210).
Adjusting the seat backrest angle X
Slide the button forwards or back in the
direction of arrow 0001.
Adjusting the seat fore-and-aft position X
Slide the button forwards or back in the
direction of arrow 0002.204
SeatsControls
*o
ptional
BA 197 ECE RE 2010/6a; 1; 2, en-GB
sabbaeu
Version: 3.0.3.6 2010-05-07T14:19:43+02:00 - Seite 204
Page 213 of 361
Calling up
astore dparking position set-
ting X
Select key position 2with the Start/Stop
button (Y page 202).
X Engage reverse gear.
The exterior mirror on the front-passenger
side moves to the stored parking position.
The exterior mirror on the front-passenger
side moves back to its original position:
R as soon as you exceed a speed of
10 km/h
R about ten seconds after you have disen-
gaged reverse gear
R if you press button 0001for the exterior mir-
ror on the driver's side Memory functions*
Storing settings
Using the memory function, you can store up
to three different settings, e.g. for three dif-
ferent people.
You can save the following settings as a single
memory preset:
R sea tand backres tposition
R driver's side: steering wheel position
R driver's side: position of the exterior mir-
rors on the driver's and front-passenger
sides G
Risk of injury
The memory function can still be used when
the key has been removed. For this reason,
children should never be left unsupervised in
the vehicle. They could otherwise become
trapped when adjusting the seat or the steer-
ing wheel. G
Risk of accident
Only use the memory function on the driver's
side when the vehicle is stationary. Other-
wise, you could be distracted from the traffic
conditions by the steering wheel and seat moving of their own accord, and as a result
cause an accident.
X
Select key position 2with the Start/Stop
button.
X Adjust the seat (Y page 204).
X On the driver's side, adjust the steering
wheel (Y page 206) and the mirrors
(Y page 208).
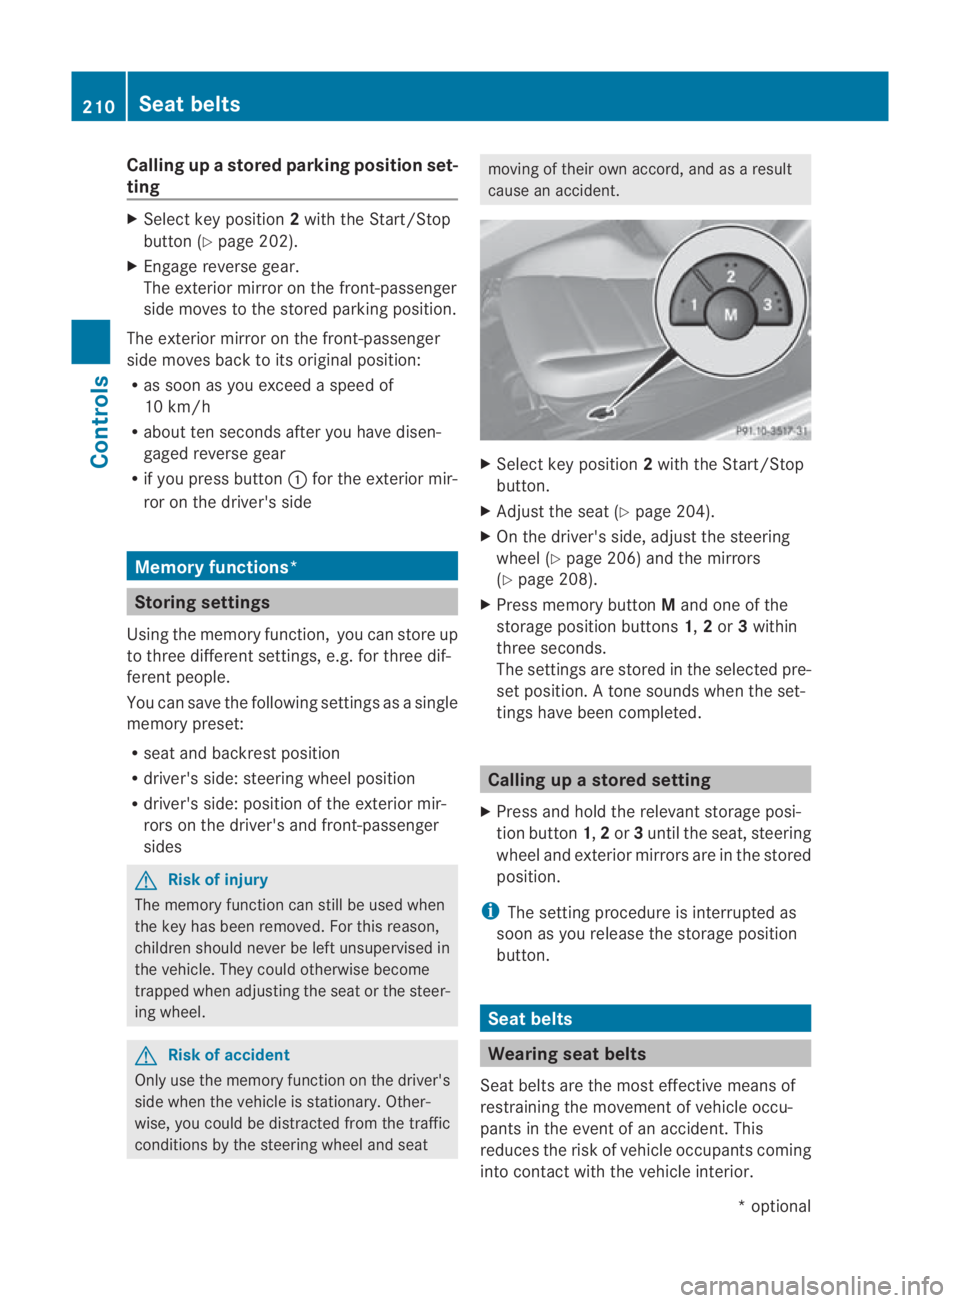
X Press memory button Mand one of the
storage position buttons 1,2or 3within
three seconds.
The settings are stored in the selected pre-
set position. Atone sounds when the set-
tings have been completed. Calling up
astore dsetting
X Press and hold the relevant storage posi-
tio nb utton 1,2or 3until the seat, steering
wheel and exterio rmirrors are in the stored
position.
i The setting procedure is interrupted as
soon as you release the storage position
button. Seat belts
Wearing seat belts
Seat belts are the most effective means of
restraining the movement of vehicle occu-
pants in the event of an accident. This
reduces the risk of vehicle occupants coming
into contact with the vehicle interior. 210
Seat beltsControls
*o
ptional
BA 197 ECE RE 2010/6a; 1; 2, en-GB
sabbaeu
Version: 3.0.3.6 2010-05-07T14:19:43+02:00 - Seite 210
Page 267 of 361
Deleting the remote control memory
X
Selec tkey position 2with the Start/Stop
button (Y page 202).
X Press and hold transmitter buttons 0002
and 0014for approximately 20 seconds until
indicator lamp 0001flashes rapidly.
The memory is cleared.
i You should clear the remot econtrol mem-
ory before selling the vehicle. Charge maintenance socket*
The charge maintenance socket is located in
the boot on the left-hand side. It is designed
solely for connecting a trickle charger. A
trickle charger can be obtained from a
Mercedes-Benz Service Centre, for example. X
Select key position 0with the Start/Stop
button.
X Connect the trickle charger to charge main-
tenance socket 0001. Consult the manufac-
turer's operating instructions on how to do
so.
i A trickle charger connected to charge
maintenance socket 0001only maintains the
current charge level of the vehicle's elec-
trical system battery. If the vehicle's elec-
trical system battery is discharged, it needs
to be charged with a battery charger. You
will find further information on charging the
battery on (Y page 334). Floormat* on the driver's side
G
Risk of accident
Make sure that there is sufficient clearance
around the pedals when floormats are used,
and that the floormats are properly secured.
The floormats must be correctly secured at all
times using retainers and press-studs.
Before you drive off, check the floormats and
secure if necessary. Afloormat which is not
properly secured can slip and, thereby, inter-
fere with the movemen tofthe pedals.
Do not place floormats on top of one another. X
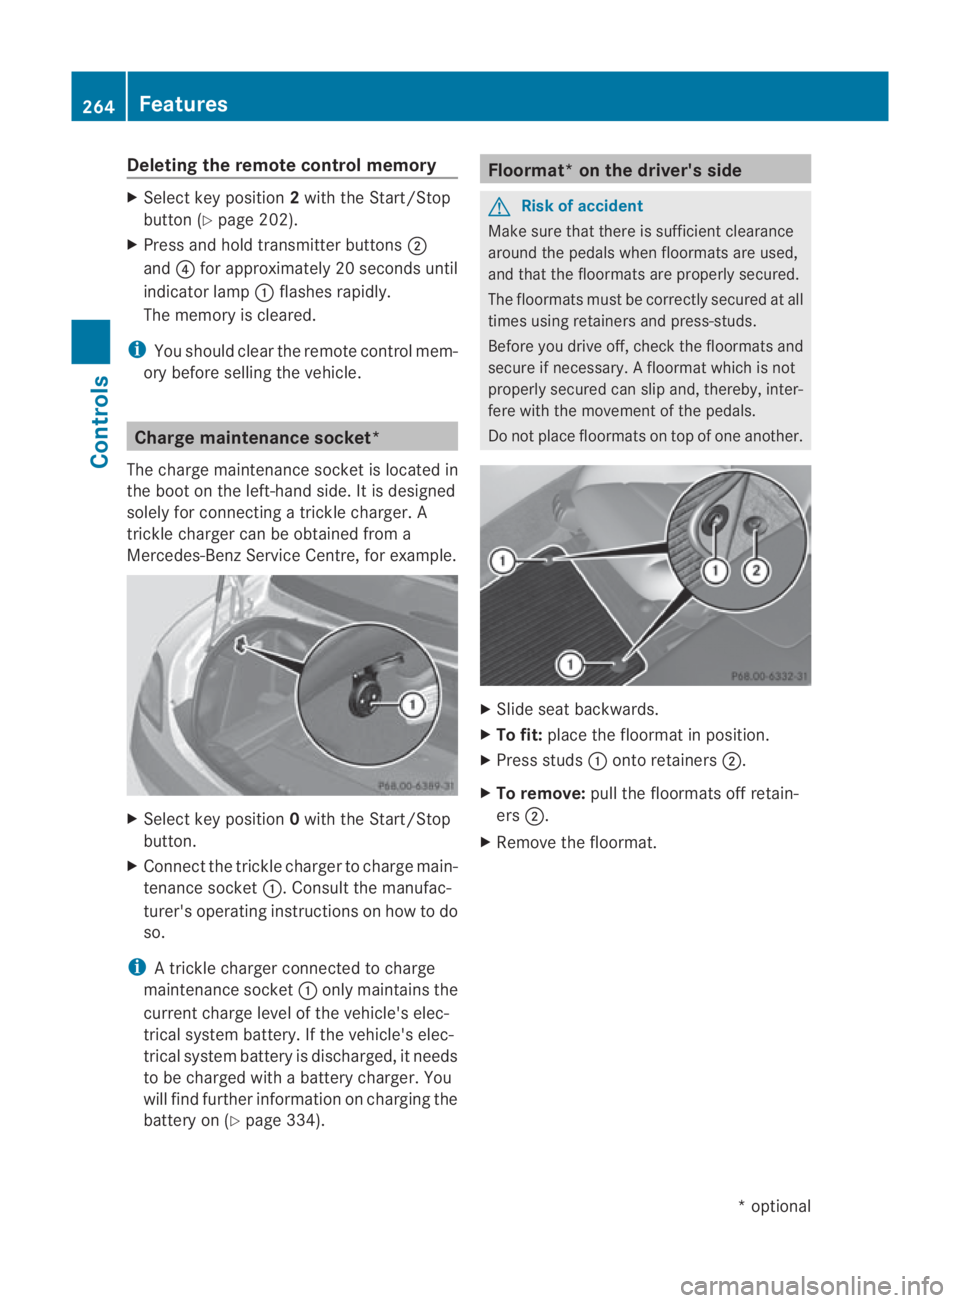
Slide seat backwards.
X To fit: place the floormat in position.
X Press studs 0001onto retainers 0002.
X To remove: pull the floormats off retain-
ers 0002.
X Remove the floormat. 264
FeaturesControls
*o
ptional
BA 197 ECE RE 2010/6a; 1; 2, en-GB
sabbaeu
Version: 3.0.3.6 2010-05-07T14:19:43+02:00 - Seite 264